
Gemini Enterprise Agent Platform Vision 是一个由 AI 赋能的平台,可用于注入、分析和存储视频 数据。借助 Gemini Enterprise Agent Platform Vision,您可以构建和部署 AI 应用。您可以利用 Gemini Enterprise Agent Platform Vision 与其他产品组件的集成,构建端到端的 Gemini Enterprise Agent Platform Vision 解决方案。
如需开始使用 Gemini Enterprise Agent Platform Vision 平台实现解决方案,请查看以下 Agent Platform Vision 概念和组件:
信息流:表示解决方案中的视频流式传输层。视频流来源可以是实时视频(例如 IP 摄像头),也可以是视频文件(例如 MP4 文件)。
应用:实现视频流与 AI 处理器之间的连接,以对视频执行机器学习操作。例如,您可以将摄像头视频流连接到可统计摄像头前经过的人数的人工智能模型。
媒体仓库:将视频流注入的视频存储到Google Cloud 存储空间。将数据存储到此目的地后,您便可以查询分析输出和元数据,这些数据来自对所提取的流中的数据使用的 AI 处理器。
目标
本教程介绍了如何执行以下操作:
- 创建数据输入流资源。
- 开始将视频数据流式传输到此数据流资源中。
- 创建空应用。
- 向应用添加节点,以流式传输数据、修改数据和存储数据。
- 部署应用以供您使用。
- 在 Google Cloud 控制台中查看处理后的数据输出。
在开始本教程之前,您必须拥有一个流式视频资源,以便将数据发送到 Gemini Enterprise Agent Platform Vision 应用。此资源可以是本地视频,也可以是 RTSP Feed。此视频数据必须包含人脸,以便示例应用随后对其进行模糊处理。
费用
在本文档中,您将使用 Google Cloud的以下收费组件:
- Agent Platform Vision (Streams - Data ingested, Streams - Data consumed, Models - Person / face blur, Warehouse - Video storage)
如需根据您的预计使用情况来估算费用,请使用价格计算器。
完成本文档中描述的任务后,您可以通过删除所创建的资源来避免继续计费。如需了解详情,请参阅清理。
准备工作
- 获取流式视频源的位置,可以是本地位置(例如
./sample_video.mp4),也可以是实时 RTSP Feed 的 IP 地址(例如rtsp://192.168.1.180:540)。创建视频流资源后,您需要此信息才能开始将数据提取到视频流中。 - 登录您的 Google Cloud 账号。如果您是 Google Cloud新手,请 创建一个账号来评估我们的产品在实际场景中的表现。新客户还可获享 $300 赠金,用于运行、测试和部署工作负载。
-
In the Google Cloud console, on the project selector page, select or create a Google Cloud project.
Roles required to select or create a project
- Select a project: Selecting a project doesn't require a specific IAM role—you can select any project that you've been granted a role on.
-
Create a project: To create a project, you need the Project Creator role
(
roles/resourcemanager.projectCreator), which contains theresourcemanager.projects.createpermission. Learn how to grant roles.
-
Verify that billing is enabled for your Google Cloud project.
Enable the Vision AI API.
Roles required to enable APIs
To enable APIs, you need the Service Usage Admin IAM role (
roles/serviceusage.serviceUsageAdmin), which contains theserviceusage.services.enablepermission. Learn how to grant roles.-
Create a service account:
-
Ensure that you have the Create Service Accounts IAM role
(
roles/iam.serviceAccountCreator) and the Project IAM Admin role (roles/resourcemanager.projectIamAdmin). Learn how to grant roles. -
In the Google Cloud console, go to the Create service account page.
Go to Create service account - Select your project.
-
In the Service account name field, enter a name. The Google Cloud console fills in the Service account ID field based on this name.
In the Service account description field, enter a description. For example,
Service account for quickstart. - Click Create and continue.
-
Grant the Vision AI > Vision AI Editor role to the service account.
To grant the role, find the Select a role list, then select Vision AI > Vision AI Editor.
- Click Continue.
-
Click Done to finish creating the service account.
Do not close your browser window. You will use it in the next step.
-
Ensure that you have the Create Service Accounts IAM role
(
-
Create a service account key:
- In the Google Cloud console, click the email address for the service account that you created.
- Click Keys.
- Click Add key, and then click Create new key.
- Click Create. A JSON key file is downloaded to your computer.
- Click Close.
-
Set the environment variable
GOOGLE_APPLICATION_CREDENTIALSto the path of the JSON file that contains your credentials. This variable applies only to your current shell session, so if you open a new session, set the variable again. -
安装 Google Cloud CLI。
-
如果您使用的是外部身份提供方 (IdP),则必须先使用联合身份登录 gcloud CLI。
-
如需初始化 gcloud CLI,请运行以下命令:
gcloud init -
In the Google Cloud console, on the project selector page, select or create a Google Cloud project.
Roles required to select or create a project
- Select a project: Selecting a project doesn't require a specific IAM role—you can select any project that you've been granted a role on.
-
Create a project: To create a project, you need the Project Creator role
(
roles/resourcemanager.projectCreator), which contains theresourcemanager.projects.createpermission. Learn how to grant roles.
-
Verify that billing is enabled for your Google Cloud project.
Enable the Vision AI API.
Roles required to enable APIs
To enable APIs, you need the Service Usage Admin IAM role (
roles/serviceusage.serviceUsageAdmin), which contains theserviceusage.services.enablepermission. Learn how to grant roles.-
Create a service account:
-
Ensure that you have the Create Service Accounts IAM role
(
roles/iam.serviceAccountCreator) and the Project IAM Admin role (roles/resourcemanager.projectIamAdmin). Learn how to grant roles. -
In the Google Cloud console, go to the Create service account page.
Go to Create service account - Select your project.
-
In the Service account name field, enter a name. The Google Cloud console fills in the Service account ID field based on this name.
In the Service account description field, enter a description. For example,
Service account for quickstart. - Click Create and continue.
-
Grant the Vision AI > Vision AI Editor role to the service account.
To grant the role, find the Select a role list, then select Vision AI > Vision AI Editor.
- Click Continue.
-
Click Done to finish creating the service account.
Do not close your browser window. You will use it in the next step.
-
Ensure that you have the Create Service Accounts IAM role
(
-
Create a service account key:
- In the Google Cloud console, click the email address for the service account that you created.
- Click Keys.
- Click Add key, and then click Create new key.
- Click Create. A JSON key file is downloaded to your computer.
- Click Close.
-
Set the environment variable
GOOGLE_APPLICATION_CREDENTIALSto the path of the JSON file that contains your credentials. This variable applies only to your current shell session, so if you open a new session, set the variable again. -
安装 Google Cloud CLI。
-
如果您使用的是外部身份提供方 (IdP),则必须先使用联合身份登录 gcloud CLI。
-
如需初始化 gcloud CLI,请运行以下命令:
gcloud init - 安装
vaictl工具以将数据注入到流中(操作系统:Debian GNU/Linux,CPU 架构:x86_64):- 下载所需的软件包:
wget https://github.com/google/visionai/releases/download/v0.0.5/visionai_0.0-5_amd64.deb
- 下载软件包后,在下载文件的目录中运行以下命令:
sudo apt install ./visionai_0.0-5_amd64.deb
- 验证安装:
vaictl --help
- 下载所需的软件包:
创建数据流
若要创建流式视频分析应用,您必须先创建并注册流资源。作为从用户那里接收视频数据的资源,在您使用 Gemini Enterprise Agent Platform Vision 构建的任何场景中,都需要使用视频流。控制台
如需在 Google Cloud 控制台中创建新的媒体资源,请按以下步骤操作。
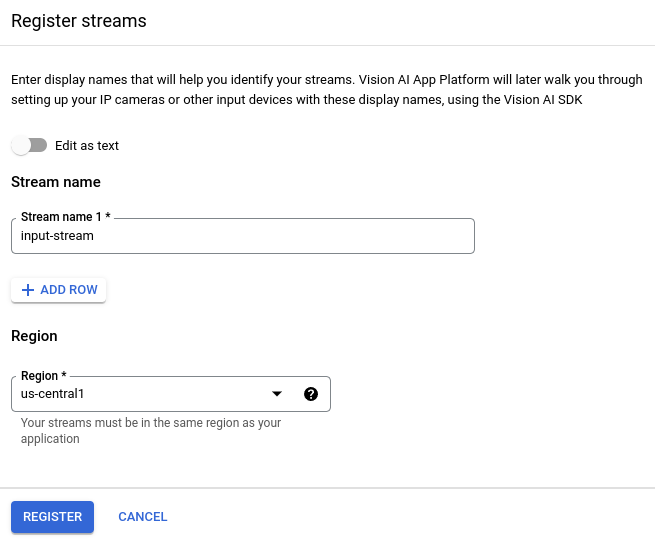
打开 Gemini Enterprise Agent Platform Vision 信息中心的信息流标签页。
点击 注册。
输入
input-stream作为数据流名称,然后选择要在其中创建数据流的区域。点击注册以创建一个或多个数据流。
将视频注入到直播中
创建直播资源后,您可以使用 vaictl 命令行工具将视频数据发送到直播。
IP 摄像头
如果您要使用实时 IP 摄像头进行测试,则需要获取摄像头的 IP 地址。您必须在请求中提供此信息,以及其他变量替换项:
- PROJECT_ID:您的 Google Cloud 项目 ID。
- LOCATION_ID:您的位置 ID。例如
us-central1。如需了解详情,请参阅 Cloud 位置。 - RTSP_ADDRESS:实时流式传输协议 (RTSP) Feed 的地址。例如
rtsp://192.168.1.180:540。
此命令会将 RTSP Feed 发送到流中。您必须在可直接访问 RTSP Feed 的网络中运行此命令。
vaictl -p PROJECT_ID \
       -l LOCATION_ID \
       -c application-cluster-0 \
       --service-endpoint visionai.googleapis.com \
send rtsp to streams input-stream --rtsp-uri RTSP_ADDRESS
如果命令成功运行,您会获得以下输出:
[...]
Waiting for long running operation projects/your-project/locations/us-central1/operations/operation-1651364156981-5dde82db7e4a9-dfb17ca5-1051eb20 ⠙
I20220430 21:16:28.024988 211449 gstvaisink.cc:417] cluster-id=application-cluster-0
I20220430 21:16:28.025032 211449 gstvaisink.cc:418] cluster-endpoint=c8khq35ftg78mn61ef50.us-central1.visionai.goog
I20220430 21:16:28.025040 211449 gstvaisink.cc:419] event-id=ev-1651364114183255223
I20220430 21:16:28.025048 211449 gstvaisink.cc:420] stream-id=input-stream
I20220430 21:16:28.025053 211449 gstvaisink.cc:421] series-id=ev-1651364114183255223--input-stream
I20220430 21:16:28.025060 211449 gstvaisink.cc:422] Sending data
本地视频文件
您还可以将视频文件数据发送到直播流,而不是实时视频 Feed。如果您无法使用 IP 摄像头,此选项会很有用。
此选项的唯一区别在于 vaictl 命令参数。不传递 IP 摄像头信息,而是传递本地视频文件的路径。进行以下变量替换:
- PROJECT_ID:您的 Google Cloud 项目 ID。
- LOCATION_ID:您的位置 ID。例如
us-central1。更多信息。 - LOCAL_FILE.EXT:本地视频文件的文件名。
例如
my-video.mp4。 --loop标志:可选。循环播放文件数据以模拟流式传输。
此命令会将视频文件流式传输到流中。如果使用 --loop 标志,视频会循环播放到流中,直到您停止命令:
vaictl -p PROJECT_ID \
       -l LOCATION_ID \
       -c application-cluster-0 \
       --service-endpoint visionai.googleapis.com \
send video-file to streams 'input-stream' --file-path LOCAL_FILE.EXT --loop
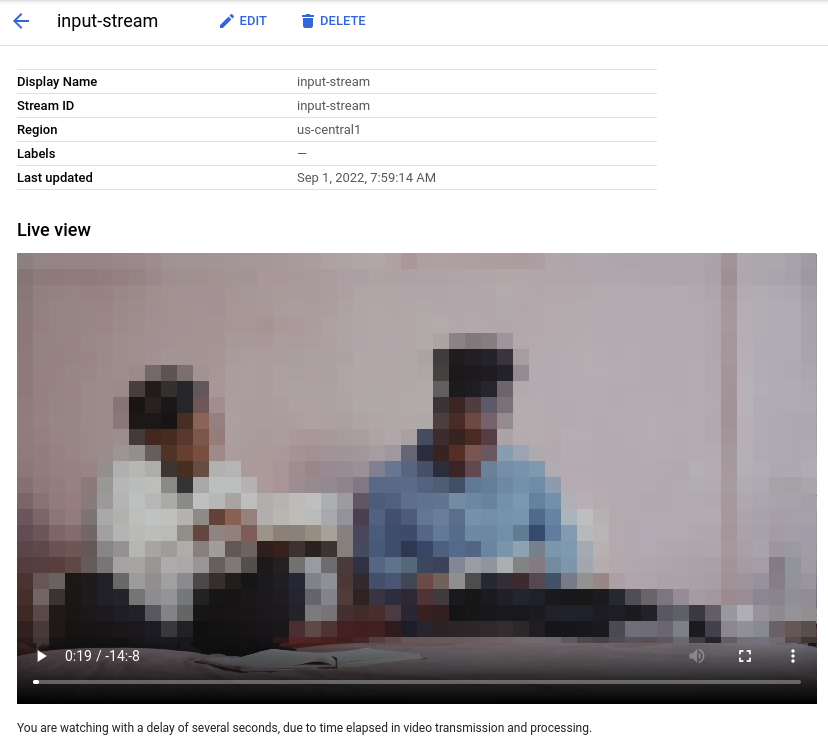
从开始 vaictl 注入操作到视频显示在信息中心,可能需要大约 100 秒的时间。
在视频流提取功能可用后,您可以在 Gemini Enterprise Agent Platform Vision 信息中心的视频流标签页中选择 input-stream 视频流,查看视频 Feed。
创建面部模糊应用
创建数据流并将数据注入到该数据流中后,接下来就可以创建 Gemini Enterprise Agent Platform Vision 应用来处理数据了。应用可以看作是一个自动化的流水线,用于连接以下各项:
- 数据注入:将视频 Feed 注入到流中。
- 数据分析:提取数据后,可以添加 AI 模型。可以对提取的视频信息执行任何计算机视觉操作。
- 数据存储:视频源的两个版本(原始视频流和经过 AI 模型处理的视频流)可以存储在媒体仓库中。
在 Google Cloud 控制台中,应用以图表形式表示。此外,在 Gemini Enterprise Agent Platform Vision 中,应用图必须至少包含两个节点:一个视频源节点(流),以及至少一个其他节点(处理模型或输出目的地)。
创建空应用
在填充应用图之前,您必须先创建一个空应用。控制台
在 Google Cloud 控制台中创建应用。
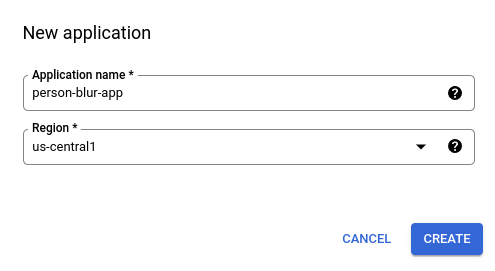
打开 Gemini Enterprise Agent Platform Vision 信息中心的应用标签页。
点击创建按钮。
输入
person-blur-app作为应用名称,然后选择您所在的区域。点击创建。
添加应用组件节点
创建空应用后,您可以将以下三个节点添加到应用图中:
- 注入节点:已在注入数据的流资源。
- 处理节点:对提取的数据执行操作的人员模糊处理模型。
- 存储节点:用于存储已处理视频的媒体仓库,同时也是元数据存储区。数据仓库可用于生成有关已提取视频数据的分析信息,以及存储 AI 模型推断出的有关数据的信息。
控制台
在控制台中向应用添加组件节点。
打开 Gemini Enterprise Agent Platform Vision 信息中心的应用标签页。
在
person-blur-app行中,选择 查看图表。这样会显示处理流水线的图表可视化效果。
添加数据注入节点
如需添加输入视频流节点,请选择侧边菜单的连接器部分中的视频流选项。
在打开的视频流菜单的来源部分中,选择 添加视频流。
在添加视频流菜单中,选择 从现有视频流中选择,然后从视频流资源列表中选择
person-blur-app。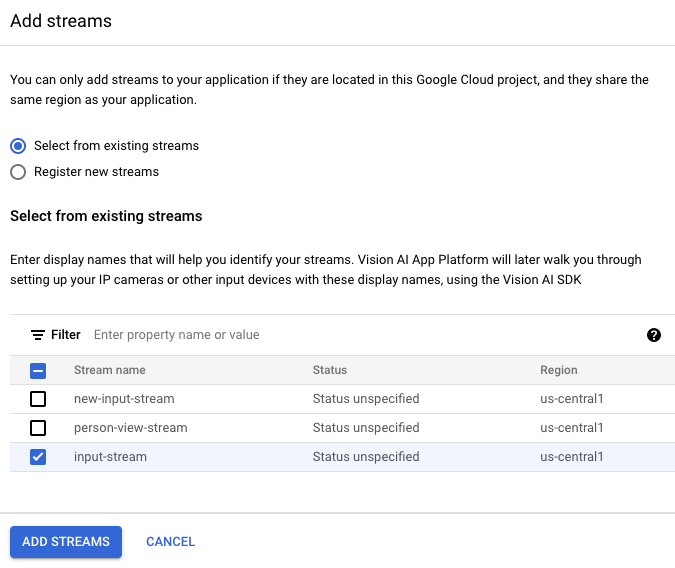
如需将视频流添加到应用图表中,请点击添加视频流。
添加数据处理节点
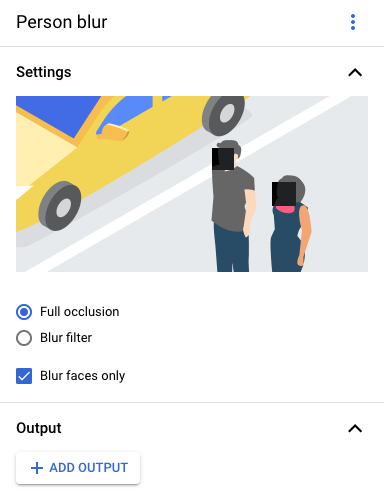
如需添加人物模糊处理模型节点,请选择侧边菜单的常规处理器部分中的人物模糊处理选项。
在打开的“人物模糊”选项菜单中,保持选中 Full occlusion(完全遮挡),然后启用 Blur faces only(仅模糊面部)选项。
添加数据存储节点
如需添加输出目标位置(存储)节点,请选择侧边菜单的连接器部分中的 Gemini Enterprise Agent Platform Vision 的媒体仓库选项。
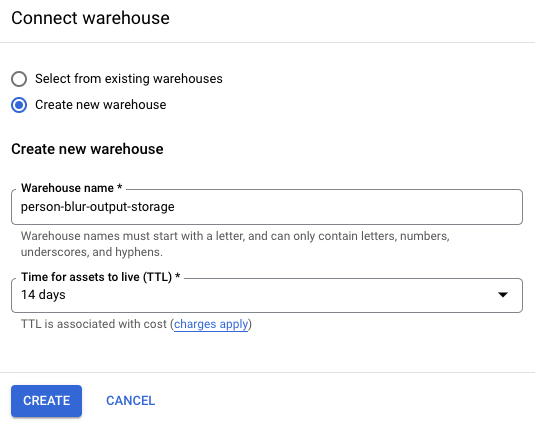
在 Gemini Enterprise Agent Platform Vision 的媒体仓库菜单中,点击连接仓库。
在连接仓库菜单中,选择 创建新仓库。将仓库命名为
person-blur-app,并将 TTL 时长保留 14 天。如需添加仓库,请点击创建。
部署应用
在构建包含所有必需组件的端到端应用后,使用该应用的最后一步是部署它。控制台
打开 Gemini Enterprise Agent Platform Vision 信息中心的应用标签页。
选择列表中
person-blur-app应用旁边的查看图表。在应用图表构建器页面中,点击部署按钮。
在随后的确认对话框中,选择部署。
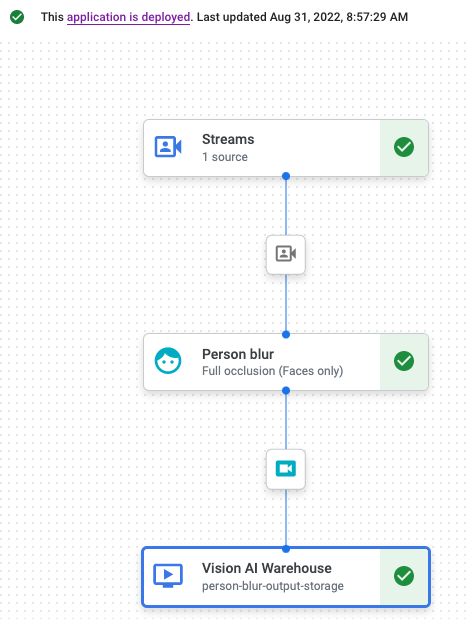
部署操作可能需要几分钟才能完成。部署完成后,节点旁边会显示绿色对勾标记。
查看已处理的输出数据
控制台
打开 Gemini Enterprise Agent Platform Vision 信息中心的仓库标签页。
在列表中找到
person-blur-output-storage仓库,然后点击 查看资产。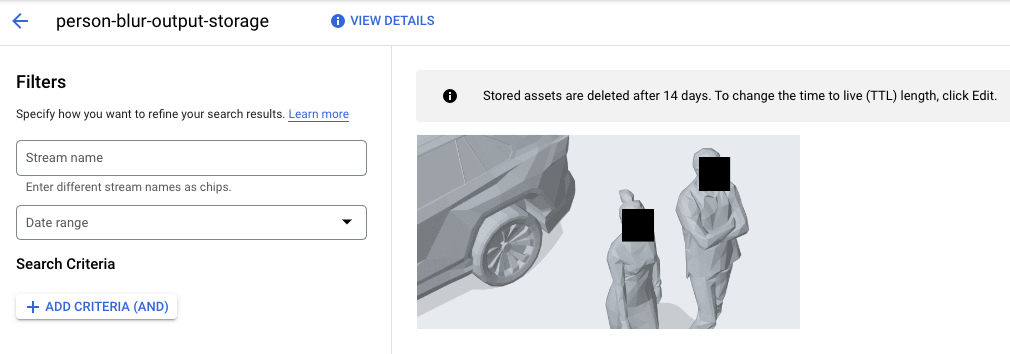
清理
为避免因本教程中使用的资源导致您的 Google Cloud 账号产生费用,请删除包含这些资源的项目,或者保留项目但删除各个资源。
删除项目
- 在 Google Cloud 控制台中,前往管理资源页面。
- 在项目列表中,选择要删除的项目,然后点击删除。
- 在对话框中输入项目 ID,然后点击关闭以删除项目。
删除各个资源
删除仓库
- 在 Google Cloud 控制台中,前往仓库页面。
-
找到
您的
person-blur-output-storage仓库。 - 如需删除数据仓库,请依次点击 操作和删除数据仓库,然后按照说明操作。
删除数据流
- 在 Google Cloud 控制台中,前往数据流页面。
-
找到
您的
input-stream数据流。 - 如需删除数据流,请依次点击 操作和删除数据流,然后按照说明操作。
删除应用
- 在 Google Cloud 控制台中,前往应用页面。
-
找到
person-blur-app应用。 - 如需删除应用,请依次点击 操作和删除应用,然后按照说明操作。
后续步骤
- 详细了解 Responsible AI 实践。
- 如需了解可添加到应用中的其他组件,请参阅构建应用。
- 如需了解其他输出存储和处理选项,请参阅将应用输出连接到数据目标位置。
- 了解如何在控制台中搜索 Warehouse 数据。
- 探索有关 Google Cloud 的参考架构、图表和最佳做法。查看我们的 Cloud 架构中心。