


將 BigQuery 連接器新增至 Gemini Enterprise Agent Platform Vision 應用程式後,所有連結的應用程式模型輸出內容都會匯入目標資料表。
您可以自行建立 BigQuery 資料表,並在將 BigQuery 連接器新增至應用程式時指定該資料表,也可以讓 Gemini Enterprise Agent Platform Vision 應用程式平台自動建立資料表。
自動建立資料表
如果讓 Gemini Enterprise Agent Platform Vision 應用程式平台自動建立資料表,您可以在新增 BigQuery 連接器節點時指定這個選項。
如要使用自動建立資料表功能,必須符合下列資料集和資料表條件:
- 資料集:系統會自動建立資料集名稱
visionai_dataset。 - 資料表:系統自動建立的資料表名稱為
visionai_dataset.APPLICATION_ID。 錯誤處理機制:
- 如果相同資料集下已有同名資料表,系統不會自動建立資料表。
控制台
開啟 Gemini Enterprise Agent Platform Vision 資訊主頁的「Applications」(應用程式) 分頁。
從清單中選取應用程式名稱旁的「查看應用程式」。
在應用程式建構工具頁面中,從「連接器」部分選取「BigQuery」。
將「BigQuery 路徑」欄位留空。
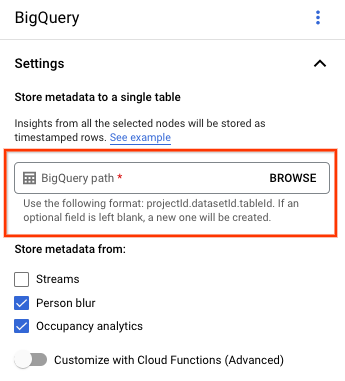
變更其他設定。
REST 和指令列
如要讓應用程式平台推斷資料表結構定義,請在建立或更新應用程式時,使用 BigQueryConfig 的 createDefaultTableIfNotExists 欄位。
手動建立及指定資料表
如要手動管理輸出資料表,該資料表必須具備必要結構定義,做為資料表結構定義的子集。
如果現有資料表有不相容的結構定義,系統會拒絕部署。
使用預設結構定義
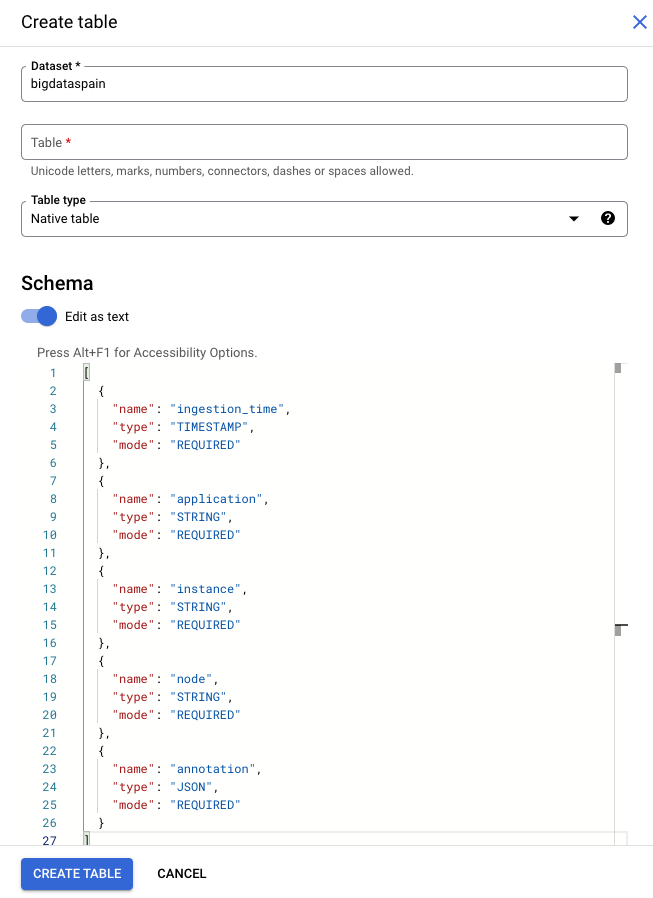
如果您使用模型輸出資料表的預設結構定義,請確保資料表只包含下表中的必要資料欄。建立 BigQuery 資料表時,可以直接複製下列結構定義文字。如要進一步瞭解如何建立 BigQuery 資料表,請參閱「建立及使用資料表」一文。如要進一步瞭解如何指定建立資料表時的結構定義,請參閱指定結構定義。
建立資料表時,請使用下列文字說明結構定義。如要瞭解如何使用 JSON 資料欄類型 ("type": "JSON"),請參閱「在標準 SQL 中使用 JSON 資料」。建議使用 JSON 資料欄類型進行註解查詢。你也可以使用 "type" : "STRING"。
[
  {
    "name": "ingestion_time",
    "type": "TIMESTAMP",
    "mode": "REQUIRED"
  },
 {
   "name": "application",
   "type": "STRING",
   "mode": "REQUIRED"
 },
 {
   "name": "instance",
   "type": "STRING",
   "mode": "REQUIRED"
 },
 {
   "name": "node",
   "type": "STRING",
   "mode": "REQUIRED"
 },
 {
   "name": "annotation",
   "type": "JSON",
   "mode": "REQUIRED"
 }
]
Google Cloud 控制台
前往 Google Cloud 控制台的「BigQuery」頁面。
選取專案。
選取「更多選項」圖示 。
點選「建立資料表」。
在「結構定義」部分,啟用「以文字形式編輯」。
gcloud
下列範例會先建立要求 JSON 檔案,然後使用 gcloud alpha bq tables create 指令。
首先,請建立要求 JSON 檔案:
echo "{
\"schema\": [
    {
      \"name\": \"ingestion_time\",
      \"type\": \"TIMESTAMP\",
      \"mode\": \"REQUIRED\"
    },
    {
      \"name\": \"application\",
      \"type\": \"STRING\",
      \"mode\": \"REQUIRED\"
    },
    {
      \"name\": \"instance\",
      \"type\": \"STRING\",
      \"mode\": \"REQUIRED\"
    },
    {
      \"name\": \"node\",
      \"type\": \"STRING\",
      \"mode\": \"REQUIRED\"
    },
    {
      \"name\": \"annotation\",
      \"type\": \"JSON\",
      \"mode\": \"REQUIRED\"
    }
]
}
" >> bigquery_schema.json
傳送
gcloud指令。請進行下列替換:TABLE_NAME:資料表的 ID 或完整限定的資料表 ID。
DATASET:BigQuery 資料集的 ID。
gcloud alpha bq tables create TABLE_NAME \
--dataset=DATASET \
--schema-file=./bigquery_schema.json
Gemini Enterprise Agent Platform Vision 應用程式產生的 BigQuery 資料列範例:
| ingestion_time | 調度應用程式資源 | 執行個體 | 節點 | 註解 |
|---|---|---|---|---|
| 2022-05-11 23:3211.911378 UTC | my_application | 5 | just-one-node | {"bytesFields": ["Ig1qdXN0LW9uZS1ub2RIGgE1Eg5teV9hcHBsaWNhdGlvbgjS+YnOzdj3Ag=="],"displayNames":["hello","world"],"ids":["12345","34567"]} |
| 2022-05-11 23:3211.911338 UTC | my_application | 1 | just-one-node | {"bytesFields": ["Ig1qdXN0LW9uZS1ub2RIGgExEg5teV9hcHBsaWNhdGlvbgiq+YnOzdj3Ag=="],"displayNames":["hello","world"],"ids":["12345","34567"]} |
| 2022-05-11 23:3211.911313 UTC | my_application | 4 | just-one-node | {"bytesFields": ["Ig1qdXN0LW9uZS1ub2RIGgE0Eg5teV9hcHBsaWNhdGlvbgiR+YnOzdj3Ag=="],"displayNames":["hello","world"],"ids":["12345","34567"]} |
| 2022-05-11 23:3212.235327 UTC | my_application | 4 | just-one-node | {"bytesFields": ["Ig1qdXN0LW9uZS1ub2RIGgE0Eg5teV9hcHBsaWNhdGlvbgi/3J3Ozdj3Ag=="],"displayNames":["hello","world"],"ids":["12345","34567"]} |
使用自訂結構定義
如果預設結構定義不適用於您的用途,可以使用 Cloud Run 函式,以使用者定義的結構定義產生 BigQuery 資料列。如果您使用自訂結構定義,BigQuery 資料表結構定義就沒有先決條件。
選取 BigQuery 節點的應用程式圖表
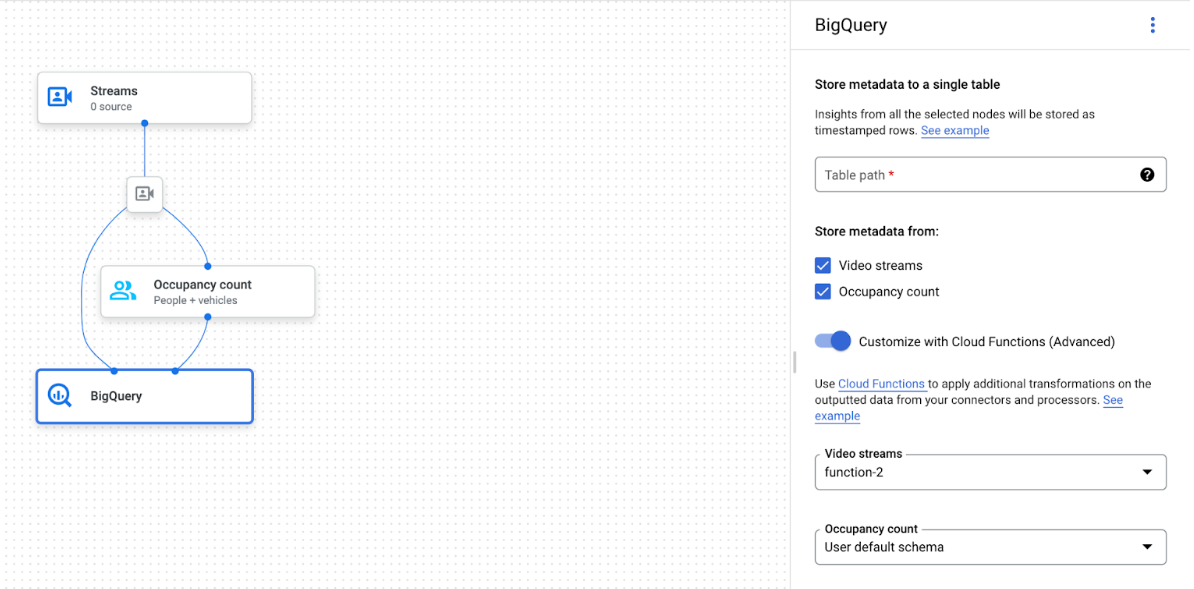
BigQuery 連接器可連結至任何輸出影片或以 Proto 為基礎的註解模型:
- 如果是影片輸入內容,BigQuery 連接器只會擷取儲存在串流標頭中的中繼資料,並將這項資料當做其他模型註解輸出內容,擷取至 BigQuery。系統不會儲存影片本身。
- 如果串流沒有中繼資料,系統就不會將任何資料儲存到 BigQuery。
查詢資料表資料
使用預設 BigQuery 資料表結構定義,資料表填入資料後,您就能執行強大的分析作業。
查詢範例
您可以在 BigQuery 中使用下列範例查詢,從 Gemini Enterprise Agent Platform Vision 模型取得洞察資料。
舉例來說,您可以使用 BigQuery,透過以下查詢,根據人員 / 車輛偵測器模型的資料,繪製每分鐘偵測到的人數上限的時間曲線:
WITH
 nested3 AS(
 WITH
   nested2 AS (
   WITH
     nested AS (
     SELECT
       t.ingestion_time AS ingestion_time,
       JSON_QUERY_ARRAY(t.annotation.stats["fullFrameCount"]) AS counts
     FROM
       `PROJECT_ID.DATASET_NAME.TABLE_NAME` AS t)
   SELECT
     ingestion_time,
     e
   FROM
     nested,
     UNNEST(nested.counts) AS e)
 SELECT
   STRING(TIMESTAMP_TRUNC(nested2.ingestion_time, MINUTE, "America/Los_Angeles"),"America/Los_Angeles") AS time,
   IFNULL(INT64(nested2.e["count"]), 0) AS person_count
 FROM
   nested2
 WHERE
   JSON_VALUE(nested2.e["entity"]["labelString"])="Person")
SELECT
 time,
 MAX(person_count)
FROM
 nested3
GROUP BY
 time
同樣地,您可以使用 BigQuery 和占用率分析模型的越線計數功能,建立查詢來計算每分鐘通過越線的車輛總數:
WITH
 nested4 AS (
 WITH
   nested3 AS (
   WITH
     nested2 AS (
     WITH
       nested AS (
       SELECT
         t.ingestion_time AS ingestion_time,
         JSON_QUERY_ARRAY(t.annotation.stats["crossingLineCounts"]) AS lines
       FROM
         `PROJECT_ID.DATASET_NAME.TABLE_NAME` AS t)
     SELECT
       nested.ingestion_time,
       JSON_QUERY_ARRAY(line["positiveDirectionCounts"]) AS entities
     FROM
       nested,
       UNNEST(nested.lines) AS line
     WHERE
       JSON_VALUE(line.annotation.id) = "LINE_ANNOTATION_ID")
   SELECT
     ingestion_time,
     entity
   FROM
     nested2,
     UNNEST(nested2.entities) AS entity )
 SELECT
   STRING(TIMESTAMP_TRUNC(nested3.ingestion_time, MINUTE, "America/Los_Angeles"),"America/Los_Angeles") AS time,
   IFNULL(INT64(nested3.entity["count"]), 0) AS vehicle_count
 FROM
   nested3
 WHERE
   JSON_VALUE(nested3.entity["entity"]["labelString"])="Vehicle" )
SELECT
 time,
 SUM(vehicle_count)
FROM
 nested4
GROUP BY
 time
執行查詢
格式化 Google 標準 SQL 查詢後,您可以使用控制台執行查詢:
控制台
在 Google Cloud 控制台開啟「BigQuery」頁面。
選取資料集名稱旁的「展開」,然後選取資料表名稱。
在表格詳細資料檢視畫面中,按一下「撰寫新查詢」。

在「Query editor」(查詢編輯器) 文字區域中輸入 Google 標準 SQL 查詢。如需查詢範例,請參閱查詢範例。
選用:如要變更資料處理位置,請依序點選「編輯」>「查詢設定」。在「處理位置」下方,點選「自動選取」,然後選擇資料的位置。最後,點選「儲存」,更新查詢設定。
按一下 [Run] (執行)。
這會建立一個查詢工作,將輸出寫入暫時性資料表。
整合 Cloud Run functions
您可以透過 Cloud Run 函式觸發額外的資料處理作業,並使用自訂的 BigQuery 擷取作業。如要使用 Cloud Run functions 進行自訂 BigQuery 擷取作業,請按照下列步驟操作:
使用 Google Cloud 控制台時,請從每個已連結模型的下拉式選單中,選取對應的 Cloud Functions。
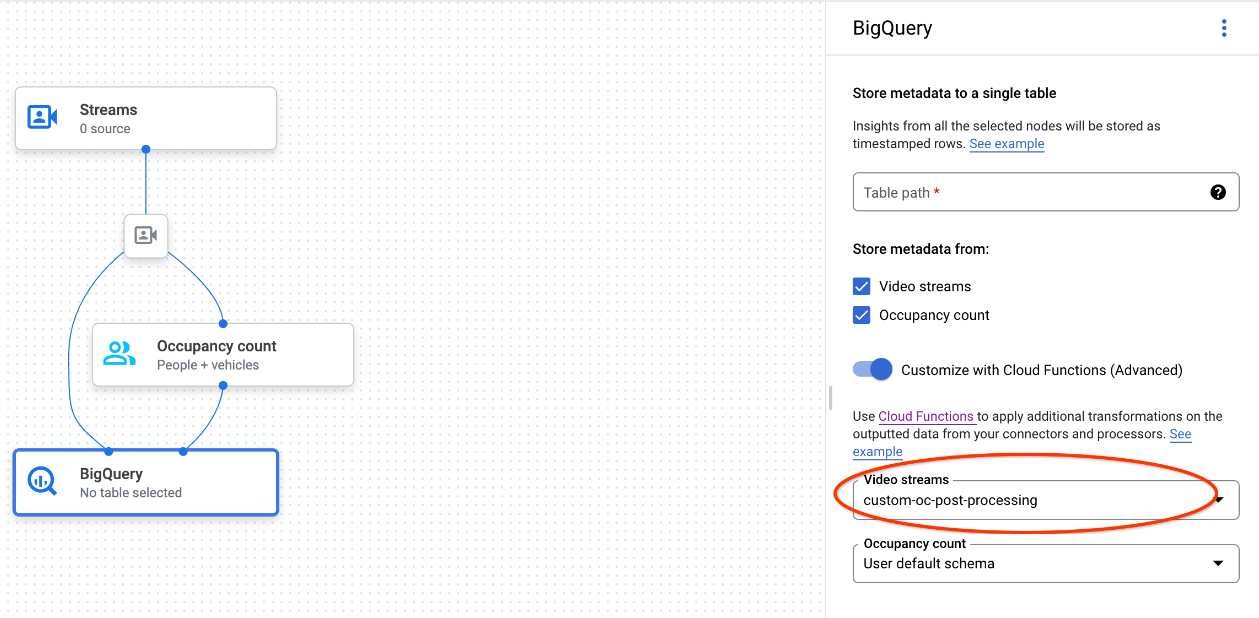
使用 Gemini Enterprise Agent Platform Vision API 時,請在 BigQuery 節點的
BigQueryConfigcloud_function_mapping欄位中新增一組鍵值組。鍵是 BigQuery 節點名稱,值是目標函式的 HTTP 觸發程序。
如要搭配自訂 BigQuery 擷取作業使用 Cloud Run functions,函式必須符合下列規定:
- 建立 BigQuery 節點前,請先建立 Cloud Run functions 執行個體。
- Gemini Enterprise Agent Platform Vision API 預期會收到 Cloud Run 函式傳回的
AppendRowsRequest註解。 - 您必須為所有
CloudFunction回應設定proto_rows.writer_schema欄位,可以忽略write_stream。
Cloud Run functions 整合範例
以下範例說明如何剖析入住人數計數節點輸出 (OccupancyCountPredictionResult),並從中擷取 ingestion_time、person_count 和 vehicle_count 表格結構定義。
下列範例的結果是具有下列結構定義的 BigQuery 資料表:
[
  {
    "name": "ingestion_time",
    "type": "TIMESTAMP",
    "mode": "REQUIRED"
  },
  {
    "name": "person_count",
    "type": "INTEGER",
    "mode": "NULLABLE"
  },
      {
    "name": "vehicle_count",
    "type": "INTEGER",
    "mode": "NULLABLE"
  },
]
請使用下列程式碼建立這個表格:
為要寫入的資料表欄位定義 proto (例如
test_table_schema.proto):syntax = "proto3"; package visionai.testing; message TestTableSchema { int64 ingestion_time = 1; int32 person_count = 2; int32 vehicle_count = 3; }編譯 proto 檔案,產生通訊協定緩衝區 Python 檔案:
protoc -I=./ --python_out=./ ./test_table_schema.proto匯入產生的 Python 檔案,並編寫 Cloud Functions。
Python
import base64
import sys

from flask import jsonify
import functions_framework
from google.protobuf import descriptor_pb2
from google.protobuf.json_format import MessageToDict
import test_table_schema_pb2

def table_schema():
  schema = descriptor_pb2.DescriptorProto()
  test_table_schema_pb2.DESCRIPTOR.message_types_by_name[
      'TestTableSchema'].CopyToProto(schema)
  return schema

def bigquery_append_row_request(row):
  append_row_request = {}
  append_row_request['protoRows'] = {
      'writerSchema': {
          'protoDescriptor': MessageToDict(table_schema())
      },
      'rows': {
          'serializedRows':
              base64.b64encode(row.SerializeToString()).decode('utf-8')
      }
  }
  return append_row_request

@functions_framework.http
def hello_http(request):
  request_json = request.get_json(silent=False)
  annotations = []
  payloads = []
  if request_json and 'annotations' in request_json:
    for annotation_with_timestamp in request_json['annotations']:
      row = test_table_schema_pb2.TestTableSchema()
      row.person_count = 0
      row.vehicle_count = 0
      if 'ingestionTimeMicros' in annotation_with_timestamp:
        row.ingestion_time = int(
            annotation_with_timestamp['ingestionTimeMicros'])
      if 'annotation' in annotation_with_timestamp:
        annotation = annotation_with_timestamp['annotation']
        if 'stats' in annotation:
          stats = annotation['stats']
          for count in stats['fullFrameCount']:
            if count['entity']['labelString'] == 'Person':
              if 'count' in count:
                row.person_count = count['count']
            elif count['entity']['labelString'] == 'Vehicle':
              if 'count' in count:
                row.vehicle_count = count['count']
      payloads.append(bigquery_append_row_request(row))
  for payload in payloads:
    annotations.append({'annotation': payload})
  return jsonify(annotations=annotations)
如要在 Cloud Run functions 中加入依附元件,您也必須上傳產生的
test_table_schema_pb2.py檔案,並指定類似下列的requirements.txt:functions-framework==3.* click==7.1.2 cloudevents==1.2.0 deprecation==2.1.0 Flask==1.1.2 gunicorn==20.0.4 itsdangerous==1.1.0 Jinja2==2.11.2 MarkupSafe==1.1.1 pathtools==0.1.2 watchdog==1.0.2 Werkzeug==1.0.1 protobuf==3.12.2部署 Cloud 函式,並在
BigQueryConfig中設定對應的 HTTP 觸發條件。