


במאמר הזה מוסבר איך לרשום את התוסף Code Interpreter שסופק על ידי Google ולהשתמש בו ממסוף Google Cloud ומ-Vertex AI API. התוסף הזה מאפשר לכם ליצור ולהריץ קוד Python כדי:
- ניתוח, ניקוי, טרנספורמציה ושינוי של מערכי נתונים
- הצגה ויזואלית של נתונים בתרשימים ובגרפים
- ביצוע חישובים
התוסף Code Interpreter משתמש ב-code_interpreter_tool כדי ליצור ולהריץ קוד Python מתיאור בשפה טבעית. ה-code_interpreter_tool מוגדר בקובץ code_interpreter.yaml של מפרט OpenAPI.
openapi: "3.0.0"
info:
  version: 1.0.0
  title: code_interpreter_tool
  description: >
    This tool supports the following operations based on user input:

    1. **Generates and Executes Code:** Accepts a user query in natural language, generates corresponding code, and executes it to produce results for the user query.


    Supported AuthTypes:

    - `GOOGLE_SERVICE_ACCOUNT_AUTH`: (Vertex AI Extension Service Agent is supported).
paths:
  /generate_and_execute:
    post:
      operationId: generate_and_execute
      description: >
        Get the results of a natural language query by generating and executing a code snippet.
        Example queries: "Find the max in [1, 2, 5]" or "Plot average sales by year (from data.csv)".
      requestBody:
        required: true
        content:
          application/json:
            schema:
              type: object
              required:
              - query
              properties:
                query:
                  type: string
                  description: >
                    Required. The Natural language query to get the results for.
                    The query string can optionally contain data to use for the code generated.
                    For example: "I have a list of numbers: [1, 2, 3, 4]. Find the largest number in the provided data."
                timeout:
                  type: number
                  description: >
                    Optional. Timeout in miliseconds for the code execution. Default value: 30000.
                files:
                  type: array
                  description: >
                    Optional. Input files to use when executing the generated code.
                    If specified, the file contents are expected be base64-encoded.
                    For example: [{"name": "data.csv", "contents": "aXRlbTEsaXRlbTI="}]
                  items:
                    $ref: "#/components/schemas/File"
                file_gcs_uris:
                  type: array
                  description: >
                    Optional. GCS URIs of input files to use when executing the generated code.
                    For example: ["gs://input-bucket/data.csv"]
                    This option is only applicable when `file_input_gcs_bucket` is specified in `Extension.CodeInterpreterRuntimeConfig`.
                  items:
                    type: string
      responses:
        '200':
          description: >
            The results of generating and executing code based on the natual language query.
            The result contains the generated code, and the STDOUT, STDERR, and output files from code execution.
          content:
            application/json:
              schema:
                $ref: "#/components/schemas/GenerationAndExecutionResult"
components:
  schemas:
    File:
      description: >
        File used as inputs and outputs of code execution. The `contents` string should be base64-encoded bytes.
        For example: [{"name": "data.csv", "contents": "aXRlbTEsaXRlbTI="}]
      type: object
      properties:
        name:
          type: string
        contents:
          type: string
          format: byte
    GenerationAndExecutionResult:
      description: >
        The results of generating and executing code based on the natual language query.
      properties:
        generated_code:
          type: string
          description: >
            The generated code in markdown format.
            For example: "```python\nprint(\"Hello World\")\n```"
        execution_result:
          type: string
          description: >
            The code execution result string from STDOUT.
        execution_error:
          type: string
          description: >
            The code execution error string from STDERR.
        output_files:
          type: array
          description: >
            The output files generated from code execution.
            If present, the file contents are required be base64-encoded.
            For example: [{"name": "data.csv", "contents": "aXRlbTEsaXRlbTI="}]
          items:
            $ref: "#/components/schemas/File"
        output_gcs_uris:
          type: array
          description: >
            The output GCS URIs of files generated from code execution.
            For example: ["gs://output-bucket/subfolder/output.csv"]

            This field is only applicable when `file_output_gcs_bucket` is specified in `Extension.CodeInterpreterRuntimeConfig`.
          items:
            type: string
לפני שמתחילים
- נכנסים לחשבון Google Cloud . אם אתם משתמשים חדשים ב- Google Cloud, צרו חשבון כדי שתוכלו להעריך את הביצועים של המוצרים שלנו בתרחישים מהעולם האמיתי. לקוחות חדשים מקבלים בחינם גם קרדיט בשווי 300$ להרצה, לבדיקה ולפריסה של עומסי העבודה.
-
In the Google Cloud console, on the project selector page, select or create a Google Cloud project.
Roles required to select or create a project
- Select a project: Selecting a project doesn't require a specific IAM role—you can select any project that you've been granted a role on.
-
Create a project: To create a project, you need the Project Creator role
(
roles/resourcemanager.projectCreator), which contains theresourcemanager.projects.createpermission. Learn how to grant roles.
-
Verify that billing is enabled for your Google Cloud project.
Enable the Vertex AI API, if it is not already enabled.
Roles required to enable APIs
To enable APIs, you need the
serviceusage.services.enablepermission. If you created the project, then you likely already have this permission through the Owner role (roles/owner). Otherwise, you can get this permission through the Service Usage Admin role (roles/serviceusage.serviceUsageAdmin). Learn how to grant roles.-
In the Google Cloud console, on the project selector page, select or create a Google Cloud project.
Roles required to select or create a project
- Select a project: Selecting a project doesn't require a specific IAM role—you can select any project that you've been granted a role on.
-
Create a project: To create a project, you need the Project Creator role
(
roles/resourcemanager.projectCreator), which contains theresourcemanager.projects.createpermission. Learn how to grant roles.
-
Verify that billing is enabled for your Google Cloud project.
Enable the Vertex AI API, if it is not already enabled.
Roles required to enable APIs
To enable APIs, you need the
serviceusage.services.enablepermission. If you created the project, then you likely already have this permission through the Owner role (roles/owner). Otherwise, you can get this permission through the Service Usage Admin role (roles/serviceusage.serviceUsageAdmin). Learn how to grant roles.
הרשמה, שליחת שאילתות והרצה של התוסף Code Interpreter
בקטעים הבאים מוסבר איך לרשום את התוסף Code Interpreter באמצעות Google Cloud המסוף ו-Vertex AI API. אחרי שמפעילים את התוסף, אפשר לשלוח לו שאילתות באמצעות מסוף Google Cloud או להפעיל פתרונות חכמים באמצעות Vertex AI API.
המסוף
רישום התוסף
כדי לרשום את התוסף Code Interpreter באמצעות המסוף Google Cloud , מבצעים את השלבים הבאים.
נכנסים לדף Extensions ב-Vertex AI במסוף Google Cloud .
לוחצים על יצירת תוסף.
בתיבת הדו-שיח יצירת תוסף חדש:
- שם התוסף: מזינים שם לתוסף, כמו code_interpreter_extension.
- תיאור: (אופציונלי) מזינים תיאור של התוסף, למשל 'תוסף לניתוח קוד'.
- סוג תוסף: בוחרים באפשרות
Code interpreter.
בקטע OpenAPI Spec file שמופיע עכשיו, מוודאים שהשדות הבאים מוגדרים בצורה נכונה:
- שם ה-API:
code_interpreter_tool. - תיאור ה-API:
Tool to generate and run valid Python code from a natural language description, or to run custom Python code... - מקור:
Cloud Storage. - OpenAPI Spec:
vertex-extension-public/code_interpreter.yaml. - אימות:
Google service account.
- שם ה-API:
(אופציונלי) בקטע Runtime configurations (הגדרות זמן ריצה), מציינים את קטגוריית הקלט ואת קטגוריית הפלט.
- קטגוריית הקלט היא קטגוריית Cloud Storage שהתוסף ישתמש בה כדי לקרוא קובצי קלט, כולל הקידומת
gs://, לדוגמה,gs://sample-bucket-name. אם מציינים את התפקיד, צריך להקצות את התפקידroles/storage.objectViewerבדלי הזה לחשבון השירות Vertex Extension Custom Code Service Agent. - קטגוריית הפלט היא קטגוריה של Cloud Storage שבה התוסף ישתמש כדי לכתוב קובצי פלט, כולל הקידומת
gs://, לדוגמה,gs://sample-bucket-name. אם מציינים את התפקיד, צריך להקצות את התפקידroles/storage.objectUserבדלי הזה לחשבון השירות Vertex Extension Custom Code Service Agent.
- קטגוריית הקלט היא קטגוריית Cloud Storage שהתוסף ישתמש בה כדי לקרוא קובצי קלט, כולל הקידומת
לוחצים על יצירת תוסף.
(אופציונלי) שליחת שאילתה לתוסף
אתם יכולים להשתמש במסוף Google Cloud כדי להתנסות בתוסף Code Interpreter. כדי להפעיל את התוסף באמצעות הנחיות בשפה טבעית:
נכנסים לדף Extensions ב-Vertex AI במסוף Google Cloud .
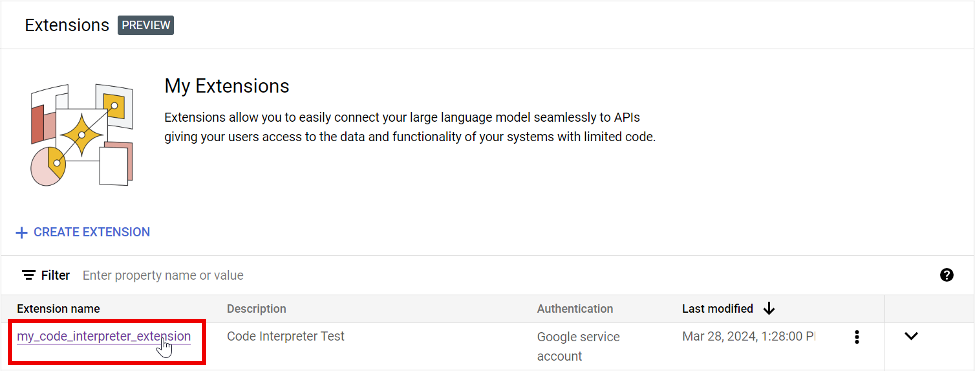
לוחצים על שם התוסף Code Interpreter כדי לפתוח את הדף פרטי התוספים.
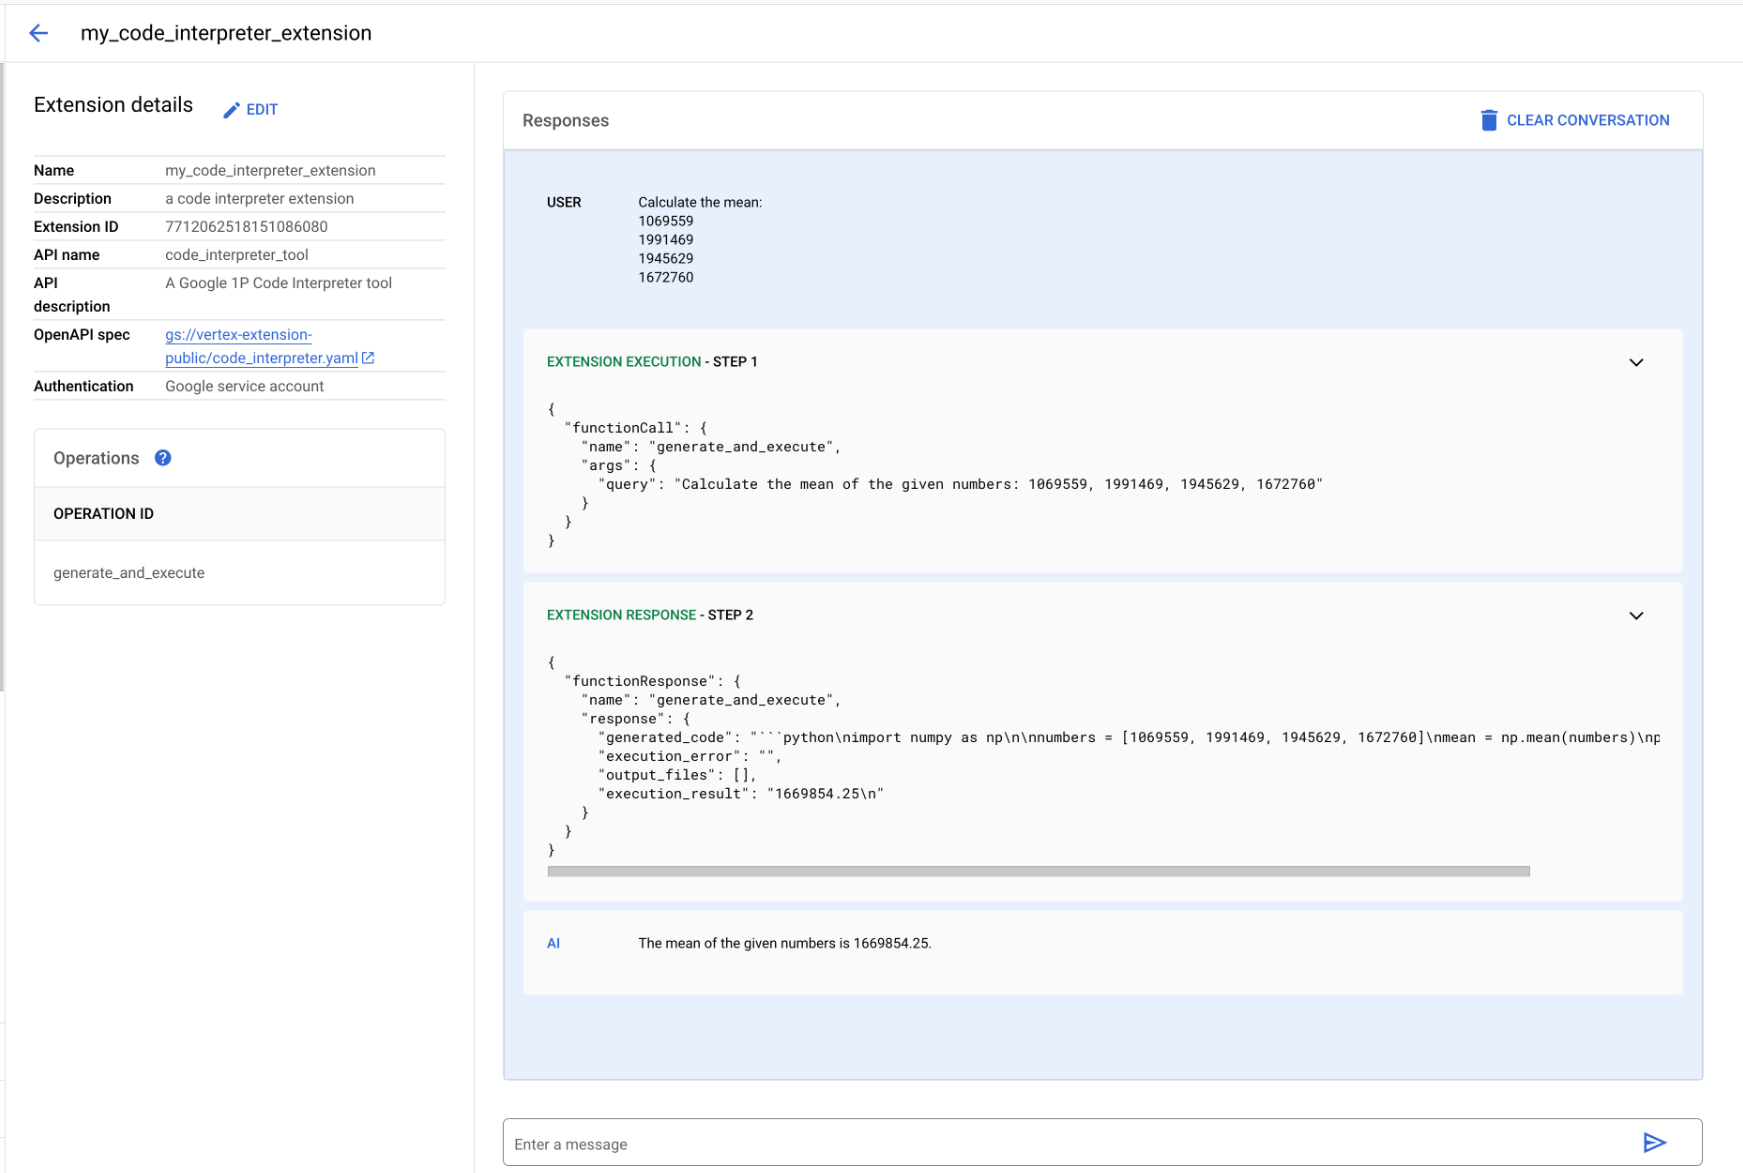
בתיבה כאן אפשר לכתוב הודעה, כותבים שאילתה וצופים בתשובה. מרחיבים את הקטעים Extension Response (תשובת התוסף) כדי לראות את הקוד שהתוסף יצר והריץ כדי להפיק את התוצאה.
בדוגמה הבאה מוצגות התוצאות של שאילתה שחישבה את הערך הממוצע של רשימת מספרים שהמשתמש הזין.
REST
רישום התוסף
שולחים בקשה ל-Vertex AI API extensions.import כדי לרשום את התוסף Code Interpreter.
לפני שמשתמשים בנתוני הבקשה, צריך להחליף את הנתונים הבאים:
- PROJECT_ID: מזהה הפרויקט ב- Google Cloud .
- REGION: אזור Compute Engine.
- DISPLAY_NAME: שם התוסף שמוצג למשתמשים, למשל my_code_interpreter_extension.
- DESCRIPTION: (אופציונלי) התיאור של התוסף שמוצג למשתמשים, למשל 'תוסף לניתוח קוד'.
- SERVICE_ACCOUNT: (אופציונלי) התוסף Code Interpreter משתמש ב-GOOGLE_SERVICE_ACCOUNT_AUTH כמו שמוצג בגוף הבקשה לדוגמה. אם לא מציינים חשבון שירות, התוסף משתמש בחשבון השירות שמוגדר כברירת מחדל Vertex AI Extension Service Agent.
אם מציינים חשבון שירות אחר, צריך לתת את ההרשאה
iam.serviceAccounts.getAccessTokenלחשבון השירות שצוין, לחשבון השירות של סוכן שירות התוספים של Vertex AI. - INPUT_BUCKET: (אופציונלי) קטגוריית Cloud Storage שהתוסף ישתמש בה כדי לקרוא קובצי קלט, כולל הקידומת
gs://, לדוגמה,gs://sample-bucket-name. אם מציינים את התפקיד, צריך להקצות את התפקידroles/storage.objectViewerבדלי הזה לחשבון השירות Vertex Extension Custom Code Service Agent. - OUTPUT_BUCKET: (אופציונלי) הקטגוריה ב-Cloud Storage שבה התוסף ישתמש כדי לכתוב קובצי פלט, כולל הקידומת
gs://, לדוגמה,gs://sample-bucket-name. אם מציינים את התפקיד, צריך להקצות את התפקידroles/storage.objectUserבדלי הזה לחשבון השירות Vertex Extension Custom Code Service Agent.
ה-method של ה-HTTP וכתובת ה-URL:
POST https://REGION-aiplatform.googleapis.com/v1beta1/projects/PROJECT_ID/locations/REGION/extensions:import
גוף בקשת JSON:
{
  "displayName":"DISPLAY_NAME",
  "description":"DESCRIPTION",
  "manifest":{
    "name":"code_interpreter_tool",
    "description":"A Google Code Interpreter tool",
    "apiSpec":{
      "openApiGcsUri":"gs://vertex-extension-public/code_interpreter.yaml"
    },
    "authConfig":{
      "authType":"GOOGLE_SERVICE_ACCOUNT_AUTH",
      "googleServiceAccountConfig":{
        "serviceAccount":"SERVICE_ACCOUNT"
      }
    }
  }
  "runtimeConfig": {
     "codeInterpreterRuntimeConfig": {
        "fileInputGcsBucket": "INPUT_BUCKET",
        "fileOutputGcsBucket": "OUTPUT_BUCKET"
     }
  }
}
כדי לשלוח את הבקשה עליכם לבחור אחת מהאפשרויות הבאות:
curl
שומרים את גוף הבקשה בקובץ בשם request.json ומריצים את הפקודה הבאה:
curl -X POST \
     -H "Authorization: Bearer $(gcloud auth print-access-token)" \
     -H "Content-Type: application/json; charset=utf-8" \
     -d @request.json \
     "https://REGION-aiplatform.googleapis.com/v1beta1/projects/PROJECT_ID/locations/REGION/extensions:import"
PowerShell
שומרים את גוף הבקשה בקובץ בשם request.json ומריצים את הפקודה הבאה:
$cred = gcloud auth print-access-token
$headers = @{ "Authorization" = "Bearer $cred" }

Invoke-WebRequest `
    -Method POST `
    -Headers $headers `
    -ContentType: "application/json; charset=utf-8" `
    -InFile request.json `
    -Uri "https://REGION-aiplatform.googleapis.com/v1beta1/projects/PROJECT_ID/locations/REGION/extensions:import" | Select-Object -Expand Content
הפעלת התוסף
אתם יכולים לשלוח פעולת execute אל Vertex AI API כדי ליצור ולהריץ קוד Python על סמך שאילתה בשפה טבעית.
דוגמאות לשאילתות:
- שאילתה פשוטה: מציאת הערך המקסימלי ברשימת מספרים.
- שאילתה של נתונים מוטבעים: הנתונים שרוצים לשאול עליהם מסופקים בגוף הבקשה.
- שאילתה עם נתוני קובץ: הדפסת נתוני קובץ.
- שאילתה עם נתונים מ-Cloud Storage: קריאת נתונים מ-Cloud Storage.
שאילתה פשוטה
לפני שמשתמשים בנתוני הבקשה, צריך להחליף את הנתונים הבאים:
- PROJECT_ID: מזהה הפרויקט ב- Google Cloud .
- REGION: אזור Compute Engine.
- EXTENSION_ID: המזהה של תוסף מתורגמן הקוד שמופיע בפרטי התוסף במסוף Google Cloud .
ה-method של ה-HTTP וכתובת ה-URL:
POST https://REGION-aiplatform.googleapis.com/v1beta1/projects/PROJECT_ID/locations/REGION/extensions/EXTENSION_ID:execute
גוף בקשת JSON:
{
  "operation_id":"generate_and_execute",
  "operation_params":{
    "query":"find the max value in the list: [1,2,3,4,-5]"
  }
}
כדי לשלוח את הבקשה עליכם לבחור אחת מהאפשרויות הבאות:
curl
שומרים את גוף הבקשה בקובץ בשם request.json ומריצים את הפקודה הבאה:
curl -X POST \
     -H "Authorization: Bearer $(gcloud auth print-access-token)" \
     -H "Content-Type: application/json; charset=utf-8" \
     -d @request.json \
     "https://REGION-aiplatform.googleapis.com/v1beta1/projects/PROJECT_ID/locations/REGION/extensions/EXTENSION_ID:execute"
PowerShell
שומרים את גוף הבקשה בקובץ בשם request.json ומריצים את הפקודה הבאה:
$cred = gcloud auth print-access-token
$headers = @{ "Authorization" = "Bearer $cred" }

Invoke-WebRequest `
    -Method POST `
    -Headers $headers `
    -ContentType: "application/json; charset=utf-8" `
    -InFile request.json `
    -Uri "https://REGION-aiplatform.googleapis.com/v1beta1/projects/PROJECT_ID/locations/REGION/extensions/EXTENSION_ID:execute" | Select-Object -Expand Content
נתונים מוטבעים
לפני שמשתמשים בנתוני הבקשה, צריך להחליף את הנתונים הבאים:
- PROJECT_ID: מזהה הפרויקט ב- Google Cloud .
- REGION: אזור Compute Engine.
- EXTENSION_ID: המזהה של תוסף מתורגמן הקוד שמופיע בפרטי התוסף במסוף Google Cloud .
ה-method של ה-HTTP וכתובת ה-URL:
POST https://REGION-aiplatform.googleapis.com/v1beta1/projects/PROJECT_ID/locations/REGION/extensions/EXTENSION_ID:execute
גוף בקשת JSON:
{
  "operation_id":"generate_and_execute",
  "operation_params":{
    "query":"Calculate the total values of each column(mobile_subscribers, percent_internet_users, total_internet_users, fixed_broadband_subscribers) from the below dataset.\n\n\ncountry_name        country_code        year        mobile_subscribers        percent_internet_users        total_internet_users        fixed_broadband_subscribers\nUnited States        US        2023        333.4        90.5        303.1        200.3\nChina        CN        2023        1.613        70.2        1131.4        512.2\nIndia        IN        2023        1.165        50.7        688.5        557.2\nJapan        JP        2023        124.3        88.2        109.5        114.8\nGermany        DE        2023        102.1        90.5        92.1        100\nUnited Kingdom        UK        2023        67.1        92.7        62.2        65\nFrance        FR        2023        66.7        89        63        69.7\nBrazil        BR        2023        213.5        68        144.1        69.4\nRussia        RU        2023        203.8        74.9        152.7        51.1"
  }
}
כדי לשלוח את הבקשה עליכם לבחור אחת מהאפשרויות הבאות:
curl
שומרים את גוף הבקשה בקובץ בשם request.json ומריצים את הפקודה הבאה:
curl -X POST \
     -H "Authorization: Bearer $(gcloud auth print-access-token)" \
     -H "Content-Type: application/json; charset=utf-8" \
     -d @request.json \
     "https://REGION-aiplatform.googleapis.com/v1beta1/projects/PROJECT_ID/locations/REGION/extensions/EXTENSION_ID:execute"
PowerShell
שומרים את גוף הבקשה בקובץ בשם request.json ומריצים את הפקודה הבאה:
$cred = gcloud auth print-access-token
$headers = @{ "Authorization" = "Bearer $cred" }

Invoke-WebRequest `
    -Method POST `
    -Headers $headers `
    -ContentType: "application/json; charset=utf-8" `
    -InFile request.json `
    -Uri "https://REGION-aiplatform.googleapis.com/v1beta1/projects/PROJECT_ID/locations/REGION/extensions/EXTENSION_ID:execute" | Select-Object -Expand Content
הדפסת קובץ
לפני שמשתמשים בנתוני הבקשה, צריך להחליף את הנתונים הבאים:
- PROJECT_ID: מזהה הפרויקט ב- Google Cloud .
- REGION: אזור Compute Engine.
- EXTENSION_ID: המזהה של תוסף מתורגמן הקוד שמופיע בפרטי התוסף במסוף Google Cloud .
- FILE_NAME: הנתונים של קובץ ה-CSV בגוף הבקשה נכתבים בקובץ הזה בספריית העבודה.
- BASE64_ENCODED_FILE_BYTES: הבייטים של הקובץ בגוף הבקשה חייבים להיות בקידוד base64.
ה-method של ה-HTTP וכתובת ה-URL:
POST https://REGION-aiplatform.googleapis.com/v1beta1/projects/PROJECT_ID/locations/REGION/extensions/EXTENSION_ID:execute
גוף בקשת JSON:
{
  "operation_id":"generate_and_execute",
  "operation_params":{
    "query":"print the csv file",
    "files":[
      {
        "name":"FILE_NAME",
        "contents":"BASE64_ENCODED_FILE_BYTES"
      }
    ]
  }
}
כדי לשלוח את הבקשה עליכם לבחור אחת מהאפשרויות הבאות:
curl
שומרים את גוף הבקשה בקובץ בשם request.json ומריצים את הפקודה הבאה:
curl -X POST \
     -H "Authorization: Bearer $(gcloud auth print-access-token)" \
     -H "Content-Type: application/json; charset=utf-8" \
     -d @request.json \
     "https://REGION-aiplatform.googleapis.com/v1beta1/projects/PROJECT_ID/locations/REGION/extensions/EXTENSION_ID:execute"
PowerShell
שומרים את גוף הבקשה בקובץ בשם request.json ומריצים את הפקודה הבאה:
$cred = gcloud auth print-access-token
$headers = @{ "Authorization" = "Bearer $cred" }

Invoke-WebRequest `
    -Method POST `
    -Headers $headers `
    -ContentType: "application/json; charset=utf-8" `
    -InFile request.json `
    -Uri "https://REGION-aiplatform.googleapis.com/v1beta1/projects/PROJECT_ID/locations/REGION/extensions/EXTENSION_ID:execute" | Select-Object -Expand Content
קריאה מ-Cloud Storage
לפני שמשתמשים בנתוני הבקשה, צריך להחליף את הנתונים הבאים:
- PROJECT_ID: מזהה הפרויקט ב- Google Cloud .
- REGION: אזור Compute Engine.
- EXTENSION_ID: המזהה של תוסף מתורגמן הקוד שמופיע בפרטי התוסף במסוף Google Cloud .
- BUCKET_NAME: קטגוריה של Cloud Storage שמכילה את קובץ ה-CSV שרוצים להדפיס. הייתם צריכים לציין את קטגוריית הקלט הזו כשרשמתם את התוסף של מתורגמן הקוד.
- FILE_NAME: הנתונים בקובץ ה-CSV שרוצים להדפיס.BUCKET_NAME
ה-method של ה-HTTP וכתובת ה-URL:
POST https://REGION-aiplatform.googleapis.com/v1beta1/projects/PROJECT_ID/locations/REGION/extensions/EXTENSION_ID:execute
גוף בקשת JSON:
{
  "operation_id":"generate_and_execute",
  "operation_params":{
    "query":"print the csv file",
    "file_gcs_uris": ["gs://BUCKET_NAME/FILE_NAME"]
  }
}
כדי לשלוח את הבקשה עליכם לבחור אחת מהאפשרויות הבאות:
curl
שומרים את גוף הבקשה בקובץ בשם request.json ומריצים את הפקודה הבאה:
curl -X POST \
     -H "Authorization: Bearer $(gcloud auth print-access-token)" \
     -H "Content-Type: application/json; charset=utf-8" \
     -d @request.json \
     "https://REGION-aiplatform.googleapis.com/v1beta1/projects/PROJECT_ID/locations/REGION/extensions/EXTENSION_ID:execute"
PowerShell
שומרים את גוף הבקשה בקובץ בשם request.json ומריצים את הפקודה הבאה:
$cred = gcloud auth print-access-token
$headers = @{ "Authorization" = "Bearer $cred" }

Invoke-WebRequest `
    -Method POST `
    -Headers $headers `
    -ContentType: "application/json; charset=utf-8" `
    -InFile request.json `
    -Uri "https://REGION-aiplatform.googleapis.com/v1beta1/projects/PROJECT_ID/locations/REGION/extensions/EXTENSION_ID:execute" | Select-Object -Expand Content