
במדריך הזה מוסבר איך להתחיל להשתמש ב-Compute Engine. במדריך הזה נסביר איך לפרוס אפליקציית אינטרנט מסוג Hello World של Node.js ל-Compute Engine. לקבלת עזרה בתחילת העבודה עם App Engine, אפשר לעיין במאמר בנושא הסביבה הרגילה של App Engine.
מטרות
- שימוש ב-Cloud Shell להורדה ולפריסה של אפליקציית Hello World לדוגמה.
- פריסת אפליקציית Hello World לדוגמה במכונה וירטואלית אחת ב-Compute Engine.
עלויות
במסמך הזה משתמשים ברכיבים הבאים של Google Cloud, והשימוש בהם כרוך בתשלום:
כדי להעריך את ההוצאות בהתאם לתחזית השימוש שלכם, אתם יכולים להיעזר במחשבון העלויות.
לפני שמתחילים
- נכנסים לחשבון Google Cloud . אם אתם משתמשים חדשים ב- Google Cloud, צרו חשבון כדי שתוכלו להעריך את הביצועים של המוצרים שלנו בתרחישים מהעולם האמיתי. לקוחות חדשים מקבלים בחינם גם קרדיט בשווי 300$ להרצה, לבדיקה ולפריסה של עומסי העבודה.
-
In the Google Cloud console, on the project selector page, select or create a Google Cloud project.
Roles required to select or create a project
- Select a project: Selecting a project doesn't require a specific IAM role—you can select any project that you've been granted a role on.
-
Create a project: To create a project, you need the Project Creator role
(
roles/resourcemanager.projectCreator), which contains theresourcemanager.projects.createpermission. Learn how to grant roles.
-
Verify that billing is enabled for your Google Cloud project.
Enable the Compute Engine API.
Roles required to enable APIs
To enable APIs, you need the Service Usage Admin IAM role (
roles/serviceusage.serviceUsageAdmin), which contains theserviceusage.services.enablepermission. Learn how to grant roles.-
במסוף Google Cloud , פותחים את האפליקציה ב-Cloud Shell.
Cloud Shell מספק גישה למשאבי הענן שלכם דרך שורת הפקודה ישירות מהדפדפן.
-
אם אתם מסכימים לשכפל את המאגר, לוחצים על אישור כדי להוריד את קוד הדוגמה ולעבור לספריית האפליקציה.
-
ב-Cloud Shell, מגדירים את ה-CLI של gcloud לשימוש בפרויקט החדש Google Cloud :
# Configure gcloud for your project
gcloud config set project YOUR_PROJECT_ID
הפעלת האפליקציה ב-Cloud Shell
אם לחצתם על Go to Cloud Shell (מעבר אל Cloud Shell) בקטע הקודם, Cloud Shell שיבט את מאגר nodejs-getting-started למכונה שלכם. אחרי שהמופע מופעל, ספריית העבודה היא ~/cloudshell_open/nodejs-getting-started/gce. אם אתם לא מופיעים בספרייה הזו, כדאי לעיין בשלבים שבקטע לפני שמתחילים.
יחסי תלות של התקנות:
npm installמריצים את האפליקציה:
npm startב-Cloud Shell, לוחצים על תצוגה מקדימה באינטרנט ובוחרים באפשרות תצוגה מקדימה ביציאה 8080. ייפתח חלון חדש עם האפליקציה הפועלת.
כדי לעצור את שרת האינטרנט המקומי, מקישים על Control+C.
הגדרה של Cloud Source Repositories
מפעילים את Cloud Source Repositories API.
במסוף Google Cloud , עוברים אל Cloud Source Repositories.
בוחרים באפשרות הוספת מאגר.

בוחרים באפשרות יצירת מאגר חדש ולוחצים על המשך.
בשדה Repository name, מזינים
new-repo.בשדה Project (פרויקט), מזינים את מזהה הפרויקט של הפרויקט שיצרתם או בחרתם עבור המדריך הזה, ואז לוחצים על Continue (המשך).
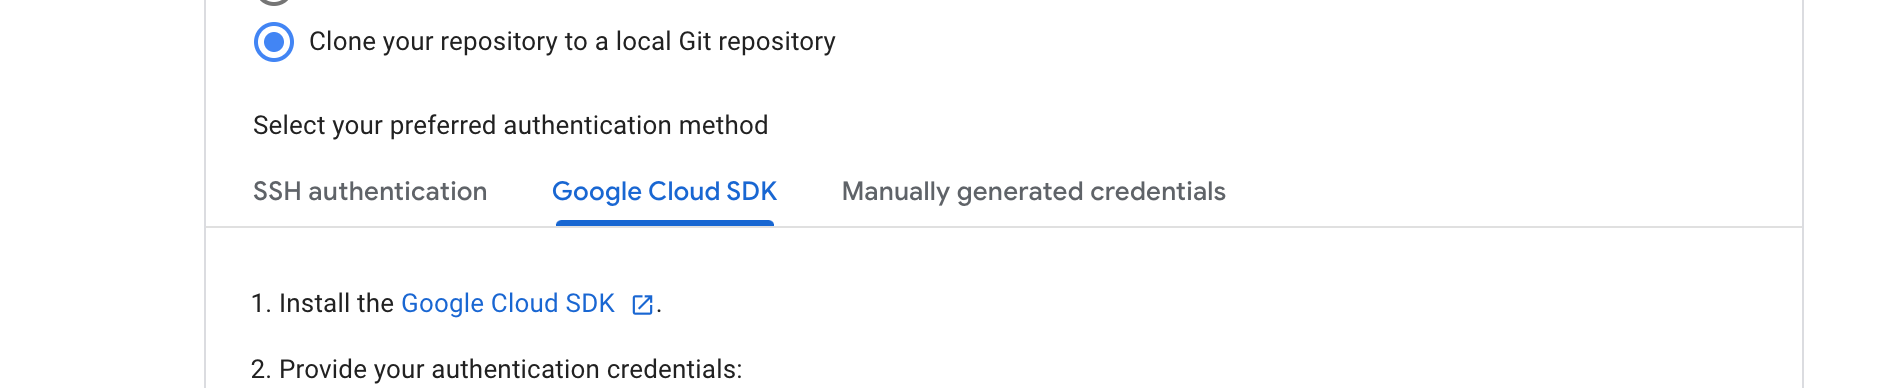
בוחרים באפשרות Clone your repository to a local Git repository (שיבוט המאגר למאגר Git מקומי).
ב-Cloud Shell, חוזרים אל root ומשכפלים את המאגר לפי ההוראות שבכרטיסייה Google Cloud SDK. משאירים את הכרטיסייה הזו פתוחה.
לפני שמבצעים את השלב האחרון בהוראות, מעתיקים את האפליקציה למאגר החדש ב-Cloud Shell:
cd new-repo
cp ../cloudshell_open/nodejs-getting-started/gce/app.js app.js
cp ../cloudshell_open/nodejs-getting-started/gce/package.json package.json
פועלים לפי שאר ההוראות בכרטיסייה Google Cloud SDK כדי לבצע commit של השינויים במאגר. כדי לוודא שהוספתם את הקוד למאגר, רעננו את הדפדפן ובדקו שהקוד נוסף למאגר
new-repo.
פריסה למופע יחיד
בקטע הזה מוסבר איך להריץ מופע יחיד של האפליקציה ב-Compute Engine.

מ-Cloud Shell, אפשר לבצע פריסה למכונה וירטואלית (VM) של Compute Engine שבה האפליקציה פועלת.
שימוש בסקריפט לטעינה בזמן ההפעלה כדי לאתחל מכונה
צריך דרך להורות למופע להוריד ולהפעיל את הקוד. למופע יכול להיות סקריפט לטעינה בזמן ההפעלה שפועל בכל פעם שהמופע מופעל או מופעל מחדש.
הנה סקריפט לטעינה בזמן ההפעלה שכלול באפליקציית הדוגמה Hello World:
סקריפט לטעינה בזמן ההפעלה מבצע את המשימות הבאות:
התקנת סוכן Cloud Logging. הסוכן אוסף באופן אוטומטי יומנים מ-syslog.
האפליקציה Supervisor מותקנת כדי להפעיל את האפליקציה כדמון.
משכפל את קוד המקור של האפליקציה מ-Cloud Source Repositories ומתקין תלויות.
מגדיר את Supervisor להרצת האפליקציה. Supervisor מוודא שהאפליקציה תופעל מחדש אם היא נסגרת באופן לא צפוי או אם היא מסתיימת על ידי אדמין או תהליך אחר. הוא גם שולח את
stdoutוstderrשל האפליקציה ל-syslog כדי שהסוכן של Logging יאסוף אותם.
יצירה והגדרה של מכונה של Compute Engine
יצירת מכונה של Compute Engine:
Linux/macOS
gcloud compute instances create my-app-instance \
    --image-family=debian-9 \
    --image-project=debian-cloud \
    --machine-type=g1-small \
    --scopes userinfo-email,cloud-platform \
    --metadata app-location=us-central1-f \
    --metadata-from-file startup-script=gce/startup-script.sh \
    --zone us-central1-f \
    --tags http-server
Windows
gcloud compute instances create my-app-instance ^
    --image-family=debian-9 ^
    --image-project=debian-cloud ^
    --machine-type=g1-small ^
    --scopes userinfo-email,cloud-platform ^
    --metadata-from-file startup-script=gce/startup-script.sh ^
    --zone us-central1-f ^
    --tags http-server
מחליפים את האזור באזור פיתוח, למשל
us-central1-a. מידע נוסף על אזורים ותחומים זמין במאמר מיקום גיאוגרפי ואזורים.הפעולה הזו יוצרת מופע חדש, מאפשרת לו לגשת לשירותים של Google Cloud Google ומריצה את הסקריפט לטעינה בזמן ההפעלה. שם המכונה הוא
my-app-instance.בודקים את התקדמות יצירת המופע:
gcloud compute instances get-serial-port-output my-app-instance --zone YOUR_ZONE
מחליפים את
YOUR_ZONEבתחום (zone) שבו פרסתם את המכונה.בסיום סקריפט לטעינה בזמן ההפעלה, תוצג ההודעה הבאה:
startup-script: INFO Finished running startup scripts.
יוצרים כלל חומת אש שמאפשר תעבורת נתונים למופע:
gcloud compute firewall-rules create default-allow-http-8080 \
    --allow tcp:8080 \
    --source-ranges 0.0.0.0/0 \
    --target-tags http-server \
    --description "Allow port 8080 access to http-server"
מקבלים את כתובת ה-IP החיצונית של המופע:
gcloud compute instances listכדי לראות את האפליקציה פועלת, מזינים את כתובת ה-URL הזו בדפדפן:
http://YOUR_INSTANCE_IP:8080
מחליפים את הערך
YOUR_INSTANCE_IPבכתובת ה-IP החיצונית של המכונה.
ניהול של אירוע ומעקב אחריו
אתם יכולים להשתמש במסוף Google Cloud כדי לעקוב אחרי המופע ולנהל אותו.
- נכנסים לדף VM instances במסוף Google Cloud .
- ברשימת המכונות הווירטואליות, לוחצים על SSH בשורה של המכונה שרוצים להתחבר אליה.
-
כדי לראות את כל היומנים שנוצרו על ידי משאבי Compute Engine, עוברים לדף Logs Explorer.
כניסה לדף Logs ExplorerCloud Logging מוגדר באופן אוטומטי לאיסוף יומנים משירותים נפוצים שונים, כולל
syslog.
הסרת המשאבים
כדי להימנע מחיובים בחשבון Google Cloud בגלל השימוש במשאבים שנעשה במסגרת המדריך הזה, אפשר למחוק את הפרויקט שמכיל את המשאבים, או להשאיר את הפרויקט ולמחוק את המשאבים בנפרד.
מחיקת הפרויקט
- במסוף Google Cloud , נכנסים לדף Manage resources.
- ברשימת הפרויקטים, בוחרים את הפרויקט שרוצים למחוק ולוחצים על Delete.
- כדי למחוק את הפרויקט, כותבים את מזהה הפרויקט בתיבת הדו-שיח ולוחצים על Shut down.
מחיקת המשאבים הבודדים
gcloud compute instances delete my-app-instance --zone=YOUR_ZONE --delete-disks=all
gcloud compute firewall-rules delete default-allow-http-8080
המאמרים הבאים
כדאי להעמיק את הקריאה ולהכיר דוגמאות לארכיטקטורות, תרשימים ושיטות מומלצות בנושאי Google Cloud. כל אלה זמינים במרכז הארכיטקטורה של Cloud.
לעיון במקורות מידע נוספים על Node.js לבניית אפליקציות, אפשר להיעזר במקורות המידע הבאים:
- אפשר לנהל ולנטר את הפריסה של קבוצת המופעים בCompute Engine > קבוצות של מופעים.
- אפשר לנהל את הגדרות איזון העומסים, כולל מיפויי כתובות URL ושירותים לקצה העורפי, בשירותי רשת > איזון עומסים.
- ניהול סשנים באמצעות Firestore
- אימות משתמשים באמצעות שרת proxy לאימות זהויות (IAP)
- פריסת אפליקציה ב-Google Kubernetes Engine
- אפשר לעיין בGoogle Cloud שירותים אחרים.