기본 구성
표준 Manufacturing Data Engine (MDE) 배포는 데이터를 수집하는 데 필요한 구성 설정을 기본적으로 적용하지 않습니다.
이 가이드에서는 기본적인 MDE 설정을 안내합니다. 예를 들어 시스템이 엔드 투 엔드로 작동하는지 테스트하는 경우입니다. 이 가이드를 사용하면 세 가지 원형 모두에 대한 메시지 클래스, 유형, 파서를 만들 수 있습니다.
Manufacturing Connect edge (MCe)를 사용하여 데이터를 수집하려면 기본 구성 패키지를 대신 배포하세요.
MDE API 또는 웹 인터페이스를 사용하여 이 구성을 완료할 수 있습니다.
메시지 클래스
이 섹션에서는 MDE에서 사용할 수 있는 메시지 클래스의 예를 제공합니다.
numeric의 메시지 클래스
다음은 basic-numeric 메시지 클래스의 예시입니다.
REST
POST /configuration/v1/message-classes
{
   "name": "basic-numeric",
   "priority": 2000,
   "expression": "#root.event['value'] instanceof T(Number) && #root.event['timestamp'] != null && #root.event['tagName'] != null"
}
웹 인터페이스
메시지 클래스 이름: basic-numeric
- MDE 웹 인터페이스에서 메시지 클래스를 클릭합니다.
- 새 메시지 클래스 추가를 클릭합니다.
- 메시지 클래스 이름을
basic-numeric로 입력합니다. 다음 표현식을 복사하여 표현식 상자에 붙여넣습니다.
#root.event['value'] instanceof T(Number) && #root.event['timestamp'] != null && #root.event['tagName'] != null우선순위를
2000로 변경합니다.만들기를 클릭합니다.

discrete의 메시지 클래스
다음은 basic-discrete 메시지 클래스의 예시입니다.
REST
POST /configuration/v1/message-classes
   {
      "name": "basic-discrete",
      "priority": 1975,
      "expression": "#root.event['value'] != null && !(#root.event['value'] instanceof T(Number)) && #root.event['timestamp'] != null && #root.event['tagName'] != null"
   }
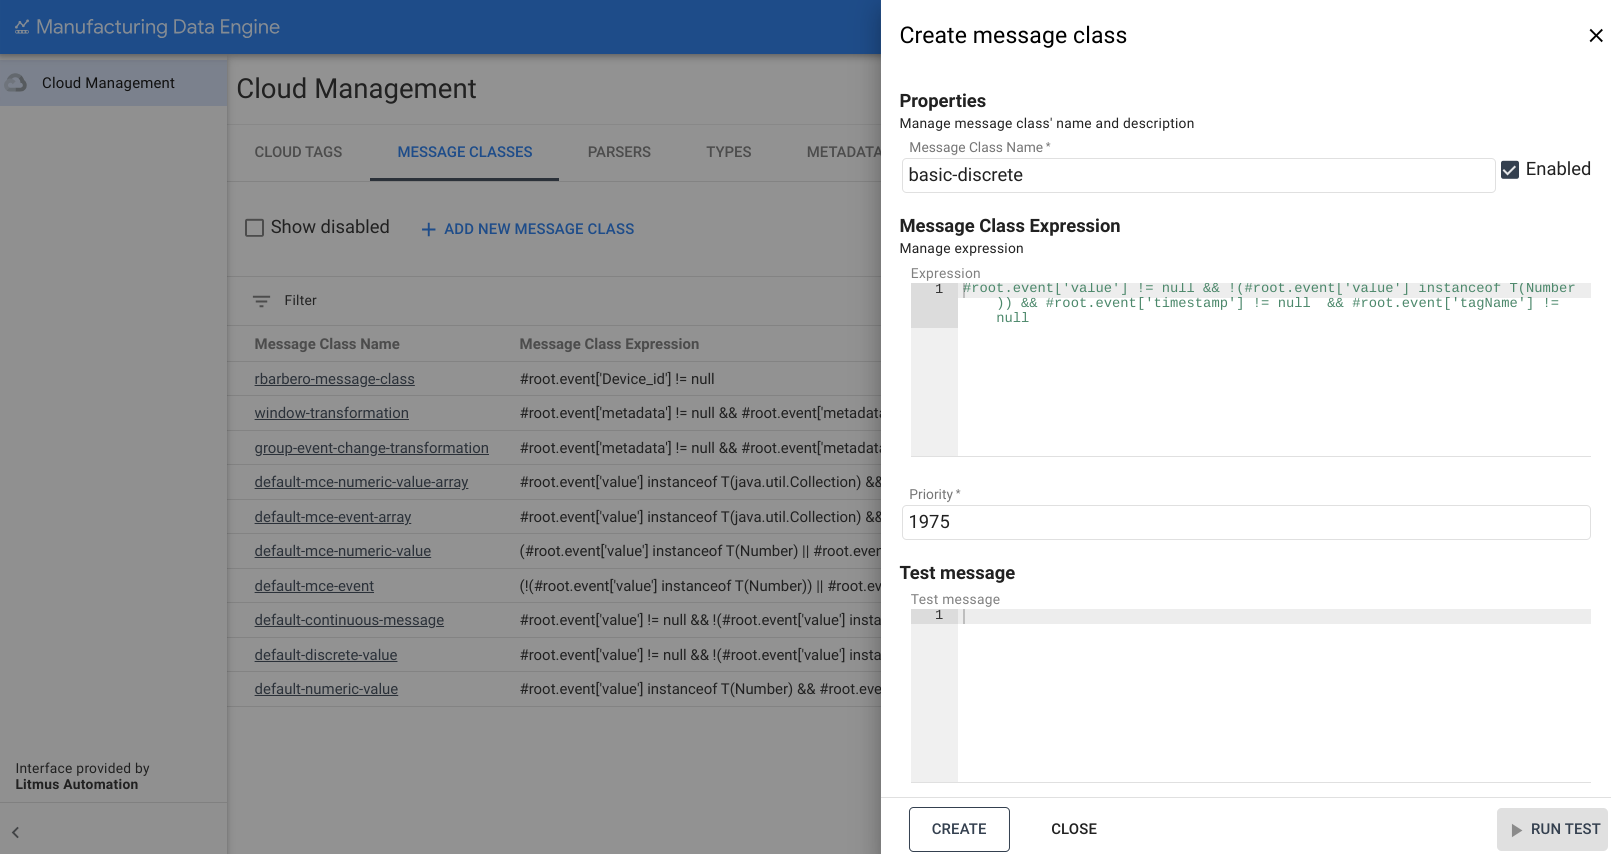
웹 인터페이스
메시지 클래스 이름: basic-discrete
- MDE 웹 인터페이스에서 메시지 클래스를 클릭합니다.
- 새 메시지 클래스 추가를 클릭합니다.
- 메시지 클래스 이름을
basic-discrete로 입력합니다. 다음 표현식을 복사하여 표현식 상자에 붙여넣습니다.
#root.event['value'] != null && !(#root.event['value'] instanceof T(Number)) && #root.event['timestamp'] != null && #root.event['tagName'] != null우선순위를
1975로 변경합니다.만들기를 클릭합니다.
continuous의 메시지 클래스
다음은 basic-continuous 메시지 클래스의 예시입니다.
REST
POST /configuration/v1/message-classes
   {
      "name": "basic-continuous",
      "priority": 1950,
      "expression": "#root.event['value'] != null && !(#root.event['value'] instanceof T(Number)) && #root.event['startTimestamp'] != null && #root.event['endTimestamp'] != null && #root.event['tagName'] != null"
   }
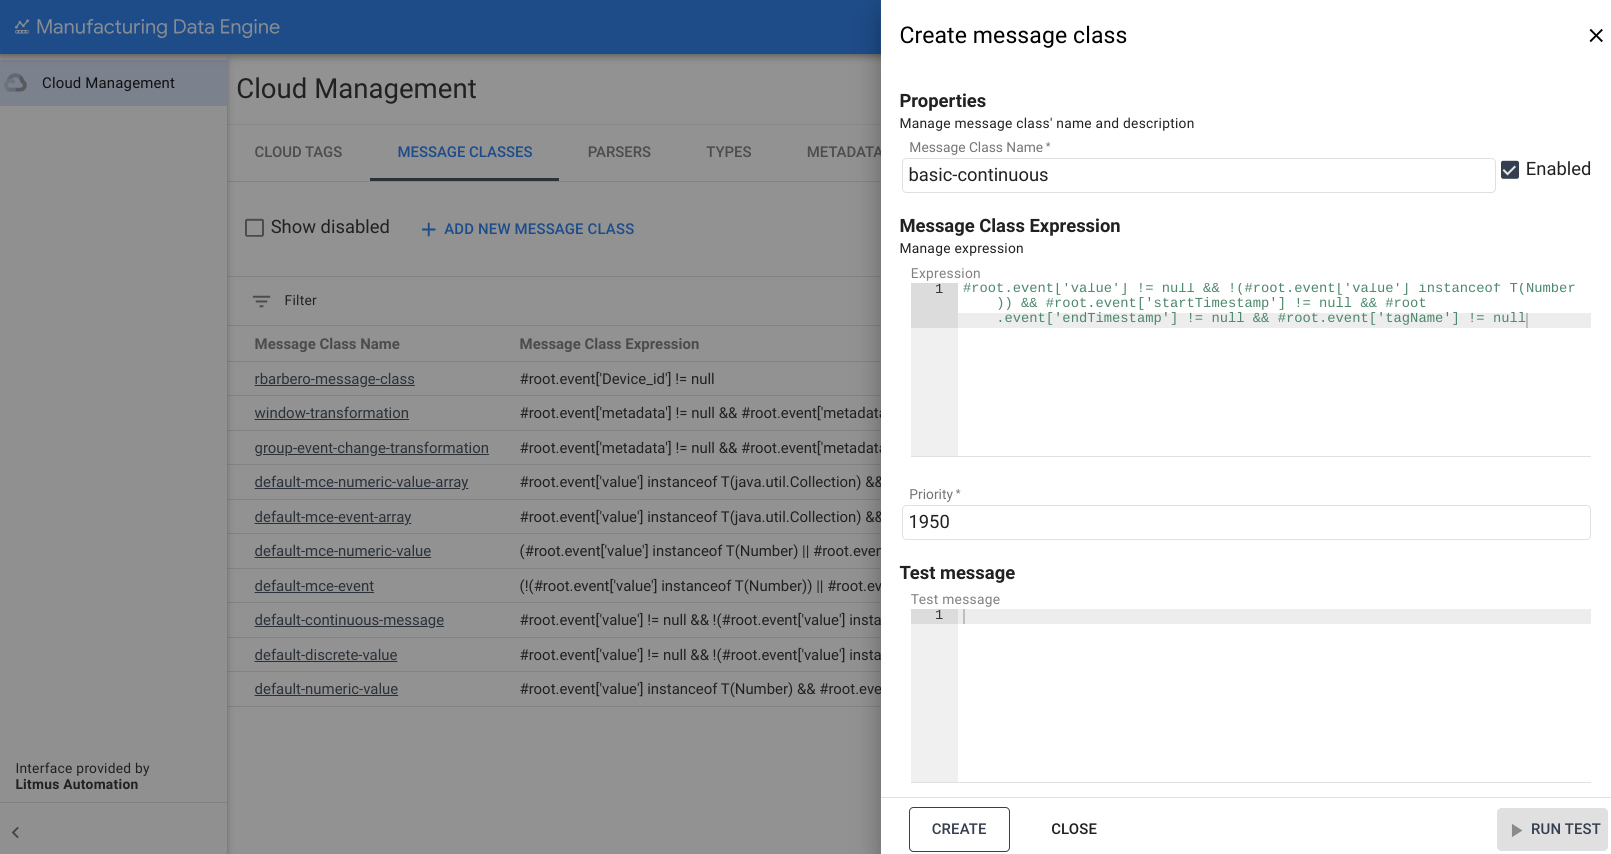
웹 인터페이스
메시지 클래스 이름: basic-continuous
- MDE 웹 인터페이스에서 메시지 클래스를 클릭합니다.
- 새 메시지 클래스 추가를 클릭합니다.
- 메시지 클래스 이름을
basic-continuous로 입력합니다. 다음 표현식을 복사하여 표현식 상자에 붙여넣습니다.
#root.event['value'] != null && !(#root.event['value'] instanceof T(Number)) && #root.event['startTimestamp'] != null && #root.event['endTimestamp'] != null && #root.event['tagName'] != null우선순위를
1950로 변경합니다.만들기를 클릭합니다.
유형
이 섹션에서는 MDE에서 사용할 수 있는 유형을 간략히 설명합니다.
numeric의 유형
다음은 basic-numeric 유형의 예시입니다.
REST
POST /configuration/v1/types
{
   "archetype": "NUMERIC_DATA_SERIES",
   "name": "basic-numeric"
}
웹 인터페이스
이름: basic-numeric
- MDE 웹 인터페이스에서 유형을 클릭합니다.
- 새 유형 추가를 클릭합니다.
- 유형 이름을
basic-numeric로 입력합니다. 아키타입 드롭다운에서
NUMERIC_DATA_SERIES을 선택합니다.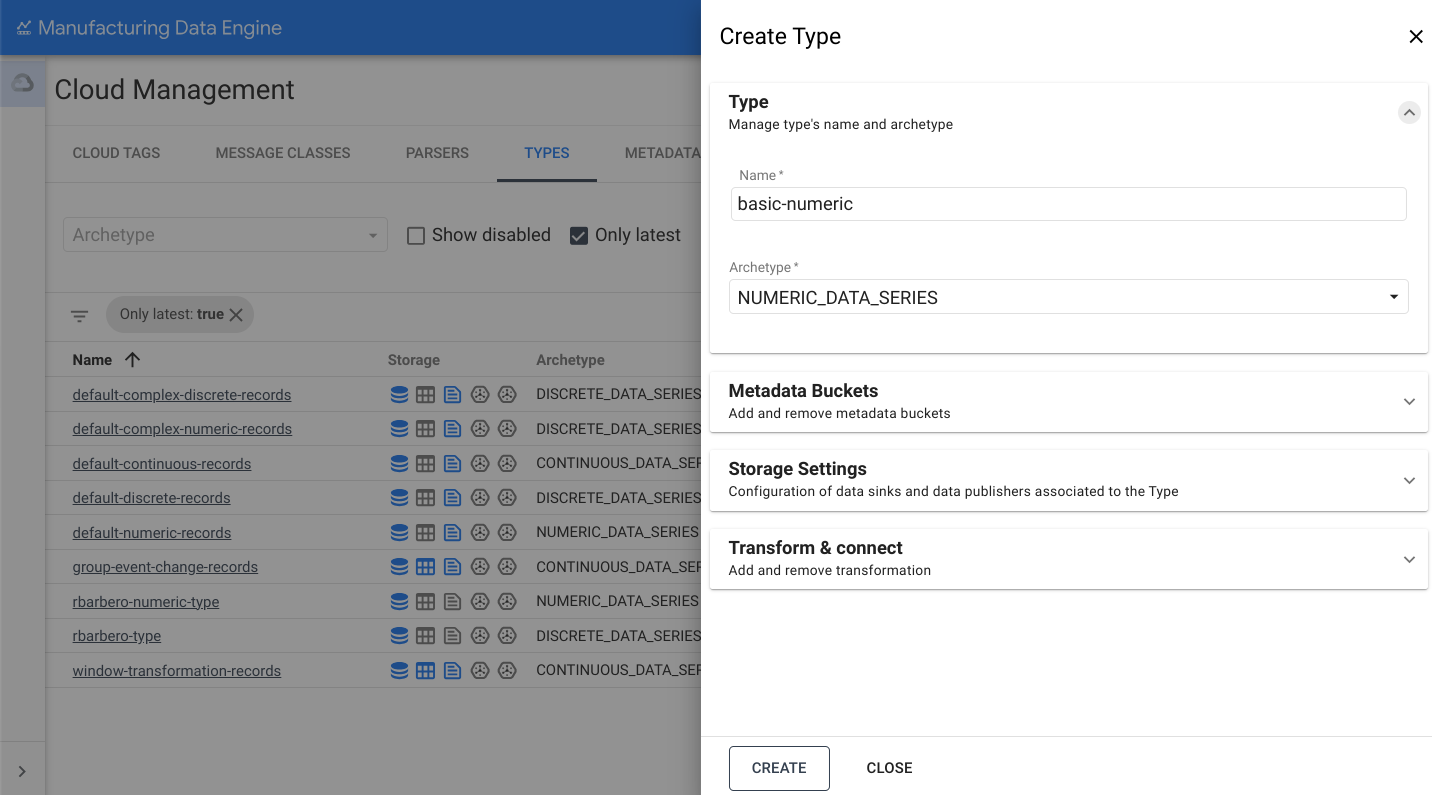
스토리지 설정 섹션을 엽니다.
BigQuery로 전송 옵션을 전환합니다.
만들기를 클릭합니다.
discrete의 유형
다음은 basic-discrete 유형의 예시입니다.
REST
POST /configuration/v1/types
{
   "archetype": "DISCRETE_DATA_SERIES",
   "name": "basic-discrete"
}
웹 인터페이스
이름: basic-discrete
- MDE 웹 인터페이스에서 유형을 클릭합니다.
- 새 유형 추가를 클릭합니다.
- 유형 이름을
basic-discrete로 입력합니다. 아키타입 드롭다운에서 `
DISCRETE_DATA_SERIES을 선택합니다.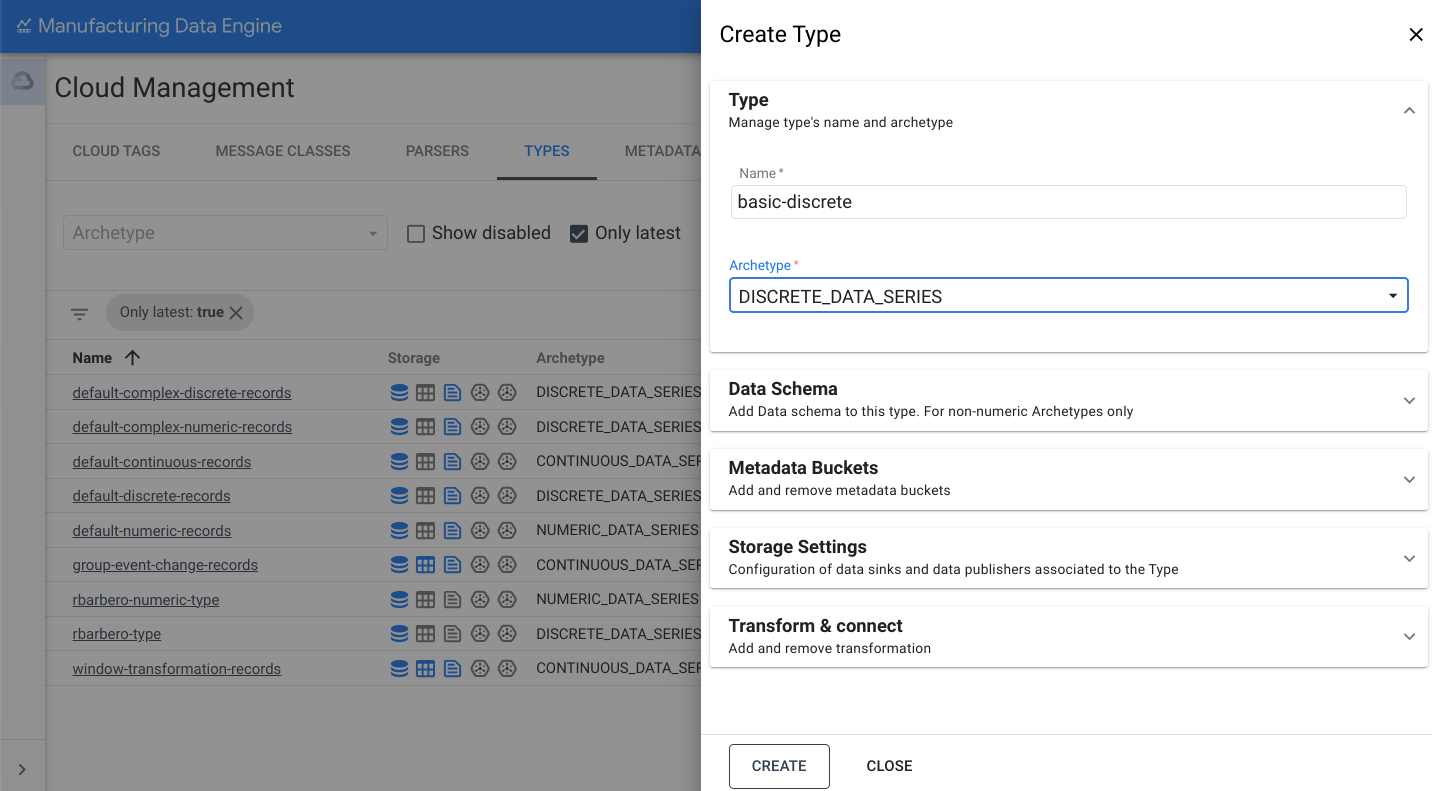
스토리지 설정 섹션을 엽니다.
BigQuery로 전송 옵션을 전환합니다.
만들기를 클릭합니다.
continuous의 유형
다음은 basic-continuous 유형의 예시입니다.
REST
POST /configuration/v1/types
{
   "archetype": "CONTINUOUS_DATA_SERIES",
   "name": "basic-continuous"
}
웹 인터페이스
이름: basic-continuous
- MDE 웹 인터페이스에서 유형을 클릭합니다.
- 새 유형 추가를 클릭합니다.
- 유형 이름을
basic-continuous로 입력합니다. 아키타입 드롭다운에서 `
CONTINUOUS_DATA_SERIES을 선택합니다.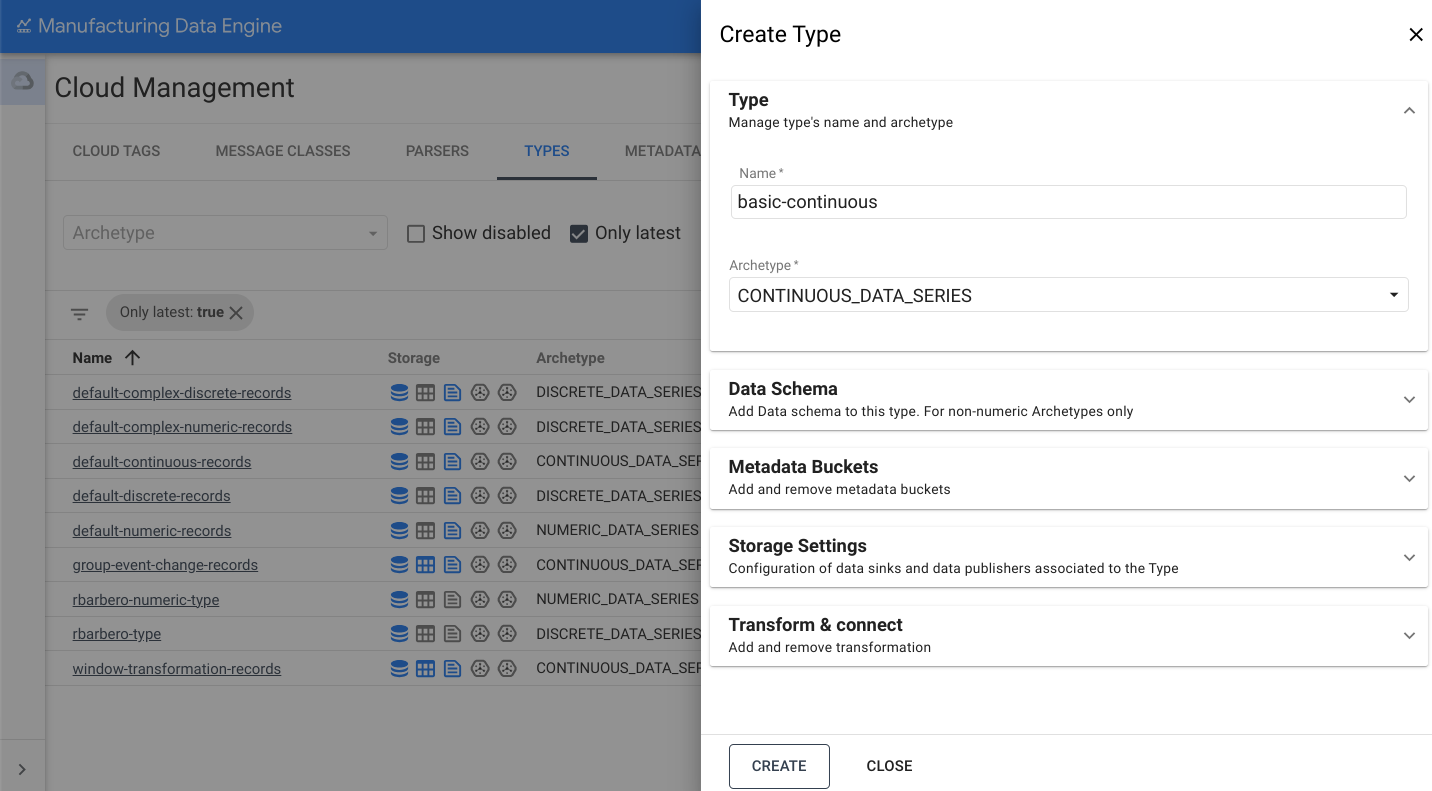
스토리지 설정 섹션을 엽니다.
BigQuery로 전송 옵션을 전환합니다.
만들기를 클릭합니다.
파서
이 섹션에서는 MDE에서 사용할 수 있는 다양한 파서에 대한 개요를 제공합니다. 파서를 만들기 전에 유형이 완전히 프로비저닝되고 active인지 확인하세요. 이 과정은 최대 3분 정도 걸릴 수 있습니다.
numeric 파서
다음은 basic-numeric 파서의 예시입니다.
REST
POST /configuration/v1/parsers
{
   "name": "basic-numeric-to-basic-numeric",
   "messageClassName": "basic-numeric",
   "typeReference": {
         "name": "basic-numeric",
         "version": 1
   },
   "script": "package mde\n\n[{\ntagName: $root.tagName;\ntimestamps: MapTimestamp($root);\ndata: MapData($root);\nembeddedMetadata: $root[where ($.field != \"value\" and $.field != \"tagName\" and $.field != \"timestamp\" and $.field != \"messageId\")];\n}]\n\ndef MapTimestamp(input) {\n    eventTimestamp: input.timestamp;\n}\n\ndef MapData(input) {\n    numeric: input.value;\n}"
}
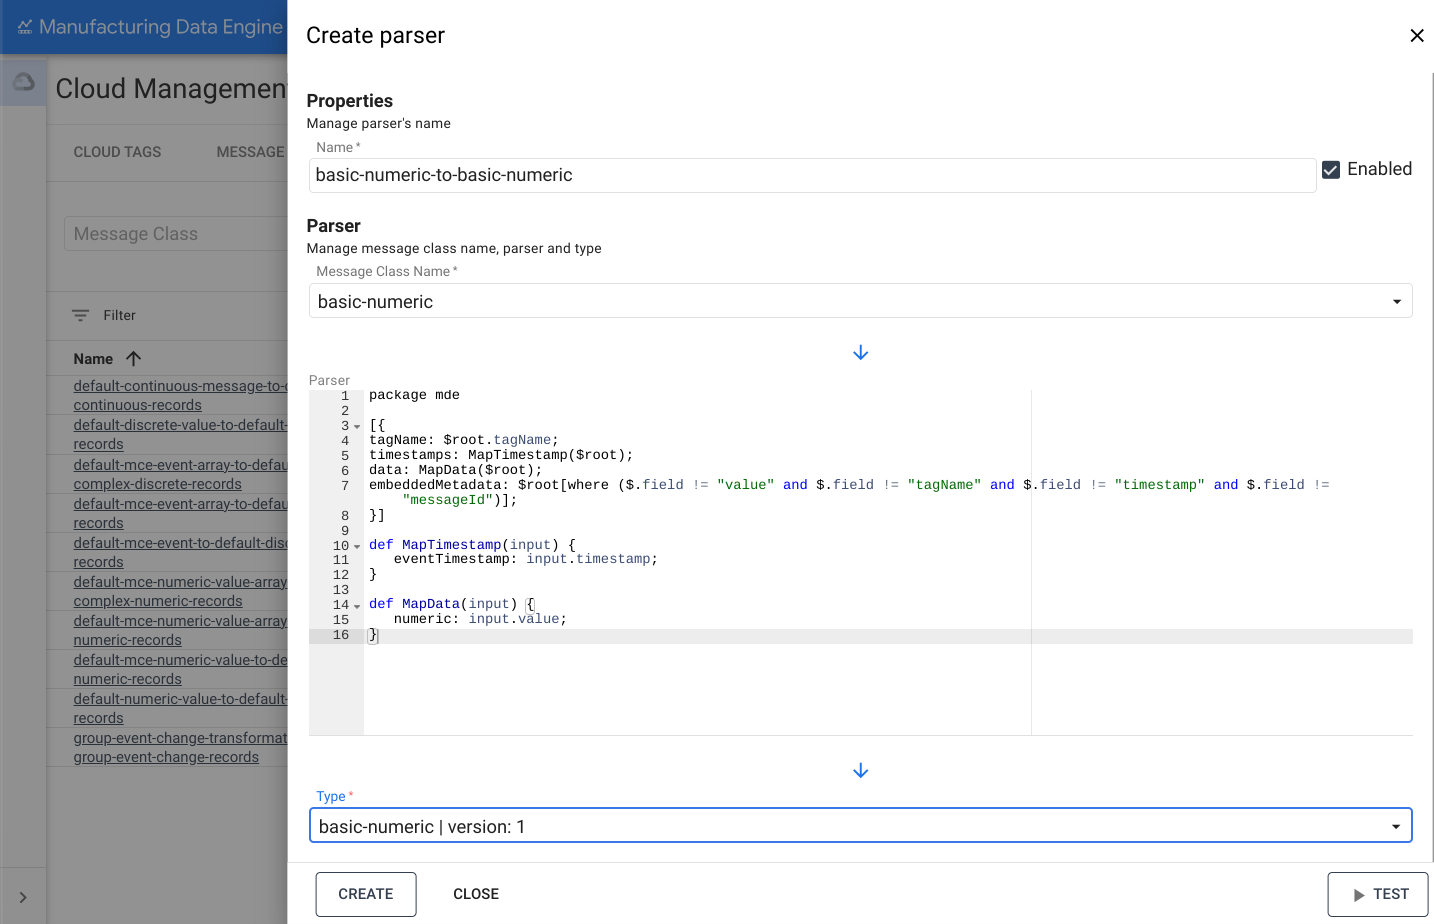
웹 인터페이스
이름: basic-numeric-to-basic-numeric
- MDE 웹 인터페이스에서 파서를 클릭합니다.
- 새 파서 추가를 클릭합니다.
- 파서 이름을
basic-numeric-to-basic-numeric로 입력합니다. - 메시지 클래스 이름 드롭다운에서
basic-numeric를 선택합니다. 다음 Whistle 코드를 복사하여 파서 상자에 붙여넣습니다.
 package mde

 [{
 tagName: $root.tagName;
 timestamps: MapTimestamp($root);
 data: MapData($root);
 embeddedMetadata: $root[where ($.field != "value" and $.field != "tagName" and $.field != "timestamp" and $.field != "messageId")];
 }]

 def MapTimestamp(input) {
    eventTimestamp: input.timestamp;
 }

 def MapData(input) {
    numeric: input.value;
 }
유형 드롭다운에서
basic-numeric | version: 1을 선택합니다.만들기를 클릭합니다.
discrete 파서
다음은 basic-discrete 파서의 예시입니다.
REST
POST /configuration/v1/parsers
{
   "name": "basic-discrete-to-basic-discrete",
   "messageClassName": "basic-discrete",
   "typeReference": {
         "name": "basic-discrete",
         "version": 1
   },
   "script": "package mde\n\n[{\ntagName: $root.tagName;\ntimestamps: MapTimestamp($root);\ndata: MapData($root);\nembeddedMetadata: $root[where ($.field != \"value\" and $.field != \"tagName\" and $.field != \"timestamp\" and $.field != \"messageId\")];\n}]\n\ndef MapTimestamp(input) {\n    eventTimestamp: input.timestamp;\n}\n\ndef MapData(input) {\n    complex: input.value;\n}\n"
}
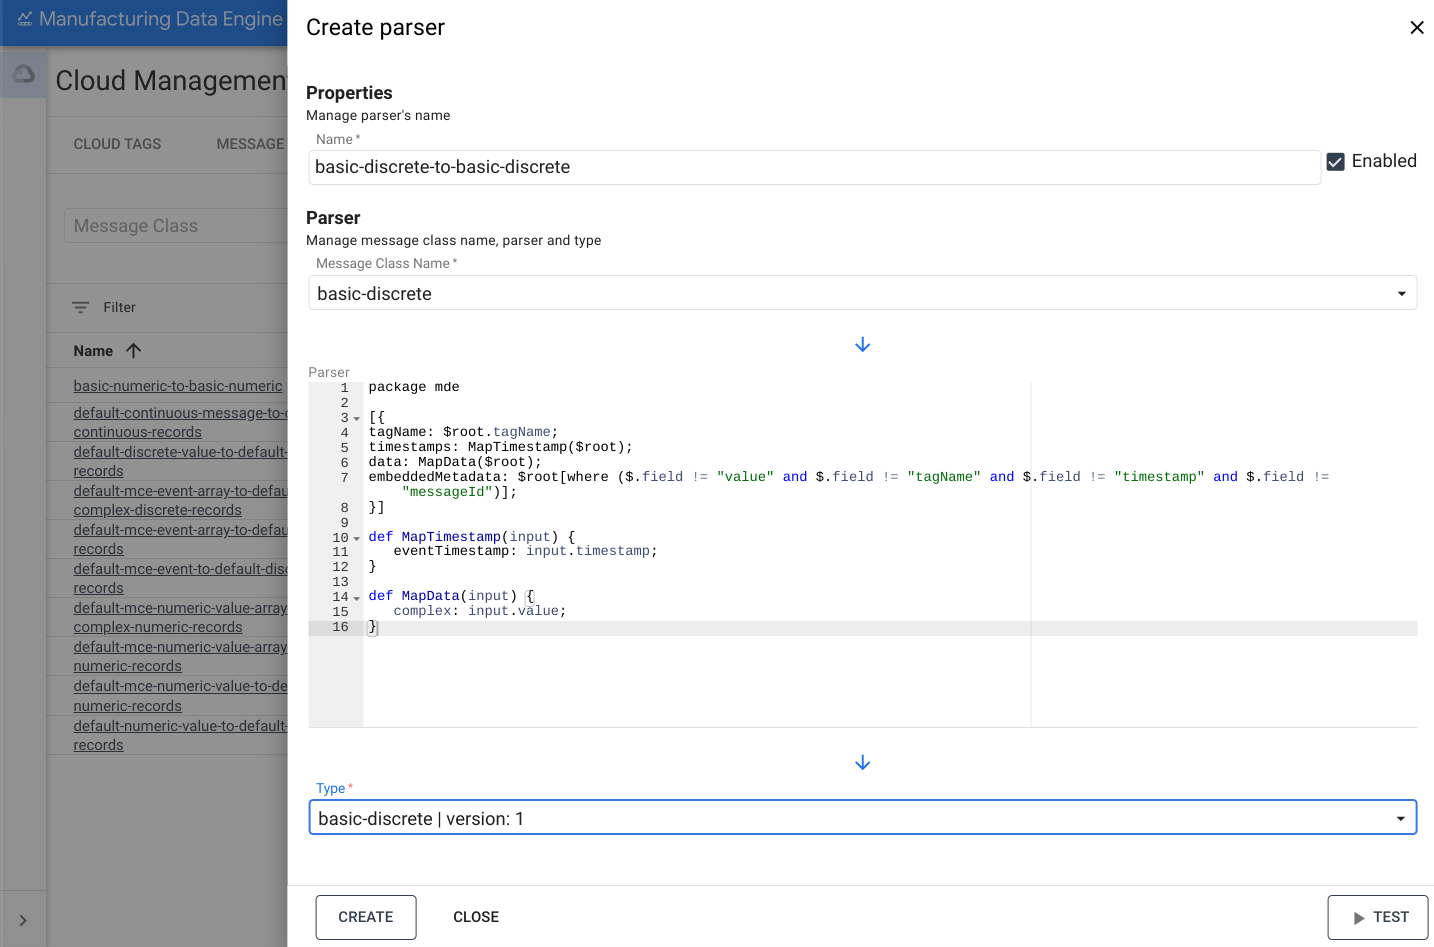
웹 인터페이스
이름: basic-discrete-to-basic-discrete
- MDE 웹 인터페이스에서 파서를 클릭합니다.
- 새 파서 추가를 클릭합니다.
- 파서 이름을
basic-numeric-to-basic-discrete로 입력합니다. - 메시지 클래스 이름 드롭다운에서
basic-discrete를 선택합니다. 다음 Whistle 코드를 복사하여 파서 상자에 붙여넣습니다.
 package mde

 [{
 tagName: $root.tagName;
 timestamps: MapTimestamp($root);
 data: MapData($root);
 embeddedMetadata: $root[where ($.field != "value" and $.field != "tagName" and $.field != "timestamp" and $.field != "messageId")];
 }]

 def MapTimestamp(input) {
    eventTimestamp: input.timestamp;
 }

 def MapData(input) {
    complex: input.value;
 }
유형 드롭다운에서
basic-discrete | version: 1을 선택합니다.만들기를 클릭합니다.
continuous 파서
다음은 basic-continuous 파서의 예시입니다.
REST
POST /configuration/v1/parsers
{
   "name": "basic-continuous-to-basic-continuous",
   "messageClassName": "basic-continuous",
   "typeReference": {
         "name": "basic-continuous",
         "version": 1
   },
   "script": "package mde\n\n[{\ntagName: $root.tagName;\ntimestamps: MapTimestamp($root);\ndata: MapData($root);\nduration: $root.duration;\nembeddedMetadata: $root[where ($.field != \"value\" and $.field != \"tagName\" and $.field != \"startTimestamp\" and $.field != \"endTimestamp\" and $.field != \"messageId\")];\n}]\n\ndef MapTimestamp(input) {\n    continuousTimestamp: {\n        eventTimestampStart: input.startTimestamp;\n        eventTimestampEnd: input.endTimestamp;\n    };\n}\n\ndef MapData(input) {\n    complex: input.value;\n}\n"
}
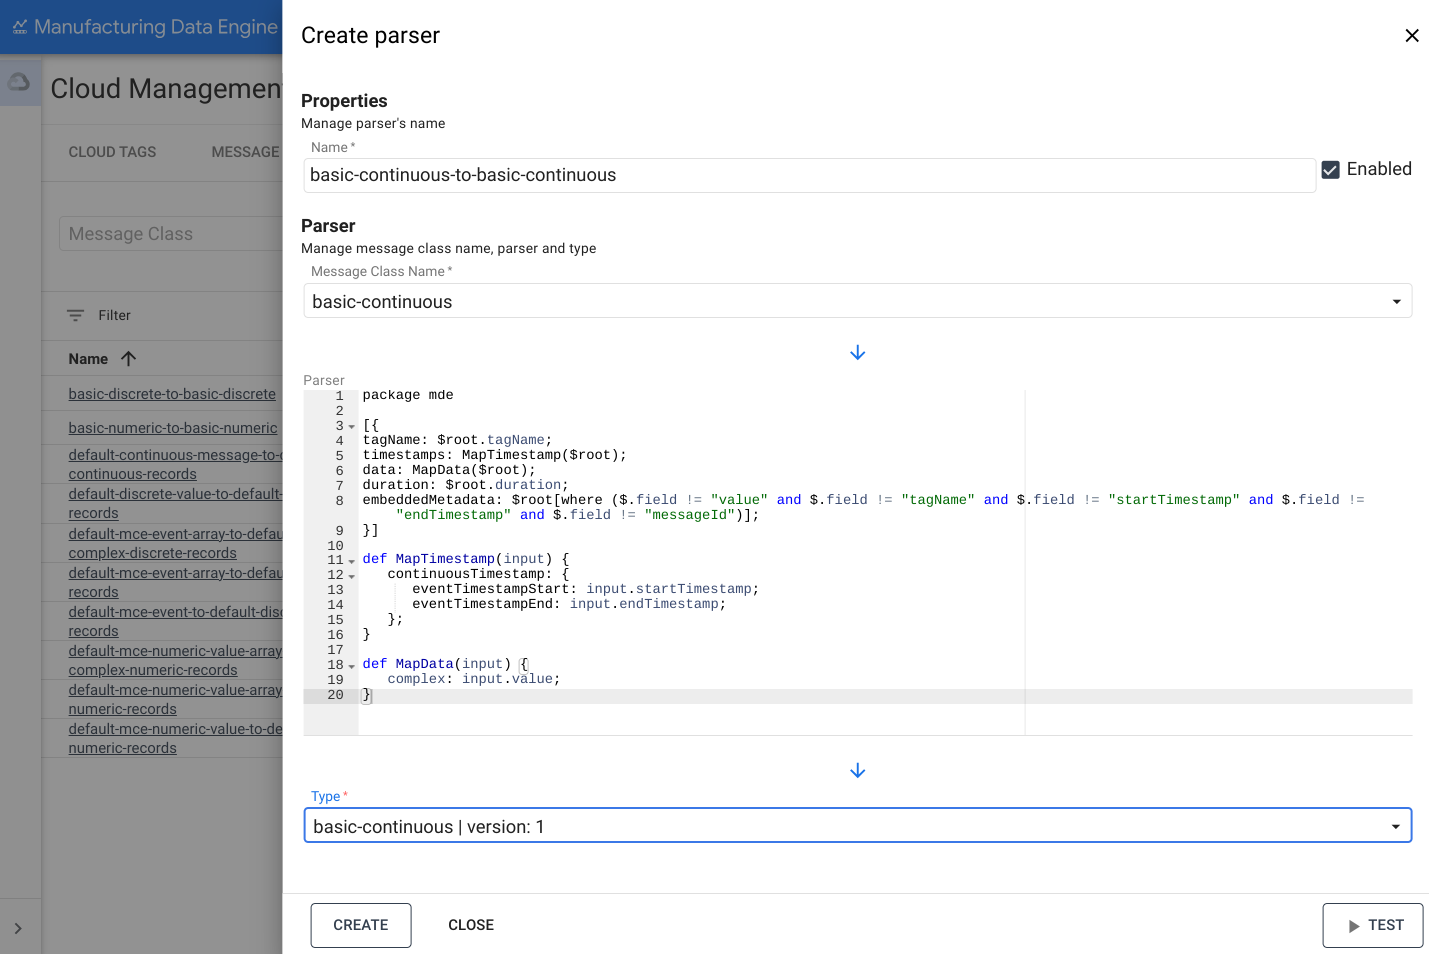
웹 인터페이스
이름: basic-continuous-to-basic-continuous
- MDE 웹 인터페이스에서 파서를 클릭합니다.
- 새 파서 추가를 클릭합니다.
- 파서 이름을
basic-numeric-to-basic-continuous로 입력합니다. - 메시지 클래스 이름 드롭다운에서
basic-continuous를 선택합니다. 다음 Whistle 코드를 복사하여 파서 상자에 붙여넣습니다.
 package mde

 [{
 tagName: $root.tagName;
 timestamps: MapTimestamp($root);
 data: MapData($root);
 duration: $root.duration;
 embeddedMetadata: $root[where ($.field != "value" and $.field != "tagName" and $.field != "startTimestamp" and $.field != "endTimestamp" and $.field != "messageId")];
 }]

 def MapTimestamp(input) {
    continuousTimestamp: {
       eventTimestampStart: input.startTimestamp;
       eventTimestampEnd: input.endTimestamp;
    };
 }

 def MapData(input) {
    complex: input.value;
 }
유형 드롭다운에서
basic-continuous | version: 1을 선택합니다.만들기를 클릭합니다.