

This tutorial shows you how to use Eventarc to build a processing pipeline that schedules queries to a public BigQuery dataset, generates charts based on the data, and shares links to the charts through email.
Objectives
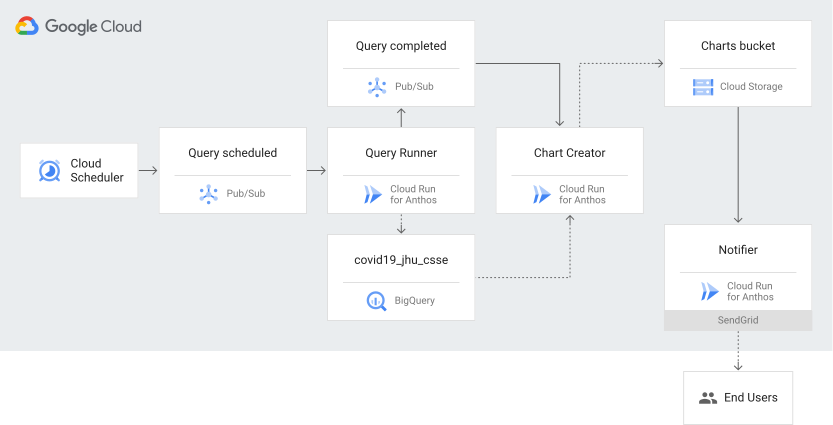
In this tutorial, you build and deploy three Google Kubernetes Engine (GKE) services running in a GKE cluster that receive events using Eventarc:
- Query runner—Triggered when Cloud Scheduler jobs publish a message to a Pub/Sub topic; this service uses the BigQuery API to retrieve data from a public COVID-19 dataset, and saves the results in a new BigQuery table.
- Chart creator—Triggered when the query runner service publishes a message to a Pub/Sub topic; this service generates charts using the Python plotting library, Matplotlib, and saves the charts to a Cloud Storage bucket.
- Notifier—Triggered by audit logs when the chart creator service stores a chart in a Cloud Storage bucket; this service uses the email service, SendGrid, to send links of the charts to an email address.
The following diagram shows the high-level architecture:
Costs
In this document, you use the following billable components of Google Cloud:
- Artifact Registry
- BigQuery
- Cloud Build
- Cloud Scheduler
- Cloud Storage
- Eventarc
- Google Kubernetes Engine
- Pub/Sub
To generate a cost estimate based on your projected usage,
use the pricing calculator.
Before you begin
- Sign in to your Google Cloud account. If you're new to Google Cloud, create an account to evaluate how our products perform in real-world scenarios. New customers also get $300 in free credits to run, test, and deploy workloads.
-
Install the Google Cloud CLI.
-
If you're using an external identity provider (IdP), you must first sign in to the gcloud CLI with your federated identity.
-
To initialize the gcloud CLI, run the following command:
gcloud init -
Create or select a Google Cloud project.
Roles required to select or create a project
- Select a project: Selecting a project doesn't require a specific IAM role—you can select any project that you've been granted a role on.
-
Create a project: To create a project, you need the Project Creator role
(
roles/resourcemanager.projectCreator), which contains theresourcemanager.projects.createpermission. Learn how to grant roles.
-
Create a Google Cloud project:
gcloud projects create PROJECT_ID
Replace
PROJECT_IDwith a name for the Google Cloud project you are creating. -
Select the Google Cloud project that you created:
gcloud config set project PROJECT_ID
Replace
PROJECT_IDwith your Google Cloud project name.
-
Verify that billing is enabled for your Google Cloud project.
Enable the Artifact Registry, BigQuery, Cloud Build, Cloud Logging, Cloud Scheduler, Eventarc, GKE, Pub/Sub, and Resource Manager APIs, if any are not already enabled:
Roles required to enable APIs
To enable APIs, you need the
serviceusage.services.enablepermission. If you created the project, then you likely already have this permission through the Owner role (roles/owner). Otherwise, you can get this permission through the Service Usage Admin role (roles/serviceusage.serviceUsageAdmin). Learn how to grant roles.gcloud services enable artifactregistry.googleapis.com
bigquery.googleapis.com cloudbuild.googleapis.com cloudresourcemanager.googleapis.com cloudscheduler.googleapis.com container.googleapis.com eventarc.googleapis.com pubsub.googleapis.com logging.googleapis.com -
Install the Google Cloud CLI.
-
If you're using an external identity provider (IdP), you must first sign in to the gcloud CLI with your federated identity.
-
To initialize the gcloud CLI, run the following command:
gcloud init -
Create or select a Google Cloud project.
Roles required to select or create a project
- Select a project: Selecting a project doesn't require a specific IAM role—you can select any project that you've been granted a role on.
-
Create a project: To create a project, you need the Project Creator role
(
roles/resourcemanager.projectCreator), which contains theresourcemanager.projects.createpermission. Learn how to grant roles.
-
Create a Google Cloud project:
gcloud projects create PROJECT_ID
Replace
PROJECT_IDwith a name for the Google Cloud project you are creating. -
Select the Google Cloud project that you created:
gcloud config set project PROJECT_ID
Replace
PROJECT_IDwith your Google Cloud project name.
-
Verify that billing is enabled for your Google Cloud project.
Enable the Artifact Registry, BigQuery, Cloud Build, Cloud Logging, Cloud Scheduler, Eventarc, GKE, Pub/Sub, and Resource Manager APIs, if any are not already enabled:
Roles required to enable APIs
To enable APIs, you need the
serviceusage.services.enablepermission. If you created the project, then you likely already have this permission through the Owner role (roles/owner). Otherwise, you can get this permission through the Service Usage Admin role (roles/serviceusage.serviceUsageAdmin). Learn how to grant roles.gcloud services enable artifactregistry.googleapis.com
bigquery.googleapis.com cloudbuild.googleapis.com cloudresourcemanager.googleapis.com cloudscheduler.googleapis.com container.googleapis.com eventarc.googleapis.com pubsub.googleapis.com logging.googleapis.com - For Cloud Storage, enable audit logging for the
ADMIN_READ,DATA_WRITE, andDATA_READdata access types.- Read the Identity and Access Management (IAM) policy associated with your
Google Cloud project, folder, or organization and store it in a temporary file:
gcloud projects get-iam-policy PROJECT_ID > /tmp/policy.yaml
- In a text editor, open
/tmp/policy.yaml, and add or change only the audit log configuration in theauditConfigssection:auditConfigs: - auditLogConfigs: - logType: ADMIN_READ - logType: DATA_WRITE - logType: DATA_READ service: storage.googleapis.com bindings: - members: [...] etag: BwW_bHKTV5U= version: 1
- Write your new IAM policy:
gcloud projects set-iam-policy PROJECT_ID /tmp/policy.yaml
If the preceding command reports a conflict with another change, then repeat these steps, starting with reading the IAM policy. For more information, see Configure Data Access audit logs with the API.
- Read the Identity and Access Management (IAM) policy associated with your
Google Cloud project, folder, or organization and store it in a temporary file:
- Set the defaults used in this tutorial:
CLUSTER_NAME=events-cluster
CLUSTER_LOCATION=us-central1
PROJECT_ID=PROJECT_ID
gcloud config set project $PROJECT_ID
gcloud config set eventarc/location $CLUSTER_LOCATION
Replace
PROJECT_IDwith your project ID.
Create a SendGrid API key
SendGrid is a cloud-based email provider that lets you send email without having to maintain email servers.
- Sign in to SendGrid and go to Settings > API Keys.
- Click Create API Key.
- Select the permissions for the key. At a minimum, the key must have Mail Send permissions to send email.
- Click Save to create the key.
- SendGrid generates a new key. This is the only copy of the key, so make sure that you copy the key and save it for later.
Create a GKE cluster
Create a cluster with Workload Identity Federation for GKE enabled so that it can access Google Cloud services from applications running within GKE. You also need Workload Identity Federation for GKE to forward events using Eventarc.
Create a GKE cluster with the
HttpLoadBalancingandHorizontalPodAutoscalingadd-ons enabled:gcloud container clusters create $CLUSTER_NAME \ --addons=HttpLoadBalancing,HorizontalPodAutoscaling \ --machine-type=n1-standard-4 \ --enable-autoscaling --min-nodes=2 --max-nodes=10 \ --no-issue-client-certificate --num-nodes=2 \ --logging=SYSTEM,WORKLOAD \ --monitoring=SYSTEM \ --scopes=cloud-platform,logging-write,monitoring-write,pubsub \ --region=$CLUSTER_LOCATION \ --release-channel=rapid \ --workload-pool=$PROJECT_ID.svc.id.googWait a few minutes for the cluster creation to complete. During the process, you might see warnings that you can safely ignore. When the cluster has been created, the output is similar to the following:
Creating cluster ...done.
Created [https://container.googleapis.com/v1/projects/my-project/zones/us-central1/clusters/events-cluster].
Update the
kubeconfigfile with credentials and endpoint information to pointkubectlat the GKE cluster:gcloud container clusters get-credentials $CLUSTER_NAME \ --region=$CLUSTER_LOCATION
Create an Artifact Registry standard repository to store your Docker container image:
gcloud artifacts repositories create REPOSITORY \
    --repository-format=docker \
    --location=$CLUSTER_LOCATION
Replace
REPOSITORYwith a unique name for the repository.
Configure the service accounts
To allow the GKE nodes to pull container images from Artifact Registry, grant the Artifact Registry Reader (
roles/artifactregistry.reader) role on the project to the Compute Engine default service account used by the cluster nodes:PROJECT_NUMBER="$(gcloud projects describe $(gcloud config get-value project) --format='value(projectNumber)')" gcloud projects add-iam-policy-binding $PROJECT_ID \ --member "serviceAccount:$PROJECT_NUMBER-compute@developer.gserviceaccount.com" \ --condition=None \ --role "roles/artifactregistry.reader"
To allow the GKE services to query and write to BigQuery, publish to Pub/Sub, and upload charts to Cloud Storage, grant the BigQuery Data Editor (
roles/bigquery.dataEditor), BigQuery Job User (roles/bigquery.jobUser), Pub/Sub Publisher (roles/pubsub.publisher), and Storage Object Admin (roles/storage.objectAdmin) roles on the project to thedefaultKubernetes ServiceAccount in thedefaultnamespace:gcloud projects add-iam-policy-binding $PROJECT_ID \ --member "principal://iam.googleapis.com/projects/$PROJECT_NUMBER/locations/global/workloadIdentityPools/$PROJECT_ID.svc.id.goog/subject/ns/default/sa/default" \ --condition=None \ --role "roles/bigquery.dataEditor" gcloud projects add-iam-policy-binding $PROJECT_ID \ --member "principal://iam.googleapis.com/projects/$PROJECT_NUMBER/locations/global/workloadIdentityPools/$PROJECT_ID.svc.id.goog/subject/ns/default/sa/default" \ --condition=None \ --role "roles/bigquery.jobUser" gcloud projects add-iam-policy-binding $PROJECT_ID \ --member "principal://iam.googleapis.com/projects/$PROJECT_NUMBER/locations/global/workloadIdentityPools/$PROJECT_ID.svc.id.goog/subject/ns/default/sa/default" \ --condition=None \ --role "roles/pubsub.publisher" gcloud projects add-iam-policy-binding $PROJECT_ID \ --member "principal://iam.googleapis.com/projects/$PROJECT_NUMBER/locations/global/workloadIdentityPools/$PROJECT_ID.svc.id.goog/subject/ns/default/sa/default" \ --condition=None \ --role "roles/storage.objectAdmin"
Enable GKE destinations
To allow Eventarc to manage resources in the GKE cluster, enable GKE destinations and bind the Eventarc service account with the required roles.
Enable GKE destinations for Eventarc:
gcloud eventarc gke-destinations init
At the prompt to bind the required roles, enter
y.The following roles are bound:
roles/compute.viewerroles/container.developerroles/iam.serviceAccountAdmin
Create a Cloud Storage bucket
Create a Cloud Storage bucket in the same region as your
GKE service to save the charts, and grant your account read
access (roles/storage.objectViewer) to view the generated charts:
export BUCKET="$(gcloud config get-value core/project)-charts"
gcloud storage buckets create gs://${BUCKET} --location=$CLUSTER_LOCATION
gcloud storage buckets update gs://${BUCKET} --uniform-bucket-level-access
gcloud storage buckets add-iam-policy-binding gs://${BUCKET} \
    --member="user:$(gcloud config get-value core/account)" \
    --role=roles/storage.objectViewer
Clone the repository
Clone the GitHub repository.
git clone https://github.com/GoogleCloudPlatform/eventarc-samples
cd eventarc-samples/processing-pipelines
Create a service account and bind access roles
Before creating the Eventarc triggers, set up a user-managed service account and grant it specific roles so that Eventarc can forward Pub/Sub events.
Create a service account called
eventarc-triggers-test-sa:TRIGGER_GSA=eventarc-triggers-test-sa gcloud iam service-accounts create $TRIGGER_GSA
Grant the
pubsub.subscriber,monitoring.metricWriter, andeventarc.eventReceiverroles to the service account:PROJECT_ID=$(gcloud config get-value project) gcloud projects add-iam-policy-binding $PROJECT_ID \ --member "serviceAccount:$TRIGGER_GSA@$PROJECT_ID.iam.gserviceaccount.com" \ --condition=None \ --role "roles/pubsub.subscriber" gcloud projects add-iam-policy-binding $PROJECT_ID \ --member "serviceAccount:$TRIGGER_GSA@$PROJECT_ID.iam.gserviceaccount.com" \ --condition=None \ --role "roles/monitoring.metricWriter" gcloud projects add-iam-policy-binding $PROJECT_ID \ --member "serviceAccount:$TRIGGER_GSA@$PROJECT_ID.iam.gserviceaccount.com" \ --condition=None \ --role "roles/eventarc.eventReceiver"
Deploy the notifier service
From the bigquery/notifier/python directory, deploy a
GKE service that receives chart creator events and
uses SendGrid to email links to the generated charts.
Build and push the container image:
pushd bigquery/notifier/python
export SERVICE_NAME=notifier
docker build -t $CLUSTER_LOCATION-docker.pkg.dev/$(gcloud config get-value project)/REPOSITORY/${SERVICE_NAME}:v1 .
docker push $CLUSTER_LOCATION-docker.pkg.dev/$(gcloud config get-value project)/REPOSITORY/${SERVICE_NAME}:v1
popd
Create a Kubernetes deployment for the container image and set the required environment variables, including an address to send emails to and the SendGrid API key:
export TO_EMAILS=EMAIL_ADDRESS
export SENDGRID_API_KEY=YOUR_SENDGRID_API_KEY
kubectl create deployment ${SERVICE_NAME} \
    --image=$CLUSTER_LOCATION-docker.pkg.dev/$(gcloud config get-value project)/REPOSITORY/${SERVICE_NAME}:v1
kubectl set env deployment/${SERVICE_NAME} \
    TO_EMAILS=${TO_EMAILS} \
    SENDGRID_API_KEY=${SENDGRID_API_KEY} \
    BUCKET=${BUCKET}
Replace the following:
EMAIL_ADDRESS: an email address to send the links to the generated chartsYOUR_SENDGRID_API_KEY: the SendGrid API key you noted previouslyREPOSITORY: the name of your Artifact Registry repository
Expose the deployment as a Kubernetes service:
kubectl expose deployment ${SERVICE_NAME} \
    --type=ClusterIP --port=80 --target-port=8080
Create a trigger for the notifier service
Create an Eventarc trigger for the notifier service deployed on
GKE that filters for Cloud Storage audit logs for the
specified Cloud Storage bucket and where the methodName is
storage.objects.create:
gcloud eventarc triggers create trigger-${SERVICE_NAME}-gke \
      --destination-gke-cluster=$CLUSTER_NAME \
      --destination-gke-location=$CLUSTER_LOCATION \
      --destination-gke-namespace=default \
      --destination-gke-service=$SERVICE_NAME \
      --destination-gke-path=/ \
      --event-filters="type=google.cloud.audit.log.v1.written" \
      --event-filters="serviceName=storage.googleapis.com" \
      --event-filters="methodName=storage.objects.create" \
      --event-filters-path-pattern="resourceName=/projects/_/buckets/$BUCKET/objects/*" \
      --service-account=$TRIGGER_GSA@$PROJECT_ID.iam.gserviceaccount.com
This creates a trigger called trigger-notifier-gke.
Deploy the chart creator service
From the bigquery/chart-creator/python directory, deploy a GKE
service that receives query runner events, retrieves data from a BigQuery
table for a specific country, and then generates a chart, using Matplotlib, from
the data. The chart is uploaded to a Cloud Storage bucket.
Build and push the container image:
pushd bigquery/chart-creator/python
export SERVICE_NAME=chart-creator
docker build -t $CLUSTER_LOCATION-docker.pkg.dev/$(gcloud config get-value project)/REPOSITORY/${SERVICE_NAME}:v1 .
docker push $CLUSTER_LOCATION-docker.pkg.dev/$(gcloud config get-value project)/REPOSITORY/${SERVICE_NAME}:v1
popd
Create a Kubernetes deployment for the container image and set the
BUCKETenvironment variable:kubectl create deployment ${SERVICE_NAME} \ --image=$CLUSTER_LOCATION-docker.pkg.dev/$(gcloud config get-value project)/REPOSITORY/${SERVICE_NAME}:v1 kubectl set env deployment/${SERVICE_NAME} \ BUCKET=${BUCKET}
Expose the deployment as a Kubernetes service:
kubectl expose deployment ${SERVICE_NAME} \
    --type=ClusterIP --port=80 --target-port=8080
Create a trigger for the chart creator service
Create an Eventarc trigger for the chart creator service deployed on GKE that filters for messages published to a Pub/Sub topic.
Create the trigger:
gcloud eventarc triggers create trigger-${SERVICE_NAME}-gke \
    --destination-gke-cluster=$CLUSTER_NAME \
    --destination-gke-location=$CLUSTER_LOCATION \
    --destination-gke-namespace=default \
    --destination-gke-service=$SERVICE_NAME \
    --destination-gke-path=/ \
    --event-filters="type=google.cloud.pubsub.topic.v1.messagePublished" \
    --service-account=$TRIGGER_GSA@$PROJECT_ID.iam.gserviceaccount.com
This creates a trigger called
trigger-chart-creator-gke.Set the Pub/Sub topic environment variable.
export TOPIC_QUERY_COMPLETED=$(basename $(gcloud eventarc triggers describe trigger-${SERVICE_NAME}-gke --format='value(transport.pubsub.topic)'))
Deploy the query runner service
From the processing-pipelines directory, deploy a GKE
service that receives Cloud Scheduler events, retrieves data from a
public COVID-19 dataset, and saves the results in a new BigQuery
table.
Build and push the container image:
export SERVICE_NAME=query-runner
docker build -t $CLUSTER_LOCATION-docker.pkg.dev/$(gcloud config get-value project)/REPOSITORY/${SERVICE_NAME}:v1 -f Dockerfile .
docker push $CLUSTER_LOCATION-docker.pkg.dev/$(gcloud config get-value project)/REPOSITORY/${SERVICE_NAME}:v1
Create a Kubernetes deployment for the container image and set the
PROJECT_IDandTOPIC_IDenvironment variables:kubectl create deployment ${SERVICE_NAME} \ --image=$CLUSTER_LOCATION-docker.pkg.dev/$(gcloud config get-value project)/REPOSITORY/${SERVICE_NAME}:v1 kubectl set env deployment/${SERVICE_NAME} \ PROJECT_ID=$(gcloud config get-value project) \ TOPIC_ID=${TOPIC_QUERY_COMPLETED}
Expose the deployment as a Kubernetes service:
kubectl expose deployment ${SERVICE_NAME} \
    --type=ClusterIP --port=80 --target-port=8080
Create a trigger for the query runner service
Create an Eventarc trigger for the query runner service deployed on GKE that filters for messages published to a Pub/Sub topic.
Create the trigger:
gcloud eventarc triggers create trigger-${SERVICE_NAME}-gke \
    --destination-gke-cluster=$CLUSTER_NAME \
    --destination-gke-location=$CLUSTER_LOCATION \
    --destination-gke-namespace=default \
    --destination-gke-service=$SERVICE_NAME \
    --destination-gke-path=/ \
    --event-filters="type=google.cloud.pubsub.topic.v1.messagePublished" \
    --service-account=$TRIGGER_GSA@$PROJECT_ID.iam.gserviceaccount.com
This creates a trigger called
trigger-query-runner-gke.Set an environment variable for the Pub/Sub topic.
export TOPIC_QUERY_SCHEDULED=$(basename $(gcloud eventarc triggers describe trigger-${SERVICE_NAME}-gke --format='value(transport.pubsub.topic)'))
Schedule the jobs
The processing pipeline is triggered by two Cloud Scheduler jobs. Create two Cloud Scheduler jobs that publish to a Pub/Sub topic once per day:
gcloud scheduler jobs create pubsub cre-scheduler-uk \
      --location=$CLUSTER_LOCATION \
      --schedule="0 16 * * *" \
      --topic=${TOPIC_QUERY_SCHEDULED} \
      --message-body="United Kingdom"
gcloud scheduler jobs create pubsub cre-scheduler-cy \
      --location=$CLUSTER_LOCATION \
      --schedule="0 17 * * *" \
      --topic=${TOPIC_QUERY_SCHEDULED} \
      --message-body="Cyprus"
The schedule is specified in unix-cron format.
For example, 0 16 * * * means that the jobs runs at 16:00 (4 PM) UTC every
day.
Run the pipeline
Confirm that all the triggers were successfully created:
gcloud eventarc triggers list
The output should be similar to the following:
NAME                       TYPE                                            DESTINATION         ACTIVE  LOCATION
trigger-chart-creator-gke  google.cloud.pubsub.topic.v1.messagePublished   GKE:chart-creator   Yes     us-central1
trigger-notifier-gke       google.cloud.audit.log.v1.written               GKE:notifier        Yes     us-central1
trigger-query-runner-gke   google.cloud.pubsub.topic.v1.messagePublished   GKE:query-runner    Yes     us-central1
Retrieve the Cloud Scheduler job IDs:
gcloud scheduler jobs list --location=$CLUSTER_LOCATION
The output should be similar to the following:
ID                LOCATION      SCHEDULE (TZ)         TARGET_TYPE  STATE
cre-scheduler-cy  us-central1   0 17 * * * (Etc/UTC)  Pub/Sub      ENABLED
cre-scheduler-uk  us-central1   0 16 * * * (Etc/UTC)  Pub/Sub      ENABLED
Although the jobs are scheduled to run daily at 4 and 5 PM, you can also run the Cloud Scheduler jobs manually:
gcloud scheduler jobs run cre-scheduler-cy --location=$CLUSTER_LOCATION
gcloud scheduler jobs run cre-scheduler-uk --location=$CLUSTER_LOCATION
After a few minutes, confirm that there are two charts in the Cloud Storage bucket:
gcloud storage ls gs://${BUCKET}
The output should be similar to the following:
gs://PROJECT_ID-charts/chart-cyprus.png
gs://PROJECT_ID-charts/chart-unitedkingdom.png
Congratulations! You should also receive two emails with links to the charts.
Clean up
If you created a new project for this tutorial, delete the project. If you used an existing project and want to keep it without the changes added in this tutorial, delete the resources created for the tutorial.
Delete a Google Cloud project:
gcloud projects delete PROJECT_ID
Delete tutorial resources
Delete the Kubernetes services and deployments that you deployed in this tutorial, and delete the GKE cluster:
kubectl delete service notifier chart-creator query-runner
kubectl delete deployment notifier chart-creator query-runner
gcloud container clusters delete $CLUSTER_NAME --region=$CLUSTER_LOCATION
Delete any Eventarc triggers you created in this tutorial:
gcloud eventarc triggers delete TRIGGER_NAME
Replace
TRIGGER_NAMEwith the name of your trigger.Delete the images from Artifact Registry:
gcloud artifacts docker images delete $CLUSTER_LOCATION-docker.pkg.dev/$(gcloud config get-value project)/REPOSITORY/notifier:v1
gcloud artifacts docker images delete $CLUSTER_LOCATION-docker.pkg.dev/$(gcloud config get-value project)/REPOSITORY/chart-creator:v1
gcloud artifacts docker images delete $CLUSTER_LOCATION-docker.pkg.dev/$(gcloud config get-value project)/REPOSITORY/query-runner:v1
Delete the Artifact Registry repository:
gcloud artifacts repositories delete REPOSITORY \
    --location=$CLUSTER_LOCATION
Delete the bucket, along with all the objects within the bucket:
gcloud storage rm --recursive gs://${BUCKET}/Delete the Cloud Scheduler jobs:
gcloud scheduler jobs delete cre-scheduler-cy --location=$CLUSTER_LOCATION
gcloud scheduler jobs delete cre-scheduler-uk --location=$CLUSTER_LOCATION
Remove any Google Cloud CLI default configurations you added during the tutorial setup:
gcloud config unset project
gcloud config unset eventarc/location