
Tutorial ini menunjukkan cara men-deploy layanan gRPC contoh sederhana dengan Extensible Service Proxy V2 (ESPv2) dalam container Docker di Compute Engine.
Tutorial ini menggunakan contoh
bookstore-grpc
versi Python. Lihat bagian Langkah berikutnya untuk contoh gRPC dalam bahasa lain.
Untuk ringkasan Cloud Endpoints, lihat Tentang Endpoints dan Arsitektur Endpoints.
Tujuan
Gunakan daftar tugas tingkat tinggi berikut saat Anda mengerjakan tutorial ini. Semua tugas diperlukan agar berhasil mengirim permintaan ke API.
- Siapkan Google Cloud project, dan download software yang diperlukan. Lihat Sebelum memulai.
- Membuat instance VM Compute Engine. Lihat Membuat instance Compute Engine.
- Salin dan konfigurasi file dari contoh
bookstore-grpc. Lihat Mengonfigurasi Endpoint. - Deploy konfigurasi Endpoints untuk membuat layanan Endpoints. Lihat Men-deploy konfigurasi Endpoints.
- Deploy API dan ESPv2 di VM Compute Engine. Lihat Men-deploy backend API.
- Kirim permintaan ke API. Lihat Mengirim permintaan ke API.
- Hindari timbulnya biaya pada akun Google Cloud Anda. Lihat Pembersihan.
Biaya
Dalam dokumen ini, Anda akan menggunakan komponen Google Cloudyang dapat ditagih berikut:
Untuk membuat perkiraan biaya berdasarkan proyeksi penggunaan Anda,
gunakan kalkulator harga.
Setelah menyelesaikan tugas yang dijelaskan dalam dokumen ini, Anda dapat menghindari penagihan berkelanjutan dengan menghapus resource yang Anda buat. Untuk mengetahui informasi selengkapnya, baca bagian Pembersihan.
Sebelum memulai
- Login ke akun Google Cloud Anda. Jika Anda baru menggunakan Google Cloud, buat akun untuk mengevaluasi performa produk kami dalam skenario dunia nyata. Pelanggan baru juga mendapatkan kredit gratis senilai $300 untuk menjalankan, menguji, dan men-deploy workload.
-
In the Google Cloud console, on the project selector page, select or create a Google Cloud project.
Roles required to select or create a project
- Select a project: Selecting a project doesn't require a specific IAM role—you can select any project that you've been granted a role on.
-
Create a project: To create a project, you need the Project Creator role
(
roles/resourcemanager.projectCreator), which contains theresourcemanager.projects.createpermission. Learn how to grant roles.
-
Verify that billing is enabled for your Google Cloud project.
-
In the Google Cloud console, on the project selector page, select or create a Google Cloud project.
Roles required to select or create a project
- Select a project: Selecting a project doesn't require a specific IAM role—you can select any project that you've been granted a role on.
-
Create a project: To create a project, you need the Project Creator role
(
roles/resourcemanager.projectCreator), which contains theresourcemanager.projects.createpermission. Learn how to grant roles.
-
Verify that billing is enabled for your Google Cloud project.
- Catat project ID karena akan diperlukan nanti.
- Instal dan lakukan inisialisasi Google Cloud CLI.
- Update gcloud CLI dan instal komponen Endpoints:
gcloud components update
-
Pastikan Google Cloud CLI (
gcloud) diizinkan untuk mengakses data dan layanan Anda di Google Cloud:gcloud auth login
-
Tetapkan project default ke project ID Anda.
gcloud config set project YOUR_PROJECT_ID
Ganti YOUR_PROJECT_ID dengan project ID Anda. Jika Anda memiliki project Google Cloud lain, dan Anda ingin menggunakan
gclouduntuk mengelolanya, lihat Mengelola Konfigurasi gcloud CLI. - Ikuti langkah-langkah di Panduan memulai gRPC Python untuk menginstal gRPC dan alat gRPC.
Setelah menyelesaikan tugas yang dijelaskan dalam dokumen ini, Anda dapat menghindari penagihan berkelanjutan dengan menghapus resource yang Anda buat. Untuk mengetahui informasi selengkapnya, lihat Pembersihan.
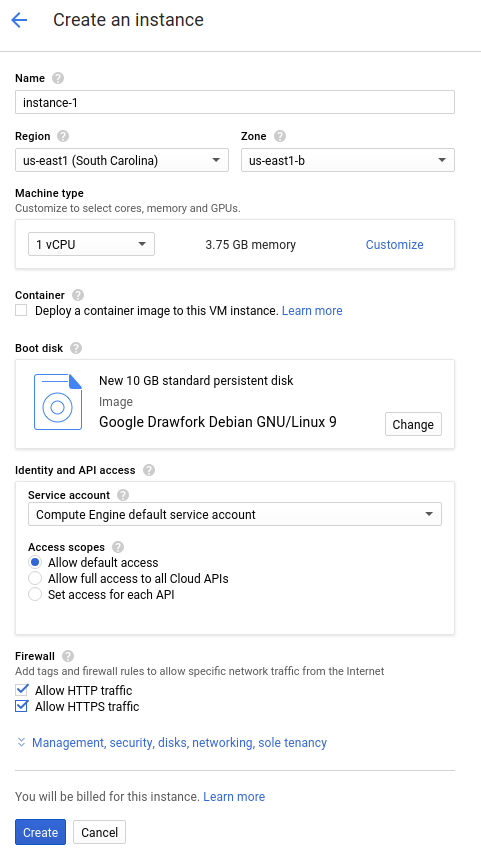
Membuat instance Compute Engine
Untuk membuat instance Compute Engine:
- Di konsol Google Cloud , buka halaman Buat instance.
- Klik Pilih.
- Di bagian Firewall, pilih Izinkan traffic HTTP dan Izinkan traffic HTTPS.
- Untuk membuat VM, klik Create.
- Pastikan Anda dapat terhubung ke instance VM.
- Di daftar instance virtual machine, klik SSH di baris instance yang ingin Anda hubungkan.
- Sekarang Anda dapat menggunakan terminal untuk menjalankan perintah Linux di instance Debian.
- Masukkan
exituntuk memutuskan koneksi dari instance.
- Catat nama instance, zona, dan alamat IP eksternal karena akan diperlukan nanti.
Tunggu hingga instance memulai. Setelah siap, instance akan dicantumkan di halaman VM Instances dengan ikon status hijau.
Mengonfigurasi Endpoint
Clone repositori contoh bookstore-grpc dari GitHub.
Untuk mengonfigurasi Endpoints:
- Buat file deskriptor protobuf mandiri dari file
.protolayanan Anda:- Simpan salinan
bookstore.protodari repositori contoh. File ini menentukan API layanan Bookstore. - Buat direktori berikut:
mkdir generated_pb2 - Buat file deskriptor,
api_descriptor.pb, menggunakan compiler buffer protokolprotoc. Jalankan perintah berikut di direktori tempat Anda menyimpanbookstore.proto:python -m grpc_tools.protoc \ --include_imports \ --include_source_info \ --proto_path=. \ --descriptor_set_out=api_descriptor.pb \ --python_out=generated_pb2 \ --grpc_python_out=generated_pb2 \ bookstore.proto
Dalam perintah sebelumnya,
--proto_pathditetapkan ke direktori kerja saat ini. Di lingkungan build gRPC, jika Anda menggunakan direktori yang berbeda untuk file input.proto, ubah--proto_pathsehingga compiler menelusuri direktori tempat Anda menyimpanbookstore.proto.
- Simpan salinan
- Buat file YAML konfigurasi gRPC API:
- Simpan salinan
api_config.yamlfile. File ini menentukan konfigurasi gRPC API untuk layanan Bookstore. - Ganti MY_PROJECT_ID di file
api_config.yamldengan project ID Google Cloud Anda. Contoh:# # Name of the service configuration. # name: bookstore.endpoints.example-project-12345.cloud.goog
Perhatikan bahwa nilai kolom
apis.namedalam file ini sama persis dengan nama API yang sepenuhnya memenuhi syarat dari file.proto; jika tidak, deployment tidak akan berfungsi. Layanan Bookstore ditentukan dibookstore.protodalam paketendpoints.examples.bookstore. Nama API yang sepenuhnya memenuhi syarat adalahendpoints.examples.bookstore.Bookstore, sama seperti yang muncul dalam fileapi_config.yaml.apis: - name: endpoints.examples.bookstore.Bookstore
- Simpan salinan
Lihat Mengonfigurasi Endpoint untuk mengetahui informasi selengkapnya.
Men-deploy konfigurasi Endpoint
Untuk men-deploy konfigurasi Endpoints, Anda menggunakan perintah
gcloud endpoints services deploy. Perintah ini menggunakan
Service Management
untuk membuat layanan terkelola.
- Pastikan Anda berada di direktori tempat file
api_descriptor.pbdanapi_config.yamlberada. - Pastikan project default yang saat ini digunakan oleh alat command line
gcloudadalah project Google Cloud yang ingin Anda gunakan untuk men-deploy konfigurasi Endpoints. Validasi project ID yang ditampilkan dari perintah berikut untuk memastikan bahwa layanan tidak dibuat di project yang salah.gcloud config list project
Jika Anda perlu mengubah project default, jalankan perintah berikut:
gcloud config set project YOUR_PROJECT_ID
- Deploy file
proto descriptordan file konfigurasi menggunakan Google Cloud CLI:gcloud endpoints services deploy api_descriptor.pb api_config.yaml
Saat membuat dan mengonfigurasi layanan, Service Management akan menampilkan informasi ke terminal. Setelah deployment selesai, pesan yang mirip dengan berikut akan ditampilkan:
Service Configuration [CONFIG_ID] uploaded for service [bookstore.endpoints.example-project.cloud.goog]
CONFIG_ID adalah ID konfigurasi layanan Endpoints unik yang dibuat oleh deployment. Contoh:
Service Configuration [2017-02-13r0] uploaded for service [bookstore.endpoints.example-project.cloud.goog]
Dalam contoh sebelumnya,
2017-02-13r0adalah ID konfigurasi layanan danbookstore.endpoints.example-project.cloud.googadalah nama layanan. ID konfigurasi layanan terdiri dari stempel tanggal yang diikuti dengan nomor revisi. Jika Anda men-deploy konfigurasi Endpoints lagi pada hari yang sama, nomor revisi akan bertambah dalam ID konfigurasi layanan.
Memeriksa layanan yang diperlukan
Minimal, Endpoints dan ESP memerlukan layanan Google berikut diaktifkan:| Nama | Judul |
|---|---|
servicemanagement.googleapis.com |
Service Management API |
servicecontrol.googleapis.com |
Service Control API |
Dalam sebagian besar kasus, perintah gcloud endpoints services deploy mengaktifkan layanan yang diperlukan ini. Namun, perintah gcloud berhasil diselesaikan, tetapi
tidak mengaktifkan layanan yang diperlukan dalam keadaan berikut:
Jika Anda menggunakan aplikasi pihak ketiga seperti Terraform, dan Anda tidak menyertakan layanan ini.
Anda men-deploy konfigurasi Endpoints ke projectGoogle Cloud yang sudah ada dan layanan ini dinonaktifkan secara eksplisit di project tersebut.
Gunakan perintah berikut untuk mengonfirmasi bahwa layanan yang diperlukan sudah diaktifkan:
gcloud services list
Jika Anda tidak melihat layanan yang diperlukan tercantum, aktifkan layanan tersebut:
gcloud services enable servicemanagement.googleapis.com
gcloud services enable servicecontrol.googleapis.com
Aktifkan juga layanan Endpoints Anda:
gcloud services enable ENDPOINTS_SERVICE_NAME
Untuk menentukan ENDPOINTS_SERVICE_NAME, Anda dapat:
Setelah men-deploy konfigurasi Endpoints, buka halaman Endpoints di Konsol Cloud. Daftar ENDPOINTS_SERVICE_NAME yang mungkin ditampilkan di kolom Nama layanan.
Untuk OpenAPI, ENDPOINTS_SERVICE_NAME adalah yang Anda tentukan di kolom
hostspesifikasi OpenAPI. Untuk gRPC, ENDPOINTS_SERVICE_NAME adalah yang Anda tentukan di kolomnamekonfigurasi gRPC Endpoints.
Untuk mengetahui informasi selengkapnya tentang perintah gcloud, lihat
layanan gcloud.
Jika Anda menerima pesan error, lihat Memecahkan masalah deployment konfigurasi Endpoints. Lihat Men-deploy konfigurasi Endpoints untuk mengetahui informasi tambahan.
Men-deploy backend API
Sejauh ini Anda telah men-deploy konfigurasi API ke Service Management, tetapi Anda belum men-deploy kode yang melayani backend API. Bagian ini memandu Anda menyiapkan Docker di instance VM dan menjalankan kode backend API serta ESPv2 dalam container Docker.
Instal Docker di instance VM
Untuk menginstal Docker di instance VM:
- Tetapkan zona untuk project Anda dengan menjalankan perintah:
gcloud config set compute/zone YOUR_INSTANCE_ZONE
Ganti YOUR_INSTANCE_ZONE dengan zona tempat instance Anda berjalan.
- Hubungkan ke instance Anda menggunakan perintah berikut:
gcloud compute ssh INSTANCE_NAME
Ganti INSTANCE_NAME dengan nama instance VM Anda.
- Lihat
dokumentasi Docker
untuk menyiapkan repositori Docker. Pastikan untuk mengikuti langkah-langkah yang sesuai dengan versi dan arsitektur instance VM Anda:
- Jessie atau yang lebih baru
- x86_64 / amd64
Menjalankan API contoh dan ESPv2 di container Docker
Untuk menjalankan layanan gRPC contoh dengan ESPv2 dalam container Docker sehingga klien dapat menggunakannya:
- Di instance VM, buat jaringan container Anda sendiri yang disebut
esp_net.sudo docker network create --driver bridge esp_net
- Jalankan server Bookstore contoh yang menyediakan contoh API:
sudo docker run \ --detach \ --name=bookstore \ --net=esp_net \ gcr.io/endpointsv2/python-grpc-bookstore-server:1 - Jalankan container Docker ESPv2 yang telah dikemas sebelumnya. Di opsi startup ESPv2, ganti SERVICE_NAME dengan nama layanan Anda. Nama ini sama dengan nama yang Anda konfigurasi di kolom
namedalam fileapi_config.yaml. Contoh:bookstore.endpoints.example-project-12345.cloud.googsudo docker run \ --detach \ --name=esp \ --publish=80:9000 \ --net=esp_net \ gcr.io/endpoints-release/endpoints-runtime:2 \ --service=SERVICE_NAME \ --rollout_strategy=managed \ --listener_port=9000 \ --backend=grpc://bookstore:8000Opsi
--rollout_strategy=managedmengonfigurasi ESPv2 untuk menggunakan konfigurasi layanan yang di-deploy terbaru. Saat Anda menentukan opsi ini, dalam waktu satu menit setelah Anda men-deploy konfigurasi layanan baru, ESPv2 akan mendeteksi perubahan dan otomatis mulai menggunakannya. Sebaiknya tentukan opsi ini, bukan memberikan ID konfigurasi tertentu untuk digunakan ESPv2. Untuk mengetahui detail selengkapnya tentang argumen ESPv2, lihat Opsi startup ESPv2.
Jika Anda menerima pesan error, lihat Memecahkan masalah Endpoints di Compute Engine.
Mengirim permintaan ke API
Jika Anda mengirim permintaan dari instance yang sama dengan tempat container Docker
berjalan, Anda dapat mengganti SERVER_IP dengan localhost. Jika tidak, ganti SERVER_IP dengan IP eksternal instance.
Anda dapat menemukan alamat IP eksternal dengan menjalankan:
gcloud compute instances list
Untuk mengirim permintaan ke contoh API, Anda dapat menggunakan contoh klien gRPC yang ditulis dalam Python.
Clone repositori git tempat kode klien gRPC dihosting:
git clone https://github.com/GoogleCloudPlatform/python-docs-samples.git
Ubah direktori kerja Anda:
cd python-docs-samples/endpoints/bookstore-grpc/
Instal dependensi:
pip install virtualenvvirtualenv envsource env/bin/activatepython -m pip install -r requirements.txtKirim permintaan ke API contoh:
python bookstore_client.py --host SERVER_IP --port 80
Lihat grafik aktivitas untuk API Anda di halaman Endpoints > Services.
Buka halaman Endpoints Services
Mungkin perlu waktu beberapa saat agar permintaan ditampilkan dalam grafik.
Lihat log permintaan untuk API Anda di halaman Logs Explorer.
Jika Anda tidak mendapatkan respons yang berhasil, lihat Memecahkan masalah error respons.
Anda baru saja men-deploy dan menguji API di Endpoints.
Pembersihan
Agar tidak perlu membayar biaya pada akun Google Cloud Anda untuk resource yang digunakan dalam tutorial ini, hapus project yang berisi resource tersebut, atau simpan project dan hapus setiap resource.
- Hapus API:
gcloud endpoints services delete SERVICE_NAME
Ganti
SERVICE_NAMEdengan nama layanan Anda. - Di konsol Google Cloud , buka halaman VM instances.
- Pilih kotak centang untuk instance yang ingin Anda hapus.
- Untuk menghapus instance, klik Tindakan lainnya, klik Hapus, lalu ikuti petunjuknya.