
Tutorial ini menunjukkan cara menggunakan Azure Pipelines, Google Kubernetes Engine (GKE), dan Container Registry Google untuk membuat pipeline continuous integration/continuous deployment (CI/CD) untuk aplikasi web ASP.NET MVC. Untuk tujuan tutorial ini, Anda dapat memilih dua contoh aplikasi:
- Aplikasi web ASP.NET Core yang menggunakan .NET 6.0 dan berjalan di Linux
- Aplikasi web ASP.NET MVC yang menggunakan .NET Framework 4 dan berjalan di Windows
Pipeline CI/CD menggunakan dua cluster GKE terpisah, satu untuk pengembangan dan satu untuk produksi, seperti yang ditunjukkan diagram berikut.

Di awal pipeline, developer melakukan commit perubahan pada codebase contoh. Tindakan ini akan memicu pipeline untuk membuat rilis dan men-deploy-nya ke cluster pengembangan. Kemudian, pengelola rilis dapat mempromosikan rilis sehingga di-deploy ke cluster produksi.
Tutorial ini ditujukan bagi developer dan engineer DevOps. Tutorial ini mengasumsikan bahwa Anda memiliki pengetahuan dasar tentang Microsoft .NET, Azure Pipelines, dan GKE. Tutorial ini juga mengharuskan Anda memiliki akses administratif ke akun Azure DevOps.
Tujuan
- Hubungkan Google Container Registry ke Azure Pipelines untuk memublikasikan image Docker.
- Siapkan aplikasi contoh.NET untuk deployment ke GKE.
- Lakukan autentikasi secara aman terhadap GKE tanpa harus menggunakan autentikasi lama.
- Gunakan pengelolaan rilis Azure Pipelines untuk mengorkestrasi deployment GKE.
Di luar cakupan
Tutorial ini tidak membahas cara menghubungkan Azure Pipelines dengan cluster GKE pribadi, atau cara menghubungkan ke jaringan pribadi yang diizinkan.
Biaya
Dalam dokumen ini, Anda akan menggunakan komponen Google Cloudyang dapat ditagih berikut:
- GKE
- Cloud Load Balancing
- Cloud Storage (for Container Registry)
Untuk membuat perkiraan biaya berdasarkan proyeksi penggunaan Anda,
gunakan kalkulator harga.
Setelah menyelesaikan tugas yang dijelaskan dalam dokumen ini, Anda dapat menghindari penagihan berkelanjutan dengan menghapus resource yang Anda buat. Untuk mengetahui informasi selengkapnya, lihat Pembersihan.
Lihat halaman harga Azure DevOps untuk mengetahui biaya yang mungkin berlaku pada penggunaan Azure DevOps.
Sebelum memulai
Biasanya disarankan untuk menggunakan project terpisah untuk workload pengembangan dan produksi sehingga peran dan izin Identity and Access Management (IAM) dapat diberikan satu per satu. Demi kesederhanaan, tutorial ini menggunakan satu project untuk kedua cluster GKE, satu untuk pengembangan dan satu untuk produksi.
-
Di konsol Google Cloud , pada halaman pemilih project, pilih atau buat project Google Cloud .
Peran yang diperlukan untuk memilih atau membuat project
- Pilih project: Memilih project tidak memerlukan peran IAM tertentu—Anda dapat memilih project mana pun yang telah diberi peran.
-
Membuat project: Untuk membuat project, Anda memerlukan peran Pembuat Project
(
roles/resourcemanager.projectCreator), yang berisi izinresourcemanager.projects.create. Pelajari cara memberikan peran.
-
Verifikasi bahwa penagihan diaktifkan untuk project Google Cloud Anda.
- Pastikan Anda memiliki akun Azure DevOps dan memiliki akses administrator ke akun tersebut. Jika belum memiliki akun Azure DevOps, Anda dapat mendaftar di halaman beranda Azure DevOps.
Membuat project Azure DevOps
Anda menggunakan Azure DevOps untuk mengelola kode sumber, menjalankan build dan pengujian, serta mengatur deployment ke GKE. Untuk memulai, Anda membuat project di akun Azure DevOps Anda.
- Buka halaman beranda Azure DevOps (https://dev.azure.com/YOUR_AZURE_DEVOPS_ACCOUNT_NAME).
- Klik Project Baru.
- Masukkan nama project, seperti
CloudDemo. - Setel Visibilitas ke Pribadi, lalu klik Buat.
- Setelah Anda membuat project, di menu sebelah kiri, klik Repos.
- Klik Impor untuk membuat fork repositori
dotnet-docs-samplesdari GitHub, lalu tetapkan nilai berikut:- Jenis repositori:
Git - URL Clone:
https://github.com/GoogleCloudPlatform/dotnet-docs-samples.git
- Jenis repositori:
Klik Import.
Setelah proses impor selesai, Anda akan melihat kode sumber repositori
dotnet-docs-samples.
Menghubungkan Azure Pipelines ke Google Container Registry
Sebelum dapat menyiapkan continuous integration untuk aplikasi CloudDemo, Anda harus
menghubungkan Azure Pipelines ke Container Registry. Koneksi ini
memungkinkan Azure Pipelines memublikasikan image container ke Container Registry.
Menyiapkan akun layanan untuk memublikasikan gambar
Buat akun layananGoogle Cloud di project Anda:
Buka konsol Google Cloud .
-
Di konsol Google Cloud , aktifkan Cloud Shell.
Untuk menghemat waktu saat mengetik opsi project ID dan zona Compute Engine, tetapkan nilai konfigurasi default dengan menjalankan perintah berikut:
gcloud config set project PROJECT_ID
gcloud config set compute/zone us-central1-a
Ganti
PROJECT_IDdengan project ID project Anda.Aktifkan Container Registry API di project:
gcloud services enable containerregistry.googleapis.comBuat akun layanan yang digunakan Azure Pipelines untuk memublikasikan image Docker:
gcloud iam service-accounts create azure-pipelines-publisher \
    --display-name="Azure Pipelines Publisher"
Berikan peran IAM Administrator Artifact Registry (
roles/artifactregistry.admin) ke akun layanan agar Azure Pipelines dapat melakukan push ke Container Registry:AZURE_PIPELINES_PUBLISHER=azure-pipelines-publisher@$GOOGLE_CLOUD_PROJECT.iam.gserviceaccount.com gcloud projects add-iam-policy-binding $GOOGLE_CLOUD_PROJECT \ --member serviceAccount:$AZURE_PIPELINES_PUBLISHER \ --role roles/artifactregistry.adminBuat kunci akun layanan:
gcloud iam service-accounts keys create azure-pipelines-publisher.json \
    --iam-account $AZURE_PIPELINES_PUBLISHER

tr -d '\n' < azure-pipelines-publisher.json > azure-pipelines-publisher-oneline.json
Lihat konten file kunci akun layanan:
echo $(<azure-pipelines-publisher-oneline.json)Anda memerlukan kunci akun layanan di salah satu langkah berikut.
Membuat koneksi layanan untuk Google Container Registry
Di Azure Pipelines, buat koneksi layanan baru untuk Container Registry:
- Di menu DevOps Azure, pilih Project settings, lalu pilih Pipelines > Service connections.
- Klik Create service connection.
- Dari daftar, pilih Docker Registry, lalu klik Next.
- Dalam dialog, masukkan nilai untuk kolom berikut:
- Jenis registry: Lainnya
- Docker Registry:
https://gcr.io/PROJECT_ID, gantiPROJECT_IDdengan nama project Anda (misalnya,https://gcr.io/azure-pipelines-test-project-12345). - Docker ID:
_json_key - Sandi: Tempelkan konten
azure-pipelines-publisher-oneline.json. - Nama koneksi layanan:
gcr-tutorial
- Klik Simpan untuk membuat koneksi.
Membangun secara berkelanjutan
Sekarang Anda dapat menggunakan Azure Pipelines untuk menyiapkan continuous integration. Untuk setiap commit yang dikirim ke repositori Git, Azure Pipelines akan membangun kode dan mengemas artefak build ke dalam container Docker. Kemudian, container akan dipublikasikan ke Container Registry.
Repositori sudah berisi Dockerfile berikut:
.NET/Linux
.NET Framework/Windows
Sekarang Anda akan membuat pipeline baru yang menggunakan sintaksis YAML:
- Dengan menggunakan klien
gitcommand line atau Visual Studio, clone repositori Git baru Anda dan periksa cabangmain. - Di root repositori, buat file bernama
azure-pipelines.yml. Salin kode berikut ke dalam file:
.NET/Linux
resources:
- repo: self
  fetchDepth: 1
pool:
  vmImage: ubuntu-20.04
trigger:
- main
variables:
  TargetFramework: 'net6.0'
  BuildConfiguration: 'Release'
  DockerImageName: 'PROJECT_ID/clouddemo'
steps:
- task: DotNetCoreCLI@2
  displayName: Publish
  inputs:
    projects: 'applications/clouddemo/netcore/CloudDemo.MvcCore.sln'
    publishWebProjects: false
    command: publish
    arguments: '--configuration $(BuildConfiguration) --framework=$(TargetFramework)'
    zipAfterPublish: false
    modifyOutputPath: false
- task: CmdLine@1
  displayName: 'Lock image version in deployment.yaml'
  inputs:
    filename: /bin/bash
    arguments: '-c "awk ''{gsub(\"CLOUDDEMO_IMAGE\", \"gcr.io/$(DockerImageName):$(Build.BuildId)\", $0); print}'' applications/clouddemo/netcore/deployment.yaml > $(build.artifactstagingdirectory)/deployment.yaml"'
- task: PublishBuildArtifacts@1
  displayName: 'Publish Artifact'
  inputs:
    PathtoPublish: '$(build.artifactstagingdirectory)'
- task: Docker@2
  displayName: 'Login to Artifact Registry'
  inputs:
    command: login
    containerRegistry: 'gcr-tutorial'
- task: Docker@2
  displayName: 'Build and push image'
  inputs:
    Dockerfile: 'applications/clouddemo/netcore/Dockerfile'
    command: buildAndPush
    repository: '$(DockerImageName)'
.NET Framework/Windows
resources:
- repo: self
  fetchDepth: 1
pool:
  vmImage: windows-2019     # Matches WINDOWS_LTSC in GKE
  demands:
  - msbuild
  - visualstudio
trigger:
- master
variables:
  Solution: 'applications/clouddemo/net4/CloudDemo.Mvc.sln'
  BuildPlatform: 'Any CPU'
  BuildConfiguration: 'Release'
  DockerImageName: 'PROJECT_ID/clouddemo'
steps:
- task: NuGetCommand@2
  displayName: 'NuGet restore'
  inputs:
    restoreSolution: '$(Solution)'
- task: VSBuild@1
  displayName: 'Build solution'
  inputs:
    solution: '$(Solution)'
    msbuildArgs: '/p:DeployOnBuild=true /p:PublishProfile=FolderProfile'
    platform: '$(BuildPlatform)'
    configuration: '$(BuildConfiguration)'
- task: PowerShell@2
  displayName: 'Lock image version in deployment.yaml'
  inputs:
    targetType: 'inline'
    script: '(Get-Content applications\clouddemo\net4\deployment.yaml) -replace "CLOUDDEMO_IMAGE","gcr.io/$(DockerImageName):$(Build.BuildId)" | Out-File -Encoding ASCII $(build.artifactstagingdirectory)\deployment.yaml'
- task: PublishBuildArtifacts@1
  displayName: 'Publish Artifact'
  inputs:
    PathtoPublish: '$(build.artifactstagingdirectory)'
- task: Docker@2
  displayName: 'Login to Artifact Registry'
  inputs:
    command: login
    containerRegistry: 'gcr-tutorial'
- task: Docker@2
  displayName: 'Build and push image'
  inputs:
    Dockerfile: 'applications/clouddemo/net4/Dockerfile'
    command: buildAndPush
    repository: '$(DockerImageName)'
Ganti
PROJECT_IDdengan nama project Anda, lalu simpan file.Lakukan commit pada perubahan Anda dan kirimkan ke Azure Pipelines.
Visual Studio
- Buka Team Explorer, lalu klik ikon Home.
- Klik Perubahan.
- Masukkan pesan commit seperti
Add pipeline definition. - Klik Commit All and Push.
Command line
Siapkan semua file yang diubah:
git add -ALakukan perubahan pada repositori lokal:
git commit -m "Add pipeline definition"Kirim perubahan ke Azure DevOps:
git push
Di menu Azure DevOps, pilih Pipelines, lalu klik Create Pipeline.
Pilih Azure Repos Git.
Pilih repositori Anda.
Di halaman Tinjau YAML pipeline Anda, klik Jalankan.
Build baru dipicu. Proses build mungkin memerlukan waktu sekitar 6 menit.
Untuk memverifikasi bahwa image telah dipublikasikan ke Container Registry, beralihlah ke project Anda di konsol Google Cloud , pilih Container Registry > Images, lalu klik clouddemo.
Satu gambar dan tag gambar ini ditampilkan. Tag sesuai dengan ID numerik build yang dijalankan di Azure Pipelines.
Men-deploy secara berkelanjutan
Dengan Azure Pipelines yang otomatis membangun kode dan memublikasikan image Docker untuk setiap commit, Anda kini dapat mengalihkan perhatian ke deployment.
Tidak seperti sistem integrasi berkelanjutan lainnya, Azure Pipelines membedakan antara membangun dan men-deploy, serta menyediakan serangkaian alat khusus berlabel Release Management untuk semua tugas terkait deployment.
Pengelolaan Rilis Azure Pipelines dibangun berdasarkan konsep berikut:
- Rilis mengacu pada sekumpulan artefak yang membentuk versi tertentu aplikasi Anda dan biasanya merupakan hasil dari proses build.
- Deployment mengacu pada proses pengambilan rilis dan men-deploy-nya ke lingkungan tertentu.
- Deployment melakukan serangkaian tugas, yang dapat dikelompokkan dalam tugas.
- Tahapan memungkinkan Anda menyegmentasikan pipeline dan dapat digunakan untuk mengatur penerapan ke beberapa lingkungan, misalnya, lingkungan pengembangan dan pengujian.
Artefak utama yang dihasilkan oleh proses build CloudDemo adalah image Docker. Namun, karena image Docker dipublikasikan ke Container Registry, image tersebut berada di luar cakupan Azure Pipelines. Oleh karena itu, gambar tidak berfungsi dengan baik sebagai definisi rilis.
Untuk men-deploy ke Kubernetes, Anda juga memerlukan manifes, yang menyerupai daftar materi. Manifes tidak hanya menentukan resource yang seharusnya dibuat dan dikelola oleh Kubernetes, tetapi juga menentukan versi persis image Docker yang akan digunakan. Manifes Kubernetes sangat cocok untuk berfungsi sebagai artefak yang menentukan rilis di Azure Pipelines Release Management.
Mengonfigurasi deployment Kubernetes
Untuk menjalankan CloudDemo di Kubernetes, Anda memerlukan resource berikut:
- Deployment yang menentukan satu pod yang menjalankan image Docker yang dihasilkan oleh build.
- Layanan NodePort yang membuat pod dapat diakses oleh load balancer.
- Ingress yang mengekspos aplikasi ke internet publik dengan menggunakan load balancer HTTP(S) Cloud.
Repositori sudah berisi manifes Kubernetes berikut yang menentukan resource ini:
.NET/Linux
.NET Framework/Windows
Menyiapkan lingkungan pengembangan dan produksi
Sebelum kembali ke Azure Pipelines Release Management, Anda harus membuat cluster GKE.
Membuat cluster GKE
Kembali ke instance Cloud Shell Anda.
Aktifkan GKE API untuk project Anda:
gcloud services enable container.googleapis.com
Buat cluster pengembangan menggunakan perintah berikut. Perhatikan bahwa proses ini mungkin memerlukan waktu beberapa menit:
.NET/Linux
gcloud container clusters create azure-pipelines-cicd-dev --enable-ip-alias
.NET Framework/Windows
gcloud container clusters create azure-pipelines-cicd-dev --enable-ip-alias

gcloud container node-pools create azure-pipelines-cicd-dev-win \
    --cluster=azure-pipelines-cicd-dev \
    --image-type=WINDOWS_LTSC \
    --no-enable-autoupgrade \
    --machine-type=n1-standard-2
Buat cluster produksi menggunakan perintah berikut. Perhatikan bahwa proses ini mungkin memerlukan waktu beberapa menit:
.NET/Linux
gcloud container clusters create azure-pipelines-cicd-prod --enable-ip-alias
.NET Framework/Windows
gcloud container clusters create azure-pipelines-cicd-prod --enable-ip-alias

gcloud container node-pools create azure-pipelines-cicd-prod-win \
    --cluster=azure-pipelines-cicd-prod \
    --image-type=WINDOWS_LTSC \
    --no-enable-autoupgrade \
    --machine-type=n1-standard-2
Menghubungkan Azure Pipelines ke cluster pengembangan
Sama seperti Anda dapat menggunakan Azure Pipelines untuk terhubung ke registry Docker eksternal seperti Container Registry, Azure Pipelines mendukung integrasi cluster Kubernetes eksternal.
Anda dapat melakukan autentikasi ke Container Registry menggunakan akun layananGoogle Cloud , tetapi penggunaan akun layanan Google Cloud tidak didukung oleh Azure Pipelines untuk melakukan autentikasi dengan GKE. Sebagai gantinya, Anda harus menggunakan akun layanan Kubernetes.
Oleh karena itu, untuk menghubungkan Azure Pipelines ke cluster pengembangan, Anda harus membuat akun layanan Kubernetes terlebih dahulu.
Di Cloud Shell, hubungkan ke cluster pengembangan:
gcloud container clusters get-credentials azure-pipelines-cicd-dev
Buat akun layanan Kubernetes untuk Azure Pipelines:
kubectl create serviceaccount azure-pipelines-deploy
Buat secret Kubernetes yang berisi kredensial token untuk Azure Pipelines:
kubectl create secret generic azure-pipelines-deploy-token --type=kubernetes.io/service-account-token --dry-run -o yaml \
  | kubectl annotate --local -o yaml -f - kubernetes.io/service-account.name=azure-pipelines-deploy \
  | kubectl apply -f -
Tetapkan peran
cluster-adminke akun layanan dengan membuat binding peran cluster:kubectl create clusterrolebinding azure-pipelines-deploy --clusterrole=cluster-admin --serviceaccount=default:azure-pipelines-deploy
Tentukan alamat IP cluster:
gcloud container clusters describe azure-pipelines-cicd-dev --format=value\(endpoint\)
Anda akan memerlukan alamat ini sebentar lagi.
Di menu Azure DevOps, pilih Project settings, lalu pilih Pipelines > Service connections.
Klik Koneksi layanan baru.
Pilih Kubernetes, lalu klik Berikutnya.
Konfigurasi setelan berikut.
- Authentication method: Service account.
- URL Server:
https://PRIMARY_IP. GantiPRIMARY_IPdengan alamat IP yang Anda tentukan sebelumnya. - Secret: Secret Kubernetes yang Anda buat sebelumnya. Untuk mendapatkan Secret, jalankan perintah berikut, salin Secret, lalu salin Secret ke halaman Azure.
kubectl get secret azure-pipelines-deploy-token -o yaml
- Service connection name:
azure-pipelines-cicd-dev.
Klik Simpan.
Menghubungkan Azure Pipelines ke cluster produksi
Untuk menghubungkan Azure Pipelines ke cluster produksi, Anda dapat mengikuti pendekatan yang sama.
Di Cloud Shell, hubungkan ke cluster produksi:
gcloud container clusters get-credentials azure-pipelines-cicd-prod
Buat akun layanan Kubernetes untuk Azure Pipelines:
kubectl create serviceaccount azure-pipelines-deploy
Tetapkan peran
cluster-adminke akun layanan dengan membuat binding peran cluster:kubectl create clusterrolebinding azure-pipelines-deploy --clusterrole=cluster-admin --serviceaccount=default:azure-pipelines-deploy
Tentukan alamat IP cluster:
gcloud container clusters describe azure-pipelines-cicd-prod --format=value\(endpoint\)
Anda akan memerlukan alamat ini sebentar lagi.
Di menu Azure DevOps, pilih Project settings, lalu pilih Pipelines > Service connections.
Klik Koneksi layanan baru.
Pilih Kubernetes, lalu klik Berikutnya.
Konfigurasi setelan berikut:
- Authentication method: Service account.
- URL Server:
https://PRIMARY_IP. GantiPRIMARY_IPdengan alamat IP yang Anda tentukan sebelumnya. - Secret: Jalankan perintah berikut di Cloud Shell dan salin
outputnya:
kubectl get secret $(kubectl get serviceaccounts azure-pipelines-deploy -o custom-columns=":secrets[0].name") -o yaml
- Service connection name:
azure-pipelines-cicd-prod.
Klik Simpan.
Mengonfigurasi pipeline rilis
Setelah menyiapkan infrastruktur GKE, Anda akan kembali ke Azure Pipelines untuk mengotomatiskan deployment, yang mencakup hal berikut:
- Men-deploy ke lingkungan pengembangan.
- Meminta persetujuan manual sebelum memulai deployment ke lingkungan produksi.
- Men-deploy ke lingkungan produksi.
Membuat definisi rilis
Sebagai langkah pertama, buat definisi rilis baru.
- Di menu Azure DevOps, pilih Pipelines > Releases.
- Klik Pipeline baru.
- Dari daftar template, pilih Empty job.
- Saat Anda diminta untuk memasukkan nama panggung, masukkan
Development. - Di bagian atas layar, beri nama rilis CloudDemo-KubernetesEngine.
- Dalam diagram pipeline, di samping Artifacts, klik Add.
Pilih Build dan tambahkan setelan berikut:
- Jenis sumber: Build
- Sumber (pipeline build): Pilih definisi build (hanya boleh ada satu opsi)
- Versi default:
Latest - Alias Sumber:
manifest
Klik Tambahkan.
Di kotak Artifact, klik Continuous deployment trigger (ikon petir) untuk menambahkan pemicu deployment.
Di bagian Pemicu deployment berkelanjutan, setel tombol ke Diaktifkan.
Klik Simpan.
Masukkan komentar jika Anda mau, lalu konfirmasi dengan mengklik Oke.
Pipeline akan ditampilkan seperti berikut.
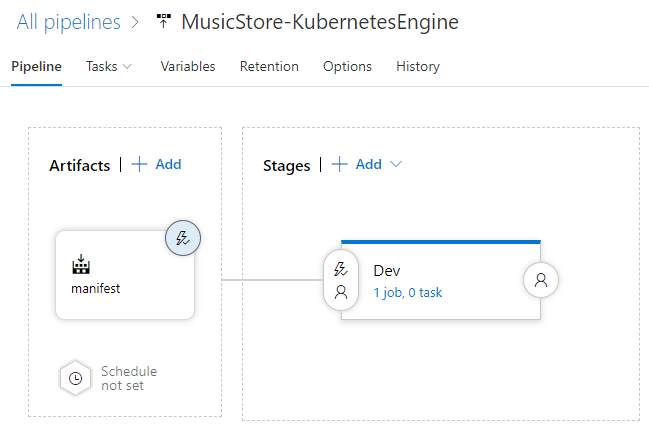
Men-deploy ke cluster pengembangan
Setelah definisi rilis dibuat, Anda kini dapat mengonfigurasi deployment ke cluster pengembangan GKE.
- Di menu, beralihlah ke tab Tugas.
Klik Agent job dan konfigurasi setelan berikut:
- Agent pool: Azure Pipelines
- Spesifikasi agen: ubuntu-18.04
Di samping Tugas agen, klik Tambahkan tugas ke tugas agen untuk menambahkan langkah ke fase.
Pilih tugas Deploy to Kubernetes, lalu klik Add.
Klik tugas yang baru ditambahkan dan konfigurasi setelan berikut:
- Nama tampilan:
Deploy - Tindakan: deploy
- Koneksi layanan Kubernetes: azure-pipelines-cicd-dev
- Namespace:
default - Strategi: Tidak ada
- Manifest:
manifest/drop/deployment.yaml
- Nama tampilan:
Klik Simpan.
Masukkan komentar jika Anda mau, lalu konfirmasi dengan mengklik Oke.
Men-deploy ke cluster produksi
Terakhir, Anda mengonfigurasi deployment ke cluster produksi GKE.
- Di menu, beralihlah ke tab Pipeline.
- Di kotak Stages, pilih Add > New stage.
- Dari daftar template, pilih Empty job.
- Saat Anda diminta untuk memasukkan nama panggung, masukkan
Production. - Klik ikon petir pada tahap yang baru dibuat.
Konfigurasi setelan berikut:
- Pilih pemicu: Setelah tahap
- Tahapan: Dev
- Persetujuan sebelum deployment: (diaktifkan)
- Pemberi persetujuan: Pilih nama pengguna Anda sendiri.
Pipeline sekarang terlihat seperti ini:
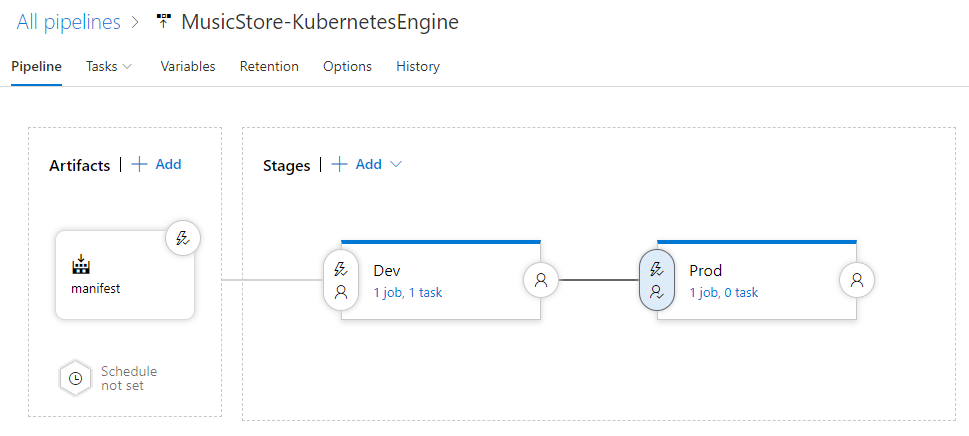
Beralihlah ke tab Tugas.
Arahkan kursor ke tab Tasks, lalu pilih Tasks > Production.
Klik Agent job dan konfigurasi setelan berikut:
- Agent pool: Azure Pipelines
- Spesifikasi agen: ubuntu-18.04
Klik Tambahkan tugas ke pekerjaan agen untuk menambahkan langkah ke fase.
Pilih tugas Deploy to Kubernetes, lalu klik Add.
Klik tugas yang baru ditambahkan dan konfigurasi setelan berikut:
- Nama tampilan:
Deploy - Tindakan: deploy
- Koneksi layanan Kubernetes: azure-pipelines-cicd-prod
- Namespace:
default - Strategi: Tidak ada
- Manifest:
manifest/drop/deployment.yaml
- Nama tampilan:
Klik Simpan.
Masukkan komentar jika Anda mau, lalu konfirmasi dengan mengklik Oke.
Menjalankan pipeline
Setelah mengonfigurasi seluruh pipeline, Anda dapat mengujinya dengan melakukan perubahan kode sumber:
Di komputer lokal Anda, buka file
Index.cshtmldari repositori Git yang Anda clone sebelumnya:.NET/Linux
File tersebut terletak di
applications\clouddemo\netcore\CloudDemo.MvcCore\Views\Home\.NET Framework/Windows
File tersebut terletak di
applications\clouddemo\net4\CloudDemo.Mvc\Views\Home\Di baris 26, ubah nilai
ViewBag.TitledariHome PagemenjadiThis app runs on GKE.Lakukan commit pada perubahan, lalu kirimkan ke Azure Pipelines.
Visual Studio
- Buka Team Explorer, lalu klik ikon Home.
- Klik Perubahan.
- Masukkan pesan commit seperti
Change site title. - Klik Commit All and Push.
Command line
Siapkan semua file yang diubah:
git add -ALakukan perubahan pada repositori lokal:
git commit -m "Change site title"Kirim perubahan ke Azure Pipelines:
git push
Di menu Azure DevOps, pilih Pipelines. Build dipicu.
Setelah build selesai, pilih Pipelines > Releases. Proses rilis dimulai.
Klik Release-1 untuk membuka halaman detail, lalu tunggu hingga status tahap Development berubah menjadi Succeeded.
Di Google Cloud konsol, pilih Kubernetes Engine > Services & Ingress > Ingress.
Cari layanan Ingress untuk cluster azure-pipelines-cicd-dev, lalu tunggu hingga statusnya berubah menjadi Ok. Proses ini dapat memerlukan waktu beberapa menit.
Buka link di kolom Frontend pada baris yang sama. Anda mungkin melihat error pada awalnya karena load balancer memerlukan waktu beberapa menit agar tersedia. Setelah siap, amati bahwa CloudDemo telah di-deploy dan menggunakan judul kustom.
Di Azure Pipelines, klik tombol Approve yang ada di bagian Prod stage untuk mempromosikan deployment ke lingkungan produksi.
Jika tidak melihat tombol tersebut, Anda mungkin perlu menyetujui atau menolak rilis sebelumnya terlebih dahulu.
Masukkan komentar jika Anda mau, lalu konfirmasi dengan mengklik Setujui.
Tunggu hingga status lingkungan Prod berubah menjadi Succeeded. Anda mungkin perlu memuat ulang halaman secara manual di browser.
Di konsol Google Cloud , muat ulang halaman Services & Ingress.
Cari layanan Ingress untuk cluster azure-pipelines-cicd-prod dan tunggu hingga statusnya berubah menjadi Ok. Proses ini dapat memerlukan waktu beberapa menit.
Buka link di kolom Frontend pada baris yang sama. Sekali lagi, Anda mungkin melihat error pada awalnya karena load balancer memerlukan waktu beberapa menit agar tersedia. Setelah siap, Anda akan melihat aplikasi CloudDemo dengan judul kustom lagi, kali ini berjalan di cluster produksi.
Pembersihan
Agar tidak menimbulkan biaya lebih lanjut setelah Anda menyelesaikan tutorial ini, hapus entitas yang telah Anda buat.
Menghapus project Azure Pipelines
Untuk menghapus project Azure Pipelines, lihat dokumentasi Azure DevOps Services. Menghapus project Azure Pipelines akan menyebabkan semua perubahan kode sumber hilang.
Menghapus Google Cloud pengembangan dan project
- Di Konsol Google Cloud , buka halaman Manage resources.
- Pada daftar project, pilih project yang ingin Anda hapus, lalu klik Delete.
- Pada dialog, ketik project ID, lalu klik Shut down untuk menghapus project.
Langkah berikutnya
- Konfigurasi kontrol akses terperinci untuk Artifact Registry.
- Pelajari cara men-deploy grup SQL Server dengan ketersediaan tinggi di Compute Engine.
- Baca tentang .NET di Google Cloud Platform.
- Pelajari arsitektur referensi, diagram, dan praktik terbaik tentang Google Cloud. Lihat Cloud Architecture Center kami.