


使用指標分析應用程式
本快速入門導覽課程說明如何使用 Cloud Deploy,根據 Google Cloud Observability 的指標分析已部署的 Cloud Run 服務,確保應用程式運作正常。
在本快速入門導覽課程中,您將執行下列操作:
建立及部署一項 Cloud Run 服務。
在這種情況下,您不會使用 Cloud Deploy 部署應用程式。
在 Google Cloud Observability 中建立運作時間檢查。
這項檢查會監控 Cloud Run 服務,確保服務正常運作。
在 Cloud Monitoring 中建立快訊政策。
根據預設,Cloud Deploy 分析可使用 Google Cloud Observability 的多種指標。如果運作時間檢查顯示有問題,這項政策就會建立快訊。
建立 Skaffold 設定,識別 Cloud Run 服務。
定義 Cloud Deploy 推送管道和目標。
這個管道只包含一個階段和一個目標,並包含分析工作的定義。
建立版本,系統會自動部署至目標。
服務應會成功部署至目標,但由於警告政策會產生警告,因此推出作業應會失敗。
變更 Cloud Run 服務定義,增加服務的執行個體數量,並建立新版本。
這次服務會成功部署,推出作業也會順利完成。
事前準備
- 登入 Google Cloud 帳戶。如果您是 Google Cloud新手,歡迎 建立帳戶,親自體驗產品的實際應用成效。新客戶還能獲得價值 $300 美元的免費抵免額,能用於執行、測試及部署工作負載。
-
In the Google Cloud console, on the project selector page, select or create a Google Cloud project.
Roles required to select or create a project
- Select a project: Selecting a project doesn't require a specific IAM role—you can select any project that you've been granted a role on.
-
Create a project: To create a project, you need the Project Creator role
(
roles/resourcemanager.projectCreator), which contains theresourcemanager.projects.createpermission. Learn how to grant roles.
-
If you're using an existing project for this guide, verify that you have the permissions required to complete this guide. If you created a new project, then you already have the required permissions.
-
Verify that billing is enabled for your Google Cloud project.
Enable the Cloud Deploy, Cloud Build, Cloud Run, and Cloud Storage APIs, if any are not already enabled.
Roles required to enable APIs
To enable APIs, you need the
serviceusage.services.enablepermission. If you created the project, then you likely already have this permission through the Owner role (roles/owner). Otherwise, you can get this permission through the Service Usage Admin role (roles/serviceusage.serviceUsageAdmin). Learn how to grant roles.-
Install the Google Cloud CLI.
-
If you're using an external identity provider (IdP), you must first sign in to the gcloud CLI with your federated identity.
-
To initialize the gcloud CLI, run the following command:
gcloud init -
In the Google Cloud console, on the project selector page, select or create a Google Cloud project.
Roles required to select or create a project
- Select a project: Selecting a project doesn't require a specific IAM role—you can select any project that you've been granted a role on.
-
Create a project: To create a project, you need the Project Creator role
(
roles/resourcemanager.projectCreator), which contains theresourcemanager.projects.createpermission. Learn how to grant roles.
-
If you're using an existing project for this guide, verify that you have the permissions required to complete this guide. If you created a new project, then you already have the required permissions.
-
Verify that billing is enabled for your Google Cloud project.
Enable the Cloud Deploy, Cloud Build, Cloud Run, and Cloud Storage APIs, if any are not already enabled.
Roles required to enable APIs
To enable APIs, you need the
serviceusage.services.enablepermission. If you created the project, then you likely already have this permission through the Owner role (roles/owner). Otherwise, you can get this permission through the Service Usage Admin role (roles/serviceusage.serviceUsageAdmin). Learn how to grant roles.-
Install the Google Cloud CLI.
-
If you're using an external identity provider (IdP), you must first sign in to the gcloud CLI with your federated identity.
-
To initialize the gcloud CLI, run the following command:
gcloud init
必要的角色
為確保 Cloud Deploy 服務帳戶具備執行 Cloud Deploy 作業及部署至 Cloud Run 的必要權限,請管理員在專案中將下列 IAM 角色授予 Cloud Deploy 服務帳戶:
- Cloud Run 開發人員 (
roles/run.developer) - Cloud Deploy Runner (
roles/clouddeploy.jobRunner) - IAM 服務帳戶使用者 (
roles/iam.serviceAccountUser) - 監控警告檢視者 (
roles/monitoring.alertViewer) - 服務使用情形消費者 (
roles/serviceusage.serviceUsageConsumer)
如要進一步瞭解如何授予角色,請參閱「管理專案、資料夾和組織的存取權」。
管理員或許也能透過自訂角色或其他預先定義的角色,授予 Cloud Deploy 服務帳戶必要權限。
進一步瞭解 Cloud Deploy 服務帳戶。
部署 Cloud Run 服務
本快速入門導覽課程使用的警告政策需要 Cloud Run 服務。因此我們將在此部署一個,並在稍後的章節中,使用相同的服務名稱定義 service.yaml。
執行下列指令,建立初始服務:
gcloud run deploy my-analysis-run-service \
  --image=us-docker.pkg.dev/cloudrun/container/hello@sha256:95ade4b17adcd07623b0a0c68359e344fe54e65d0cb01b989e24c39f2fcd296a \
  --project=PROJECT_ID \
  --region=us-central1 \
  --allow-unauthenticated
將 PROJECT_ID 替換為專案 ID。
建立 Google Cloud Observability 運作時間檢查
這項運作時間檢查會監控執行中的服務,確認服務是否正常運作。 在後續章節中,您會建立 Google Cloud Observability 警報政策,如果服務沒有至少一個可用的執行個體,就會產生警報。
如要建立正常運作時間檢查,請執行下列指令:
gcloud monitoring uptime create my-analysis-run-service-cloud-run-uptime-check \
  --resource-type=cloud-run-revision \
  --resource-labels="project_id=PROJECT_ID,location=us-central1,service_name=my-analysis-run-service" \
  --project=PROJECT_ID \
  --protocol=https \
  --path="/" \
  --port=443 \
  --period=1 \
  --timeout=10 \
  --service-agent-auth="oidc-token" \
  --status-classes="2xx"
複製運作時間檢查 ID。
您剛執行的指令會輸出 ID。
準備 Skaffold 設定和服務定義
在本快速入門導覽課程中,您會建立 skaffold.yaml 檔案,識別要部署範例 Cloud Run 服務的資訊清單,並定義 service.yaml 檔案,用來定義 Cloud Run 本身。
開啟終端機視窗。
建立新目錄並前往該處。
mkdir deploy-analysis-run-quickstart
cd deploy-analysis-run-quickstart
- 建立名為
skaffold.yaml的檔案,並在當中加入下列內容:
apiVersion: skaffold/v4beta7
kind: Config
manifests:
  rawYaml:
  - service.yaml
deploy:
  cloudrun: {}
如要進一步瞭解這個設定檔,請參閱 skaffold.yaml 參考資料。
- 建立名為
service.yaml的檔案,並加入下列內容:
apiVersion: serving.knative.dev/v1
kind: Service
metadata:
  name: my-analysis-run-service
  annotations:
    run.googleapis.com/scalingMode: manual
    run.googleapis.com/manualInstanceCount: 0
spec:
  template:
    spec:
      containers:
      - image: my-app-image
這個檔案是 Cloud Run 服務定義,用於部署應用程式。要部署的容器映像檔會在此處設為預留位置 my-app-image,並在建立版本時替換為特定映像檔。
請注意,我們已將資源調度模式設為手動,並將執行個體數量設為 0。
這表示已部署的服務無法接收流量,也不會有任何執行中的執行個體,因此會觸發警報。接下來,您將設定該快訊。
建立快訊政策
本快速入門導覽課程會使用 Google Cloud Observability 警告政策。如果 Cloud Run 服務未通過您先前建立的正常運作時間檢查,這項警告政策就會產生警告。
在
deploy-analysis-run-quickstart目錄中建立名為policy.yaml的檔案,並加入以下內容:displayName: Cloud Run service uptime check userLabels: policy-for: analysis-run-pipeline combiner: OR conditions: - displayName: Failure of uptime check UPTIME_ID conditionThreshold: filter: metric.type="monitoring.googleapis.com/uptime_check/check_passed" AND metric.label.check_id="UPTIME_ID" AND resource.type="cloud_run_revision" aggregations: - alignmentPeriod: 60s crossSeriesReducer: REDUCE_COUNT_FALSE groupByFields: - resource.label.* perSeriesAligner: ALIGN_NEXT_OLDER comparison: COMPARISON_GT duration: 60s thresholdValue: 1.0將
UPTIME_ID替換為先前建立的運作時間檢查 ID。執行下列指令來建立政策:
gcloud monitoring policies create \
  --policy-from-file=policy.yaml\
  --project=PROJECT_ID
將
PROJECT_ID替換為專案 ID。從剛執行的指令輸出內容中複製政策 ID。
這次請複製整個資源 ID,包括路徑。您會在下一節的傳送管道分析設定中使用這個 ID。
建立推送管道和目標
這個推送管道有一個階段,適用於一個目標:analysis-staging。
在
deploy-analysis-run-quickstart目錄中建立新檔案clouddeploy.yaml,並加入下列內容:apiVersion: deploy.cloud.google.com/v1 kind: DeliveryPipeline metadata: name: deploy-analysis-demo-app-run description: main application pipeline serialPipeline: stages: - targetId: analysis-staging profiles: [] strategy: standard: analysis: duration: 300s googleCloud: alertPolicyChecks: - id: check-1 alertPolicies: - ALERT_POLICY_ID --- apiVersion: deploy.cloud.google.com/v1 kind: Target metadata: name: analysis-staging description: staging Run service run: location: projects/PROJECT_ID/locations/us-central1在這個 YAML 中,請將
ALERT_POLICY_ID替換為您先前執行的gcloud monitoring policies list指令輸出內容,並將PROJECT_ID替換為您使用的專案 ID。向 Cloud Deploy 服務註冊管道和目標:
gcloud deploy apply --file=clouddeploy.yaml --region=us-central1 --project=PROJECT_ID您現在已擁有一個推送管道和一個目標,可以開始部署應用程式。
確認管道和目標:
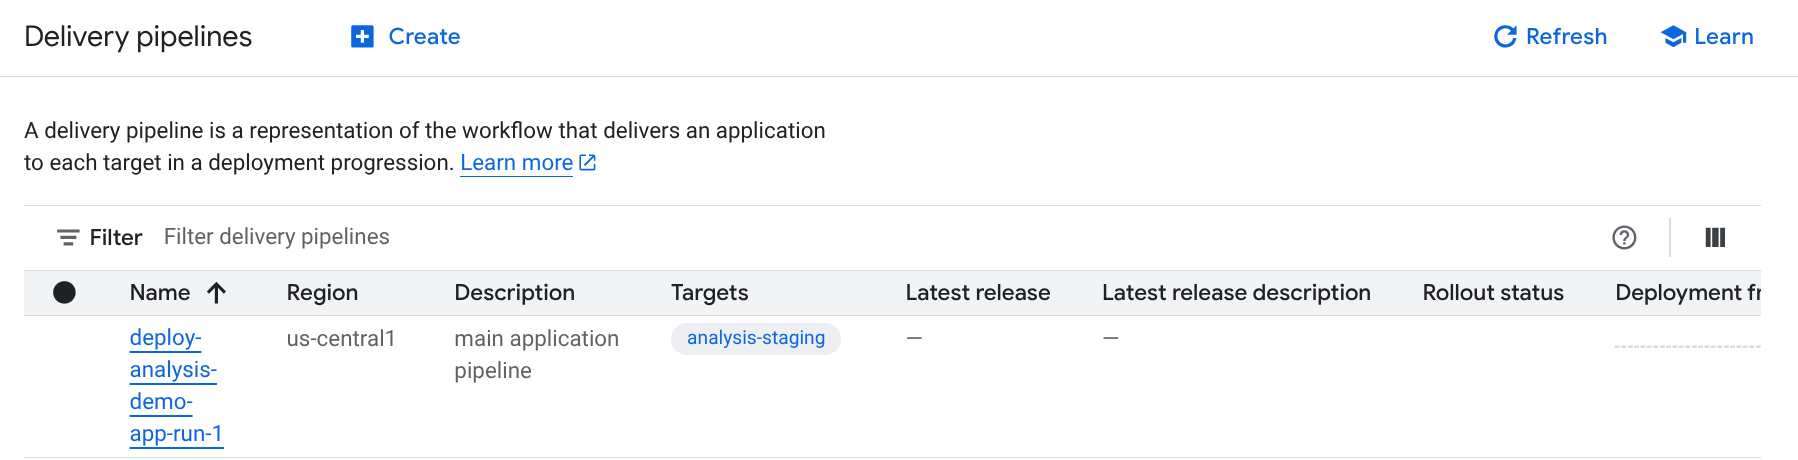
在 Google Cloud 控制台中,前往 Cloud Deploy 的「Delivery pipelines」(推送管道) 頁面,查看可用推送管道的清單。
您剛建立的推送管道會顯示在「目標」欄中,並列出一個目標。
建立發布版本
版本是代表要部署變更的核心 Cloud Deploy 資源。發布管道會定義該版本的生命週期。如要進一步瞭解該生命週期,請參閱「Cloud Deploy 服務架構」。
從 deploy-analysis-run-quickstart 目錄執行下列指令,建立代表要部署容器映像檔的 release 資源:
gcloud deploy releases create test-release-001 \
  --project=PROJECT_ID \
  --region=us-central1 \
  --delivery-pipeline=deploy-analysis-demo-app-run \
  --images=my-app-image=us-docker.pkg.dev/cloudrun/container/hello@sha256:95ade4b17adcd07623b0a0c68359e344fe54e65d0cb01b989e24c39f2fcd296a
請注意 --images= 旗標,您可以使用這個旗標,將服務定義中的預留位置 (my-app-image) 替換為符合 SHA 資格的特定映像檔。Google 建議您以這種方式將服務定義範本化,並在建立發布版本時使用 SHA 認證的圖片名稱。
與所有版本一樣 (除非包含 --disable-initial-rollout),Cloud Deploy 也會自動建立推出資源。應用程式會自動部署至為這個發布管道設定的目標。
在 Google Cloud 控制台中查看結果
幾分鐘後,版本就會部署至目標執行階段。你可以查看。
在 Google Cloud 控制台中,前往 Cloud Deploy 的「Delivery pipelines」(推送管道) 頁面,查看推送管道 (「deploy-analysis-demo-app-run」)。
點選推送管道名稱 (「deploy-analysis-demo-app-run」)。
管道圖表會顯示應用程式的部署狀態。由於管道中只有一個階段,因此視覺化內容只會顯示一個節點。
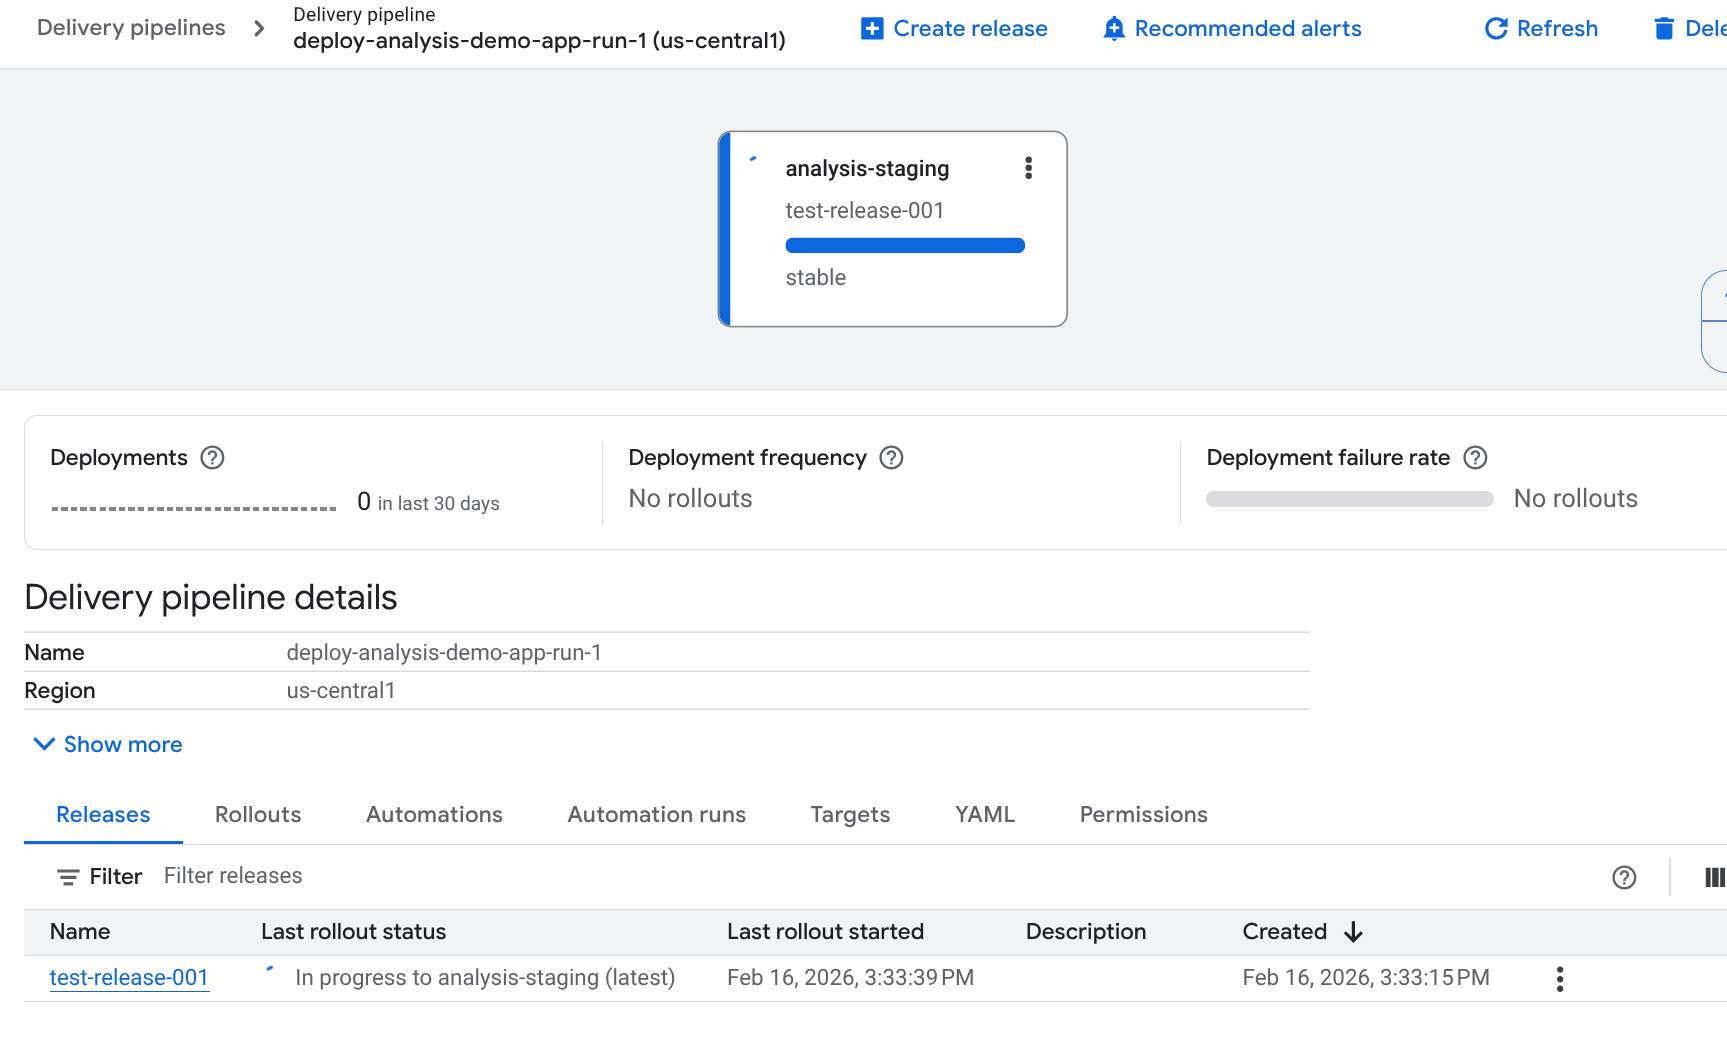
發行內容會列在「推送 pipeline 詳細資料」底下的「發行內容」分頁中。
按一下「發布」分頁標籤,然後點選「發布管道詳細資料」下方的「發布」分頁標籤。
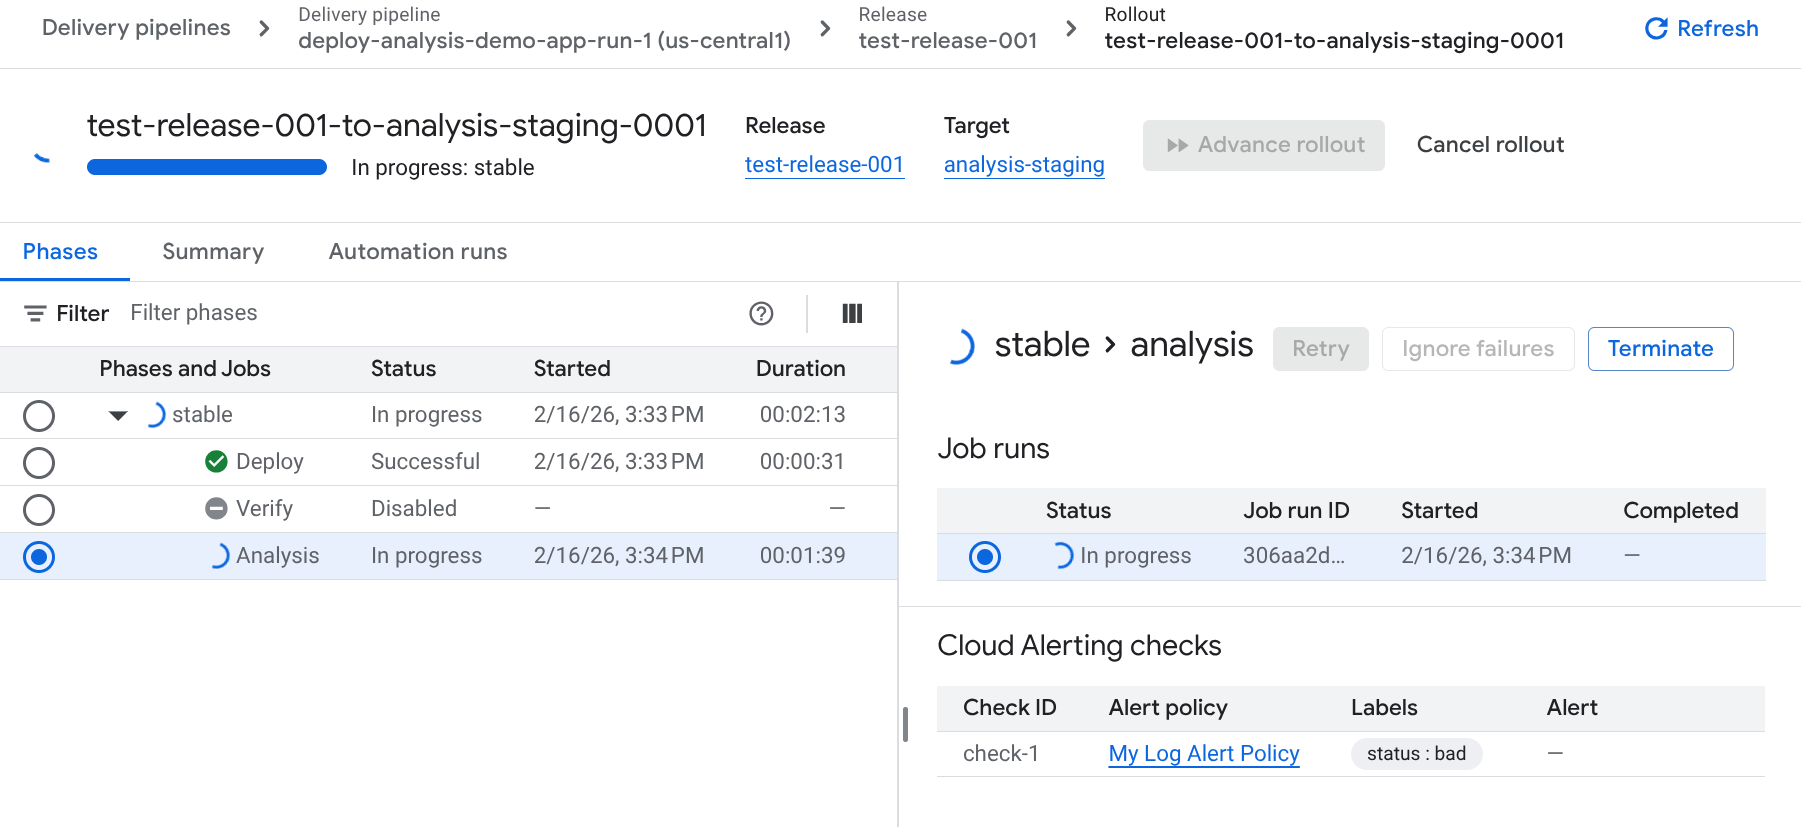
按一下推出名稱,即可查看推出詳細資料。
「分析」列為工作。
分析失敗
在應用程式部署完成後,我們在推送管道設定中指定的分析工作,會做為這次推出作業的一部分執行。這項分析應該會失敗,因為快訊政策應會觸發快訊。由於這項分析失敗,因此推出作業會失敗。
我們會進行變更,然後建立另一個版本,這樣應該就能成功。
變更服務定義並建立新版本
現在,我們變更服務定義中的執行個體計數,讓服務執行個體開始執行,這樣就不會觸發快訊。
編輯 Cloud Run 定義檔案
service.yaml,將run.googleapis.com/manualInstanceCount的值從0變更為1。從相同
deploy-analysis-run-quickstart目錄執行下列指令,建立另一個release:gcloud deploy releases create test-release-002 \ --project=PROJECT_ID \ --region=us-central1 \ --delivery-pipeline=deploy-analysis-demo-app-run \ --images=my-app-image=us-docker.pkg.dev/cloudrun/container/hello@sha256:95ade4b17adcd07623b0a0c68359e344fe54e65d0cb01b989e24c39f2fcd296a
這次應該就能順利推出。這是因為您的 Cloud Run 服務現在有一個執行中的執行個體,因此正常運作時間檢查不會從快訊政策觸發快訊。
清除所用資源
為了避免系統向您的 Google Cloud 帳戶收取本頁面所用資源的費用,請按照下列步驟操作。
刪除 Cloud Run 服務:
gcloud run services delete my-analysis-run-service \
--region=us-central1 \
--project=PROJECT_ID
如要刪除推送管道、目標、版本和推出作業,請在包含推送管道定義的目錄中執行下列指令:
gcloud deploy delete --file=clouddeploy.yaml \
--force \
--region=us-central1 \
--project=PROJECT_ID
刪除 Google Cloud Observability 快訊政策:
gcloud monitoring policies delete ALERT_POLICY_ID刪除 Cloud Deploy 建立的 Cloud Storage bucket。
一個結尾為
_clouddeploy,另一個則是[region].deploy-artifacts.[project].appspot.com。
大功告成,您已經完成本快速入門導覽課程!