
In questo documento vengono utilizzati i seguenti componenti fatturabili di Google Cloud:
- Dataproc
- Compute Engine
- Cloud Composer
Per generare una stima dei costi in base all'utilizzo previsto,
utilizza il calcolatore prezzi.
Prima di iniziare
Configura il progetto
- Accedi al tuo Google Cloud account. Se non conosci Google Cloud, crea un account per valutare le prestazioni dei nostri prodotti in scenari reali. I nuovi clienti ricevono anche 300 $di crediti senza costi per l'esecuzione, il test e il deployment dei workload.
-
In the Google Cloud console, on the project selector page, select or create a Google Cloud project.
Roles required to select or create a project
- Select a project: Selecting a project doesn't require a specific IAM role—you can select any project that you've been granted a role on.
-
Create a project: To create a project, you need the Project Creator role
(
roles/resourcemanager.projectCreator), which contains theresourcemanager.projects.createpermission. Learn how to grant roles.
-
Verify that billing is enabled for your Google Cloud project.
Enable the Dataproc, Compute Engine, and Cloud Composer APIs.
Roles required to enable APIs
To enable APIs, you need the Service Usage Admin IAM role (
roles/serviceusage.serviceUsageAdmin), which contains theserviceusage.services.enablepermission. Learn how to grant roles.-
Installa Google Cloud CLI.
-
Se utilizzi un provider di identità (IdP) esterno, devi prima accedere a gcloud CLI con la tua identità federata.
-
Per inizializzare gcloud CLI, esegui questo comando:
gcloud init -
In the Google Cloud console, on the project selector page, select or create a Google Cloud project.
Roles required to select or create a project
- Select a project: Selecting a project doesn't require a specific IAM role—you can select any project that you've been granted a role on.
-
Create a project: To create a project, you need the Project Creator role
(
roles/resourcemanager.projectCreator), which contains theresourcemanager.projects.createpermission. Learn how to grant roles.
-
Verify that billing is enabled for your Google Cloud project.
Enable the Dataproc, Compute Engine, and Cloud Composer APIs.
Roles required to enable APIs
To enable APIs, you need the Service Usage Admin IAM role (
roles/serviceusage.serviceUsageAdmin), which contains theserviceusage.services.enablepermission. Learn how to grant roles.-
Installa Google Cloud CLI.
-
Se utilizzi un provider di identità (IdP) esterno, devi prima accedere a gcloud CLI con la tua identità federata.
-
Per inizializzare gcloud CLI, esegui questo comando:
gcloud init
Crea un modello di workflow Dataproc
Copia ed esegui i seguenti comandi in una finestra del terminale locale o in Cloud Shell per creare e definire un modello di workflow.
- Crea il modello di workflow
sparkpi.gcloud dataproc workflow-templates create sparkpi \ --region=us-central1 - Aggiungi il job Spark al modello di workflow
sparkpi. Il flag "compute"step-ididentifica il job SparkPi.gcloud dataproc workflow-templates add-job spark \ --workflow-template=sparkpi \ --step-id=compute \ --class=org.apache.spark.examples.SparkPi \ --jars=file:///usr/lib/spark/examples/jars/spark-examples.jar \ --region=us-central1 \ -- 1000 - Utilizza un cluster gestito,
a nodo singolo
per eseguire il workflow. Dataproc creerà il cluster, eseguirà il workflow al suo interno e poi lo eliminerà al termine del workflow.
gcloud dataproc workflow-templates set-managed-cluster sparkpi \ --cluster-name=sparkpi \ --single-node \ --region=us-central1 - Conferma la creazione del modello di workflow.
Console
Fai clic sul nome
sparkpinella pagina Workflow di Dataproc nella console per aprire la pagina Dettagli modello di workflow. Google Cloud Fai clic sul nome del tuo modello di workflow per confermare gli attributi del modellosparkpi.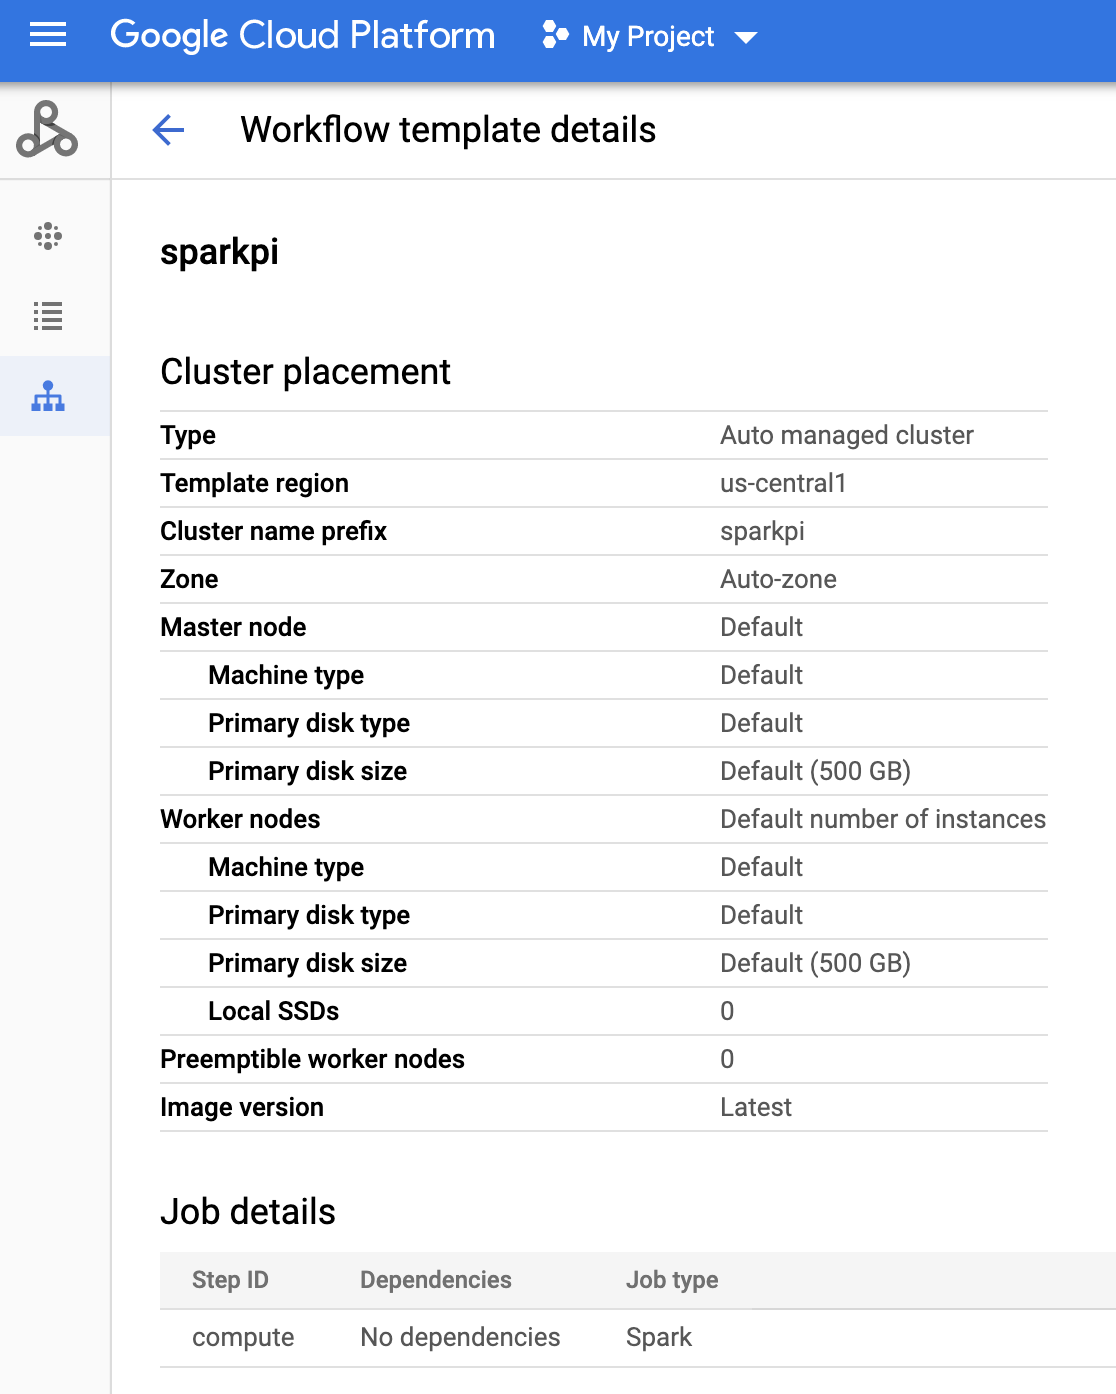
Comando g-cloud
Esegui questo comando:
gcloud dataproc workflow-templates describe sparkpi --region=us-central1
Crea e carica un DAG in Cloud Storage
- Crea o utilizza un ambiente Cloud Composer esistente.
- Imposta le variabili di ambiente.
UI di Airflow
- Nella barra degli strumenti, fai clic su Amministrazione > Variabili.
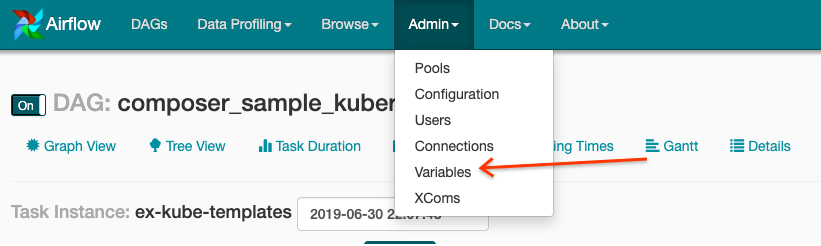
- Fai clic su Crea.
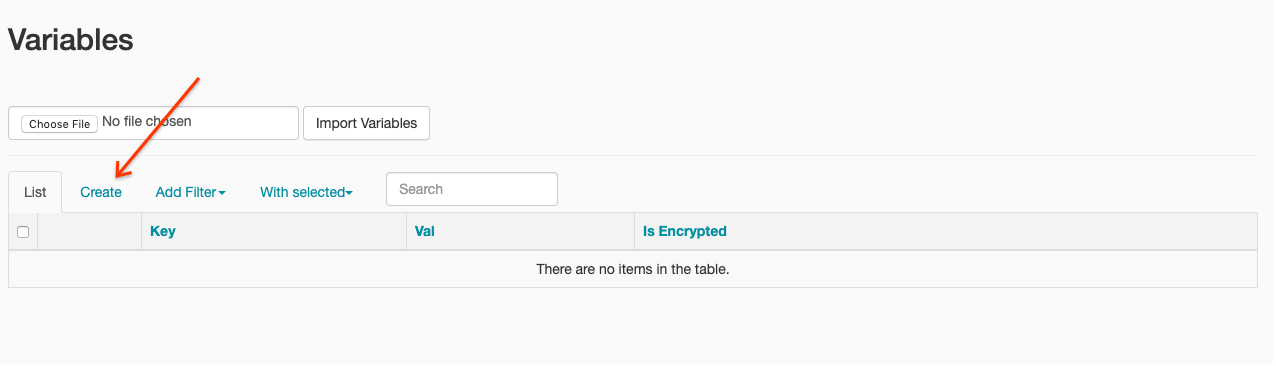
- Inserisci le seguenti informazioni:
- Chiave:
project_id - Valore: PROJECT_ID — il tuo Google Cloud ID progetto
- Chiave:
- Fai clic su Salva.
Comando g-cloud
Inserisci i seguenti comandi:
ENVIRONMENTè il nome dell'ambiente Cloud ComposerLOCATIONè la regione in cui si trova l'ambiente Cloud ComposerPROJECT_IDè l'ID progetto del progetto che contiene l'ambiente Cloud Composer
gcloud composer environments run ENVIRONMENT --location LOCATION variables set -- project_id PROJECT_ID - Nella barra degli strumenti, fai clic su Amministrazione > Variabili.
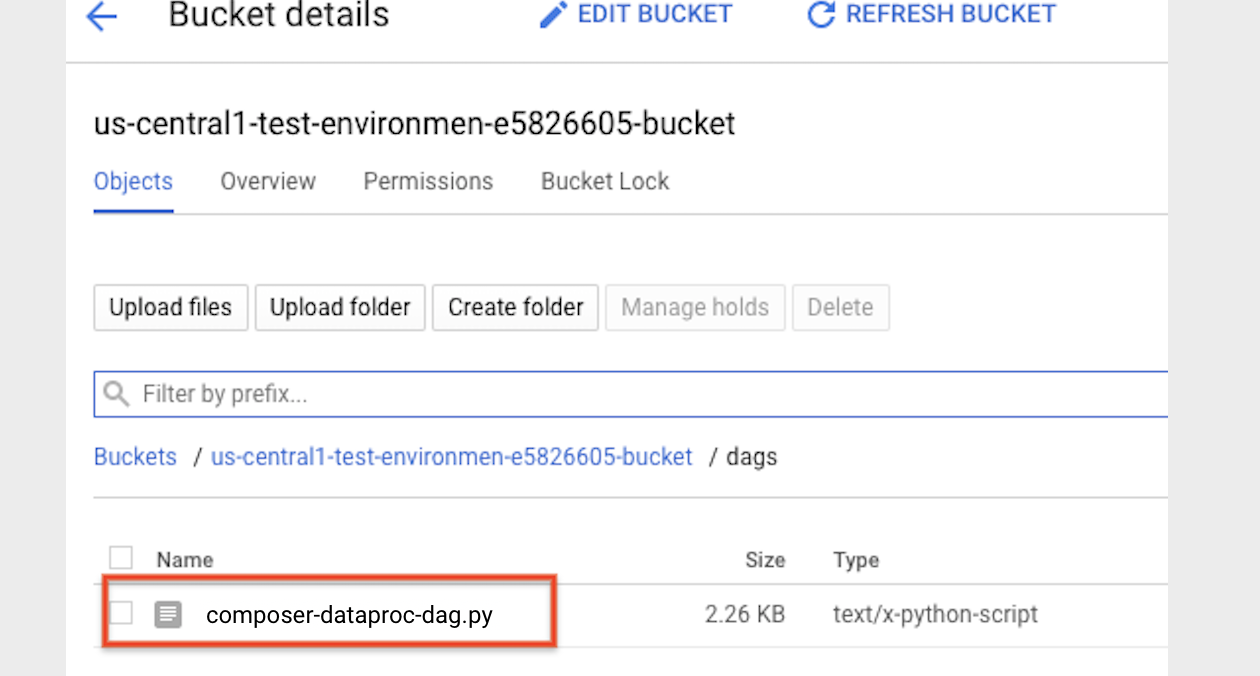
- Copia il seguente codice DAG localmente in un file denominato "composer-dataproc-dag.py",
che utilizza il
DataprocInstantiateWorkflowTemplateOperator.
Airflow 2
Airflow 1
- Carica il
DAG nella cartella dell'ambiente in Cloud Storage. Al termine del caricamento, fai clic sul link Cartella DAG nella pagina dell'ambiente Cloud Composer.
Visualizza lo stato di un'attività
UI di Airflow
- Apri l'interfaccia web di Airflow.
- Nella pagina DAG, fai clic sul nome del DAG (ad esempio
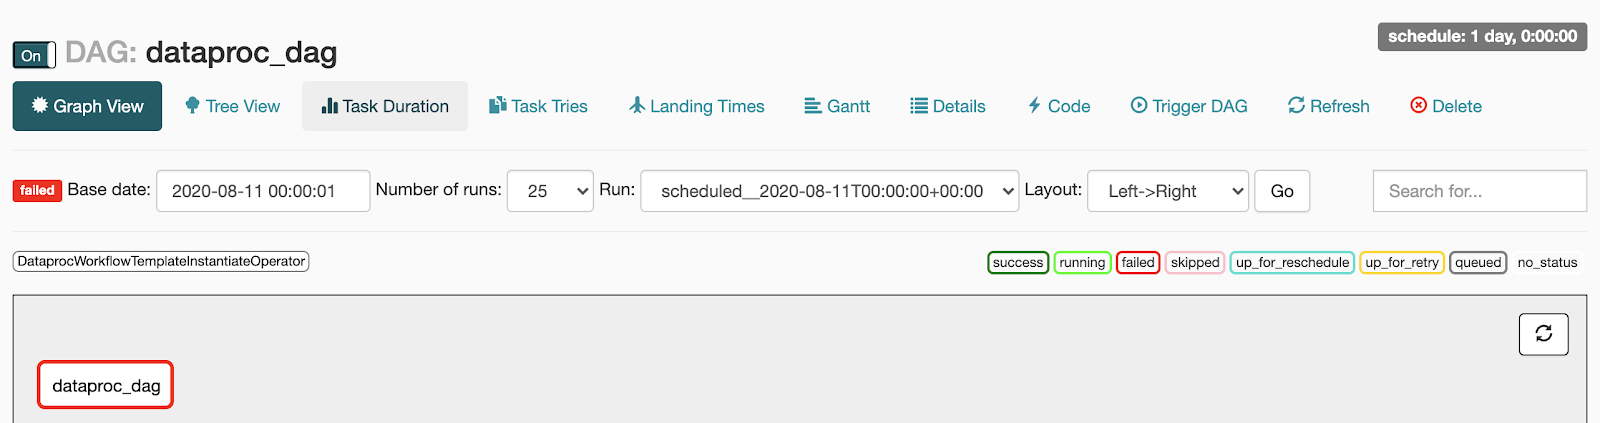
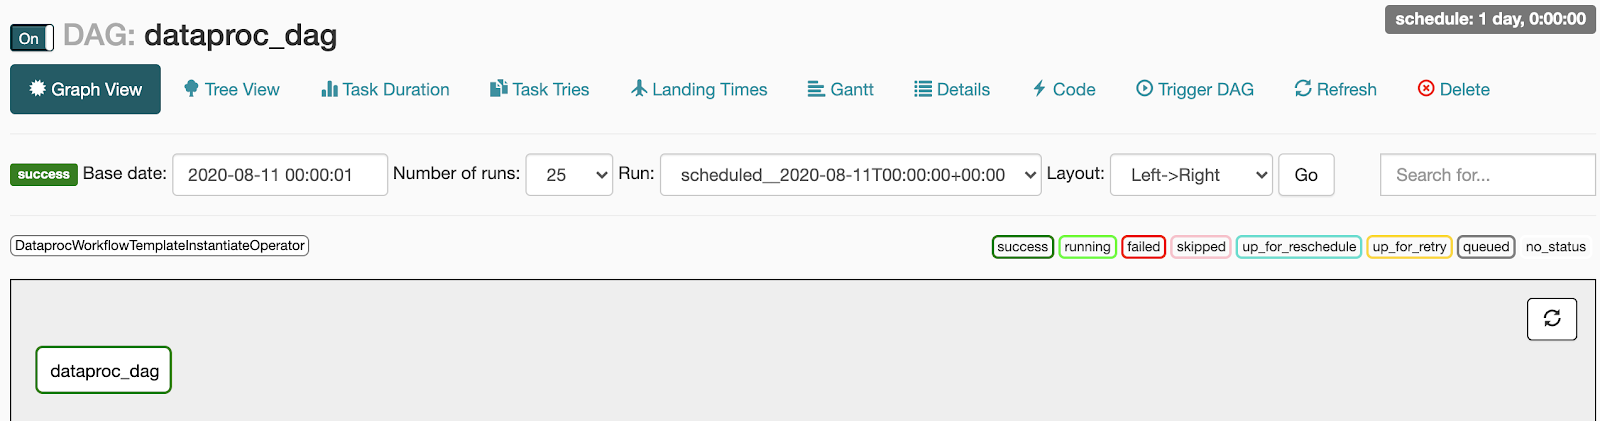
dataproc_workflow_dag). - Nella pagina dei dettagli dei DAG, fai clic su Visualizzazione grafico.
- Controlla lo stato:
- Non riuscito: l'attività ha una casella rossa intorno.
Puoi anche tenere il puntatore sopra l'attività e cercare Stato: Non riuscito.
- Riuscito: l'attività ha una casella verde intorno.
Puoi anche tenere il puntatore sopra l'attività e cercare Stato: Riuscito.
- Non riuscito: l'attività ha una casella rossa intorno.
Puoi anche tenere il puntatore sopra l'attività e cercare Stato: Non riuscito.
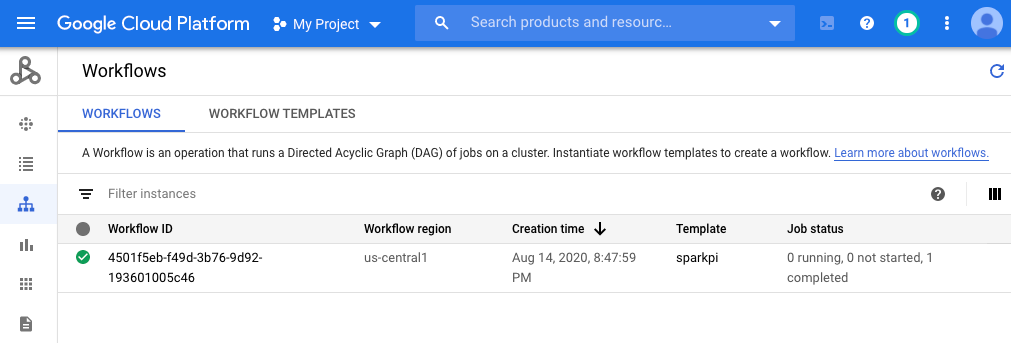
Console
Fai clic sulla scheda Workflows per visualizzare lo stato del workflow.
Comando g-cloud
gcloud dataproc operations list \
    --region=us-central1 \
    --filter="labels.goog-dataproc-workflow-template-id=sparkpi"
Libera spazio
Per evitare che al tuo Google Cloud account vengano addebitati costi, puoi eliminare le risorse utilizzate in questo tutorial:
Passaggi successivi
- Consulta la panoramica dei modelli di workflow Dataproc.
- Consulta le soluzioni di pianificazione del workflow.