
Create a lakehouse with Spark and Lakehouse runtime catalog
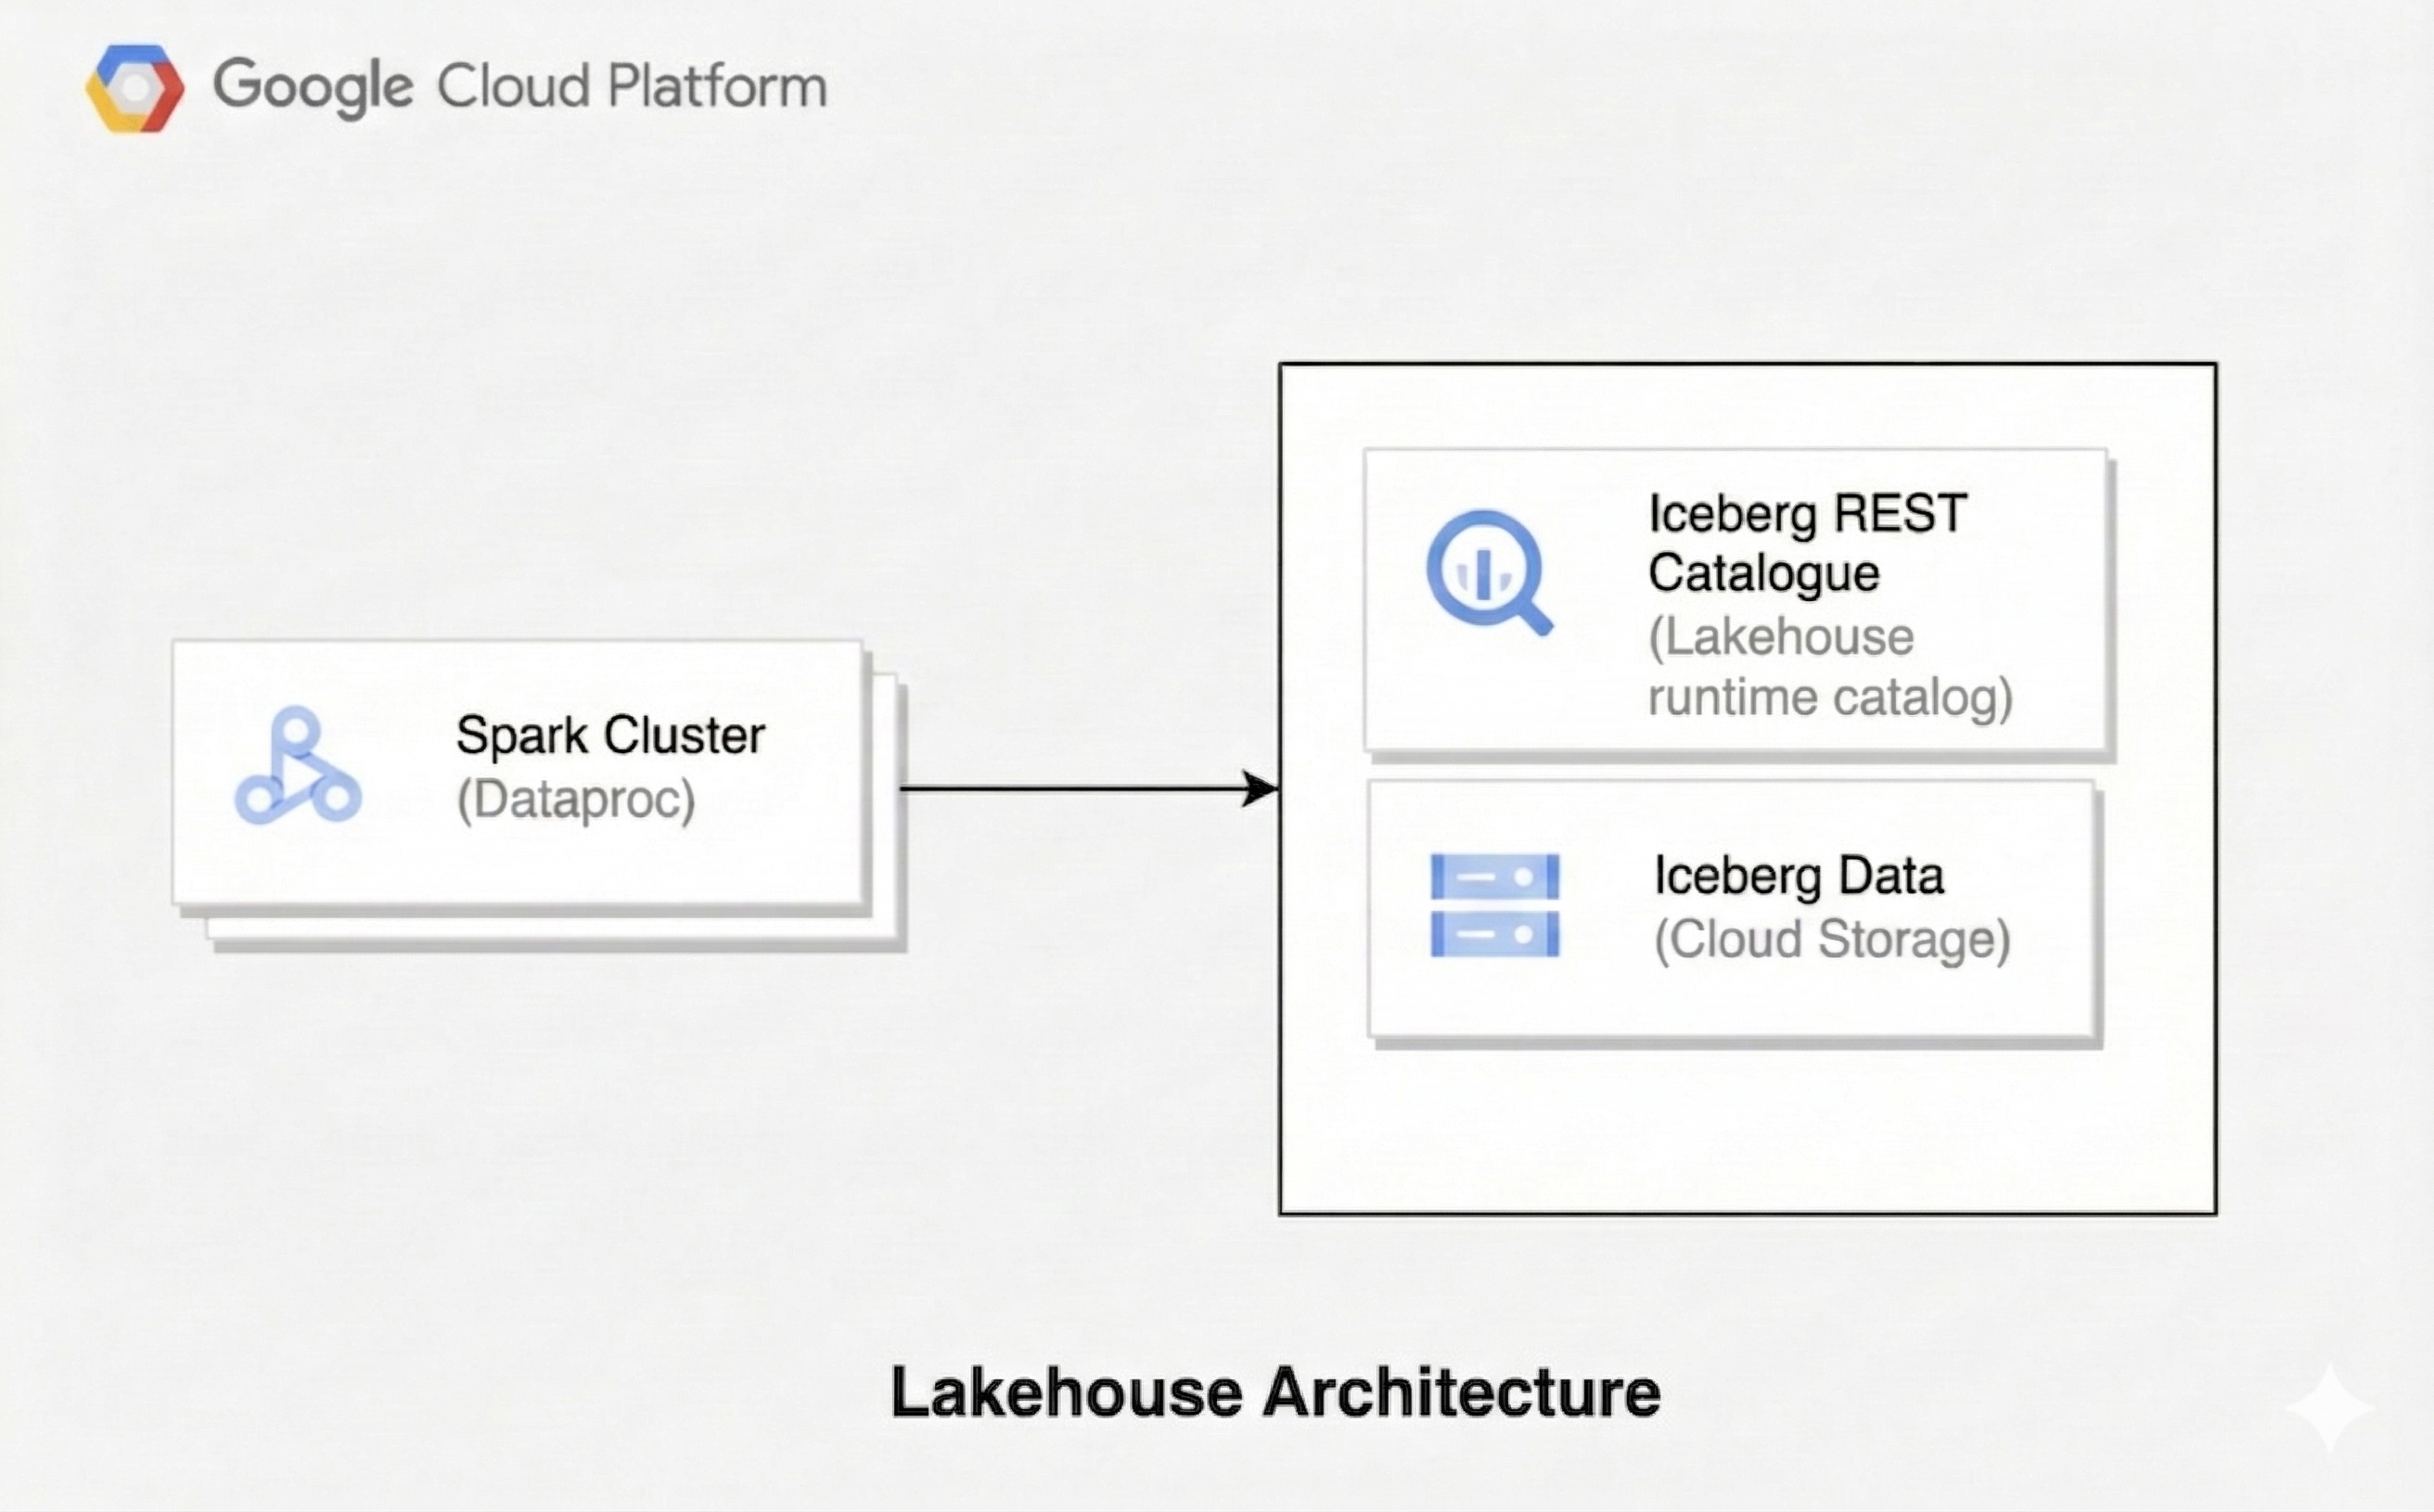
A lakehouse architecture combines the flexibility of a data lake with the data management features of a data warehouse. This document shows you how to set up a lakehouse on Google Cloud. You use Apache Iceberg as the table format, Managed Service for Apache Spark for processing, and the Lakehouse runtime catalog Iceberg REST Catalog for unified metadata management.
This architecture uses open table formats like Iceberg to add data warehousing capabilities, such as transactions and schema evolution, to data in Cloud Storage. This approach creates a single source of truth for your data that is accessible by various engines.
Before you begin
- Sign in to your Google Cloud account. If you're new to Google Cloud, create an account to evaluate how our products perform in real-world scenarios. New customers also get $300 in free credits to run, test, and deploy workloads.
-
In the Google Cloud console, on the project selector page, select or create a Google Cloud project.
Roles required to select or create a project
- Select a project: Selecting a project doesn't require a specific IAM role—you can select any project that you've been granted a role on.
-
Create a project: To create a project, you need the Project Creator role
(
roles/resourcemanager.projectCreator), which contains theresourcemanager.projects.createpermission. Learn how to grant roles.
-
Verify that you have the permissions required to complete this guide.
-
Verify that billing is enabled for your Google Cloud project.
Enable the Dataproc, BigQuery, and Cloud Storage APIs.
Roles required to enable APIs
To enable APIs, you need the Service Usage Admin IAM role (
roles/serviceusage.serviceUsageAdmin), which contains theserviceusage.services.enablepermission. Learn how to grant roles.-
In the Google Cloud console, on the project selector page, select or create a Google Cloud project.
Roles required to select or create a project
- Select a project: Selecting a project doesn't require a specific IAM role—you can select any project that you've been granted a role on.
-
Create a project: To create a project, you need the Project Creator role
(
roles/resourcemanager.projectCreator), which contains theresourcemanager.projects.createpermission. Learn how to grant roles.
-
Verify that you have the permissions required to complete this guide.
-
Verify that billing is enabled for your Google Cloud project.
Enable the Dataproc, BigQuery, and Cloud Storage APIs.
Roles required to enable APIs
To enable APIs, you need the Service Usage Admin IAM role (
roles/serviceusage.serviceUsageAdmin), which contains theserviceusage.services.enablepermission. Learn how to grant roles.- Create a Cloud Storage bucket to store Iceberg data.
Required roles
Certain Identity and Access Management (IAM) roles are required to run the examples on this page. Depending on organization policies, these roles may have already been granted. To check role grants, see Do you need to grant roles?.
For more information about granting roles, see Manage access to projects,folders, and organizations.
User roles
To get the permissions that you need to create a Managed Service for Apache Spark cluster, ask your administrator to grant you the following IAM roles:
- Dataproc Editor (
roles/dataproc.editor) on the project - Service Account User (
roles/iam.serviceAccountUser) on the Compute Engine default service account
Service account role
To ensure that the Compute Engine default service account has the necessary
permissions to create a Managed Service for Apache Spark cluster,
ask your administrator to grant the
Dataproc Worker (roles/dataproc.worker) IAM role to the Compute Engine default service account on the project.
Create a Managed Service for Apache Spark cluster
Create a Managed Service for Apache Spark cluster with the Iceberg and Jupyter optional components.
To create the cluster, run the following
gcloudcommand:gcloud dataproc clusters create CLUSTER_NAME \ --project=PROJECT_ID \ --region=REGION \ --image-version=2.3-debian12 \ --optional-components=ICEBERG,JUPYTER \ --enable-component-gateway \ --properties 'dataproc:dataproc.lineage.enabled=true'Replace the following:
CLUSTER_NAME: a name for your cluster.PROJECT_ID: your Google Cloud project ID.REGION: the Google Cloud region for the cluster, for example,us-central1.
Note, setting
dataproc:dataproc.lineage.enabled=trueis not required for the Lakehouse runtime catalog Iceberg REST Catalog to work correctly. It is added for lineage tracking in the data lineage example below.Connect to the cluster using a Jupyter Notebook. You can use a Vertex AI Workbench notebook or launch a notebook directly on the cluster.
Configure a Spark session
In your Jupyter Notebook, create a Spark session configured to use the Lakehouse runtime catalog Iceberg REST Catalog.
import pyspark
from pyspark.context import SparkContext
from pyspark.sql import SparkSession

catalog_name = "CATALOG_NAME"

spark = SparkSession.builder.appName("APP_NAME") \
  .config(f'spark.sql.catalog.{catalog_name}', 'org.apache.iceberg.spark.SparkCatalog') \
  .config(f'spark.sql.catalog.{catalog_name}.type', 'rest') \
  .config(f'spark.sql.catalog.{catalog_name}.uri', 'https://biglake.googleapis.com/iceberg/v1beta/restcatalog') \
  .config(f'spark.sql.catalog.{catalog_name}.warehouse', 'gs://GCS_BUCKET') \
  .config(f'spark.sql.catalog.{catalog_name}.header.x-goog-user-project', 'PROJECT_ID') \
  .config(f'spark.sql.catalog.{catalog_name}.rest.auth.type', 'org.apache.iceberg.gcp.auth.GoogleAuthManager') \
  .config(f'spark.sql.catalog.{catalog_name}.io-impl', 'org.apache.iceberg.gcp.gcs.GCSFileIO') \
  .config(f'spark.sql.catalog.{catalog_name}.rest-metrics-reporting-enabled', 'false') \
  .config('spark.sql.extensions', 'org.apache.iceberg.spark.extensions.IcebergSparkSessionExtensions') \
  .config('spark.sql.defaultCatalog', catalog_name) \
  .getOrCreate()
Replace the following:
CATALOG_NAME: a name for your Iceberg catalog, for example,iceberg_catalog.APP_NAME: the name of your Spark application.GCS_BUCKET: the Cloud Storage bucket to store your Iceberg table data.PROJECT_ID: your Google Cloud project ID.
Manage data with Spark SQL
After you configure the Spark session, use Spark SQL to perform data management operations.
Create a namespace. In the Lakehouse runtime catalog Iceberg REST Catalog, a namespace corresponds to a BigQuery dataset.
spark.sql("CREATE NAMESPACE IF NOT EXISTS NAMESPACE_NAME")
spark.sql("USE NAMESPACE_NAME")
Replace
NAMESPACE_NAMEwith the name for your namespace, for example,spark_lakehouse.Create a base table in Iceberg format and insert data.
spark.sql("DROP TABLE IF EXISTS base_table PURGE")
spark.sql("CREATE TABLE base_table (id LONG) USING iceberg")
spark.sql("INSERT INTO base_table VALUES 0, 1, 2, 3, 4")
spark.sql("SELECT * FROM base_table").show()
The output is similar to the following:
   +---+
   | id|
   +---+
   |  0|
   |  1|
   |  2|
   |  3|
   |  4|
   +---+
Create a second table for new data.
spark.sql("DROP TABLE IF EXISTS newdata PURGE")
spark.sql("CREATE TABLE newdata(id LONG) USING iceberg")
spark.sql("INSERT INTO newdata VALUES 3, 4, 5, 6")
spark.sql("SELECT * FROM newdata").show()
The output is similar to the following:
   +---+
   | id|
   +---+
   |  3|
   |  4|
   |  5|
   |  6|
   +---+
Merge the new data into the base table.
spark.sql("""MERGE INTO base_table USING newdata
           ON base_table.id = newdata.id
           WHEN MATCHED THEN
             UPDATE SET base_table.id = newdata.id
           WHEN NOT MATCHED THEN INSERT * """)
spark.sql("SELECT * FROM base_table").show()
The output is similar to the following:
   +---+
   | id|
   +---+
   |  0|
   |  1|
   |  2|
   |  3|
   |  4|
   |  5|
   |  6|
   +---+
Update records in the base table.
spark.sql(
     "UPDATE base_table SET id = (id + 100) WHERE (id % 2 == 0)"
 )
spark.sql("SELECT * FROM base_table").show()
The output is similar to the following:
   +---+
   | id|
   +---+
   |  3|
   |104|
   |  5|
   |106|
   |100|
   |102|
   |  1|
   +---+
Delete records from the base table.
spark.sql("DELETE FROM base_table WHERE (id % 2 == 0)")
spark.sql("SELECT * FROM base_table").show()
The output is similar to the following:
   +---+
   | id|
   +---+
   |  3|
   |  5|
   |  1|
   +---+
Query a historical snapshot
Retrieve a previous version of a table by querying a specific snapshot ID. This operation is also known as time travel.
Retrieve the snapshot ID of the table version before the
MERGE,UPDATE, andDELETEoperations.snapshot_ids = spark.sql( "SELECT snapshot_id FROM `NAMESPACE_NAME`.`base_table`.snapshots" ).collect() oldest_snapshot_id = snapshot_ids[1]["snapshot_id"]Replace
NAMESPACE_NAMEwith the namespace that you created.Query the table using the retrieved snapshot ID.
df = (
     spark.read.format("iceberg")
     .option("versionAsOf", oldest_snapshot_id)
     .load("base_table")
 )
df.show()
The output shows the state of the table after the
MERGEoperation but before anyUPDATEorDELETEoperations.+---+ | id| +---+ | 0| | 1| | 2| | 3| | 4| | 5| | 6| +---+
Discover data lineage
You can track data movement between Lakehouse runtime catalog
Iceberg REST Catalog tables
with data lineage, which
is available in Managed Service for Apache Spark 2.2 and later image versions.
Data lineage example
Create source and target Iceberg tables, then copy data.
spark.sql("DROP TABLE IF EXISTS source_table PURGE")
spark.sql("DROP TABLE IF EXISTS target_table PURGE")
spark.sql("CREATE TABLE source_table (id LONG) USING iceberg")
spark.sql("""CREATE TABLE target_table
  USING ICEBERG
  AS SELECT max(id) as top_id FROM source_table
  """)
In the Google Cloud console, go to the Knowledge Catalog Search page.
Search for one of the tables, and then click the
Lineagetab: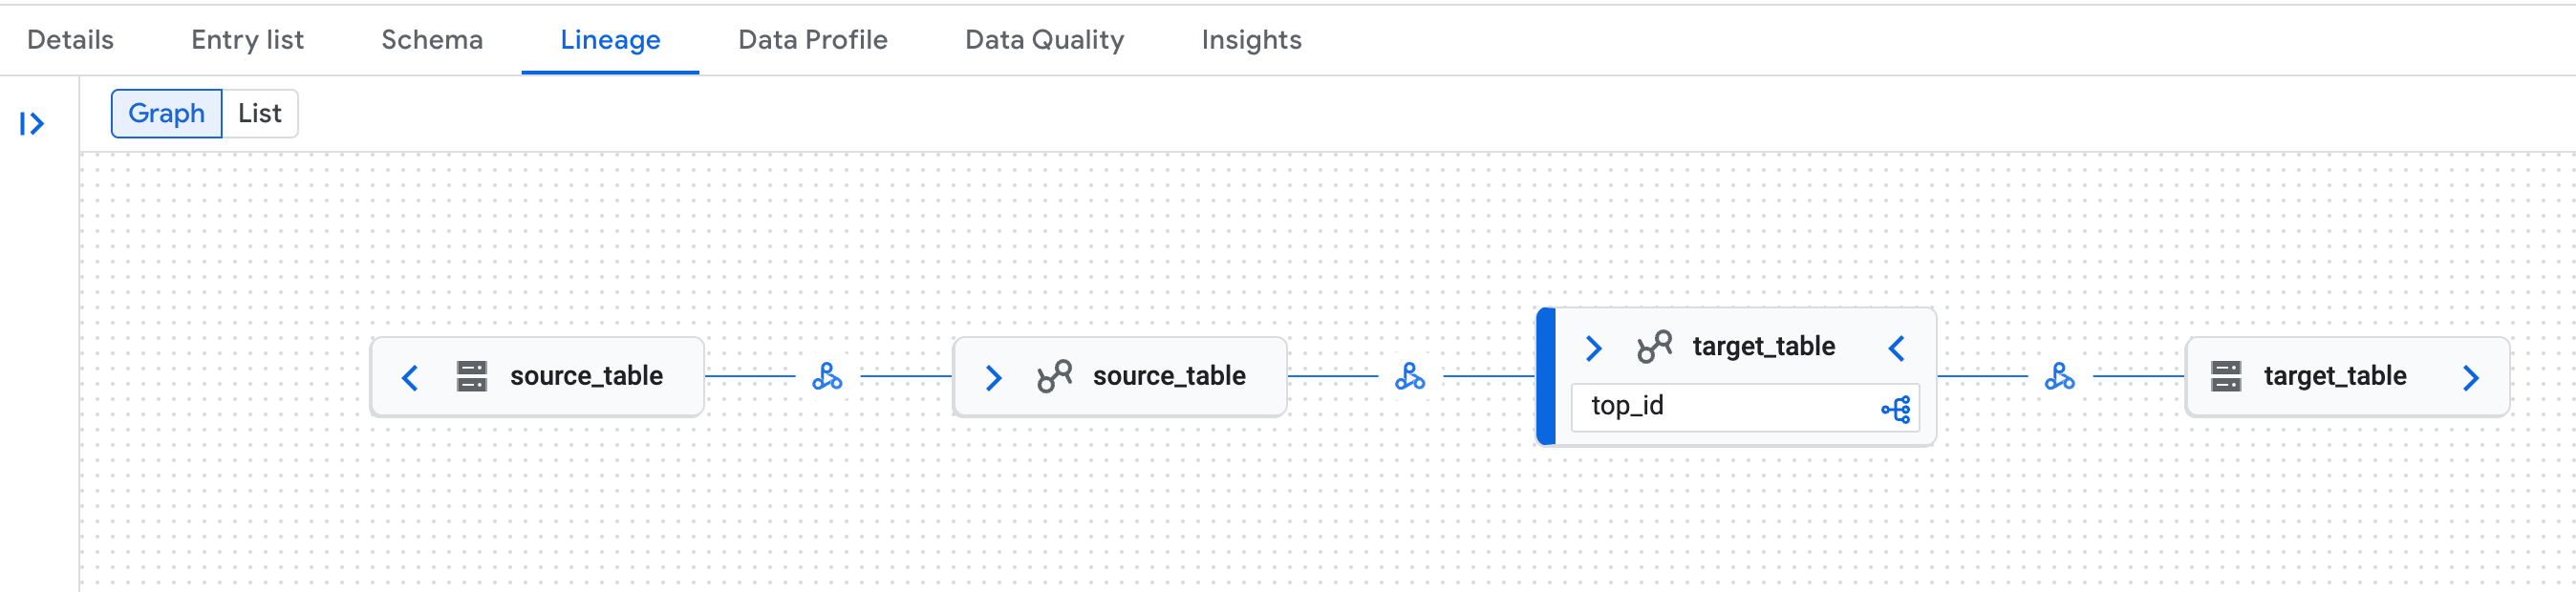
Example of data lineage graph in the Knowledge Catalog page in the Google Cloud console. Data lineage recognizes both the logical (Lakehouse runtime catalog table) and physical (Cloud Storage) representations of Lakehouse runtime catalog Iceberg REST Catalog tables.
Data lineage known issue
In some Managed Service for Apache Spark clusters the full data lineage may not be
generated due to an OpenLineage library issue.
Workaround: in the Spark session config, set the spark.sql.catalog.{catalog_name}.uri
property to https://biglake.googleapis.com/iceberg/v1beta/restcatalog.
What's next
- Learn more about the Lakehouse runtime catalog Iceberg REST Catalog.
- Explore the features of Apache Iceberg.
- Learn how to query Iceberg data from Lakehouse runtime catalog.
- Learn more about data lineage and Managed Service for Apache Spark.