
Dans ce document, vous utilisez les composants facturables suivants de Google Cloud :
- Managed Service for Apache Spark
- Compute Engine
- Cloud Composer
Pour obtenir une estimation des coûts en fonction de votre utilisation prévue, utilisez le simulateur de coût.
Avant de commencer
Configurer votre projet
- Connectez-vous à votre compte Google Cloud . Si vous débutez sur Google Cloud, créez un compte pour évaluer les performances de nos produits en conditions réelles. Les nouveaux clients bénéficient également de 300 $de crédits sans frais pour exécuter, tester et déployer des charges de travail.
-
In the Google Cloud console, on the project selector page, select or create a Google Cloud project.
Roles required to select or create a project
- Select a project: Selecting a project doesn't require a specific IAM role—you can select any project that you've been granted a role on.
-
Create a project: To create a project, you need the Project Creator role
(
roles/resourcemanager.projectCreator), which contains theresourcemanager.projects.createpermission. Learn how to grant roles.
-
Verify that billing is enabled for your Google Cloud project.
Enable the Dataproc, Compute Engine, and Cloud Composer APIs.
Roles required to enable APIs
To enable APIs, you need the Service Usage Admin IAM role (
roles/serviceusage.serviceUsageAdmin), which contains theserviceusage.services.enablepermission. Learn how to grant roles.-
Installez la Google Cloud CLI.
-
Si vous utilisez un fournisseur d'identité (IdP) externe, vous devez d'abord vous connecter à la gcloud CLI avec votre identité fédérée.
-
Pour initialiser la gcloud CLI, exécutez la commande suivante :
gcloud init -
In the Google Cloud console, on the project selector page, select or create a Google Cloud project.
Roles required to select or create a project
- Select a project: Selecting a project doesn't require a specific IAM role—you can select any project that you've been granted a role on.
-
Create a project: To create a project, you need the Project Creator role
(
roles/resourcemanager.projectCreator), which contains theresourcemanager.projects.createpermission. Learn how to grant roles.
-
Verify that billing is enabled for your Google Cloud project.
Enable the Dataproc, Compute Engine, and Cloud Composer APIs.
Roles required to enable APIs
To enable APIs, you need the Service Usage Admin IAM role (
roles/serviceusage.serviceUsageAdmin), which contains theserviceusage.services.enablepermission. Learn how to grant roles.-
Installez la Google Cloud CLI.
-
Si vous utilisez un fournisseur d'identité (IdP) externe, vous devez d'abord vous connecter à la gcloud CLI avec votre identité fédérée.
-
Pour initialiser la gcloud CLI, exécutez la commande suivante :
gcloud init
Créer un modèle de workflow Managed Service pour Apache Spark
Copiez et exécutez les commandes suivantes dans une fenêtre de terminal local ou dans Cloud Shell pour créer et définir un modèle de workflow.
- Créez le modèle de workflow
sparkpi.gcloud dataproc workflow-templates create sparkpi \ --region=us-central1 - Ajoutez la tâche spark au modèle de workflow
sparkpi. L'option "compute"step-ididentifie la tâche SparkPi.gcloud dataproc workflow-templates add-job spark \ --workflow-template=sparkpi \ --step-id=compute \ --class=org.apache.spark.examples.SparkPi \ --jars=file:///usr/lib/spark/examples/jars/spark-examples.jar \ --region=us-central1 \ -- 1000 - Utilisez un cluster géré à nœud unique pour exécuter le workflow. Managed Service for Apache Spark crée le cluster, y exécute le workflow, puis le supprime une fois le workflow terminé.
gcloud dataproc workflow-templates set-managed-cluster sparkpi \ --cluster-name=sparkpi \ --single-node \ --region=us-central1 - Confirmez la création du modèle de workflow.
Console
Cliquez sur le nom
sparkpisur la page Workflows Managed Service for Apache Spark dans la console Google Cloud pour ouvrir la page Détails du modèle de workflow. Cliquez sur le nom de votre modèle de workflow pour confirmer les attributs du modèlesparkpi.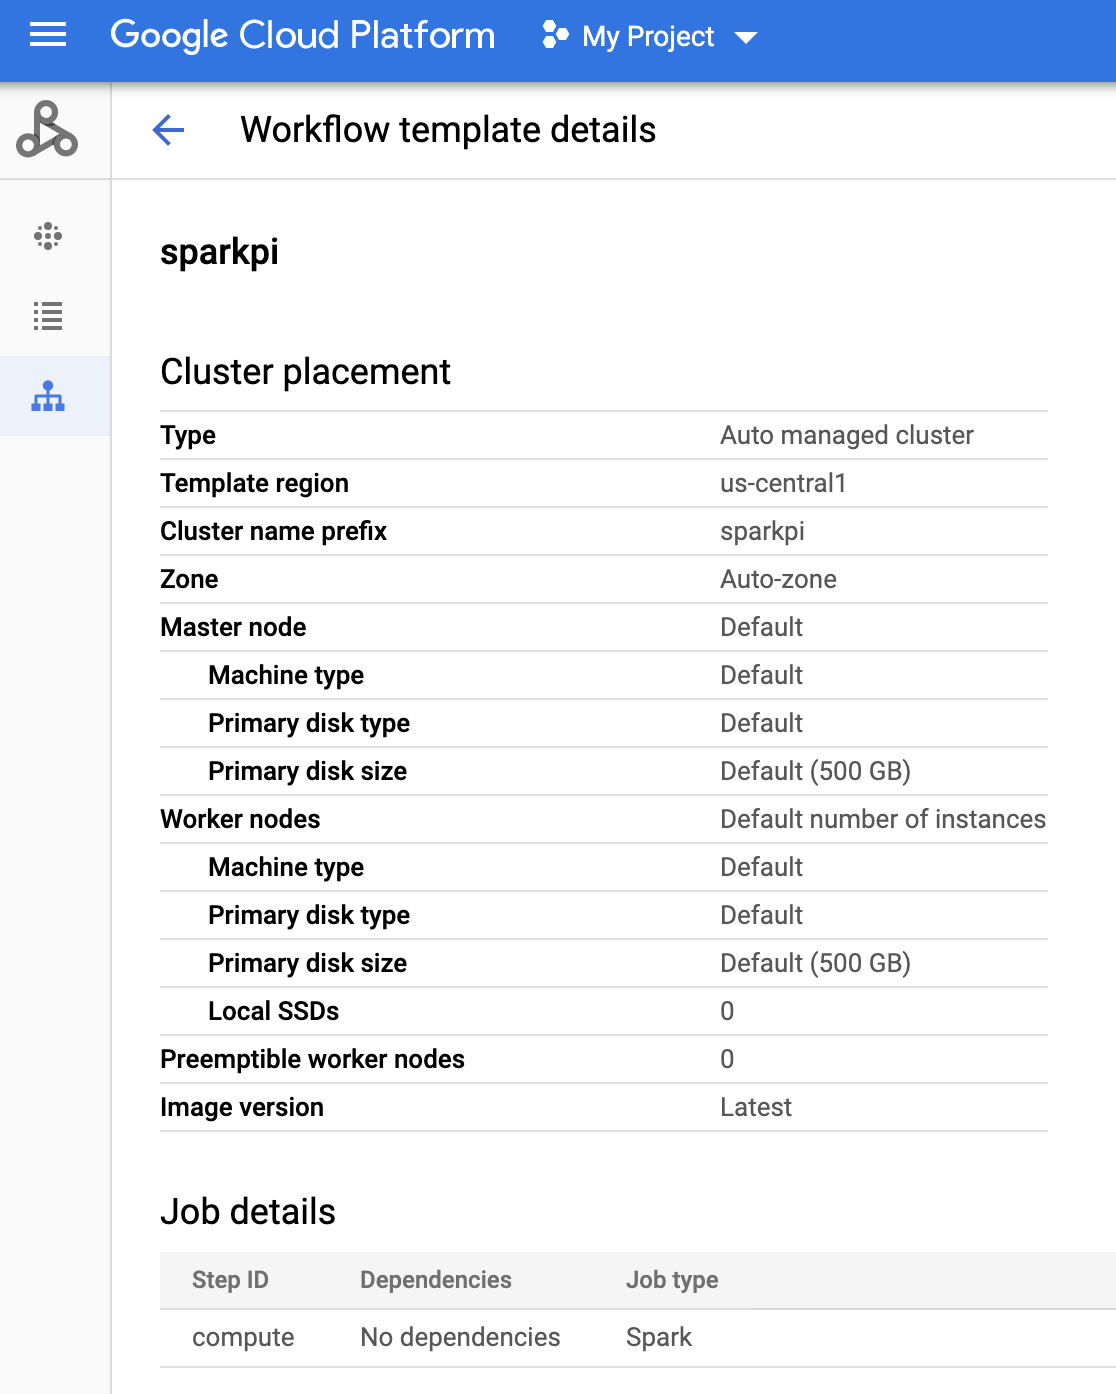
Commande gcloud
Exécutez la commande suivante :
gcloud dataproc workflow-templates describe sparkpi --region=us-central1
Créer et importer un DAG dans Cloud Storage
- Créez ou utilisez un environnement Cloud Composer existant.
- Définir des variables d'environnement.
Interface utilisateur d'Airflow
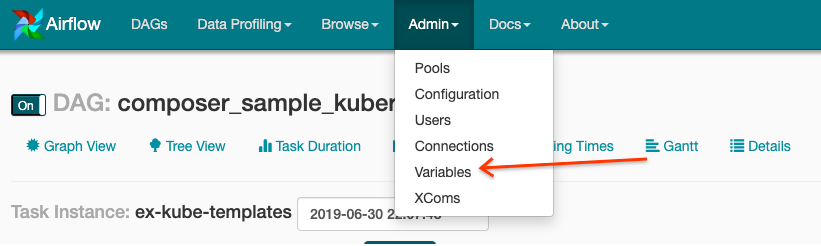
- Dans la barre d'outils, cliquez sur Admin > Variables (Administration > Variables).
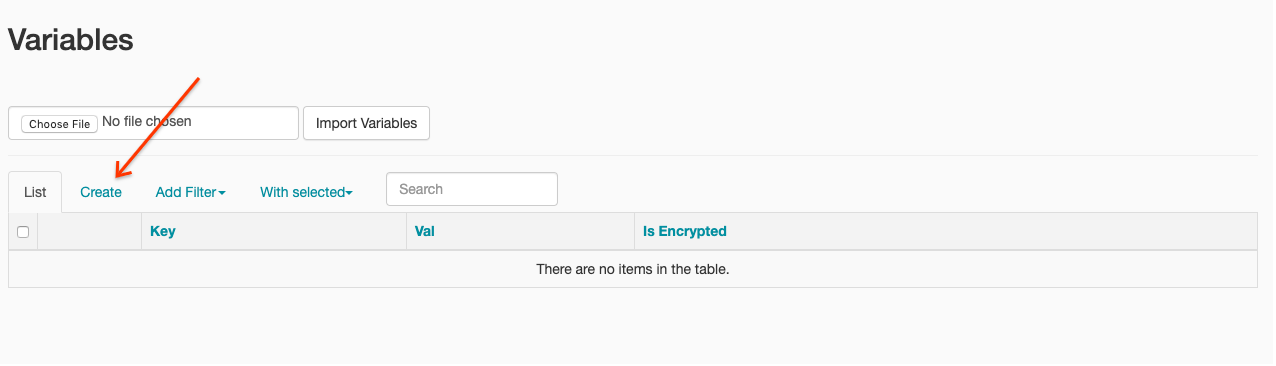
- Cliquez sur Créer.
- Saisissez les informations suivantes :
- Key (Clé) :
project_id - Valeur : PROJECT_ID, l'ID de votre Google Cloud projet
- Key (Clé) :
- Cliquez sur Enregistrer.
Commande gcloud
Saisissez les commandes suivantes :
ENVIRONMENTcorrespond au nom de l'environnement Cloud Composer.LOCATIONcorrespond à la région où se trouve l'environnement Cloud Composer.PROJECT_IDest l'ID du projet contenant l'environnement Cloud Composer.
gcloud composer environments run ENVIRONMENT --location LOCATION variables set -- project_id PROJECT_ID - Dans la barre d'outils, cliquez sur Admin > Variables (Administration > Variables).
- Copiez le code DAG suivant localement dans un fichier nommé "composer-dataproc-dag.py", qui utilise DataprocInstantiateWorkflowTemplateOperator.
Airflow 2
Airflow 1
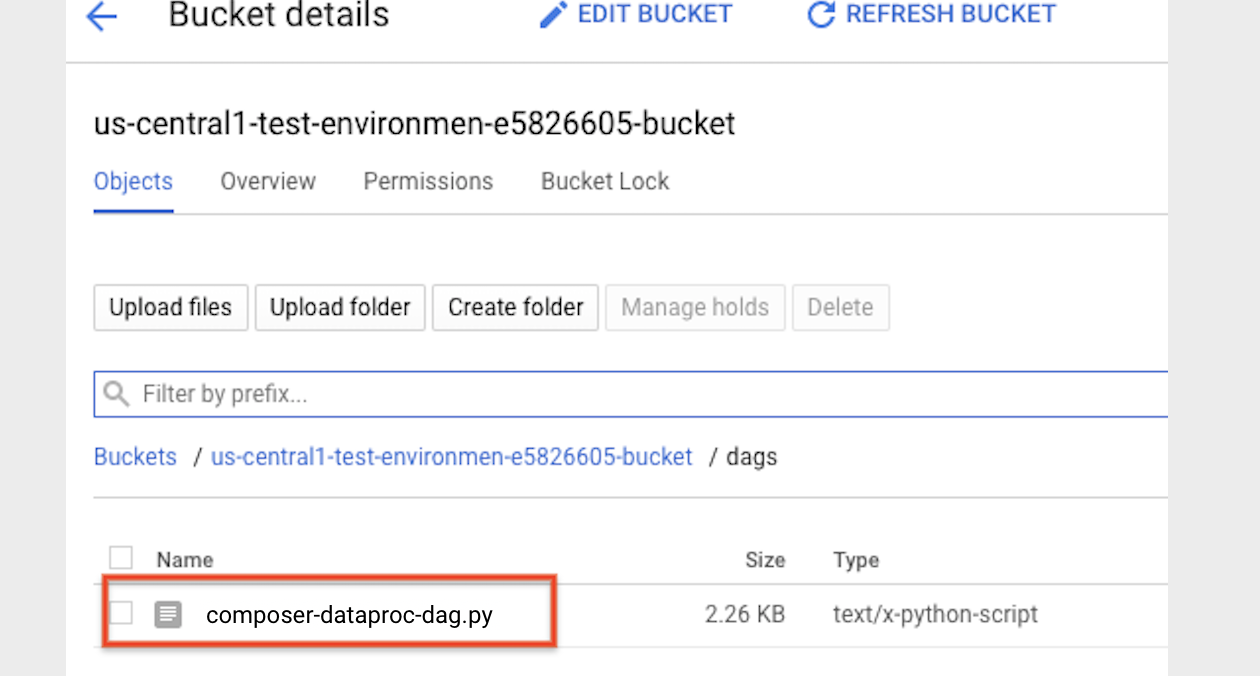
- Importez votre DAG dans le dossier d'environnement de Cloud Storage. Une fois l'importation terminée, cliquez sur le lien Dossier DAGS sur la page de l'environnement Cloud Composer.
Afficher l'état d'une tâche
Interface utilisateur d'Airflow
- Ouvrez l'interface Web Airflow.
- Sur la page des DAG, cliquez sur le nom du DAG (par exemple,
dataproc_workflow_dag). - Sur la page "Détails des DAG", cliquez sur Graph View (Vue graphique).
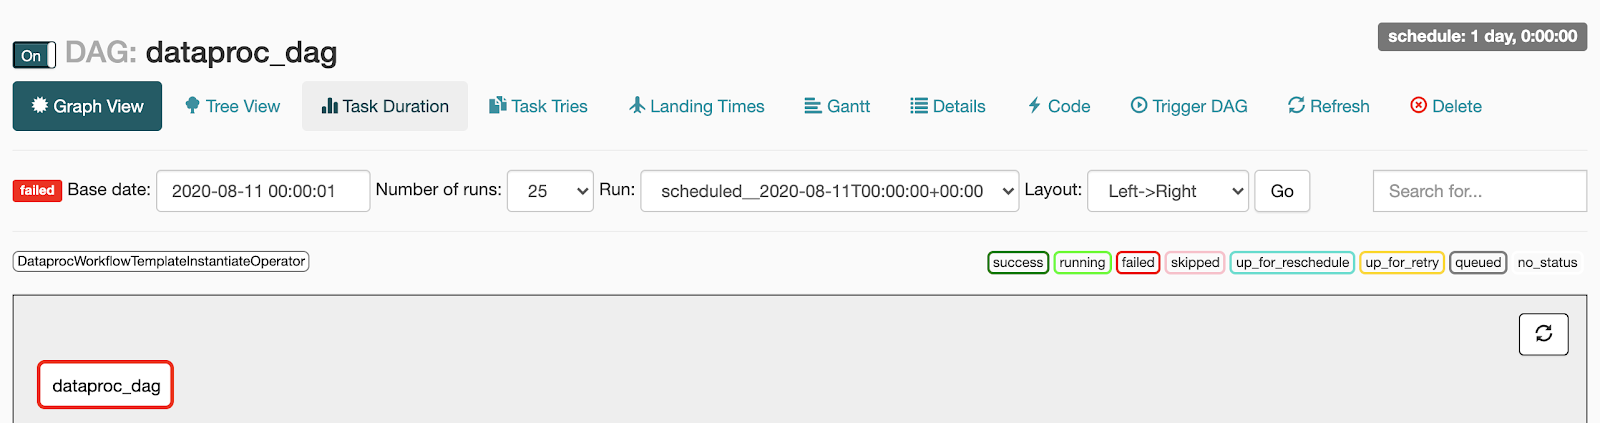
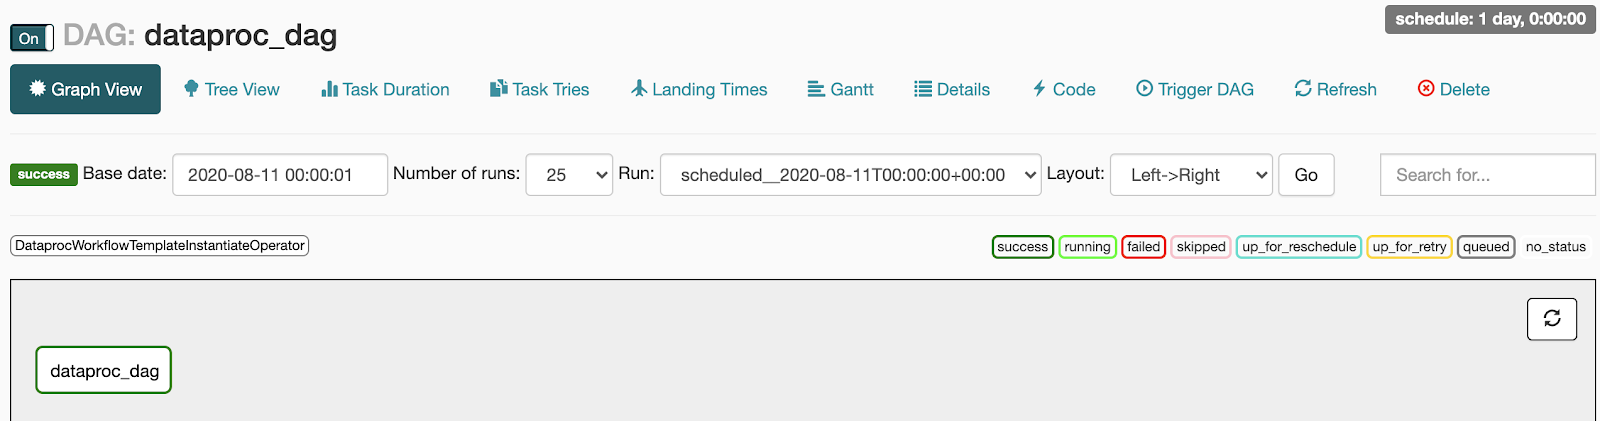
- Vérifiez l'état :
- Échec : la tâche apparaît dans un encadré rouge.
Vous pouvez également placer le pointeur sur la tâche pour voir s'afficher la mention (État : Échec).
- Réussite : la tâche apparaît dans un encadré vert.
Vous pouvez également placer le pointeur sur la tâche pour voir s'afficher la mention (État : Réussite).
- Échec : la tâche apparaît dans un encadré rouge.
Vous pouvez également placer le pointeur sur la tâche pour voir s'afficher la mention (État : Échec).
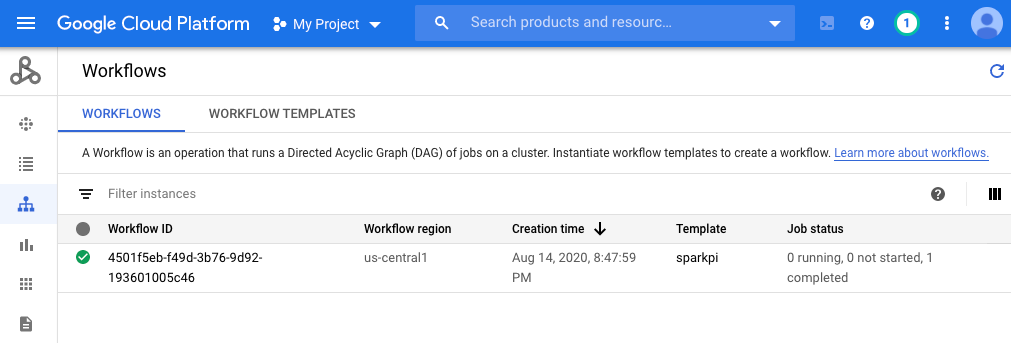
Console
Cliquez sur l'onglet "Workflows" pour afficher l'état du workflow.
Commande gcloud
gcloud dataproc operations list \
    --region=us-central1 \
    --filter="labels.goog-dataproc-workflow-template-id=sparkpi"
Effectuer un nettoyage
Pour éviter que les ressources utilisées dans ce tutoriel soient facturées sur votre compte Google Cloud , vous pouvez les supprimer :
Étapes suivantes
- Consultez la présentation des modèles de workflow Managed Service pour Apache Spark.
- Consultez Solutions de planification des workflows.