
搭配 JupyterLab 筆記本使用 Apache Beam 互動式執行器,即可在「讀取-求值-印出迴圈」(REPL) 工作流程中,以疊代方式開發管道、檢查管道圖,以及剖析個別 PCollection。如需教學課程,瞭解如何搭配使用 Apache Beam 互動式執行器和 JupyterLab 筆記本,請參閱「使用 Apache Beam 筆記本開發」。
本頁詳細說明 Apache Beam 筆記本的進階功能。
在筆記本管理的叢集上使用互動式 FlinkRunner
如要從筆記本以互動方式處理生產規模的資料,可以使用 FlinkRunner 和一些一般管道選項,告知筆記本工作階段管理長期執行的 Managed Service for Apache Spark 叢集,並以分散式方式執行 Apache Beam 管道。
必要條件
如何使用這項功能:
- 啟用 Managed Service for Apache Spark API。
- 將管理員或編輯者角色授予執行 Managed Service for Apache Spark 筆記本執行個體的服務帳戶。
- 使用 Apache Beam SDK 2.40.0 以上版本的筆記本核心。
設定
您至少需要下列設定:
# Set a Cloud Storage bucket to cache source recording and PCollections.
# By default, the cache is on the notebook instance itself, but that does not
# apply to the distributed execution scenario.
ib.options.cache_root = 'gs://<BUCKET_NAME>/flink'

# Define an InteractiveRunner that uses the FlinkRunner under the hood.
interactive_flink_runner = InteractiveRunner(underlying_runner=FlinkRunner())

options = PipelineOptions()
# Instruct the notebook that Google Cloud is used to run the FlinkRunner.
cloud_options = options.view_as(GoogleCloudOptions)
cloud_options.project = 'PROJECT_ID'
明確佈建 (選用)
你可以新增下列選項。
# Change this if the pipeline needs to run in a different region
# than the default, 'us-central1'. For example, to set it to 'us-west1':
cloud_options.region = 'us-west1'

# Explicitly provision the notebook-managed cluster.
worker_options = options.view_as(WorkerOptions)
# Provision 40 workers to run the pipeline.
worker_options.num_workers=40
# Use the default subnetwork.
worker_options.subnetwork='default'
# Choose the machine type for the workers.
worker_options.machine_type='n1-highmem-8'

# When working with non-official Apache Beam releases, such as Apache Beam built from source
# code, configure the environment to use a compatible released SDK container.
# If needed, build a custom container and use it. For more information, see:
# https://beam.apache.org/documentation/runtime/environments/
options.view_as(PortableOptions).environment_config = 'apache/beam_python3.7_sdk:2.41.0 or LOCATION.pkg.dev/PROJECT_ID/REPOSITORY/your_custom_container'
用量
# The parallelism is applied to each step, so if your pipeline has 10 steps, you
# end up having 10 * 10 = 100 tasks scheduled, which can be run in parallel.
options.view_as(FlinkRunnerOptions).parallelism = 10

p_word_count = beam.Pipeline(interactive_flink_runner, options=options)
word_counts = (
    p_word_count
    | 'read' >> ReadWordsFromText('gs://apache-beam-samples/shakespeare/kinglear.txt')
    | 'count' >> beam.combiners.Count.PerElement())
# The notebook session automatically starts and manages a cluster to run
# your pipelines with the FlinkRunner.
ib.show(word_counts)

# Interactively adjust the parallelism.
options.view_as(FlinkRunnerOptions).parallelism = 150
# The BigQuery read needs a Cloud Storage bucket as a temporary location.
options.view_as(GoogleCloudOptions).temp_location = ib.options.cache_root
p_bq = beam.Pipeline(runner=interactive_flink_runner, options=options)
delays_by_airline = (
    p_bq
    | 'Read Dataset from BigQuery' >> beam.io.ReadFromBigQuery(
        project=project, use_standard_sql=True,
        query=('SELECT airline, arrival_delay '
               'FROM `bigquery-samples.airline_ontime_data.flights` '
               'WHERE date >= "2010-01-01"'))
    | 'Rebalance Data to TM Slots' >> beam.Reshuffle(num_buckets=1000)
    | 'Extract Delay Info' >> beam.Map(
        lambda e: (e['airline'], e['arrival_delay'] > 0))
    | 'Filter Delayed' >> beam.Filter(lambda e: e[1])
    | 'Count Delayed Flights Per Airline' >> beam.combiners.Count.PerKey())
# This step reuses the existing cluster.
ib.collect(delays_by_airline)

# Describe the cluster running the pipelines.
# You can access the Flink dashboard from the printed link.
ib.clusters.describe()

# Cleans up all long-lasting clusters managed by the notebook session.
ib.clusters.cleanup(force=True)
筆記本管理的叢集
- 根據預設,如果您未提供任何管道選項,Interactive Apache Beam 一律會重複使用最近使用的叢集,透過
FlinkRunner執行管道。- 如要避免這種情況,例如在同一個筆記本工作階段中執行另一個管道,且該管道使用並非由筆記本代管的 FlinkRunner,請執行
ib.clusters.set_default_cluster(None)。
- 如要避免這種情況,例如在同一個筆記本工作階段中執行另一個管道,且該管道使用並非由筆記本代管的 FlinkRunner,請執行
- 當您例項化使用專案、區域和佈建設定的新管道,並對應至現有的 Managed Service for Apache Spark 叢集時,Dataflow 也會重複使用該叢集,但可能不會使用最近使用的叢集。
- 不過,每當系統提供佈建變更 (例如調整叢集大小) 時,就會建立新叢集來啟動所需變更。如果您打算調整叢集大小,請使用
ib.clusters.cleanup(pipeline)清理不必要的叢集,以免耗盡雲端資源。 - 指定 Flink
master_url時,如果該 Flink 屬於筆記本工作階段管理的叢集,Dataflow 會重複使用該代管叢集。- 如果筆記本工作階段無法辨識
master_url,表示使用者想自行代管FlinkRunner。筆記本不會隱含執行任何動作。
- 如果筆記本工作階段無法辨識
疑難排解
本節提供相關資訊,協助您排解及偵錯筆記本管理叢集上的互動式 FlinkRunner。
Flink IOException:網路緩衝區數量不足
為求簡單起見,Flink 網路緩衝區設定不會公開供設定。
如果工作圖表過於複雜,或平行處理設定過高,步驟基數乘以平行處理可能過大,導致平行排定的工作過多,執行失敗。
請參考下列提示,加快互動式執行速度:
- 只將要檢查的
PCollection指派給變數。 - 逐一檢查
PCollections。 - 在高扇出轉換後使用重新隨機排序。
- 根據資料大小調整平行處理。有時檔案越小,速度就越快。
檢查資料的時間過長
請檢查 Flink 資訊主頁,確認工作是否正在執行。您可能會看到一個步驟,其中數百個工作已完成,只剩一個工作,因為進行中的資料位於單一機器上,且未經過重組。
在大量擴散傳遞轉換後,一律使用重新隨機排序,例如:
- 從檔案讀取資料列
- 從 BigQuery 資料表讀取資料列
如果沒有重新洗牌,扇出資料一律會在同一個工作站上執行,因此您無法善用平行處理。
我需要多少工作人員?
根據經驗法則,Flink 叢集的 vCPU 數量約為工作站數量乘以工作站數。舉例來說,如果您有 40 個 n1-highmem-8 工作站,Flink 叢集最多會有 320 個時段,也就是 8 乘以 40。
理想情況下,工作人員可以管理讀取、對應及合併的工作,並將平行處理設定為數百,同時排定數千項工作。
是否支援串流?
串流管道目前不支援筆記本管理叢集上的互動式 Flink 功能。
Beam SQL 和 beam_sql magic
Beam SQL 可讓您使用 SQL 陳述式查詢有界和無界 PCollections。如果您使用 Apache Beam 筆記本,可以運用 IPython 自訂魔法
beam_sql 加快管道開發速度。
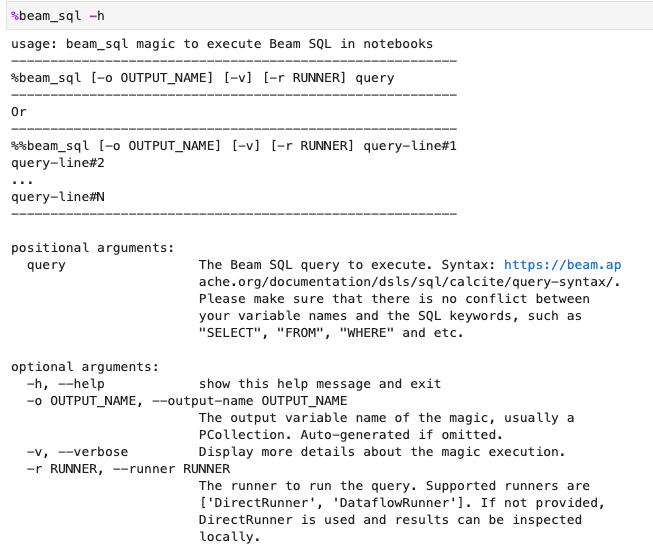
您可以使用 -h 或 --help 選項檢查 beam_sql 魔法的使用情形:
您可以從常數值建立 PCollection:

你可以加入多個 PCollections:

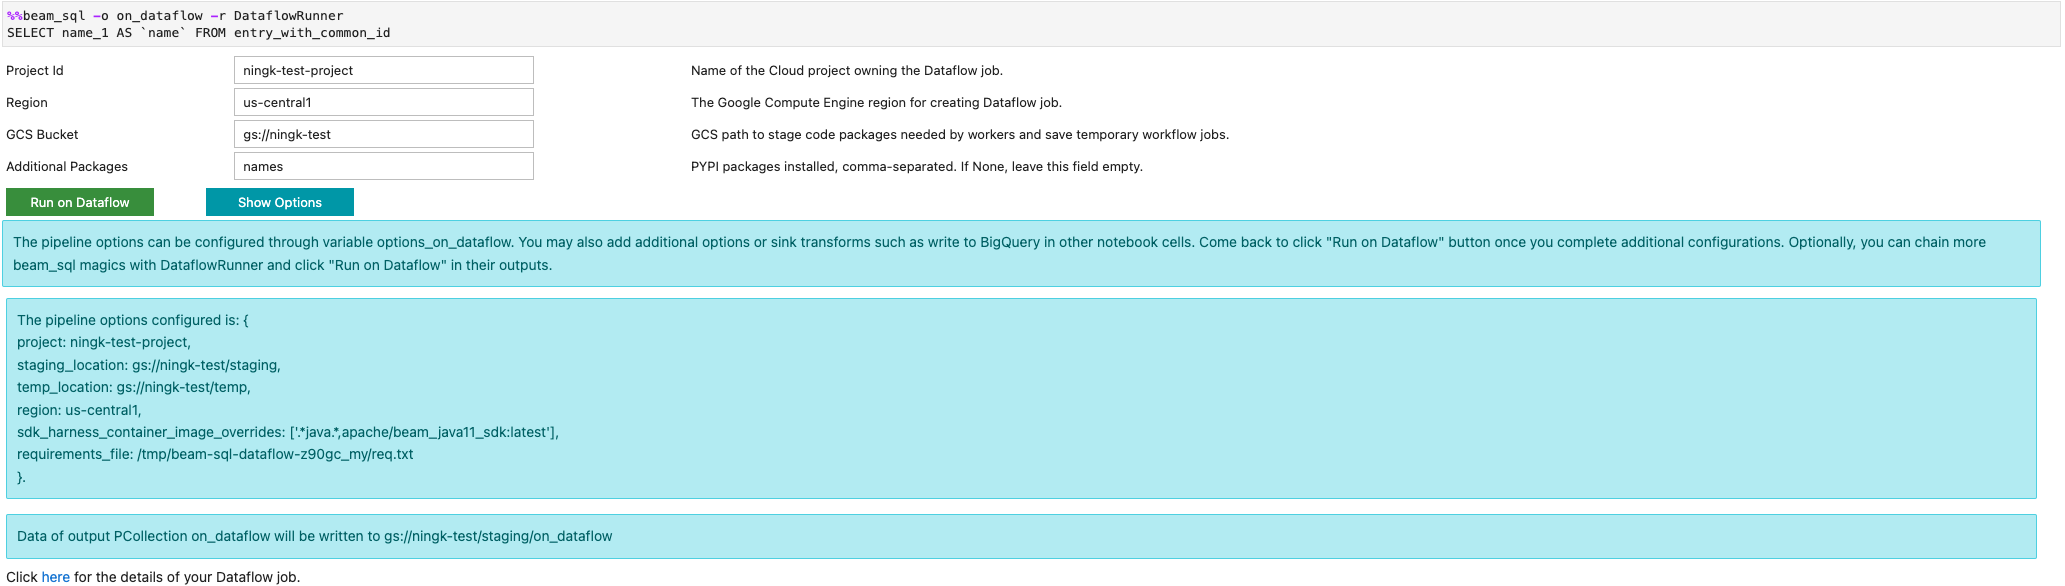
您可以使用 -r DataflowRunner 或 --runner DataflowRunner 選項啟動 Dataflow 工作:
詳情請參閱「Apache Beam SQL in notebooks」範例筆記本。
使用 JIT 編譯器和 GPU 加速
您可以使用 numba 和 GPU 等程式庫,加快 Python 程式碼和 Apache Beam 管道的執行速度。在以 nvidia-tesla-t4 GPU 建立的 Apache Beam 筆記本執行個體中,如要在 GPU 上執行,請使用 numba.cuda.jit 編譯 Python 程式碼。(選用) 如要加快 CPU 執行速度,請使用 numba.jit 或 numba.njit 將 Python 程式碼編譯為機器碼。
以下範例會建立在 GPU 上處理的 DoFn:
class Sampler(beam.DoFn):
    def __init__(self, blocks=80, threads_per_block=64):
        # Uses only 1 cuda grid with below config.
        self.blocks = blocks
        self.threads_per_block = threads_per_block

    def setup(self):
        import numpy as np
        # An array on host as the prototype of arrays on GPU to
        # hold accumulated sub count of points in the circle.
        self.h_acc = np.zeros(
            self.threads_per_block * self.blocks, dtype=np.float32)

    def process(self, element: Tuple[int, int]):
        from numba import cuda
        from numba.cuda.random import create_xoroshiro128p_states
        from numba.cuda.random import xoroshiro128p_uniform_float32

        @cuda.jit
        def gpu_monte_carlo_pi_sampler(rng_states, sub_sample_size, acc):
            """Uses GPU to sample random values and accumulates the sub count
            of values within a circle of radius 1.
            """
            pos = cuda.grid(1)
            if pos < acc.shape[0]:
                sub_acc = 0
                for i in range(sub_sample_size):
                    x = xoroshiro128p_uniform_float32(rng_states, pos)
                    y = xoroshiro128p_uniform_float32(rng_states, pos)
                    if (x * x + y * y) <= 1.0:
                        sub_acc += 1
                acc[pos] = sub_acc

        rng_seed, sample_size = element
        d_acc = cuda.to_device(self.h_acc)
        sample_size_per_thread = sample_size // self.h_acc.shape[0]
        rng_states = create_xoroshiro128p_states(self.h_acc.shape[0], seed=rng_seed)
        gpu_monte_carlo_pi_sampler[self.blocks, self.threads_per_block](
            rng_states, sample_size_per_thread, d_acc)
        yield d_acc.copy_to_host()
下圖顯示在 GPU 上執行的筆記本:
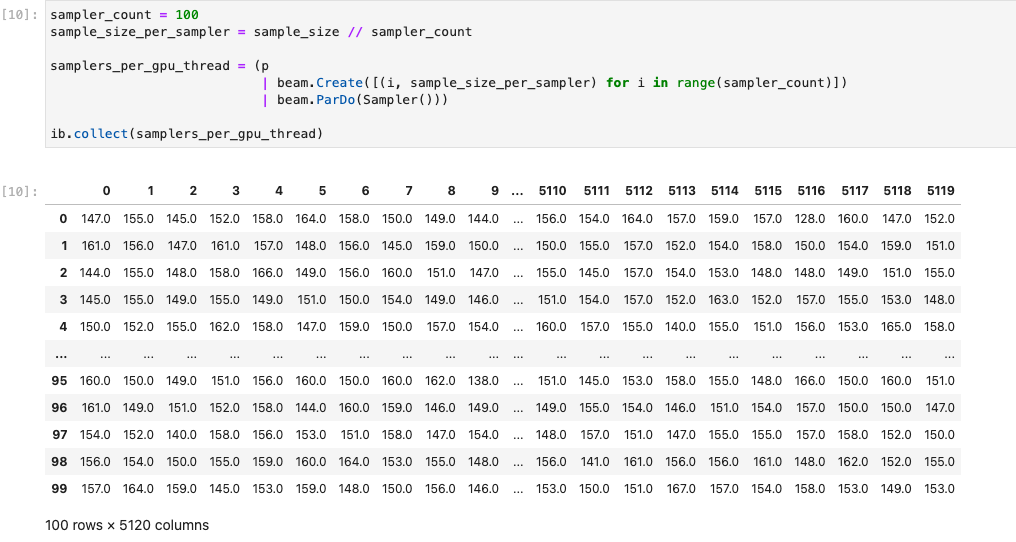
詳情請參閱範例筆記本「Use GPUs with Apache Beam」。
建構自訂容器
在大多數情況下,如果管道不需要額外的 Python 依附元件或可執行檔,Apache Beam 就能自動使用官方容器映像檔執行使用者定義的程式碼。這些映像檔隨附許多常見的 Python 模組,您不必建構或明確指定這些模組。
在某些情況下,您可能會有額外的 Python 依附元件,甚至是 非 Python 依附元件。在這些情況下,您可以建構自訂容器,並提供給 Flink 叢集執行。使用自訂容器的優點如下:
- 連續和互動式執行的設定時間縮短
- 穩定的設定和依附元件
- 更有彈性:您可以設定 Python 依附元件以外的項目
容器建構程序可能很繁瑣,但您可以使用下列使用模式,在筆記本中完成所有作業。
建立本機工作區
首先,請在 Jupyter 主目錄下建立本機工作目錄。
!mkdir -p /home/jupyter/.flink
準備 Python 依附元件
接著,請安裝您可能會用到的所有額外 Python 依附元件,並匯出至必要條件檔案。
%pip install dep_a
%pip install dep_b
...
您可以使用 %%writefile 筆記本魔法,明確建立需求檔案。
%%writefile /home/jupyter/.flink/requirements.txt
dep_a
dep_b
...
或者,您也可以將所有本機依附元件凍結到需求檔案中。這個選項可能會產生意料之外的依附元件。
%pip freeze > /home/jupyter/.flink/requirements.txt
準備非 Python 依附元件
將所有非 Python 依附元件複製到工作區。如果沒有任何非 Python 依附元件,請略過這個步驟。
!cp /path/to/your-dep /home/jupyter/.flink/your-dep
...
建立 Dockerfile
使用 %%writefile 筆記本魔法建立 Dockerfile。例如:
%%writefile /home/jupyter/.flink/Dockerfile
FROM apache/beam_python3.7_sdk:2.40.0

COPY  requirements.txt /tmp/requirements.txt
COPY  your_dep /tmp/your_dep
...

RUN python -m pip install -r /tmp/requirements.txt
範例容器使用以 Python 3.7 為基礎的 Apache Beam SDK 2.40.0 版映像檔,
新增 your_dep 檔案,並安裝額外的 Python 依附元件。
請使用這個 Dockerfile 做為範本,並根據您的用途進行編輯。
在 Apache Beam 管道中,如要參照非 Python 依附元件,請使用這些依附元件的 COPY 目的地。舉例來說,/tmp/your_dep 是 your_dep 檔案的路徑。
使用 Cloud Build 在 Artifact Registry 中建構容器映像檔
啟用 Cloud Build 和 Artifact Registry 服務 (如尚未啟用)。
!gcloud services enable cloudbuild.googleapis.com
!gcloud services enable artifactregistry.googleapis.com
建立 Artifact Registry 存放區,以便上傳構件。每個存放區只能包含單一支援格式的構件。
所有存放區內容都會使用 Google-owned and Google-managed encryption keys 或客戶自行管理的加密金鑰加密。Artifact Registry 預設使用Google-owned and Google-managed encryption keys ,不需要為這個選項進行任何設定。
您必須至少具備存放區的 Artifact Registry 寫入者存取權。
執行下列指令來建立新的存放區。這個指令會使用
--async旗標並立即傳回,不會等待執行中的作業完成。gcloud artifacts repositories create REPOSITORY \ --repository-format=docker \ --location=LOCATION \ --async替換下列值:
- REPOSITORY:存放區名稱。專案中每個存放區位置的存放區名稱不得重複。
- LOCATION:存放區的位置。
在推送或提取映像檔前,請先設定 Docker,驗證傳送至 Artifact Registry 的要求。如要為 Docker 存放區設定驗證機制,請執行下列指令:
gcloud auth configure-docker LOCATION-docker.pkg.dev這個指令會更新 Docker 設定。您現在可以在 Google Cloud 專案中連結 Artifact Registry,以推送映像檔。
使用 Cloud Build 建構容器映像檔,並儲存至 Artifact Registry。
!cd /home/jupyter/.flink \
&& gcloud builds submit \
 --tag LOCATION.pkg.dev/PROJECT_ID/REPOSITORY/flink:latest \
 --timeout=20m
將
PROJECT_ID替換為專案的專案 ID。
使用自訂容器
視執行者而定,自訂容器的用途也不同。
如要瞭解 Apache Beam 容器的一般用途,請參閱:
如要瞭解 Dataflow 容器用量,請參閱:
停用外部 IP 位址
建立 Apache Beam 筆記本執行個體時,請停用外部 IP 位址,以提高安全性。由於筆記本執行個體需要下載一些公開網際網路資源 (例如 Artifact Registry),因此您必須先建立沒有外部 IP 位址的新虛擬私有雲網路。接著,為這個虛擬私有雲網路建立 Cloud NAT 閘道。如要進一步瞭解 Cloud NAT,請參閱 Cloud NAT 說明文件。 使用虛擬私有雲網路和 Cloud NAT 閘道存取必要的公用網際網路資源,不必啟用外部 IP 位址。