


搭配使用 Apache Beam 互動式執行器和 JupyterLab 筆記本,即可反覆開發管道、檢查管道圖表,以及在讀取-評估-列印迴圈 (REPL) 工作流程中剖析個別 PCollection。如需教學課程,瞭解如何搭配使用 Apache Beam 互動式執行器和 JupyterLab 筆記本,請參閱「使用 Apache Beam 筆記本開發」。
本頁詳細說明 Apache Beam 筆記本的進階功能。
在筆記本管理的叢集上使用互動式 FlinkRunner
如要從筆記本以互動方式處理生產規模的資料,可以使用 FlinkRunner,並搭配一些一般管道選項,告知筆記本工作階段管理長期執行的 Managed Service for Apache Spark 叢集,並以分散式方式執行 Apache Beam 管道。
必要條件
如何使用這項功能:
- 啟用 Managed Service for Apache Spark API。
- 將管理員或編輯者角色授予服務帳戶,該服務帳戶會為 Managed Service for Apache Spark 執行 Notebook 執行個體。
- 使用 Apache Beam SDK 2.40.0 以上版本的筆記本核心。
設定
您至少需要下列設定:
# Set a Cloud Storage bucket to cache source recording and PCollections.
# By default, the cache is on the notebook instance itself, but that does not
# apply to the distributed execution scenario.
ib.options.cache_root = 'gs://<BUCKET_NAME>/flink'

# Define an InteractiveRunner that uses the FlinkRunner under the hood.
interactive_flink_runner = InteractiveRunner(underlying_runner=FlinkRunner())

options = PipelineOptions()
# Instruct the notebook that Google Cloud is used to run the FlinkRunner.
cloud_options = options.view_as(GoogleCloudOptions)
cloud_options.project = 'PROJECT_ID'
明確條款 (選填)
您可以新增下列選項。
# Change this if the pipeline needs to run in a different region
# than the default, 'us-central1'. For example, to set it to 'us-west1':
cloud_options.region = 'us-west1'

# Explicitly provision the notebook-managed cluster.
worker_options = options.view_as(WorkerOptions)
# Provision 40 workers to run the pipeline.
worker_options.num_workers=40
# Use the default subnetwork.
worker_options.subnetwork='default'
# Choose the machine type for the workers.
worker_options.machine_type='n1-highmem-8'

# When working with non-official Apache Beam releases, such as Apache Beam built from source
# code, configure the environment to use a compatible released SDK container.
# If needed, build a custom container and use it. For more information, see:
# https://beam.apache.org/documentation/runtime/environments/
options.view_as(PortableOptions).environment_config = 'apache/beam_python3.7_sdk:2.41.0 or LOCATION.pkg.dev/PROJECT_ID/REPOSITORY/your_custom_container'
用量
# The parallelism is applied to each step, so if your pipeline has 10 steps, you
# end up having 10 * 10 = 100 tasks scheduled, which can be run in parallel.
options.view_as(FlinkRunnerOptions).parallelism = 10

p_word_count = beam.Pipeline(interactive_flink_runner, options=options)
word_counts = (
    p_word_count
    | 'read' >> ReadWordsFromText('gs://apache-beam-samples/shakespeare/kinglear.txt')
    | 'count' >> beam.combiners.Count.PerElement())
# The notebook session automatically starts and manages a cluster to run
# your pipelines with the FlinkRunner.
ib.show(word_counts)

# Interactively adjust the parallelism.
options.view_as(FlinkRunnerOptions).parallelism = 150
# The BigQuery read needs a Cloud Storage bucket as a temporary location.
options.view_as(GoogleCloudOptions).temp_location = ib.options.cache_root
p_bq = beam.Pipeline(runner=interactive_flink_runner, options=options)
delays_by_airline = (
    p_bq
    | 'Read Dataset from BigQuery' >> beam.io.ReadFromBigQuery(
        project=project, use_standard_sql=True,
        query=('SELECT airline, arrival_delay '
               'FROM `bigquery-samples.airline_ontime_data.flights` '
               'WHERE date >= "2010-01-01"'))
    | 'Rebalance Data to TM Slots' >> beam.Reshuffle(num_buckets=1000)
    | 'Extract Delay Info' >> beam.Map(
        lambda e: (e['airline'], e['arrival_delay'] > 0))
    | 'Filter Delayed' >> beam.Filter(lambda e: e[1])
    | 'Count Delayed Flights Per Airline' >> beam.combiners.Count.PerKey())
# This step reuses the existing cluster.
ib.collect(delays_by_airline)

# Describe the cluster running the pipelines.
# You can access the Flink dashboard from the printed link.
ib.clusters.describe()

# Cleans up all long-lasting clusters managed by the notebook session.
ib.clusters.cleanup(force=True)
筆記本代管的叢集
- 根據預設,如果您未提供任何管道選項,Interactive Apache Beam 一律會重複使用最近使用的叢集,透過
FlinkRunner執行管道。- 如要避免這種情況,例如在同一個筆記本工作階段中執行另一個管道,且該管道使用並非由筆記本代管的 FlinkRunner,請執行
ib.clusters.set_default_cluster(None)。
- 如要避免這種情況,例如在同一個筆記本工作階段中執行另一個管道,且該管道使用並非由筆記本代管的 FlinkRunner,請執行
- 如果新管道使用的專案、區域和佈建設定對應至現有的 Managed Service for Apache Spark 叢集,Dataflow 也會重複使用該叢集,但可能不是最近使用的叢集。
- 不過,每當您進行佈建變更 (例如調整叢集大小) 時,系統都會建立新的叢集來套用所要求的變更。如果您打算調整叢集大小,請使用
ib.clusters.cleanup(pipeline)清除不必要的叢集,以免耗盡雲端資源。 - 如果您指定的 Flink
master_url屬於筆記本工作階段管理的叢集,Dataflow 會重複使用該代管叢集。- 如果筆記本工作階段無法辨識
master_url,表示您想使用自行代管的FlinkRunner。筆記本不會隱含執行任何動作。
- 如果筆記本工作階段無法辨識
疑難排解
本節提供相關資訊,協助您在筆記本管理的叢集上,排解 Interactive FlinkRunner 的問題並進行偵錯。
Flink IOException:網路緩衝區數量不足
為簡化作業,Flink 網路緩衝區設定不會公開供設定。
如果工作圖過於複雜,或平行處理設定過高,步驟基數乘以平行處理數量的結果可能過大,導致系統平行排定過多工作,進而導致執行失敗。
請參考下列提示,加快互動式執行速度:
- 只將要檢查的
PCollection指派給變數。 - 逐一檢查
PCollections。 - 高扇出轉換後使用重新隨機重組。
- 根據資料大小調整平行處理。有時較小的檔案速度較快。
檢查資料的時間過長
在 Flink 資訊主頁中,檢查正在執行的工作。您可能會看到一個步驟,其中有數百個工作已完成,只剩一個工作,因為進行中的資料位於單一機器上,且未經過重組。
在大量擴散傳遞轉換後,一律使用重新隨機排序,例如:
- 從檔案讀取資料列
- 從 BigQuery 資料表讀取資料列
如果沒有重新隨機分配,扇出資料一律會在同一個工作者上執行,因此您無法善用平行處理。
需要多少工作人員?
根據經驗法則,Flink 叢集的 vCPU 數量約為 worker 時段數乘以 vCPU 數。舉例來說,如果您有 40 個 n1-highmem-8 worker,Flink 叢集最多會有 320 個時段,也就是 8 乘以 40。
理想情況下,工作人員可以管理讀取、對應及合併的工作,並將平行處理設定為數百,同時排定數千項工作。
是否支援串流?
串流管道與筆記本管理叢集上的互動式 Flink 功能不相容。
Beam SQL 和 beam_sql magic
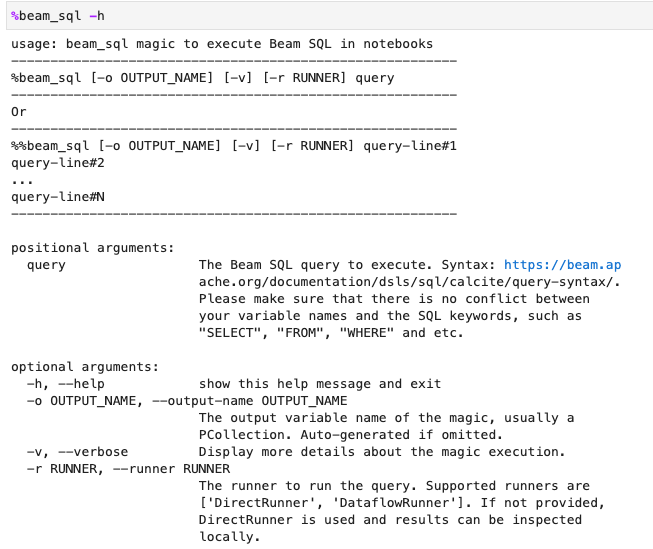
Beam SQL 可讓您使用 SQL 陳述式查詢有界和無界 PCollections。如果您在 Apache Beam 筆記本中工作,可以使用 IPython 自訂魔法
beam_sql 加速管道開發。
你可以使用 -h 或 --help 選項,查看 beam_sql 魔法的使用情況:
您可以從常數值建立 PCollection:

你可以加入多個 PCollections:

您可以使用 -r DataflowRunner 或 --runner DataflowRunner 選項啟動 Dataflow 工作:
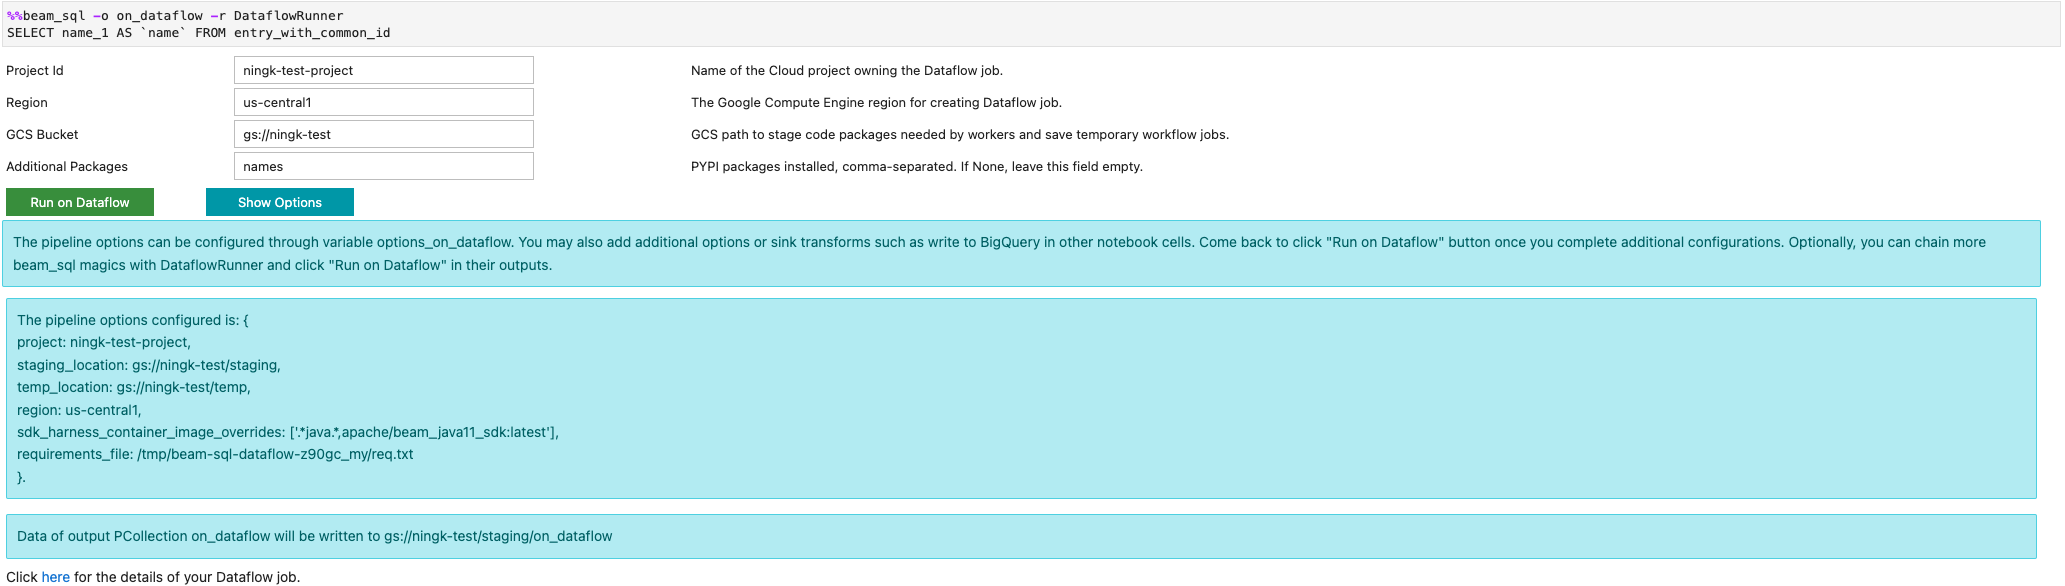
詳情請參閱「筆記本中的 Apache Beam SQL」範例筆記本。
使用 JIT 編譯器和 GPU 加速
您可以使用 numba 和 GPU 等程式庫,加速執行 Python 程式碼和 Apache Beam 管道。在以 nvidia-l4 GPU 建立的 Apache Beam 筆記本執行個體中,如要使用 GPU 執行,請使用 numba.cuda.jit 編譯 Python 程式碼。(選用) 如要加快 CPU 執行速度,請使用 numba.jit 或 numba.njit 將 Python 程式碼編譯為機器碼。
以下範例會建立在 GPU 上處理的 DoFn:
class Sampler(beam.DoFn):
    def __init__(self, blocks=80, threads_per_block=64):
        # Uses only 1 cuda grid with below config.
        self.blocks = blocks
        self.threads_per_block = threads_per_block

    def setup(self):
        import numpy as np
        # An array on host as the prototype of arrays on GPU to
        # hold accumulated sub count of points in the circle.
        self.h_acc = np.zeros(
            self.threads_per_block * self.blocks, dtype=np.float32)

    def process(self, element: Tuple[int, int]):
        from numba import cuda
        from numba.cuda.random import create_xoroshiro128p_states
        from numba.cuda.random import xoroshiro128p_uniform_float32

        @cuda.jit
        def gpu_monte_carlo_pi_sampler(rng_states, sub_sample_size, acc):
            """Uses GPU to sample random values and accumulates the sub count
            of values within a circle of radius 1.
            """
            pos = cuda.grid(1)
            if pos < acc.shape[0]:
                sub_acc = 0
                for i in range(sub_sample_size):
                    x = xoroshiro128p_uniform_float32(rng_states, pos)
                    y = xoroshiro128p_uniform_float32(rng_states, pos)
                    if (x * x + y * y) <= 1.0:
                        sub_acc += 1
                acc[pos] = sub_acc

        rng_seed, sample_size = element
        d_acc = cuda.to_device(self.h_acc)
        sample_size_per_thread = sample_size // self.h_acc.shape[0]
        rng_states = create_xoroshiro128p_states(self.h_acc.shape[0], seed=rng_seed)
        gpu_monte_carlo_pi_sampler[self.blocks, self.threads_per_block](
            rng_states, sample_size_per_thread, d_acc)
        yield d_acc.copy_to_host()
下圖顯示在 GPU 上執行的筆記本:
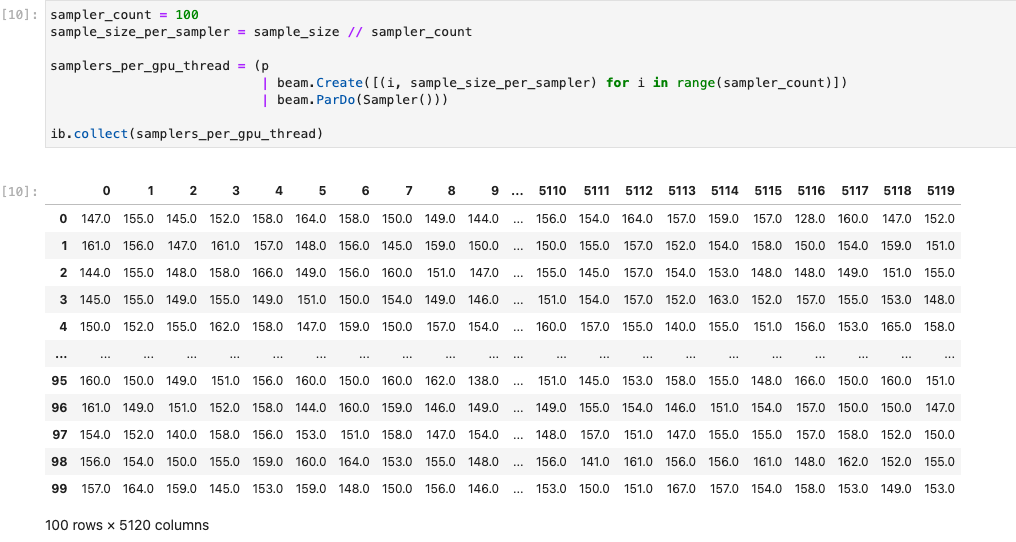
詳情請參閱「搭配使用 GPU 和 Apache Beam」範例筆記本。
建構自訂容器
在大多數情況下,如果管道不需要額外的 Python 依附元件或可執行檔,Apache Beam 就能自動使用官方容器映像檔執行使用者定義的程式碼。這些映像檔隨附許多常見的 Python 模組,您不必建構或明確指定這些模組。
在某些情況下,您可能會有額外的 Python 依附元件,甚至是 Python 以外的依附元件。在這些情況下,您可以建構自訂容器,並提供給 Flink 叢集執行。使用自訂容器的優點如下:
- 連續和互動式執行的設定時間縮短
- 穩定的設定和依附元件
- 更有彈性:您可以設定 Python 依附元件以外的項目
容器建構程序可能很繁瑣,但您可以使用下列使用模式,在筆記本中完成所有作業。
建立本機工作區
首先,請在 Jupyter 主目錄下建立本機工作目錄。
!mkdir -p /home/jupyter/.flink
準備 Python 依附元件
接著,安裝所有可能使用的額外 Python 依附元件,並匯出至需求檔案。
%pip install dep_a
%pip install dep_b
...
您可以使用 %%writefile 筆記本魔法,明確建立需求檔案。
%%writefile /home/jupyter/.flink/requirements.txt
dep_a
dep_b
...
或者,您也可以將所有本機依附元件凍結到需求檔案中。 這個選項可能會產生非預期的依附元件。
%pip freeze > /home/jupyter/.flink/requirements.txt
準備非 Python 依附元件
將所有非 Python 依附元件複製到工作區。如果沒有任何非 Python 依附元件,請略過這個步驟。
!cp /path/to/your-dep /home/jupyter/.flink/your-dep
...
建立 Dockerfile
使用 %%writefile 筆記本魔法建立 Dockerfile。例如:
%%writefile /home/jupyter/.flink/Dockerfile
FROM apache/beam_python3.7_sdk:2.40.0

COPY  requirements.txt /tmp/requirements.txt
COPY  your_dep /tmp/your_dep
...

RUN python -m pip install -r /tmp/requirements.txt
範例容器使用 Apache Beam SDK 2.40.0 版的映像檔,以 Python 3.7 為基礎,加入 your_dep 檔案,並安裝額外的 Python 依附元件。請使用這個 Dockerfile 做為範本,並根據您的用途進行編輯。
在 Apache Beam 管道中,如要參照非 Python 依附元件,請使用這些依附元件的 COPY 目的地。舉例來說,/tmp/your_dep 是 your_dep 檔案的路徑。
使用 Cloud Build 在 Artifact Registry 中建構容器映像檔
啟用 Cloud Build 和 Artifact Registry 服務 (如果尚未啟用)。
!gcloud services enable cloudbuild.googleapis.com
!gcloud services enable artifactregistry.googleapis.com
建立 Artifact Registry 存放區,以便上傳構件。每個存放區只能包含單一支援格式的構件。
所有存放區內容都會使用 Google-owned and Google-managed encryption keys 或客戶自行管理的加密金鑰加密。Artifact Registry 預設使用Google-owned and Google-managed encryption keys ,不需要為這個選項進行任何設定。
您必須至少具備存放區的 Artifact Registry 寫入者存取權。
執行下列指令來建立新的存放區。這項指令會使用
--async旗標並立即傳回,不會等待執行中的作業完成。gcloud artifacts repositories create REPOSITORY \ --repository-format=docker \ --location=LOCATION \ --async替換下列值:
- REPOSITORY:存放區名稱。專案中每個存放區位置的存放區名稱不得重複。
- LOCATION:存放區的位置。
在推送或提取映像檔前,請先設定 Docker,驗證傳送至 Artifact Registry 的要求。如要為 Docker 存放區設定驗證機制,請執行下列指令:
gcloud auth configure-docker LOCATION-docker.pkg.dev這個指令會更新 Docker 設定。您現在可以在 Google Cloud 專案中連結 Artifact Registry,以推送映像檔。
使用 Cloud Build 建構容器映像檔,並儲存至 Artifact Registry。
!cd /home/jupyter/.flink \
&& gcloud builds submit \
 --tag LOCATION.pkg.dev/PROJECT_ID/REPOSITORY/flink:latest \
 --timeout=20m
將
PROJECT_ID替換為專案的專案 ID。
使用自訂容器
視執行器而定,自訂容器的用途可能有所不同。
如要瞭解 Apache Beam 容器的一般用途,請參閱:
如要瞭解 Dataflow 容器用量,請參閱:
停用外部 IP 位址
建立 Apache Beam 筆記本執行個體時,請停用外部 IP 位址,以提高安全性。由於筆記本執行個體需要下載一些公開網際網路資源 (例如 Artifact Registry),因此您必須先建立沒有外部 IP 位址的新虛擬私有雲網路。然後為這個虛擬私有雲網路建立 Cloud NAT 閘道。 如要進一步瞭解 Cloud NAT,請參閱 Cloud NAT 說明文件。 使用虛擬私有雲網路和 Cloud NAT 閘道存取必要的公開網際網路資源,不必啟用外部 IP 位址。