


使用 Cloud Code for VS Code 部署 Kubernetes 應用程式
本頁說明如何快速開始使用 Cloud Code。
您將使用「Hello World」範例應用程式設定新的 Kubernetes 應用程式、建立叢集、在這個叢集上執行應用程式、偵錯執行中的程式碼、查看運作中應用程式的記錄,以及將終端機連線至執行中的容器。
事前準備
- 登入 Google Cloud 帳戶。如果您是 Google Cloud新手,歡迎 建立帳戶,親自體驗產品的實際應用成效。新客戶還能獲得價值 $300 美元的免費抵免額,能用於執行、測試及部署工作負載。
-
In the Google Cloud console, on the project selector page, select or create a Google Cloud project.
Roles required to select or create a project
- Select a project: Selecting a project doesn't require a specific IAM role—you can select any project that you've been granted a role on.
-
Create a project: To create a project, you need the Project Creator role
(
roles/resourcemanager.projectCreator), which contains theresourcemanager.projects.createpermission. Learn how to grant roles.
-
If you're using an existing project for this guide, verify that you have the permissions required to complete this guide. If you created a new project, then you already have the required permissions.
-
Verify that billing is enabled for your Google Cloud project.
Enable the Google Kubernetes Engine API, if it is not already enabled.
Roles required to enable APIs
To enable APIs, you need the
serviceusage.services.enablepermission. If you created the project, then you likely already have this permission through the Owner role (roles/owner). Otherwise, you can get this permission through the Service Usage Admin role (roles/serviceusage.serviceUsageAdmin). Learn how to grant roles.-
In the Google Cloud console, on the project selector page, select or create a Google Cloud project.
Roles required to select or create a project
- Select a project: Selecting a project doesn't require a specific IAM role—you can select any project that you've been granted a role on.
-
Create a project: To create a project, you need the Project Creator role
(
roles/resourcemanager.projectCreator), which contains theresourcemanager.projects.createpermission. Learn how to grant roles.
-
If you're using an existing project for this guide, verify that you have the permissions required to complete this guide. If you created a new project, then you already have the required permissions.
-
Verify that billing is enabled for your Google Cloud project.
Enable the Google Kubernetes Engine API, if it is not already enabled.
Roles required to enable APIs
To enable APIs, you need the
serviceusage.services.enablepermission. If you created the project, then you likely already have this permission through the Owner role (roles/owner). Otherwise, you can get this permission through the Service Usage Admin role (roles/serviceusage.serviceUsageAdmin). Learn how to grant roles.- 安裝 Git。 您必須使用 Git,才能將範例複製到電腦。
- 安裝 Docker。 您必須使用 Docker 建構程式碼範例。確認本機使用者帳戶可以建構容器。
- 如果尚未安裝 Cloud Code 外掛程式,請先安裝。
必要的角色
如要取得完成本快速入門導覽課程所需的權限,請要求管理員在專案中授予您 Kubernetes Engine 管理員 (roles/container.admin) IAM 角色。如要進一步瞭解如何授予角色,請參閱「管理專案、資料夾和組織的存取權」。
建立應用程式
開啟指令區塊面板 (按下
Ctrl/Cmd+Shift+P鍵,或依序點選「View」(瀏覽) >「Command Palette」(指令面板)),然後執行「Cloud Code: New Application」。選擇「Kubernetes Application」(Kubernetes 應用程式)。
選擇您偏好的 Hello World 應用程式語言。
舉例來說,選擇
Node.js: Hello World會建立 Node.js Hello World 應用程式的入門範本。儲存新應用程式。
系統會顯示通知,確認已建立應用程式,並開啟含有應用程式的新視窗。
建立 GKE 叢集
如要建立標準 Google Kubernetes Engine (GKE) 叢集,請按照下列步驟操作:
按一下
 「Cloud Code」,然後展開「Kubernetes」部分。
依序點選「新增」將叢集新增至 KubeConfig,然後在「快速挑選」選單中點選「Google Kubernetes Engine」。
系統提示啟用容器 API 時,請選取「是」。
按一下「+ 建立新的 GKE 叢集」。
選擇「標準」做為叢集類型。
按一下「開啟」,允許 Cloud Code 開啟控制台。 Google Cloud
在 Google Cloud 控制台中,確認選取的專案是您先前建立或選擇的專案。
將叢集名稱設為
my-first-cluster。選取「區域」Zonal做為位置類型,並將可用區設為
us-central1-a。點選「建立」。叢集建立作業需要幾分鐘才能完成。
叢集建立完成後,請再次點選「Add a cluster to the KubeConfig」(將叢集新增至 KubeConfig),然後從清單中選取您剛建立的叢集。
新叢集會新增至設定,並設為有效環境。
執行及查看應用程式
現在一切都設定完畢,您可以執行應用程式並即時查看。 Cloud Code 會監控檔案系統的變更,方便您編輯及重新執行應用程式,近乎即時。
如要執行應用程式,請按照下列步驟操作:
在 Cloud Code 狀態列中,按一下有效專案名稱。

在隨即顯示的「快速挑選」選單中,選取「在 Kubernetes 中執行」。 再次出現提示時,請選取「Run on Kubernetes」(在 Kubernetes 中執行)。
確認是否要使用目前的叢集環境,或改用其他環境。
系統顯示提示時,請選擇要將圖片推送至哪個映像檔登錄檔。如果您使用
gcr.io/PROJECT_ID建立新的映像檔登錄檔,請確保映像檔登錄檔與叢集位於同一個專案中。應用程式在 Kubernetes 上執行後,請按一下「Development sessions」(開發工作階段) 區段中「Run on Kubernetes」(在 Kubernetes 上執行) 工作的「Status」(狀態) 項目。系統會開啟視窗,並顯示「Output」分頁,其中包含應用程式的網址。如要開啟這個網址,請按下 Control 鍵 (或 macOS 的 Command 鍵),然後點按該網址。
您也可以在 Google Cloud 控制台的「工作負載總覽」中找到應用程式。如要進一步瞭解執行中的應用程式,包括外部 IP 位址和連接埠號碼,請按一下清單中的應用程式名稱。
疑難排解提示
如果您使用現有叢集,請按照下列步驟將叢集設為有效,並取得叢集憑證:
在 VS Code 中,按一下
「Cloud Code」,然後展開「Kubernetes」部分。在叢集名稱上按一下滑鼠右鍵,然後按一下「設為使用中叢集」。
對應用程式進行偵錯
如要偵錯應用程式,請按照下列步驟操作:
在 Cloud Code 狀態列中,按一下有效專案名稱。
在隨即顯示的「快速挑選」選單中,選取「在 Kubernetes 上偵錯」。
如果系統提示,請驗證您的憑證,在本機執行及偵錯應用程式。
系統顯示提示時,請確認是否要使用目前的叢集環境,或切換至偏好的環境。
Cloud Code 會使用
.vscode/launch.json檔案中的cloudcode.kubernetes設定執行應用程式,並將偵錯工具工作階段附加至該應用程式。Cloud Code 會建構容器、將容器推送至登錄檔、將 Kubernetes 設定套用至叢集,並傳回可用於瀏覽運作中應用程式的 IP 位址。
在附加偵錯工具工作階段之前,系統會提示您確認或輸入遠端容器中要偵錯的程式所在目錄,或按 ESC 鍵略過容器偵錯。
如要在第 9 行新增中斷點,請開啟
src/app.js,然後在編輯器邊界中按一下。紅色實心圓圈代表有效的中斷點,灰色空心圓圈則代表已停用的中斷點。如要更精細地控制中斷點,可以使用 VS Code「Debug」檢視區塊中的「Breakpoints」部分。
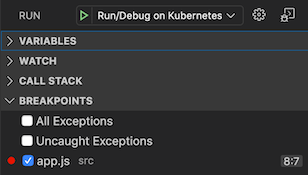
當您向應用程式傳送新要求時,偵錯工具會在第一個有效中斷點暫停。
在下列範例中,請注意「Variables」部分的「Local」下方,
Hello, world!的res._contentLength;值為 13。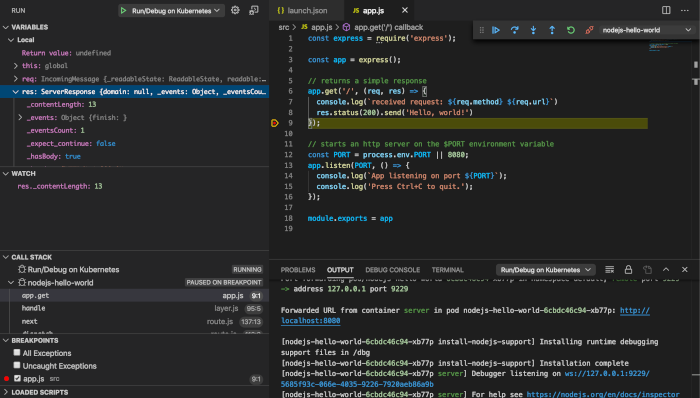
將第 8 行傳送的字串內嵌編輯為
Hello, goodbye!,然後重新啟動「在 Kubernetes 上偵錯」動作。重新建構及部署應用程式後,請記下
res._contentLength的更新值。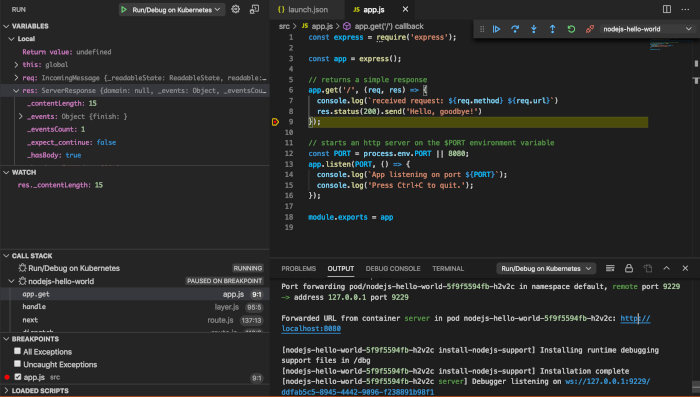
偵錯工作階段開始後,「開發工作階段」窗格會顯示結構化記錄檢視畫面。任務開始後,畫面會顯示任務和旋轉的半圓形 progress_activity。
如果工作成功,步驟旁會顯示勾號 check_circle。
如要查看步驟詳細資料,請點按「Development session」(開發工作階段) 窗格中的步驟。「Output」(輸出) 窗格會顯示記錄輸出內容中的步驟。
在容器中開啟終端機
如要在容器中開啟終端機,請按照下列操作說明:
按一下
「Cloud Code」,然後展開「Kubernetes」部分。展開下列各節:
- 偏好叢集區段
- 「Namespaces」(命名空間) 區段,然後是您偏好的命名空間區段
- 「Pod」部分,然後選取偏好的 Pod 部分
「容器」部分
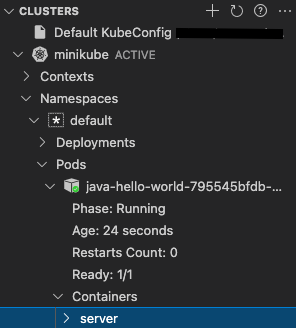
在要開啟終端機的容器上按一下滑鼠右鍵,然後點選「Get Terminal」(取得終端機)。
系統會啟動終端機。您現在可以存取執行中容器內的殼層。
清除所用資源
停止應用程式後,系統會自動刪除執行期間部署的所有 Kubernetes 資源。
如要避免系統向您的帳戶收取本快速入門導覽中其他資源的費用,請務必刪除您建立的專案或叢集 (如要重複使用專案)。
如要刪除叢集:
- 按一下 「Cloud Code」,然後展開「Kubernetes」探索工具。
- 將指標懸停在叢集名稱上,然後按一下「open_in_new」open_in_new「在控制台中開啟」 Google Cloud 。
- 按一下「Delete」(刪除),然後點選「Delete」(刪除)。
如要刪除專案 (和相關聯的資源,包括所有叢集),請按照下列步驟操作:
- 前往 Google Cloud 控制台的「Manage resources」(管理資源) 頁面。
- 在專案清單中選取要刪除的專案,然後點選「Delete」(刪除)。
- 在對話方塊中輸入專案 ID,然後按一下 [Shut down] (關閉) 以刪除專案。
後續步驟
- 建議您將現有應用程式匯入 VS Code,並透過 Cloud Code 進行設定。
- 透過 Cloud Code 的 YAML 編輯支援功能,處理更進階的 Google Cloud Kubernetes 設定。
- 瞭解 Cloud Code 提供的語言專屬偵錯支援。
- 透過檔案同步和熱重載功能,加快開發速度。
- 建立及設定 GKE 叢集
- 設定私人叢集
- 設定相關設定,打造專屬 Cloud Code 體驗。
- 將應用程式部署至 ARM64、AMD64 或混合架構 GKE 叢集。