
This document describes how to create and optimize the context sets that help achieve high QueryData query accuracy on your data agent applications. The context engineering agent helps you build, evaluate, and improve context sets by automating their creation and optimization.
To learn about context sets and QueryData, see Context sets overview and QueryData overview.To build enterprise-grade data applications, text-to-SQL model accuracy typically needs to achieve near-100% quality. Incorrect query results affect overall application usability and user experience. Achieving explainable, business-relevant answers with high accuracy requires context engineering, which is the process of creating and iteratively optimizing the context to achieve optimal accuracy.
By providing QueryData with the context targeted to your business application, you supply the precise business rules the system needs to resolve nuanced user intent.
Context engineering agent
The context engineering agent automates this optimization workflow. You can converse with the agent to handle ad hoc tasks to optimize your context. The following list provides examples of natural language prompts you can use to instruct the agent, along with a description of how the agent responds. Use these examples to help build and optimize your context:
- Example prompt for failure analysis: "Update context so that we correctly identify the airport for queries like 'disney world flights'." The agent analyzes the failure, reasons about the gap, and recommends adding an appropriate context item, such as a value search query.
- Example prompt for context suggestion: "Read my app code and suggest some context to add." The agent parses through the code, reasons about the domain of your application, and suggests what context items would be relevant.
- Example prompt for bulk processing: "Here are 10 examples of questions and SQL queries. Turn them into templates." The agent bulk-processes your inputs and updates your context set.
Importance of the golden dataset
To optimize your context, you must first create a dataset that matches the natural language inputs of your application. The agent can help you build this golden dataset, which consists of user questions and their expected database queries. A golden dataset lets you:
- Establish a baseline for query performance.
- Validate updates against ground-truth database queries.
- Measure accuracy improvements across iterations.
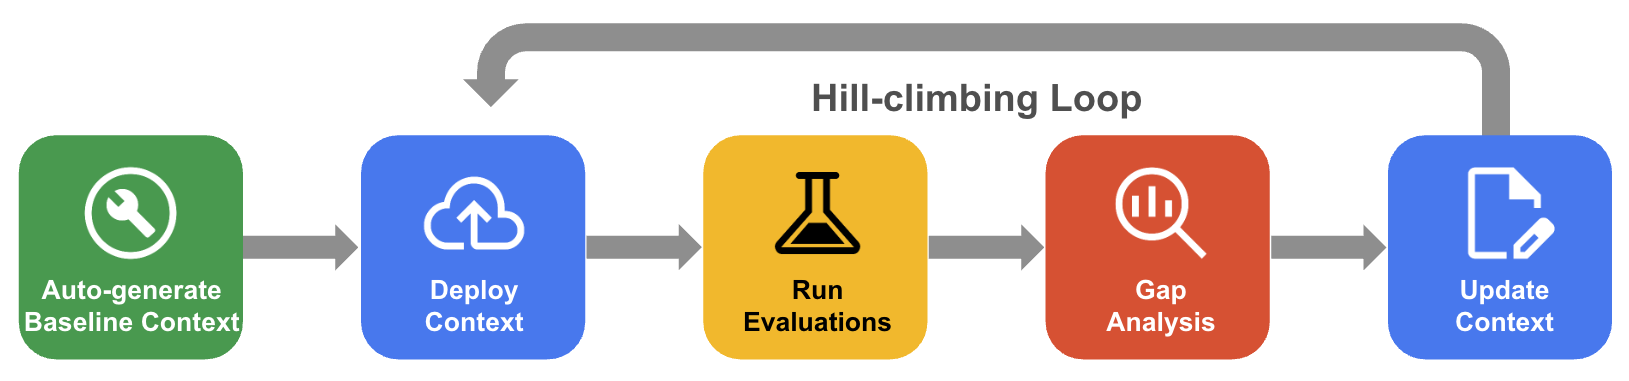
The systematic hill-climbing process
In systematic hill-climbing, the agent iteratively improves a context set through evaluation of the golden dataset, gap analysis, and updates to drive accuracy toward near-100%.
- Auto-generate baseline context: Create a starting context set derived from your database schema and application artifacts.
- Hill-climbing optimization workflow: Let the agent evaluate your QueryData accuracy, perform gap analysis on failures, and automatically propose improvements to drive accuracy higher.
The following diagram shows the systematic hill-climbing workflow:
Before you begin
Complete the following prerequisites before using the context engineering agent.
Enable required services
Enable the following services for your project:Prepare an AlloyDB for PostgreSQL cluster, instance, and database
Make sure that you have access to an existing AlloyDB cluster and instance or create a new one.This tutorial requires you to have a database in your AlloyDB instance. For more information, see Create a database.
Required roles and permissions
- Add an Identity and Access Management (IAM) user or service account to the cluster at the database level. For more information, see Manage database users.
- Grant the
alloydb.databaseUser, theserviceusage.serviceUsageConsumer, and thegeminidataanalytics.queryDataUserroles to the IAM user at the project level. For more information, see Add IAM policy binding for a project.
Grant executesql permission to AlloyDB for PostgreSQL instance
To grant the executesql permission to the AlloyDB for PostgreSQL instance and set
the data_api_access instance setting to the value ALLOW_DATA_API,
use the following curl command :
   curl -X PATCH \
     -H "Authorization: Bearer $(gcloud auth print-access-token)" \
     -H "Content-Type: application/json" \
     https://alloydb.googleapis.com/v1alpha/projects/PROJECT_ID/locations/LOCATION/clusters/CLUSTER_ID/instances/INSTANCE_ID?updateMask=dataApiAccess \
     -d '{
       "dataApiAccess": "ENABLED",
     }'
PROJECT_ID: The ID of your Google Cloud project.LOCATION: The region where your AlloyDB cluster is located.CLUSTER_ID: The ID of your AlloyDB cluster.INSTANCE_ID: The ID of your AlloyDB instance.
Prepare your environment
You can build context set files from any local development environment or IDE. To prepare your environment, complete the following steps:
- Install the context engineering agent
- Set up the database connection
Install the context engineering agent
The context engineering agent runs Model Context Protocol (MCP) server that
requires uv to manage underlying Python packages.
Install
uvby following the instructions in Installuv.Verify that
uvis installed and accessible from your command line:uv --version
To prepare your environment, install the context engineering agent in your selected agent harness, such as the Antigravity CLI, Claude Code, or the Gemini CLI.
Depending on your selected agent harness, follow the corresponding installation steps:
Antigravity CLI
To install the context engineering agent in the Antigravity CLI, follow these steps:
- Install the Antigravity CLI. See Get Started with Antigravity CLI.
- Install the context engineering agent plugin, which includes workflows for context generation. Replace VERSION with the required released version:
agy plugin install https://github.com/GoogleCloudPlatform/db-context-enrichment/tree/VERSION
- Start the Antigravity CLI:
agy
- Optional. Update the plugin:
agy plugin uninstall google-cloud-db-context-engineering
agy plugin install https://github.com/GoogleCloudPlatform/db-context-enrichment/tree/NEW_VERSION
Claude Code
To install the context engineering agent in Claude Code, follow these steps:
- Add the plugin marketplace:
/plugin marketplace add https://github.com/GoogleCloudPlatform/db-context-enrichment.git
- Install the plugin:
/plugin install db-context-engineering@db-context-enrichment-marketplace
- Reload plugins to activate the changes:
/reload-plugins
- Optional. Update the plugin:
/plugin update db-context-engineering@db-context-enrichment-marketplace
Gemini CLI (Deprecated)
To install the context engineering agent in the Gemini CLI, follow these steps:
- Install the Gemini CLI. See Get Started with Gemini CLI.
- Install the extension:
gemini extensions install https://github.com/GoogleCloudPlatform/db-context-enrichment
- Optional. Update the extension:
gemini extensions update mcp-db-context-enrichment
Set up the database connection
The agent requires a database connection to fetch schemas and the ability to validate the syntax of generated SQL context. To let the agent interact with your database, configure authentication credentials and define your database connection configuration.
Configure Application Default Credentials
Configure Application Default Credentials (ADC) to provide user credentials for accessing Google Cloud resources from the context engineering agent:
- Toolbox MCP server: Uses credentials to connect to your database, fetch schemas, and run SQL for validation.
- Evalbench: Uses credentials to invoke QueryData for evaluation.
Run the following commands in your terminal to authenticate:
gcloud auth application-default loginConfigure the database connection file
The agent requires a database connection for context generation, which the MCP Toolbox supports and defines within a configuration file.
The configuration file specifies your database source and tools required to either fetch schemas or execute SQL. The context engineering agent comes with pre-installed Agent Skills to help you generate the configuration.
Start your agent environment.
Ask the agent to help set up the database connection—for example, prompt "help me set up the database connection." Follow the agent's instructions to create the configuration file in your current working directory as
autoctx/tools.yaml.To apply the new
tools.yamlconfiguration, reload your connection:- In the Antigravity CLI, run
/mcpand selecttoolboxto restart. - In the Gemini CLI, run
/mcp reload. - In Claude Code, run
/mcp, selecttoolbox, and selectReconnect.
- In the Antigravity CLI, run
For more information about manually configuring the database configuration file, see MCP Toolbox Configuration.
Generate and optimize context
The context engineering agent provides a set of Agent Skills and MCP tools to enhance your coding agent's context engineering capability. You can use these tools together to generate a baseline, measure effectiveness, and iteratively apply improvements. However, you can begin at any stage of the workflow:
- If you already have a context set, you can proceed directly to evaluation.
- If you have failing queries that you want to fix, you can proceed directly to gap analysis.
Each capability describes the agent's actions, use cases, and invocation commands.
The example prompts show how you can query the agent in natural language. If the agent requires additional details to complete a request, it prompts you for clarification.
Build and expand evaluation datasets
To improve performance, you must first measure it. Context engineering without a golden dataset, which consists of user questions paired with their expected SQL, lacks systematic verification. With a golden dataset, every change is a measurable improvement that you can validate against ground truth.
Creating a representative golden dataset manually is time-consuming, and small datasets might miss variations in user phrasing. The agent resolves this by:
- Generating candidate question-SQL pairs based on your database schema.
- Expanding a small seed dataset using filter variations, synonyms, and rephrasings.
Optionally, you can let the agent execute the generated SQL against your database. This verification confirms that queries execute successfully before you add them to the dataset.
The dataset is a JSON file containing question-SQL pairs:
[
  {
    "id": "example_001",
    "nlq": "What is the total revenue for the top 5 products?",
    "golden_sql": "SELECT product_id, sum(net_revenue) FROM sales GROUP BY product_id ORDER BY sum(net_revenue) DESC LIMIT 5;"
  }
]
Approved pairs populate the autoctx/golden.json file in your workspace, where
they are ready for evaluation. You can provide an existing file or write some
evaluation examples inline for the agent to expand.
You can use the following example prompts to instruct the agent:
- "Generate an evaluation dataset from my schema."
- "Here's a seed question and SQL—expand it into a broader dataset and verify the queries run."
Generate a baseline context set
To avoid creating context from scratch, you can let the agent derive an initial context set from your database schema and application artifacts, such as business rules, sample queries, or README files. Although this baseline context is not final, it provides a validated starting point grounded in your database model.
You can use the following example prompts to instruct the agent:
- "Generate a context set from my schema."
- "Generate initial context using these schemas and the business rules in
requirements.md."
The agent prompts you to name the experiment, which organizes generated artifacts, and might ask you to narrow the scope if your database schema is large. To upload the context using AlloyDB Studio, follow the instructions after the agent generates the JSON file.
Evaluate context effectiveness
After you establish a context set and a golden dataset, you can let the agent measure context performance by querying your data agent's QueryData API with each golden question. The agent compares the generated SQL and its execution results against the expected answer using Evalbench to handle the comparison.
Running an evaluation provides the following:
- Quantitative metrics, such as pass and fail results and aggregate scores, to track progress across context iterations.
- An inline conversation summary and detailed CSV reports written to the
eval_reports/directory in your experiment folder.
To start an evaluation, provide the golden dataset path and the context set ID. To learn about finding the context set ID, see Find the agent context ID.
You can use the following example prompts to instruct the agent:
- "Evaluate my context against
golden.json." - "Re-run the evaluation using the config from my last experiment."
To re-run a previously generated evaluation configuration without setting it up again, ask the agent or invoke the CLI directly:
uvx google-evalbench --run_config=autoctx/experiments/my-experiment/eval_configs/run_config.json
For details on the evaluation configuration schema and how to customize evaluation runs, see the Evalbench documentation.
Perform gap analysis and propose improvements
To resolve query failures, you must identify their root causes, such as incorrect columns, missing table joins, or unresolved fuzzy terms. Manually identifying these issues requires extensive analysis of evaluation reports.
The agent automates this analysis and correction loop:
- Gap analysis: The agent reads evaluation results and your context set to group similar failures and recommend targeted context additions, such as templates, facets, or value searches.
- Proposed fixes: The agent proposes concrete edits and optionally tests the SQL against your database to verify the resolution.
- Baseline preservation: The agent writes the improvements to a new JSON file alongside your baseline context, preserving the original files.
You can use the following example prompts to instruct the agent:
- "Run gap analysis on my last evaluation and propose fixes."
- "Optimize this context set against
golden.json."
To prepare for the next iteration, upload the improved context to the target context set using Data Agents Studio, follow the instructions.
Author specific context items on demand
If you already know the required context, such as a template for a specific question, a facet for a repeated filter, or a value search for a particular column, writing the context JSON manually can introduce serialization errors in parameter names, type metadata, or fragment syntax. The agent handles JSON formatting to let you focus on your business intent.
You can also use this feature for ad hoc updates, such as when you need to support a new query pattern or address a missing schema detail. To get the JSON, describe the required context to the agent without running an evaluation or setting up an experiment.
This is also the right capability to reach for when you're handed a one-off task: a stakeholder gives you a new question-SQL pair they want supported, or you spot a missing facet during a code review. You don't need to set up an experiment or run an evaluation to fix it—describe what you want and the agent produces the JSON.
You can use the following example prompts to instruct the agent:
- "Create a template for: 'Which airports are in California?' with SQL:
SELECT name FROM airports WHERE country = 'United States' AND state = 'CA'." - "Create a facet for the filter
departure_time BETWEEN '00:00:00' AND '06:00:00'labeled 'red eye'." - "Create a value search for
airports.iata."
Reason about which context type selection
Selecting the correct context type regardless of whether a template, facet, or value search, helps prevent context bloat and database query regressions. For example, using a template instead of a facet can cause duplicate rules, while value searches introduced where a template is sufficient can increase query latency. To find the correct schema format, prompt the agent to recommend a type based on the query structure or database columns before you create context items. The agent explains its reasoning to help you understand the context options.
You can use the following example prompts to instruct the agent:
- "I keep writing the filter
departure_time BETWEEN '00:00:00' AND '06:00:00'across many queries. What's the best way to capture this?" - "Users describe flight status in free text and I want to match them to
flights.status. What kind of value search should I set up?" - "What's the difference between a template and a facet, and when should I use each?"
Apply bulk operations across a context set
The agent supports bulk updates to manage large context sets consistently. If you need to update multiple context items simultaneously, such as when a database column is renamed, a code value changes format, or templates reference a deprecated table, the agent can apply the change across every affected item without altering unrelated entries.
You can use the following example prompts to instruct the agent:
- "Read
golden.txtand turn all the pairs into templates." - "In
context_set.json, replaceairline = 'UA'withairline = 'United Airlines'for any item referencing 'United'. Leave unrelated items alone."
What's next
- Learn more about context sets.
- Learn how to create or delete a context set in AlloyDB Studio.
- Learn how to test a context set.