
本页面介绍了如何将智能体开发套件 (ADK) 智能体与 Vertex AI Agent Engine 会话相关联,以及如何在本地环境和生产环境中使用受管理的会话。
准备工作
请确保按照设置环境中的获取所需角色和身份验证步骤设置您的环境。
创建 Vertex AI Agent Engine 实例
如需访问 Vertex AI Agent Engine 会话,您首先需要使用 Vertex AI Agent Engine 实例。您无需部署任何代码即可开始使用会话。如果您之前使用过 Agent Engine,那么创建 Vertex AI Agent Engine 实例只需几秒钟,无需部署任何代码。如果您是首次使用 Agent Engine,可能需要更长时间。
Google Cloud 项目
import vertexai

client = vertexai.Client(
  project="PROJECT_ID",
  location="LOCATION"
)

# If you don't have an Agent Engine instance already, create an instance.
agent_engine = client.agent_engines.create()

# Print the agent engine ID, you will need it in the later steps to initialize
# the ADK `VertexAiSessionService`.
print(agent_engine.api_resource.name.split("/")[-1])
替换以下内容:
PROJECT_ID:您的项目 ID。
LOCATION:您的区域。 请参阅会话的支持的区域。
开发 ADK 智能体
如要创建 ADK 智能体,您可以按照智能体开发套件中的说明操作,也可以使用以下代码创建一个示例智能体来用一些固定的问候语向用户问好:
from google import adk

def greetings(query: str):
  """Tool to greet user."""
  if 'hello' in query.lower():
    return {"greeting": "Hello, world"}
  else:
    return {"greeting": "Goodbye, world"}

# Define an ADK agent
root_agent = adk.Agent(
    model="gemini-2.0-flash",
    name='my_agent',
    instruction="You are an Agent that greet users, always use greetings tool to respond.",
    tools=[greetings]
)
设置 ADK 运行程序
ADK 运行时负责对智能体、工具及回调的执行以及会话的读取和写入调用进行编排。使用 VertexAiSessionService 服务初始化运行程序,该服务会与 Vertex AI Agent Engine 会话建立连接。
Google Cloud 项目
from google.adk.sessions import VertexAiSessionService
from google.genai import types

app_name="APP_NAME"
user_id="USER_ID"

# Create the ADK runner with VertexAiSessionService
session_service = VertexAiSessionService(
      "PROJECT_ID",
      "LOCATION",
      "AGENT_ENGINE_ID"
)
runner = adk.Runner(
    agent=root_agent,
    app_name=app_name,
    session_service=session_service)

# Helper method to send query to the runner
def call_agent(query, session_id, user_id):
  content = types.Content(role='user', parts=[types.Part(text=query)])
  events = runner.run(
      user_id=user_id, session_id=session_id, new_message=content)

  for event in events:
      if event.is_final_response():
          final_response = event.content.parts[0].text
          print("Agent Response: ", final_response)
替换以下内容:
APP_NAME:您的代理应用的名称。
USER_ID:自行选择用户 ID,字符数限制为 128。 例如
user-123。AGENT_ENGINE_ID:Vertex AI Agent Engine 实例的资源 ID。
对于已部署的智能体,资源 ID 会显示为
GOOGLE_CLOUD_AGENT_ENGINE_ID环境变量对于本地智能体,您可以使用
agent_engine.api_resource.name.split("/")[-1]检索该资源 ID。
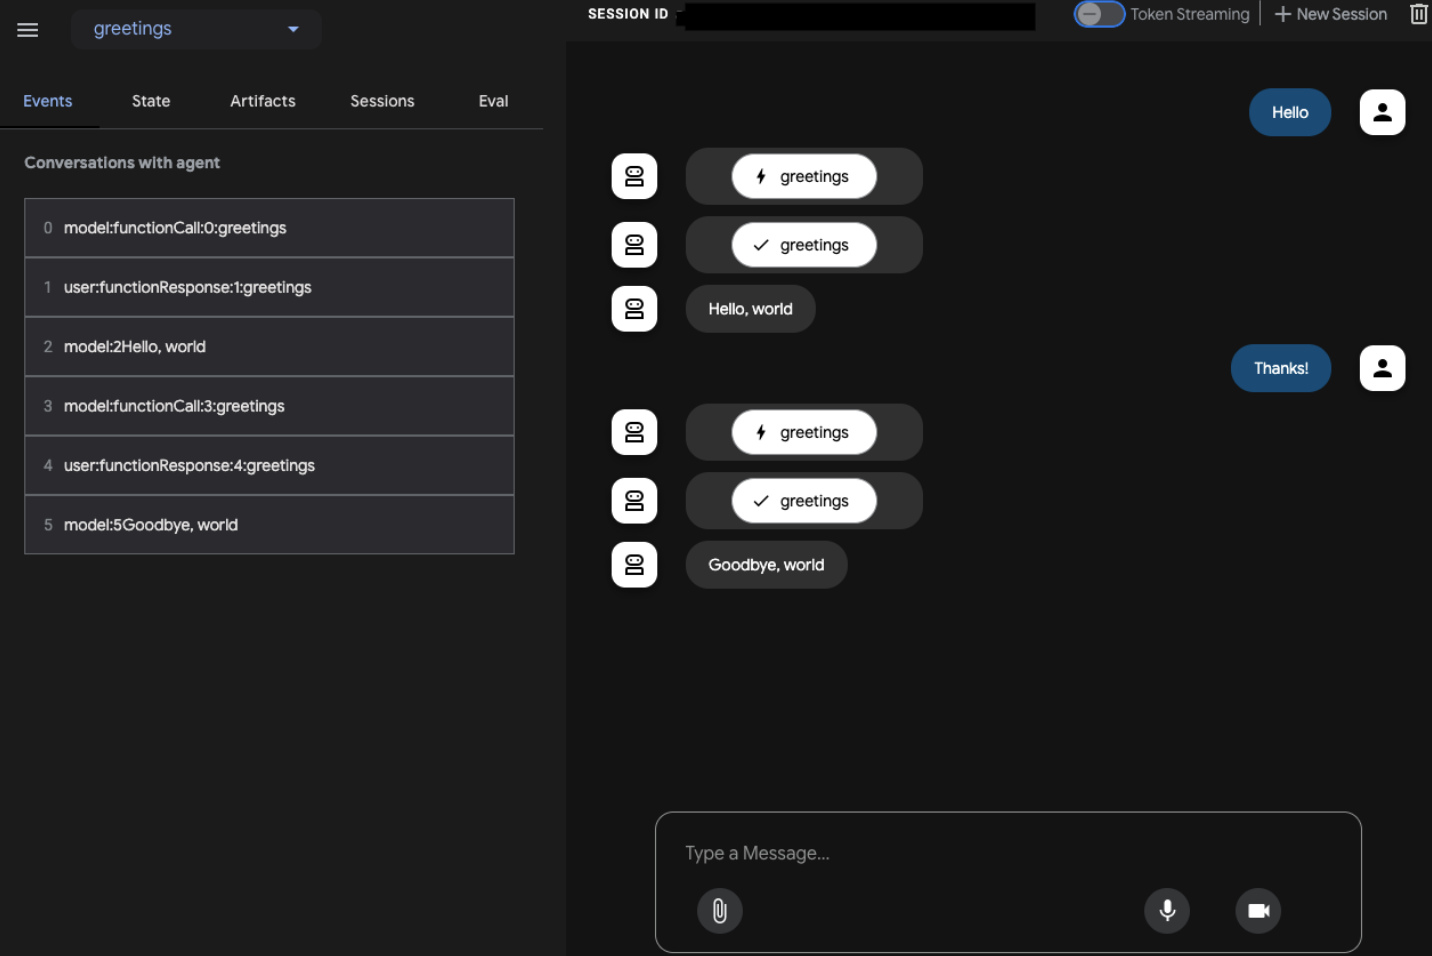
与您的代理互动
定义智能体并设置 Vertex AI Agent Engine 会话后,您可以与智能体互动,以检查会话记录及状态是否会保留。
ADK 界面
使用 ADK 界面测试智能体,并通过 session_service_uri 命令行选项连接到 Vertex AI Agent Engine 会话:
agent_engine_id="AGENT_ENGINE_ID"

adk web --session_service_uri=agentengine://${agent_engine_id}

# Sample output
+-----------------------------------------------------------------------------+
| ADK Web Server started                                                      |
|                                                                             |
| For local testing, access at http://localhost:8000.                         |
+-----------------------------------------------------------------------------+

INFO:     Application startup complete.
INFO:     Uvicorn running on http://0.0.0.0:8000 (Press CTRL+C to quit)
Python
使用 ADK Python 代码管理会话及状态。
创建会话并向智能体发出查询请求
使用以下代码创建会话并向智能体发送查询请求:
# Create a session
session = await session_service.create_session(
       app_name=app_name,
       user_id=user_id)

call_agent("Hello!", session.id, user_id)
# Agent response: "Hello, world"

call_agent("Thanks!", session.id, user_id)
# Agent response: "Goodbye, world"
在创建会话并将其传递给运行程序后,ADK 会使用该会话来存储当前互动产生的事件。您还可以通过提供相应会话的 ID 来恢复之前的会话。
配置会话存留时间 (TTL)
您可以在创建或更新会话时设置会话过期时间。会话及其子事件会在过期时间过后自动删除。您可以直接设置到期时间 (expire_time),也可以设置以秒为单位的存留时间 (ttl)。
存留时间
如果您设置了存留时间,服务器会计算新创建的会话的到期时间(即 create_time + ttl)或更新的会话的到期时间(即 update_time + ttl)。
  session = await session_service.create_session(
        app_name=app_name,
        user_id=user_id,
        # Session will be deleted 10 days after creation time.
        ttl=f"{24 * 60 * 60 * 10}s"
  )
  ```
有效期
  import datetime

  expire_time = datetime.datetime.now(
        tz=datetime.timezone.utc) + datetime.timedelta(seconds=24 * 60 * 60 * 10)

  session = await session_service.create_session(
        app_name=app_name,
        user_id=user_id,
        # Session will be deleted at the provided time (10 days after current time).
        expire_time=expire_time.isoformat()
  )
列出现有会话
列出与给定用户 ID 相关联的所有现有会话。
# List sessions
await session_service.list_sessions(app_name=app_name,user_id=user_id)

# ListSessionsResponse(session_ids=['1122334455', '9988776655'])
管理会话状态
状态包含智能体在处理对话时需要的信息。您可以在创建会话时以字典形式提供初始状态:
# Create a session with state
session = await session_service.create_session(
    app_name=app_name,
    user_id=user_id,
    state={'key': 'value'})

print(session.state['key'])
# value
如要在运行程序之外更新会话状态,您可以使用 state_delta 向会话附加新事件:
from google.adk.events import Event, EventActions
import time

# Define state changes
state_changes = {'key': 'new_value'}

# Create event with actions
actions_with_update = EventActions(state_delta=state_changes)
system_event = Event(
invocation_id="invocation_id",
author="system", # Or 'agent', 'tool' etc.
actions=actions_with_update,
timestamp=time.time()
)

# Append the event
await session_service.append_event(session, system_event)

# Check updated state
updated_session = await session_service.get_session(
    app_name=app_name,
    user_id=user_id,
    session_id=session.id)
# State is updated to new value
print(updated_session.state['key'])
# new_value
删除会话
删除与某个用户 ID 关联的特定会话:
await session_service.delete_session(app_name=app_name, user_id=user_id, session_id=session.id)
将智能体部署到 Vertex AI Agent Engine
在本地测试智能体后,您便可以使用以下参数更新 Vertex AI Agent Engine 实例,将智能体部署到生产环境:
Google Cloud 项目
client.agent_engines.update(
    resource_name=agent_engine.api_resource.name,
    agent=AGENT,
    config={
      "display_name": DISPLAY_NAME,      # Optional.
      "requirements": REQUIREMENTS,      # Optional.
      "staging_bucket": STAGING_BUCKET,  # Required.
    },
)
替换以下内容:
AGENT:实现
query / stream_query方法的应用(例如,对于 ADK 智能体,则为AdkApp)。如需了解详情,请参阅部署注意事项。DISPLAY_NAME:智能体的简单易记的名称。
REQUIREMENTS:您的代理所需的 pip 软件包列表。例如
["google-cloud-storage", "google-cloud-aiplatform[agent_engines,adk]"]。STAGING_BUCKET:以
gs://为前缀的 Cloud Storage 存储桶。
清理
如需清理此项目中使用的所有资源,您可以删除 Vertex AI Agent Engine 实例及其子资源:
agent_engine.delete(force=True)