This tutorial shows you how to create a Cloud Tasks queue that
can regulate the rate of workflow executions.
There is a [maximum number](https://docs.cloud.google.com/workflows/quotas#quotas) of active workflow
executions that can happen concurrently. Once this quota is exhausted, and if
[execution backlogging](https://docs.cloud.google.com/workflows/docs/executing-workflow#manage_execution_backlogging)
is disabled, or if the quota for backlogged executions is reached, any new
executions fail with an HTTP `429 Too many requests` status code. By enabling a
Cloud Tasks queue to execute child workflows at a rate that you
define, you can avoid Workflows quota-related issues and achieve a
better execution rate.
Note that Cloud Tasks is designed to provide "at least once"
delivery; however, Workflows doesn't ensure exactly-once
processing of duplicate requests from Cloud Tasks.
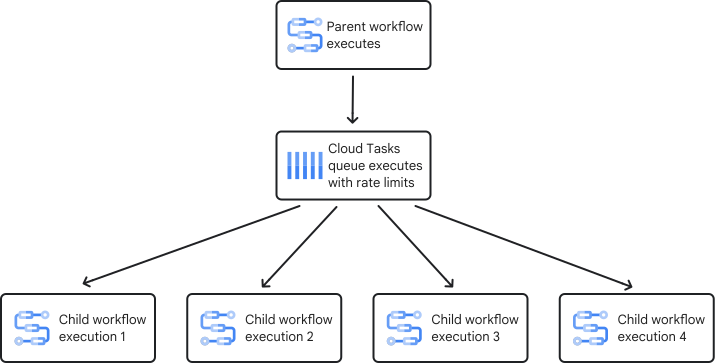
In the following diagram, a parent workflow invokes child workflows that are
regulated by a Cloud Tasks queue that has a dispatch rate
applied.
## Objectives
In this tutorial you will:
1. Create a Cloud Tasks queue that acts as an intermediary between the parent and child workflows.
2. Create and deploy a child workflow that receives data from the parent workflow.
3. Create and deploy the parent workflow that executes the child workflow through the Cloud Tasks queue.
4. Run the parent workflow without a dispatch rate limit, which invokes executions of the child workflow.
5. Apply a dispatch limit to the Cloud Tasks queue and run the parent workflow.
6. Observe that the child workflows are executed at the rate defined through the Cloud Tasks queue.
You can run the following commands in the Google Cloud console or by using the
Google Cloud CLI in either your terminal or Cloud Shell.
## Costs
In this document, you use the following billable components of Google Cloud:
- [Cloud Tasks](https://docs.cloud.google.com/tasks)
- [Workflows](https://docs.cloud.google.com/workflows)
To generate a cost estimate based on your projected usage,
use the [pricing calculator](https://docs.cloud.google.com/products/calculator).
New Google Cloud users might be eligible for a [free trial](https://docs.cloud.google.com/free).
## Before you begin
Security constraints defined by your organization might prevent you from completing the
following steps. For troubleshooting information, see
[Develop applications in a constrained Google Cloud environment](https://docs.cloud.google.com/resource-manager/docs/organization-policy/develop-apps-constrained-environment).
### Console
1. In the Google Cloud console, go to the **IAM** page to set permissions for the Compute Engine default service account.
[Go to IAM](https://console.cloud.google.com/iam-admin/iam)
Make note of the [Compute Engine
default service account](https://docs.cloud.google.com/iam/docs/service-account-types#default) as you will associate it with the workflows in
this tutorial for testing purposes. This service account is automatically
created after enabling or using a Google Cloud service that uses
Compute Engine, and with the following email format:
```bash
PROJECT_NUMBER-compute@developer.gserviceaccount.com
```
Replace `PROJECT_NUMBER` with your
Google Cloud project number. You can find your project number on the
[Welcome](https://console.cloud.google.com/welcome)
page of the Google Cloud console.
For production environments, we strongly recommend
[creating a new service account](https://docs.cloud.google.com/iam/docs/service-accounts-create)
and granting it one or more IAM roles that contain the
[minimum permissions required](https://docs.cloud.google.com/iam/docs/best-practices-service-accounts#limit-service-account-privileges)
and follow the principle of
[least privilege](https://docs.cloud.google.com/iam/docs/using-iam-securely#least_privilege).
> [!NOTE]
> **Note:**
>
>
> Depending on your organization policy configuration, the default service account might
> automatically be granted the [Editor role](https://docs.cloud.google.com/iam/docs/roles-overview#basic) on your
> project. We strongly recommend that you disable the automatic role grant by [enforcing the `iam.automaticIamGrantsForDefaultServiceAccounts` organization policy
> constraint](https://docs.cloud.google.com/resource-manager/docs/organization-policy/restricting-service-accounts#disable_service_account_default_grants). If you created your organization after May 3, 2024, this
> constraint is enforced by default.
>
>
> If you disable the automatic role grant, you must decide which roles to grant to the default
> service accounts, and then [grant these
> roles](https://docs.cloud.google.com/iam/docs/granting-changing-revoking-access) yourself.
>
>
> If the default service account already has the Editor role, we recommend that you replace the
> Editor role with less permissive roles.To safely modify the service account's roles, use [Policy Simulator](https://docs.cloud.google.com/policy-intelligence/docs/simulate-iam-policies) to see the impact of
> the change, and then [grant and revoke the
> appropriate roles](https://docs.cloud.google.com/iam/docs/granting-changing-revoking-access).
2. Select the Compute Engine default service account and in that row, click **Edit principal**.
3. In the dialog box that appears, click **Add another role** and add the following roles:
1. In the **Select a role** list, select **Workflows** \> **Workflows Invoker** so that the account has permission to trigger your workflow execution.
2. In the **Select a role** list, select **Cloud Tasks** \> **Cloud Tasks Enqueuer** so that the account has permission to create tasks.
4. Click **Save**.
### gcloud
1. Make note of the [Compute Engine
default service account](https://docs.cloud.google.com/iam/docs/service-account-types#default) as you will associate it with the workflows in
this tutorial for testing purposes. This service account is automatically
created after enabling or using a Google Cloud service that uses
Compute Engine, and with the following email format:
```bash
PROJECT_NUMBER-compute@developer.gserviceaccount.com
```
Replace `PROJECT_NUMBER` with your
Google Cloud project number. You can find your project number by
running the following command:
```bash
gcloud projects describe PROJECT_ID --format='value(projectNumber)'
```
For production environments, we strongly recommend
[creating a new service account](https://docs.cloud.google.com/iam/docs/service-accounts-create)
and granting it one or more IAM roles that contain the
[minimum permissions required](https://docs.cloud.google.com/iam/docs/best-practices-service-accounts#limit-service-account-privileges)
and follow the principle of
[least privilege](https://docs.cloud.google.com/iam/docs/using-iam-securely#least_privilege).
> [!NOTE]
> **Note:**
>
>
> Depending on your organization policy configuration, the default service account might
> automatically be granted the [Editor role](https://docs.cloud.google.com/iam/docs/roles-overview#basic) on your
> project. We strongly recommend that you disable the automatic role grant by [enforcing the `iam.automaticIamGrantsForDefaultServiceAccounts` organization policy
> constraint](https://docs.cloud.google.com/resource-manager/docs/organization-policy/restricting-service-accounts#disable_service_account_default_grants). If you created your organization after May 3, 2024, this
> constraint is enforced by default.
>
>
> If you disable the automatic role grant, you must decide which roles to grant to the default
> service accounts, and then [grant these
> roles](https://docs.cloud.google.com/iam/docs/granting-changing-revoking-access) yourself.
>
>
> If the default service account already has the Editor role, we recommend that you replace the
> Editor role with less permissive roles.To safely modify the service account's roles, use [Policy Simulator](https://docs.cloud.google.com/policy-intelligence/docs/simulate-iam-policies) to see the impact of
> the change, and then [grant and revoke the
> appropriate roles](https://docs.cloud.google.com/iam/docs/granting-changing-revoking-access).
2. Grant the [Workflows Invoker role](https://docs.cloud.google.com/iam/docs/roles-permissions/workflows#workflows.invoker) (`roles/workflows.invoker`) on the project to the Compute Engine default service account so that the account has permission to trigger your workflow execution.
```bash
gcloud projects add-iam-policy-binding PROJECT_ID \
--member=serviceAccount:PROJECT_NUMBER-compute@developer.gserviceaccount.com \
--role=roles/workflows.invoker
```
Replace the following:
- `PROJECT_ID`: the Google Cloud project ID
- `PROJECT_NUMBER`: the Google Cloud project number
3. Grant the [Cloud Tasks Enqueuer role](https://docs.cloud.google.com/iam/docs/roles-permissions/cloudtasks#cloudtasks.enqueuer) (`roles/cloudtasks.enqueuer`) on the project to the Compute Engine default service account so that the account has permission to create tasks.
```bash
gcloud projects add-iam-policy-binding PROJECT_ID \
--member=serviceAccount:PROJECT_NUMBER-compute@developer.gserviceaccount.com \
--role=roles/cloudtasks.enqueuer
```
## Create a Cloud Tasks queue
Create a Cloud Tasks queue that you can use in the parent
workflow and that lets you regulate the rate of workflow executions.
### Console
1. In the Google Cloud console, go to the **Cloud Tasks**
page:
[Go to Cloud Tasks](https://console.cloud.google.com/cloudtasks)
2. Click
**Create push queue**.
3. Enter the **Queue name** , `queue-workflow-child`.
4. In the **Region** list, select **us-central1 (Iowa)**.
5. Click **Create**.
### gcloud
```bash
QUEUE=queue-workflow-child
LOCATION=us-central1
gcloud tasks queues create $QUEUE --location=$LOCATION
```
## Create and deploy a child workflow
A child workflow can receive and process data from a parent workflow. Create and
deploy a child workflow that does the following:
- Receives an `iteration` as an argument
- Sleeps for 10 seconds to simulate some processing
- Returns a string upon successful execution
### Console
1. In the Google Cloud console, go to the **Workflows**
page.
[Go to Workflows](https://console.cloud.google.com/workflows)
2. Click
**Create**.
3. Enter the name, `workflow-child`, for the new workflow.
4. In the **Region** list, select **us-central1 (Iowa)**.
5. In the **Service account** list, select the
**Compute Engine default service account**.
6. Click **Next**.
7. In the workflow editor, enter the following definition for your workflow:
main:
params: [args]
steps:
- init:
assign:
- iteration : ${args.iteration}
- wait:
call: sys.sleep
args:
seconds: 10
- return_message:
return: ${"Hello world"+iteration}
8. Click **Deploy**.
### gcloud
1. Create a source code file for your workflow:
```bash
touch workflow-child.yaml
```
2. Open your source code file in a text editor and copy the following
workflow to the file.
main:
params: [args]
steps:
- init:
assign:
- iteration : ${args.iteration}
- wait:
call: sys.sleep
args:
seconds: 10
- return_message:
return: ${"Hello world"+iteration}
3. Deploy the workflow:
gcloud workflows deploy workflow-child \
--source=workflow-child.yaml \
--location=us-central1 \
--service-account=PROJECT_NUMBER-compute@developer.gserviceaccount.com
## Create and deploy the parent workflow
The parent workflow executes multiple branches of the child workflow using a
`for` loop.
1. Copy the source code that defines the parent workflow:
main:
steps:
- init:
assign:
- project_id: ${sys.get_env("GOOGLE_CLOUD_PROJECT_ID")}
- project_number: ${sys.get_env("GOOGLE_CLOUD_PROJECT_NUMBER")}
- location: ${sys.get_env("GOOGLE_CLOUD_LOCATION")}
- workflow_child_name: "workflow-child"
- queue_name: "queue-workflow-child"
- enqueue_tasks_to_execute_child_workflow:
for:
value: iteration
range: [1, 100]
steps:
- iterate:
assign:
- data:
iteration: ${iteration}
- exec:
# Encode object to JSON string in expression for workflow argument
argument: ${json.encode_to_string(data)}
- create_task_to_execute_child_workflow:
call: googleapis.cloudtasks.v2.projects.locations.queues.tasks.create
args:
parent: ${"projects/" + project_id + "/locations/" + location + "/queues/" + queue_name}
body:
task:
httpRequest:
body: ${base64.encode(json.encode(exec))}
url: ${"https://workflowexecutions.googleapis.com/v1/projects/" + project_id + "/locations/" + location + "/workflows/" + workflow_child_name + "/executions"}
oauthToken:
serviceAccountEmail: ${project_number + "-compute@developer.gserviceaccount.com"}
The workflow consists of the following parts:
- A map that is used to assign constants referring to the child workflow
and the Cloud Tasks queue name. For more information, see
[Maps](https://docs.cloud.google.com/workflows/docs/reference/syntax/maps).
- A `for` loop that is executed to invoke the child workflow, iteratively.
For more information, see
[Iteration](https://docs.cloud.google.com/workflows/docs/reference/syntax/iteration).
- A workflow step that creates and adds a large number of tasks to the
Cloud Tasks queue to execute the child workflow. For more
information, see
[Cloud Tasks API connector](https://docs.cloud.google.com/workflows/docs/reference/googleapis/cloudtasks/Overview).
2. Deploy the workflow:
### Console
1. In the Google Cloud console, go to the **Workflows**
page:
[Go to Workflows](https://console.cloud.google.com/workflows)
2. Click
**Create**.
3. Enter the name, `workflow-parent`, for the new workflow.
4. In the **Region** list, select **us-central1 (Iowa)**.
5. In the **Service account** list, select the
**Compute Engine default service account**.
6. Click **Next**.
7. In the workflow editor, paste the definition for the parent workflow.
8. Click **Deploy**.
### gcloud
1. Create a source code file for your workflow:
```bash
touch workflow-parent.yaml
```
2. Open your source code file in a text editor and paste the definition
for the parent workflow.
3. Deploy the workflow:
gcloud workflows deploy workflow-parent \
--source=workflow-parent.yaml \
--location=us-central1 \
--service-account=PROJECT_NUMBER-compute@developer.gserviceaccount.com
## Execute the parent workflow without rate limits
Execute the parent workflow to invoke the child workflows through the
Cloud Tasks queue. The executions should take about 10
seconds to complete.
### Console
1. In the Google Cloud console, go to the **Workflows**
page:
[Go to Workflows](https://console.cloud.google.com/workflows)
2. On the **Workflows** page, click the
**workflow-parent** workflow to go to its details page.
3. On the **Workflow details** page, click
**Execute**.
4. Click **Execute** again.
5. As the parent workflow is running, return to the
**Workflows** page, and click the
**workflow-child** workflow to go to its details page.
6. Click the **Executions** tab.
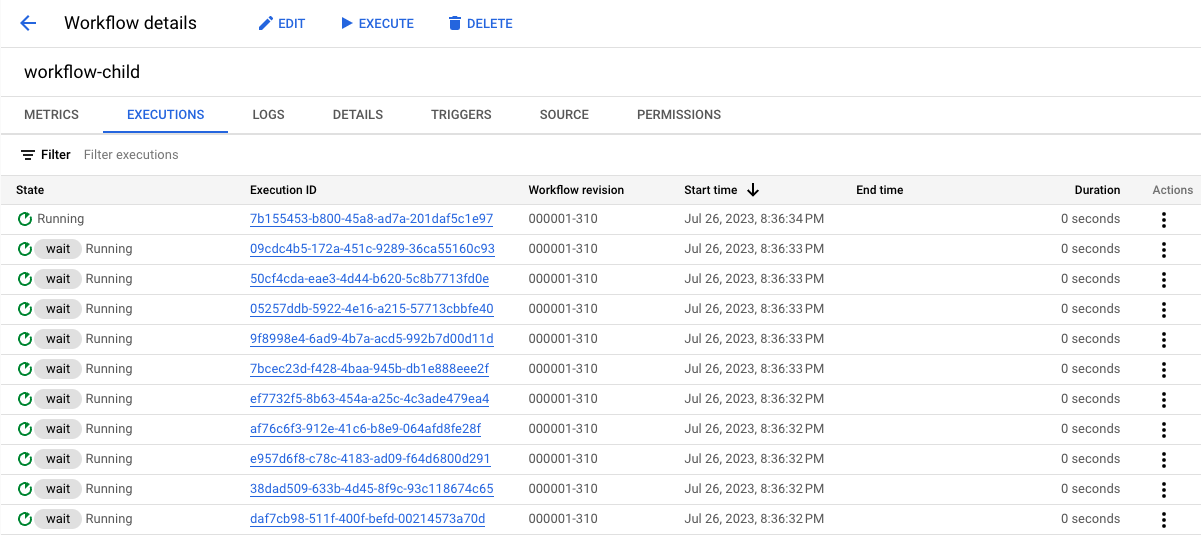
You should see executions of the child workflow, running around the same
time, similar to the following:
### gcloud
1. Execute the workflow:
```bash
gcloud workflows run workflow-parent \
--location=us-central1
```
2. To verify that a workflow execution was triggered, list the last four
executions:
```bash
gcloud workflows executions list workflow-child --limit=4
```
Since the number of executions (100 ) is below the
Workflows concurrency limit, the results should be
similar to the following. Quota issues might arise if you submit
thousands of executions at the same time.
```bash
NAME: projects/620278351741/locations/us-central1/workflows/workflow-child/executions/1570d06e-d133-4536-a859-b7b6a1a85524
STATE: ACTIVE
START_TIME: 2023-07-27T00:56:15.093934448Z
END_TIME:
NAME: projects/620278351741/locations/us-central1/workflows/workflow-child/executions/82724960-7d92-4961-aa2c-a0f0be46212c
STATE: ACTIVE
START_TIME: 2023-07-27T00:56:14.903007626Z
END_TIME:
NAME: projects/620278351741/locations/us-central1/workflows/workflow-child/executions/598126fb-37f9-45bc-91d8-aea7d795d702
STATE: ACTIVE
START_TIME: 2023-07-27T00:56:14.698260524Z
END_TIME:
NAME: projects/620278351741/locations/us-central1/workflows/workflow-child/executions/d2e9960b-f93f-4df4-a594-3e7e5c2be53f
STATE: ACTIVE
START_TIME: 2023-07-27T00:56:14.503818840Z
END_TIME:
```
You have created and deployed a workflow that invokes 100 iterations of the
child workflow.
## Execute the parent workflow with rate limits
Apply a rate limit of one dispatch per second to the Cloud Tasks
queue and then execute the parent workflow.
### Console
1. In the Google Cloud console, go to the **Cloud Tasks**
page:
[Go to Cloud Tasks](https://console.cloud.google.com/cloudtasks)
2. Click **queue-workflow-child** , the Cloud Tasks queue you
created, and click **Edit queue**.
3. In the **Rate limits for task dispatches** section, for the
**Max dispatches** field, type **1**.
4. Click **Save**.
5. Go to the **Workflows** page:
[Go to Workflows](https://console.cloud.google.com/workflows)
6. Click the **workflow-parent** workflow to go to its details page.
7. On the **Workflow details** page, click
**Execute**.
8. Click **Execute** again.
9. As the parent workflow is running, return to the
**Workflows** page, and click the
**workflow-child** workflow to go to its details page.
10. Click the **Executions** tab.
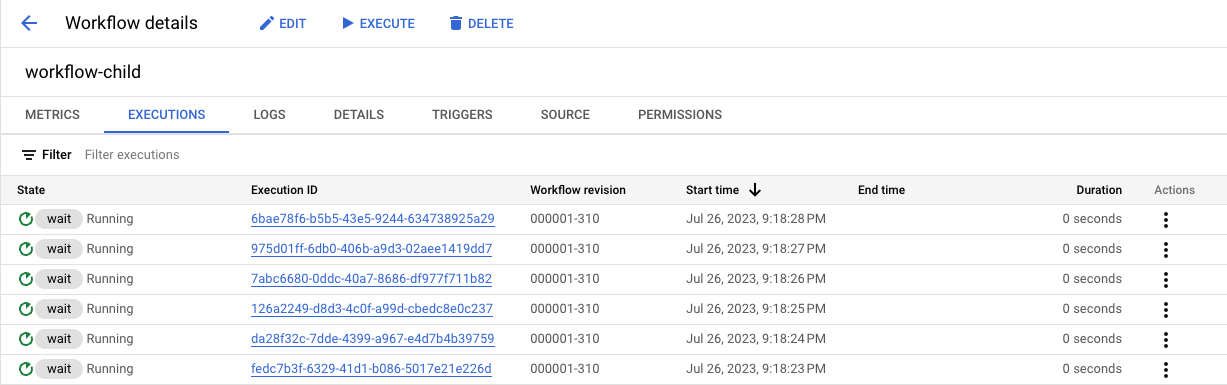
You should see executions of the child workflow, running at one request
per second, similar to the following:
### gcloud
1. Update the Cloud Tasks queue to apply a rate limit of one
dispatch per second:
```bash
gcloud tasks queues update $QUEUE \
--max-dispatches-per-second=1 \
--location=us-central1
```
2. Execute the workflow:
```bash
gcloud workflows run workflow-parent \
--location=us-central1
```
3. To verify that a workflow execution was triggered, list the last four
executions:
```bash
gcloud workflows executions list workflow-child --limit=4
```
The results should be similar to the following, with one workflow executed per
second:
```bash
NAME: projects/620278351741/locations/us-central1/workflows/workflow-child/executions/becf4957-9fb2-40d9-835d-0ff2dd0c1249
STATE: ACTIVE
START_TIME: 2023-07-27T01:07:24.446361457Z
END_TIME:
NAME: projects/620278351741/locations/us-central1/workflows/workflow-child/executions/6c1e7c4b-7ac6-4121-b351-1e2d56d10903
STATE: ACTIVE
START_TIME: 2023-07-27T01:07:23.448213989Z
END_TIME:
NAME: projects/620278351741/locations/us-central1/workflows/workflow-child/executions/f2ba5027-af40-4cd3-8cd0-b8033bcc6211
STATE: ACTIVE
START_TIME: 2023-07-27T01:07:22.431485914Z
END_TIME:
NAME: projects/620278351741/locations/us-central1/workflows/workflow-child/executions/ecc61ee5-fe87-49eb-8803-89dba929f6c8
STATE: ACTIVE
START_TIME: 2023-07-27T01:07:21.443466369Z
END_TIME:
```
You have successfully deployed a workflow that invokes 100 iterations of the
child workflow with a dispatch rate of one execution per second.
## Clean up
If you created a new project for this tutorial, [delete the project](https://docs.cloud.google.com/workflows/docs/tutorials/buffer-workflows-executions#delete-project).
If you used an existing project and wish to keep it without the changes added
in this tutorial, [delete resources created for the tutorial](https://docs.cloud.google.com/workflows/docs/tutorials/buffer-workflows-executions#delete-resources).
### Delete the project
The easiest way to eliminate billing is to delete the project that you
created for the tutorial.
To delete the project:
> [!CAUTION]
> **Caution** : Deleting a project has the following effects:
>
> - **Everything in the project is deleted.** If you used an existing project for the tasks in this document, when you delete it, you also delete any other work you've done in the project.
> - **Custom project IDs are lost.** When you created this project, you might have created a custom project ID that you want to use in the future. To preserve the URLs that use the project ID, such as an `appspot.com` URL, delete selected resources inside the project instead of deleting the whole project.
>
>
> If you plan to explore multiple architectures, tutorials, or quickstarts, reusing projects
> can help you avoid exceeding project quota limits.
1. In the Google Cloud console, go to the **Manage resources** page.
[Go to Manage resources](https://console.cloud.google.com/iam-admin/projects)
2. In the project list, select the project that you want to delete, and then click **Delete**.
3. In the dialog, type the project ID, and then click **Shut down** to delete the project.
### Delete tutorial resources
Delete the workflows and Cloud Tasks resources created in this
tutorial:
### Console
- To delete the workflows, follow these steps:
1. In the Google Cloud console, go to the **Workflows**
page:
[Go to Workflows](https://console.cloud.google.com/workflows)
2. From the list of workflows, click a workflow to go to its
**Workflow details** page.
3. Click **Delete**.
4. Type the name of the workflow and then click **Confirm**.
- To delete the Cloud Tasks queue, follow these steps:
1. In the Google Cloud console, go to the **Cloud Tasks**
page:
[Go to Cloud Tasks](https://console.cloud.google.com/cloudtasks)
2. Select the name of the queue you want to delete and click
**Delete queue**.
3. Confirm the action.
### gcloud
- To delete the workflows, run these commands:
```bash
gcloud workflows delete workflow-child
gcloud workflows delete workflow-parent
```
- To delete the Cloud Tasks queue, run this command:
```bash
gcloud tasks queues delete queue-workflow-child
```
## What's next
- To learn more about how to use Cloud Tasks to queue a workflow and execute it asynchronously, see [Queue workflow executions using Cloud Tasks](https://docs.cloud.google.com/workflows/docs/create-http-task).
- To learn more about the Workflows syntax, see the [Workflows syntax reference](https://docs.cloud.google.com/workflows/docs/reference/syntax).