


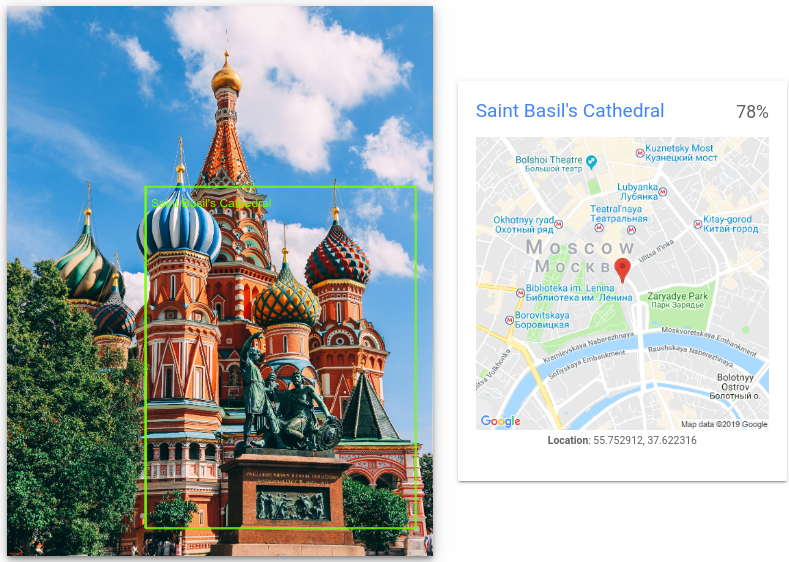
זיהוי ציוני דרך מזהה מבנים טבעיים ומבנים מעשה ידי אדם פופולריים בתמונה.
בקשות לזיהוי ציוני דרך
הגדרה של Google Cloud הפרויקט והאימות
זיהוי ציוני דרך בתמונה מקומית
אתם יכולים להשתמש ב-Vision API כדי לבצע זיהוי תכונות בקובץ תמונה מקומי.
בבקשות REST, שולחים את תוכן קובץ התמונה כמחרוזת מקודדת ב-Base64 בגוף הבקשה.
בבקשות של gcloud וספריית לקוח, מציינים בבקשה את הנתיב לתמונה מקומית.
REST
לפני שמשתמשים בנתוני הבקשה, צריך להחליף את הנתונים הבאים:
- BASE64_ENCODED_IMAGE: ייצוג base64 (מחרוזת ASCII) של נתוני התמונה הבינאריים. המחרוזת הזו צריכה להיראות כמו המחרוזת הבאה:
/9j/4QAYRXhpZgAA...9tAVx/zDQDlGxn//2Q==
- RESULTS_INT: (אופציונלי) ערך של מספר שלם של תוצאות להחזרה. אם משמיטים את השדה
"maxResults"ואת הערך שלו, ה-API מחזיר את ערך ברירת המחדל של 10 תוצאות. השדה הזה לא רלוונטי לסוגי התכונות הבאים:TEXT_DETECTION,DOCUMENT_TEXT_DETECTIONאוCROP_HINTS. - PROJECT_ID: מזהה הפרויקט ב- Google Cloud .
ה-method של ה-HTTP וכתובת ה-URL:
POST https://vision.googleapis.com/v1/images:annotate
גוף בקשת JSON:
{
  "requests": [
    {
      "image": {
        "content": "BASE64_ENCODED_IMAGE"
      },
      "features": [
        {
          "maxResults": RESULTS_INT,
          "type": "LANDMARK_DETECTION"
        },
      ]
    }
  ]
}
כדי לשלוח את הבקשה עליכם לבחור אחת מהאפשרויות הבאות:
curl
שומרים את גוף הבקשה בקובץ בשם request.json ומריצים את הפקודה הבאה:
curl -X POST \
     -H "Authorization: Bearer $(gcloud auth print-access-token)" \
     -H "x-goog-user-project: PROJECT_ID" \
     -H "Content-Type: application/json; charset=utf-8" \
     -d @request.json \
     "https://vision.googleapis.com/v1/images:annotate"
PowerShell
שומרים את גוף הבקשה בקובץ בשם request.json ומריצים את הפקודה הבאה:
$cred = gcloud auth print-access-token
$headers = @{ "Authorization" = "Bearer $cred"; "x-goog-user-project" = "PROJECT_ID" }

Invoke-WebRequest `
    -Method POST `
    -Headers $headers `
    -ContentType: "application/json; charset=utf-8" `
    -InFile request.json `
    -Uri "https://vision.googleapis.com/v1/images:annotate" | Select-Object -Expand Content
אם הבקשה תתבצע בהצלחה, השרת יחזיר קוד סטטוס 200 OK של HTTP ואת התשובה בפורמט JSON.
תשובה:
{
  "responses": [
    {
      "landmarkAnnotations": [
        {
          "mid": "/m/014lft",
          "description": "Saint Basil's Cathedral",
          "score": 0.7840959,
          "boundingPoly": {
            "vertices": [
              {
                "x": 812,
                "y": 1058
              },
              {
                "x": 2389,
                "y": 1058
              },
              {
                "x": 2389,
                "y": 3052
              },
              {
                "x": 812,
                "y": 3052
              }
            ]
          },
          "locations": [
            {
              "latLng": {
                "latitude": 55.752912,
                "longitude": 37.622315883636475
              }
            }
          ]
        }
      ]
    }
  ]
}
Go
לפני שמנסים את הדוגמה הזו, צריך לפעול לפי Goהוראות ההגדרה שבמדריך לתחילת העבודה עם Vision באמצעות ספריות לקוח. מידע נוסף מופיע במאמרי העזרה של Vision Go API.
כדי לבצע אימות ב-Vision, צריך להגדיר את Application Default Credentials. מידע נוסף זמין במאמר הגדרת אימות לסביבת פיתוח מקומית.
Java
לפני שמנסים את הדוגמה הזו, צריך לפעול לפי הוראות ההגדרה של Java במאמר התחלת העבודה עם Vision API באמצעות ספריות לקוח. מידע נוסף מופיע ב מאמרי העזרה של Vision API Java.
Node.js
לפני שמנסים את הדוגמה הזו, צריך לפעול לפי Node.jsהוראות ההגדרה שבמדריך לתחילת העבודה עם Vision באמצעות ספריות לקוח. מידע נוסף מופיע במאמרי העזרה של Vision Node.js API.
כדי לבצע אימות ב-Vision, צריך להגדיר את Application Default Credentials. מידע נוסף זמין במאמר הגדרת אימות לסביבת פיתוח מקומית.
Python
לפני שמנסים את הדוגמה הזו, צריך לפעול לפי Pythonהוראות ההגדרה שבמדריך לתחילת העבודה עם Vision באמצעות ספריות לקוח. מידע נוסף מופיע במאמרי העזרה של Vision Python API.
כדי לבצע אימות ב-Vision, צריך להגדיר את Application Default Credentials. מידע נוסף זמין במאמר הגדרת אימות לסביבת פיתוח מקומית.
שפות נוספות
C#: פועלים לפי הוראות ההגדרה של C# בדף של ספריות הלקוח ואז עוברים אל מאמרי העזרה בנושא Vision ל- .NET.
PHP: Please follow the PHP setup instructions on the client libraries page and then visit the מאמרי עזרה של Vision עבור PHP.
Ruby: פועלים לפי הוראות ההגדרה של Ruby בדף של ספריות הלקוח ואז עוברים אל מאמרי העזרה של Vision בנושא Ruby.
זיהוי ציוני דרך בתמונה מרוחקת
אתם יכולים להשתמש ב-Vision API כדי לבצע זיהוי תכונות בקובץ תמונה מרוחק שנמצא ב-Cloud Storage או באינטרנט. כדי לשלוח בקשה לקובץ מרוחק, מציינים את כתובת ה-URL של הקובץ או את ה-URI של Cloud Storage בגוף הבקשה.
REST
לפני שמשתמשים בנתוני הבקשה, צריך להחליף את הנתונים הבאים:
- CLOUD_STORAGE_IMAGE_URI: הנתיב לקובץ תמונה תקין בקטגוריה של Cloud Storage. צריכות להיות לכם לפחות הרשאות קריאה לקובץ.
דוגמה:
gs://cloud-samples-data/vision/landmark/st_basils.jpeg
- RESULTS_INT: (אופציונלי) ערך של מספר שלם של תוצאות להחזרה. אם משמיטים את השדה
"maxResults"ואת הערך שלו, ה-API מחזיר את ערך ברירת המחדל של 10 תוצאות. השדה הזה לא רלוונטי לסוגי התכונות הבאים:TEXT_DETECTION,DOCUMENT_TEXT_DETECTIONאוCROP_HINTS. - PROJECT_ID: מזהה הפרויקט ב- Google Cloud .
ה-method של ה-HTTP וכתובת ה-URL:
POST https://vision.googleapis.com/v1/images:annotate
גוף בקשת JSON:
{
  "requests": [
    {
      "image": {
        "source": {
          "gcsImageUri": "CLOUD_STORAGE_IMAGE_URI"
        }
      },
      "features": [
        {
          "maxResults": RESULTS_INT,
          "type": "LANDMARK_DETECTION"
        },
      ]
    }
  ]
}
כדי לשלוח את הבקשה עליכם לבחור אחת מהאפשרויות הבאות:
curl
שומרים את גוף הבקשה בקובץ בשם request.json ומריצים את הפקודה הבאה:
curl -X POST \
     -H "Authorization: Bearer $(gcloud auth print-access-token)" \
     -H "x-goog-user-project: PROJECT_ID" \
     -H "Content-Type: application/json; charset=utf-8" \
     -d @request.json \
     "https://vision.googleapis.com/v1/images:annotate"
PowerShell
שומרים את גוף הבקשה בקובץ בשם request.json ומריצים את הפקודה הבאה:
$cred = gcloud auth print-access-token
$headers = @{ "Authorization" = "Bearer $cred"; "x-goog-user-project" = "PROJECT_ID" }

Invoke-WebRequest `
    -Method POST `
    -Headers $headers `
    -ContentType: "application/json; charset=utf-8" `
    -InFile request.json `
    -Uri "https://vision.googleapis.com/v1/images:annotate" | Select-Object -Expand Content
אם הבקשה תתבצע בהצלחה, השרת יחזיר קוד סטטוס 200 OK של HTTP ואת התשובה בפורמט JSON.
תשובה:
{
  "responses": [
    {
      "landmarkAnnotations": [
        {
          "mid": "/m/014lft",
          "description": "Saint Basil's Cathedral",
          "score": 0.7840959,
          "boundingPoly": {
            "vertices": [
              {
                "x": 812,
                "y": 1058
              },
              {
                "x": 2389,
                "y": 1058
              },
              {
                "x": 2389,
                "y": 3052
              },
              {
                "x": 812,
                "y": 3052
              }
            ]
          },
          "locations": [
            {
              "latLng": {
                "latitude": 55.752912,
                "longitude": 37.622315883636475
              }
            }
          ]
        }
      ]
    }
  ]
}
Go
לפני שמנסים את הדוגמה הזו, צריך לפעול לפי Goהוראות ההגדרה שבמדריך לתחילת העבודה עם Vision באמצעות ספריות לקוח. מידע נוסף מופיע במאמרי העזרה של Vision Go API.
כדי לבצע אימות ב-Vision, צריך להגדיר את Application Default Credentials. מידע נוסף זמין במאמר הגדרת אימות לסביבת פיתוח מקומית.
Java
לפני שמנסים את הדוגמה הזו, צריך לפעול לפי Javaהוראות ההגדרה שבמדריך לתחילת העבודה עם Vision באמצעות ספריות לקוח. מידע נוסף מופיע במאמרי העזרה של Vision Java API.
כדי לבצע אימות ב-Vision, צריך להגדיר את Application Default Credentials. מידע נוסף זמין במאמר הגדרת אימות לסביבת פיתוח מקומית.
Node.js
לפני שמנסים את הדוגמה הזו, צריך לפעול לפי Node.jsהוראות ההגדרה שבמדריך לתחילת העבודה עם Vision באמצעות ספריות לקוח. מידע נוסף מופיע במאמרי העזרה של Vision Node.js API.
כדי לבצע אימות ב-Vision, צריך להגדיר את Application Default Credentials. מידע נוסף זמין במאמר הגדרת אימות לסביבת פיתוח מקומית.
Python
לפני שמנסים את הדוגמה הזו, צריך לפעול לפי Pythonהוראות ההגדרה שבמדריך לתחילת העבודה עם Vision באמצעות ספריות לקוח. מידע נוסף מופיע במאמרי העזרה של Vision Python API.
כדי לבצע אימות ב-Vision, צריך להגדיר את Application Default Credentials. מידע נוסף זמין במאמר הגדרת אימות לסביבת פיתוח מקומית.
gcloud
כדי לבצע זיהוי של ציוני דרך, משתמשים בפקודה gcloud ml vision detect-landmarks כמו בדוגמה הבאה:
gcloud ml vision detect-landmarks gs://cloud-samples-data/vision/landmark/st_basils.jpeg
שפות נוספות
C#: פועלים לפי הוראות ההגדרה של C# בדף של ספריות הלקוח ואז עוברים אל מאמרי העזרה בנושא Vision ל- .NET.
PHP: Please follow the PHP setup instructions on the client libraries page and then visit the מאמרי עזרה של Vision עבור PHP.
Ruby: פועלים לפי הוראות ההגדרה של Ruby בדף של ספריות הלקוח ואז עוברים אל מאמרי העזרה של Vision בנושא Ruby.
אני רוצה לנסות
אפשר לנסות לזהות ציוני דרך בהמשך. אתם יכולים להשתמש בתמונה שכבר צוינה (gs://cloud-samples-data/vision/landmark/st_basils.jpeg) או לציין תמונה משלכם במקומה. לוחצים על Execute (הפעלה) כדי לשלוח את הבקשה.
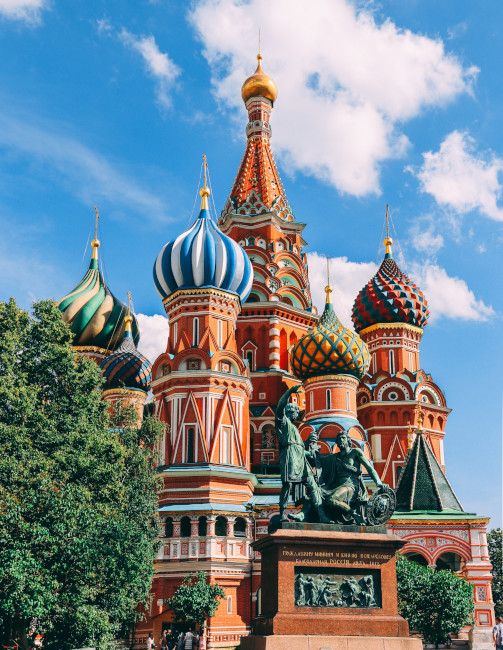
גוף הבקשה:
{
  "requests": [
    {
      "features": [
        {
          "maxResults": 10,
          "type": "LANDMARK_DETECTION"
        }
      ],
      "image": {
        "source": {
          "imageUri": "gs://cloud-samples-data/vision/landmark/st_basils.jpeg"
        }
      }
    }
  ]
}
פותחים את Google APIs Explorer ושולחים את הבקשה.
כדי לפתוח את Google APIs Explorer, לוחצים על Try it!.
זה שינוי אופציונלי. משנים את גוף הבקשה הקיים.
כדי לשלוח את הבקשה, לוחצים על Execute (ביצוע).