# Cloud TPU Multislice Overview
> [!CAUTION]
> **Caution:** This page applies to the Cloud TPU API, which is no longer under active development. The Cloud TPU API will receive bug fixes and security updates only. We recommend using Google Kubernetes Engine for Multislice. For more information, see [Deploy TPU Multislices in
> GKE](https://docs.cloud.google.com/kubernetes-engine/docs/how-to/tpu-multislice).
> [!IMPORTANT]
> **Important:** Multislice is only supported on Cloud TPU v4 and later [TPU versions](https://docs.cloud.google.com/tpu/docs/system-architecture-tpu-vm.md.txt#versions). All slices in a Multislice configuration must share the same TPU type, topology, and software version, and must reside in the same zone.
Cloud TPU Multislice is a full stack performance-scaling technology
that enables a training job to use multiple [TPU
slices](https://docs.cloud.google.com/tpu/docs/system-architecture-tpu-vm#slices) within a single pod or on
slices in multiple [Pods](https://docs.cloud.google.com/tpu/docs/system-architecture-tpu-vm.md.txt#tpu-pod) with
standard data parallelism. With [TPU v4](https://docs.cloud.google.com/tpu/docs/v4.md.txt) chips, this means training
jobs can use more than 4096 chips in a single run. For training jobs that
require less than 4096 chips, a single slice can offer the best performance.
However, multiple smaller slices are more readily available, allowing for a
faster startup time when Multislice is used with smaller slices.

When deployed in Multislice configurations, TPU chips in each slice
communicate through inter-chip-interconnect (ICI). TPU chips in different slices
communicate by transferring data to CPUs (hosts) which in turn transmit the data
over the data-center network (DCN). For more information about scaling with
Multislice, see [How to scale AI training to up to tens of thousands of
Cloud TPU chips with
Multislice](https://cloud.google.com/blog/products/compute/using-cloud-tpu-multislice-to-scale-ai-workloads).
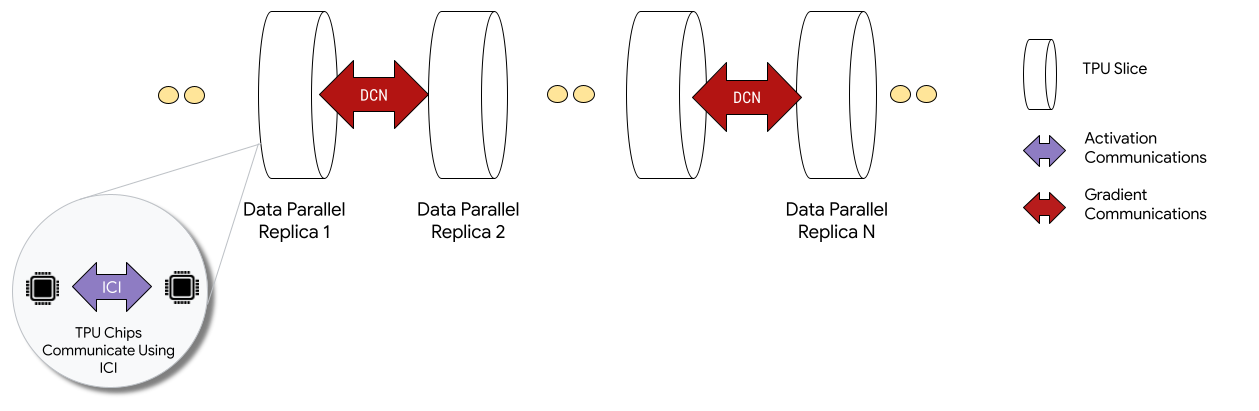
Developers don't have to write code to implement inter-slice DCN communication.
The XLA compiler generates that code for you and overlaps communication with
computation for maximum performance.
## Concepts
*Accelerator type*
: The shape of each [TPU slice](https://docs.cloud.google.com/tpu/docs/system-architecture-tpu-vm.md.txt#slices)
that comprises a [Multislice](https://docs.cloud.google.com/tpu/docs/multislice-introduction.md.txt#multislice-term). Each slice in a
multislice request is of the same accelerator type. An accelerator type
consists of a TPU type (v4 or later) followed by the number of TensorCores.
For example, `v5litepod-128` specifies a TPU v5e with 128 TensorCores.
*Auto-repair*
: When a [slice](https://docs.cloud.google.com/tpu/docs/system-architecture-tpu-vm.md.txt#slices)
encounters a maintenance event, preemption or hardware failure, Cloud TPU
will create a new slice. If there are insufficient
resources to create a new slice, the creation won't complete until hardware
becomes available. After the new slice is created all other slices in the [Multislice](https://docs.cloud.google.com/tpu/docs/multislice-introduction.md.txt#multislice-term) environment will be restarted so
training can continue. With a properly configured [startup
script](https://docs.cloud.google.com/tpu/docs/multislice-introduction#startup-script), the training script can automatically relaunch
without user intervention, loading and resuming from the latest checkpoint.
*Data Center Networking (DCN)*
: A higher latency, lower-throughput network (when compared with [ICI](https://docs.cloud.google.com/tpu/docs/multislice-introduction.md.txt#ici))
that connects [TPU slices](https://docs.cloud.google.com/tpu/docs/system-architecture-tpu-vm.md.txt#slices) in a
[Multislice](https://docs.cloud.google.com/tpu/docs/multislice-introduction.md.txt#multislice-term) configuration.
*Gang scheduling*
: When all [TPU
slices](https://docs.cloud.google.com/tpu/docs/system-architecture-tpu-vm#slices) are provisioned
together, at the same time, guaranteeing either all or none of the slices
are provisioned successfully.
*Interchip interconnect (ICI)*
: High speed, low latency internal links that connect TPUs within a [TPU
Pod](https://docs.cloud.google.com/tpu/docs/system-architecture-tpu-vm#tpu-pod).
*Multislice*
: Two or more TPU chip [slices](https://docs.cloud.google.com/tpu/docs/system-architecture-tpu-vm.md.txt#slices)
that have the same TPU type and topology, are located in the same zone, and
communicate over [DCN](https://docs.cloud.google.com/tpu/docs/multislice-introduction.md.txt#dcn). All slices in a Multislice workload
must reside in the same zone.
*Node*
: In the [Multislice](https://docs.cloud.google.com/tpu/docs/multislice-introduction.md.txt#multislice-term) context, node refers to
a single [TPU slice](https://docs.cloud.google.com/tpu/docs/system-architecture-tpu-vm.md.txt#slices). Each TPU
slice in a Multislice is given a node ID.
*Startup script*
: A standard [Compute Engine startup
script](https://docs.cloud.google.com/compute/docs/instances/startup-scripts/linux) that is run every
time a VM is booted or rebooted. For
[Multislice](https://docs.cloud.google.com/tpu/docs/multislice-introduction.md.txt#multislice-term), it is specified in the QR creation
request. For more information about Cloud TPU startup scripts, see
[Manage TPU resources](https://docs.cloud.google.com/tpu/docs/managing-tpus-tpu-vm.md.txt).
*Tensor*
: A data structure that is used to represent multidimensional data in a
machine learning model.
*Types of Cloud TPU capacity*
: TPUs can be created from different types of
capacity (see Usage Options in [How TPU pricing works](https://cloud.google.com/tpu/pricing)):
- **Reservation** : To consume a reservation, you must have a reservation agreement
with Google. Use the `--reserved` flag when creating your resources.
- **Spot** : Targets preemptible quota using Spot VMs. Your resources may be
preempted to make room for requests for a higher priority job. Use the
`--spot` flag when creating your resources.
- **On-demand**: Targets on-demand
quota, which doesn't need a reservation and won't be preempted. The TPU
request will be enqueued to an on-demand quota queue offered by
Cloud TPU, the availability of resources is not guaranteed. Selected by
default, no flags needed.
## Get started
1. [Set up your Cloud TPU environment](https://docs.cloud.google.com/tpu/docs/setup-gcp-account.md.txt).
2. In the Google Cloud console, activate Cloud Shell.
[Activate Cloud Shell](https://console.cloud.google.com/?cloudshell=true)
At the bottom of the Google Cloud console, a
[Cloud Shell](https://docs.cloud.google.com/shell/docs/how-cloud-shell-works.md.txt)
session starts and displays a command-line prompt. Cloud Shell is a shell environment
with the Google Cloud CLI
already installed and with values already set for
your current project. It can take a few seconds for the session to initialize.
To use Multislice, your TPU
resources must be managed as [queued resources](https://docs.cloud.google.com/tpu/docs/queued-resources.md.txt).
### Introductory example
This tutorial uses code from the [MaxText GitHub repo](https://github.com/google/maxtext).
MaxText is a high performance, arbitrarily scalable, open source, and well-tested
basic LLM written in Python and Jax. MaxText was designed to train efficiently on
Cloud TPU.
The code in [`shardings.py`](https://github.com/AI-Hypercomputer/maxtext/blob/main/pedagogical_examples/shardings.py)
is designed to help you get started experimenting with different parallelism
options. For example, data parallelism, fully sharded data parallelism (FSDP),
and tensor parallelism. The code scales from single slice to Multislice
environments.
#### ICI parallelism
ICI refers to the high speed interconnect that connects the TPUs in a single
slice. ICI sharding corresponds to sharding within a slice. [`shardings.py`](https://github.com/AI-Hypercomputer/maxtext/blob/main/pedagogical_examples/shardings.py)
provides three ICI parallelism parameters:
- `ici_data_parallelism`
- `ici_fsdp_parallelism`
- `ici_tensor_parallelism`
The values you specify for these parameters determine the number of shards for
each parallelism method.
These inputs must be constrained so that
`ici_data_parallelism * ici_fsdp_parallelism * ici_tensor_parallelism` is equal
to the number of chips in the slice.
The following table shows example user inputs for ICI parallelism for the four
chips available in v4-8:
|---|---|---|---|
| | *ici_data_parallelism* | *ici_fsdp_parallelism* | *ici_tensor_parallelism* |
| 4-way FSDP | 1 | 4 | 1 |
| 4-way Tensor parallelism | 1 | 1 | 4 |
| 2-way FSDP + 2-way Tensor parallelism | 1 | 2 | 2 |
Note that `ici_data_parallelism` should be left as 1 in most cases because the
ICI network is fast enough to almost always prefer FSDP to data parallelism.
This example assumes you are familiar with running code on a single TPU slice
such as in [Run a calculation on a Cloud TPU VM using JAX](https://docs.cloud.google.com/tpu/docs/run-calculation-jax.md.txt).
This example show how to run [`shardings.py`](https://github.com/AI-Hypercomputer/maxtext/blob/main/pedagogical_examples/shardings.py) on a single slice.
1. Set up the environment:
```bash
$ gcloud auth login
$ export QR_ID=your-queued-resource-id
$ export TPU_NAME=your-tpu-name
$ export PROJECT=your-project-name
$ export ZONE=us-central1-a
$ export NETWORK_NAME=your-network-name
$ export SUBNETWORK_NAME=your-subnetwork-name
$ export RUNTIME_VERSION=v2-alpha-tpuv5-lite
$ export ACCELERATOR_TYPE=v5litepod-16
$ export EXAMPLE_TAG_1=your-tag-1
$ export EXAMPLE_TAG_2=your-tag-2
$ export SLICE_COUNT=4
$ export STARTUP_SCRIPT='#!/bin/bash\n'
```
#### Variable descriptions
- `QR_ID`: The user-assigned ID of the queued resource.
- `TPU_NAME`: The user-assigned name of your TPU.
- `PROJECT`: Google Cloud project name
- `ZONE`: Specifies the [zone](https://docs.cloud.google.com/tpu/docs/regions-zones.md.txt) in which to create the resources. All slices in a Multislice configuration must be in the same zone.
- `NETWORK_NAME`: Name of the VPC network.
- `SUBNETWORK_NAME`: Name of the subnet in the VPC network
- `RUNTIME_VERSION`: The [Cloud TPU software version](https://docs.cloud.google.com/tpu/docs/supported-tpu-configurations#tpu_software_versions).
- `ACCELERATOR_TYPE`: The accelerator type specifies the version and size of the Cloud TPU you want to create.
- `EXAMPLE_TAG_1, EXAMPLE_TAG_2 ...`: Tags used to identify valid sources or targets for network firewalls
- `SLICE_COUNT`: Number of slices (limited to a maximum of 256 slices when using the Cloud TPU API). For GKE Multislice configurations, the number of slices is not limited to 256, but is constrained by your project's TPU quota, reservation, and cluster limits (all slices must reside in the same zone and cluster). For more information, see [Deploy TPU Multislices in GKE](https://docs.cloud.google.com/kubernetes-engine/docs/how-to/tpu-multislice.md.txt).
- `STARTUP_SCRIPT`: If you specify a [startup script](https://docs.cloud.google.com/compute/docs/instances/startup-scripts/linux.md.txt), the script runs when the TPU slice is provisioned or restarted.
2. Create SSH keys for `gcloud`. We recommend leaving a blank password (press
enter twice after running the following command). If you are prompted that the
`google_compute_engine` file already exists, replace the existing version.
```bash
$ ssh-keygen -f ~/.ssh/google_compute_engine
```
3. Provision your TPUs:
### gcloud
```bash
$ gcloud compute tpus queued-resources \
create ${QR_ID} \
--accelerator-type=${ACCELERATOR_TYPE} \
--runtime-version=${RUNTIME_VERSION} \
--node-id=${TPU_NAME} \
--zone=${ZONE} \
[--reserved |--spot]
```
The Google Cloud CLI does not support all create QR options, such as tags.
For more information, see [Create QRs](https://docs.cloud.google.com/tpu/docs/multislice-introduction.md.txt#create-queued-resources).
### Console
1. In the Google Cloud console, go to the **TPUs** page:
[Go to TPUs](https://console.cloud.google.com/compute/tpus)
2. Click **Create TPU**.
3. In the **Name** field, enter a name for your TPU.
4. In the **Zone** box, select the zone where you want to create the TPU.
5. In the **TPU type** box, select an accelerator type. The accelerator
type specifies the version and size of the Cloud TPU you want to
create. For more information about supported accelerator types for each
TPU version, see [TPU versions](https://docs.cloud.google.com/tpu/docs/system-architecture-tpu-vm.md.txt#versions).
6. In the **TPU software version** box, select a software version. When
creating a Cloud TPU VM, the TPU software version specifies the
version of the TPU runtime to install. For more information, see
[TPU software versions](https://docs.cloud.google.com/tpu/docs/runtimes.md.txt).
7. Click the **Enable queueing** toggle.
8. In the **Queued resource name** field, enter a name for your queued
resource request.
9. Click **Create** to create your queued resource request.
4. Wait until the queued resource is in the `ACTIVE` state which means the worker nodes are
in the `READY` state. Once the queued resource provisioning starts, it might take one to five
minutes to complete depending on the size of the queued resource. You can check the status
of a queued resource request using the gcloud CLI or the Google Cloud console:
### gcloud
```bash
$ gcloud compute tpus queued-resources \
list --filter=${QR_ID} --zone=${ZONE}
```
### Console
1. In the Google Cloud console, go to the **TPUs** page:
[Go to TPUs](https://console.cloud.google.com/compute/tpus)
2. Click the **Queued resources** tab.
3. Click the name of your queued resource request.
5. Connect to the TPU VM using SSH:
```bash
$ gcloud compute tpus tpu-vm ssh ${TPU_NAME} --zone=${ZONE}
```
6. Clone [MaxText](https://github.com/AI-Hypercomputer/maxtext)
(which includes [`shardings.py`](https://github.com/AI-Hypercomputer/maxtext/blob/main/pedagogical_examples/shardings.py)) to your TPU VM:
```bash
$ git clone https://github.com/AI-Hypercomputer/maxtext && cd maxtext
```
7. Install Python 3.10:
```bash
$ sudo apt-get update
$ sudo apt install python3.10
$ sudo apt install python3.10-venv
```
8. Create and activate a virtual environment:
> [!NOTE]
> **Note:** Creating a virtual environment for each project is a best practice for managing Python dependencies. For more information, see the [`venv` documentation](https://docs.python.org/3/library/venv.html).
```bash
$ python3 -m venv your-venv-name
$ source your-venv-name/bin/activate
```
9. Within the MaxText repository directory, run the setup script to install
JAX and other dependencies on your TPU slice. Setup script takes a few
minutes to run.
```bash
$ bash setup.sh
```
10. Run the following command to run [`shardings.py`](https://github.com/AI-Hypercomputer/maxtext/blob/main/pedagogical_examples/shardings.py) on your TPU slice.
```bash
$ python3 -m pedagogical_examples.shardings \
--ici_fsdp_parallelism 4 \
--batch_size 131072 \
--embedding_dimension 2048
```
You can see the results in the logs. Your TPUs should achieve about 260 TFLOP
per second or an impressive 90%+ FLOP utilization! In this case, we've
selected approximately the maximum batch that fits into the TPU's High
Bandwidth Memory (HBM).
11. Feel free to explore [other sharding strategies](https://docs.cloud.google.com/tpu/docs/multislice-introduction.md.txt#single-slice-sharding-using-ici-parallelism)
over ICI, for example you could try the following combination:
```bash
$ python3 -m pedagogical_examples.shardings \
--ici_tensor_parallelism 4 \
--batch_size 131072 \
--embedding_dimension 2048
```
12. Delete the queued resource and TPU slice when finished. You should run
these cleanup steps from the environment where you set up the slice (first
run `exit` to exit the SSH session). The deletion will take two to five
minutes to complete. If you're using the gcloud CLI, you can run
this command in the background with the optional `--async` flag.
> [!IMPORTANT]
> **Important:** Queued resources must be deleted after use. If you don't, they will continue to consume your queued resource quota which is tracked separately from TPU quota.
### gcloud
```bash
$ gcloud compute tpus queued-resources \
delete ${QR_ID} --force (--async)
```
### Console
1. In the Google Cloud console, go to the **TPUs** page:
[Go to TPUs](https://console.cloud.google.com/compute/tpus)
2. Click the **Queued resources** tab.
3. Select the checkbox next to your queued resource request.
4. Click **Delete**.
#### Multislice sharding using DCN parallelism
The [`shardings.py`](https://github.com/AI-Hypercomputer/maxtext/blob/main/pedagogical_examples/shardings.py) script takes three parameters that specify DCN parallelism,
corresponding to the number of shards of each type of data parallelism:
- dcn_data_parallelism
- dcn_fsdp_parallelism
- dcn_tensor_parallelism
The values of these parameters must be constrained so that
`dcn_data_parallelism * dcn_fsdp_parallelism * dcn_tensor_parallelism` equals
the number of slices.
As an example for two slices, use `--dcn_data_parallelism = 2`.
|---|---|---|---|---|
| | *dcn_data_parallelism* | *dcn_fsdp_parallelism* | *dcn_tensor_parallelism* | # of slices |
| 2-way data parallelism | 2 | 1 | 1 | 2 |
`dcn_tensor_parallelism` should always be set to `1` because the DCN is a poor
fit for such sharding. For typical LLM workloads on v4 chips,
`dcn_fsdp_parallelism` should also be set to `1` and therefore
`dcn_data_parallelism` should be set to the number of slices, but this is
application dependent.
As you increase the number of slices (assuming you keep the slice size and batch
per slice constant), you increase the amount of data parallelism.
#### Running `shardings.py` in a Multislice environment
You can run [`shardings.py`](https://github.com/AI-Hypercomputer/maxtext/blob/main/pedagogical_examples/shardings.py) in a Multislice environment using
[`multihost_runner.py`](https://github.com/AI-Hypercomputer/maxtext/blob/main/multihost_runner.py) or by running [`shardings.py`](https://github.com/AI-Hypercomputer/maxtext/blob/main/pedagogical_examples/shardings.py) on each TPU VM. Here we use
[`multihost_runner.py`](https://github.com/AI-Hypercomputer/maxtext/blob/main/multihost_runner.py). The following steps are very similar to those in
[Getting Started: Quick Experiments on Multiple slices](https://github.com/google/maxtext/blob/main/README.md#getting-started)
from the MaxText repository, except here we run [`shardings.py`](https://github.com/AI-Hypercomputer/maxtext/blob/main/pedagogical_examples/shardings.py) instead of the
more complex LLM in [`train.py`](https://github.com/AI-Hypercomputer/maxtext/blob/main/src/MaxText/train.py).
The [`multihost_runner.py`](https://github.com/AI-Hypercomputer/maxtext/blob/main/multihost_runner.py) tool is optimized for quick experiments, repeatedly
re-using the same TPUs. Because the [`multihost_runner.py`](https://github.com/AI-Hypercomputer/maxtext/blob/main/multihost_runner.py) script depends on
long-lived SSH connections, we don't recommend it for any long-running jobs.
If you want to run a longer job (for example, hours or days), we recommend you
use [`multihost_job.py`](https://github.com/AI-Hypercomputer/maxtext/blob/main/multihost_job.py).
In this tutorial, we use the term *runner* to indicate the machine on which you
run the [`multihost_runner.py`](https://github.com/AI-Hypercomputer/maxtext/blob/main/multihost_runner.py) script. We use the term *workers* to indicate the
TPU VMs that make up your slices. You can run [`multihost_runner.py`](https://github.com/AI-Hypercomputer/maxtext/blob/main/multihost_runner.py) on a local
machine or any Compute Engine VM in the same project as your slices. Running
[`multihost_runner.py`](https://github.com/AI-Hypercomputer/maxtext/blob/main/multihost_runner.py) on a worker is not supported.
[`multihost_runner.py`](https://github.com/AI-Hypercomputer/maxtext/blob/main/multihost_runner.py) automatically connects to TPU workers using SSH.
In this example, you run [`shardings.py`](https://github.com/AI-Hypercomputer/maxtext/blob/main/pedagogical_examples/shardings.py) over two v5e-16 slices, a total of four
VMs and 16 TPU chips. You can modify the example to run on more TPUs.
#### Set up your environment
1. Clone [MaxText](https://github.com/google/maxtext/tree/main) on your runner
machine:
```bash
$ git clone https://github.com/AI-Hypercomputer/maxtext
```
2. Go to the repository directory.
```bash
$ cd maxtext
```
3. Create SSH keys for `gcloud`, we recommend leaving a blank password (press
enter twice after running the following command). If you are prompted that
the `google_compute_engine` file already exists, select not to keep your
existing version.
```bash
$ ssh-keygen -f ~/.ssh/google_compute_engine
```
4. Add an environment variable to set the TPU slice count to `2`.
```bash
$ export SLICE_COUNT=2
```
5. Create a Multislice environment using the `queued-resources
create` command or the Google Cloud console.
### gcloud
> [!NOTE]
> **Note:** Ensure you have the respective quota before selecting `--reserved`, or `--spot`, or the default on-demand quota. For information on quota types, see [Quota Policy](https://docs.cloud.google.com/tpu/docs/quota.md.txt).
The following command shows how to create a v5e Multislice TPU. To use
a different TPU version, specify a different
[`accelerator-type`](https://docs.cloud.google.com/tpu/docs/multislice-introduction.md.txt#accelerator-type) and
[`runtime-version`](https://docs.cloud.google.com/tpu/docs/runtimes.md.txt).
```bash
$ gcloud compute tpus queued-resources \
create ${QR_ID} \
--accelerator-type=${ACCELERATOR_TYPE} \
--runtime-version=${RUNTIME_VERSION} \
--node-count=${SLICE_COUNT} \
--node-prefix=${TPU_NAME} \
--zone=${ZONE} \
[--reserved|--spot]
```
### Console
1. In the Google Cloud console, go to the **TPUs** page:
[Go to TPUs](https://console.cloud.google.com/compute/tpus)
2. Click **Create TPU**.
3. In the **Name** field, enter a name for your TPU.
4. In the **Zone** box, select the zone where you want to create the TPU.
5. In the **TPU type** box, select an accelerator type. The accelerator
type specifies the version and size of the Cloud TPU you want to
create. Multislice is only supported on Cloud TPU v4 and later TPU
versions. For more information about TPU versions, see
[TPU versions](https://docs.cloud.google.com/tpu/docs/system-architecture-tpu-vm.md.txt#versions).
6. In the **TPU software version** box, select a software version. When
creating a Cloud TPU VM, the TPU software version specifies the version
of the TPU runtime to install on the TPU VMs. For more information, see [TPU
software versions](https://docs.cloud.google.com/tpu/docs/runtimes).
7. Click the **Enable queueing** toggle.
8. In the **Queued resource name** field, enter a name for your queued
resource request.
9. Click the **Make this a Multislice TPU** checkbox.
10. In the **Slice count** field, enter the number of slices you want to create.
11. Click **Create** to create your queued resource request.
6. When the queued resource provisioning starts, it can take up to five minutes
to complete depending on the size of the queued resource. Wait until the
queued resource is in the `ACTIVE` state. You can check the status of a
queued resource request using the gcloud CLI or the
Google Cloud console:
### gcloud
```bash
$ gcloud compute tpus queued-resources list \
--filter=${QR_ID} --zone=${ZONE} --project=${PROJECT}
```
This should generate output that looks like:
```bash
NAME ZONE NODE_COUNT ACCELERATOR_TYPE STATE
...
que-res-id us-central2-b 4 v5litepod-16 ACTIVE
...
```
### Console
1. In the Google Cloud console, go to the **TPUs** page:
[Go to TPUs](https://console.cloud.google.com/compute/tpus)
2. Click the **Queued resources** tab.
3. Click the name of your queued resource request.
Contact your Google Cloud account representative if the QR status is in the
`WAITING_FOR_RESOURCES` or `PROVISIONING` state for more than
15 minutes.
7. Install dependencies.
```bash
$ python3 multihost_runner.py \
--TPU_PREFIX=${TPU_NAME} \
--ZONE=${ZONE} \
--COMMAND="bash setup.sh"
```
8. Run [`shardings.py`](https://github.com/AI-Hypercomputer/maxtext/blob/main/pedagogical_examples/shardings.py) on each worker using [`multihost_runner.py`](https://github.com/AI-Hypercomputer/maxtext/blob/main/multihost_runner.py).
```bash
$ python3 multihost_runner.py \
--TPU_PREFIX=${TPU_NAME} \
--ZONE=${ZONE} \
--COMMAND="python3 -m pedagogical_examples.shardings \
--dcn_data_parallelism ${SLICE_COUNT} \
--ici_fsdp_parallelism 16 \
--batch_size 131072 \
--embedding_dimension 2048"
```
You'll see approximately 230 TFLOPs per second of performance in the log
files.
For more information about configuring parallelism, see [Multislice sharding using DCN parallelism](https://docs.cloud.google.com/tpu/docs/multislice-introduction.md.txt#multislice-sharding-using-dcn-parallelism) and [`shardings.py`](https://github.com/AI-Hypercomputer/maxtext/blob/main/pedagogical_examples/shardings.py).
9. Clean up the TPUs and queued resource when finished. The deletion will take
two to five minutes to complete. If you're using the gcloud CLI,
you can run this command in the background with the optional `--async`
flag.
## Scaling a workload to Multislice
Before running your model in a Multislice environment, make the
following code changes:
- Use [jax.experimental.mesh_utils.create_hybrid_device_mesh](https://github.com/google/jax/blob/0affb3bb180048e7d989861cb81a0398117fbe7a/jax/experimental/mesh_utils.py#L275-L297) instead of [jax.experimental.mesh_utils.create_device_mesh](https://github.com/google/jax/blob/0affb3bb180048e7d989861cb81a0398117fbe7a/jax/experimental/mesh_utils.py#L218-L238) when creating your mesh.
These should be the only necessary code changes when moving to Multislice.
To achieve high performance, DCN needs to be mapped onto data parallel, fully
sharded data parallel or pipeline parallel axes. Performance considerations and
sharding strategies are discussed in more detail in
[Sharding With Multislice for Maximum Performance](https://docs.cloud.google.com/tpu/docs/multislice-introduction.md.txt#sharding-with-multislice-for-maximum-performance).
To validate that your code can access all the devices, you can assert that
`len(jax.devices())` is equal to the number of chips in your Multislice
environment. For example, if you are using four slices of `v4-16`, you have
eight chips per slice \* 4 slices, so `len(jax.devices())` should return 32.
### Choosing slice sizes for Multislice environments
To get a linear speed up, add new slices of the same size as your existing
slice. For example, if you use a `v4-512` slice, Multislice will
achieve approximately twice the performance by adding a second `v4-512` slice
and doubling your global batch size. For more information, see
[Sharding With Multislice for Maximum Performance](https://docs.cloud.google.com/tpu/docs/multislice-introduction.md.txt#sharding-with-multislice-for-maximum-performance).
### Running your Job on multiple slices
There are three different approaches to running your custom workload in a
Multislice environment:
1. Using the experimentation runner script, [`multihost_runner.py`](https://github.com/AI-Hypercomputer/maxtext/blob/main/multihost_runner.py)
2. Using the production runner script, [`multihost_job.py`](https://github.com/AI-Hypercomputer/maxtext/blob/main/multihost_job.py)
3. Using a manual approach
#### Experimentation runner script
The [`multihost_runner.py`](https://github.com/AI-Hypercomputer/maxtext/blob/main/multihost_runner.py)
script distributes code to an existing Multislice environment, and runs
your command on each host, copies your logs back, and tracks each command's error
status. The [`multihost_runner.py`](https://github.com/AI-Hypercomputer/maxtext/blob/main/multihost_runner.py) script is documented in
[MaxText README](https://github.com/google/maxtext/blob/main/README.md).
Because [`multihost_runner.py`](https://github.com/AI-Hypercomputer/maxtext/blob/main/multihost_runner.py) maintains persistent SSH connections, it is only
suitable for modestly sized, relatively short-running experimentation. You can
adapt the steps in the [`multihost_runner.py` tutorial](https://docs.cloud.google.com/tpu/docs/multislice-introduction.md.txt#multislice-sharding-using-dcn-parallelism)
to your workload and hardware configuration.
#### Production runner script
For production jobs that need resiliency against hardware failures and other
preemptions, it is best to integrate directly with the Create Queued Resource
API. Use [`multihost_job.py`](https://github.com/AI-Hypercomputer/maxtext/blob/main/multihost_job.py) as a working example
which triggers the Created Queued Resource API call with the appropriate startup
script to run your training and resume on preemption. The [`multihost_job.py`](https://github.com/AI-Hypercomputer/maxtext/blob/main/multihost_job.py)
script is documented in the
[MaxText README](https://github.com/google/maxtext/blob/main/README.md).
Because [`multihost_job.py`](https://github.com/AI-Hypercomputer/maxtext/blob/main/multihost_job.py) must provision resources for each run, it doesn't
provide as fast an iteration cycle as [`multihost_runner.py`](https://github.com/AI-Hypercomputer/maxtext/blob/main/multihost_runner.py).
#### Manual approach
We recommend you use or adapt [multihost_runner.py](https://docs.cloud.google.com/tpu/docs/multislice-introduction.md.txt#experimentation-runner-script)
or [multihost_job.py](https://docs.cloud.google.com/tpu/docs/multislice-introduction.md.txt#production-job-script) to run your custom workload in
your Multislice configuration. However, if you prefer to provision and
manage your environment using QR commands directly, see
[Manage a Multislice Environment](https://docs.cloud.google.com/tpu/docs/multislice-introduction.md.txt#manage-a-multislice-environment).
### Manage a Multislice environment
To manually provision and manage QRs without using the tools
provided in the [MaxText repo](https://github.com/google/maxtext), read the
following sections.
#### Create queued resources
### gcloud
1. Create a queued resource request using the following command:
```bash
$ gcloud compute tpus queued-resources \
create ${QR_ID} \
--project=${PROJECT} \
--zone=${ZONE} \
--node-count=${SLICE_COUNT} \
--accelerator-type=${ACCELERATOR_TYPE} \
--runtime-version=${RUNTIME_VERSION} \
--network=${NETWORK_NAME} \
--subnetwork=${SUBNETWORK_NAME} \
--tags=${EXAMPLE_TAG_1},${EXAMPLE_TAG_2} \
--metadata=startup-script="${STARTUP_SCRIPT}" \
[--reserved|--spot]
```
Ensure you have the respective quota before selecting `--reserved`,
`--spot`, or the default on-demand quota. For information on quota types,
see [Quota Policy](https://docs.cloud.google.com/tpu/docs/quota.md.txt).
### curl
1. Create a file named `queued-resource-req.json` and copy the following JSON into it.
```bash
{
"guaranteed": { "reserved": true },
"tpu": {
"node_spec": [
{
"parent": "projects/your-project-number/locations/your-zone",
"node": {
"accelerator_type": "accelerator-type",
"runtime_version": "tpu-vm-runtime-version",
"network_config": {
"network": "your-network-name",
"subnetwork": "your-subnetwork-name",
"enable_external_ips": true
},
"tags" : ["example-tag-1"]
"metadata": {
"startup-script": "your-startup-script"
}
},
"multi_node_params": {
"node_count": slice-count,
"node_id_prefix": "your-queued-resource-id"
}
}
]
}
}
```
Replace the following values:
- your-project-number: Your Google Cloud project number
- your-zone: The zone in which you want to create your queued resource
- accelerator-type: The version and size of a single slice. Multislice is only supported on Cloud TPU v4 and later TPU versions.
- tpu-vm-runtime-version: The TPU VM runtime version you want to use.
- your-network-name: Optional, a network to which the queued resource will be attached
- your-subnetwork-name: Optional, a subnetwork to which the queued resource will be attached
- example-tag-1: Optional, an arbitrary tag string
- your-startup-script: A startup script that will be run when the queued resource is allocated
- slice-count: The number of TPU slices in your Multislice environment
- your-queued-resource-id: The user supplied ID for the queued resource
For more information, see the [REST Queued Resource API](https://docs.cloud.google.com/tpu/docs/reference/rest/v2alpha1/projects.locations.queuedResources.md.txt)
documentation for all available options.
> [!NOTE]
> **Note:** Although `node_spec` is a list, only one `node_spec` entry is supported.
To use Spot capacity, replace:
`"guaranteed": { "reserved": true }` with `"spot": {}`
Remove the line to use the default on-demand capacity.
2. Submit the queued resource create request with the JSON payload:
```bash
$ curl -X POST -H "Authorization: Bearer $(gcloud auth print-access-token)" \
-H "Content-Type: application/json" \
-d @queuedresourcereq.json \
https://tpu.googleapis.com/v2alpha1/projects/your-project-id/locations/your-zone/queuedResources\?queued_resource_id\=your-queued-resource-id
```
Replace the following values:
- your-project-id: Your Google Cloud project ID
- your-zone: The zone in which you want to create your queued resource
- your-queued-resource-id: The user supplied ID for the queued resource
The response should look like the following:
```bash
{
"name": "projects//locations//operations/operation-",
"metadata": {
"@type": "type.googleapis.com/google.cloud.common.OperationMetadata",
"createTime": "2023-11-01T00:17:05.742546311Z",
"target": "projects//locations//queuedResources/",
"verb": "create",
"cancelRequested": false,
"apiVersion": "v2alpha1"
},
"done": false
}
```
Use GUID value at the end of the string value for the `name` attribute to get
information about the queued resource request.
### Console
1. In the Google Cloud console, go to the **TPUs** page:
[Go to TPUs](https://console.cloud.google.com/compute/tpus)
2. Click **Create TPU**.
3. In the **Name** field, enter a name for your TPU.
4. In the **Zone** box, select the zone where you want to create the TPU.
5. In the **TPU type** box, select an accelerator type. The accelerator
type specifies the version and size of the Cloud TPU you want to
create. Multislice is only supported on Cloud TPU v4 and
later TPU versions. For more information about supported accelerator
types for each TPU version, see
[TPU versions](https://docs.cloud.google.com/tpu/docs/system-architecture-tpu-vm.md.txt#versions).
6. In the **TPU software version** box, select a software version. When
creating a Cloud TPU VM, the TPU software version specifies the
version of the TPU runtime to install. For more information, see
[TPU software versions](https://docs.cloud.google.com/tpu/docs/runtimes.md.txt).
7. Click the **Enable queueing** toggle.
8. In the **Queued resource name** field, enter a name for your queued
resource request.
9. Click the **Make this a Multislice TPU** checkbox.
10. In the **Slice count** field, enter the number of slices you want to create.
11. Click **Create** to create your queued resource request.
#### Retrieve the status of a queued resource
### gcloud
```bash
$ gcloud compute tpus queued-resources describe ${QR_ID} --zone=${ZONE}
```
For a queued resource that is in the `ACTIVE` state, the output looks like
the following:
```
...
state:
state: ACTIVE
...
```
### curl
```bash
$ curl -X GET -H "Authorization: Bearer $(gcloud auth print-access-token)" -H "Content-Type: application/json" https://tpu.googleapis.com/v2/projects/your-project-id/locations/your-zone/queuedResources/${YOUR_QR_ID}
```
For a queued resource that is in the `ACTIVE` state, the output looks like
the following:
```
{
"name": your-queued-res,
"tpu": {
"nodeSpec": [
{
... // node 1
},
{
... // node 2
},
...
]
},
...
"state": "ACTIVE"
}
```
### Console
1. In the Google Cloud console, go to the **TPUs** page:
[Go to TPUs](https://console.cloud.google.com/compute/tpus)
2. Click the **Queued resources** tab.
3. Click the name of your queued resource request.
After your TPU has been provisioned, you can also view details about your
queued resource request by going to the
[**TPUs** page](https://console.cloud.google.com/compute/tpus), finding your TPU, and
clicking on the name of the corresponding queued resource request.
In a rare scenario, you might find your queued resource in the `FAILED` state while some
slices are `ACTIVE`. If this happens, delete the resources that were created,
and try again in a few minutes or contact [Google Cloud Support](https://docs.cloud.google.com/support).
#### SSH and install dependencies
[Run JAX code on TPU slices](https://docs.cloud.google.com/tpu/docs/jax-pods.md.txt)
describes how to connect to your TPU VMs using SSH in a single slice. To
connect to all TPU VMs in your Multislice environment over SSH and
install dependencies, use the following `gcloud` command:
```bash
$ gcloud compute tpus queued-resources ssh ${QR_ID} \
--zone=${ZONE} \
--node=all \
--worker=all \
--command="command-to-run" \
--batch-size=4
```
This `gcloud` command sends the specified command to all workers and nodes in
QR using SSH. The command is batched into groups of four and is sent
simultaneously. The next batch of commands are sent when the current batch
completes execution. If there is a failure with one of the commands, processing
stops, and no further batches are sent. For more information, see the
[Queued resource API reference](https://docs.cloud.google.com/sdk/gcloud/reference/compute/tpus/queued-resources/ssh).
If the number of slices you are using exceeds your local computer's threading
limit (also called batching limit) you will run into a deadlock. As an example,
assume the batching limit on your local machine is 64. If you try to run a
training script on more than 64 slices, say 100, the SSH command will break up
the slices into batches. It will run the training script on the first batch of 64
slices and wait for the scripts to complete before running the script on the
remaining batch of 36 slices. However, the first batch of 64 slices cannot
complete until the remaining 36 slices start running the script, causing a
deadlock.
To prevent this scenario, you can run the training script in the background on
each VM by appending an ampersand (`&`) to the script command you specify
with the `--command` flag. When you do this, after starting the training script
on the first batch of slices, control will immediately return to
the SSH command. The SSH command can then start running the training script on
the remaining batch of 36 slices. You'll need to pipe your `stdout` and `stderr`
streams appropriately when running the commands in the background. To increase
parallelism within the same QR, you can select specific slices using the `--node`
parameter.
#### Network setup
Ensure TPU slices can communicate with each other by running the following steps.
Install JAX on **each** of the slices. For more information, see
[Run JAX code on TPU slices](https://docs.cloud.google.com/tpu/docs/jax-pods.md.txt). Assert that
`len(jax.devices())` is equal to the number of chips in your Multislice
environment. To do this, on each slice, run:
```bash
$ python3 -c 'import jax; print(jax.devices())'
```
If you run this code on four slices of v4-16's, there are eight chips per
slice and four slices, a total of 32 chips (devices) should be returned
by `jax.devices()`.
#### List queued resources
### gcloud
You can view the state of your queued resources using the `queued-resources list` command:
```bash
$ gcloud compute tpus queued-resources list --zone=${ZONE}
```
The output looks similar to the following:
```
NAME ZONE NODE_COUNT ACCELERATOR_TYPE STATE
...
que-res-id us-central1-a 4 v5litepod-16 ACTIVE
...
```
### Console
1. In the Google Cloud console, go to the **TPUs** page:
[Go to TPUs](https://console.cloud.google.com/compute/tpus)
2. Click the **Queued resources** tab.
#### Start your job on a provisioned environment
You can manually run workloads by connecting to all hosts in each slice over SSH
and running the following command on all hosts.
```bash
$ gcloud compute tpus tpu-vm ssh ${TPU_NAME} \
--zone=${ZONE} \
--worker=all \
--command="command-to-run"
```
#### Resetting QRs
The `ResetQueuedResource` API can be used to [reset](https://docs.cloud.google.com/compute/docs/samples/compute-reset-instance.md.txt)
all the VMs in an `ACTIVE` QR. Resetting the VMs forcibly erases the memory of
the machine and resets the VM to its initial state. Any data stored locally will
remain intact and the startup script will be invoked after a reset. The
`ResetQueuedResource` API can be useful when you want to restart all TPUs. For
example, when training is stuck and resetting all VMs is easier than debugging.
The resets of all VMs are performed in parallel and a `ResetQueuedResource`
operation takes one to two minutes to complete. To invoke the API, use the following
command:
```bash
$ gcloud compute tpus queued-resources reset ${QR_ID} --zone=${ZONE}
```
#### Deleting queued resources
To release resources at the end of your training session, delete the queued
resource. The deletion will take two to five minutes to complete. If you're
using the gcloud CLI, you can run this command in the background with
the optional `--async` flag.
### gcloud
```bash
$ gcloud compute tpus queued-resources \
delete ${QR_ID} --zone=${ZONE} --force [--async]
```
### Console
1. In the Google Cloud console, go to the **TPUs** page:
[Go to TPUs](https://console.cloud.google.com/compute/tpus)
2. Click the **Queued resources** tab.
3. Select the checkbox next to your queued resource request.
4. Click **Delete**.
#### Automatic failure recovery
In the event of a disruption, Multislice offers intervention-free
repair of the impacted slice and reset of all slices afterward. The impacted
slice is replaced with a new slice and the remaining otherwise healthy slices
are [reset](https://docs.cloud.google.com/compute/docs/samples/compute-reset-instance.md.txt). If no capacity is
available to allocate a replacement slice, training stops.
To resume training automatically after an interruption, you must specify a
[startup script](https://docs.cloud.google.com/compute/docs/instances/startup-scripts/linux.md.txt) that checks for
and loads the last saved checkpoints. Your startup script is automatically run
every time a slice is reallocated or a VM is reset. You specify a startup
script in the JSON payload you send to the create QR request API.
The following startup script (used in [Create QRs](https://docs.cloud.google.com/tpu/docs/multislice-introduction.md.txt#create-queued-resources))
lets you automatically recover from failures and resume training from
checkpoints stored in a Cloud Storage bucket during MaxText training:
```
{
"tpu": {
"node_spec": [
{
...
"metadata": {
"startup-script": "#! /bin/bash \n pwd \n runuser -l user1 -c 'cd /home/user1/MaxText && python3 -m MaxText.train MaxText/configs/base.yml run_name=run_test_failure_recovery dcn_data_parallelism=4 ici_fsdp_parallelism=8 steps=10000 save_period=10 base_output_directory='gs://user1-us-central2'' EOF"
}
...
}
]
}
}
```
Clone the [MaxText repo](https://github.com/google/maxtext) before trying this
out.
## Profiling and debugging
Profiling is the same in single slice and Multislice environments. For
more information, see [Profiling JAX programs](https://jax.readthedocs.io/en/latest/profiling.html).
## Optimizing training
The following sections describe how you can optimize Multislice
training.
### Sharding with Multislice for maximum performance
Achieving maximum performance in Multislice environments requires
considering how to shard across the multiple slices. There are typically three
choices (data parallelism, fully-sharded data parallelism and pipeline parallelism).
We don't recommend sharding activations across the model dimensions (sometimes
called tensor parallelism) because it requires too much inter-slice bandwidth.
For all these strategies, you can keep the same sharding strategy within a slice
that has worked for you in the past.
We recommend starting with pure data parallelism. Using fully-sharded data
parallelism is useful for freeing up memory usage. The drawback is that
communication between slices uses the DCN network and will slow down your
workload. Use pipeline parallelism only when necessary based on batch size
(as analyzed below).
### When to use data parallelism
Pure data parallelism will work well in cases where you have a workload that is
running well, but you'd like to improve its performance by scaling across
multiple slices.
To achieve strong scaling across multiple slices, the amount of time required
to perform all-reduce over DCN needs to be less than the amount of time required
to perform a backwards pass. DCN is used for communication between slices and
is a limiting factor in workload throughput.
Each v4 TPU chip performs at a peak of 275 \* 10^12^ FLOPS per second.
There are four chips per TPU host and each host has a maximum network bandwidth
of 50 Gbps.
That means the [arithmetic intensity](https://crd.lbl.gov/divisions/amcr/computer-science-amcr/par/research/roofline/introduction/#:%7E:text=Arithmetic%20Intensity%20is%20the%20ratio,ndependent%20of%20the%20vector%20size./)
is 4 \* 275 \* 10^12^ FLOPS / 50 Gbps = 22000 FLOPS / bit.
Your model will use 32 to 64 bits of DCN bandwidth for each parameter per step.
If you use two slices, your model will use 32 bits of DCN bandwidth. If you
use more than two slices the compiler will perform a full shuffle all-reduce
operation and you'll use up to 64 bits of DCN bandwidth for each parameter per
step. The amount of FLOPS needed for each parameter will vary depending on your
model. Specifically, for Transformer based language models, the number of FLOPS
required for a forward and a backward pass are approximately 6 \* B \* P where:
- B is the batch size in tokens
- P is the number of parameters
The number of FLOPS per parameter is `6 * B` and the number of FLOPS per parameter
during the backwards pass is `4 * B`.
To ensure strong scaling across multiple slices, ensure that the operational
intensity exceeds the arithmetic intensity of the TPU hardware. To calculate the
operational intensity, divide the number of FLOPS per parameter during the
backwards pass by the network bandwidth (in bits) per parameter per step:
`Operational Intensity = FLOPSbackwards_pass / DCN bandwidth`
Therefore, for a Transformer based language model, if you are using two slices:
`Operational intensity = 4 * B / 32`
If you are using more than two slices: `Operational intensity = 4 * B/64`
This suggests a minimum batch size of between 176k and 352k for Transformer
based language models. Because the DCN network can briefly drop packets, it's
best to maintain a significant margin for error, deploying data parallelism only
if the batch size per Pod is at least 350k (two Pods) to 700k (many Pods).
For other model architectures, you'll need to estimate the runtime of your
backwards pass per slice (either by timing it using a profiler or by counting
FLOPS). Then you can compare that to the expected run time to all reduce over
DCN and get a good estimate of if data parallelism will make sense for you.
### When to use fully sharded data parallelism (FSDP)
Fully sharded data parallelism (FSDP) combines data parallelism (sharding the
data across nodes) with sharding the weights across nodes. For each operation in
the forward and backward passes, the weights are all-gathered so that each
slice has the weights it needs. Instead of synchronizing the gradients using
all-reduce, the gradients are reduce-scattered as they are produced. In this way,
each slice only gets the gradients for the weights it's responsible for.
Similar to data parallelism, FSDP will require scaling the global batch size
linearly with the number of slices. FSDP will decrease the memory pressure as
you increase the number of slices. This is because the number of weights and
optimizer state per slice decreases but it does so at the price of increased
network traffic and the greater possibility for blocking due to a delayed
collective.
In practice, FSDP across slices is best if you are increasing the batch per
slice, storing more activations to minimize re-materialization during the
backwards pass or increasing the number of parameters in your neural network.
The all-gather and all-reduce operations in FSDP work similarly to those in DP,
so you can determine if your FSDP workload is limited by DCN performance in
the same way as described in the previous section.
### When to use pipeline parallelism
Pipeline parallelism becomes relevant when achieving high performance with other
parallelism strategies that require a global batch size greater than your
preferred maximum batch size. Pipeline parallelism allows the slices
comprising a pipeline to "share" a batch. However, pipeline parallelism has two
significant downsides:
1. It incurs the "pipeline bubble" where chips are idle because they are waiting for data.
2. It requires micro-batching which decreases the effective batch size, the arithmetic intensity and ultimately model FLOP utilization.
Pipeline parallelism should be used only if the other parallelism strategies
require too large a global batch size. Before trying pipeline parallelism, it is
worth experimenting to see empirically if convergence per sample slows down at
the batch size necessary to achieve high performance FSDP. FSDP tends to achieve
higher model FLOP utilization but if the convergence per sample slows as the
batch size grows, pipeline parallelism may still be the better choice. Most
workloads can tolerate sufficiently large batch sizes to not benefit from
pipeline parallelism, but your workload may be different.
If pipeline parallelism is necessary, we recommend combining it with data
parallelism or FSDP. This will enable you to minimize the pipeline depth while
increasing the per pipeline batch size until DCN latency becomes less of a
factor in throughput. Concretely, if you have N slices, consider pipelines of
depth 2 and N/2 replicas of data parallelism, then pipelines of depth 4 and N/4
replicas of data parallelism, continuing in the same manner, until the batch per
pipeline gets large enough that the DCN collectives can be hidden behind the
arithmetic in the backwards pass. This will minimize the slowdown introduced by
pipeline parallelism while allowing you to scale past the global batch size
limit.
## Multislice best practices
The following sections describe best practices for Multislice training.
### Data loading
During training we repeatedly load batches from a dataset to feed into the
model. Having an efficient, async data loader which shards the batch across
hosts is important to avoid starving the TPUs of work. The current data loader
in MaxText has each host load an equal subset of the examples. This solution is
adequate for text but requires a reshard within the model. Additionally, MaxText
doesn't yet offer deterministic snapshotting which would allow the data iterator
to load the same data before and after preemption.
### Checkpointing
The [Orbax](https://github.com/google/orbax) checkpointing library provides
primitives for checkpointing JAX PyTrees to local storage or Google Cloud storage.
We provide a reference integration with synchronous checkpointing into MaxText
in [`checkpointing.py`](https://github.com/AI-Hypercomputer/maxtext/blob/main/src/MaxText/checkpointing.py).
## Supported configurations
The following sections describe the supported slice shapes, orchestration,
frameworks, and parallelism for Multislice.
### Shapes
All slices must be of the same shape (for example, the same `AcceleratorType`).
Heterogeneous slice shapes are not supported.
### Orchestration
Orchestration is supported with GKE. For more information,
see [TPUs in GKE](https://docs.cloud.google.com/tpu/docs/tpus-in-gke).
### Frameworks
Multislice only supports JAX and PyTorch workloads.
### Parallelism
We recommend users test Multislice with data parallelism. To learn more
about implementing pipeline parallelism with Multislice, contact your
Google Cloud account representative.
## Support and Feedback
We welcome all feedback! To share feedback or request support, reach out to us
using the [Cloud TPU Support or Feedback form](https://forms.gle/pLFRKSdWZ97o2o867).