This document explains how to instrument an AI agent that was built with the
[Agent Development Kit (ADK) framework](https://google.github.io/adk-docs/). The ADK framework includes
OpenTelemetry instrumentation that collects telemetry from agent's key actions.
When you enable the built-in instrumentation, that instrumentation sends
information like text prompts and agent responses to your Google Cloud project.
This document outlines the required changes and
provides a link to a sample application.
Applications that use ADK can also collect multimodal prompts and responses.
This document describes how to collect text prompts and responses. If you want
to collect multimodal data, then additional configuration is required.
For more information, see
[Collect and view multimodal prompts and responses](https://docs.cloud.google.com/stackdriver/docs/instrumentation/collect-view-multimodal-prompts-responses.md.txt).
The default observability provided by ADK might not be sufficient for your
application's
use case. You can add additional instrumentation libraries by using OpenTelemetry
to capture telemetry from other pieces of your app, or your own custom
instrumentation to capture application-specific data to get more fine-grained
observability.
For example, in your application you could write instrumentation code to:
- Track resource consumption of agent-invoked tools.
- Track application-specific validation failures, business rule violations, or custom error recovery mechanisms.
- Track quality scores for agent responses based on your domain-specific criteria.
> [!NOTE]
> **Note:** This document assumes that you are using an ADK framework with version 1.17.0 or higher.
## Instrument your generative AI application to collect telemetry
To instrument your AI agent to collect log, metric, and trace data, do the
following:
1. [Install OpenTelemetry packages](https://docs.cloud.google.com/stackdriver/docs/instrumentation/ai-agent-adk.md.txt#install-packages).
2. [Configure your ADK environment](https://docs.cloud.google.com/stackdriver/docs/instrumentation/ai-agent-adk.md.txt#configure).
The remainder of this section describes the previous steps.
### Install OpenTelemetry packages
Add the following OpenTelemetry instrumentations and exporter packages:
```bash
uv add 'google-adk>=2.12.0' \
'opentelemetry-instrumentation-google-genai>=0.7b1' \
'opentelemetry-instrumentation-sqlite3>=0.63b1' \
'opentelemetry-exporter-otlp-proto-grpc>=1.42.1' \
'opentelemetry-exporter-otlp-proto-http>=1.42.1' \
'opentelemetry-instrumentation-vertexai>=2.0b0'
```
Log, metric, and trace data is sent to Google Cloud by using the
[Telemetry (OTLP) API](https://docs.cloud.google.com/stackdriver/docs/reference/telemetry/overview.md.txt), which implements the
[OpenTelemetry Protocol](https://opentelemetry.io/docs/specs/otlp).
The [`opentelemetry-exporter-otlp-proto-grpc`](https://pypi.org/project/opentelemetry-exporter-otlp-proto-grpc/) library
invokes the Telemetry (OTLP) API endpoint.
Your trace data is stored in a format that is
generally consistent with the proto files defined by the
[OpenTelemetry Protocol](https://opentelemetry.io/docs/specs/otlp). However, fields might be converted from an
OpenTelemetry-specific data type to a JSON data type before storage.
To learn more about the storage format,
see [Schema for trace data](https://docs.cloud.google.com/stackdriver/docs/reference/telemetry/trace-schema.md.txt).
### Configure your ADK environment
ADK framework versions 1.17.0 and later include
built-in support for OpenTelemetry and sending OpenTelemetry telemetry data to
Google Cloud Observability. To enable this, configure your ADK environment:
- If you run your application with the `adk web` command, then include the
`--otel_to_cloud` flag.
- In your `opentelemetry.env` file, set the following environment variables:
```bash
OTEL_SERVICE_NAME='adk-sql-agent'
OTEL_PYTHON_LOGGING_AUTO_INSTRUMENTATION_ENABLED='true'
```
- Configure OpenTelemetry to use the most recent semantic conventions for
generative AI.
```bash
OTEL_SEMCONV_STABILITY_OPT_IN='gen_ai_latest_experimental'
```
- Configure OpenTelemetry to attach messages as events.
```bash
OTEL_INSTRUMENTATION_GENAI_CAPTURE_MESSAGE_CONTENT='EVENT_ONLY'
```
> [!NOTE]
> **Note:** Don't set the value of this variable to `true`. When you use the most recent semantic conventions, setting the value of this variable to `true` results in an invalid configuration. Therefore, log and trace data isn't collected.
For more information about allowed enumerated values, see
[`genai/types.py`](https://github.com/open-telemetry/opentelemetry-python-contrib/blob/opentelemetry-util-genai%3D%3D0.3b0/util/opentelemetry-util-genai/src/opentelemetry/util/genai/types.py).
- We recommend that you also add the following environment variable to your
`opentelemetry.env` file:
```bash
ADK_CAPTURE_MESSAGE_CONTENT_IN_SPANS='false'
```
This environment variable does the following:
- Prevents the ADK instrumentation from attaching span attributes that exceed the attribute size limit.
- Prevents personally identifiable information (PII) from being attached to spans as attributes.
- You might need to set other environment variables. For example, if you
deploy to
[Gemini Enterprise Agent Platform](https://docs.cloud.google.com/gemini-enterprise-agent-platform/scale/runtime/tracing.md.txt),
then you also want to set the following environment variable:
```bash
GOOGLE_CLOUD_AGENT_ENGINE_ENABLE_TELEMETRY='true'
```
## Download and run the sample application
This sample code implements a generative AI agent that is built using ADK. The
agent is instrumented with OpenTelemetry, configured to send metrics, traces and logs
to your Google Cloud project. The telemetry sent to your project includes generative
AI prompts and responses.
### ADK agent persona
The generative AI agent is defined as a SQL expert that has full access to an
ephemeral SQLite database. The agent is built with the
[Agent Development Kit](https://google.github.io/adk-docs/) and accesses a database using the
[SQLDatabaseToolkit](https://python.langchain.com/docs/integrations/tools/sql_database/). The database is initially empty.
### Before you begin
1.
To get the permissions that
you need to have the sample application write log, metric, and trace data,
ask your administrator to grant you the
following IAM roles on your project:
- [Cloud Telemetry Traces Writer](https://docs.cloud.google.com/iam/docs/roles-permissions/telemetry.md.txt#telemetry.tracesWriter) (`roles/telemetry.tracesWriter`)
- [Logs Writer](https://docs.cloud.google.com/iam/docs/roles-permissions/logging.md.txt#logging.logWriter) (`roles/logging.logWriter`)
- [Monitoring Metric Writer](https://docs.cloud.google.com/iam/docs/roles-permissions/monitoring.md.txt#monitoring.metricWriter) (`roles/monitoring.metricWriter`)
- [Vertex AI User](https://docs.cloud.google.com/iam/docs/roles-permissions/aiplatform.md.txt#aiplatform.user) (`roles/aiplatform.user`)
These permissions are sufficient if you run the sample in the
Cloud Shell, on Google Cloud resources, or on a local
development environment.
> [!NOTE]
> **Important**: Production applications typically rely on a service account to provide the credentials required to write log, metric, and trace data. In those scenarios, grant the previous roles to the service account.
2. Make sure that you specify a quota project. The Vertex AI API
(`aiplatform.googleapis.com`) requires
that a quota project is specified. For more information, see
[Set the quota project](https://docs.cloud.google.com/docs/quotas/set-quota-project.md.txt).
For example, the following command can set a quota project.
```bash
gcloud config set billing/quota_project PROJECT_ID
```
### Launch the application
To launch the sample application, do the following:
1. In the Cloud Shell, clone the repository:
```bash
git clone https://github.com/GoogleCloudPlatform/opentelemetry-samples.git
```
2. Go to the sample directory:
```bash
cd opentelemetry-samples/python/adk-sql-agent
```
The sample contains an `.env` file that sets two environment variables. One
variable controls which endpoints the SDK uses. The other variable sets a
location.
If you prefer to use a different model, edit `main.py`. Make sure that the
model you select supports the location specified in the `.env` file. For
information about models, see
[Google models](https://docs.cloud.google.com/gemini-enterprise-agent-platform/models/google-models.md.txt).
3. Create a virtual environment and run the sample:
```bash
uv run --env-file opentelemetry.env adk web --otel_to_cloud
```
The application displays a message similar to the following:
Application startup complete
Uvicorn running on http://127.0.0.1:8080
4. To interact with the agent, select the URL shown in the output of the
previous step.
5. Expand **Select an app** and select `sql_agent` from the list of agents.
> [!NOTE]
> **Note:** This application requires Cross-Origin Resource Sharing (CORS). If you enter a prompt and CORS is blocked, then the application displays the message `Failed to create session` and the command line shows that commands were rejected, `POST /apps/sql_agent/users/user/sessions HTTP/1.1" 403 Forbidden`.
> You can enable CORS by appending the following to the command that runs the sample:
>
> ```
> --allow_origins="regex:.*"
> ```
### Engage with the agent
To engage with the agent, ask it a question or give it a command. For example,
you might ask the question:
What can you do for me ?
Similarly, since the `sql_agent` has the persona of a SQL expert, you might ask
it to create tables for your applications and write queries to operate on the
created tables. The agent can only create an ephemeral database that is backed
by a `.db` file that is created on the machine running the application.
The following illustrates a sample interaction between the `sql_agent` and the
user:

The actions performed by generative AI agents aren't deterministic, so
you might see a different response for the same prompt.
### Exit the application
To exit the application, enter `Ctrl-C` on the shell used to launch the
application.
## View the traces, metrics, and logs
This section describes how you can view generative AI events.
### Before you begin
To get the permissions that
you need to view your log, metric, and trace data,
ask your administrator to grant you the
following IAM roles on your project:
- [Logs Viewer](https://docs.cloud.google.com/iam/docs/roles-permissions/logging.md.txt#logging.viewer) (`roles/logging.viewer`)
- [Monitoring Viewer](https://docs.cloud.google.com/iam/docs/roles-permissions/monitoring.md.txt#monitoring.viewer) (`roles/monitoring.viewer`)
- [Cloud Trace User](https://docs.cloud.google.com/iam/docs/roles-permissions/cloudtrace.md.txt#cloudtrace.user) (`roles/cloudtrace.user`)
For more information about granting roles, see [Manage access to projects, folders, and organizations](https://docs.cloud.google.com/iam/docs/granting-changing-revoking-access.md.txt).
You might also be able to get
the required permissions through [custom
roles](https://docs.cloud.google.com/iam/docs/creating-custom-roles) or other [predefined
roles](https://docs.cloud.google.com/iam/docs/roles-overview#predefined).
### View telemetry
To view the generative AI events created by the application, use the
**Trace Explorer** page:
1. In the Google Cloud console, go to the

**Trace explorer** page:
[Go to **Trace explorer**](https://console.cloud.google.com/traces/explorer)
You can also find this page by using the search bar.
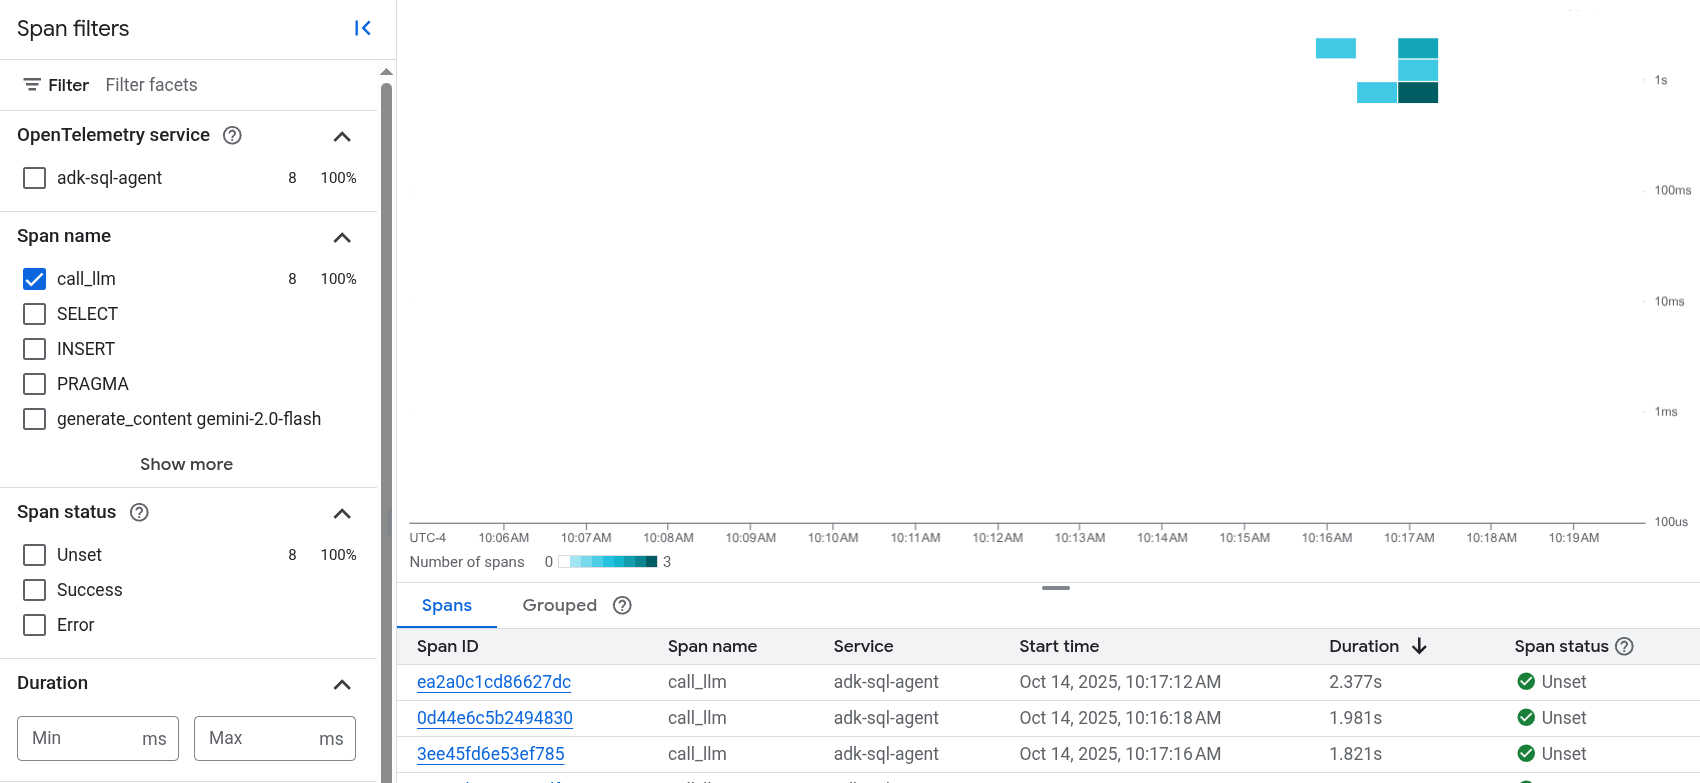
2. In the toolbar, select **Add filter** , select **Span name** , and then
select `call_llm`.
The following illustrates the **Trace Explorer** page after
filtering the data:
If you've never used Cloud Trace before, then Google Cloud Observability needs to
create a database to store your trace data. The creation of the database
can take a few minutes and during that period, no trace data is available
to view.
3. To explore your span and log data, in the **Spans** table, select a span.
The **Details** page opens. This page displays the associated trace and its
spans. The table on the page displays detailed information for the
span you selected. This information includes the following:
- The **Inputs/Outputs** tab displays events for
generative AI agents. To learn more about these events, see
[View generative AI events](https://docs.cloud.google.com/trace/docs/finding-traces.md.txt#view_generative_ai_events).
The following screenshot illustrates a trace, where one span has the
name `call_llm`. That span invokes the LLM (Large Language Model)
powering this agent. For this sample, it is Gemini.
The Gemini span includes
generative AI events:

- The **Logs \& Events** tab lists log entries and events that are
associated with the span. If you want to view the log data in
the Logs Explorer, then in the toolbar of this tab, select
**View logs**.
The log data includes the response of the `sql_agent`. For example,
for the sample run, the JSON payload includes the following content:
{
"logName": "projects/my-project/logs/otel_python_inprocess_log_name_temp",
"jsonPayload": {
"content": {
"parts": [
0: {
"text": "Now I can create the table."
}
1: {1}
],
"role": "model"
}
},
...
}