# Set up service security with Envoy
Use the instructions in this guide to configure authentication and authorization
for services deployed with Cloud Service Mesh and Envoy proxies. For complete
information about Cloud Service Mesh service security, see
[Cloud Service Mesh service security](https://docs.cloud.google.com/service-mesh/v1.23/docs/service-routing/security-overview.md.txt).
## Requirements
Before you configure service security for Cloud Service Mesh with Envoy, make
sure that your setup meets the following prerequisites:
- You can meet all of the requirements for deploying Cloud Service Mesh. For
complete information about these requirements, see
[Prepare to set up on service routing APIs with Envoy and proxyless workloads](https://docs.cloud.google.com/service-mesh/v1.23/docs/onboarding/prepare-service-routing-envoy-proxyless.md.txt).
- You have sufficient permissions to create or update the Cloud Service Mesh and
Google Cloud service mesh resources to use the service security, as described
in [Prepare to set up on service routing APIs with Envoy and proxyless workloads](https://docs.cloud.google.com/service-mesh/v1.23/docs/onboarding/prepare-service-routing-envoy-proxyless.md.txt).
## Prepare for setup
The following sections describe the tasks you need to complete before you set up
Cloud Service Mesh security service. These tasks are:
- Updating the Google Cloud CLI
- Setting up variables
- Enabling the APIs required for Cloud Service Mesh to work with Certificate Authority Service
## Update the `gcloud` command-line tool
To update the Google Cloud CLI, run the following on your local
machine:
```
gcloud components update
```
## Set up variables
Set the following variables so that you can copy and paste code with consistent
values as you work through the example in this document. Use the following
values.
- PROJECT_ID: Substitute the ID of your project.
- CLUSTER_NAME: Substitute the cluster name you want to us, for example, `secure-td-cluster`.
- ZONE: Substitute the zone where your cluster is located. your cluster is located.
- GKE_CLUSTER_URL: Substitute `https://container.googleapis.com/v1/projects/PROJECT_ID/locations/ZONE/clusters/CLUSTER_NAME`
- WORKLOAD_POOL: Substitute `PROJECT_ID.svc.id.goog`
- K8S_NAMESPACE: Substitute `default`.
- DEMO_CLIENT_KSA: Substitute the name of your client Kubernetes service account.
- DEMO_SERVER_KSA: Substitute the name of your server Kubernetes service account.
- PROJNUM: Substitute the project number of your project,
which you can determine from the Google Cloud console or with this command:
```
gcloud projects describe PROJECT_ID --format="value(projectNumber)"
```
- SA_GKE: Substitute `service-PROJNUM@container-engine-robot.iam.gserviceaccount.com`
- CLUSTER_VERSION: Substitute the most recent version
available. You can find this in the [Rapid channel release notes](https://docs.cloud.google.com/kubernetes-engine/docs/release-notes-rapid.md.txt).
The minimum required version is 1.21.4-gke.1801. This is the GKE
cluster version to use in this example.
Set the values here:
```
# Substitute your project ID
PROJECT_ID=PROJECT_ID
# GKE cluster name and zone for this example.
CLUSTER_NAME=CLUSTER_NAME
ZONE=ZONE
# GKE cluster URL derived from the above
GKE_CLUSTER_URL="https://container.googleapis.com/v1/projects/PROJECT_ID/locations/ZONE/clusters/CLUSTER_NAME"
# Workload pool to be used with the GKE cluster
WORKLOAD_POOL="PROJECT_ID.svc.id.goog"
# Kubernetes namespace to run client and server demo.
K8S_NAMESPACE=K8S_NAMESPACE
DEMO_CLIENT_KSA=DEMO_CLIENT_KSA
DEMO_SERVER_KSA=DEMO_SERVER_KSA
# Compute other values
# Project number for your project
PROJNUM=PROJNUM
CLUSTER_VERSION=CLUSTER_VERSION
SA_GKE=service-PROJNUM@container-engine-robot.iam.gserviceaccount.com
```
## Enable the APIs
Use the [`gcloud services enable`](https://docs.cloud.google.com/sdk/gcloud/reference/services/enable)
command to enable all of the APIs you need to set up Cloud Service Mesh
security with Certificate Authority Service.
```
gcloud services enable \
container.googleapis.com \
cloudresourcemanager.googleapis.com \
compute.googleapis.com \
trafficdirector.googleapis.com \
networkservices.googleapis.com \
networksecurity.googleapis.com \
privateca.googleapis.com \
gkehub.googleapis.com
```
## Create or update a GKE cluster
Cloud Service Mesh service security depends on the CA Service
integration with GKE. The GKE cluster must
meet the following requirements in addition to
[the requirements for setup](https://docs.cloud.google.com/service-mesh/v1.23/docs/service-routing/security-envoy-setup.md.txt#requirements):
- Use a minimum cluster version of 1.21.4-gke.1801. If you need features that are in a later version, you can obtain that version from the rapid release channel.
- The GKE cluster must be enabled and configured with mesh certificates, as described in [Creating certificate authorities to issue certificates](https://docs.cloud.google.com/service-mesh/v1.23/docs/service-routing/security-envoy-setup.md.txt#configure-cas).
1. Create a new cluster that uses Workload Identity Federation for GKE. If you are updating an
existing cluster, skip to the next step. The value you give for `--tags`
must match the name passed to the `--target-tags` flag for the
`firewall-rules create` command in the section
[Configuring Cloud Service Mesh with Cloud Load Balancing components](https://docs.cloud.google.com/service-mesh/legacy/load-balancing-apis/set-up-gke-pods-auto.md.txt#configuring_with_components).
```
# Create a GKE cluster with GKE managed mesh certificates.
gcloud container clusters create CLUSTER_NAME \
--release-channel=rapid \
--scopes=cloud-platform \
--image-type=cos_containerd \
--machine-type=e2-standard-2 \
--zone=ZONE \
--workload-pool=PROJECT_ID.svc.id.goog \
--enable-mesh-certificates \
--cluster-version=CLUSTER_VERSION \
--enable-ip-alias \
--tags=allow-health-checks \
--workload-metadata=GKE_METADATA
```
Cluster creation might take several minutes to complete.
2. If you are using an existing cluster, turn on Workload Identity Federation for GKE and
GKE mesh certificates. Make sure that the cluster was created
with the `--enable-ip-alias` flag, which cannot be used with the `update`
command.
```
gcloud container clusters update CLUSTER_NAME \
--enable-mesh-certificates
```
3. Run the following command to switch to the new cluster as the default cluster
for your `kubectl` commands:
```
gcloud container clusters get-credentials CLUSTER_NAME \
--zone ZONE
```
### Deploying in a multi-cluster environment
If you are deploying in a multi-cluster environment, follow the general
procedure described in this section. These instructions assume that
client Pods are running in one cluster and server Pods are running in the
other cluster.
1. Create or update the clusters using the instructions in the previous
section.
2. Capture the Pod IP address ranges for each cluster using the following
command:
```
gcloud compute firewall-rules list \
--filter="name~gke-{CLUSTER_NAME}-[0-9a-z]*-all" \
--format="value(sourceRanges)"
```
For example, for clusters called `cluster-a` and `cluster-b`, the commands
return results such as the following:
```
cluster-a, pod CIDR: 10.4.0.0/14, node network tag: gke-cluster-a-9cd18751-node
cluster-b, pod CIDR: 10.8.0.0/14, node network tag: gke-cluster-b-acd14479-node
```
3. Create VPC firewall rules that allow the clusters to
communicate with each other. For example, the following command creates a
firewall rule that allows the `cluster-a` pod IP addresses to communicate with
`cluster-b` nodes:
```
gcloud compute firewall-rules create per-cluster-a-pods \
--allow="tcp,udp,icmp,esp,ah,sctp" \
--target-tags="gke-cluster-b-acd14479-node"
```
The following command creates a firewall rule that allows the `cluster-b`
pod IP addresses to communicate with `cluster-a` nodes:
```
gcloud compute firewall-rules create per-cluster-b-pods \
--allow="tcp,udp,icmp,esp,ah,sctp" \
--target-tags="gke-cluster-a-9cd18751-node"
```
## Register clusters with a fleet
Register the cluster that you created or updated in
[Creating a GKE cluster](https://docs.cloud.google.com/service-mesh/v1.23/docs/service-routing/security-envoy-setup.md.txt#create-cluster) with a fleet.
Registering the cluster makes it easier for you to configure clusters across
multiple projects.
Note that these steps can take up to ten minutes each to complete.
1. Register your cluster with the fleet:
```
gcloud container fleet memberships register CLUSTER_NAME \
--gke-cluster=ZONE/CLUSTER_NAME \
--enable-workload-identity --install-connect-agent \
--manifest-output-file=MANIFEST-FILE_NAME
```
Replace the variables as follows:
- CLUSTER_NAME: Your cluster's name.
- ZONE: Your cluster's zone.
- MANIFEST-FILE_NAME: The path where these commands generate the manifest for registration.
When the registration process succeeds, you see a message such as the
following:
```
Finished registering the cluster CLUSTER_NAME with the fleet.
```
2. Apply the generated manifest file to your cluster:
```
kubectl apply -f MANIFEST-FILE_NAME
```
When the application process succeeds, you see messages such as the
following:
```
namespace/gke-connect created
serviceaccount/connect-agent-sa created
podsecuritypolicy.policy/gkeconnect-psp created
role.rbac.authorization.k8s.io/gkeconnect-psp:role created
rolebinding.rbac.authorization.k8s.io/gkeconnect-psp:rolebinding created
role.rbac.authorization.k8s.io/agent-updater created
rolebinding.rbac.authorization.k8s.io/agent-updater created
role.rbac.authorization.k8s.io/gke-connect-agent-20210416-01-00 created
clusterrole.rbac.authorization.k8s.io/gke-connect-impersonation-20210416-01-00 created
clusterrolebinding.rbac.authorization.k8s.io/gke-connect-impersonation-20210416-01-00 created
clusterrolebinding.rbac.authorization.k8s.io/gke-connect-feature-authorizer-20210416-01-00 created
rolebinding.rbac.authorization.k8s.io/gke-connect-agent-20210416-01-00 created
role.rbac.authorization.k8s.io/gke-connect-namespace-getter created
rolebinding.rbac.authorization.k8s.io/gke-connect-namespace-getter created
secret/http-proxy created
deployment.apps/gke-connect-agent-20210416-01-00 created
service/gke-connect-monitoring created
secret/creds-gcp create
```
3. Get the membership resource from the cluster:
```
kubectl get memberships membership -o yaml
```
The output should include the Workoad Identity pool assigned by the fleet,
where PROJECT_ID is your project ID:
```
workload_identity_pool: PROJECT_ID.svc.id.goog
```
This means that the cluster registered successfully.
## Create certificate authorities to issue certificates
To issue certificates to your Pods, create a CA Service pool
and the following certificate authorities (CAs):
- Root CA. This is the root of trust for all issued mesh certificates. You can use an existing root CA if you have one. Create the root CA in the `enterprise` tier, which is meant for long-lived, low-volume certificate issuance.
- Subordinate CA. This CA issues certificates for workloads. Create the subordinate CA in the region where your cluster is deployed. Create the subordinate CA in the `devops` tier, which is meant for short-lived, high-volume certificate issuance.
Creating a subordinate CA is optional, but we strongly recommend creating one
rather than using your root CA to issue GKE mesh certificates. If
you decide to use the root CA to issue mesh certificates, ensure that the
default [config-based issuance mode](https://docs.cloud.google.com/certificate-authority-service/docs/reference/rpc/google.cloud.security.privateca.v1.md.txt#issuancemodes)
remains permitted.
The subordinate CA can be in a different region from your cluster, but we
strongly recommend creating it in the same region as your cluster to optimize
performance. You can, however, create the root and subordinate CAs in different
regions without any impact to performance or availability.
These regions are supported for CA Service:
| Region name | Region description |
|---|---|
| `asia-east1` | Taiwan |
| `asia-east2` | Hong Kong |
| `asia-northeast1` | Tokyo |
| `asia-northeast2` | Osaka |
| `asia-northeast3` | Seoul |
| `asia-south1` | Mumbai |
| `asia-south2` | Delhi |
| `asia-southeast1` | Singapore |
| `asia-southeast2` | Jakarta |
| `australia-southeast1` | Sydney |
| `australia-southeast2` | Melbourne |
| `europe-central2` | Warsaw |
| `europe-north1` | Finland |
| `europe-southwest1` | Madrid |
| `europe-west1` | Belgium |
| `europe-west2` | London |
| `europe-west3` | Frankfurt |
| `europe-west4` | Netherlands |
| `europe-west6` | Zürich |
| `europe-west8` | Milan |
| `europe-west9` | Paris |
| `europe-west10` | Berlin |
| `europe-west12` | Turin |
| `me-central1` | Doha |
| `me-central2` | Dammam |
| `me-west1` | Tel Aviv |
| `northamerica-northeast1` | Montréal |
| `northamerica-northeast2` | Toronto |
| `southamerica-east1` | São Paulo |
| `southamerica-west1` | Santiago |
| `us-central1` | Iowa |
| `us-east1` | South Carolina |
| `us-east4` | Northern Virginia |
| `us-east5` | Columbus |
| `us-south1` | Dallas |
| `us-west1` | Oregon |
| `us-west2` | Los Angeles |
| `us-west3` | Salt Lake City |
| `us-west4` | Las Vegas |
The list of supported locations can also be checked by running the following
command:
gcloud privateca locations list
1. Grant the IAM `roles/privateca.caManager` to individuals
who create a CA pool and a CA. Note that for MEMBER, the
correct format is `user:userid@example.com`. If that person is the current
user, you can obtain the current user ID with the shell command
`$(gcloud auth list --filter=status:ACTIVE --format="value(account)")`.
```
gcloud projects add-iam-policy-binding PROJECT_ID \
--member=MEMBER \
--role=roles/privateca.caManager
```
2. Grant the role `role/privateca.admin` for CA Service to individuals
who need to modify IAM policies, where `MEMBER` is an
individual who needs this access, specifically, any individuals who perform
the steps that follow that grant the `privateca.auditor` and
`privateca.certificateManager` roles:
```
gcloud projects add-iam-policy-binding PROJECT_ID \
--member=MEMBER \
--role=roles/privateca.admin
```
3. Create the root CA Service pool.
```
gcloud privateca pools create ROOT_CA_POOL_NAME \
--location ROOT_CA_POOL_LOCATION \
--tier enterprise
```
4. Create a root CA.
```
gcloud privateca roots create ROOT_CA_NAME --pool ROOT_CA_POOL_NAME \
--subject "CN=ROOT_CA_NAME, O=ROOT_CA_ORGANIZATION" \
--key-algorithm="ec-p256-sha256" \
--max-chain-length=1 \
--location ROOT_CA_POOL_LOCATION
```
For this demonstration setup, use the following values for the variables:
- ROOT_CA_POOL_NAME=td_sec_pool
- ROOT_CA_NAME=pkcs2-ca
- ROOT_CA_POOL_LOCATION=us-east1
- ROOT_CA_ORGANIZATION="TestCorpLLC"
5. Create the subordinate pool and subordinate CA. Ensure that the default
[config-based issuance mode](https://docs.cloud.google.com/certificate-authority-service/docs/reference/rpc/google.cloud.security.privateca.v1.md.txt#issuancemodes)
remains permitted.
```
gcloud privateca pools create SUBORDINATE_CA_POOL_NAME \
--location SUBORDINATE_CA_POOL_LOCATION \
--tier devops
```
```
gcloud privateca subordinates create SUBORDINATE_CA_NAME \
--pool SUBORDINATE_CA_POOL_NAME \
--location SUBORDINATE_CA_POOL_LOCATION \
--issuer-pool ROOT_CA_POOL_NAME \
--issuer-location ROOT_CA_POOL_LOCATION \
--subject "CN=SUBORDINATE_CA_NAME, O=SUBORDINATE_CA_ORGANIZATION" \
--key-algorithm "ec-p256-sha256" \
--use-preset-profile subordinate_mtls_pathlen_0
```
For this demonstration setup, use the following values for the variables:
- SUBORDINATE_CA_POOL_NAME="td-ca-pool"
- SUBORDINATE_CA_POOL_LOCATION=us-east1
- SUBORDINATE_CA_NAME="td-ca"
- SUBORDINATE_CA_ORGANIZATION="TestCorpLLC"
- ROOT_CA_POOL_NAME=td_sec_pool
- ROOT_CA_POOL_LOCATION=us-east1
6. Grant the IAM `privateca.auditor` role for the root CA pool to
allow access from the GKE service account:
```
gcloud privateca pools add-iam-policy-binding ROOT_CA_POOL_NAME \
--location ROOT_CA_POOL_LOCATION \
--role roles/privateca.auditor \
--member="serviceAccount:service-PROJNUM@container-engine-robot.iam.gserviceaccount.com"
```
7. Grant the IAM `privateca.certificateManager`
role for the subordinate CA pool to allow access from the GKE
service account:
```
gcloud privateca pools add-iam-policy-binding SUBORDINATE_CA_POOL_NAME \
--location SUBORDINATE_CA_POOL_LOCATION \
--role roles/privateca.certificateManager \
--member="serviceAccount:service-PROJNUM@container-engine-robot.iam.gserviceaccount.com"
```
8. Save the following `WorkloadCertificateConfig` YAML configuration to tell
your cluster how to issue mesh certificates:
```yaml
apiVersion: security.cloud.google.com/v1
kind: WorkloadCertificateConfig
metadata:
name: default
spec:
# Required. The CA service that issues your certificates.
certificateAuthorityConfig:
certificateAuthorityServiceConfig:
endpointURI: ISSUING_CA_POOL_URI
# Required. The key algorithm to use. Choice of RSA or ECDSA.
#
# To maximize compatibility with various TLS stacks, your workloads
# should use keys of the same family as your root and subordinate CAs.
#
# To use RSA, specify configuration such as:
# keyAlgorithm:
# rsa:
# modulusSize: 4096
#
# Currently, the only supported ECDSA curves are "P256" and "P384", and the only
# supported RSA modulus sizes are 2048, 3072 and 4096.
keyAlgorithm:
rsa:
modulusSize: 4096
# Optional. Validity duration of issued certificates, in seconds.
#
# Defaults to 86400 (1 day) if not specified.
validityDurationSeconds: 86400
# Optional. Try to start rotating the certificate once this
# percentage of validityDurationSeconds is remaining.
#
# Defaults to 50 if not specified.
rotationWindowPercentage: 50
```
Replace the following:
- The project ID of the project in which your cluster runs:
```
PROJECT_ID
```
- The fully qualified URI of the CA that issues your mesh certificates (ISSUING_CA_POOL_URI). This can be either your subordinate CA (recommended) or your root CA. The format is:
```
//privateca.googleapis.com/projects/PROJECT_ID/locations/SUBORDINATE_CA_POOL_LOCATION/caPools/SUBORDINATE_CA_POOL_NAME
```
9. Save the following `TrustConfig` YAML configuration to tell your cluster how
to trust the issued certificates:
```yaml
apiVersion: security.cloud.google.com/v1
kind: TrustConfig
metadata:
name: default
spec:
# You must include a trustStores entry for the trust domain that
# your cluster is enrolled in.
trustStores:
- trustDomain: PROJECT_ID.svc.id.goog
# Trust identities in this trustDomain if they appear in a certificate
# that chains up to this root CA.
trustAnchors:
- certificateAuthorityServiceURI: ROOT_CA_POOL_URI
```
Replace the following:
- The project ID of the project in which your cluster runs:
```
PROJECT_ID
```
- The fully qualified URI of the root CA pool (ROOT_CA_POOL_URI). The format is:
```
//privateca.googleapis.com/projects/PROJECT_ID/locations/ROOT_CA_POOL_LOCATION/caPools/ROOT_CA_POOL_NAME
```
10. Apply the configurations to your cluster:
```bash
kubectl apply -f WorkloadCertificateConfig.yaml
kubectl apply -f TrustConfig.yaml
```
## Configure Identity and Access Management
To create the resources required for the setup, you must have the
`compute.NetworkAdmin` role. This role contains all the necessary permissions to
create, update, delete, list, and use (that is, referencing this in other
resources) the required resources. If you are the owner-editor of your project,
you automatically have this role.
Note that the `networksecurity.googleapis.com.clientTlsPolicies.use` and
`networksecurity.googleapis.com.serverTlsPolicies.use` are not enforced when you
reference these resources in the backend service.
If these permissions are enforced in the future and you are using the
`compute.NetworkAdmin` role, then you won't notice any issues when this check
is enforced.
If you are using custom roles and this check is enforced in the future, you must
make sure to include the respective `.use` permission. Otherwise, in the future,
you might find that your custom role does not have the necessary permissions
to refer to `clientTlsPolicy` or `serverTlsPolicy` from the backend service or
endpoint policy.
The following instructions let the default service account access the
Cloud Service Mesh Security API and create the Kubernetes service accounts.
1. Configure IAM to allow the default service account to access
the Cloud Service Mesh security API.
```
GSA_EMAIL=$(gcloud iam service-accounts list --format='value(email)' \
--filter='displayName:Compute Engine default service account')
gcloud projects add-iam-policy-binding PROJECT_ID \
--member serviceAccount:${GSA_EMAIL} \
--role roles/trafficdirector.client
```
2. Set up Kubernetes service accounts. The client and server deployments in
the following sections use the Knames of the Kubernetes server and client
service accounts.
```
kubectl create serviceaccount --namespace K8S_NAMESPACE DEMO_SERVER_KSA
kubectl create serviceaccount --namespace K8S_NAMESPACE DEMO_CLIENT_KSA
```
3. Allow the Kubernetes service accounts to impersonate the default Compute Engine
service account by creating an IAM policy binding between the two. This
binding allows the Kubernetes service account to act as the default
Compute Engine service account.
```
gcloud iam service-accounts add-iam-policy-binding \
--role roles/iam.workloadIdentityUser \
--member "serviceAccount:PROJECT_ID.svc.id.goog[K8S_NAMESPACE/DEMO_SERVER_KSA]" ${GSA_EMAIL}
gcloud iam service-accounts add-iam-policy-binding \
--role roles/iam.workloadIdentityUser \
--member "serviceAccount:PROJECT_ID.svc.id.goog[K8S_NAMESPACE/DEMO_CLIENT_KSA]" ${GSA_EMAIL}
```
4. Annotate the Kubernetes service accounts to associate them with the default
Compute Engine service account.
```
kubectl annotate --namespace K8S_NAMESPACE \
serviceaccount DEMO_SERVER_KSA \
iam.gke.io/gcp-service-account=${GSA_EMAIL}
kubectl annotate --namespace K8S_NAMESPACE \
serviceaccount DEMO_CLIENT_KSA \
iam.gke.io/gcp-service-account=${GSA_EMAIL}
```
## Set up Cloud Service Mesh
Use the following instructions to install the sidecar injector, set up a test
service, and complete other deployment tasks.
### Install the Envoy sidecar injector in the cluster
Use the instructions in both of the following sections of the
[Cloud Service Mesh setup for GKE Pods with automatic Envoy injection](https://docs.cloud.google.com/service-mesh/legacy/load-balancing-apis/set-up-gke-pods-auto.md.txt) to deploy and enable Envoy sidecar injection in your cluster:
- [Configure project information](https://docs.cloud.google.com/service-mesh/legacy/load-balancing-apis/set-up-gke-pods-auto.md.txt#configure_project_information)
- [Installing the MutatingWebhookConfigurations](https://docs.cloud.google.com/service-mesh/legacy/load-balancing-apis/set-up-gke-pods-auto.md.txt#apply_the_configurations_for_mutating_webhook). Make sure that you configure the mesh name as `sidecar_mesh` and the network as "", an empty string.
- [Enabling sidecar injection](https://docs.cloud.google.com/service-mesh/legacy/load-balancing-apis/set-up-gke-pods-auto.md.txt#enable-sidecar-injection)
Make sure that you complete both sets of instructions before you set up a
test service.
### Set up a test service
After you install the Envoy sidecar injector, use these instructions to set up
a test service for your deployment.
```
wget -q -O - https://storage.googleapis.com/traffic-director/security/ga/service_sample.yaml | sed -e s/DEMO_SERVER_KSA_PLACEHOLDER/DEMO_SERVER_KSA/g > service_sample.yaml
kubectl apply -f service_sample.yaml
```
The file `service_sample.yaml` contains the podspec for your demo server
application. There are some annotations that are specific to Cloud Service Mesh
security.
### Cloud Service Mesh proxy metadata
The podspec specifies the `proxyMetadata` annotation:
```
spec:
...
annotations:
cloud.google.com/proxyMetadata: '{"app": "payments"}'
...
```
When the Pod is initialized, the sidecar proxy picks up this annotation and
transmits it to Cloud Service Mesh. Cloud Service Mesh can then use this
information to send back filtered configuration:
- [Later in this guide](https://docs.cloud.google.com/service-mesh/v1.23/docs/service-routing/security-envoy-setup.md.txt#secure-inbound-traffic), note that the endpoint policy specifies an endpoint matcher.
- The endpoint matcher specifies that only clients that present a label with name `app` and value `payments` receive the filtered configuration.
### Use mesh certificates and keys signed by CA Service
The podspec specifies the `enableManagedCerts` annotation:
```
spec:
...
annotations:
...
cloud.google.com/enableManagedCerts: "true"
...
```
When the Pod is initialized, CA Service signed certificates and
keys are automatically mounted on the local sidecar proxy file system.
### Configuring the inbound traffic interception port
The podspec specifies the `includeInboundPorts` annotation:
```
spec:
...
annotations:
...
cloud.google.com/includeInboundPorts: "8000"
...
```
This is the port on which your server application listens for connections. When
the Pod is initialized, the sidecar proxy picks up this annotation and transmits
it to Cloud Service Mesh. Cloud Service Mesh can then use this information to send
back filtered configuration which intercepts all incoming traffic to this port
and can apply security policies on it.
The health check port must be different from the application port. Otherwise,
the same security policies will apply to incoming connections to the health
check port which may lead to the connections being declined which results in the
server incorrectly marked as unhealthy.
### Configure GKE services with NEGs
GKE services must be exposed through network endpoint groups
(NEGs) so that you can configure them as backends of a Cloud Service Mesh backend
service. The `service_sample.yaml` package provided with this setup guide uses
the NEG name `service-test-neg` in the following annotation:
```
...
metadata:
annotations:
cloud.google.com/neg: '{"exposed_ports": {"80":{"name": "service-test-neg"}}}'
spec:
ports:
- port: 80
name: service-test
protocol: TCP
targetPort: 8000
```
You don't need to change the `service_sample.yaml` file.
### Save the NEG's name
Save the NEG's name in the `NEG_NAME` variable:
```
NEG_NAME="service-test-neg"
```
### Deploy a client application to GKE
Run the following command to launch a demonstration client with an Envoy proxy
as a sidecar, which you need to demonstrate the security features.
```
wget -q -O - https://storage.googleapis.com/traffic-director/security/ga/client_sample.yaml | sed -e s/DEMO_CLIENT_KSA_PLACEHOLDER/DEMO_CLIENT_KSA/g > client_sample.yaml
kubectl apply -f client_sample.yaml
```
The client podspec only includes the `enableManagedCerts` annotation. This is
required to mount the necessary volumes for GKE managed mesh
certificates and keys which are signed by the CA Service instance.
### Configure health check, firewall rule, and backend service resources
In this section, you create health check, firewall rule, and backend service
resources for Cloud Service Mesh.
1. Create the [health check](https://docs.cloud.google.com/load-balancing/docs/health-checks.md.txt).
```
gcloud compute health-checks create http td-gke-health-check \
--use-serving-port
```
2. Create the firewall rule to allow the health checker IP address ranges.
```
gcloud compute firewall-rules create fw-allow-health-checks \
--action ALLOW \
--direction INGRESS \
--source-ranges 35.191.0.0/16,130.211.0.0/22 \
--rules tcp
```
3. Create the backend service and associate the health check with the
backend service.
```
gcloud compute backend-services create td-gke-service \
--global \
--health-checks td-gke-health-check \
--load-balancing-scheme INTERNAL_SELF_MANAGED
```
4. Add the previously created NEG as a backend to the backend service.
```
gcloud compute backend-services add-backend td-gke-service \
--global \
--network-endpoint-group ${NEG_NAME} \
--network-endpoint-group-zone ZONE \
--balancing-mode RATE \
--max-rate-per-endpoint 5
```
### Configure `Mesh` and `HTTPRoute` resources
In this section, you create `Mesh` and `HTTPRoute` resources.
1. Create the `Mesh` resource specification and save it in a file called
`mesh.yaml`.
```
name: sidecar-mesh
interceptionPort: 15001
```
The interception port defaults to `15001` if you don't specify it in the
`mesh.yaml` file.
2. Create the `Mesh` resource using the mesh.yaml specification.
```
gcloud network-services meshes import sidecar-mesh \
--source=mesh.yaml \
--location=global
```
3. Create the `HTTPRoute` specification and save it to a file called
`http_route.yaml`.
You can use either `PROJECT_ID` or `PROJECT_NUMBER`.
```
name: helloworld-http-route
hostnames:
- service-test
meshes:
- projects/PROJNUM/locations/global/meshes/sidecar-mesh
rules:
- action:
destinations:
- serviceName: "projects/PROJNUM/locations/global/backendServices/td-gke-service"
```
4. Create the `HTTPRoute` resource using the specification in the
`http_route.yaml` file.
```
gcloud network-services http-routes import helloworld-http-route \
--source=http_route.yaml \
--location=global
```
Cloud Service Mesh configuration is complete and you can now configure
authentication and authorization policies.
## Set up service-to-service security
Use the instructions in the following sections to set up service-to-service
security.
### Enable mTLS in the mesh
To set up mTLS in your mesh, you must secure outbound traffic to the backend
service and secure inbound traffic to the endpoint.
### Format for policy references
Note the following required format for referring to server TLS, client TLS,
and authorization policies:
```
projects/PROJECT_ID/locations/global/[serverTlsPolicies|clientTlsPolicies|authorizationPolicies]/[server-tls-policy|client-mtls-policy|authz-policy]
```
For example:
```
projects/PROJECT_ID/locations/global/serverTlsPolicies/server-tls-policy
```
```
projects/PROJECT_ID/locations/global/clientTlsPolicies/client-mtls-policy
```
```
projects/PROJECT_ID/locations/global/authorizationPolicies/authz-policy
```
### Secure outbound traffic to the backend service
To secure outbound traffic, you first create a client TLS policy that does the
following:
- Uses `google_cloud_private_spiffe` as the plugin for `clientCertificate`, which programs Envoy to use GKE managed mesh certificates as the client identity.
- Uses `google_cloud_private_spiffe` as the plugin for `serverValidationCa` which programs Envoy to use GKE managed mesh certificates for server validation.
Next, you attach the client TLS policy to the backend service. This does the
following:
- Applies the authentication policy from the client TLS policy to outbound connections to endpoints of the backend service.
- SAN (Subject Alternative Names) instructs the client to assert the exact identity of the server that it's connecting to.
1. Create the client TLS policy in a file `client-mtls-policy.yaml`:
```
name: "client-mtls-policy"
clientCertificate:
certificateProviderInstance:
pluginInstance: google_cloud_private_spiffe
serverValidationCa:
- certificateProviderInstance:
pluginInstance: google_cloud_private_spiffe
```
2. Import the client TLS policy:
```
gcloud network-security client-tls-policies import client-mtls-policy \
--source=client-mtls-policy.yaml --location=global
```
3. Attach the client TLS policy to the backend service. This enforces mTLS
authentication on all outbound requests from the client to this backend
service.
```
gcloud compute backend-services export td-gke-service \
--global --destination=demo-backend-service.yaml
```
Append the following lines to `demo-backend-service.yaml`:
```
securitySettings:
clientTlsPolicy: projects/PROJECT_ID/locations/global/clientTlsPolicies/client-mtls-policy
subjectAltNames:
- "spiffe://PROJECT_ID.svc.id.goog/ns/K8S_NAMESPACE/sa/DEMO_SERVER_KSA"
```
4. Import the values:
```
gcloud compute backend-services import td-gke-service \
--global --source=demo-backend-service.yaml
```
5. Optionally, run the following command to check whether the request fails.
This is an expected failure, because the client expects certificates from the
endpoint, but the endpoint is not programmed with a security policy.
```
# Get the name of the Podrunning Busybox.
BUSYBOX_POD=$(kubectl get po -l run=client -o=jsonpath='{.items[0].metadata.name}')
# Command to execute that tests connectivity to the service service-test.
TEST_CMD="wget -q -O - service-test; echo"
# Execute the test command on the pod.
kubectl exec -it $BUSYBOX_POD -c busybox -- /bin/sh -c "$TEST_CMD"
```
You see output such as this:
```
wget: server returned error: HTTP/1.1 503 Service Unavailable
```
### Secure inbound traffic to the endpoint
To secure inbound traffic, you first create a server TLS policy that does the
following:
- Uses `google_cloud_private_spiffe` as the plugin for `serverCertificate`, which programs Envoy to use GKE managed mesh certificates as the server identity.
- Uses `google_cloud_private_spiffe` as the plugin for `clientValidationCa`, which programs Envoy to use GKE managed mesh certificates for client validation.
1. Save the server TLS policy values in a file called `server-mtls-policy.yaml`.
```
name: "server-mtls-policy"
serverCertificate:
certificateProviderInstance:
pluginInstance: google_cloud_private_spiffe
mtlsPolicy:
clientValidationCa:
- certificateProviderInstance:
pluginInstance: google_cloud_private_spiffe
```
2. Create the server TLS policy:
```
gcloud network-security server-tls-policies import server-mtls-policy \
--source=server-mtls-policy.yaml --location=global
```
3. Create a file called `ep_mtls.yaml` that contains the endpoint matcher and
attach the server TLS policy.
```
endpointMatcher:
metadataLabelMatcher:
metadataLabelMatchCriteria: MATCH_ALL
metadataLabels:
- labelName: app
labelValue: payments
name: "ep"
serverTlsPolicy: projects/PROJECT_ID/locations/global/serverTlsPolicies/server-mtls-policy
type: SIDECAR_PROXY
```
4. Import the endpoint matcher.
```
gcloud network-services endpoint-policies import ep \
--source=ep_mtls.yaml --location=global
```
### Validate the setup
Run the following `curl` command. If the request finishes successfully, you
see `x-forwarded-client-cert` in the output. The header is printed only when
the connection is an mTLS connection.
```
# Get the name of the Podrunning Busybox.
BUSYBOX_POD=$(kubectl get po -l run=client -o=jsonpath='{.items[0].metadata.name}')
# Command to execute that tests connectivity to the service service-test.
TEST_CMD="wget -q -O - service-test; echo"
# Execute the test command on the pod.
kubectl exec -it $BUSYBOX_POD -c busybox -- /bin/sh -c "$TEST_CMD"
```
You see output such as the following:
```
GET /get HTTP/1.1
Host: service-test
content-length: 0
x-envoy-internal: true
accept: */*
x-forwarded-for: 10.48.0.6
x-envoy-expected-rq-timeout-ms: 15000
user-agent: curl/7.35.0
x-forwarded-proto: http
x-request-id: redacted
x-forwarded-client-cert: By=spiffe://PROJECT_ID.svc.id.goog/ns/K8S_NAMESPACE/sa/DEMO_SERVER_KSA;Hash=Redacted;Subject="Redacted;URI=spiffe://PROJECT_ID.svc.id.goog/ns/K8S_NAMESPACE/sa/DEMO_CLIENT_KSA
```
Note that the `x-forwarded-client-cert` header is inserted by the server side
Envoy and contains its own identity (server) and the identity of the source
client. Because we see both the client and server identities, this is a signal
of a mTLS connection.
### Configure service-level access with an authorization policy
These instructions create an authorization policy that allows requests that
are sent by the `DEMO_CLIENT_KSA` account in which the hostname is
`service-test`, the port is `8000`, and the HTTP method is `GET`. Before you
create authorization policies, read the caution in
[Restrict access using authorization](https://docs.cloud.google.com/service-mesh/v1.23/docs/service-routing/security-overview.md.txt#restrict-access-authz).
1. Create an authorization policy by creating a file called `authz-policy.yaml`.
```
action: ALLOW
name: authz-policy
rules:
- sources:
- principals:
- spiffe://PROJECT_ID.svc.id.goog/ns/K8S_NAMESPACE/sa/DEMO_CLIENT_KSA
destinations:
- hosts:
- service-test
ports:
- 8000
methods:
- GET
```
2. Import the policy:
```
gcloud network-security authorization-policies import authz-policy \
--source=authz-policy.yaml \
--location=global
```
3. Update the endpoint policy to reference the new authorization policy by
appending the following to the file `ep_mtls.yaml`:
```
authorizationPolicy: projects/PROJECT_ID/locations/global/authorizationPolicies/authz-policy
```
The endpoint policy now specifies that both mTLS and the authorization
policy must be enforced on inbound requests to Pods whose Envoy sidecar
proxies present the label `app:payments`.
4. Import the policy:
```
gcloud network-services endpoint-policies import ep \
--source=ep_mtls.yaml --location=global
```
### Validate the setup
Run the following commands to validate the setup.
```
# Get the name of the Podrunning Busybox.
BUSYBOX_POD=$(kubectl get po -l run=client -o=jsonpath='{.items[0].metadata.name}')
# Command to execute that tests connectivity to the service service-test.
# This is a valid request and will be allowed.
TEST_CMD="wget -q -O - service-test; echo"
# Execute the test command on the pod.
kubectl exec -it $BUSYBOX_POD -c busybox -- /bin/sh -c "$TEST_CMD"
```
The expected output is similar to this:
```
GET /get HTTP/1.1
Host: service-test
content-length: 0
x-envoy-internal: true
accept: */*
x-forwarded-for: redacted
x-envoy-expected-rq-timeout-ms: 15000
user-agent: curl/7.35.0
x-forwarded-proto: http
x-request-id: redacted
x-forwarded-client-cert: By=spiffe://PROJECT_ID.svc.id.goog/ns/K8S_NAMESPACE/sa/DEMO_SERVER_KSA;Hash=Redacted;Subject="Redacted;URI=spiffe://PROJECT_ID.svc.id.goog/ns/K8S_NAMESPACE/sa/DEMO_CLIENT_KSA
```
Run the following commands to test whether the authorization policy is
correctly refusing invalid requests:
```
# Failure case
# Command to execute that tests connectivity to the service service-test.
# This is an invalid request and server will reject because the server
# authorization policy only allows GET requests.
TEST_CMD="wget -q -O - service-test --post-data='' ; echo"
# Execute the test command on the pod.
kubectl exec -it $BUSYBOX_POD -c busybox -- /bin/sh -c "$TEST_CMD"
```
The expected output is similar to this:
```
```
## Set up ingress gateway security
This section assumes that you completed the service-to-service security section,
including setting up your GKE cluster with the sidecar auto-injector, creating
a certificate authority, and creating an endpoint policy.
In this section, you deploy an Envoy proxy as an ingress gateway that terminates
TLS connections and authorizes requests from a cluster's internal clients.
[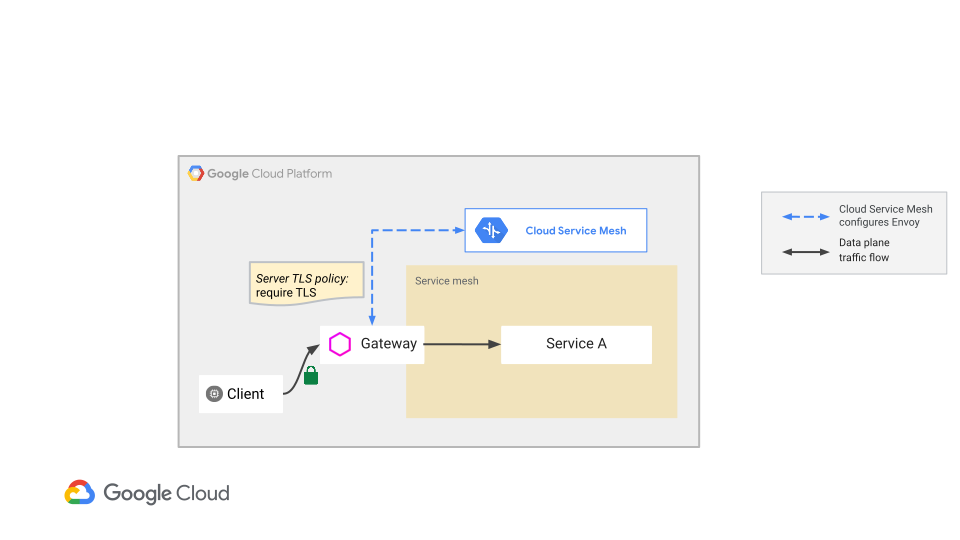](https://docs.cloud.google.com/static/service-mesh/v1.23/docs/images/td-security-tls-gateway.svg) Terminating TLS at an ingress gateway (click to enlarge)
To set up an ingress gateway to terminate TLS, do the following:
1. Deploy a Kubernetes service that is reachable using a cluster internal IP address.
1. The deployment consists of a standalone Envoy proxy that is exposed as a Kubernetes service and connects to Cloud Service Mesh.
2. Create a server TLS policy to to terminate TLS.
3. Create an authorization policy to authorize incoming requests.
### Deploy an ingress gateway service to GKE
Run the following command to deploy the ingress gateway service on
GKE:
```
wget -q -O - https://storage.googleapis.com/traffic-director/security/ga/gateway_sample_xdsv3.yaml | sed -e s/PROJECT_NUMBER_PLACEHOLDER/PROJNUM/g | sed -e s/NETWORK_PLACEHOLDER/default/g | sed -e s/DEMO_CLIENT_KSA_PLACEHOLDER/DEMO_CLIENT_KSA/g > gateway_sample.yaml
kubectl apply -f gateway_sample.yaml
```
The file `gateway_sample.yaml` is the spec for the ingress gateway. The following
sections describe some additions to the spec.
#### Disabling Cloud Service Mesh sidecar injection
The `gateway_sample.yaml` spec deploys an Envoy proxy as the sole container. In
previous steps, Envoy was injected as a sidecar to an application container. To
avoid having multiple Envoys handle requests, you can disable sidecar injection
for this Kubernetes service using the following statement:
```
sidecar.istio.io/inject: "false"
```
#### Mount the correct volume
The `gateway_sample.yaml` spec mounts the volume `gke-workload-certificates`.
This volume is used in sidecar deployment as well, but it is added automatically
by the sidecar injector when it sees the annotation
`cloud.google.com/enableManagedCerts: "true"`. The `gke-workload-certificates`
volume contains the GKE-managed SPIFFE certs and keys that are signed by the
CA Service instance that you set up.
#### Set the cluster's internal IP address
Configure the ingress gateway with a service of type `ClusterInternal`. This
creates an internally-resolvable DNS hostname for `mesh-gateway`. When a
client sends a request to `mesh-gateway:443`, Kubernetes
immediately routes the request to the ingress gateway Envoy deployment's port
`8080`.
### Enable TLS on an ingress gateway
Use these instructions to enable TLS on an ingress gateway.
1. Create a server TLS policy resource to terminate TLS connections, with the
values in a file called `server-tls-policy.yaml`:
```
description: tls server policy
name: server-tls-policy
serverCertificate:
certificateProviderInstance:
pluginInstance: google_cloud_private_spiffe
```
2. Import the server TLS policy:
```
gcloud network-security server-tls-policies import server-tls-policy \
--source=server-tls-policy.yaml --location=global
```
3. Create a new target `Gateway` and save it in the file `td-gke-gateway.yaml`.
This attaches the server TLS policy and configures the Envoy proxy ingress
gateway to terminate incoming TLS traffic.
```
name: td-gke-gateway
scope: gateway-proxy
ports:
- 8080
type: OPEN_MESH
serverTlsPolicy: projects/PROJECT_ID/locations/global/serverTlsPolicies/server-tls-policy
```
4. Import the gateway:
```
gcloud network-services gateways import td-gke-gateway \
--source=td-gke-gateway.yaml \
--location=global
```
5. Create and save a new `HTTPRoute` called `td-gke-route` that references
the gateway and routes all requests to `td-gke-service`.
```
name: td-gke-route
hostnames:
- mesh-gateway
gateways:
- projects/PROJECT_NUMBER/locations/global/gateways/td-gke-gateway
rules:
- action:
destinations:
- serviceName: "projects/PROJECT_NUMBER/locations/global/backendServices/td-gke-service"
```
6. Import the `HTTPRoute`:
```
gcloud network-services http-routes import td-gke-route \
--source=td-gke-route.yaml \
--location=global
```
7. Optionally, update the authorization policy on the backends to allow requests
when all of the following conditions are met:
- Requests sent by `DEMO_CLIENT_KSA`. (The ingress gateway deployment uses the `DEMO_CLIENT_KSA` service account.)
- Requests with host `mesh-gateway` or `service-test`
- Port: `8000`
You don't need to run these commands unless you configured an authorization
policy for your backends. If there is no authorization policy on the endpoint
or it does not contain host or source principal match in the authorization
policy, then request are allowed without this step. Add these values to
`authz-policy.yaml`.
```
action: ALLOW
name: authz-policy
rules:
- sources:
- principals:
- spiffe://PROJECT_ID.svc.id.goog/ns/K8S_NAMESPACE/sa/DEMO_CLIENT_KSA
destinations:
- hosts:
- service-test
- mesh-gateway
ports:
- 8000
methods:
- GET
```
8. Import the policy:
```
gcloud network-security authorization-policies import authz-policy \
--source=authz-policy.yaml \
--location=global
```
### Validate the ingress gateway deployment
You use a new container called `debug` to send requests to the ingress gateway
to validate the deployment.
In the following spec, the annotation `"sidecar.istio.io/inject":"false"` keeps
the Cloud Service Mesh sidecar injector from automatically injecting a sidecar
proxy. There is no sidecar to help the `debug` container in request routing.
The container must connect to the ingress gateway for routing.
The spec includes the `--no-check-certificate` flag, which ignores server
certificate validation. The `debug` container does not have the certificate
authority validation certificates necessary to valid certificates signed by
CA Service that are used by the ingress gateway to terminate
TLS.
In a production environment, we recommend that you [download the CA Service
validation certificate](https://docs.cloud.google.com/certificate-authority-service/docs/requesting-certificates#view_details_for_a_single_certificate) and mount or install it on
your client. After you install the validation certificate, remove the
`--no-check-certificate` option of the `wget` command.
Run the following command:
```
kubectl run -i --tty --rm debug --image=busybox --restart=Never --overrides='{ "metadata": {"annotations": { "sidecar.istio.io/inject":"false" } } }' -- /bin/sh -c "wget --no-check-certificate -qS -O - https://mesh-gateway; echo"
```
You see output similar to this:
```
GET / HTTP/1.1
Host: 10.68.7.132
x-forwarded-client-cert: By=spiffe://PROJECT_ID.svc.id.goog/ns/K8S_NAMESPACE/sa/DEMO_SERVER_KSA;Hash=Redacted;Subject="Redacted;URI=spiffe://PROJECT_ID.svc.id.goog/ns/K8S_NAMESPACE/sa/DEMO_CLIENT_KSA
x-envoy-expected-rq-timeout-ms: 15000
x-envoy-internal: true
x-request-id: 5ae429e7-0e18-4bd9-bb79-4e4149cf8fef
x-forwarded-for: 10.64.0.53
x-forwarded-proto: https
content-length: 0
user-agent: Wget
```
Run the following negative test command:
```
# Negative test
# Expect this to fail because gateway expects TLS.
kubectl run -i --tty --rm debug --image=busybox --restart=Never --overrides='{ "metadata": {"annotations": { "sidecar.istio.io/inject":"false" } } }' -- /bin/sh -c "wget --no-check-certificate -qS -O - http://mesh-gateway:443/headers; echo"
```
You see output similar to the following:
```
wget: error getting response: Connection reset by peer
```
Run the following negative test command:
```
# Negative test.
# AuthorizationPolicy applied on the endpoints expect a GET request. Otherwise
# the request is denied authorization.
kubectl run -i --tty --rm debug --image=busybox --restart=Never --overrides='{ "metadata": {"annotations": { "sidecar.istio.io/inject":"false" } } }' -- /bin/sh -c "wget --no-check-certificate -qS -O - https://mesh-gateway --post-data=''; echo"
```
You see output similar to the following:
```
HTTP/1.1 403 Forbidden
wget: server returned error: HTTP/1.1 403 Forbidden
```
## Delete the deployment
You can optionally run these commands to delete the deployment you created
using this guide.
To delete the cluster, run this command:
```
gcloud container clusters delete CLUSTER_NAME --zone ZONE --quiet
```
To delete the resources you created, run these commands:
```
gcloud compute backend-services delete td-gke-service --global --quiet
cloud compute network-endpoint-groups delete service-test-neg --zone ZONE --quiet
gcloud compute firewall-rules delete fw-allow-health-checks --quiet
gcloud compute health-checks delete td-gke-health-check --quiet
gcloud network-services endpoint-policies delete ep \
--location=global --quiet
gcloud network-security authorization-policies delete authz-gateway-policy \
--location=global --quiet
gcloud network-security authorization-policies delete authz-policy \
--location=global --quiet
gcloud network-security client-tls-policies delete client-mtls-policy \
--location=global --quiet
gcloud network-security server-tls-policies delete server-tls-policy \
--location=global --quiet
gcloud network-security server-tls-policies delete server-mtls-policy \
--location=global --quiet
```
## Limitations
Cloud Service Mesh service security is supported only with
GKE. You cannot deploy service security with Compute Engine.
## Troubleshooting
This section contains information on how to fix issues you encounter during
security service setup.
### Connection failures
If the connection fails with an`upstream connect` error or `disconnect/reset
before headers` error, examine the Envoy logs, where you might see one of
the following log messages:
`gRPC config stream closed: 5, Requested entity was not found`
`gRPC config stream closed: 2, no credential token is found`
If you see these errors in the Envoy log, it is likely that the service
account token is mounted incorrectly, or it is using a different `audience`, or
both.
For more information, see
[Error messages in the Envoy logs indicate a configuration
problem](https://docs.cloud.google.com/service-mesh/v1.23/docs/service-routing/troubleshooting#config_problem).
### Pods not created
To troubleshoot this issue, see
[Troubleshooting automatic deployments for GKE Pods](https://docs.cloud.google.com/service-mesh/v1.23/docs/service-routing/troubleshooting.md.txt#automatic-gke).
### Envoy not authenticating with Cloud Service Mesh
When Envoy (`envoy-proxy`) connects to Cloud Service Mesh to fetch the xDS
configuration, it uses Workload Identity Federation for GKE and the Compute Engine VM
default service account (unless the bootstrap was changed). If the
authentication fails, then Envoy does not get into the ready state.
### Unable to create a cluster with `--workload-identity-certificate-authority flag`
If you see this error, make sure that you're running the most recent version of
the Google Cloud CLI:
```
gcloud components update
```
### Pods remain in a pending state
If the Pods stay in a pending state during the setup process, increase the
CPU and memory resources for the Pods in your deployment spec.
### Unable to create cluster with the `--enable-mesh-certificates` flag
Ensure that you are running the latest version of the gcloud CLI:
```bash
gcloud components update
```
Note that the `--enable-mesh-certificates` flag works only with `gcloud beta`.
### Pods don't start
Pods that use GKE mesh certificates might fail to start if certificate provisioning
is failing. This can happen in situations like the following:
- The `WorkloadCertificateConfig` or the `TrustConfig` is misconfigured or missing.
- CSRs aren't being approved.
You can check whether certificate provisioning is failing by checking the Pod
events.
1. Check the status of your Pod:
```bash
kubectl get pod -n POD_NAMESPACE POD_NAME
```
Replace the following:
- `POD_NAMESPACE`: the namespace of your Pod.
- `POD_NAME`: the name of your Pod.
2. Check recent events for your Pod:
```bash
kubectl describe pod -n POD_NAMESPACE POD_NAME
```
3. If certificate provisioning is failing, you will see an event with
`Type=Warning`, `Reason=FailedMount`, `From=kubelet`, and a `Message` field that
begins with `MountVolume.SetUp failed for volume "gke-workload-certificates"`.
The `Message` field contains troubleshooting information.
Events:
Type Reason Age From Message
--- --- --- --- ---
Warning FailedMount 13s (x7 over 46s) kubelet MountVolume.SetUp failed for volume "gke-workload-certificates" : rpc error: code = Internal desc = unable to mount volume: store.CreateVolume, err: unable to create volume "csi-4d540ed59ef937fbb41a9bf5380a5a534edb3eedf037fe64be36bab0abf45c9c": caPEM is nil (check active WorkloadCertificateConfig)
4. See the following troubleshooting steps if the reason your Pods don't start
is because of misconfigured objects, or because of rejected CSRs.
#### `WorkloadCertificateConfig` or `TrustConfig` is misconfigured
Ensure that you created the `WorkloadCertificateConfig` and `TrustConfig`
objects correctly. You can diagnose misconfigurations on either of these
objects using `kubectl`.
1. Retrieve the current status.
For `WorkloadCertificateConfig`:
```bash
kubectl get WorkloadCertificateConfig default -o yaml
```
For `TrustConfig`:
```bash
kubectl get TrustConfig default -o yaml
```
2. Inspect the status output. A valid object will have a condition with
`type: Ready` and `status: "True"`.
status:
conditions:
- lastTransitionTime: "2021-03-04T22:24:11Z"
message: WorkloadCertificateConfig is ready
observedGeneration: 1
reason: ConfigReady
status: "True"
type: Ready
For invalid objects, `status: "False"` appears instead. The`reason`and
`message` field contain additional troubleshooting details.
#### CSRs are not approved
If something goes wrong during the CSR approval process, you can check the error
details in the `type: Approved` and `type: Issued` conditions of the CSR.
1. List relevant CSRs using `kubectl`:
```bash
kubectl get csr \
--field-selector='spec.signerName=spiffe.gke.io/spiffe-leaf-signer'
```
2. Choose a CSR that is either `Approved` and not `Issued`, or is not `Approved`.
3. Get details for the selected CSR using kubectl:
```bash
kubectl get csr CSR_NAME -o yaml
```
Replace `CSR_NAME` with the name of the CSR you chose.
A valid CSR has a condition with `type: Approved` and `status: "True"`, and a
valid certificate in the `status.certificate` field:
status:
certificate:
conditions:
- lastTransitionTime: "2021-03-04T21:58:46Z"
lastUpdateTime: "2021-03-04T21:58:46Z"
message: Approved CSR because it is a valid SPIFFE SVID for the correct identity.
reason: AutoApproved
status: "True"
type: Approved
Troubleshooting information for invalid CSRs appears in the `message` and
`reason` fields.
### Applications cannot use issued mTLS credentials
1. Verify that the certificate has not expired:
```bash
cat /var/run/secrets/workload-spiffe-credentials/certificates.pem | openssl x509 -text -noout | grep "Not After"
```
2. Check that the key type you used is supported by your application.
```bash
cat /var/run/secrets/workload-spiffe-credentials/certificates.pem | openssl x509 -text -noout | grep "Public Key Algorithm" -A 3
```
3. Check that the issuing CA uses the same key family as the certificate key.
1. Get the status of the CA Service ([Preview](https://cloud.google.com/products/#product-launch-stages))
instance:
```bash
gcloud privateca ISSUING_CA_TYPE describe ISSUING_CA_NAME \
--location ISSUING_CA_LOCATION
```
Replace the following:
- `ISSUING_CA_TYPE`: the issuing CA type, which must be either `subordinates` or `roots`.
- `ISSUING_CA_NAME`: the name of the issuing CA.
- `ISSUING_CA_LOCATION`: the region of the issuing CA.
2. Check that the `keySpec.algorithm` in the output is the same key algorithm
you defined in the [`WorkloadCertificateConfig` YAML manifest](https://docs.cloud.google.com/service-mesh/v1.23/docs/service-routing/security-envoy-setup.md.txt#issue-certs).
The output looks like this:
config:
...
subjectConfig:
commonName: td-sub-ca
subject:
organization: TestOrgLLC
subjectAltName: {}
createTime: '2021-05-04T05:37:58.329293525Z'
issuingOptions:
includeCaCertUrl: true
keySpec:
algorithm: RSA_PKCS1_2048_SHA256
...
### Certificates get rejected
1. Verify that the peer application uses the same trust bundle to verify the certificate.
2. Verify that the certificate has not expired:
```bash
cat /var/run/secrets/workload-spiffe-credentials/certificates.pem | openssl x509 -text -noout | grep "Not After"
```
3. Verify that the client code, if not using the gRPC Go [Credentials Reloading API](https://github.com/grpc/grpc-go/tree/master/security/advancedtls), periodically refreshes the credentials from the file system.
4. Verify that your workloads are in the same trust domain as your CA. GKE mesh certificates supports communication between workloads in a single trust domain.