<br />

This tutorial shows how to use [Cloud Service Mesh](https://docs.cloud.google.com/service-mesh/docs/overview.md.txt)
egress gateways and other Google Cloud controls to secure outbound traffic
(egress) from workloads deployed on a Google Kubernetes Engine cluster. The tutorial
is intended as a companion to the [Best Practices for using Cloud Service Mesh egress gateways on GKE clusters](https://docs.cloud.google.com/service-mesh/docs/security/egress-gateways-best-practices.md.txt).

The intended audience for this tutorial includes network, platform, and
security engineers who administer Google Kubernetes Engine clusters used by one or
more software delivery teams. The controls described here are especially useful
for organizations that must demonstrate compliance with regulations---for example,
[GDPR](https://gdpr.eu/) and [PCI](https://www.pcisecuritystandards.org/).

## Objectives

<br />

- Set up the infrastructure for running Cloud Service Mesh:
  - Custom [VPC network](https://docs.cloud.google.com/vpc) and private subnet
  - [Cloud NAT](https://docs.cloud.google.com/nat/docs/overview.md.txt#NATwithGKE) for internet access
  - [Private GKE cluster](https://docs.cloud.google.com/kubernetes-engine/docs/concepts/private-cluster-concept) with an extra node pool for egress gateway pods
  - Restrictive egress [VPC firewall rules](https://docs.cloud.google.com/vpc/docs/firewalls); only gateway nodes can reach external hosts
  - [Private Google Access](https://docs.cloud.google.com/vpc/docs/private-access-options.md.txt#pga) for connecting to [Container Registry](https://docs.cloud.google.com/container-registry) and Google APIs
- Install Cloud Service Mesh.
- Install egress gateway proxies running on a dedicated node pool.
- Configure multi-tenant routing rules for external traffic through the egress gateway:
  - Applications in namespace `team-x` can connect to `example.com`
  - Applications in namespace `team-y` can connect to `httpbin.org`
- Use the `Sidecar` resource to restrict the scope of the sidecar proxy egress configuration for each namespace.
- Configure authorization policies to enforce egress rules.
- Configure the egress gateway to upgrade plain HTTP requests to TLS (TLS origination).
- Configure the egress gateway to pass-through TLS traffic.
- Set up Kubernetes network policies as an additional egress control.
- Configure direct access to Google APIs using Private Google Access and Identity and Access Management (IAM) permissions.

## Costs

<br />


In this document, you use the following billable components of Google Cloud:


- [Compute Engine](https://cloud.google.com/compute/pricing/)
- [Google Kubernetes Engine (GKE)](https://cloud.google.com/kubernetes-engine/pricing)
- [Container Registry](https://cloud.google.com/container-registry/pricing)
- [Cloud Service Mesh](https://cloud.google.com/service-mesh/pricing)
- [Cloud Load Balancing](https://docs.cloud.google.com/vpc/network-pricing#lb)
- [Cloud NAT](https://docs.cloud.google.com/vpc/network-pricing#nat-pricing)
- [Networking](https://cloud.google.com/vpc/network-pricing)
- [Cloud Storage](https://cloud.google.com/storage/pricing/)


To generate a cost estimate based on your projected usage,
use the [pricing calculator](https://docs.cloud.google.com/products/calculator).
New Google Cloud users might be eligible for a [free trial](https://docs.cloud.google.com/free).

<br />

When you finish this tutorial, you can avoid ongoing costs by deleting the
resources you created. For more information, see [Cleaning up](https://docs.cloud.google.com/service-mesh/v1.21/docs/security/egress-gateway-gke-tutorial.md.txt#cleaning-up).

## Before you begin

<br />

1. In the Google Cloud console, on the project selector page,
   select or create a Google Cloud project.

   **Roles required to select or create a project**
   - **Select a project**: Selecting a project doesn't require a specific IAM role---you can select any project that you've been granted a role on.
   - **Create a project** : To create a project, you need the Project Creator role (`roles/resourcemanager.projectCreator`), which contains the `resourcemanager.projects.create` permission. [Learn how to grant
     roles](https://docs.cloud.google.com/iam/docs/granting-changing-revoking-access).

   > [!NOTE]
   > **Note**: If you don't plan to keep the resources that you create in this procedure, create a project instead of selecting an existing project. After you finish these steps, you can delete the project, removing all resources associated with the project.

   [Go to project selector](https://console.cloud.google.com/projectselector2/home/dashboard)
2.
   [Verify that billing is enabled for your Google Cloud project](https://docs.cloud.google.com/billing/docs/how-to/verify-billing-enabled.md.txt#confirm_billing_is_enabled_on_a_project).

3. In the Google Cloud console, activate Cloud Shell.

   [Activate Cloud Shell](https://console.cloud.google.com/?cloudshell=true)
4. Create a working directory to use while following the tutorial:

   ```bash
   mkdir -p ~/WORKING_DIRECTORY
   cd ~/WORKING_DIRECTORY
   ```
5. Create a shell script to initialize your environment for the tutorial.
   Replace and edit the variables according to your project and preferences.
   Run this script with the `source` command to reinitialize your environment
   if your shell session expires:

   ```bash
   cat << 'EOF' > ./init-egress-tutorial.sh
   #! /usr/bin/env bash
   PROJECT_ID=YOUR_PROJECT_ID
   REGION=REGION
   ZONE=ZONE

   gcloud config set project ${PROJECT_ID}
   gcloud config set compute/region ${REGION}
   gcloud config set compute/zone ${ZONE}

   EOF
   ```
6. Enable `compute.googleapis.com`:

   ```bash
   gcloud services enable compute.googleapis.com --project=YOUR_PROJECT_ID
   ```
7. Make the script executable and run it with the `source` command to
   initialize your environment. Select `Y` if prompted to enable
   `compute.googleapis.com`:

   ```bash
   chmod +x ./init-egress-tutorial.sh
   source ./init-egress-tutorial.sh
   ```
<br />

## Setting up the infrastructure

### Create a VPC network and subnet

1. Create a new VPC network:

   ```bash
   gcloud compute networks create vpc-network \
       --subnet-mode custom
   ```
2. Create a subnet for the cluster to run in with pre-assigned secondary
   IP address ranges for Pods and services. Private Google Access is
   enabled so that applications with only internal IP addresses can reach
   Google APIs and services:

   ```bash
   gcloud compute networks subnets create subnet-gke \
       --network vpc-network \
       --range 10.0.0.0/24 \
       --secondary-range pods=10.1.0.0/16,services=10.2.0.0/20 \
       --enable-private-ip-google-access
   ```

### Configure Cloud NAT

Cloud NAT allows workloads without external IP addresses to connect to
destinations on the internet and receive inbound responses from those
destinations.

> [!NOTE]
> **Note:** Cloud Router and Cloud NAT are used only to configure NAT for external internet connectivity; however, they are not actually in the path of network traffic. NAT configuration is applied at the software defined networking layer.

1. Create a Cloud Router:

   ```bash
   gcloud compute routers create nat-router \
       --network vpc-network
   ```
2. Add a NAT configuration to the router:

   ```bash
   gcloud compute routers nats create nat-config \
       --router nat-router \
       --nat-all-subnet-ip-ranges \
       --auto-allocate-nat-external-ips
   ```

### Create service accounts for each GKE node pool

Create two service accounts for use by the two GKE node
pools. A separate service account is assigned to each node pool so that you can
apply VPC firewall rules to specific nodes.

1. Create a service account for use by the nodes in the default node pool:

   ```bash
   gcloud iam service-accounts create sa-application-nodes \
       --description="SA for application nodes" \
       --display-name="sa-application-nodes"
   ```
2. Create a service account for use by the nodes in the gateway node pool:

   ```bash
   gcloud iam service-accounts create sa-gateway-nodes \
       --description="SA for gateway nodes" \
       --display-name="sa-gateway-nodes"
   ```

### Grant permissions to the service accounts

Add a minimal set of IAM roles to the application and gateway
service accounts. These roles are required for logging, monitoring, and
pulling private container images from Container Registry.

```bash
    project_roles=(
        roles/logging.logWriter
        roles/monitoring.metricWriter
        roles/monitoring.viewer
        roles/storage.objectViewer
    )
    for role in "${project_roles[@]}"
    do
        gcloud projects add-iam-policy-binding ${PROJECT_ID} \
            --member="serviceAccount:sa-application-nodes@${PROJECT_ID}.iam.gserviceaccount.com" \
            --role="$role"
        gcloud projects add-iam-policy-binding ${PROJECT_ID} \
            --member="serviceAccount:sa-gateway-nodes@${PROJECT_ID}.iam.gserviceaccount.com" \
            --role="$role"
    done
```

> [!NOTE]
> **Note:** If workloads on your GKE cluster need access to other Google Cloud services, create workload-specific service accounts with the least privileges possible. [Workload Identity Federation for GKE](https://docs.cloud.google.com/kubernetes-engine/docs/how-to/workload-identity.md.txt) allows IAM permissions to be assigned to specific workloads. Later, this tutorial explains how to configure IAM access so that a particular workload can read a file in a Cloud Storage bucket.

### Creating the firewall rules

In the following steps, you apply a firewall rule to the VPC network so that,
by default, all egress traffic is denied. Specific connectivity is required for
the cluster to function and for gateway nodes to be able to reach destinations
outside of the VPC. A minimal set of specific firewall rules overrides the
default deny-all rule to allow the necessary connectivity.

1. Create a default (low priority) firewall rule to deny all egress from
   the VPC network:

   ```bash
   gcloud compute firewall-rules create global-deny-egress-all \
       --action DENY \
       --direction EGRESS \
       --rules all \
       --destination-ranges 0.0.0.0/0 \
       --network vpc-network \
       --priority 65535 \
       --description "Default rule to deny all egress from the network."
   ```
2. Create a rule to allow only those nodes with the gateway service
   account to reach the internet:

   ```bash
   gcloud compute firewall-rules create gateway-allow-egress-web \
       --action ALLOW \
       --direction EGRESS \
       --rules tcp:80,tcp:443 \
       --target-service-accounts sa-gateway-nodes@${PROJECT_ID}.iam.gserviceaccount.com \
       --network vpc-network \
       --priority 1000 \
       --description "Allow the nodes running the egress gateways to connect to the web"
   ```
3. Allow nodes to the reach the Kubernetes control plane:

   ```bash
   gcloud compute firewall-rules create allow-egress-to-api-server \
       --action ALLOW \
       --direction EGRESS \
       --rules tcp:443,tcp:10250 \
       --target-service-accounts sa-application-nodes@${PROJECT_ID}.iam.gserviceaccount.com,sa-gateway-nodes@${PROJECT_ID}.iam.gserviceaccount.com \
       --destination-ranges 10.5.0.0/28 \
       --network vpc-network \
       --priority 1000 \
       --description "Allow nodes to reach the Kubernetes API server."
   ```
4. Optional: This firewall rule is not needed if you use Managed Cloud Service Mesh.

   Cloud Service Mesh uses webhooks when injecting sidecar proxies into
   workloads. Allow the GKE API server to call the webhooks
   exposed by the service mesh control plane running on the nodes:

   ```bash
   gcloud compute firewall-rules create allow-ingress-api-server-to-webhook \
       --action ALLOW \
       --direction INGRESS \
       --rules tcp:15017 \
       --target-service-accounts sa-application-nodes@${PROJECT_ID}.iam.gserviceaccount.com,sa-gateway-nodes@${PROJECT_ID}.iam.gserviceaccount.com \
       --source-ranges 10.5.0.0/28 \
       --network vpc-network \
       --priority 1000 \
       --description "Allow the API server to call the webhooks exposed by istiod discovery"
   ```
5. Allow egress connectivity between Nodes and Pods running on the
   cluster. GKE automatically creates a
   corresponding ingress rule. No rule is required for Service connectivity
   because the iptables routing chain always converts Service IP addresses to
   Pod IP addresses.

   ```bash
   gcloud compute firewall-rules create allow-egress-nodes-and-pods \
       --action ALLOW \
       --direction EGRESS \
       --rules all \
       --target-service-accounts sa-application-nodes@${PROJECT_ID}.iam.gserviceaccount.com,sa-gateway-nodes@${PROJECT_ID}.iam.gserviceaccount.com \
       --destination-ranges 10.0.0.0/24,10.1.0.0/16 \
       --network vpc-network \
       --priority 1000 \
       --description "Allow egress to other Nodes and Pods"
   ```
6. Allow access to the reserved sets of IP addresses used by
   Private Google Access for serving Google APIs,
   Container Registry, and other services:

   ```bash
   gcloud compute firewall-rules create allow-egress-gcp-apis \
       --action ALLOW \
       --direction EGRESS \
       --rules tcp \
       --target-service-accounts sa-application-nodes@${PROJECT_ID}.iam.gserviceaccount.com,sa-gateway-nodes@${PROJECT_ID}.iam.gserviceaccount.com \
       --destination-ranges 199.36.153.8/30 \
       --network vpc-network \
       --priority 1000 \
       --description "Allow access to the VIPs used by Google Cloud APIs (Private Google Access)"
   ```

   > [!IMPORTANT]
   >
   > If you are using
   > [VPC Service Controls](https://docs.cloud.google.com/vpc-service-controls), use
   > 199.36.153.8/30 instead. For more information, see the following section..
   >
   >
   > As an alternative to using the reserved set of internal IP addresses, you
   > can expose a [Private Service Connect](https://docs.cloud.google.com/vpc/docs/configure-private-service-connect-apis.md.txt) endpoint with an internal IP
   > address of your choice.

7. Allow the Google Cloud health checker service to access pods
   running in the cluster. See [health checks](https://docs.cloud.google.com/load-balancing/docs/health-checks.md.txt):
   for more information.

   ```bash
   gcloud compute firewall-rules create allow-ingress-gcp-health-checker \
       --action ALLOW \
       --direction INGRESS \
       --rules tcp:80,tcp:443 \
       --target-service-accounts sa-application-nodes@${PROJECT_ID}.iam.gserviceaccount.com,sa-gateway-nodes@${PROJECT_ID}.iam.gserviceaccount.com \
       --source-ranges 35.191.0.0/16,130.211.0.0/22,209.85.152.0/22,209.85.204.0/22 \
       --network vpc-network \
       --priority 1000 \
       --description "Allow workloads to respond to Google Cloud health checks"
   ```

### Configuring private access to Google Cloud APIs

Private Google Access enables VMs and Pods that only have internal IP
addresses to access Google APIs and services. Although Google APIs and services
are served from external IPs, traffic from the nodes never leaves the Google
network when using Private Google Access.

> [!IMPORTANT]
>
> Private Google Access provides [different options and VIPs](https://docs.cloud.google.com/vpc/docs/private-access-options.md.txt#private-vips) for connecting to Google APIs and services. This
> tutorial uses private.googleapis.com and its corresponding VIP. If you use
> [VPC Service Controls](https://docs.cloud.google.com/vpc-service-controls) and want to block
> access to APIs that do not support VPC Service Controls, use
> restricted.googleapis.com and the 199.36.153.8/30 VIP.
>
>
> As an alternative to using the reserved set of internal IP addresses, you
> can expose APIs using [Private Service Connect](https://docs.cloud.google.com/vpc/docs/configure-private-service-connect-apis.md.txt)
> endpoints with IP addresses of your choice.
>
>
Enable the Cloud DNS API:

```bash
gcloud services enable dns.googleapis.com
```

Create a private DNS zone, a `CNAME`, and `A` records so that nodes and
workloads can connect to Google APIs and services using
Private Google Access and the `private.googleapis.com` hostname:

```bash
gcloud dns managed-zones create private-google-apis \
    --description "Private DNS zone for Google APIs" \
    --dns-name googleapis.com \
    --visibility private \
    --networks vpc-network

gcloud dns record-sets transaction start --zone private-google-apis

gcloud dns record-sets transaction add private.googleapis.com. \
    --name "*.googleapis.com" \
    --ttl 300 \
    --type CNAME \
    --zone private-google-apis

gcloud dns record-sets transaction add "199.36.153.8" \
"199.36.153.9" "199.36.153.10" "199.36.153.11" \
    --name private.googleapis.com \
    --ttl 300 \
    --type A \
    --zone private-google-apis

gcloud dns record-sets transaction execute --zone private-google-apis
```

### Configuring private access to Container Registry

Create a private DNS zone, a `CNAME` and an `A` record so that nodes can
connect to Container Registry using Private Google Access and the
`gcr.io` hostname:

```bash
gcloud dns managed-zones create private-gcr-io \
    --description "private zone for Container Registry" \
    --dns-name gcr.io \
    --visibility private \
    --networks vpc-network

gcloud dns record-sets transaction start --zone private-gcr-io

gcloud dns record-sets transaction add gcr.io. \
    --name "*.gcr.io" \
    --ttl 300 \
    --type CNAME \
    --zone private-gcr-io

gcloud dns record-sets transaction add "199.36.153.8" "199.36.153.9" "199.36.153.10" "199.36.153.11" \
    --name gcr.io \
    --ttl 300 \
    --type A \
    --zone private-gcr-io

gcloud dns record-sets transaction execute --zone private-gcr-io
```

### Create a private GKE cluster

1. Find the external IP address of your Cloud Shell so that you
   can add it to the list of networks that are allowed to access your
   cluster's API server:

   ```bash
   SHELL_IP=$(dig TXT -4 +short @ns1.google.com o-o.myaddr.l.google.com)
   ```

   After a period of inactivity, the external IP address of your
   Cloud Shell VM can change. If that happens, you must update your
   cluster's list of authorized networks. Add the following command to your
   initialization script:

   ```bash
   cat << 'EOF' >> ./init-egress-tutorial.sh
   SHELL_IP=$(dig TXT -4 +short @ns1.google.com o-o.myaddr.l.google.com)
   gcloud container clusters update cluster1 \
       --enable-master-authorized-networks \
       --master-authorized-networks ${SHELL_IP//\"}/32
   EOF
   ```
2. Enable the Google Kubernetes Engine API:

   ```bash
   gcloud services enable container.googleapis.com
   ```
3. Create a private GKE cluster:

   ```bash
   gcloud container clusters create cluster1 \
       --enable-ip-alias \
       --enable-private-nodes \
       --release-channel "regular" \
       --enable-master-authorized-networks \
       --master-authorized-networks ${SHELL_IP//\"}/32 \
       --master-ipv4-cidr 10.5.0.0/28 \
       --enable-dataplane-v2 \
       --service-account "sa-application-nodes@${PROJECT_ID}.iam.gserviceaccount.com" \
       --machine-type "e2-standard-4" \
       --network "vpc-network" \
       --subnetwork "subnet-gke" \
       --cluster-secondary-range-name "pods" \
       --services-secondary-range-name "services" \
       --workload-pool "${PROJECT_ID}.svc.id.goog" \
       --zone ${ZONE}
   ```

   It takes a few minutes for the cluster to be created. The cluster has
   private nodes with internal IP addresses. Pods and services are assigned
   IPs from the named secondary ranges that you defined when creating the VPC
   subnet.

   Cloud Service Mesh with an in-cluster control plane requires the cluster
   nodes to use a machine type that has at least 4 vCPUs.

   Google recommends that the cluster be subscribed to the "regular" release
   channel to ensure that nodes are running a Kubernetes version that is
   supported by Cloud Service Mesh.

   For more information on the prerequisites for running Cloud Service Mesh
   with an in-cluster control plane, see the
   [in-cluster prerequisites](https://docs.cloud.google.com/service-mesh/docs/unified-install/anthos-service-mesh-prerequisites#cluster_requirements).

   For more information on the requirements and limitations for running
   managed Cloud Service Mesh see the
   [managed Cloud Service Mesh supported features](https://docs.cloud.google.com/service-mesh/docs/managed/supported-features-mcp).

   [Workload Identity Federation for GKE](https://docs.cloud.google.com/kubernetes-engine/docs/how-to/workload-identity.md.txt) is
   enabled on the cluster. Cloud Service Mesh requires Workload Identity Federation for GKE and
   is the recommended way to access Google APIs from GKE
   workloads.
4. Create a node pool called *gateway* . This node pool is where the egress
   gateway is deployed. The `dedicated=gateway:NoSchedule` [taint](https://docs.cloud.google.com/kubernetes-engine/docs/how-to/node-taints)
   is added to every node in the gateway node pool.

   ```bash
   gcloud container node-pools create "gateway" \
       --cluster "cluster1" \
       --machine-type "e2-standard-4" \
       --node-taints dedicated=gateway:NoSchedule \
       --service-account "sa-gateway-nodes@${PROJECT_ID}.iam.gserviceaccount.com" \
       --num-nodes "1"
   ```

   Kubernetes [taints and tolerations](https://docs.cloud.google.com/kubernetes-engine/docs/how-to/node-taints)
   help ensure that only egress gateway Pods run on nodes in the gateway node
   pool.
5. Download credentials so that you can connect to the cluster with kubectl:

   ```bash
   gcloud container clusters get-credentials cluster1
   ```
6. Verify that the gateway nodes have the correct taint:

   ```bash
   kubectl get nodes -l cloud.google.com/gke-nodepool=gateway -o yaml \
   -o=custom-columns='name:metadata.name,taints:spec.taints[?(@.key=="dedicated")]'
   ```

   The output is similar to the following:

       name                                 taints
       gke-cluster1-gateway-9d65b410-cffs   map[effect:NoSchedule key:dedicated value:gateway]

## Installing and setting up Cloud Service Mesh

Follow one of the installation guides for Cloud Service Mesh:

- [Managed Cloud Service Mesh](https://docs.cloud.google.com/service-mesh/docs/managed/provision-managed-anthos-service-mesh)
- [In-cluster Cloud Service Mesh](https://docs.cloud.google.com/service-mesh/docs/unified-install/anthos-service-mesh-prerequisites)

Once you have installed Cloud Service Mesh, stop and return to this tutorial
without installing ingress or egress gateways.

### Install an egress gateway

1. Create a Kubernetes namespace for the egress gateway:

   ```bash
   kubectl create namespace istio-egress
   ```
2. Enable the namespace for injection. The steps depend on your [control plane implementation](https://docs.cloud.google.com/service-mesh/docs/check-control-plane-implementation.md.txt).

   ### Managed (TD)

   Apply the default injection label to the namespace:

   ```bash
   kubectl label namespace istio-egress \
       istio.io/rev- istio-injection=enabled --overwrite
   ```

   ### Managed (Istiod)

   **Recommended:** Run the following command to apply the default injection label to the namespace:

   ```bash
     kubectl label namespace istio-egress \
         istio.io/rev- istio-injection=enabled --overwrite
   ```

   **If you are an existing user with the Managed Istiod control plane:**
   We recommend that you use default injection, but revision-based injection is
   supported. Use the following instructions:
   1. Run the following command to locate the available release channels:

      ```bash
      kubectl -n istio-system get controlplanerevision
      ```

      The output is similar to the following:

          NAME                AGE
          asm-managed-rapid   6d7h

      > [!NOTE]
      > **Note:** If two control plane revisions appear in the list above, remove one. Having multiple control plane channels in the cluster is not supported.

      In the output, the value under the `NAME` column is the revision label that corresponds to the available [release channel](https://docs.cloud.google.com/service-mesh/docs/managed/select-a-release-channel#anthos_service_mesh_versions_per_channel) for the Cloud Service Mesh version.
   2. Apply the revision label to the namespace:

      ```bash
      kubectl label namespace istio-egress \
          istio-injection- istio.io/rev=REVISION_LABEL --overwrite
      ```

   ### In-cluster

   **Recommended:** Run the following command to apply the default injection label to the namespace:

   ```bash
     kubectl label namespace istio-egress \
         istio.io/rev- istio-injection=enabled --overwrite
   ```

   **We recommend that you use default injection, but revision-based injection is supported:**
   Use the following instructions:
   1. Use the following command to locate the revision label on `istiod`:

      ```bash
      kubectl get deploy -n istio-system -l app=istiod -o \
         jsonpath={.items[*].metadata.labels.'istio\.io\/rev'}'{"\n"}'
      ```
   2. Apply the revision label to the namespace. In the following command,
      `REVISION_LABEL` is the value of the `istiod` revision
      label that you noted in the previous step.

      ```bash
      kubectl label namespace istio-egress \
          istio-injection- istio.io/rev=REVISION_LABEL --overwrite
      ```
3. Create an [operator manifest](https://istio.io/latest/docs/reference/config/istio.operator.v1alpha1/)
   for the egress gateway:

   ```bash
   cat << EOF > egressgateway-operator.yaml
   apiVersion: install.istio.io/v1alpha1
   kind: IstioOperator
   metadata:
     name: egressgateway-operator
     annotations:
       config.kubernetes.io/local-config: "true"
   spec:
     profile: empty
     revision: REVISION
     components:
       egressGateways:
       - name: istio-egressgateway
         namespace: istio-egress
         enabled: true
     values:
       gateways:
         istio-egressgateway:
           injectionTemplate: gateway
           tolerations:
             - key: "dedicated"
               operator: "Equal"
               value: "gateway"
           nodeSelector:
             cloud.google.com/gke-nodepool: "gateway"
   EOF
   ```
4. Download the `istioctl` tool. You must use version 1.16.2-asm.2 or newer even
   if you are using Cloud Service Mesh version 1.15 or lower. See
   [Downloading the correct istioctl version](https://docs.cloud.google.com/service-mesh/docs/downloading-istioctl.md.txt).

5. After extracting the downloaded archive, set an environment variable to hold
   the path to the `istioctl` tool and add it to your initialization script:

   ```bash
   ISTIOCTL=$(find "$(pwd -P)" -name istioctl)
   echo "ISTIOCTL=\"${ISTIOCTL}\"" >> ./init-egress-tutorial.sh
   ```
6. Create the egress gateway installation manifest using the operator
   manifest and `istioctl`:

   ```bash
   ${ISTIOCTL} manifest generate \
       --filename egressgateway-operator.yaml \
       --output egressgateway \
       --cluster-specific
   ```

   > [!IMPORTANT]
   > You can view the generated manifest at
   > 'egressgateway/Base/Pilot/EgressGateways/EgressGateways.yaml'.
   >
   > When deployed it creates standard Kubernetes resources such as
   > Deployment, Service, ServiceAccount, Role, RoleBinding,
   > HorizontalPodAutoscaler, and PodDisruptionBudget. Using istioctl and the
   > operator manifest are a convenient way to generate the deployment manifest.
   > For your own production mesh you can generate and manage the deployment
   > manifest using your preferred tools.

7. Install the egress gateway:

   ```bash
   kubectl apply --recursive --filename egressgateway/
   ```
8. Check that the egress gateway is running on nodes in the `gateway` node
   pool:

   ```bash
   kubectl get pods -n istio-egress -o wide
   ```
9. The egress gateway pods have `affinity` for nodes in the `gateway` node pool
   and a toleration that lets them run on the tainted gateway nodes. Examine
   the node affinity and tolerations for the egress gateway pods:

   ```bash
   kubectl -n istio-egress get pod -l istio=egressgateway \
       -o=custom-columns='name:metadata.name,node-affinity:spec.affinity.nodeAffinity.requiredDuringSchedulingIgnoredDuringExecution.nodeSelectorTerms,tolerations:spec.tolerations[?(@.key=="dedicated")]'
   ```

   The output is similar to the following:

       name                                   node-affinity                                                                                   tolerations
       istio-egressgateway-754d9684d5-jjkdz   [map[matchExpressions:[map[key:cloud.google.com/gke-nodepool operator:In values:[gateway]]]]]   map[key:dedicated operator:Equal value:gateway]

> [!CAUTION]
> **Caution**
>
> The operator manifest for the egress gateway specifies a toleration and a
> nodeSelector so that the deployed gateway will only run on gateway nodes.
>
> Make sure that only network administrators can apply the gateway toleration
> to Pods. Unauthorized use of the gateway toleration allows deployed pods to
> impersonate the gateway and run on gateway nodes. Pods running on gateway nodes
> can connect directly to external hosts. Restrict use of the gateway toleration
> as part of deployment pipelines or by using Kubernetes admission control. An
> [GKE Enterprise Policy Controller](https://docs.cloud.google.com/anthos-config-management/docs/concepts/policy-controller) constraint can be used in both scenarios.

### Enable Envoy access logging

The steps required to enable Envoy access logs depend on your Cloud Service Mesh
type, either managed or in-cluster:

### Managed

Follow the instructions to
[enable access logs in managed Cloud Service Mesh](https://docs.cloud.google.com/service-mesh/docs/managed/enable-managed-anthos-service-mesh-optional-features#envoy_access_logs).

### In-cluster

Follow the instructions to
[enable access logs in in-cluster Cloud Service Mesh](https://docs.cloud.google.com/service-mesh/docs/unified-install/options/enable-optional-features#enable_access_logs).

## Preparing the mesh and a test application

1. Make sure that STRICT mutual TLS is enabled. Apply a default
   `PeerAuthentication` policy for the mesh in the `istio-system` namespace:

   ```yaml
   cat <<EOF | kubectl apply -f -
   apiVersion: "security.istio.io/v1beta1"
   kind: "PeerAuthentication"
   metadata:
     name: "default"
     namespace: "istio-system"
   spec:
     mtls:
       mode: STRICT
   EOF
   ```

   You can override this configuration by creating `PeerAuthentication`
   resources in specific namespaces.
2. Create namespaces to use for deploying test workloads. Later steps in
   this tutorial explain how to configure different egress routing rules for
   each namespace.

   ```bash
   kubectl create namespace team-x
   kubectl create namespace team-y
   ```
3. Label the namespaces so that they can be selected by Kubernetes network
   policies:

   ```bash
   kubectl label namespace team-x team=x
   kubectl label namespace team-y team=y
   ```
4. For Cloud Service Mesh to automatically inject proxy sidecars, you
   set the control plane revision label on the workload namespaces:

   ```bash
   kubectl label ns team-x istio.io/rev- istio-injection=enabled --overwrite
   kubectl label ns team-y istio.io/rev- istio-injection=enabled --overwrite
   ```
5. Create a YAML file to use for making test deployments:

   ```yaml
   cat << 'EOF' > ./test.yaml
   apiVersion: v1
   kind: ServiceAccount
   metadata:
     name: test
   ---
   apiVersion: v1
   kind: Service
   metadata:
     name: test
     labels:
       app: test
   spec:
     ports:
     - port: 80
       name: http
     selector:
       app: test
   ---
   apiVersion: apps/v1
   kind: Deployment
   metadata:
     name: test
   spec:
     replicas: 1
     selector:
       matchLabels:
         app: test
     template:
       metadata:
         labels:
           app: test
       spec:
         serviceAccountName: test
         containers:
         - name: test
           image: gcr.io/google.com/cloudsdktool/cloud-sdk:slim
           command: ["/bin/sleep", "infinity"]
           imagePullPolicy: IfNotPresent
   EOF
   ```
6. Deploy the test application to the `team-x` namespace:

   ```bash
   kubectl -n team-x create -f ./test.yaml
   ```
7. Verify that the test application is deployed to a node in the default
   pool and that a proxy sidecar container is injected. Repeat the following
   command until the pod's status is `Running`:

       kubectl -n team-x get po -l app=test -o wide

   The output is similar to the following:

       NAME                   READY   STATUS    RESTARTS   AGE   IP          NODE                                      NOMINATED NODE   READINESS GATES
       test-d5bdf6f4f-9nxfv   2/2     Running   0          19h   10.1.1.25   gke-cluster1-default-pool-f6c7a51f-wbzj

   2 out of 2 containers are `Running`. One container is the test
   application and the other is the proxy sidecar.

   The Pod is running on a node in the default node pool.
8. Verify that it is not possible to make an HTTP request from the test
   container to an external site:

   ```bash
   kubectl -n team-x exec -it \
       $(kubectl -n team-x get pod -l app=test -o jsonpath={.items..metadata.name}) \
       -c test -- curl -v http://example.com
   ```

   An error message from the sidecar proxy is generated because the
   `global-deny-egress-all` firewall rule denies the upstream connection.

## Using the Sidecar resource to restrict the scope of sidecar proxy configuration

You can use the
[Sidecar resource](https://istio.io/v1.21/docs/reference/config/networking/sidecar/)
to restrict the scope of the egress listener that is configured for sidecar
proxies. To reduce configuration bloat and memory usage, it's a good practice to
apply a default `Sidecar` resource for every namespace.

The proxy that Cloud Service Mesh runs in the sidecar is Envoy. In
[Envoy terminology](https://www.envoyproxy.io/docs/envoy/latest/intro/arch_overview/intro/terminology),
a `cluster` is a logically similar group of upstream endpoints used as
destinations for load balancing.

1. Inspect the outbound clusters configured in the Envoy sidecar proxy for
   the test pod by running the `istioctl proxy-config` command:

   ```bash
   ${ISTIOCTL} pc c $(kubectl -n team-x get pod -l app=test \
       -o jsonpath={.items..metadata.name}).team-x --direction outbound
   ```

   There are approximately 11 Envoy clusters in the list, including some
   for the egress gateway.
2. Restrict the proxy configuration to egress routes that have been
   explicitly defined with [service entries](https://istio.io/latest/docs/reference/config/networking/service-entry/)
   in the egress and `team-x` namespaces. Apply a `Sidecar` resource to the
   `team-x` namespace:

   ```yaml
   cat <<EOF | kubectl apply -f -
   apiVersion: networking.istio.io/v1beta1
   kind: Sidecar
   metadata:
     name: default
     namespace: team-x
   spec:
     outboundTrafficPolicy:
       mode: REGISTRY_ONLY
     egress:
     - hosts:
       - 'istio-egress/*'
       - 'team-x/*'
   EOF
   ```

   Setting outbound traffic policy mode to `REGISTRY_ONLY` restricts the
   proxy configuration to include only those external hosts that have been
   explicitly added to the mesh's service registry by defining service entries.

   Setting `egress.hosts` specifies that the sidecar proxy only selects
   routes from the egress namespace that are made available by using
   the `exportTo` attribute. The '`team-x/*`' part includes any routes that
   have been configured locally in the `team-x` namespace.
3. View the outbound clusters configured in the Envoy sidecar proxy, and
   compare them to the list of clusters that were configured before applying
   the `Sidecar` resource:

   ```bash
   ${ISTIOCTL} pc c $(kubectl -n team-x get pod -l app=test \
       -o jsonpath={.items..metadata.name}).team-x --direction outbound
   ```

   You see clusters for the egress gateway and one for the test pod itself.

## Configuring Cloud Service Mesh to route traffic through the egress gateway

1. Configure a `Gateway` for HTTP traffic on port 80. The `Gateway`
   selects the egress gateway proxy that you deployed to the
   egress namespace. The `Gateway` configuration is applied to the egress
   namespace and handles traffic for any host.

   ```yaml
   cat <<EOF | kubectl apply -f -
   apiVersion: networking.istio.io/v1beta1
   kind: Gateway
   metadata:
     name: egress-gateway
     namespace: istio-egress
   spec:
     selector:
       istio: egressgateway
     servers:
     - port:
         number: 80
         name: https
         protocol: HTTPS
       hosts:
         - '*'
       tls:
         mode: ISTIO_MUTUAL
   EOF
   ```
2. Create a `DestinationRule` for the egress gateway with mutual TLS for
   authentication and encryption. Use a single shared destination rule for all
   external hosts.

   ```yaml
   cat <<EOF | kubectl apply -f -
   apiVersion: networking.istio.io/v1beta1
   kind: DestinationRule
   metadata:
     name: target-egress-gateway
     namespace: istio-egress
   spec:
     host: istio-egressgateway.istio-egress.svc.cluster.local
     subsets:
     - name: target-egress-gateway-mTLS
       trafficPolicy:
         tls:
           mode: ISTIO_MUTUAL
   EOF
   ```
3. Create a `ServiceEntry` in the egress namespace to explicitly
   register example.com in the mesh's service registry for the `team-x`
   namespace:

   ```yaml
   cat <<EOF | kubectl apply -f -
   apiVersion: networking.istio.io/v1beta1
   kind: ServiceEntry
   metadata:
     name: example-com-ext
     namespace: istio-egress
     labels:
       # Show this service and its telemetry in the Cloud Service Mesh page of the Google Cloud console
       service.istio.io/canonical-name: example.com
   spec:
     hosts:
     - example.com
     ports:
     - number: 80
       name: http
       protocol: HTTP
     - number: 443
       name: tls
       protocol: TLS
     resolution: DNS
     location: MESH_EXTERNAL
     exportTo:
     - 'team-x'
     - 'istio-egress'
   EOF
   ```

   > [!IMPORTANT]
   > **Configuring different egress routing for each namespace**
   >
   > The [\`exportTo\`](https://istio.io/v1.21/docs/reference/config/networking/service-entry/#ServiceEntry-export_to) property controls which namespaces can use
   > the service entry. Network administrators use service entries to centrally
   > control the set of external hosts available to each namespace. Configure
   > Kubernetes RBAC permissions so that only network administrators can directly
   > create and modify service entries. Consider creating automation with an
   > approval workflow so that application developers can request access to new
   > external hosts.

4. Create a `VirtualService` to route traffic to example.com through the
   egress gateway. There are two match conditions: the first condition directs
   traffic to the egress gateway, and the second directs traffic from the
   egress gateway to the destination host. The `exportTo` property controls
   which namespaces can use the virtual service.

   ```yaml
   cat <<EOF | kubectl apply -f -
   apiVersion: networking.istio.io/v1beta1
   kind: VirtualService
   metadata:
     name: example-com-through-egress-gateway
     namespace: istio-egress
   spec:
     hosts:
     - example.com
     gateways:
     - istio-egress/egress-gateway
     - mesh
     http:
     - match:
       - gateways:
         - mesh
         port: 80
       route:
       - destination:
           host: istio-egressgateway.istio-egress.svc.cluster.local
           subset: target-egress-gateway-mTLS
           port:
             number: 80
         weight: 100
     - match:
       - gateways:
         - istio-egress/egress-gateway
         port: 80
       route:
       - destination:
           host: example.com
           port:
             number: 80
         weight: 100
     exportTo:
     - 'istio-egress'
     - 'team-x'
   EOF
   ```
5. Run `istioctl analyze` to check for configuration errors:

   ```bash
   ${ISTIOCTL} analyze -n istio-egress --revision REVISION
   ```

   The output is similar to the following:

       ✔ No validation issues found when analyzing namespace: istio-egress.

6. Send several requests through the egress gateway to the external site:

   ```bash
   for i in {1..4}
   do
       kubectl -n team-x exec -it $(kubectl -n team-x get pod -l app=test \
           -o jsonpath={.items..metadata.name}) -c test -- \
       curl -s -o /dev/null -w "%{http_code}\n" http://example.com
   done
   ```

   You see `200` status codes for all four responses.
7. Verify that the requests were directed through the egress gateway by
   checking the proxy access logs. First check the access log for the proxy
   sidecar deployed with the test application:

   ```bash
   kubectl -n team-x logs -f $(kubectl -n team-x get pod -l app=test \
       -o jsonpath={.items..metadata.name}) istio-proxy
   ```

   For each request you send, you see a log entry similar to the following:

       [2020-09-14T17:37:08.045Z] "HEAD / HTTP/1.1" 200 - "-" "-" 0 0 5 4 "-" "curl/7.67.0" "d57ea5ad-90e9-46d9-8b55-8e6e404a8f9b" "example.com" "10.1.4.12:8080" outbound|80||istio-egressgateway.istio-egress.svc.cluster.local 10.1.0.17:42140 93.184.216.34:80 10.1.0.17:60326 - -

8. Also check the egress gateway access log:

   ```bash
   kubectl -n istio-egress logs -f $(kubectl -n istio-egress get pod -l istio=egressgateway \
       -o jsonpath="{.items[0].metadata.name}") istio-proxy
   ```

   For each request you send, you see an egress gateway access log entry
   similar to the following:

       [2020-09-14T17:37:08.045Z] "HEAD / HTTP/2" 200 - "-" "-" 0 0 4 3 "10.1.0.17" "curl/7.67.0" "095711e6-64ef-4de0-983e-59158e3c55e7" "example.com" "93.184.216.34:80" outbound|80||example.com 10.1.4.12:37636 10.1.4.12:8080 10.1.0.17:44404 outbound_.80_.target-egress-gateway-mTLS_.istio-egressgateway.istio-egress.svc.cluster.local -

## Configure different routing for a second namespace

Configure routing for a second external host to learn how different external
connectivity can be configured for different teams.

1. Create a `Sidecar` resource for the `team-y` namespace:

   ```yaml
   cat <<EOF | kubectl apply -f -
   apiVersion: networking.istio.io/v1beta1
   kind: Sidecar
   metadata:
     name: default
     namespace: team-y
   spec:
     outboundTrafficPolicy:
       mode: REGISTRY_ONLY
     egress:
     - hosts:
       - 'istio-egress/*'
       - 'team-y/*'
   EOF
   ```
2. Deploy the test application to the `team-y` namespace:

   ```bash
   kubectl -n team-y create -f ./test.yaml
   ```
3. Register a second external host and export it to the `team-x` and
   the `team-y` namespace:

   ```yaml
   cat <<EOF | kubectl apply -f -
   apiVersion: networking.istio.io/v1beta1
   kind: ServiceEntry
   metadata:
     name: httpbin-org-ext
     namespace: istio-egress
     labels:
       # Show this service and its telemetry in the Cloud Service Mesh page of the Google Cloud console
       service.istio.io/canonical-name: httpbin.org
   spec:
     hosts:
     - httpbin.org
     ports:
     - number: 80
       name: http
       protocol: HTTP
     - number: 443
       name: tls
       protocol: TLS
     resolution: DNS
     location: MESH_EXTERNAL
     exportTo:
     - 'istio-egress'
     - 'team-x'
     - 'team-y'
   EOF
   ```
4. Create a virtual service to route traffic to httpbin.org through the
   egress gateway:

   ```yaml
   cat <<EOF | kubectl apply -f -
   apiVersion: networking.istio.io/v1beta1
   kind: VirtualService
   metadata:
     name: httpbin-org-through-egress-gateway
     namespace: istio-egress
   spec:
     hosts:
     - httpbin.org
     gateways:
     - istio-egress/egress-gateway
     - mesh
     http:
     - match:
       - gateways:
         - mesh
         port: 80
       route:
       - destination:
           host: istio-egressgateway.istio-egress.svc.cluster.local
           subset: target-egress-gateway-mTLS
           port:
             number: 80
         weight: 100
     - match:
       - gateways:
         - istio-egress/egress-gateway
         port: 80
       route:
       - destination:
           host: httpbin.org
           port:
             number: 80
         weight: 100
     exportTo:
     - 'istio-egress'
     - 'team-x'
     - 'team-y'
   EOF
   ```
5. Run `istioctl analyze` to check for configuration errors:

   ```bash
   ${ISTIOCTL} analyze -n istio-egress --revision REVISION
   ```

   You see:

       ✔ No validation issues found when analyzing namespace: istio-egress.

6. Make a request to httpbin.org from the `team-y` test app:

   ```bash
   kubectl -n team-y exec -it $(kubectl -n team-y get pod -l app=test -o \
       jsonpath={.items..metadata.name}) -c test -- curl -I http://httpbin.org
   ```

   You see a `200 OK` response.
7. Also make a request to httpbin.org from the `team-x` test app:

   ```bash
   kubectl -n team-x exec -it $(kubectl -n team-x get pod -l app=test \
       -o jsonpath={.items..metadata.name}) -c test -- curl -I http://httpbin.org
   ```

   You see a `200 OK` response.
8. Attempt to make a request to example.com from the `team-y` namespace:

   ```bash
   kubectl -n team-y exec -it $(kubectl -n team-y get pod -l app=test \
       -o jsonpath={.items..metadata.name}) -c test -- curl -I http://example.com
   ```

   The request fails because there is no outbound route configured for the
   `example.com` host.

## Using Authorization Policy to provide additional control over traffic

In this tutorial, authorization policies for the egress gateway are created in
the `istio-egress`namespace. You can configure Kubernetes RBAC so that only
network administrators can access the `istio-egress` namespace.

1. Create an `AuthorizationPolicy` so that applications in the `team-x`
   namespace can connect to example.com but not to other external hosts when
   sending requests using port 80. The corresponding `targetPort` on the
   egress gateway pods is 8080.

   ```yaml
   cat <<EOF | kubectl apply -f -
   apiVersion: security.istio.io/v1beta1
   kind: AuthorizationPolicy
   metadata:
     name: egress-team-x-to-example-com
     namespace: istio-egress
   spec:
     action: ALLOW
     rules:
       - from:
         - source:
             namespaces:
             - 'team-x'
         to:
         - operation:
             hosts:
               - 'example.com'
         when:
         - key: destination.port
           values: ["8080"]
   EOF
   ```
2. Verify that you can make a request to example.com from the test
   application in the `team-x` namespace:

   ```bash
   kubectl -n team-x exec -it $(kubectl -n team-x get pod -l app=test \
       -o jsonpath={.items..metadata.name}) -c test -- curl -I http://example.com
   ```

   You see a `200 OK` response.
3. Try to make a request to httpbin.org from the test application in the
   `team-x` namespace:

   ```bash
   kubectl -n team-x exec -it $(kubectl -n team-x get pod -l app=test \
       -o jsonpath={.items..metadata.name}) -c test -- curl -s -w " %{http_code}\n" \
       http://httpbin.org
   ```

   The request fails with an `RBAC: access denied` message and a 403
   Forbidden status code. You may need to wait a few seconds because there is
   often a short delay before authorization policy takes effect.
4. Authorization policies provide rich control over which traffic is
   allowed or denied. Apply the following authorization policy to allow the
   test app in the `team-y` namespace to make requests to httpbin.org by using
   one particular URL path when sending requests using port 80. The
   corresponding `targetPort` on the egress gateway pods is 8080.

   ```yaml
   cat <<EOF | kubectl apply -f -
   apiVersion: security.istio.io/v1beta1
   kind: AuthorizationPolicy
   metadata:
     name: egress-team-y-to-httpbin-teapot
     namespace: istio-egress
   spec:
     action: ALLOW
     rules:
       - from:
         - source:
             namespaces:
             - 'team-y'
         to:
         - operation:
             hosts:
             - httpbin.org
             paths: ['/status/418']
         when:
         - key: destination.port
           values: ["8080"]
   EOF
   ```
5. Attempt to connect to httpbin.org from the test app in the `team-y`
   namespace:

   ```bash
   kubectl -n team-y exec -it $(kubectl -n team-y get pod -l app=test \
       -o jsonpath={.items..metadata.name}) -c test -- curl -s -w " %{http_code}\n" \
       http://httpbin.org
   ```

   The request fails with an RBAC: access denied message and a 403
   Forbidden status code.
6. Now make a request to httpbin.org/status/418 from the same app:

   ```bash
   kubectl -n team-y exec -it $(kubectl -n team-y get pod -l app=test \
       -o jsonpath={.items..metadata.name}) -c test -- curl http://httpbin.org/status/418
   ```

   The request succeeds because the path matches the pattern in the
   authorization policy. The output is similar to the following:

          -=[ teapot ]=-
             _...._
           .'  _ _ `.
          | ."` ^ `". _,
          \_;`"---"`|//
            |       ;/
            \_     _/
              `"""`

## TLS origination at the egress gateway

You can configure egress gateways to `upgrade` (originate) plain HTTP
requests to TLS or mutual TLS. Allowing applications to make plain HTTP requests
has several advantages when used with Istio mutual TLS and TLS origination. For
more information, [see the best practices guide](https://docs.cloud.google.com/service-mesh/docs/security/egress-gateways-best-practices.md.txt).

![TLS origination at egress gateway](https://docs.cloud.google.com/static/service-mesh/docs/images/tls-origination.svg)

1. Create a `DestinationRule. The DestinationRule` specifies that the
   gateway originate a TLS connection to example.com.

   ```yaml
   cat <<EOF | kubectl apply -f -
   apiVersion: networking.istio.io/v1beta1
   kind: DestinationRule
   metadata:
     name: example-com-originate-tls
     namespace: istio-egress
   spec:
     host: example.com
     subsets:
       - name: example-com-originate-TLS
         trafficPolicy:
           portLevelSettings:
           - port:
               number: 443
             tls:
               mode: SIMPLE
               sni: example.com
   EOF
   ```
2. Update the virtual service for example.com so that requests to port 80
   on the gateway are `upgraded` to TLS on port 443 when they are sent to the
   destination host:

   ```yaml
   cat <<EOF | kubectl apply -f -
   apiVersion: networking.istio.io/v1alpha3
   kind: VirtualService
   metadata:
     name: example-com-through-egress-gateway
     namespace: istio-egress
   spec:
     hosts:
     - example.com
     gateways:
     - mesh
     - istio-egress/egress-gateway
     http:
     - match:
       - gateways:
         - mesh
         port: 80
       route:
       - destination:
           host: istio-egressgateway.istio-egress.svc.cluster.local
           subset: target-egress-gateway-mTLS
           port:
             number: 80
     - match:
       - gateways:
         - istio-egress/egress-gateway
         port: 80
       route:
       - destination:
           host: example.com
           port:
             number: 443
           subset: example-com-originate-TLS
         weight: 100
   EOF
   ```
3. Make several requests to example.com from the test app in the `team-x`
   namespace:

   ```bash
   for i in {1..4}
   do
       kubectl -n team-x exec -it $(kubectl -n team-x get pod -l app=test \
           -o jsonpath={.items..metadata.name}) -c test -- curl -I http://example.com
   done
   ```

   As before, the requests succeed with `200 OK` responses.
4. Check the egress gateway log to verify that the gateway routed the
   requests to the destination host by originating TLS connections:

   ```bash
   kubectl -n istio-egress logs -f $(kubectl -n istio-egress get pod -l istio=egressgateway \
       -o jsonpath="    {.items[0].metadata.name}") istio-proxy
   ```

   The output is similar to the following:

       [2020-09-24T17:58:02.548Z] "HEAD / HTTP/2" 200 - "-" "-" 0 0 6 5 "10.1.1.15" "curl/7.67.0" "83a77acb-d994-424d-83da-dd8eac902dc8" "example.com" "93.184.216.34:443" outbound|443|example-com-originate-TLS|example.com 10.1.4.31:49866 10.1.4.31:8080 10.1.1.15:37334 outbound_.80_.target-egress-gateway-mTLS_.istio-egressgateway.istio-egress.svc.cluster.local -

   The proxy sidecar sent the request to the gateway using port 80 and TLS
   originated on port 443 to send the request to the destination host.

> [!NOTE]
> **Note:** You can configure additional [client settings](https://istio.io/latest/docs/reference/config/networking/destination-rule/#ClientTLSSettings) for TLS and mutual TLS connections that originate at the egress gateway. For example, you can specify client certificate credentials and certificate authority certificates for verifying presented server certificates.

## Pass-through of HTTPS/TLS connections

Your existing applications might already be using TLS connections when
communicating with external services. You can configure the egress gateway to
pass TLS connections through without decrypting them.

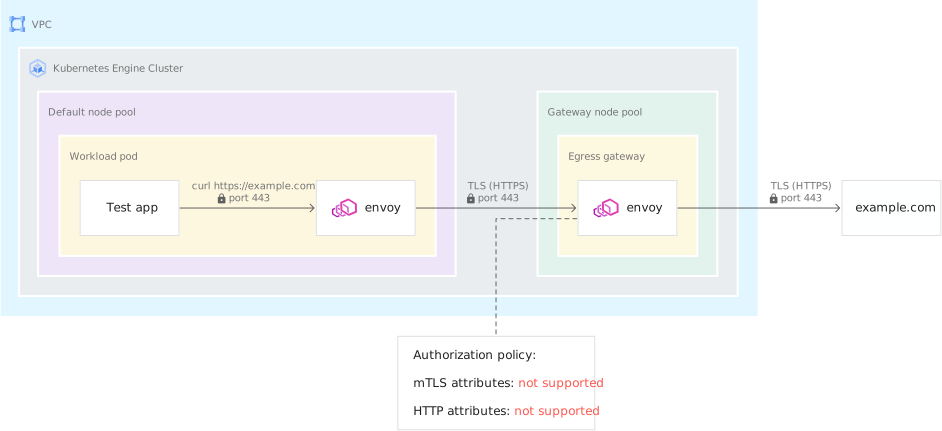
> [!CAUTION]
> **Caution** : The gateway treats the encrypted pass-through TLS connection as a TCP connection and can not read any HTTP related attributes or any signed and trusted metadata. You **can't** use authorization policies to allow or deny pass-through traffic based on attributes of the request. The next steps of this tutorial create an extra authorization policy to allow **any** traffic that is sent to the egress gateway on port 443. That traffic can be unencrypted, and the policy doesn't restrict connections based on particular sources and destinations inside or outside of the mesh. If you need to apply authorization policy, we recommend that you avoid TLS pass-through.
![tls pass through](https://docs.cloud.google.com/static/service-mesh/docs/images/tls-passthrough.svg)

1. Modify your configuration so that the egress gateway uses TLS
   pass-through for connections to port 443:

   ```yaml
   cat <<EOF | kubectl apply -f -
   apiVersion: networking.istio.io/v1beta1
   kind: Gateway
   metadata:
     name: egress-gateway
     namespace: istio-egress
   spec:
     selector:
       istio: egressgateway
     servers:
     - port:
         number: 80
         name: https
         protocol: HTTPS
       hosts:
         - '*'
       tls:
         mode: ISTIO_MUTUAL
     - port:
         number: 443
         name: tls
         protocol: TLS
       hosts:
       - '*'
       tls:
         mode: PASSTHROUGH
   EOF
   ```
2. Update the `DestinationRule` pointing to the egress gateway to add a
   second subset for port 443 on the gateway. This new subset doesn't use
   mutual TLS. Istio mutual TLS is not supported for pass-through of TLS
   connections. Connections on port 80 still use mTLS:

   ```yaml
   cat <<EOF | kubectl apply -f -
   apiVersion: networking.istio.io/v1alpha3
   kind: DestinationRule
   metadata:
     name: target-egress-gateway
     namespace: istio-egress
   spec:
     host: istio-egressgateway.istio-egress.svc.cluster.local
     subsets:
     - name: target-egress-gateway-mTLS
       trafficPolicy:
         portLevelSettings:
         - port:
             number: 80
           tls:
             mode: ISTIO_MUTUAL
     - name: target-egress-gateway-TLS-passthrough
   EOF
   ```
3. Update the virtual service for example.com so that TLS traffic on port
   443 is passed through the gateway:

   ```yaml
   cat <<EOF | kubectl apply -f -
   apiVersion: networking.istio.io/v1alpha3
   kind: VirtualService
   metadata:
     name: example-com-through-egress-gateway
     namespace: istio-egress
   spec:
     hosts:
     - example.com
     gateways:
     - mesh
     - istio-egress/egress-gateway
     http:
     - match:
       - gateways:
         - mesh
         port: 80
       route:
       - destination:
           host: istio-egressgateway.istio-egress.svc.cluster.local
           subset: target-egress-gateway-mTLS
           port:
             number: 80
     - match:
       - gateways:
         - istio-egress/egress-gateway
         port: 80
       route:
       - destination:
           host: example.com
           port:
             number: 443
           subset: example-com-originate-TLS
         weight: 100
     tls:
     - match:
       - gateways:
         - mesh
         port: 443
         sniHosts:
         - example.com
       route:
       - destination:
           host: istio-egressgateway.istio-egress.svc.cluster.local
           subset: target-egress-gateway-TLS-passthrough
           port:
             number: 443
     - match:
       - gateways:
         - istio-egress/egress-gateway
         port: 443
         sniHosts:
         - example.com
       route:
       - destination:
           host: example.com
           port:
             number: 443
         weight: 100
     exportTo:
     - 'istio-egress'
     - 'team-x'
   EOF
   ```
4. Update the virtual service for httpbin.org so that TLS traffic on port
   443 is passed through the gateway:

   ```yaml
   cat <<EOF | kubectl apply -f -
   apiVersion: networking.istio.io/v1beta1
   kind: VirtualService
   metadata:
     name: httpbin-org-through-egress-gateway
     namespace: istio-egress
   spec:
     hosts:
     - httpbin.org
     gateways:
     - istio-egress/egress-gateway
     - mesh
     http:
     - match:
       - gateways:
         - mesh
         port: 80
       route:
       - destination:
           host: istio-egressgateway.istio-egress.svc.cluster.local
           subset: target-egress-gateway-mTLS
           port:
             number: 80
         weight: 100
     - match:
       - gateways:
         - istio-egress/egress-gateway
         port: 80
       route:
       - destination:
           host: httpbin.org
           port:
             number: 80
         weight: 100
     tls:
     - match:
       - gateways:
         - mesh
         port: 443
         sniHosts:
         - httpbin.org
       route:
       - destination:
           host: istio-egressgateway.istio-egress.svc.cluster.local
           subset: target-egress-gateway-TLS-passthrough
           port:
             number: 443
     - match:
       - gateways:
         - istio-egress/egress-gateway
         port: 443
         sniHosts:
         - httpbin.org
       route:
       - destination:
           host: httpbin.org
           port:
             number: 443
         weight: 100
     exportTo:
     - 'istio-egress'
     - 'team-x'
     - 'team-y'
   EOF
   ```
5. Add an authorization policy that accepts any kind of traffic sent to
   port 443 of the egress gateway service. The corresponding `targetPort` on
   the gateway pods is 8443.

   ```yaml
   cat <<EOF | kubectl apply -f -
   apiVersion: security.istio.io/v1beta1
   kind: AuthorizationPolicy
   metadata:
     name: egress-all-443
     namespace: istio-egress
   spec:
     action: ALLOW
     rules:
       - when:
         - key: destination.port
           values: ["8443"]
   EOF
   ```
6. Run `istioctl analyze` to check for configuration errors:

   ```bash
   ${ISTIOCTL} analyze -n istio-egress --revision REVISION
   ```

   You see:

       ✔ No validation issues found when analyzing namespace: istio-egress.

7. Make a plain HTTP request to example.com from the test application in
   the `team-x`namespace:

   ```bash
   kubectl -n team-x exec -it $(kubectl -n team-x get pod -l app=test \
       -o jsonpath={.items..metadata.name}) -c test -- curl -I http://example.com
   ```

   The request succeeds with a `200 OK` response.
8. Now make several TLS (HTTPS) requests from the test application in the
   `team-x` namespace:

   ```bash
   for i in {1..4}
   do
       kubectl -n team-x exec -it $(kubectl -n team-x get pod -l app=test \
           -o jsonpath={.items..metadata.name}) -c test -- curl -s -o /dev/null \
           -w "%{http_code}\n" \
           https://example.com
   done
   ```

   You see 200 responses.
9. Look at the egress gateway log again:

   ```bash
   kubectl -n istio-egress logs -f $(kubectl -n istio-egress get pod -l istio=egressgateway \
       -o jsonpath="{.items[0].metadata.name}") istio-proxy
   ```

   You see log entries similar to the following:

       [2020-09-24T18:04:38.608Z] "- - -" 0 - "-" "-" 1363 5539 10 - "-" "-" "-" "-" "93.184.216.34:443" outbound|443||example.com 10.1.4.31:51098 10.1.4.31:8443 10.1.1.15:57030 example.com -

   The HTTPS request has been treated as TCP traffic and passed through the
   gateway to the destination host, so no HTTP information is included in the
   log.

## Using Kubernetes NetworkPolicy as an additional control

There are many scenarios in which an application can bypass a sidecar proxy.
You can use Kubernetes `NetworkPolicy` to additionally specify which connections
workloads are allowed to make. After a single network policy is applied, all
connections that aren't specifically allowed are denied.

This tutorial only considers egress connections and egress selectors for
network policies. If you control ingress with network policies on your own
clusters, then you must create ingress policies to correspond to your egress
policies. For example, if you allow egress from workloads in the `team-x`
namespace to the `team-y` namespace, you must also allow ingress to the `team-y`
namespace from the `team-x` namespace.

1. Allow workloads and proxies deployed in the `team-x` namespace to
   connect to `istiod` and the egress gateway:

   ```yaml
   cat <<EOF | kubectl apply -f -
   apiVersion: networking.k8s.io/v1
   kind: NetworkPolicy
   metadata:
     name: allow-egress-to-control-plane
     namespace: team-x
   spec:
     podSelector: {}
     policyTypes:
       - Egress
     egress:
     - to:
       - namespaceSelector:
           matchLabels:
             "kubernetes.io/metadata.name": istio-system
         podSelector:
           matchLabels:
             istio: istiod
       - namespaceSelector:
           matchLabels:
             "kubernetes.io/metadata.name": istio-egress
         podSelector:
           matchLabels:
             istio: egressgateway
   EOF
   ```
2. Allow workloads and proxies to query DNS:

   ```yaml
   cat <<EOF | kubectl apply -f -
   apiVersion: networking.k8s.io/v1
   kind: NetworkPolicy
   metadata:
     name: allow-egress-to-dns
     namespace: team-x
   spec:
     podSelector: {}
     policyTypes:
       - Egress
     egress:
     - to:
       - namespaceSelector:
           matchLabels:
             "kubernetes.io/metadata.name": kube-system
       ports:
       - port: 53
         protocol: UDP
       - port: 53
         protocol: TCP
   EOF
   ```
3. Allow workloads and proxies to connect to the IPs that serve Google
   APIs and services, including Cloud Service Mesh certificate authority:

   ```yaml
   cat <<EOF | kubectl apply -f -
   apiVersion: networking.k8s.io/v1
   kind: NetworkPolicy
   metadata:
     name: allow-egress-to-google-apis
     namespace: team-x
   spec:
     podSelector: {}
     policyTypes:
       - Egress
     egress:
     - to:
       - ipBlock:
           cidr: 199.36.153.4/30
       - ipBlock:
           cidr: 199.36.153.8/30
   EOF
   ```
4. Allow workloads and proxies to connect to the GKE
   metadata server:

   ```yaml
   cat <<EOF | kubectl apply -f -
   apiVersion: networking.k8s.io/v1
   kind: NetworkPolicy
   metadata:
     name: allow-egress-to-metadata-server
     namespace: team-x
   spec:
     podSelector: {}
     policyTypes:
       - Egress
     egress:
     - to: # For GKE data plane v2
       - ipBlock:
           cidr: 169.254.169.254/32
     - to: # For GKE data plane v1
       - ipBlock:
           cidr: 127.0.0.1/32 # Prior to 1.21.0-gke.1000
       - ipBlock:
           cidr: 169.254.169.252/32 # 1.21.0-gke.1000 and later
       ports:
       - protocol: TCP
         port: 987
       - protocol: TCP
         port: 988
   EOF
   ```
5. Optional: Allow workloads and proxies in the `team-x` namespace to make
   connections to each other:

   ```yaml
   cat <<EOF | kubectl apply -f -
   apiVersion: networking.k8s.io/v1
   kind: NetworkPolicy
   metadata:
     name: allow-egress-to-same-namespace
     namespace: team-x
   spec:
     podSelector: {}
     ingress:
       - from:
         - podSelector: {}
     egress:
       - to:
         - podSelector: {}
   EOF
   ```
6. Optional: Allow workloads and proxies in the `team-x` namespace to make
   connections to workloads deployed by a different team:

   ```yaml
   cat <<EOF | kubectl apply -f -
   apiVersion: networking.k8s.io/v1
   kind: NetworkPolicy
   metadata:
     name: allow-egress-to-team-y
     namespace: team-x
   spec:
     podSelector: {}
     policyTypes:
       - Egress
     egress:
     - to:
       - namespaceSelector:
           matchLabels:
             "kubernetes.io/metadata.name": team-y
   EOF
   ```
7. Connections between sidecar proxies persist. Existing connections are
   not closed when you apply a new network policy. Restart the workloads in
   the team-x namespace to make sure existing connections are closed:

   ```bash
   kubectl -n team-x rollout restart deployment
   ```
8. Verify that you can still make an HTTP request to example.com from the
   test application in the `team-x`namespace:

   ```bash
   kubectl -n team-x exec -it $(kubectl -n team-x get pod -l app=test \
       -o jsonpath={.items..metadata.name}) -c test -- curl -I http://example.com
   ```

   The request succeeds with a `200 OK` response.

## Directly accessing Google APIs using Private Google Access and IAM permissions

Google's APIs and services are exposed using external IP addresses. When pods
with VPC-native alias IP addresses make connections to Google APIs by using
[Private Google Access](https://docs.cloud.google.com/vpc/docs/configure-private-google-access.md.txt), the
traffic never leaves Google's network.

When you set up the infrastructure for this tutorial, you enabled
Private Google Access for the subnet used by GKE
pods. To allow access to the IP addresses used by Private Google Access,
you created a route, a VPC firewall rule, and a private DNS zone. This
configuration lets pods reach Google APIs directly without sending traffic
through the egress gateway. You can control which APIs are available to specific
Kubernetes service accounts (and hence namespaces) by using
[Workload Identity Federation for GKE](https://docs.cloud.google.com/kubernetes-engine/docs/how-to/workload-identity.md.txt) and
IAM. Istio authorization doesn't take effect because the egress
gateway is not handling connections to the Google APIs.

Before pods can call Google APIs, you must use IAM to grant
permissions. The cluster you are using for this tutorial is configured to use
Workload Identity Federation for GKE, which allows a Kubernetes service account to act as a
Google service account.

1. Create a Google service account for your application to use:

   ```bash
   gcloud iam service-accounts create sa-test-app-team-x
   ```
2. Allow the Kubernetes service account to impersonate the Google service
   account:

   ```bash
   gcloud iam service-accounts add-iam-policy-binding \
     --role roles/iam.workloadIdentityUser \
     --member "serviceAccount:${PROJECT_ID}.svc.id.goog[team-x/test]" \
     sa-test-app-team-x@${PROJECT_ID}.iam.gserviceaccount.com
   ```
3. Annotate the Kubernetes service account for the test app in the
   `team-x` namespace with the email address of the Google service account:

   ```yaml
   cat <<EOF | kubectl apply -f -
   apiVersion: v1
   kind: ServiceAccount
   metadata:
     annotations:
       iam.gke.io/gcp-service-account: sa-test-app-team-x@${PROJECT_ID}.iam.gserviceaccount.com
     name: test
     namespace: team-x
   EOF
   ```
4. The test application pod must be able to access the Google metadata
   server (running as a DaemonSet) to obtain temporary credentials for calling
   Google APIs. Create a service entry for the GKE
   metadata server:

   ```yaml
   cat <<EOF | kubectl apply -f -
   apiVersion: networking.istio.io/v1beta1
   kind: ServiceEntry
   metadata:
     name: metadata-google-internal
     namespace: istio-egress
     labels:
       # Show this service and its telemetry in the Cloud Service Mesh page of the Google Cloud console
       service.istio.io/canonical-name: metadata.google.internal
   spec:
     hosts:
     - metadata.google.internal
     ports:
     - number: 80
       name: http
       protocol: HTTP
     - number: 443
       name: tls
       protocol: TLS
     resolution: DNS
     location: MESH_EXTERNAL
     exportTo:
     - 'istio-egress'
     - 'team-x'
   EOF
   ```
5. Also create a service entry for private.googleapis.com and
   storage.googleapis.com:

   ```yaml
   cat <<EOF | kubectl apply -f -
   apiVersion: networking.istio.io/v1beta1
   kind: ServiceEntry
   metadata:
     name: private-googleapis-com
     namespace: istio-egress
     labels:
       # Show this service and its telemetry in the Cloud Service Mesh page of the Google Cloud console
       service.istio.io/canonical-name: googleapis.com
   spec:
     hosts:
     - private.googleapis.com
     - storage.googleapis.com
     ports:
     - number: 80
       name: http
       protocol: HTTP
     - number: 443
       name: tls
       protocol: TLS
     resolution: DNS
     location: MESH_EXTERNAL
     exportTo:
     - 'istio-egress'
     - 'team-x'
   EOF
   ```
6. Verify that the Kubernetes service account is correctly configured to
   act as the Google service account:

   ```bash
   kubectl -n team-x exec -it $(kubectl -n team-x get pod -l app=test \
       -o jsonpath={.items..metadata.name}) -c test -- gcloud auth list
   ```

   You see the Google service account listed as the active and only identity.
7. Create a test file in a Cloud Storage bucket:

   ```bash
   echo "Hello, World!" > /tmp/hello
   gcloud storage buckets create gs://${PROJECT_ID}-bucket
   gcloud storage cp /tmp/hello gs://${PROJECT_ID}-bucket/
   ```
8. Grant permission for the service account to list and view files in the
   bucket:

   ```bash
   gcloud storage buckets add-iam-policy-binding gs://${PROJECT_ID}-bucket/ \
       --member=serviceAccount:sa-test-app-team-x@${PROJECT_ID}.iam.gserviceaccount.com \
       --role=roles/storage.objectViewer
   ```
9. Verify that the test application can access the test bucket:

   ```bash
   kubectl -n team-x exec -it \
   $(kubectl -n team-x get pod -l app=test -o jsonpath={.items..metadata.name}) \
   -c test \
   -- gcloud storage cat gs://${PROJECT_ID}-bucket/hello
   ```

   You see:

       Hello, World!

## Clean up


To avoid incurring charges to your Google Cloud account for the resources used in this
tutorial, either delete the project that contains the resources, or keep the project and
delete the individual resources.

<br />

To avoid incurring charges to your Google Cloud account for the resources
used in this tutorial, complete the steps in the following sections.:

### Delete the project

The easiest way to eliminate billing is to delete the project you created for
the tutorial.  

> [!CAUTION]
> **Caution** : Deleting a project has the following effects:
>
> - **Everything in the project is deleted.** If you used an existing project for the tasks in this document, when you delete it, you also delete any other work you've done in the project.
> - **Custom project IDs are lost.** When you created this project, you might have created a custom project ID that you want to use in the future. To preserve the URLs that use the project ID, such as an `appspot.com` URL, delete selected resources inside the project instead of deleting the whole project.
>
>
> If you plan to explore multiple architectures, tutorials, or quickstarts, reusing projects
> can help you avoid exceeding project quota limits.

1. In the Google Cloud console, go to the **Manage resources** page.

   [Go to Manage resources](https://console.cloud.google.com/iam-admin/projects)
2. In the project list, select the project that you want to delete, and then click **Delete**.
3. In the dialog, type the project ID, and then click **Shut down** to delete the project.

<br />

## What's next

<br />

- Read the [companion best practices guide](https://docs.cloud.google.com/service-mesh/docs/security/egress-gateways-best-practices.md.txt).
- Consult the [GKE](https://docs.cloud.google.com/kubernetes-engine/docs/how-to/hardening-your-cluster.md.txt) hardening guide.
- Learn how to [automate TLS certificate management for Cloud Service Mesh
  ingress gateway using CA Service](https://docs.cloud.google.com/service-mesh/docs/automate-tls).
- Learn about managing configuration and policy across all of your infrastructure with [GKE Enterprise Configuration Management](https://docs.cloud.google.com/anthos/config-management).
- For more reference architectures, diagrams, and best practices, explore the [Cloud Architecture Center](https://docs.cloud.google.com/architecture).