# Automate TLS certificate management for Cloud Service Mesh
ingress gateway using Certificate Authority Service
This tutorial shows platform operators how to use the
Certificate Authority Service (CA Service) issuer for the cert-manager tool
to automate TLS certificate management for the Cloud Service Mesh ingress gateway.
The certificates enable the ingress gateway to terminate HTTPS and other TLS and
mTLS traffic originating from clients in your Virtual Private Cloud (VPC) but
outside the service mesh. The tutorial assumes basic familiarity with Kubernetes
and TLS certificates.
## Introduction
Cloud Service Mesh provisions TLS certificates to every workload in the service mesh.
These certificates enable encrypted and
[mutually authenticated TLS (mTLS)](https://docs.cloud.google.com/service-mesh/v1.20/docs/security/security-overview.md.txt#mutual_tls)
communication between workloads in the service mesh. One of the supported CAs
issues and signs the certificates.
However, Cloud Service Mesh doesn't automatically provision certificates to the
[ingress gateway](https://docs.cloud.google.com/service-mesh/v1.20/docs/gateways.md.txt) for traffic entering the service mesh.
A common solution is to use the open source [cert-manager](https://cert-manager.io/)
tool to automate the management of ingress gateway certificates.
The cert-manager tool requests certificates from an [issuer](https://cert-manager.io/docs/concepts/issuer/),
which represents a [certificate authority (CA)](https://wikipedia.org/wiki/Certificate_authority).
[CA Service](https://docs.cloud.google.com/certificate-authority-service/docs.md.txt) is a
Google Cloud service that enables you to create your own private CA. The
cert-manager tool can request certificates from CA Service by
using the open source
[external issuer for CA Service](https://github.com/jetstack/google-cas-issuer).
A private CA can issue TLS certificates that authenticate and encrypt traffic
inside an internal network. Cloud Service Mesh ingress gateways are often set
up to allow incoming traffic from clients that are inside your
VPC but outside the service mesh. For internal network traffic,
you can use a private CA in CA Service to issue certificates for
the ingress gateway.
This tutorial shows you how to set up the cert-manager tool and the
CA Service issuer to automate TLS certificate provisioning and
renewal for the ingress gateway. the cert-manager tool provisions certificates
as
[Kubernetes Secret resources of type TLS](https://kubernetes.io/docs/concepts/configuration/secret/#tls-secrets).
When the cert-manager tool renews a certificate, it updates the Secret resource
with a new certificate. The ingress gateway runs the
[Envoy Proxy](https://www.envoyproxy.io/), and it supports
[Envoy's secret discovery service (SDS)](https://www.envoyproxy.io/docs/envoy/latest/configuration/security/secret).
SDS enables the ingress gateway to start using a new certificate without
requiring an administrator to restart or reload the process.
Sidecar proxies that are part of the mesh can obtain TLS certificates from
either CA Service or Cloud Service Mesh certificate authority. In this
tutorial, you use CA Service for both sidecar proxy and ingress
gateway certificates. This enables you to use one root CA for all TLS
certificates.
The following diagram shows the resources you provision in this tutorial.
You provision an internal passthrough Network Load Balancer for the ingress gateway. The
[internal passthrough Network Load Balancer](https://docs.cloud.google.com/load-balancing/docs/internal.md.txt) is not a proxy, so it
doesn't terminate TCP connections or perform TLS handshakes. Instead, it routes
connections to the pods of the `istio-ingressgateway` deployment.
The `hello-example-com-credential` Secret contains a certificate and a private
key. The `hello` gateway configures the pods of the `istio-ingressgateway`
deployment to use this certificate and private key to perform TLS handshakes for
requests with the hostname `hello.example.com`.
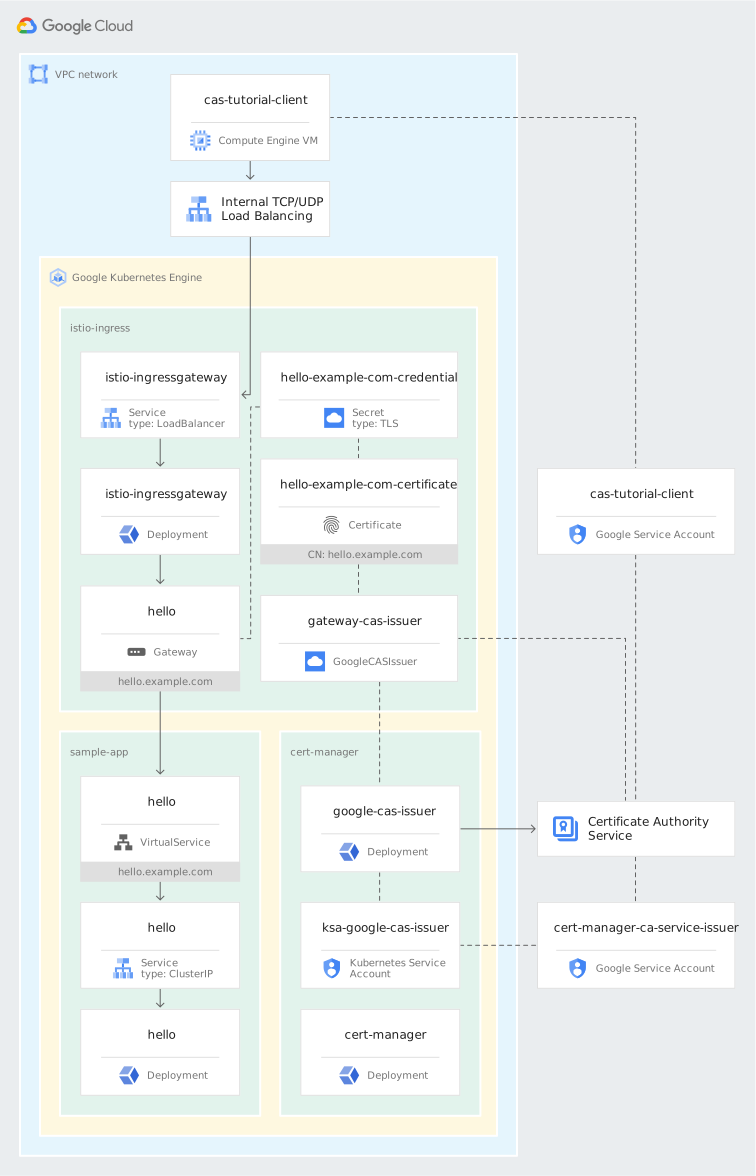
The pods of the `google-cas-issuer` deployment in the `cert-manager` namespace
request certificates from the CA that you create in CA Service. You create a
[Identity and Access Management](https://docs.cloud.google.com/iam/docs.md.txt) policy binding that allows the `ca-service-isser` pods
to impersonate a Google service account using
[Workload Identity Federation for GKE](https://docs.cloud.google.com/kubernetes-engine/docs/how-to/workload-identity.md.txt). You
grant this Google service account permission to request certificates from your
CA in CA Service by creating an IAM policy binding
on your CA pool.
## Objectives
- [Configure CA Service](https://docs.cloud.google.com/service-mesh/v1.20/docs/automate-tls.md.txt#configure_ca_service)
- [Create a GKE cluster](https://docs.cloud.google.com/service-mesh/v1.20/docs/automate-tls.md.txt#create_a_google_kubernetes_engine_cluster)
- [Install the Cloud Service Mesh control plane](https://docs.cloud.google.com/service-mesh/v1.20/docs/automate-tls.md.txt#install_the_anthos_service_mesh_control_plane)
- [Install the ingress gateway](https://docs.cloud.google.com/service-mesh/v1.20/docs/automate-tls.md.txt#install_the_ingress_gateway)
- [Install the cert-manager tool](https://docs.cloud.google.com/service-mesh/v1.20/docs/automate-tls.md.txt#install_the_cert-manager_tool)
- [Install the CA Service issuer controller](https://docs.cloud.google.com/service-mesh/v1.20/docs/automate-tls.md.txt#install_the_ca_service_issuer_controller)
- [Create a certificate issuer](https://docs.cloud.google.com/service-mesh/v1.20/docs/automate-tls.md.txt#create_a_certificate_issuer)
- [Deploy a sample application](https://docs.cloud.google.com/service-mesh/v1.20/docs/automate-tls.md.txt#deploy_a_sample_application)
- [Verify the solution](https://docs.cloud.google.com/service-mesh/v1.20/docs/automate-tls.md.txt#verify_the_solution)
- (Optional) [Add CA certificates to a trust store](https://docs.cloud.google.com/service-mesh/v1.20/docs/automate-tls.md.txt#optional_add_ca_certificates_to_trust_store)
## Costs
This tutorial uses the following billable components of Google Cloud:
- [Cloud Service Mesh](https://docs.cloud.google.com/service-mesh/v1.20/pricing)
- [CA Service](https://cloud.google.com/certificate-authority-service/pricing)
- [Compute Engine](https://cloud.google.com/compute/all-pricing)
- [GKE](https://cloud.google.com/kubernetes-engine/pricing)
To generate a cost estimate based on your projected usage, use the
[pricing calculator](https://cloud.google.com/products/calculator). New Google Cloud users
might be eligible for a free trial.
When you finish this tutorial, you can avoid ongoing billing by deleting the
resources you created. For more information, see [Clean up](https://docs.cloud.google.com/service-mesh/v1.20/docs/automate-tls.md.txt#clean_up).
## Before you begin
1. In the Google Cloud console,
[go to the project selector page](https://console.cloud.google.com/projectselector2/home/dashboard),
and then select or create a project.
> [!NOTE]
> **Note:** If you don't plan to keep the resources that you create in this tutorial, create a project instead of selecting an existing project. After you finish this tutorial, you can delete the project, removing all resources associated with the project.
2. Make sure that [billing is enabled for your Google Cloud project](https://docs.cloud.google.com/billing/docs/how-to/modify-project.md.txt).
3. In the Google Cloud console, [go to Cloud Shell](https://ssh.cloud.google.com/cloudshell/editor).
At the bottom of the Google Cloud console, a Cloud Shell session
opens and displays a command-line prompt. You use Cloud Shell to run
all the commands in this tutorial.
4. Set the Google Cloud console project you want to use for this tutorial:
gcloud config set core/project PROJECT_ID
Replace PROJECT_ID with the project ID of your Cloud
project.
In the Authorize Cloud Shell dialog, click **Authorize** . By
clicking **Authorize** , you allow `gcloud` commands that you run in
Cloud Shell to use your user credentials to authenticate to Google APIs.
5. Enable the Resource Manager, GKE, GKE GKE Fleet,
Cloud Service Mesh certificate authority, and CA Service APIs:
gcloud services enable \
cloudresourcemanager.googleapis.com \
container.googleapis.com \
gkehub.googleapis.com \
meshca.googleapis.com \
privateca.googleapis.com
> [!NOTE]
> **Note:** Enabling the APIs can take up to a minute to complete.
## Configure CA Service
In this section, you create a root CA and two subordinate CAs in
CA Service. One subordinate CA issues certificates to the ingress
gateway, and the other subordinate CA issues certificates to sidecar proxies in
the mesh.
For simplicity, you use the same project for the GKE cluster and
the root and subordinate CAs in this tutorial. In your own environment, you can
use a different project for the GKE cluster and the CAs.
> [!NOTE]
> **Note:** In your own environment, you can create a subordinate CA in CA Service from an existing root CA in your organization. If you use an existing root CA, you do not need to create a root CA in CA Service. We recommend you consult the documentation on how to [create a subordinate CA from an external CA](https://docs.cloud.google.com/certificate-authority-service/docs/creating-certificate-authorities#subordinate-external).
1. In Cloud Shell, create a CA pool to use for the root CA:
gcloud privateca pools create ROOT_CA_POOL \
--location CA_LOCATION \
--tier enterprise
- ROOT_CA_POOL is the name of the CA pool. For example, `root-ca-pool-tutorial`.
- CA_LOCATION is the location of the CA pool. For example, `us-central1`.
You can list the available CA Service locations using this
command: `gcloud privateca locations list`
2. Create and enable a root CA:
gcloud privateca roots create ROOT_CA \
--auto-enable \
--key-algorithm ec-p384-sha384 \
--location CA_LOCATION \
--pool ROOT_CA_POOL \
--subject "CN=Example Root CA, O=Example Organization" \
--use-preset-profile root_unconstrained
- ROOT_CA is the name you want to use for the root CA. For example, `root-ca-tutorial`.
3. Create a CA pool to use for the subordinate CA that issues certificates to
the ingress gateway:
gcloud privateca pools create SUBORDINATE_CA_POOL_GATEWAYS \
--location CA_LOCATION \
--tier devops
- SUBORDINATE_CA_POOL_GATEWAYS is the name of the CA pool. For example, `subordinate-ca-mtls-pool-gateways-tutorial`.
4. Create and enable the subordinate CA that issues certificates to the ingress
gateway:
gcloud privateca subordinates create SUBORDINATE_CA_GATEWAYS \
--auto-enable \
--issuer-location CA_LOCATION \
--issuer-pool ROOT_CA_POOL \
--key-algorithm ec-p256-sha256 \
--location CA_LOCATION \
--pool SUBORDINATE_CA_POOL_GATEWAYS \
--subject "CN=Example Gateway mTLS CA, O=Example Organization" \
--use-preset-profile subordinate_mtls_pathlen_0
- SUBORDINATE_CA_GATEWAYS is the name you want to use for the subordinate CA. For example, `subordinate-ca-mtls-gateways-tutorial`.
- The `--use-preset-profile` flag configures the subordinate CA to use the [Subordinate mTLS](https://docs.cloud.google.com/certificate-authority-service/docs/certificate-profile.md.txt#sub-mtls) certificate profile. This profile enables the subordinate CA to issue both client and server TLS certificates for mTLS.
If you want your ingress gateway to use simple TLS instead of mTLS, your
subordinate CA only needs to issue server TLS certificates. In this case, you
can use the [Subordinate server TLS](https://docs.cloud.google.com/certificate-authority-service/docs/certificate-profile.md.txt#sub-server-tls)
(`subordinate_server_tls_pathlen_0`) certificate profile instead.
5. Create a [certificate issuance policy](https://docs.cloud.google.com/certificate-authority-service/docs/use-issuance-policy.md.txt):
cat << EOF > policy.yaml
baselineValues:
keyUsage:
baseKeyUsage:
digitalSignature: true
keyEncipherment: true
extendedKeyUsage:
serverAuth: true
clientAuth: true
caOptions:
isCa: false
identityConstraints:
allowSubjectPassthrough: false
allowSubjectAltNamesPassthrough: true
celExpression:
expression: subject_alt_names.all(san, san.type == URI && san.value.startsWith("spiffe://PROJECT_ID.svc.id.goog/ns/") )
EOF
This issuance policy constrains CAs to only issue certificates for workloads
in the mesh.
6. Create a CA pool to use for the subordinate CA that issues certificates to
the sidecar proxies in the mesh. Apply the issuance policy to the CA pool:
gcloud privateca pools create SUBORDINATE_CA_POOL_SIDECARS \
--issuance-policy policy.yaml \
--location CA_LOCATION \
--tier devops
- SUBORDINATE_CA_POOL_SIDECARS is the name of the CA pool. For example, `subordinate-ca-mtls-pool-sidecars-tutorial`.
7. Create and enable the subordinate CA that issues certificates to the sidecar
proxies in the mesh:
gcloud privateca subordinates create SUBORDINATE_CA_SIDECARS \
--auto-enable \
--issuer-location CA_LOCATION \
--issuer-pool ROOT_CA_POOL \
--key-algorithm ec-p256-sha256 \
--location CA_LOCATION \
--pool SUBORDINATE_CA_POOL_SIDECARS \
--subject "CN=Example Sidecar mTLS CA, O=Example Organization" \
--use-preset-profile subordinate_mtls_pathlen_0
- SUBORDINATE_CA_GATEWAYS is the name you want to use for the subordinate CA. For example, `subordinate-ca-mtls-sidecars-tutorial`.
## Create a Google Kubernetes Engine cluster
1. In Cloud Shell, create a GKE cluster:
gcloud container clusters create CLUSTER_NAME \
--enable-ip-alias \
--num-nodes 4 \
--release-channel regular \
--scopes cloud-platform \
--workload-pool PROJECT_ID.svc.id.goog \
--zone ZONE
Replace CLUSTER_NAME with the name you want to use for
the cluster. For example, `asm-ingress-cert-manager-ca-service`.
Replace ZONE with the zone you want to use for the
cluster. For example, `us-central1-f`.
Note the following about the command:
- The `--release-channel` flag selects the [GKE release channel](https://docs.cloud.google.com/kubernetes-engine/docs/concepts/release-channels.md.txt) for the cluster.
- Both Cloud Service Mesh and the CA Service issuer for the cert-manager tool require that you set the `cloud-platform` scope on the cluster nodes.
- The `--workload-pool` argument enables Workload Identity Federation for GKE, which allows the CA Service issuer Kubernetes service account to impersonate a Google service account. This impersonation means that the CA Service issuer pods can access the CA Service API without downloading a [key file](https://docs.cloud.google.com/iam/docs/creating-managing-service-account-keys) for the Google service account.
2. Grant [cluster administrator permissions](https://kubernetes.io/docs/reference/access-authn-authz/rbac/#user-facing-roles)
to your user account:
kubectl create clusterrolebinding cluster-admin-binding \
--clusterrole cluster-admin \
--user $(gcloud config get-value core/account)
You need the permissions provided by the Kubernetes `cluster-admin`
ClusterRole to create the [role-based access control (RBAC)](https://kubernetes.io/docs/reference/access-authn-authz/rbac/)
rules for Cloud Service Mesh, and to install the cert-manager tool.
## Install the Anthos Service Mesh control plane
In this tutorial, you install [managed Cloud Service Mesh](https://docs.cloud.google.com/service-mesh/docs/managed/supported-features-mcp)
for a GKE cluster on Google Cloud, with all resources in
one project. In your own environment, you can apply the solution described in
this document using either managed Cloud Service Mesh or an
[in-cluster control plane](https://docs.cloud.google.com/service-mesh/v1.20/docs/supported-features.md.txt).
Cloud Service Mesh provides a range of installation options for different scenarios.
After completing this tutorial, we recommend that you review the
[installation guide](https://docs.cloud.google.com/service-mesh/v1.20/docs/unified-install/install-anthos-service-mesh.md.txt)
to select the option that best fits your environment.
1. In Cloud Shell, download the [`asmcli`](https://docs.cloud.google.com/service-mesh/v1.20/docs/unified-install/asmcli-overview.md.txt)
installation tool:
curl --location --output asmcli https://storage.googleapis.com/csm-artifacts/asm/asmcli_1.31
chmod +x asmcli
You use `asmcli` to install the Cloud Service Mesh control plane.
2. Install the Cloud Service Mesh control plane:
./asmcli install \
--ca gcp_cas \
--ca_pool projects/PROJECT_ID/locations/CA_LOCATION/caPools/SUBORDINATE_CA_POOL_SIDECARS \
--cluster_location ZONE \
--cluster_name CLUSTER_NAME \
--enable_all \
--enable_registration \
--fleet_id PROJECT_ID \
--managed \
--output_dir asm-files \
--project_id PROJECT_ID \
--verbose
- The `--ca gcp_cas` and `--ca_pool` flags configures the Cloud Service Mesh
control plane to
[use the sidecar CA pool in CA Service to issue certificates to sidecar proxies in the mesh](https://docs.cloud.google.com/service-mesh/docs/managed/service-mesh#ca-service).
- The `--enable_registration` flag
[registers the GKE cluster](https://docs.cloud.google.com/anthos/multicluster-management/connect/registering-a-cluster)
to the [fleet](https://docs.cloud.google.com/anthos/multicluster-management/fleets) in the project
specified by the `--fleet_id` flag. In this tutorial, the
GKE cluster and the fleet use the same project.
- The `--managed` flag sets up a
[managed Cloud Service Mesh control plane](https://docs.cloud.google.com/service-mesh/docs/managed/supported-features-mcp).
- The `--output_dir` flag specifies a directory that `asmcli` uses to
download files and configurations necessary for installing Cloud Service Mesh.
You use these files later in the tutorial.
> [!NOTE]
> **Note:** To view all the available `asmcli` options, run `./asmcli --help --verbose`.
Installation takes several minutes. When the installation is complete, you
see the following output:
```
asmcli: Successfully installed ASM.
```
## Install the ingress gateway
1. In Cloud Shell, create a Kubernetes namespace for the ingress
gateway:
kubectl create namespace GATEWAY_NAMESPACE
- GATEWAY_NAMESPACE is the name of the namespace you want to use for the ingress gateway. For example, `istio-ingress`.
2. Reserve a [static internal IP address](https://docs.cloud.google.com/vpc/docs/reserve-static-internal-ip-address.md.txt)
to use for the ingress gateway internal passthrough Network Load Balancer:
LOAD_BALANCER_IP=$(gcloud compute addresses create \
asm-ingress-gateway-ilb \
--region REGION \
--subnet default \
--format 'value(address)')
- Replace REGION with the region that contains the zone or zones that your GKE cluster nodes use. For example, if your cluster uses the `us-central1-f` zone, replace REGION with `us-central1`.
This command reserves an IP address from the default subnet in the region you
specify.
3. Create an [operator manifest](https://istio.io/latest/docs/reference/config/istio.operator.v1alpha1/)
for the ingress gateway:
cat << EOF > ingressgateway-operator.yaml
apiVersion: install.istio.io/v1alpha1
kind: IstioOperator
metadata:
name: ingressgateway-operator
annotations:
config.kubernetes.io/local-config: "true"
spec:
profile: empty
revision: asm-managed
components:
ingressGateways:
- name: istio-ingressgateway
namespace: GATEWAY_NAMESPACE
enabled: true
k8s:
overlays:
- apiVersion: apps/v1
kind: Deployment
name: istio-ingressgateway
patches:
- path: spec.template.metadata.annotations
value:
inject.istio.io/templates: gateway
- path: spec.template.metadata.labels.sidecar\.istio\.io/inject
value: "true"
- path: spec.template.spec.containers[name:istio-proxy]
value:
name: istio-proxy
image: auto
service:
loadBalancerIP: $LOAD_BALANCER_IP
serviceAnnotations:
networking.gke.io/load-balancer-type: Internal
networking.gke.io/internal-load-balancer-allow-global-access: "true"
EOF
Note the following about the [operator manifest](https://istio.io/latest/docs/reference/config/istio.operator.v1alpha1/):
- The `revision` field specifies the managed Cloud Service Mesh release channel to
use for the data plane. Change the value of this field if you use the
[Rapid or Stable release channels](https://docs.cloud.google.com/service-mesh/docs/managed/select-a-release-channel#how_to_select_a_release_channel)
for the control plane.
- The `annotation`, `label`, and `image` specified in the `overlays` section
enable
[auto-injection of proxy configuration for the ingress gateway deployment](https://docs.cloud.google.com/service-mesh/v1.20/docs/gateways.md.txt).
- The `loadBalancerIP` field specifies
[the IP address to use for the load balancer](https://docs.cloud.google.com/kubernetes-engine/docs/how-to/service-parameters#lb_ip).
If you remove this field from the manifest, the load balancer uses an
[ephemeral IP address](https://docs.cloud.google.com/compute/docs/ip-addresses.md.txt).
- The service annotation
[`networking.gke.io/load-balancer-type: Internal`](https://docs.cloud.google.com/kubernetes-engine/docs/how-to/internal-load-balancing.md.txt)
on the ingress gateway means that GKE provisions an
[internal passthrough Network Load Balancer](https://docs.cloud.google.com/load-balancing/docs/internal.md.txt) in front of the
ingress gateway pods. If you remove this annotation, GKE
instead provisions a
[regional external passthrough Network Load Balancer](https://docs.cloud.google.com/load-balancing/docs/network).
- The optional service annotation
[`networking.gke.io/internal-load-balancer-allow-global-access: "true"`](https://docs.cloud.google.com/kubernetes-engine/docs/how-to/internal-load-balancing.md.txt#global_access)
allows clients from any region in your VPC to access the
internal passthrough Network Load Balancer. If you remove this annotation, the internal passthrough Network Load Balancer
only accepts traffic from clients in the same region in your
VPC.
4. Create the ingress gateway installation manifest using the operator manifest
and the [`istioctl`](https://istio.io/latest/docs/reference/commands/istioctl/)
tool that the `asmcli` script downloaded when you installed the control plane:
./asm-files/istioctl manifest generate \
--filename ingressgateway-operator.yaml \
--output ingressgateway
5. Install the [ingress gateway](https://docs.cloud.google.com/service-mesh/docs/managed/auto-control-plane-with-fleet#install_istio_gateways_optional):
kubectl apply --recursive --filename ingressgateway/
## Install the cert-manager tool
1. In Cloud Shell, download and apply the cert-manager tool
installation manifest:
CERT_MANAGER_VERSION=v1.5.4
curl --location --output cert-manager.yaml "https://github.com/jetstack/cert-manager/releases/download/${CERT_MANAGER_VERSION}/cert-manager.yaml"
kubectl apply --filename cert-manager.yaml
Installing the cert-manager tool takes about a minute to complete.
## Install the CA Service issuer controller
The [CA Service issuer controller](https://github.com/jetstack/google-cas-issuer)
enables the cert-manager tool to request certificates using
CA Service. The controller uses the cert-manager tool
[external issuer](https://cert-manager.io/docs/configuration/external/)
extension mechanism.
1. In Cloud Shell, create a [Google service account](https://docs.cloud.google.com/iam/docs/service-accounts):
gcloud iam service-accounts create CAS_ISSUER_GSA \
--display-name "CA Service issuer for cert-manager"
- CAS_ISSUER_GSA is the name of the Google service account. For example, `cert-manager-ca-service-issuer`.
The Certificate Authority Service issuer controller uses this Google service
account to authenticate to the [Certificate Authority Service APIs](https://docs.cloud.google.com/certificate-authority-service/docs/apis.md.txt).
2. Create an Identity and Access Management policy binding that allows the
Certificate Authority Service issuer controller Google service account to request
certificates from the CA pool that contains your subordinate CA:
gcloud privateca pools add-iam-policy-binding SUBORDINATE_CA_POOL_GATEWAYS \
--location CA_LOCATION \
--member "serviceAccount:CAS_ISSUER_GSA@PROJECT_ID.iam.gserviceaccount.com" \
--role roles/privateca.certificateRequester
3. Download the Certificate Authority Service issuer controller installation manifest:
CAS_ISSUER_VERSION=v0.5.3
curl --location --output ca-service-issuer.yaml "https://github.com/jetstack/google-cas-issuer/releases/download/${CAS_ISSUER_VERSION}/google-cas-issuer-${CAS_ISSUER_VERSION}.yaml"
4. Create an IAM policy binding to allow the
`ksa-google-cas-issuer` Kubernetes service account in the `cert-manager`
namespace to impersonate the Google service account (GSA) using
[Workload Identity Federation for GKE](https://docs.cloud.google.com/kubernetes-engine/docs/how-to/workload-identity.md.txt):
gcloud iam service-accounts add-iam-policy-binding \
CAS_ISSUER_GSA@PROJECT_ID.iam.gserviceaccount.com \
--member "serviceAccount:PROJECT_ID.svc.id.goog[cert-manager/ksa-google-cas-issuer]" \
--role roles/iam.workloadIdentityUser
The CA Service issuer controller pods use the
`ksa-google-cas-issuer` Kubernetes service account.
5. Install the CA Service issuer controller in your
GKE cluster:
kubectl apply --filename ca-service-issuer.yaml
6. Add the Workload Identity Federation for GKE annotation `iam.gke.io/gcp-service-account` to
the Kubernetes service account used by the CA Service issuer
controller pods:
kubectl annotate serviceaccount ksa-google-cas-issuer --namespace cert-manager \
"iam.gke.io/gcp-service-account=CAS_ISSUER_GSA@PROJECT_ID.iam.gserviceaccount.com"
This annotation informs GKE that the Kubernetes service
account can impersonate the Google service account to access Google APIs.
## Create a certificate issuer
1. In Cloud Shell, create and apply a [GoogleCASIssuer](https://github.com/jetstack/google-cas-issuer#configuring-the-issuer)
manifest:
cat << EOF > gateway-cas-issuer.yaml
apiVersion: cas-issuer.jetstack.io/v1beta1
kind: GoogleCASIssuer
metadata:
name: gateway-cas-issuer
namespace: GATEWAY_NAMESPACE
spec:
caPoolId: SUBORDINATE_CA_POOL_GATEWAYS
location: CA_LOCATION
project: PROJECT_ID
EOF
kubectl apply --filename gateway-cas-issuer.yaml
The issuer enables the cert-manager tool to provision certificates from your
subordinate CA pool in your ingress gateway namespace
> [!NOTE]
> **Note:** You can create a [cluster-scoped issuer](https://github.com/jetstack/google-cas-issuer#configuring-the-issuer) instead of a namespace-scoped issuer. A cluster-scoped issuer can provision certificates for any namespace in the Kubernetes cluster.
## Deploy a sample application
In this section, you verify that the cert-manager tool can use the
CA Service issuer to obtain certificates from
CA Service. To verify, you deploy a sample application with
request routing configuration and a certificate for the ingress gateway.
1. In Cloud Shell, create a namespace for the sample application
resources:
cat << EOF > sample-app-namespace.yaml
apiVersion: v1
kind: Namespace
metadata:
name: APP_NAMESPACE
annotations:
mesh.cloud.google.com/proxy: '{"managed":"true"}'
labels:
istio.io/rev: asm-managed
EOF
kubectl apply --filename sample-app-namespace.yaml
- APP_NAMESPACE is the name of the namespace for the sample application. For example, `sample-app`.
The annotation `mesh.cloud.google.com/proxy` enables the
[managed data plane](https://docs.cloud.google.com/service-mesh/docs/managed/auto-control-plane-with-fleet#managed-data-plane)
for the namespace.
The label `istio.io/rev: asm-managed` selects the
[Regular release channel](https://docs.cloud.google.com/service-mesh/docs/managed/select-a-release-channel)
for the managed data plane in the sample application namespace. Change the
value of this label if you use the
[Rapid or Stable release channels](https://docs.cloud.google.com/service-mesh/docs/managed/select-a-release-channel#how_to_select_a_release_channel).
2. Create a Deployment resource for the sample application:
cat << EOF > deployment.yaml
apiVersion: apps/v1
kind: Deployment
metadata:
name: hello
namespace: APP_NAMESPACE
labels:
app: hello
spec:
replicas: 1
selector:
matchLabels:
app: hello
template:
metadata:
labels:
app: hello
spec:
containers:
- image: gcr.io/google-samples/hello-app:1.0
name: hello-app
ports:
- containerPort: 8080
EOF
kubectl apply --filename deployment.yaml
3. Create a Service resource for the sample application:
cat << EOF > service.yaml
apiVersion: v1
kind: Service
metadata:
name: SERVICE_NAME
namespace: APP_NAMESPACE
spec:
ports:
- name: http-hello
port: 8080
selector:
app: hello
type: ClusterIP
EOF
kubectl apply --filename service.yaml
- SERVICE_NAME is the name of the service. For example, `hello`.
4. Create a Certificate resource for the domain name `hello.example.com` using
the certificate issuer:
cat << EOF > certificate.yaml
apiVersion: cert-manager.io/v1
kind: Certificate
metadata:
name: hello-example-com-certificate
namespace: GATEWAY_NAMESPACE
spec:
secretName: hello-example-com-credential
commonName: hello.example.com
dnsNames:
- hello.example.com
duration: 24h
renewBefore: 8h
issuerRef:
group: cas-issuer.jetstack.io
kind: GoogleCASIssuer
name: gateway-cas-issuer
EOF
kubectl apply --filename certificate.yaml
The Certificate namespace must match the ingress gateway namespace.
Typically, only platform administrators can change resources in this
namespace, since changes can affect the entire service mesh. the cert-manager
tool creates the Secret resource for the TLS certificate in the same
namespace. This means that application administrators do not need to have
access to the ingress gateway namespace.
You can add additional hostnames in the `dnsNames` list in the Certificate.
These hostnames are included in the certificate as
[Subject Alternate Names (SANs)](https://wikipedia.org/wiki/Subject_Alternative_Name).
5. Create a [Gateway](https://istio.io/latest/docs/reference/config/networking/gateway/)
resource for the sample application:
cat << EOF > gateway.yaml
apiVersion: networking.istio.io/v1beta1
kind: Gateway
metadata:
name: GATEWAY_NAME
namespace: GATEWAY_NAMESPACE
spec:
selector:
istio: ingressgateway
servers:
- hosts:
- APP_NAMESPACE/hello.example.com
port:
name: https-hello
number: 443
protocol: HTTPS
tls:
credentialName: hello-example-com-credential
mode: MUTUAL
EOF
kubectl apply --filename gateway.yaml
- GATEWAY_NAME is the gateway name. For example, `hello`.
- The `credentialName` field in the Gateway matches the `secretName` field in the Certificate. the cert-manager tool creates a Kubernetes Secret with the TLS certificate from CA Service. This certificate enables the ingress gateway to terminate TLS traffic destined to `hello.example.com`.
The Gateway manifest specifies [MUTUAL](https://istio.io/latest/docs/reference/config/networking/gateway/#ServerTLSSettings-TLSmode)
TLS (mTLS). If you want to configure the gateway for regular TLS, set the TLS
mode of the Gateway to `SIMPLE` instead.
6. Create a VirtualService resource for the sample application:
cat << EOF > virtual-service.yaml
apiVersion: networking.istio.io/v1beta1
kind: VirtualService
metadata:
name: hello
namespace: APP_NAMESPACE
spec:
hosts:
- hello.example.com
gateways:
- GATEWAY_NAMESPACE/GATEWAY_NAME
http:
- route:
- destination:
host: SERVICE_NAME
port:
number: 8080
EOF
kubectl apply --filename virtual-service.yaml
The Gateway and VirtualService use different namespaces. This common pattern
restricts changes to host-based routing in the Gateway to platform
administrators who have permissions to change resources in the ingress
gateway namespace.
Application administrators with permissions to edit the VirtualService in the
sample application namespace can change routing by other request fields, such
as URL path, without coordinating with platform administrators.
If you want to explore other configuration options, read the API documentation
for the [Certificate](https://cert-manager.io/docs/reference/api-docs/#cert-manager.io/v1.Certificate),
[Gateway](https://istio.io/latest/docs/reference/config/networking/gateway/),
and [VirtualService](https://istio.io/latest/docs/reference/config/networking/virtual-service/)
resources.
You can apply authentication and authorization policies to traffic entering the
service mesh through the ingress gateway. To do so, read the documentation for
the Istio [PeerAuthentication](https://istio.io/latest/docs/reference/config/security/peer_authentication/)
and [AuthorizationPolicy](https://istio.io/latest/docs/reference/config/security/authorization-policy/)
APIs.
## Verify the solution
In this section, you verify that you can send HTTPS requests using mTLS to the
sample application from outside the service mesh. To verify, you create a
Compute Engine VM instance, request a client TLS certificate from
CA Service, and use this certificate to authenticate the request
to the sample application.
You need SSH access to the VM instance. The [default network](https://docs.cloud.google.com/vpc/docs/vpc.md.txt#default-network)
includes a
[firewall rule that allows SSH access](https://docs.cloud.google.com/vpc/docs/firewalls#more_rules_default_vpc).
If you don't have SSH access, follow the
[firewall rules documentation](https://docs.cloud.google.com/vpc/docs/using-firewalls) to create a firewall
rule that allows incoming TCP connections on port 22.
> [!NOTE]
> **Note:** If you don't want to create a VM instance with a public IP address, you can use [TCP forwarding with Identity-Aware Proxy (IAP)](https://docs.cloud.google.com/iap/docs/tcp-forwarding-overview.md.txt). This feature enables authenticated and authorized SSH access from outside the VPC to VM instances that do not have public IP addresses. If you use this feature, add the `--tunnel-through-iap` flag to the `gcloud compute scp` and `gcloud compute ssh` commands in this section.
1. In Cloud Shell, create a Google service account:
gcloud iam service-accounts create CLIENT_VM_GSA \
--display-name "CA Service tutorial VM instance service account"
- CLIENT_VM_GSA is the name of the Google service account. For example, `cas-tutorial-client`.
You assign this Google service account to the Compute Engine VM
instance.
2. Grant the [CA Service Certificate Requester](https://docs.cloud.google.com/certificate-authority-service/docs/reference/permissions-and-roles#predefined-roles)
role on the gateways subordinate CA pool to the Google service account:
gcloud privateca pools add-iam-policy-binding SUBORDINATE_CA_POOL_GATEWAYS \
--location CA_LOCATION \
--member "serviceAccount:CLIENT_VM_GSA@PROJECT_ID.iam.gserviceaccount.com" \
--role roles/privateca.certificateRequester
This role provides permissions to request certificates from the CA pool.
3. Create a Compute Engine VM instance in the same VPC as
the GKE cluster:
gcloud compute instances create cas-tutorial-client \
--scopes cloud-platform \
--service-account CLIENT_VM_GSA@PROJECT_ID.iam.gserviceaccount.com \
--zone ZONE
The VM instance requires the `cloud-platform` scope to access the
[CA Service API](https://docs.cloud.google.com/certificate-authority-service/docs/reference/rest/v1/projects.locations.caPools.certificates/create.md.txt).
4. Save the IP address of the ingress gateway internal passthrough Network Load Balancer to a file:
kubectl get services istio-ingressgateway \
--namespace GATEWAY_NAMESPACE \
--output jsonpath='{.status.loadBalancer.ingress[0].ip}' > ilb-ip.txt
5. Save the public key certificate of your root CA to a file:
gcloud privateca roots describe ROOT_CA \
--location CA_LOCATION \
--pool ROOT_CA_POOL \
--format 'value(pemCaCertificates)' > root-ca-cert.pem
> [!NOTE]
> **Note:** You do not need to treat this certificate as a secret credential. It contains only the public key of the root CA, not the private key. All clients using your service receive a copy of this certificate as part of the TLS handshake.
6. Copy the root CA certificate and the file containing the IP address of the
ingress gateway internal passthrough Network Load Balancer to the VM instance:
gcloud compute scp root-ca-cert.pem ilb-ip.txt cas-tutorial-client:~ \
--zone ZONE
7. Connect to the VM instance using SSH:
gcloud compute ssh cas-tutorial-client --zone ZONE
Run the rest of the commands in this section from the SSH session.
8. Install the `ca-certificates` and `coreutils` packages, and the `curl`,
`openssl`, and [`jq`](https://stedolan.github.io/jq/)
command-line tools:
sudo apt-get update --yes
sudo apt-get install --yes ca-certificates coreutils curl jq openssl
9. Create a key pair for the client TLS certificate:
openssl genrsa -out private-key.pem 2048
openssl rsa -in private-key.pem -pubout -out public-key.pem
10. Query the [metadata server](https://docs.cloud.google.com/compute/docs/metadata/overview.md.txt) to get the email
address of the Google service account identity attached to the VM instance:
GSA_EMAIL=$(curl --silent --header "Metadata-Flavor: Google" http://metadata.google.internal/computeMetadata/v1/instance/service-accounts/default/email)
11. Create a JSON file that you use as the request body when
[requesting a client TLS certificate from the Certificate Authority Service API](https://docs.cloud.google.com/certificate-authority-service/docs/reference/rest/v1/projects.locations.caPools.certificates/create.md.txt):
cat << EOF > request.json
{
"config": {
"publicKey": {
"format": "PEM",
"key": "$(base64 --wrap 0 public-key.pem)"
},
"subjectConfig": {
"subject": {
"commonName": "$(hostname --short)",
"organization": "Example Organization"
},
"subjectAltName": {
"dnsNames": [
"$(hostname --fqdn)"
],
"emailAddresses": [
"$GSA_EMAIL"
]
}
},
"x509Config": {
"caOptions": {
"isCa": false
},
"keyUsage": {
"baseKeyUsage": {
"digitalSignature": true,
"keyEncipherment": true
},
"extendedKeyUsage": {
"clientAuth": true
}
}
}
},
"lifetime": "86400s"
}
EOF
To learn more about the fields in the config section, see the
[`CertificateConfig`](https://docs.cloud.google.com/certificate-authority-service/docs/reference/rest/v1/CertificateConfig.md.txt)
type in the CA Service API documentation.
12. Request an [OAuth 2.0 access token](https://docs.cloud.google.com/compute/docs/access/create-enable-service-accounts-for-instances.md.txt#applications)
from the [metadata server](https://docs.cloud.google.com/compute/docs/metadata/overview.md.txt):
TOKEN=$(curl --silent --header "Metadata-Flavor: Google" http://metadata.google.internal/computeMetadata/v1/instance/service-accounts/default/token | jq --raw-output ".access_token")
This access token provides the permissions granted to the Google service
account that is attached to the VM instance.
13. Request a client TLS certificate from the CA Service API and
store the response body in a file:
curl --silent --request POST \
--header "Authorization: Bearer $TOKEN" \
--header "Content-Type: application/json" \
--data @request.json \
--output response.json \
"https://privateca.googleapis.com/v1/projects/PROJECT_ID/locations/CA_LOCATION/caPools/SUBORDINATE_CA_POOL_GATEWAYS/certificates"
The command uses the access token to authenticate the API request.
14. Save the client certificate and certificate chain to a file:
jq --raw-output --join-output ".pemCertificate , .pemCertificateChain[]" response.json > client-cert-chain.pem
15. Use `curl` to send an HTTPS request from the VM instance to the sample
application:
curl --cert client-cert-chain.pem --key private-key.pem \
--cacert root-ca-cert.pem \
--resolve hello.example.com:443:$(cat ilb-ip.txt) \
--silent https://hello.example.com | head -n1
The output looks like this:
```
Hello, world!
```
This response shows that `curl` successfully sent the HTTPS request using
mTLS. The sample application responded with the message you see in the
terminal output.
The `curl` command does the following:
- The `--cert` and `--key` flags instruct `curl` to use the client TLS
certificate and private key to authenticate the request. The client
certificate file contains the full chain of certificates, from the client
certificate to the root CA.
- The `--cacert` flag instructs `curl` to verify that the root CA you created
in this tutorial, or one of its subordinate CAs, issued the server
certificate.
If you omit this flag, `curl` attempts to verify the server certificate
using the default CA bundle of your operating system, such as the
[`ca-certificates`](https://packages.debian.org/stable/ca-certificates)
package on Debian. Verification fails because the default CA bundle does
not include the root CA you created in this tutorial.
- The `--resolve` flag instructs `curl` to use the internal passthrough Network Load Balancer IP
address as the destination for requests to host `hello.example.com` on
port 443.
If you omit this flag, `curl` attempts to use DNS to resolve the
`hello.example.com` hostname. DNS resolution fails because there is no DNS
entry for this hostname.
In your own environment, we recommend that you create a
[DNS A record](https://docs.cloud.google.com/dns/docs/overview.md.txt#supported_dns_record_types) that points
to the internal passthrough Network Load Balancer IP address (`$LOAD_BALANCER_IP`). Create this
record using [Cloud DNS](https://docs.cloud.google.com/dns/docs.md.txt), by following the
documentation on [managing records](https://docs.cloud.google.com/dns/docs/records.md.txt#adding_a_record).
- The `--silent` flag suppresses response download progress reporting in the
terminal output.
- The command pipes the curl output to `head -n1`. The result is that the
output in the terminal only includes the first line of the response body.
16. Leave the SSH session:
exit
In this section, you requested a client TLS certificate directly from the
CA Service API. In the situation where the client is the egress
gateway of another service mesh in a separate Kubernetes cluster, you can use
the cert-manager tool and the Certificate Authority Service issuer with the same root CA
to provide client certificates to the egress gateway.
In other situations you can use tools such as Hashicorp Vault, Terraform, or
`gcloud` to request client TLS certificates for workloads outside the service
mesh. For more information, see the CA Service documentation for
[sample solutions](https://docs.cloud.google.com/certificate-authority-service/docs/samples.md.txt), and the
`gcloud` documentation for CA Service.
## (Optional) Add CA certificates to trust store
This optional section shows how to add CA certificates to the store of trusted
CA certificates for the Debian distribution of Linux. These instructions also
apply to distributions derived from Debian, such as Ubuntu.
Adding your CA certificates to this store means that you don't need to specify
the location of trusted CA certificates when sending HTTPS requests using `curl`,
Python, Go, and Ruby.
1. Connect to the VM instance using SSH:
gcloud compute ssh cas-tutorial-client --zone ZONE
Run the rest of the commands in this section from the SSH session.
2. Copy the root CA certificate to the directory
`/usr/local/share/ca-certificates`, and ensure the file has the extension
`.crt`:
sudo cp root-ca-cert.pem /usr/local/share/ca-certificates/cas-rootca.crt
3. Set the file permissions so all users can read the root CA certificate file:
sudo chmod 644 /usr/local/share/ca-certificates/cas-rootca.crt
4. Run the [`update-ca-certificates`](https://manpages.debian.org/buster/ca-certificates/update-ca-certificates.8.en.html)
script:
sudo update-ca-certificates
This script adds the certificate to the set of trusted certificates in the
directory `/etc/ssl/certs`, and to the file
`/etc/ssl/certs/ca-certificates.crt`.
The output is the following:
```
Updating certificates in /etc/ssl/certs...
1 added, 0 removed; done.
Running hooks in /etc/ca-certificates/update.d...
done.
```
5. Use `curl` to send an HTTPS request from the VM instance to the sample
application:
curl --cert client-cert-chain.pem --key private-key.pem \
--resolve hello.example.com:443:$(cat ilb-ip.txt) \
--silent https://hello.example.com | head -n1
The output looks like this:
```
Hello, world!
```
This response shows that `curl` successfully sent the HTTPS request using
mTLS, and validated the server TLS certificate from the ingress gateway using
the default CA certificate store.
6. Leave the SSH session:
exit
## Troubleshoot
If the CA Service issuer controller doesn't create the TLS
certificate secret, view the logs of the CA Service issuer
controller:
kubectl logs deployment/google-cas-issuer --namespace cert-manager
If you encounter problems installing Cloud Service Mesh,
[run the `asmcli` tool to validate your Cloud project and GKE cluster](https://docs.cloud.google.com/service-mesh/v1.20/docs/unified-install/install-dependent-tools.md.txt#validate_project_and_cluster).
If you run into other problems with this tutorial, we recommend that you review
these documents:
- [CA Service frequently asked questions](https://docs.cloud.google.com/certificate-authority-service/docs/faqs.md.txt)
- [Troubleshooting Cloud Service Mesh step-by-step](https://docs.cloud.google.com/service-mesh/v1.20/docs/troubleshooting/troubleshoot-intro.md.txt)
- [Resolving managed Cloud Service Mesh issues](https://docs.cloud.google.com/service-mesh/docs/managed/troubleshoot-managed-anthos-service-mesh)
- [Istio operations common problems](https://istio.io/docs/ops/common-problems/)
- [GKE troubleshooting](https://docs.cloud.google.com/kubernetes-engine/docs/troubleshooting.md.txt)
- [Troubleshooting Kubernetes clusters](https://kubernetes.io/docs/tasks/debug/debug-cluster/)
## Clean up
To avoid incurring continuing charges to your Google Cloud account for
the resources used in this tutorial, you can either delete the project or delete
the individual resources.
### Delete the project
> [!CAUTION]
> **Caution:** Deleting a project has the following effects:
>
> - **Everything in the project is deleted.** If you used an existing project for this tutorial, when you delete it, you also delete any other work you've done in the project.
> - **Custom project IDs are lost.** When you created this project, you might have created a custom project ID that you want to use in the future. To preserve the URLs that use the project ID, such as an appspot.com URL, delete selected resources inside the project instead of deleting the whole project.
1. In Cloud Shell, delete the project:
gcloud projects delete PROJECT_ID
### Delete the resources
If you want to keep the Google Cloud project you used in this tutorial,
delete the individual resources:
1. In Cloud Shell, unregister the GKE cluster from
GKE GKE Fleet:
gcloud container hub memberships unregister CLUSTER_NAME \
--gke-cluster ZONE/CLUSTER_NAME
2. Delete the GKE cluster:
gcloud container clusters delete CLUSTER_NAME \
--zone ZONE --async --quiet
3. Delete the IAM policy bindings on the subordinate CA pool:
gcloud privateca pools remove-iam-policy-binding SUBORDINATE_CA_POOL_GATEWAYS \
--location CA_LOCATION \
--member "serviceAccount:CAS_ISSUER_GSA@PROJECT_ID.iam.gserviceaccount.com" \
--role roles/privateca.certificateRequester
gcloud privateca pools remove-iam-policy-binding SUBORDINATE_CA_POOL_GATEWAYS \
--location CA_LOCATION \
--member "serviceAccount:CLIENT_VM_GSA@PROJECT_ID.iam.gserviceaccount.com" \
--role roles/privateca.certificateRequester
4. Disable and schedule deletion of the subordinate CAs and the root CA:
gcloud privateca subordinates disable SUBORDINATE_CA_GATEWAYS \
--location CA_LOCATION \
--pool SUBORDINATE_CA_POOL_GATEWAYS \
--quiet
gcloud privateca subordinates delete SUBORDINATE_CA_GATEWAYS \
--location CA_LOCATION \
--pool SUBORDINATE_CA_POOL_GATEWAYS \
--ignore-active-certificates \
--quiet
gcloud privateca subordinates disable SUBORDINATE_CA_SIDECARS \
--location CA_LOCATION \
--pool SUBORDINATE_CA_POOL_SIDECARS \
--quiet
gcloud privateca subordinates delete SUBORDINATE_CA_SIDECARS \
--location CA_LOCATION \
--pool SUBORDINATE_CA_POOL_SIDECARS \
--ignore-active-certificates \
--quiet
gcloud privateca roots disable ROOT_CA \
--location CA_LOCATION \
--pool ROOT_CA_POOL \
--quiet
gcloud privateca roots delete ROOT_CA \
--location CA_LOCATION \
--pool ROOT_CA_POOL \
--ignore-active-certificates \
--quiet
5. Delete the IAM policy binding for the
CA Service issuer controller Google service account:
gcloud iam service-accounts remove-iam-policy-binding \
CAS_ISSUER_GSA@PROJECT_ID.iam.gserviceaccount.com \
--member "serviceAccount:PROJECT_ID.svc.id.goog[cert-manager/ksa-google-cas-issuer]" \
--role roles/iam.workloadIdentityUser
6. Delete the Google service accounts:
gcloud iam service-accounts delete --quiet \
CAS_ISSUER_GSA@PROJECT_ID.iam.gserviceaccount.com
gcloud iam service-accounts delete --quiet \
CLIENT_VM_GSA@PROJECT_ID.iam.gserviceaccount.com
7. Delete the reserved load balancer IP address:
gcloud compute addresses delete asm-ingress-gateway-ilb \
--region REGION --quiet
8. Delete the Compute Engine VM instance:
gcloud compute instances delete cas-tutorial-client \
--zone ZONE --quiet
## What's next
- Explore other [Certificate Authority Service how-to guides](https://docs.cloud.google.com/certificate-authority-service/docs/how-to).
- Learn more about [Cloud Service Mesh](https://docs.cloud.google.com/service-mesh/v1.20/docs/overview.md.txt), an Istio-based suite of tools that helps you monitor and manage a reliable service mesh on-premises and on Google Cloud.
- Explore [Cloud Service Mesh how-to guides](https://docs.cloud.google.com/service-mesh/v1.20/docs.md.txt).