In this tutorial, you will walk through a common use case of rolling out a canary deployment with Cloud Service Mesh.
### What is a canary deployment?
A canary deployment routes a small percentage of traffic to a new version of a microservice, then allows you to gradually roll out to the whole user base, while phasing out and retiring the old version. If something goes wrong during this process, traffic can be switched back to the old version.
With Cloud Service Mesh, you can route traffic to ensure that new services are introduced safely.
## Costs
In this document, you use the following billable components of Google Cloud:
- [GKE](https://docs.cloud.google.com/kubernetes-engine/pricing)
- [Cloud Service Mesh](https://docs.cloud.google.com/service-mesh/v1.19/pricing)
To generate a cost estimate based on your projected usage,
use the [pricing calculator](https://docs.cloud.google.com/products/calculator).
New Google Cloud users might be eligible for a [free trial](https://docs.cloud.google.com/free).
When you finish this tutorial, you can avoid ongoing costs by deleting the
resources you created. For more information, see [Clean up](https://docs.cloud.google.com/service-mesh/v1.19/docs/by-example/canary-deployment.md.txt#clean-up).
## Before you begin
- Make sure that billing is enabled for your Cloud project. [Learn how to
confirm that billing is enabled for your project](https://docs.cloud.google.com/billing/docs/how-to/modify-project#confirm_billing_is_enabled_on_a_project).
- Install
[managed Cloud Service Mesh](https://docs.cloud.google.com/service-mesh/docs/managed/provision-managed-anthos-service-mesh)\*
on a GKE cluster.
> [!NOTE]
> **Note:** This tutorial also works for [managed Cloud Service Mesh via `asmcli`](https://docs.cloud.google.com/service-mesh/docs/managed/provision-managed-anthos-service-mesh-asmcli) and [in-cluster Cloud Service Mesh](https://docs.cloud.google.com/service-mesh/v1.19/docs/unified-install/install-anthos-service-mesh.md.txt).
- [Deploy an Ingress Gateway](https://docs.cloud.google.com/service-mesh/v1.19/docs/gateways.md.txt#deploy_gateways).
- Clone the repo:
git clone https://github.com/GoogleCloudPlatform/anthos-service-mesh-samples
cd anthos-service-mesh-samples/docs/canary-service
## Deploy Online Boutique
1. Set the current context for `kubectl` to the cluster where you deployed
Online Boutique:
gcloud container clusters get-credentials CLUSTER_NAME \
--project=PROJECT_ID \
--zone=CLUSTER_LOCATION
2. Create the namespace for the sample application and the ingress gateway:
kubectl create namespace onlineboutique
3. Label the `onlineboutique` namespace to automatically inject Envoy proxies.
Follow the steps on [how to enable automatic sidecar injection](https://docs.cloud.google.com/service-mesh/v1.19/docs/anthos-service-mesh-proxy-injection.md.txt).
4. Deploy the sample app. For this tutorial, you will deploy [Online Boutique](https://github.com/GoogleCloudPlatform/microservices-demo), a microservice demo app.
kubectl apply \
-n onlineboutique \
-f https://raw.githubusercontent.com/GoogleCloudPlatform/anthos-service-mesh-samples/main/docs/shared/online-boutique/kubernetes-manifests.yaml
5. Add a label `version=v1` to the `productcatalog` deployment by running the following command:
kubectl patch deployments/productcatalogservice -p '{"spec":{"template":{"metadata":{"labels":{"version":"v1"}}}}}' \
-n onlineboutique
View your services you have deployed:
kubectl get pods -n onlineboutique
Expected output:
NAME READY STATUS RESTARTS AGE
adservice-85598d856b-m84m6 2/2 Running 0 2m7s
cartservice-c77f6b866-m67vd 2/2 Running 0 2m8s
checkoutservice-654c47f4b6-hqtqr 2/2 Running 0 2m10s
currencyservice-59bc889674-jhk8z 2/2 Running 0 2m8s
emailservice-5b9fff7cb8-8nqwz 2/2 Running 0 2m10s
frontend-77b88cc7cb-mr4rp 2/2 Running 0 2m9s
loadgenerator-6958f5bc8b-55q7w 2/2 Running 0 2m8s
paymentservice-68dd9755bb-2jmb7 2/2 Running 0 2m9s
productcatalogservice-84f95c95ff-c5kl6 2/2 Running 0 114s
recommendationservice-64dc9dfbc8-xfs2t 2/2 Running 0 2m9s
redis-cart-5b569cd47-cc2qd 2/2 Running 0 2m7s
shippingservice-5488d5b6cb-lfhtt 2/2 Running 0 2m7s
All of the pods for your application should be up and running, with a `2/2` in the `READY` column. This indicates that the pods have an Envoy sidecar proxy injected successfully.
6. Deploy your `VirtualService` and `DestinationRule` for v1 of `productcatalog`:
kubectl apply -f destination-vs-v1.yaml -n onlineboutique
```yaml
apiVersion: networking.istio.io/v1beta1
kind: DestinationRule
metadata:
name: productcatalogservice
spec:
host: productcatalogservice
subsets:
- labels:
version: v1
name: v1
---
apiVersion: networking.istio.io/v1beta1
kind: VirtualService
metadata:
name: productcatalogservice
spec:
hosts:
- productcatalogservice
http:
- route:
- destination:
host: productcatalogservice
subset: v1
```
Note that only `v1` is present in the resources.
7. Visit the application in your browser using the external IP address of your ingress:
kubectl get services -n GATEWAY_NAMESPACE
This next section will tour the Cloud Service Mesh UI and show how you can view your metrics.
## Deploy and View your services in Google Cloud console
1. In Google Cloud console, go the **GKE Enterprise Services** page.
[Go to GKE Enterprise Services](https://console.cloud.google.com/anthos/services)
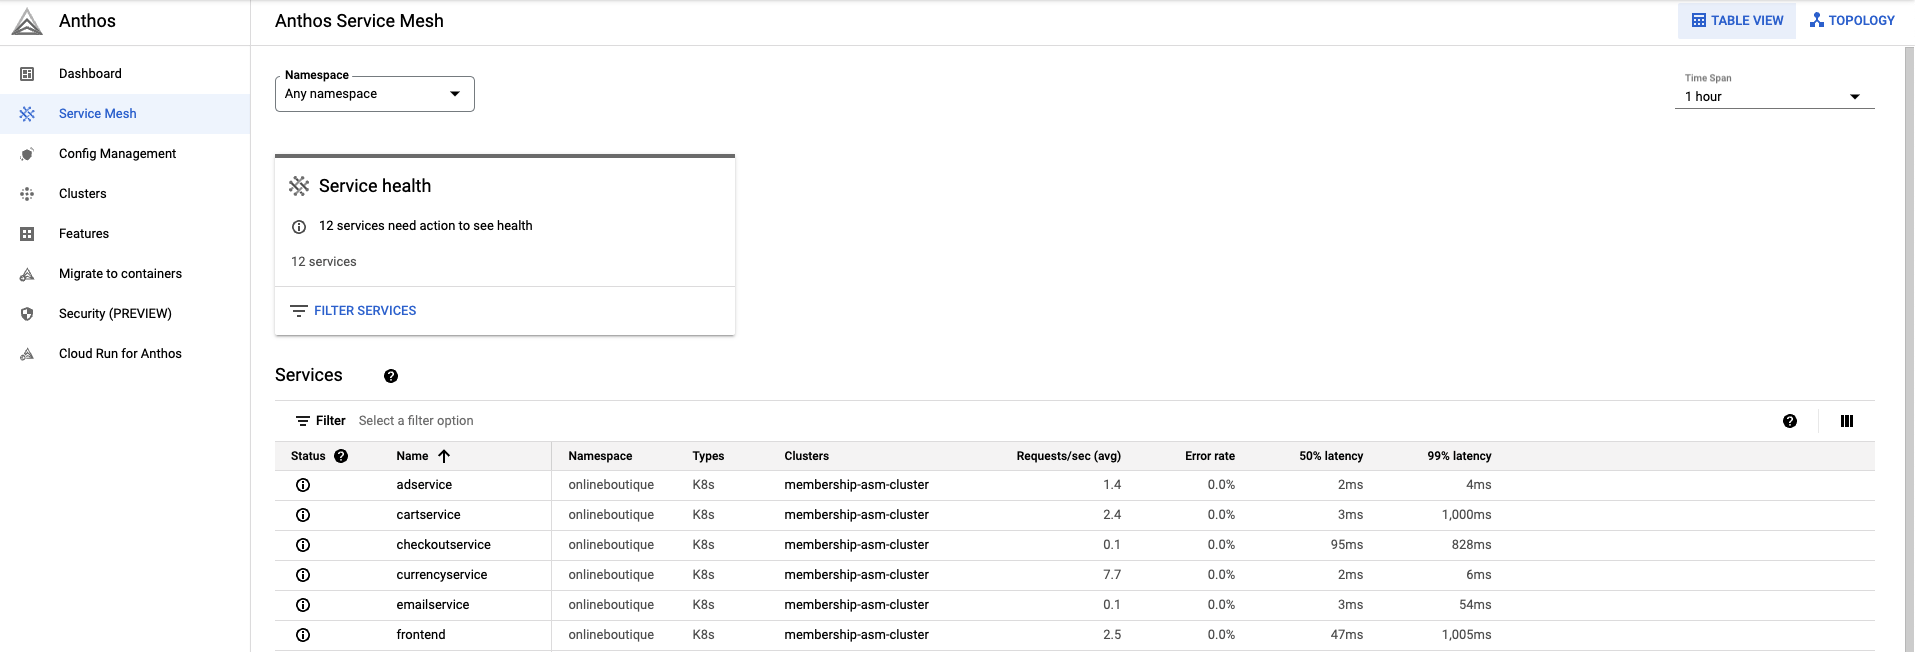
2. By default, you view your services in the **Table** view.
The Table Overview lets you observe all your services, as well as important metrics at a glance.
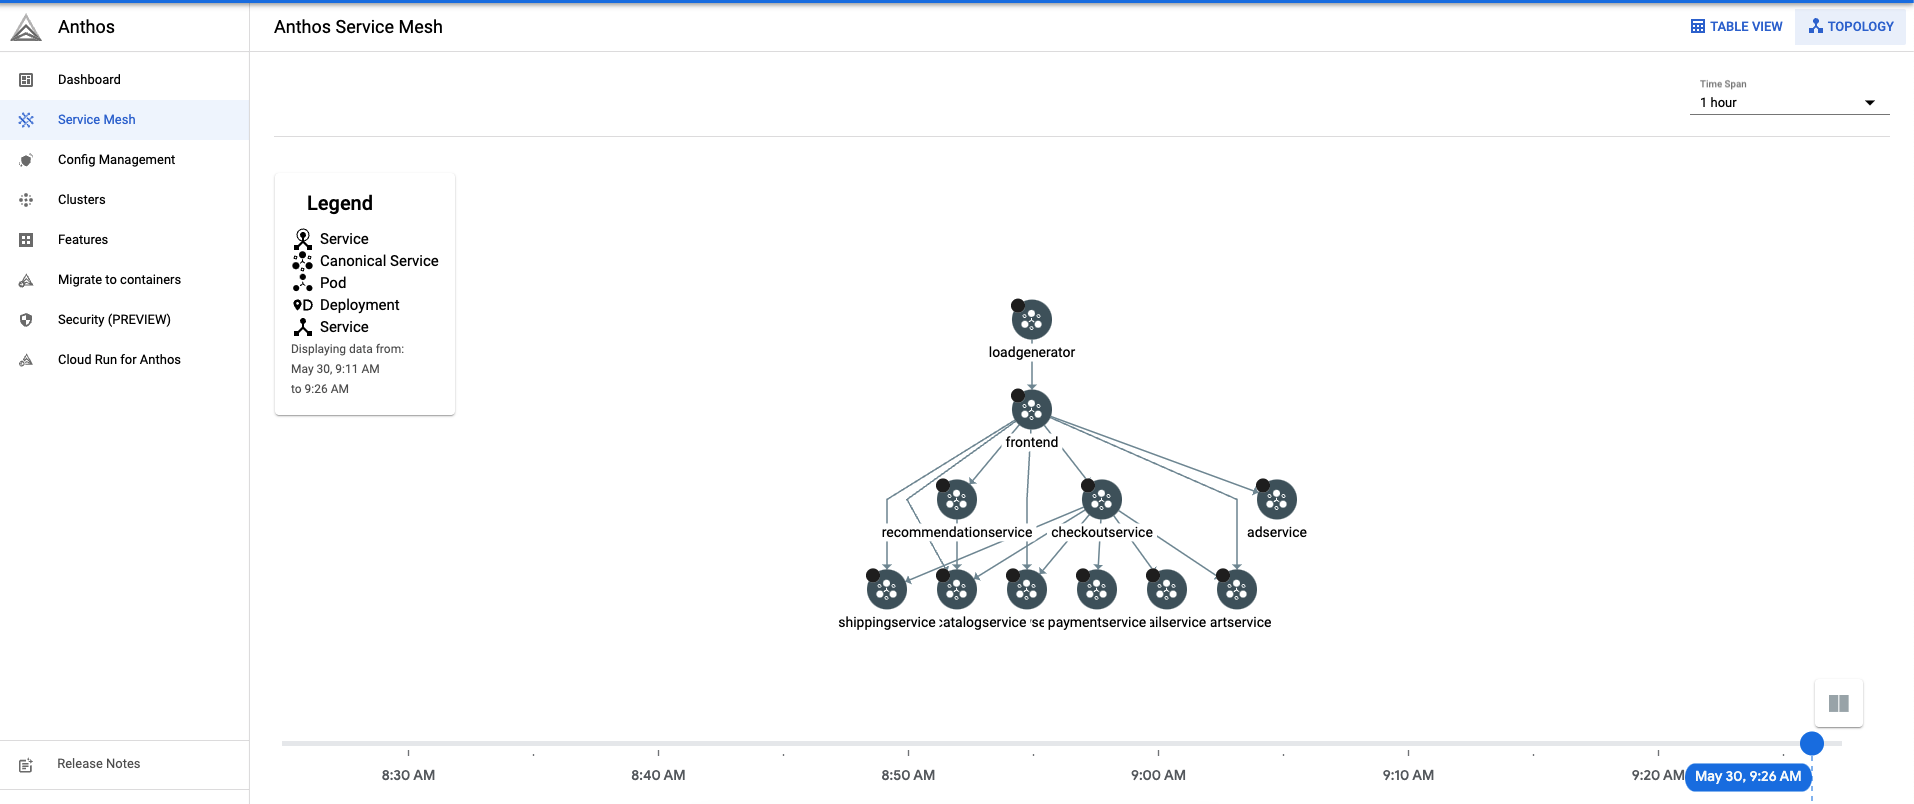
3. In the top right, click on **Topology**.
Here you can view your services and their interaction with each other.
You can expand services and view the requests per second for each of your services by hovering over on them with your cursor.
4. Navigate back to the **Table View**.
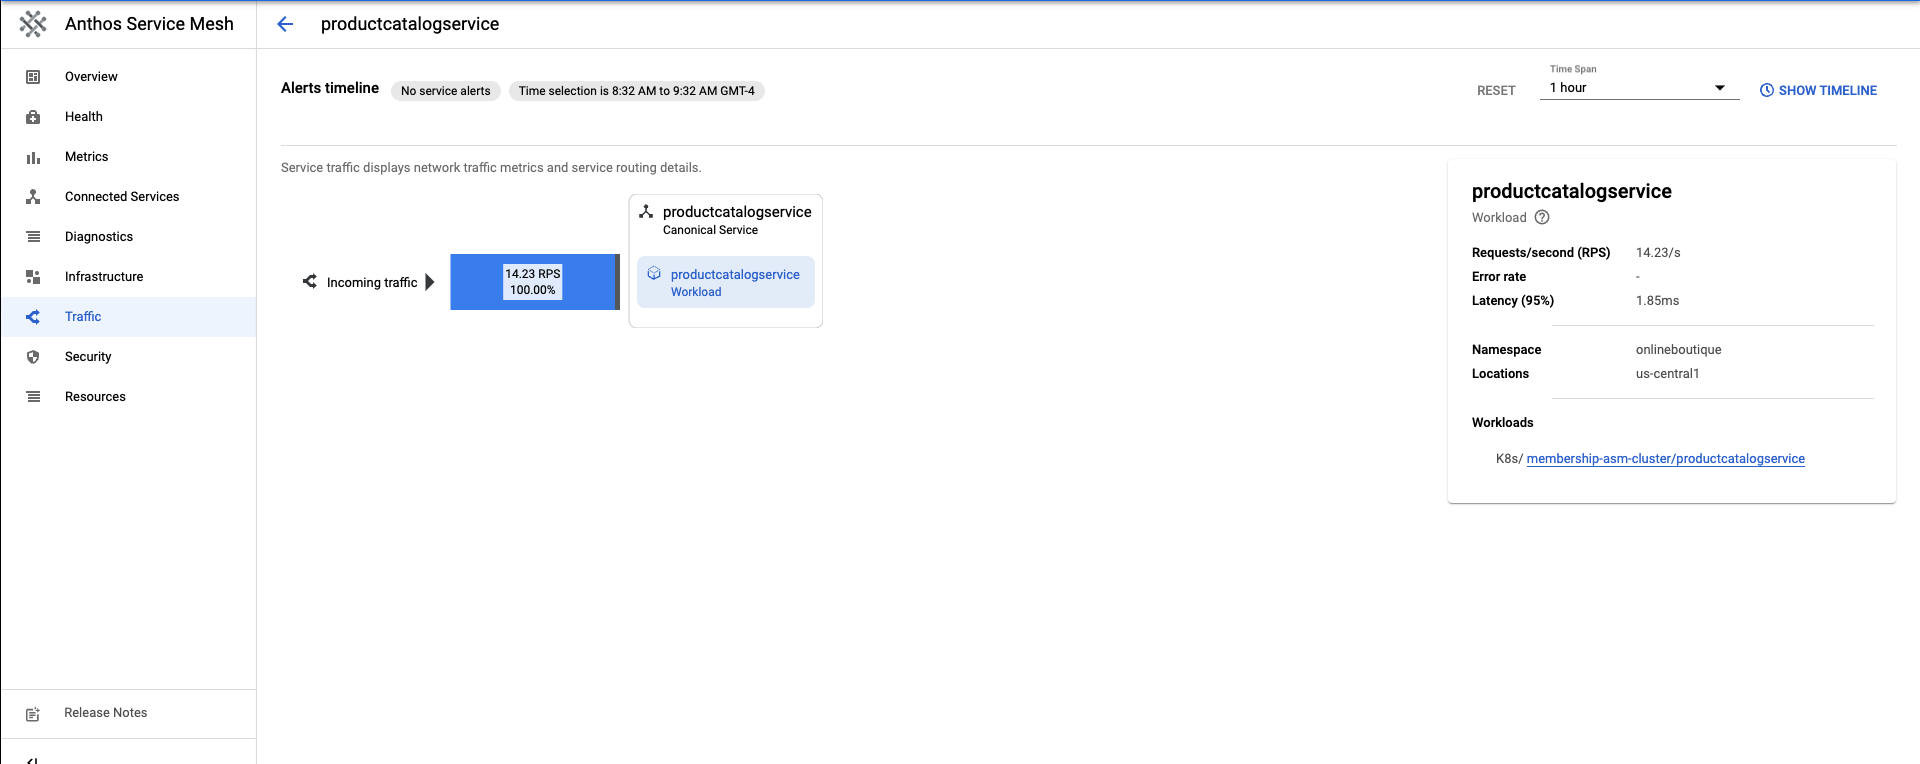
5. In the **Services Table** , select `productcatalogservice`. This will take you to an overview of your service.
6. On the left side of the screen, click **Traffic**.
7. Ensure 100% of the incoming traffic to `productcatalogservice` goes to the workload service.
The next section will go through creating a v2 of the `productcatalog` service.
## Deploy v2 of a service
1. For this tutorial, `productcatalogservice-v2` will introduce a 3-second latency into requests with the `EXTRA_LATENCY` field.
```yaml
apiVersion: apps/v1
kind: Deployment
metadata:
name: productcatalogservice-v2
spec:
selector:
matchLabels:
app: productcatalogservice
template:
metadata:
labels:
app: productcatalogservice
version: v2
spec:
containers:
- env:
- name: PORT
value: '3550'
- name: EXTRA_LATENCY
value: 3s
name: server
image: gcr.io/google-samples/microservices-demo/productcatalogservice:v0.3.6
livenessProbe:
exec:
command: ["/bin/grpc_health_probe", "-addr=:3550"]
ports:
- containerPort: 3550
readinessProbe:
exec:
command: ["/bin/grpc_health_probe", "-addr=:3550"]
resources:
limits:
cpu: 200m
memory: 128Mi
requests:
cpu: 100m
memory: 64Mi
terminationGracePeriodSeconds: 5
```
Apply this resource to the `onlineboutique`namespace.
kubectl apply -f productcatalog-v2.yaml -n onlineboutique
2. Check on your application pods.
kubectl get pods -n onlineboutique
Expected output:
NAME READY STATUS RESTARTS AGE
adservice-85598d856b-8wqfd 2/2 Running 0 25h
cartservice-c77f6b866-7jwcr 2/2 Running 0 25h
checkoutservice-654c47f4b6-n8c6x 2/2 Running 0 25h
currencyservice-59bc889674-l5xw2 2/2 Running 0 25h
emailservice-5b9fff7cb8-jjr89 2/2 Running 0 25h
frontend-77b88cc7cb-bwtk4 2/2 Running 0 25h
loadgenerator-6958f5bc8b-lqmnw 2/2 Running 0 25h
paymentservice-68dd9755bb-dckrj 2/2 Running 0 25h
productcatalogservice-84f95c95ff-ddhjv 2/2 Running 0 25h
productcatalogservice-v2-6df4cf5475-9lwjb 2/2 Running 0 8s
recommendationservice-64dc9dfbc8-7s7cx 2/2 Running 0 25h
redis-cart-5b569cd47-vw7lw 2/2 Running 0 25h
shippingservice-5488d5b6cb-dj5gd 2/2 Running 0 25h
Note that there are now two `productcatalogservices` listed.
3. The `DestinationRule` is how to specify the subsets of a service. In this scenario, there is a subset for v1 and for v2 of `productcatalogservice`.
```yaml
apiVersion: networking.istio.io/v1beta1
kind: DestinationRule
metadata:
name: productcatalogservice
spec:
host: productcatalogservice
subsets:
- labels:
version: v1
name: v1
- labels:
version: v2
name: v2
```
Note the `labels` field. The versions of `productcatalogservice` are distinguished after the traffic is routed by the `VirtualService`.
Apply the `DestinationRule`:
kubectl apply -f destination-v1-v2.yaml -n onlineboutique
### Split Traffic between v1 and v2
1. A `VirtualService` is how you introduce a small percentage of the traffic to direct to v2 of the `productcatalogservice`.
```yaml
apiVersion: networking.istio.io/v1beta1
kind: VirtualService
metadata:
name: productcatalogservice
spec:
hosts:
- productcatalogservice
http:
- route:
- destination:
host: productcatalogservice
subset: v1
weight: 75
- destination:
host: productcatalogservice
subset: v2
weight: 25
```
The subset field indicates the version, and the weight field indicates the percentage split of traffic. 75% of traffic will go to v1 of productcatalog, and 25% will go to v2.
Apply the `VirtualService`:
kubectl apply -f vs-split-traffic.yaml -n onlineboutique
If you visit the `EXTERNAL_IP` of the cluster's ingress, you should notice that periodically, the frontend is slower to load.
In the next section, you will explore the traffic split in GKE Enterprise Google Cloud console.
## Observe the Traffic Split in Google Cloud console
1. Return to Google Cloud console and go to GKE Enterprise Services page
[Go to GKE Enterprise Services](https://console.cloud.google.com/anthos/services)
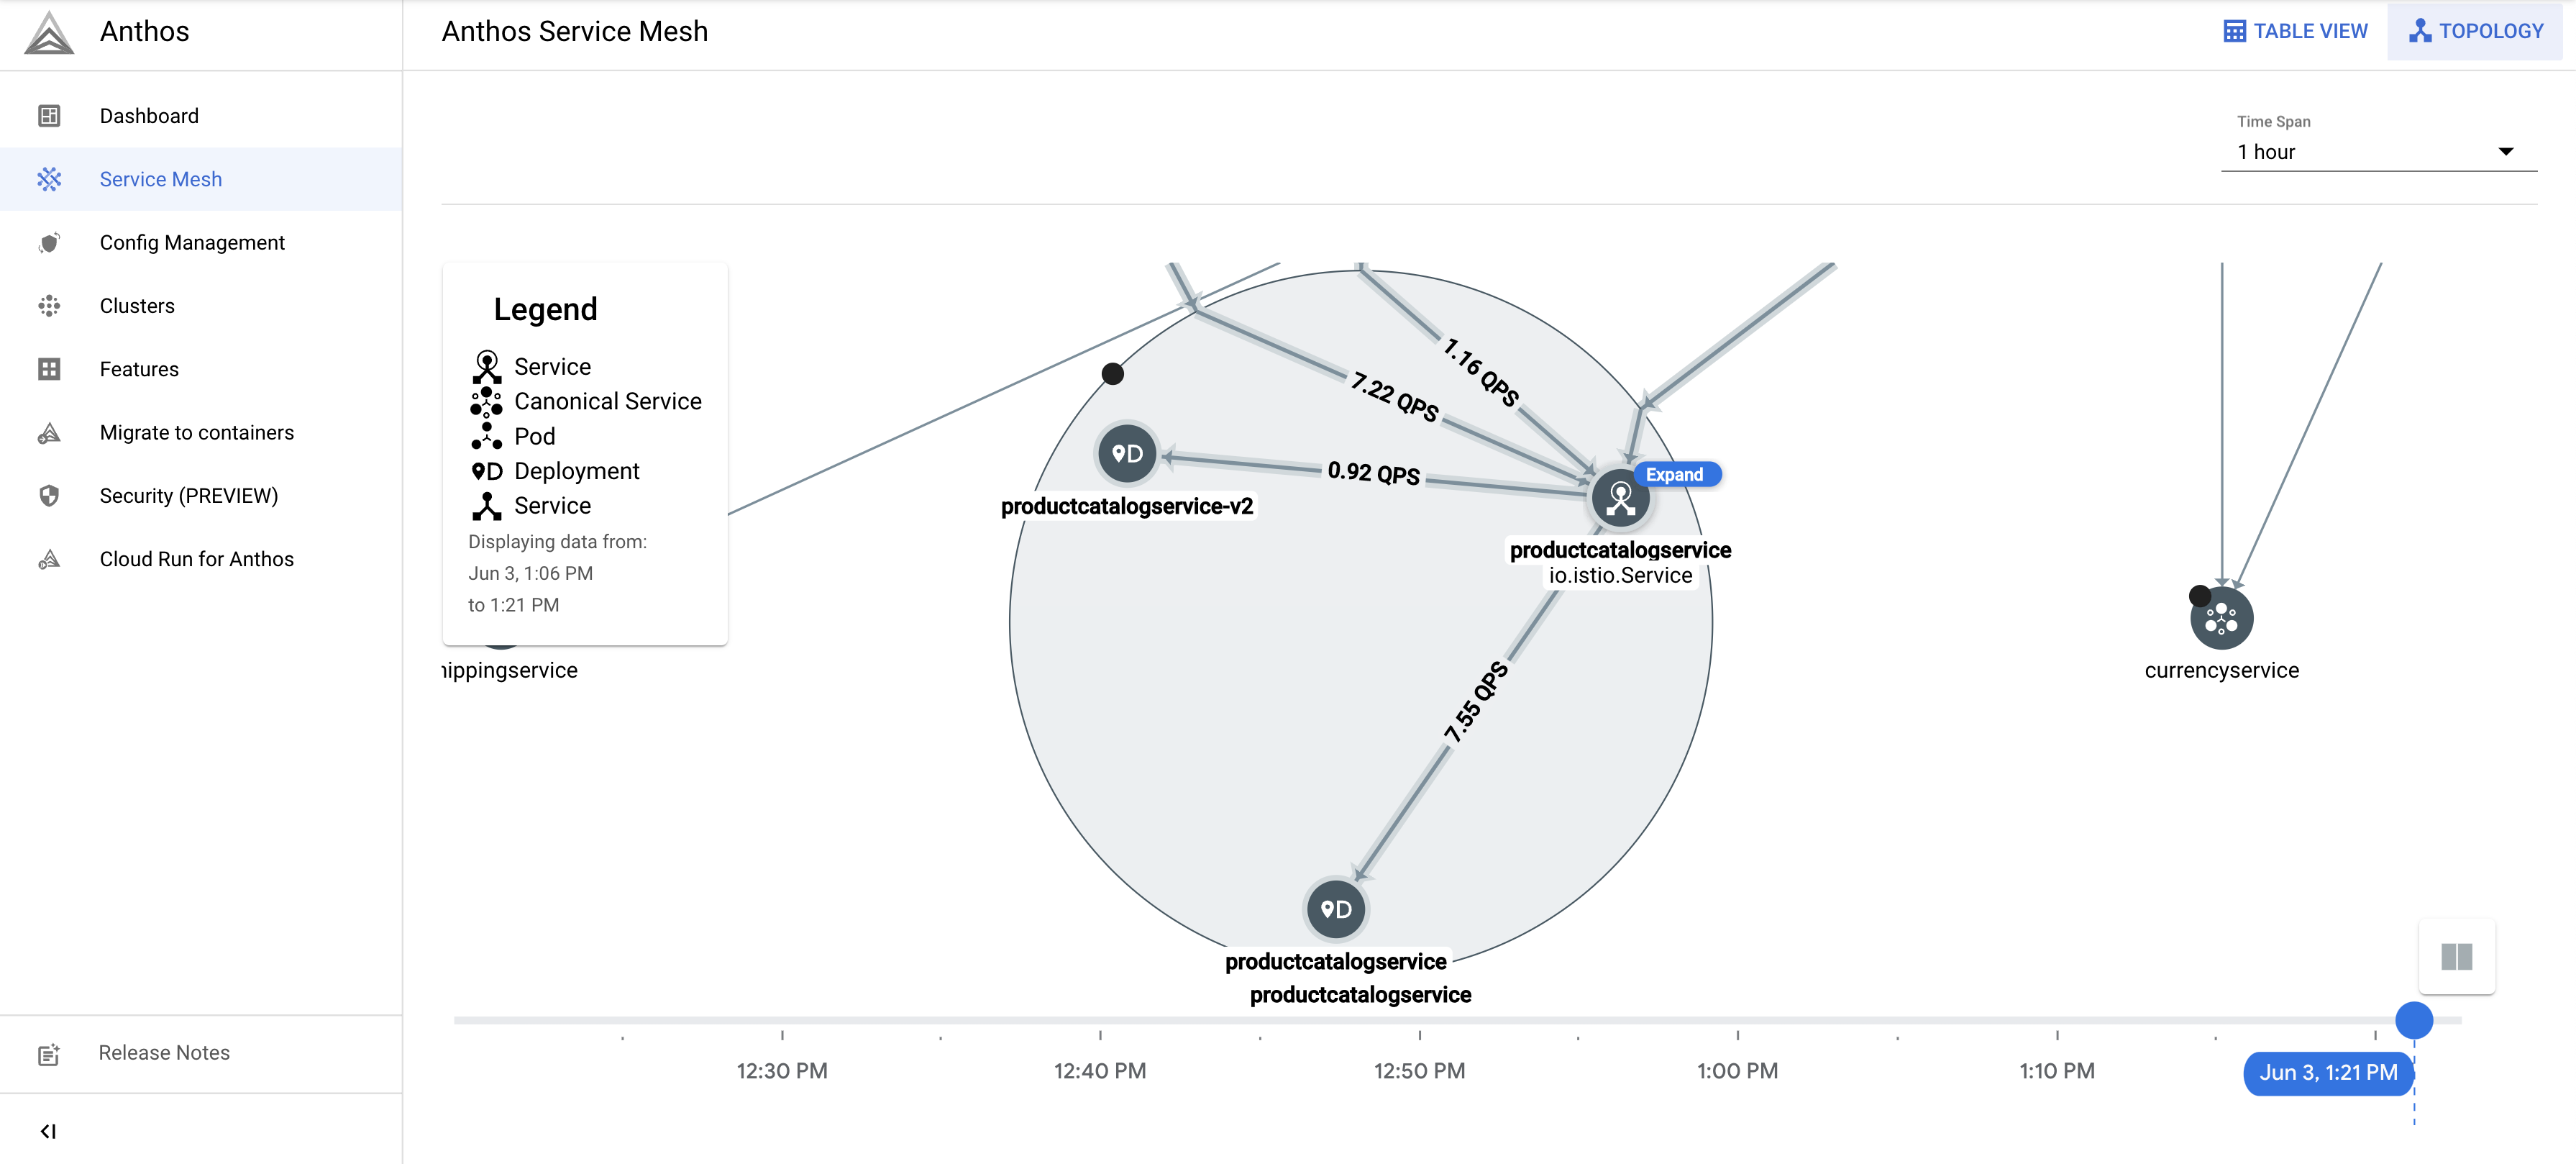
2. In the top right, click on **Topology**.
**Expand** the `productcatalogservice` workload. You will see `productcatalogservice` and `productcatalogservice-v2` deployments.
3. Return to the **Table View** . Click `productcatalogservice` in the Services Table.
Return to **Traffic** on the left navigation bar.
4. Note that the incoming traffic is split between v1 and v2 by the percentage specified in the `VirtualService` file, and that there are 2 workloads of the productcatalog service.
On the right side of the screen, you will see Requests, Error Rate, and Latency Metrics. With Cloud Service Mesh, each service will have these metrics outlined to provide you the observability.

> [!NOTE]
> **Note:** It will take some time for the actual 75-25 split to be shown, since traffic over time will be directed to the `v2` service.
## Rollout or Rollback to a version
After observing the metrics during a canary deployment, you can rollout to the new service, or rollback to the old service by leveraging the `VirtualService` resource.
### Rollout
Once you are satisfied with the behavior of a v2 service, incrementally increase the behavior of traffic to the v2 service. Eventually, traffic can be directed 100% to the new service.
```yaml
apiVersion: networking.istio.io/v1beta1
kind: VirtualService
metadata:
name: productcatalogservice
spec:
hosts:
- productcatalogservice
http:
- route:
- destination:
host: productcatalogservice
subset: v2
```
To direct all the traffic to v2 of `productcatalogservice`:
kubectl apply -f vs-v2.yaml -n onlineboutique
### Rollback
If you need to roll back to the v1 service, simply apply the `destination-vs-v1.yaml` from earlier. This will direct traffic only to v1 of `productcatalogservice`.
```yaml
apiVersion: networking.istio.io/v1beta1
kind: VirtualService
metadata:
name: productcatalogservice
spec:
hosts:
- productcatalogservice
http:
- route:
- destination:
host: productcatalogservice
subset: v1
```
To direct all the traffic to v1 of `productcatalogservice`:
kubectl apply -f vs-v1.yaml -n onlineboutique
## Clean up
To avoid incurring charges to your Google Cloud account for the resources used in this
tutorial, either delete the project that contains the resources, or keep the project and
delete the individual resources.
To avoid incurring continuing charges to your Google Cloud account for
the resources used in this tutorial, you can either delete the project or delete
the individual resources.
### Delete the project
> [!CAUTION]
> **Caution:** Deleting a project has the following effects:
>
> - **Everything in the project is deleted.** If you used an existing project for this tutorial, when you delete it, you also delete any other work you've done in the project.
> - **Custom project IDs are lost.** When you created this project, you might have created a custom project ID that you want to use in the future. To preserve the URLs that use the project ID, such as an appspot.com URL, delete selected resources inside the project instead of deleting the whole project.
1. In Cloud Shell, delete the project:
gcloud projects delete PROJECT_ID
### Delete the resources
- If you want to prevent additional charges, delete the cluster:
gcloud container clusters delete CLUSTER_NAME \
--project=PROJECT_ID \
--zone=CLUSTER_LOCATION
- If you want to keep your cluster and remove the Online Boutique sample:
1. Delete the application namespaces:
kubectl delete -f namespace onlineboutique
Expected output:
namespace "onlineboutique" deleted
2. Delete the service entries:
kubectl delete -f https://raw.githubusercontent.com/GoogleCloudPlatform/microservices-demo/main/istio-manifests/frontend.yaml -n onlineboutique
kubectl delete -f https://raw.githubusercontent.com/GoogleCloudPlatform/microservices-demo/main/istio-manifests/frontend-gateway.yaml -n onlineboutique
Expected output:
serviceentry.networking.istio.io "allow-egress-googleapis" deleted
serviceentry.networking.istio.io "allow-egress-google-metadata" deleted
## What's next
- For a general guide on configuring `PeerAuthentication` policies, see [Configuring transport security](https://docs.cloud.google.com/service-mesh/v1.19/docs/security/configuring-mtls.md.txt).