# Options for Compute Engine VM setup using automatic Envoy deployment
> [!NOTE]
> **Note:** This guide only supports Cloud Service Mesh with Google Cloud APIs and does not support Istio APIs. For more information see, [Cloud Service Mesh overview](https://docs.cloud.google.com/service-mesh/docs/overview.md.txt).
This guide provides you with information on additional options and tasks for
automated Envoy deployment.
## Additional instance template creation options
When you create an instance template for automated Envoy proxy deployment, you
can use the following parameters to define some aspects of the deployment and
the behavior of the proxies.
| Parameter | Value and Description | Required or optional |
|---|---|---|
| `--service-proxy` | `enabled` Controls whether the service proxy and agent are installed and configured on the VM. | Required if you want to automatically deploy and configure the service proxy. If you omit this setting, the service proxy isn't installed or configured. |
| `--service-proxy:serving-ports` | A semicolon-separated list of ports. The port(s) on which your application/workload is serving. The service proxy intercepts inbound traffic, then forwards it to the specified serving port(s) on localhost. | Optional If you omit this flag, the service proxy only handles outbound traffic from your workload. Inbound traffic is not handled by the service proxy. |
| `--service-proxy:proxy-port` | A single port. The port on which the service proxy listens. The VM intercepts traffic and redirects it to this port for handling by the service proxy. | Optional. If you omit this flag, the value defaults to `15001` |
| `--service-proxy:network` | The name of a valid VPC network. The Google Cloud VPC network used by the service proxy's control plane to generate dynamic configuration for the service proxy. | Required if the VM is on more than one network; otherwise, this is optional. If you omit this flag, the value that is specified using the `--network` parameter during VM instance template creation is used. |
| `--service-proxy:tracing` | `ON` or `OFF` Enables the service proxy to generate distributed tracing information. If set to `ON`, the service proxy's control plane generates configuration that enables request ID-based tracing. For more information, refer to the [`generate_request_id`](https://www.envoyproxy.io/docs/envoy/latest/api-v3/extensions/filters/network/http_connection_manager/v3/http_connection_manager.proto.html) documentation for the Envoy proxy. | Optional. If you omit this flag, tracing is not enabled. |
| `--service-proxy:access-log` | The file path for access logs sent to the service proxy by the control plane. All incoming and outgoing requests are recorded in this file. For more information, refer to the [File access log](https://www.envoyproxy.io/docs/envoy/latest/api-v3/extensions/access_loggers/file/v3/file.proto) documentation for the Envoy proxy. | Optional. There is no default value. If you do not specify the file path, the logs are not created. |
| `--service-proxy:intercept-all-outbound-traffic` (Preview) | Enables interception of all outgoing traffic by the service proxy and then redirect to an external host. Use `gcloud beta` with this option. | Optional. |
| `--service-proxy:exclude-outbound-ip-ranges` (Preview) | A semicolon-separated (;) list of the IP addresses or CIDR ranges, specified inside quotation marks ("), that should be excluded from redirection. Only applies when the `intercept-all-outbound-traffic` flag is set. Use `gcloud beta` with this option. For example:
`exclude-outbound-ip-ranges="8.8.8.8;129.168.10.0/24"` | Optional. |
| `--service-proxy:exclude-outbound-port-ranges` (Preview) | A semicolon-separated (;) list of the ports or port ranges, specified inside quotation marks ("), that should be excluded from redirection. Only applies when the `intercept-all-outbound-traffic` flag is set. Use `gcloud beta` with this option. For example:
`exclude-outbound-port-ranges="81;8080-8090"` | Optional. |
| `--service-proxy:scope` (Preview) | The `scope` option defines a logical configuration boundary for the `Gateway` resource. When a VM starts, the service proxy communicates with Cloud Service Mesh to retrieve the routing information corresponding to the routes attached to the gateway with this scope name. When `scope` is specified, network value is ignored. You cannot specify `scope` and `mesh` values at the same time. Use `gcloud beta` with this option. | Optional. |
| `--service-proxy:mesh` (Preview) | The `mesh` option defines a logical configuration boundary for a `Mesh` resource. When a VM starts, the service proxy communicates with Cloud Service Mesh to retrieve the routing information corresponding to the routes attached to the `Mesh` with this mesh name. When `mesh` is specified, the network value is ignored. You cannot specify `scope` and `mesh` values at the same time. Use `gcloud beta` with this option | Optional. |
| `--service-proxy:project-number` (Preview) | The `project-number` option specifies the project where the `Mesh` and `Gateway` resources are created. If not specified, the project where the instance exists is used. This is applicable only to the new service routing APIs. | Optional. |
| `--service-proxy:use-regional-control-plane` | Allows the VM to connect to the regional endpoint of Cloud Service Mesh. | Optional. |
| `--service-proxy:envoy-bootstrap` | Takes a gcs path of a JSON file to be used as a custom Envoy bootstrap config. For example, `gs://gcs-bucket/bootstrap.json`. | Optional. |
| `--service-proxy-labels` | Key/value pairs in the format `key=value`. Labels that you can apply to your service proxy. These are reflected in your Envoy proxy's bootstrap metadata. The labels can be any `key=value` pairs that you want to set as proxy metadata (for example, for use with [config filtering](https://docs.cloud.google.com/service-mesh/docs/service-routing/advanced-traffic-management.md.txt#config-filtering-metadata). You might use these flags for application and version labels, for example, `app=review` or `version=canary`. You can also use these together. | Optional. |
For example, the following `gcloud` command creates an instance template
called `proxy-it`. Instances created from this template have the Envoy proxy and
service proxy agent installed.
```
gcloud compute instance-templates create proxy-it \
--service-proxy enabled,use-regional-control-plane
```
In the following example, the instance template is called `proxy-it`, the Envoy
proxy and service proxy agent are installed, the serving port and proxy port are
set, tracing is enabled, and a label is defined.
```
gcloud compute instance-templates create proxy-it \
--service-proxy enabled,serving-ports=8080,proxy-port=15001,tracing=ON \
--service-proxy-labels version=canary
```
The following diagram illustrates the traffic flow when you specify the serving
port as `8080`. Inbound TCP connections to port `8080` are intercepted by
iptables and redirected to the Envoy proxy, which then passes them to the
application on your VM listening on TCP port `8080`. In addition:
- All outbound connections to the VIPs of services configured in Cloud Service Mesh are intercepted by iptables, which configures netfilter. Netfilter ensures that the corresponding traffic traversing the network stack is intercepted and redirected to the Envoy proxy. The traffic is then load balanced based on how you have Cloud Service Mesh configured.
- All other inbound connections are not intercepted by iptables, and are passed directly services on the VM.
- All connections to external endpoints are directly passed to external IP addresses without being intercepted.
- All UDP traffic is passed directly to the destination without being intercepted by iptables.
This is illustrated in the following diagram.
[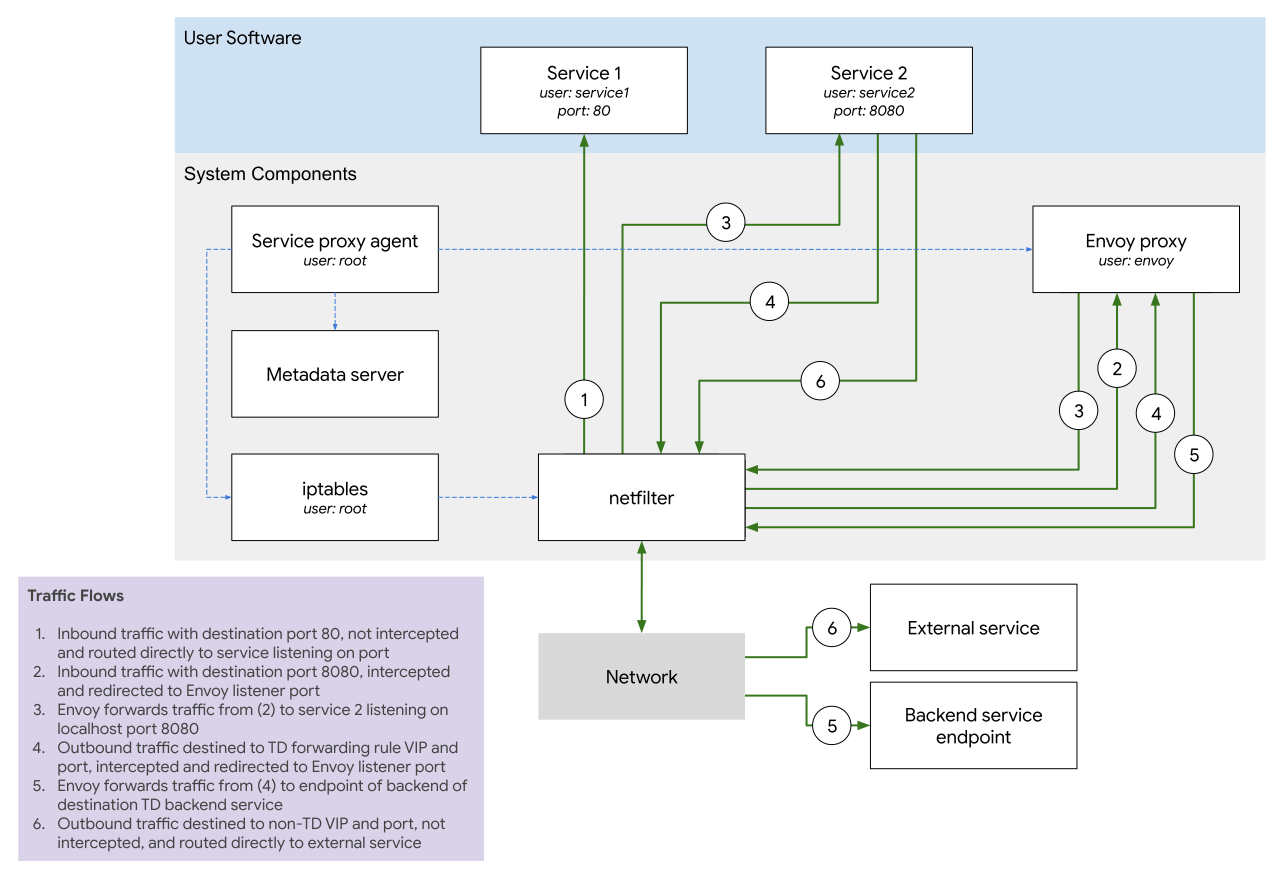](https://docs.cloud.google.com/static/service-mesh/docs/images/td-auto-envoy.svg) Traffic distribution with Cloud Service Mesh (click to enlarge)
The traffic flows in the diagram are as follows:
1. Inbound traffic with destination port `80`, not intercepted and routed directly to service listening on the port.
2. Inbound traffic with destination port `8080`, intercepted and redirected to the Envoy listener port.
3. Envoy forwards traffic from (2) to service 2 listening on localhost port `8080`.
4. Outbound traffic destined to Cloud Service Mesh forwarding rule VIP and port, intercepted and redirected to Envoy listener port.
5. Envoy forwards traffic from (4) to endpoint of backend of destination Cloud Service Mesh backend service.
6. Outbound traffic destined to non-Cloud Service Mesh VIP and port, not intercepted, and routed directly to external service.
## Using labels
If you want to specify labels to use with Cloud Service Mesh metadata
filtering or enable access logging for the Envoy proxies, use the
`--service-proxy-labels` or `--service-proxy access-log` parameters.
For example:
```
gcloud compute instance-templates create td-vm-template-auto \
--service-proxy enabled,access-log=/var/log/envoy/access.log,network=default \
--service-proxy-labels myapp=review,version=canary
```
The Envoy proxy can intercept the health check ports for services on the VMs. If
you do this, the health check probes report on your application and on the Envoy
proxies. Traffic is not directed to the VM if the Envoy proxy is not running
correctly. For example:
```
gcloud compute instance-templates create td-vm-template-auto \
--service-proxy=enabled,serving-ports="80;8080"
```
## Using the managed instance group update process
If you used the [automated process](https://docs.cloud.google.com/service-mesh/legacy/load-balancing-apis/auto-vms-options.md.txt#auto-envoy-config) for configuring the
Envoy proxies, you can use the [managed instance group update process](https://docs.cloud.google.com/compute/docs/instance-groups/rolling-out-updates-to-managed-instance-groups.md.txt)
to update your managed instance group. Use this process to:
- Add the service proxy components to an existing managed instance group and enroll it in a Cloud Service Mesh network.
- Update the service proxy components on the VMs.
Before you perform the rolling update, do the following.
1. Set [connection draining](https://docs.cloud.google.com/load-balancing/docs/enabling-connection-draining.md.txt) on the backend service to a value of at least 30 seconds.
2. Use the `--min-ready` parameter, set to a value of 3 minutes or more, when you call the updater. The `--min-ready` parameter makes the managed instance group wait after a VM is updated before proceeding to update the next VM. Without this, the newly-created VM has no time to fully boot up Envoy and the service proxy agent, and the update proceeds too quickly.
To perform the rolling update on the managed instance group, follow these
steps.
1. Create a new instance template, as described above, with the service proxy information. The original version of the instance template can be used for the update if it contains the service proxy information and your goal is to update to the most recent stable version of the proxy software.
2. Perform a rolling update of the managed instance group. Make sure that you set `REPLACE` as the [minimum action that the Updater must perform](https://docs.cloud.google.com/compute/docs/instance-groups/rolling-out-updates-to-managed-instance-groups.md.txt#minimal_action). The instance group installs the latest version of the proxy software and configures it as specified in the instance template.
You can also remove the service proxy components from a managed instance group
using the update process:
1. Create a new instance template without specifying the flag `--service-proxy`.
2. Perform a rolling update using the managed instance group update process.
This removes the Envoy proxy from your VMs. If that managed instance group was
the only MIG attached to the backend service, you might want to remove the
Cloud Service Mesh configuration that you created when you set up
Cloud Service Mesh.