

Creating a Deployment Manager-based solution
When creating Service Catalog solutions for users in your organization, you can create a Deployment Manager (DM) solution, which users launch using a Deployment Manager template. After you create a solution, you can share it with your users by adding it to catalogs.
Before you begin
You must have the Catalog Admin (
roles/cloudprivatecatalogproducer.admin) OR Catalog Manager (roles/cloudprivatecatalogproducer.manager) role for the Google Cloud organization associated with the Google Cloud project which has Service Catalog enabled. If you don't have this role, contact your Organization Administrator to request access.-
Enable the Cloud Deployment Manager and Compute Engine APIs.
Roles required to enable APIs
To enable APIs, you need the
serviceusage.services.enablepermission. If you created the project, then you likely already have this permission through the Owner role (roles/owner). Otherwise, you can get this permission through the Service Usage Admin role (roles/serviceusage.serviceUsageAdmin). Learn how to grant roles.
Preparing your deployment template
To create a Deployment Manager solution in Service Catalog, you first prepare a Deployment Manager template zip file to upload, which must contain the following files:
- A Jinja template file ending in the
.jinjaextension or a Python template file ending in the.pyextension. - A
schema file
ending in the
.jinja.schemaextension for a Jinja template or thepy.schemaextension for a Python template.
The name of the zip file must match the names of both the schema and Jinja or
Python files. For example, if the zip file is named
android-dev-environment.zip, the Jinja schema file inside the zip must be
named android-dev-environment.jinja.schema and the Jinja template must be
named android-dev-environment.jinja.
The following code sample illustrates a schema file to create a deployment form:
info:
  title: Single Google Compute Engine Machine
  author: Google Inc.
  description: Creates a virtual machine based on zone and machine type selection.

required:
  - machinetype
  - zone

properties:
  machinetype:
    title: Machine type
    type: string
    enum:
      - n2-standard-2
      - n2-standard-4
      - n2-standard-8
      - n2-highmem-2
      - n2-highmem-4
      - n2-highmem-8
      - n2-highcpu-2
      - n2-highcpu-4
      - n2-highcpu-8
  zone:
    title: Zone
    type: string
    enum:
      - us-central1-a
      - us-central1-c
      - us-east1-b
      - us-east1-c
      - us-west1-a
      - us-west1-b
      - us-west1-c
The following code sample illustrates a Jinja file to create a persistent VM:
# Creates a Persistent VM
resources:
- type: compute.v1.instance
  name: vm-{{ env["deployment"] }}
  properties:
    zone: {{ properties["zone"] }}
    # Note the machineType definition at the end. n2-custom-4-5120 specifies n2 machine family with 4 CPUs and 5GB (5120 MB) of RAM. For custom machine types, refer to https://cloud.google.com/compute/docs/instances/creating-instance-with-custom-machine-type
    machineType: https://www.googleapis.com/compute/v1/projects/{{ env["project"] }}/zones/{{ properties["zone"] }}/machineTypes/{{ properties["machinetype"] }}
    disks:
    - deviceName: boot
      type: PERSISTENT
      boot: true
      autoDelete: true
      initializeParams:
        diskName: disk-{{ env["deployment"] }}
        sourceImage: https://www.googleapis.com/compute/v1/projects/debian-cloud/global/images/family/debian-9
    networkInterfaces:
    - network: https://www.googleapis.com/compute/v1/projects/{{ env["project"] }}/global/networks/default
      # Access Config required to give the instance a public IP address
      accessConfigs:
      - name: External NAT
        type: ONE_TO_ONE_NAT
Creating the solution in Service Catalog
To create a Deployment Manager template-based solution:
Go to the Service Catalog Admin Solutions page in the Google Cloud console.
Go to the Solutions pageClick Select to choose the Google Cloud project.
Click CREATE SOLUTION. In the drop-down list, select Create a DM solution.
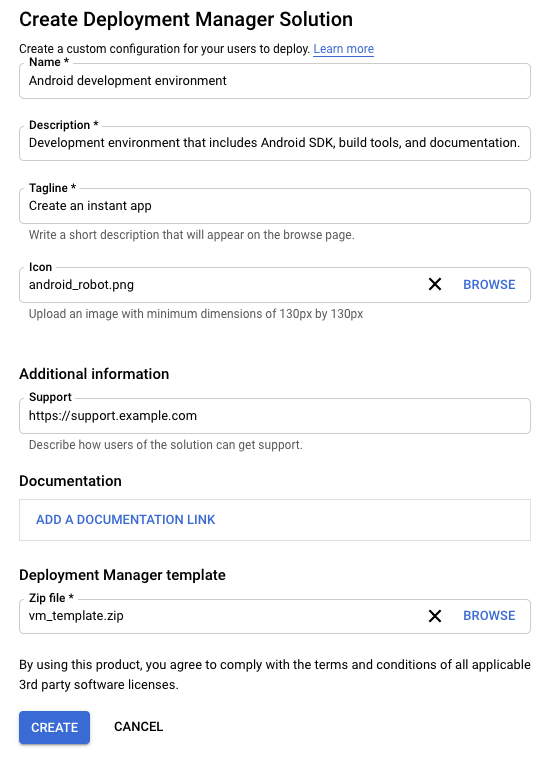
Enter a name, description, and tagline for your solution. The tagline is a short description of a solution that users see as they browse Service Catalog.
Upload a zip file, containing the files for a deployment configuration.
Optionally, upload an icon for the solution. The recommended dimensions for an icon are 80 by 80 pixels.
Optionally, enter a support link and contact information for the creator.
Optionally, add a link to the documentation for the solution.
Click CREATE.
The following screenshot illustrates creating a DM-based solution:
Next steps
- Assign the solution to a catalog, so that users in your organization can access and deploy the solution.