This tutorial shows how to implement an automated data quarantine and
classification system using Cloud Storage and other Google Cloud
products. The tutorial assumes that you are familiar with
Google Cloud and basic shell programming.
In every organization, data protection officers like you face an ever-increasing
amount of data, data that must be protected and treated appropriately.
Quarantining and classifying that data can be complicated and time consuming,
especially given hundreds or thousands of files a day.
What if you could take each file, upload it to a quarantine location, and have
it automatically classified and moved to the appropriate location based on the
classification result? This tutorial shows you how to implement such a system by
using
[Cloud Run functions](https://docs.cloud.google.com/functions),
[Cloud Storage](https://docs.cloud.google.com/storage),
and
[Sensitive Data Protection](https://docs.cloud.google.com/sensitive-data-protection).
## Objectives
- Create Cloud Storage buckets to be used as part of the quarantine and classification pipeline.
- Create a Pub/Sub topic and subscription to notify you when file processing is completed.
- Create a simple Cloud Function that invokes the DLP API when files are uploaded.
- Upload some sample files to the quarantine bucket to invoke the Cloud Function. The function uses the DLP API to inspect and classify the files and move them to the appropriate bucket.
## Costs
This tutorial uses billable Google Cloud components, including:
- Cloud Storage
- Cloud Run functions
- Sensitive Data Protection
You can use the
[Pricing Calculator](https://cloud.google.com/products/calculator/)
to generate a cost estimate based on your projected usage.
## Before you begin
## Granting permissions to service accounts
Your first step is to grant permissions to two service accounts: the
Cloud Run functions service account and the
Cloud Data Loss Prevention Service Agent.
### Grant permissions to the App Engine default service account
1. In the Google Cloud console, open the IAM \& Admin page and select the
project you created:
[Go to IAM](https://console.cloud.google.com/iam-admin/iam)
2. Locate the App Engine service account. This account has the
format `[PROJECT_ID]@appspot.gserviceaccount.com`. Replace `[PROJECT_ID]`
with your project ID.
3. Select the edit icon next to the
service account.
4. Add the following roles:
- **DLP Administrator**
- **DLP API Service Agent**
5. Click **Save**.
### Grant permissions to the Cloud Data Loss Prevention Service Agent
The Cloud Data Loss Prevention Service Agent is created the first time it is
needed.
1. In Cloud Shell, create the Cloud Data Loss Prevention Service Agent by making a call to [`InspectContent`](https://docs.cloud.google.com/sensitive-data-protection/docs/reference/rest/v2/projects.content/inspect.md.txt):
```bash
curl --request POST
"https://dlp.googleapis.com/v2/projects/PROJECT_ID/locations/us-central1/content:inspect"
--header "X-Goog-User-Project: PROJECT_ID"
--header "Authorization: Bearer $(gcloud auth print-access-token)"
--header 'Accept: application/json'
--header 'Content-Type: application/json'
--data '{"item":{"value":"google@google.com"}}'
--compressed
```
Replace `PROJECT_ID` with your [project ID](https://docs.cloud.google.com/resource-manager/docs/creating-managing-projects.md.txt#before_you_begin).
2. In the Google Cloud console, open the **IAM \& Admin** page and select
the project you created:
[Go to IAM](https://console.cloud.google.com/iam-admin/iam)
3. Select the include Google-provided role grants checkbox
4. Locate the Cloud Data Loss Prevention Service Agent. This
account has the format
`service-[PROJECT_NUMBER]@dlp-api.iam.gserviceaccount.com`. Replace
`[PROJECT_NUMBER]` with your project number.
5. Select the edit icon next to the
service account.
6. Add the role **Project** \> **Viewer** , and then click **Save**.
## Building the quarantine and classification pipeline
In this section, you build the quarantine and classification pipeline shown in
the following diagram.
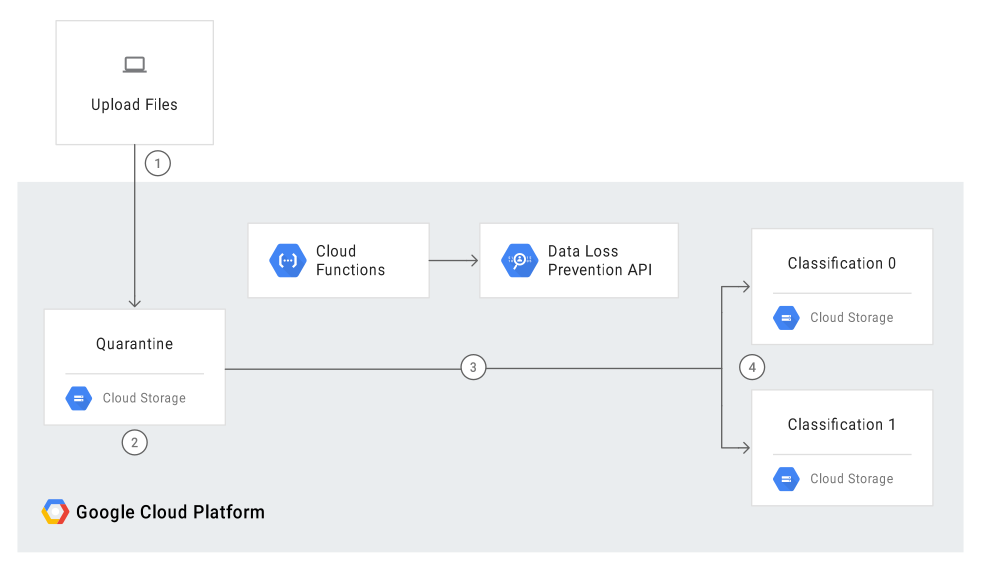
The numbers in this pipeline correspond to these steps:
1. You upload files to Cloud Storage.
2. You invoke a Cloud Function.
3. Sensitive Data Protection inspects and classifies the data.
4. The file is moved to the appropriate bucket.
### Create Cloud Storage buckets
Following the guidance outlined in the
[bucket naming guidelines](https://docs.cloud.google.com/storage/docs/buckets.md.txt#naming),
create three uniquely named buckets, which you use throughout this tutorial:
- **Bucket 1** : Replace `[YOUR_QUARANTINE_BUCKET]` with a unique name.
- **Bucket 2** : Replace `[YOUR_SENSITIVE_DATA_BUCKET]` with a unique name.
- **Bucket 3** : Replace `[YOUR_NON_SENSITIVE_DATA_BUCKET]` with a unique name.
*** ** * ** ***
### console
1. In the Google Cloud console, open the Cloud Storage browser:
[Go to Cloud Storage](https://console.cloud.google.com/storage/browser/)
2. Click **Create bucket**.
3. In the **Bucket name** text box, enter the name you selected for
`[YOUR_QUARANTINE_BUCKET]`, and then click **Create**.
4. Repeat for the `[YOUR_SENSITIVE_DATA_BUCKET]` and
`[YOUR_NON_SENSITIVE_DATA_BUCKET]` buckets.
### gcloud
1. Open Cloud Shell:
[Go to Cloud Shell](https://console.cloud.google.com/cloudshell)
2. Create three buckets using the following commands:
```
gcloud storage buckets create gs://[YOUR_QUARANTINE_BUCKET]
gcloud storage buckets create gs://[YOUR_SENSITIVE_DATA_BUCKET]
gcloud storage buckets create gs://[YOUR_NON_SENSITIVE_DATA_BUCKET]
```
### Create a Pub/Sub topic and subscription
### console
1. Open the **Pub/Sub Topics** page:
[Go to Pub/Sub topics](https://console.cloud.google.com/cloudpubsub/topicList)
2. Click **Create topic**.
3. In the text box enter a topic name.
4. Select the **Add a default subscription** check box.
5. Click **Create Topic**.
### gcloud
1. Open Cloud Shell:
[Go to Cloud Shell](https://console.cloud.google.com/cloudshell)
2. Create a topic, replacing `[PUB/SUB_TOPIC]` with a name of your choosing:
```
gcloud pubsub topics create [PUB/SUB_TOPIC]
```
3. Create a subscription, replacing `[PUB/SUB_SUBSCRIPTION]` with a name
of your choosing:
```
gcloud pubsub subscriptions create [PUB/SUB_SUBSCRIPTION] --topic [PUB/SUB_TOPIC]
```
### Create the Cloud Run functions
This section steps through deploying the Python script containing the following
two Cloud Run functions:
- A function that is invoked when an object is uploaded to Cloud Storage.
- A function that is invoked when a message is received in the Pub/Sub queue.
The Python script that you use to complete this tutorial is contained in a [GitHub repository](https://github.com/GoogleCloudPlatform/dlp-cloud-functions-tutorials)
To create the first Cloud Function, you must enable the correct APIs.
To enable the APIs, do the following:
- If you are working in the console, when you click **Create function**, you will see a guide on how to enable the APIs that you need to use Cloud Functions.
- If you are working in gcloud CLI, you must manually enable the following APIs:
- Artifact Registry API
- Eventarc API
- Cloud Run Admin API
#### Creating the first function
### console
1. Open the **Cloud Run functions Overview** page:
[Go to Cloud Run functions](https://console.cloud.google.com/functions/list?_ga=2.92640221.111886965.1514931920-1149755035.1514931920)
2. Select the project for which you enabled Cloud Run functions.
3. Click **Create function**.
4. In the **Function name** box, replace the default name with `create_DLP_job`.
5. In the **Trigger** field, select **Cloud Storage**.
6. In **Event type** field select **Finalize/Create**.
7. In the **Bucket** field, click **browse** , select your quarantine bucket
by highlighting the bucket in the drop-down list, and then click
**Select**.
8. Click **Save**
9. Click **Next**
10. Under **Runtime** , select **Python 3.7**.
11. Under **Source code** , check **Inline editor**.
12. Replace the text in the **main.py** box with the contents of the following file `https://github.com/GoogleCloudPlatform/dlp-cloud-functions-tutorials/blob/master/gcs-dlp-classification-python/main.py`.
Replace the following:
- `[PROJECT_ID_DLP_JOB & TOPIC]`: the project ID that is hosting your Cloud Run function and Pub/Sub topic.
- `[YOUR_QUARANTINE_BUCKET]` the name of the bucket you will be uploading the files to be processed to .
- `[YOUR_SENSITIVE_DATA_BUCKET]`: the name of the bucket you will be moving sensitive files to.
- `[YOUR_NON_SENSITIVE_DATA_BUCKET]`: the name of the bucket you will be uploading the files to be processed to.
- `[PUB/SUB_TOPIC]`: the name of the Pub/Sub topic that you created earlier.
13. In the **Entry point** text box, replace the default text with the following:
`create_DLP_job`.
14. Replace the text in the **requirements.txt** text box with the contents of the following file:`https://github.com/GoogleCloudPlatform/dlp-cloud-functions-tutorials/blob/master/gcs-dlp-classification-python/requirements.txt.`
15. Click **Deploy**.
A green checkmark beside the function indicates a successful deployment.

### gcloud
1. Open a Cloud Shell session and clone the GitHub repository
that contains the code and some sample data files:
[OPEN IN Cloud Shell](https://console.cloud.google.com/cloudshell/open?git_repo=https://github.com/GoogleCloudPlatform/dlp-cloud-functions-tutorials.git)
2. Change directories to the folder the repository has been cloned to:
```
cd ~dlp-cloud-functions-tutorials/gcs-dlp-classification-python/
```
3. Make the following replacements in the
**main.py** file
- `[PROJECT_ID_DLP_JOB & TOPIC]`: the project ID that is hosting your Cloud Run function and Pub/Sub topic.
- `[YOUR_QUARANTINE_BUCKET]`: the name of the bucket you will be uploading the files to be processed to .
- `[YOUR_SENSITIVE_DATA_BUCKET]`: the name of the bucket you will be moving sensitive files to.
- `[YOUR_NON_SENSITIVE_DATA_BUCKET]`: the name of the bucket you will be uploading the files to be processed to.
- `[PUB/SUB_TOPIC`: the name of the Pub/Sub topic that you created earlier.
4. Deploy the function, replacing `[YOUR_QUARANTINE_BUCKET]` with your
bucket name:
```
gcloud functions deploy create_DLP_job --runtime python37 \
--trigger-resource [YOUR_QUARANTINE_BUCKET] \
--trigger-event google.storage.object.finalize
```
5. Validate that the function has successfully deployed:
```
gcloud functions describe create_DLP_job
```
A successful deployment is indicated by a ready status similar to the
following:
```
status: READY
timeout: 60s
```
When the Cloud Function has successfully deployed, continue to the next section
to create the second Cloud Function.
#### Creating the second function
### console
1. Open the **Cloud Run functions Overview** page:
[GO TO THE Cloud Run functions OVERVIEW PAGE](https://console.cloud.google.com/functions/list?_ga=2.92640221.111886965.1514931920-1149755035.1514931920)
2. Select the project for which you enabled Cloud Run functions.
3. Click **Create function**.
4. In the **Function Name** box, replace the default name with `resolve_DLP`.
5. In the **Trigger** field, select **Pub/Sub**.
6. In the **Select a Cloud Pub/Sub Topic** field, search for the Pub/Sub topic you created earlier.
7. Click **Save**
8. Click **Next**
9. Under **Runtime** , select **Python 3.7**.
10. Under **Source code** , select **Inline editor**.
11. In the **Entry point** text box, replace the default text with
`resolve_DLP`.
12. Replace the text in the **main.py** box with the contents of the following file: https://github.com/GoogleCloudPlatform/dlp-cloud-functions-tutorials/blob/master/gcs-dlp-classification-python/main.py.
Make the following replacements
- `[PROJECT_ID_DLP_JOB & TOPIC]`: the project ID that is hosting your Cloud Run function and Pub/Sub topic.
- `[YOUR_QUARANTINE_BUCKET]`: the name of the bucket you will be uploading the files to be processed to .
- `[YOUR_SENSITIVE_DATA_BUCKET]`: the name of the bucket you will be moving sensitive files to.
- `[YOUR_NON_SENSITIVE_DATA_BUCKET]`: the name of the bucket you will be uploading the files to be processed to.
- `[PUB/SUB_TOPIC`: the name of the Pub/Sub topic that you created earlier.
13. Click **Deploy**.
A green checkmark beside the function indicates a successful deployment.

### gcloud
1. Open (or reopen) a Cloud Shell session and clone the GitHub
repository that contains the code and some sample data files:
[OPEN IN Cloud Shell](https://console.cloud.google.com/cloudshell/open?git_repo=https://github.com/GoogleCloudPlatform/dlp-cloud-functions-tutorials.git)
2. Change directories to the folder with the Python code:
```
cd gcs-dlp-classification-python/
```
3. Make the following replacements in the `main.py` file:
- `[PROJECT_ID_DLP_JOB & TOPIC]`: the project ID that is hosting your Cloud Run function and Pub/Sub topic.
- `[YOUR_QUARANTINE_BUCKET]`: the name of the bucket you will be uploading the files to be processed to.
- `[YOUR_SENSITIVE_DATA_BUCKET]`: the name of the bucket you will be moving sensitive files to.
- `[YOUR_NON_SENSITIVE_DATA_BUCKET]`: the name of the bucket you will be uploading the files to be processed to.
- `[PUB/SUB_TOPIC`: the name of the Pub/Sub topic that you created earlier.
4. Deploy the function, replacing `[PUB/SUB_TOPIC]` with your
Pub/Sub topic:
```
gcloud functions deploy resolve_DLP --runtime python37 --trigger-topic [PUB/SUB_TOPIC]
```
5. Validate that the function has successfully deployed:
```
gcloud functions describe resolve_DLP
```
A successful deployment is indicated by a ready status similar to the
following:
```
status: READY
timeout: 60s
```
When the Cloud Function has successfully deployed, continue to the next section.
### Upload sample files to the quarantine bucket
The [GitHub repository](https://github.com/GoogleCloudPlatform/dlp-cloud-functions-tutorials) associated with this article includes sample data files. The
folder contains some files that have sensitive data and other files that have
nonsensitive data. Sensitive data is classified as containing one or more of the
following `INFO_TYPES` values:
```
US_SOCIAL_SECURITY_NUMBER
EMAIL_ADDRESS
PERSON_NAME
LOCATION
PHONE_NUMBER
```
The data types that are used to classify the sample files are defined in the
`INFO_TYPES` constant in the `main.py` file, which is initially set to
`'FIRST_NAME,PHONE_NUMBER,EMAIL_ADDRESS,US_SOCIAL_SECURITY_NUMBER'`.
1. If you have not already cloned the repository, open Cloud Shell and
clone the GitHub repository that contains the code and some sample data
files:
[OPEN IN Cloud Shell](https://console.cloud.google.com/cloudshell/open?git_repo=https://github.com/GoogleCloudPlatform/dlp-cloud-functions-tutorials.git)
2. Change folders to the sample data files:
```
cd ~/dlp-cloud-functions-tutorials/sample_data/
```
3. Copy the sample data files to the quarantine bucket by using the
`cp` command, replacing `[YOUR_QUARANTINE_BUCKET]` with the name of
your quarantine bucket:
```
gcloud storage cp * gs://[YOUR_QUARANTINE_BUCKET]/
```
Sensitive Data Protection inspects and classifies each file uploaded to
the quarantine bucket and moves it to the appropriate target bucket based
on its classification.
4. In the Cloud Storage console, open the **Storage Browser** page:
[GO TO Cloud Storage BROWSER](https://console.cloud.google.com/storage/browser/)
5. Select one of the target buckets that you created earlier and review
the uploaded files. Also review the other buckets that you created.
## Clean up
After you finish the tutorial, you can clean up the resources that you created so that they
stop using quota and incurring charges. The following sections describe how to delete or turn off
these resources.
### Delete the project
> [!CAUTION]
> **Caution** : Deleting a project has the following effects:
>
> - **Everything in the project is deleted.** If you used an existing project for the tasks in this document, when you delete it, you also delete any other work you've done in the project.
> - **Custom project IDs are lost.** When you created this project, you might have created a custom project ID that you want to use in the future. To preserve the URLs that use the project ID, such as an `appspot.com` URL, delete selected resources inside the project instead of deleting the whole project.
1. In the Google Cloud console, go to the **Manage resources** page.
[Go to Manage resources](https://console.cloud.google.com/iam-admin/projects)
2. In the project list, select the project that you want to delete, and then click **Delete**.
3. In the dialog, type the project ID, and then click **Shut down** to delete the project.
## What's next
- Try setting different [valid data type values](https://docs.cloud.google.com/sensitive-data-protection/docs/infotypes-reference.md.txt) for `INFO_TYPES`.
- Learn more about [inspecting storage and databases for sensitive data](https://docs.cloud.google.com/sensitive-data-protection/docs/inspecting-storage.md.txt) using the Sensitive Data Protection.
- Learn more about [Cloud Run functions](https://docs.cloud.google.com/functions/docs/concepts/overview.md.txt).
- Explore reference architectures, diagrams, and best practices about Google Cloud. Take a look at our [Cloud Architecture Center](https://docs.cloud.google.com/architecture).