> [!NOTE]
> Standard-legacy, Standard, Premium, and Enterprise (Deprecated) [service tiers](https://docs.cloud.google.com/security-command-center/docs/service-tiers.md.txt)
> [!CAUTION]
> The Security Command Center Enterprise service tier will shut down on May 21, 2027. If your organization uses the Enterprise service tier, then the organization will automatically move to the Premium service tier on or after May 21, 2027. Contact your account representative or a [Google Cloud sales specialist](https://cloud.google.com/contact) if you have questions.
This page describes how to stream new and updated findings to a
[BigQuery](https://docs.cloud.google.com/bigquery) dataset by using the Security Command Center
export function for BigQuery. Existing findings are not sent to
BigQuery unless they are updated.
BigQuery is Google Cloud's fully managed, petabyte-scale, and
cost-effective analytics data warehouse that lets you run analytics over vast
amounts of data in near real time. You can use BigQuery to run
queries against new and updated findings, filter data to find what you need, and
generate custom reports. To learn more about BigQuery, see the
[BigQuery documentation](https://docs.cloud.google.com/bigquery/docs.md.txt).
## Overview
When you enable this feature, new findings that are written to
Security Command Center are exported to a BigQuery table in near real
time. You can then integrate the data into existing workflows and create custom
analyses. You can enable this feature at the organization, folder, and project
levels to export findings based on your requirements.
This feature is the recommended way to export Security Command Center findings to
BigQuery, because it's fully managed and doesn't require
performing manual operations or writing custom code.
## Dataset structure
This feature adds each new finding and its subsequent updates as
new rows in the `findings` table, which is clustered by `source_id`,
[`finding_id`](https://docs.cloud.google.com/security-command-center/docs/reference/rest/v2/organizations.sources.findings/create.md.txt#body.QUERY_PARAMETERS.finding_id),
and [`event_time`](https://docs.cloud.google.com/security-command-center/docs/reference/rest/v2/organizations.sources.findings.md.txt#Finding.FIELDS.event_time).
This creates multiple finding records with
the same `source_id` and `finding_id` values, but with different `event_time`
values. This dataset structure lets you view how each finding's state changes
over time.
Note that duplicate entries might exist in your dataset. To parse them out, you
can use the `DISTINCT` clause, as shown in the
[first example query](https://docs.cloud.google.com/security-command-center/docs/how-to-analyze-findings-in-big-query.md.txt#example-query-1).
Each dataset contains a `findings` table, which has the following fields:
| Field | Description |
|---|---|
| `source_id` | A unique identifier that Security Command Center assigns to the [source of a finding](https://docs.cloud.google.com/security-command-center/docs/concepts-security-sources.md.txt). For example, all findings from the Cloud Anomaly Detection source have the same `source_id` value. Example: `1234567890` |
| `finding_id` | Unique identifier that represents the finding. It is unique within a source for an organization. It is alphanumeric and has less than or equal to 32 characters. |
| `event_time` | The time that the event took place or the time that an update to the finding occurred. For example, if the finding represents an open firewall, then `event_time` captures the time the detector believes the firewall was opened. If the finding is resolved afterward, then this time reflects when that finding was resolved. Example: `2019-09-26 12:48:00.985000 UTC` For more information about changes that update the event time, see [Finding lifecycle overview](https://docs.cloud.google.com/security-command-center/docs/finding-lifecycle-overview.md.txt). |
| `bulk_export_id` | For bulk exports, this is a UUID. For continuous exports, this field is empty. |
| `finding` | A record of assessment data like security, risk, health, or privacy, that is ingested into Security Command Center for presentation, notification, analysis, policy testing, and enforcement. For example, a cross-site scripting (XSS) vulnerability in an App Engine application is a finding. For more information about the nested fields, see the API reference for the [`Finding`](https://docs.cloud.google.com/security-command-center/docs/reference/rest/v2/organizations.sources.findings.md.txt#resource:-finding) object. |
| `resource` | Information related to the Google Cloud resource that is associated with this finding. For more information about the nested fields, see the API reference for the [`Resource`](https://docs.cloud.google.com/security-command-center/docs/reference/rest/v2/ListFindingsResponse.md.txt#resource) object. |
## Cost
You incur BigQuery charges related to this feature. For more
information, see [BigQuery pricing](https://cloud.google.com/bigquery/pricing).
## Before you begin
You must complete these steps before you enable this feature.
### Set up permissions
To complete this guide, you must have the following Identity and Access Management (IAM)
roles:
- On the organization, folder, or project where you want to export findings
from, one of the following:
- [Security Center BigQuery Exports Editor](https://docs.cloud.google.com/iam/docs/roles-permissions/securitycenter.md.txt#securitycenter.bigQueryExportsEditor) (`roles/securitycenter.bigQueryExportsEditor`).
- [Security Center Admin](https://docs.cloud.google.com/iam/docs/roles-permissions/securitycenter.md.txt#securitycenter.admin) (`roles/securitycenter.admin`).
To learn more about Security Command Center roles, see
[Access control](https://docs.cloud.google.com/security-command-center/docs/access-control.md.txt).
- On the BigQuery dataset,
[BigQuery Data Owner](https://docs.cloud.google.com/iam/docs/roles-permissions/bigquery.md.txt#bigquery.dataOwner)
(`roles/bigquery.dataOwner`).
### Create a BigQuery dataset
Create a BigQuery dataset. For more information, see
[Creating datasets](https://docs.cloud.google.com/bigquery/docs/datasets.md.txt).
### Plan for data residency
If [data residency](https://docs.cloud.google.com/security-command-center/docs/data-residency-support.md.txt) is enabled for
Security Command Center, the configurations that define streaming exports to
BigQuery---`BigQueryExport` resources---are subject to
data residency control and are stored in a
[Security Command Center location](https://docs.cloud.google.com/security-command-center/docs/data-residency-support.md.txt#supported_data_locations)
that you select.
To export findings in a Security Command Center location to BigQuery,
you must configure the BigQuery export in the same
Security Command Center location as the findings.
Because the filters that are used in BigQuery exports can contain
data that is subject to residency controls, make sure you specify the correct
location before you create them. Security Command Center does not restrict which
location you create exports in.
BigQuery exports are stored only in the location in which they
are created and cannot be viewed or edited in other locations.
After you create a BigQuery export, you can't change its
location. To change the location, you need to delete the
BigQuery export and recreate it in the new location.
To learn how to use Security Command Center when data residency is enabled, see
[Security Command Center regional endpoints](https://docs.cloud.google.com/security-command-center/docs/regional-endpoints.md.txt).
## How Security Command Center exports findings to BigQuery
The following sections describe how Security Command Center exports new, updated, and
deleted findings to BigQuery.
### Exporting new and updated findings
When a finding attribute is updated, Security Command Center takes a snapshot
and attempts to send the snapshot to BigQuery.
This attempt results in one of the following outcomes:
- If the attributes of the finding in the snapshot match the export filter
defined in the BigQuery export, the snapshot is sent to BigQuery,
where it becomes the current record of the finding in BigQuery.
- If the attributes of the finding don't match the filter, the snapshot is not
sent to BigQuery. If a previous snapshot of the finding exists
in BigQuery, it remains the latest available record in the
dataset, even though it doesn't reflect the recent updates in Security Command Center.
For example, if the filter for a BigQuery export contains the active
state, a new finding is generated with the active state, and a snapshot of the
finding is exported successfully to BigQuery.
Later, the state of that finding in Security Command Center is updated to inactive.
The update triggers an export of a new snapshot of the finding
to BigQuery, but, because the state value no longer matches the filter,
the filter blocks the export of the finding snapshot.
Consequently, the snapshot of the finding in BigQuery still has
the active state, but the same finding in Security Command Center has the inactive
state.
This also results in a mismatch between the number of active findings
in Security Command Center and the number of active findings in BigQuery.
The number of active findings is almost always greater in BigQuery
than it is in Security Command Center.
For example, if an export filter specifies the active state and 100 findings
are generated with the active state, all 100 are exported to BigQuery.
Then later in Security Command Center, 50 of those findings are updated to inactive,
and the filter blocks the export triggered by the updates because the state
value no longer matches the filter. Consequently, in BigQuery,
all 100 of the findings are still active, while in Security Command Center only 50
findings remain active.
### Exporting deleted findings
Security Command Center deletes findings periodically based on
[data retention](https://docs.cloud.google.com/security-command-center/docs/concepts-data-security-overview.md.txt#data_retention)
policies. You can configure whether Security Command Center exports a snapshot of
deleted findings to BigQuery.
You can enable deletion notifications when you create or update an
export configuration. When deletion notifications are enabled,
Security Command Center sends a finding snapshot to BigQuery
with the `deleted_finding` field set to `true` and the `event_time` set to the
time the finding was deleted. This lets you run queries that track deleted findings.
When you modify the deletion notification option on an export configuration,
the change applies to future deletions of findings only. Findings deleted prior
to enabling the option aren't retroactively exported.
## Export findings from Security Command Center to BigQuery
To export findings, first enable the Security Command Center API.
### Enabling the Security Command Center API
To enable the Security Command Center API:
1. Go to the API Library page in the Google Cloud console.
[Go to API Library](https://console.cloud.google.com/projectselector2/apis/library)
2. Select the project for which you want to enable the Security Command Center API.
3. In the **Search** box, enter `Security Command Center`, and then click
Security Command Center in the search results.
4. On the API page that appears, click **Enable**.
The Security Command Center API is enabled for your project. Next, you use
gcloud CLI to create a new export configuration to
BigQuery.
### Granting perimeter access in VPC Service Controls
If you use [VPC Service Controls](https://docs.cloud.google.com/vpc-service-controls/docs/overview.md.txt) and your
BigQuery dataset is part of a project inside a service perimeter, you
must grant access to projects in order to export findings.
To grant access to projects, create
[ingress and egress rules](https://docs.cloud.google.com/vpc-service-controls/docs/ingress-egress-rules.md.txt) for
the principals and projects that you are exporting findings from. The rules
allow access to protected resources and let BigQuery verify that
users have the `setIamPolicy` permission on the BigQuery
dataset.
#### Before setting up a new export to BigQuery
### Console
#### Navigate to the service perimeter
1. In the Google Cloud console, go to the **VPC Service Controls** page.
[Go to VPC Service Controls](https://console.cloud.google.com/projectselector2/security/service-perimeter?supportedpurview=organizationId)
2. Select your organization.
3. In the drop-down list, select the access policy that contains the service perimeter
that you want to grant access to.
The service perimeters associated with the access policy appear in the list.
4. Click the name of the service perimeter that you want to update.
To find the service perimeter you need to modify, you can check your logs for entries
that show `RESOURCES_NOT_IN_SAME_SERVICE_PERIMETER` violations. In those
entries, check the `servicePerimeterName` field:
```
accessPolicies/ACCESS_POLICY_ID/servicePerimeters/SERVICE_PERIMETER_NAME
```
5. Click **Edit**.
#### Add an egress rule
1. Click **Egress policy**.
2. Click **Add an egress rule**.
3. In the **From** section, set the following details:
1. For **Identities \> Identity** , select **Select identities \& groups**.
2. Click **Add identities**.
3. Enter the email address that identifies the principal used to call the Security Command Center API.
4. Select the principal or press ENTER, and then click **Add
identities**.
4. In the **To** section, set the following details:
1. For **Resources \> Projects** , select **All projects**.
2. For **Operations or IAM roles** , select **Select operations**.
3. Click **Add operations**, and then add the following operations:
- Add the **bigquery.googleapis.com** service.
1. Click **All methods**.
2. Click **Add all methods**.
#### Add an ingress rule
1. Click **Ingress policy**.
2. Click **Add an ingress rule**.
3. In the **From** section, set the following details:
1. For **Identities \> Identity** , select **Select identities \& groups**.
2. Click **Add identities**.
3. Enter the email address that identifies the principal used to call the Security Command Center API.
4. Select the principal or press ENTER, and then click **Add
identities**.
4. In the **To** section, set the following details:
1. For **Resources \> Projects** , select **Select projects**.
2. Click **Add projects**, and then add the project that contains the BigQuery dataset.
3. For **Operations or IAM roles** , select **Select operations**.
4. Click **Add operations**, and then add the following operations:
- Add the **bigquery.googleapis.com** service.
1. Click **All methods**.
2. Click **Add all methods**.
5. Click **Save**.
### gcloud
> [!WARNING]
> **Warning:** The `--set-ingress-policies` and `--set-egress-policies` flags replace all existing ingress or egress policies in the perimeter. If you have existing policies, you must retrieve them first, add the new policy to the appropriate ingress or egress YAML file, and then run the update command.
1.
If a quota project isn't already set, then set it. Choose a project that has the
Access Context Manager API enabled.
```bash
gcloud config set billing/quota_project QUOTA_PROJECT_ID
```
Replace `QUOTA_PROJECT_ID` with the ID of the project that you
want to use for billing and quota.
2. Create a file named `egress-rule.yaml` with the following contents:
```yaml
- egressFrom:
identities:
- PRINCIPAL_ID
egressTo:
operations:
- serviceName: bigquery.googleapis.com
methodSelectors:
- method: '*'
resources:
- '*'
```
Replace `PRINCIPAL_ID` with the identifier for the principal used to
call the Security Command Center API.
3. Create a file named `ingress-rule.yaml` with the following contents:
```yaml
- ingressFrom:
identities:
- PRINCIPAL_ID
sources:
- accessLevel: '*'
ingressTo:
operations:
- serviceName: bigquery.googleapis.com
methodSelectors:
- method: '*'
resources:
- projects/PROJECT_ID
```
Replace `PRINCIPAL_ID` with the identifier for the principal used to
call the Security Command Center API.
Replace `PROJECT_ID` with the ID of the project that
contains the BigQuery dataset.
4. Add the egress rule to the perimeter:
```bash
gcloud access-context-manager perimeters update PERIMETER_NAME \
--set-egress-policies=egress-rule.yaml
```
Replace the following:
-
`PERIMETER_NAME`: the name of the perimeter. For example,
`accessPolicies/1234567890/servicePerimeters/example_perimeter`.
To find the service perimeter you need to modify, you can check your logs for
entries that show `RESOURCES_NOT_IN_SAME_SERVICE_PERIMETER` violations.
In those entries, check the `servicePerimeterName` field:
```
accessPolicies/ACCESS_POLICY_ID/servicePerimeters/SERVICE_PERIMETER_NAME
```
5. Add the ingress rule to the perimeter:
```bash
gcloud access-context-manager perimeters update PERIMETER_NAME \
--set-ingress-policies=ingress-rule.yaml
```
Replace the following:
-
`PERIMETER_NAME`: the name of the perimeter. For example,
`accessPolicies/1234567890/servicePerimeters/example_perimeter`.
To find the service perimeter you need to modify, you can check your logs for
entries that show `RESOURCES_NOT_IN_SAME_SERVICE_PERIMETER` violations.
In those entries, check the `servicePerimeterName` field:
```
accessPolicies/ACCESS_POLICY_ID/servicePerimeters/SERVICE_PERIMETER_NAME
```
For more information, see [Ingress and egress rules](https://docs.cloud.google.com/vpc-service-controls/docs/ingress-egress-rules.md.txt).
### Set up a new export to BigQuery
In this step, you create an export configuration to export findings to a
BigQuery instance. You can create export configurations at the
project, folder, or organization level. For example, if you want to export
findings from a project to a BigQuery dataset, you create an
export configuration at the project level to export only the findings related
to that project. Optionally, you can specify filters to export certain findings
only.
Be sure to create your export configurations at the appropriate level. For
example, if you create an export configuration in Project B to export findings
from Project A and you define filters such as
`resource.project_display_name: project-a-id`, the configuration does not export
any findings.
You can create a maximum of 500 export configurations to BigQuery
for your organization. You can use the same dataset for multiple export
configurations. If you use the same dataset, all updates will be made to the
same [findings table](https://docs.cloud.google.com/security-command-center/docs/how-to-analyze-findings-in-big-query.md.txt#data-structure).
When you create your first export configuration, a service account is
automatically created for you. This service account is required to create or
update the findings table within a dataset and to export findings to the table.
It has the form
`service-org-ORGANIZATION_ID@gcp-sa-scc-notification.iam.gservicaccount.com` and
is granted the BigQuery Data Editor (`roles/bigquery.dataEditor`) role at the
BigQuery dataset level.
> [!NOTE]
> **Note:** If you migrate to the v2 Security Command Center API, keep in mind that `BigQueryExport` resources created with the v1 API are not visible in the v2 API. For more information, see [Notification configurations and
> BigQuery export configurations](https://docs.cloud.google.com/security-command-center/docs/migrate-v2-api#export-config).
>
>
> To manage `BigQueryExport` resources created with the v1 API, don't specify
> a location when you run gcloud CLI commands. The v1 API doesn't
> support data residency.
### gcloud
1. Go to the Google Cloud console.
[Go to the Google Cloud console](https://console.cloud.google.com/projectselector2/projectselector2?supportedpurview=organizationId)
2. Select the project for which you enabled the Security Command Center API.
3. Click **Activate Cloud Shell** .

4. To create a new export configuration, run the following command:
```bash
gcloud scc bqexports create BIGQUERY_EXPORT \
--dataset=DATASET_NAME \
--folder=FOLDER_ID | --organization=ORGANIZATION_ID | --project=PROJECT_ID \
--location=LOCATION \
[--description=DESCRIPTION] \
[--filter=FILTER] \
[--deletion-notifications-enabled]
```
Replace the following:
- `BIGQUERY_EXPORT` with a name for this export configuration.
- `DATASET_NAME` with the name of the BigQuery dataset---for example, `projects/PROJECT_ID/datasets/DATASET_ID`.
- `FOLDER_ID`, `ORGANIZATION_ID`, or `PROJECT_ID` with the name of your folder, organization, or project. You must set one of these options. For folders and organizations, the name is the folder ID or the organization ID. For projects, the name is the project number or the project ID.
- `LOCATION`: the [Security Command Center
location](https://docs.cloud.google.com/security-command-center/docs/data-residency-support#supported_data_locations) in which to create an export configuration; if data residency is enabled, use `eu`, `sa`, or `us`; otherwise, use the value `global`.
- `DESCRIPTION` with a human-readable description of the export configuration. This variable is optional.
- `FILTER` with an expression that defines what findings to include in the export. For example, if you want to filter on the XSS_SCRIPTING category, type `"category=\"XSS_SCRIPTING\"`. This variable is optional.
Use the following flags to configure whether to receive notifications for
deleted findings. If you don't specify either flag, the default behavior is
to not export deleted findings.
- `--deletion-notifications-enabled`: enable notifications
for findings deleted due to retention policies. When enabled, deleted findings
are exported to BigQuery with `deleted_finding = true`.
This flag applies to future deletion events only. Findings deleted
before enabling this flag aren't retroactively exported.
- `--no-deletion-notifications-enabled`: disable notifications for deleted
findings.
### Terraform
To learn how to apply or remove a Terraform configuration, see
[Basic Terraform commands](https://docs.cloud.google.com/docs/terraform/basic-commands.md.txt).
For more information, see the
[Terraform provider reference documentation](https://registry.terraform.io/providers/hashicorp/google/latest/docs).
Create an export configuration for an organization:
```terraform
resource "google_bigquery_dataset" "default" {
dataset_id = "my-dataset"
friendly_name = "test"
description = "This is a test description"
location = "US"
default_table_expiration_ms = 3600000
default_partition_expiration_ms = null
labels = {
env = "default"
}
lifecycle {
ignore_changes = [default_partition_expiration_ms]
}
}
resource "google_scc_v2_organization_scc_big_query_export" "custom_big_query_export_config" {
name = "my-export"
big_query_export_id = "my-export"
organization = "123456789"
dataset = google_bigquery_dataset.default.id
location = "global"
description = "Cloud Security Command Center Findings Big Query Export Config"
filter = "state=\"ACTIVE\" AND NOT mute=\"MUTED\""
}
```
Create an export configuration for a folder:
```terraform
resource "google_folder" "folder" {
parent = "organizations/123456789"
display_name = "folder-name"
deletion_protection = false
}
resource "google_bigquery_dataset" "default" {
dataset_id = "my_dataset_id"
friendly_name = "test"
description = "This is a test description"
location = "US"
default_table_expiration_ms = 3600000
default_partition_expiration_ms = null
labels = {
env = "default"
}
lifecycle {
ignore_changes = [default_partition_expiration_ms]
}
}
resource "google_scc_v2_folder_scc_big_query_export" "custom_big_query_export_config" {
big_query_export_id = "my-export"
folder = google_folder.folder.folder_id
dataset = google_bigquery_dataset.default.id
location = "global"
description = "Cloud Security Command Center Findings Big Query Export Config"
filter = "state=\"ACTIVE\" AND NOT mute=\"MUTED\""
}
```
Create an export configuration for a project:
```terraform
resource "google_bigquery_dataset" "default" {
dataset_id = "my_dataset_id"
friendly_name = "test"
description = "This is a test description"
location = "US"
default_table_expiration_ms = 3600000
default_partition_expiration_ms = null
labels = {
env = "default"
}
lifecycle {
ignore_changes = [default_partition_expiration_ms]
}
}
resource "google_scc_v2_project_scc_big_query_export" "custom_big_query_export_config" {
name = "my-export"
big_query_export_id = "my-export"
project = "my-project-name"
dataset = google_bigquery_dataset.default.id
location = "global"
description = "Cloud Security Command Center Findings Big Query Export Config"
filter = "state=\"ACTIVE\" AND NOT mute=\"MUTED\""
}
```
### Java
To authenticate to Security Command Center, set up Application Default
Credentials. For more information, see
[Set up ADC for a local development environment](https://docs.cloud.google.com/docs/authentication/set-up-adc-local-dev-environment.md.txt).
```java
import com.google.cloud.securitycenter.v2.BigQueryExport;
import com.google.cloud.securitycenter.v2.CreateBigQueryExportRequest;
import com.google.cloud.securitycenter.v2.OrganizationLocationName;
import com.google.cloud.securitycenter.v2.SecurityCenterClient;
import java.io.IOException;
import java.util.UUID;
public class CreateBigQueryExport {
public static void main(String[] args) throws IOException {
// TODO(Developer): Modify the following variable values.
// organizationId: Google Cloud Organization id.
String organizationId = "{google-cloud-organization-id}";
// projectId: Google Cloud Project id.
String projectId = "{your-project}";
// Specify the location.
String location = "global";
// filter: Expression that defines the filter to apply across create/update events of findings.
String filter = "severity=\"LOW\" OR severity=\"MEDIUM\"";
// bigQueryDatasetId: The BigQuery dataset to write findings' updates to.
String bigQueryDatasetId = "{bigquery-dataset-id}";
// bigQueryExportId: Unique identifier provided by the client.
// For more info, see:
// https://cloud.google.com/security-command-center/docs/how-to-analyze-findings-in-big-query#export_findings_from_to
String bigQueryExportId = "default-" + UUID.randomUUID().toString().split("-")[0];
createBigQueryExport(organizationId, location, projectId, filter, bigQueryDatasetId,
bigQueryExportId);
}
// Create export configuration to export findings from a project to a BigQuery dataset.
// Optionally specify filter to export certain findings only.
public static BigQueryExport createBigQueryExport(String organizationId, String location,
String projectId, String filter, String bigQueryDatasetId, String bigQueryExportId)
throws IOException {
// Initialize client that will be used to send requests. This client only needs to be created
// once, and can be reused for multiple requests.
try (SecurityCenterClient client = SecurityCenterClient.create()) {
OrganizationLocationName organizationName = OrganizationLocationName.of(organizationId,
location);
// Create the BigQuery export configuration.
BigQueryExport bigQueryExport =
BigQueryExport.newBuilder()
.setDescription(
"Export low and medium findings if the compute resource "
+ "has an IAM anomalous grant")
.setFilter(filter)
.setDataset(String.format("projects/%s/datasets/%s", projectId, bigQueryDatasetId))
.build();
CreateBigQueryExportRequest bigQueryExportRequest =
CreateBigQueryExportRequest.newBuilder()
.setParent(organizationName.toString())
.setBigQueryExport(bigQueryExport)
.setBigQueryExportId(bigQueryExportId)
.build();
// Create the export request.
BigQueryExport response = client.createBigQueryExport(bigQueryExportRequest);
System.out.printf("BigQuery export request created successfully: %s\n", response.getName());
return response;
}
}
}
```
### Python
To authenticate to Security Command Center, set up Application Default
Credentials. For more information, see
[Set up ADC for a local development environment](https://docs.cloud.google.com/docs/authentication/set-up-adc-local-dev-environment.md.txt).
```python
def create_bigquery_export(
parent: str, export_filter: str, bigquery_dataset_id: str, bigquery_export_id: str
):
from google.cloud import securitycenter_v2
"""
Create export configuration to export findings from a project to a BigQuery dataset.
Optionally specify filter to export certain findings only.
Args:
parent: Use any one of the following resource paths:
- organizations/{organization_id}/locations/{location_id}
- folders/{folder_id}/locations/{location_id}
- projects/{project_id}/locations/{location_id}
export_filter: Expression that defines the filter to apply across create/update events of findings.
bigquery_dataset_id: The BigQuery dataset to write findings' updates to.
- projects/{PROJECT_ID}/datasets/{BIGQUERY_DATASET_ID}
bigquery_export_id: Unique identifier provided by the client.
- example id: f"default-{str(uuid.uuid4()).split('-')[0]}"
For more info, see:
https://cloud.google.com/security-command-center/docs/how-to-analyze-findings-in-big-query#export_findings_from_to
"""
client = securitycenter_v2.SecurityCenterClient()
# Create the BigQuery export configuration.
bigquery_export = securitycenter_v2.BigQueryExport()
bigquery_export.description = "Export low and medium findings if the compute resource has an IAM anomalous grant"
bigquery_export.filter = export_filter
bigquery_export.dataset = bigquery_dataset_id
request = securitycenter_v2.CreateBigQueryExportRequest()
request.parent = parent
request.big_query_export = bigquery_export
request.big_query_export_id = bigquery_export_id
# Create the export request.
response = client.create_big_query_export(request)
print(f"BigQuery export request created successfully: {response.name}\n")
return response
```
You should see findings in your BigQuery dataset within about 15
minutes after you create the export configuration. After the
BigQuery table is created, any new and updated findings that
match your filter and scope will appear in the table in near real time.
To review your findings, see [Review findings](https://docs.cloud.google.com/security-command-center/docs/how-to-analyze-findings-in-big-query.md.txt#review-findings).
### Create an ingress rule for the new export to BigQuery
If you use [VPC Service Controls](https://docs.cloud.google.com/vpc-service-controls/docs/overview.md.txt) and your
BigQuery dataset is part of a project inside a service perimeter, you
must create an ingress rule for a new export to BigQuery.
### Console
#### Navigate to the service perimeter
1. Re-open the service perimeter from the previous section.
[Go to VPC Service Controls](https://console.cloud.google.com/projectselector2/security/service-perimeter?supportedpurview=organizationId)
#### Add an ingress rule
1. Click **Ingress policy**.
2. Click **Add an ingress rule**.
3. In the **From** section, set the following details:
1. For **Identities \> Identity** , select **Select identities \& groups**.
2. Click **Add identities**.
3.
Enter the email address that identifies the BigQuery export configuration service agent. This address has the
following format:
```
service-org-ORGANIZATION_ID@gcp-sa-scc-notification.iam.gserviceaccount.com
```
Replace `ORGANIZATION_ID` with your organization ID.
4. Select the service agent or press ENTER, and then click **Add
identities**.
4. In the **To** section, set the following details:
1. For **Resources \> Projects** , select **Select projects**.
2. Click **Add projects**, and then add the project that contains the BigQuery dataset.
3. For **Operations or IAM roles** , select **Select operations**.
4. Click **Add operations**, and then add the following operations:
- Add the **bigquery.googleapis.com** service.
1. Click **All methods**.
2. Click **Add all methods**.
5. Click **Save**.
### gcloud
> [!WARNING]
> **Warning:** The `--set-ingress-policies` and `--set-egress-policies` flags replace all existing ingress or egress policies in the perimeter. If you have existing policies, you must retrieve them first, add the new policy to the appropriate ingress or egress YAML file, and then run the update command.
1.
If a quota project isn't already set, then set it. Choose a project that has the
Access Context Manager API enabled.
```bash
gcloud config set billing/quota_project QUOTA_PROJECT_ID
```
Replace `QUOTA_PROJECT_ID` with the ID of the project that you
want to use for billing and quota.
2. Create a file named `ingress-rule.yaml` with the following contents:
```yaml
- ingressFrom:
identities:
- serviceAccount:service-org-ORGANIZATION_ID@gcp-sa-scc-notification.iam.gserviceaccount.com
sources:
- accessLevel: '*'
ingressTo:
operations:
- serviceName: bigquery.googleapis.com
methodSelectors:
- method: '*'
resources:
- projects/PROJECT_ID
```
Replace `ORGANIZATION_ID` with your organization ID.
Replace `PROJECT_ID` with the ID of the project that
contains the BigQuery dataset.
3. Add the ingress rule to the perimeter:
```bash
gcloud access-context-manager perimeters update PERIMETER_NAME \
--set-ingress-policies=ingress-rule.yaml
```
Replace the following:
-
`PERIMETER_NAME`: the name of the perimeter. For example,
`accessPolicies/1234567890/servicePerimeters/example_perimeter`.
To find the service perimeter you need to modify, you can check your logs for
entries that show `RESOURCES_NOT_IN_SAME_SERVICE_PERIMETER` violations.
In those entries, check the `servicePerimeterName` field:
```
accessPolicies/ACCESS_POLICY_ID/servicePerimeters/SERVICE_PERIMETER_NAME
```
For more information, see [Ingress and egress rules](https://docs.cloud.google.com/vpc-service-controls/docs/ingress-egress-rules.md.txt).
The selected projects, users, and service accounts can now access the protected
resources and export findings.
If you followed all of the steps in this guide, and exports are working
properly, you can now delete the following:
- The ingress rule for the principal
- The egress rule for the principal
Those rules were only needed to configure the export configuration. However, for
export configurations to continue working, you must keep the ingress rule that
you created previously, which lets Security Command Center export findings to your
BigQuery dataset behind the service perimeter.
## View the details of an export configuration
### gcloud
1. Go to the Google Cloud console.
[Go to the Google Cloud console](https://console.cloud.google.com/projectselector2/projectselector2?supportedpurview=organizationId)
2. Select the project for which you enabled the Security Command Center API.
3. Click **Activate Cloud Shell** .

4. To verify the details of the export configuration, run the following
command:
```bash
gcloud scc bqexports get BIGQUERY_EXPORT \
--folder=FOLDER_ID | --organization=ORGANIZATION_ID | --project=PROJECT_ID \
--location=LOCATION
```
Replace the following:
- `BIGQUERY_EXPORT` with the name for this export configuration.
- `FOLDER_ID`, `ORGANIZATION_ID`, or `PROJECT_ID` with the name of your folder, organization, or project. You must set one of these options. For folders and organizations, the name is the folder ID or the organization ID. For projects, the name is the project number or the project ID.
- `LOCATION`:
the
[Security Command Center
location](https://docs.cloud.google.com/security-command-center/docs/data-residency-support#supported_data_locations) in which to create an export configuration; if data residency is enabled, use `eu`,
`sa`, or `us`; otherwise, use the value `global`.
For example, to get an export configuration named `my-bq-export` from an
organization with an organization ID set to `123`, run:
```bash
gcloud scc bqexports get my-bq-export \
--organization=123 \
--location=global
```
## Update an export configuration
When necessary, you can modify the filter, dataset, and description of an
existing export configuration. You cannot change the name of the export
configuration.
### gcloud
1. Go to the Google Cloud console.
[Go to the Google Cloud console](https://console.cloud.google.com/projectselector2/projectselector2?supportedpurview=organizationId)
2. Select the project for which you enabled the Security Command Center API.
3. Click **Activate Cloud Shell** .

4. To update an export configuration, run the following command:
```bash
gcloud scc bqexports update BIGQUERY_EXPORT \
--dataset=DATASET_NAME \
--folder=FOLDER_ID | --organization=ORGANIZATION_ID | --project=PROJECT_ID \
--location=LOCATION \
[--description=DESCRIPTION] \
[--filter=FILTER] \
[--deletion-notifications-enabled]
```
Replace the following:
- `BIGQUERY_EXPORT` with the name for the export configuration that you want to update.
- `DATASET_NAME` with the name of the BigQuery dataset---for example, `projects/PROJECT_ID/datasets/DATASET_ID`.
- `FOLDER_ID`, `ORGANIZATION_ID`, or `PROJECT_ID` with the name of your folder, organization, or project. You must set one of these options. For folders and organizations, the name is the folder ID or the organization ID. For projects, the name is the project number or the project ID.
- `LOCATION`: the [Security Command Center
location](https://docs.cloud.google.com/security-command-center/docs/data-residency-support#supported_data_locations) in which to update the export configuration; if data residency is enabled, use `eu`, `sa`, or `us`; otherwise, use the value `global`.
- `DESCRIPTION` with a human-readable description of the export configuration. This variable is optional.
- `FILTER` with an expression that defines what findings to include in the export. For example, if you want to filter on the XSS_SCRIPTING category, type `"category=\"XSS_SCRIPTING\"`. This variable is optional.
Use the following flags to configure whether to receive notifications for
deleted findings. If you don't specify either flag, the default behavior
is to not export deleted findings.
- `--deletion-notifications-enabled`: enable notifications for findings
deleted due to retention policies. When enabled, deleted findings are
exported to BigQuery with `deleted_finding = true`. This
flag applies to future deletion events only. Findings deleted before
enabling this flag aren't retroactively exported.
- `--no-deletion-notifications-enabled`: disable notifications for
deleted findings.
## View all export configurations
You can view all the export configurations within your organization, folder, or
project.
> [!NOTE]
> **Note:** If you migrate to the v2 Security Command Center API, keep in mind that `BigQueryExport` resources created with the v1 API are not visible in the v2 API. For more information, see [Notification configurations and
> BigQuery export configurations](https://docs.cloud.google.com/security-command-center/docs/migrate-v2-api#export-config).
>
>
> To manage `BigQueryExport` resources created with the v1 API, don't specify
> a location when you run gcloud CLI commands. The v1 API doesn't
> support data residency.
### gcloud
1. Go to the Google Cloud console.
[Go to the Google Cloud console](https://console.cloud.google.com/projectselector2/projectselector2?supportedpurview=organizationId)
2. Select the project for which you enabled the Security Command Center API.
3. Click **Activate Cloud Shell** .

4. To list the export configurations, run the following command:
```bash
gcloud scc bqexports list \
--folder=FOLDER_ID | --organization=ORGANIZATION_ID | --project=PROJECT_ID \
--location=LOCATION \
[--limit=LIMIT] \
[--page-size=PAGE_SIZE]
```
Replace the following:
- `FOLDER_ID`, `ORGANIZATION_ID`, or
`PROJECT_ID` with the name of your folder, organization,
or project. You must set one of these options. For folders and
organizations, the name is the folder ID or the organization ID. For
projects, the name is the project number or the project ID.
If you specify an organization ID, the list includes all export
configurations defined in that organization, including those at the folder
and project levels. If you specify a folder ID, the list includes all
export configurations defined at the folder level and in the projects
within that folder. If you specify a project number or project ID, the
list includes all export configurations for that project only.
- `LOCATION`:
the
[Security Command Center
location](https://docs.cloud.google.com/security-command-center/docs/data-residency-support#supported_data_locations) in which to list export configurations; if data residency is enabled, use `eu`,
`sa`, or `us`; otherwise, use the value `global`.
- `LIMIT` with the number of export configurations that you
want to see. This variable is optional.
- `PAGE_SIZE` with a
[page size value](https://docs.cloud.google.com/security-command-center/docs/how-to-api-list-findings.md.txt#page_size).
This variable is optional.
### Java
To authenticate to Security Command Center, set up Application Default
Credentials. For more information, see
[Set up ADC for a local development environment](https://docs.cloud.google.com/docs/authentication/set-up-adc-local-dev-environment.md.txt).
```java
import com.google.cloud.securitycenter.v2.BigQueryExport;
import com.google.cloud.securitycenter.v2.ListBigQueryExportsRequest;
import com.google.cloud.securitycenter.v2.OrganizationLocationName;
import com.google.cloud.securitycenter.v2.SecurityCenterClient;
import com.google.cloud.securitycenter.v2.SecurityCenterClient.ListBigQueryExportsPagedResponse;
import java.io.IOException;
public class ListBigQueryExports {
public static void main(String[] args) throws IOException {
// TODO(Developer): Modify the following variable values.
// organizationId: Google Cloud Organization id.
String organizationId = "{google-cloud-organization-id}";
// Specify the location to list the findings.
String location = "global";
listBigQueryExports(organizationId, location);
}
// List BigQuery exports in the given parent.
public static ListBigQueryExportsPagedResponse listBigQueryExports(String organizationId,
String location) throws IOException {
// Initialize client that will be used to send requests. This client only needs to be created
// once, and can be reused for multiple requests.
try (SecurityCenterClient client = SecurityCenterClient.create()) {
OrganizationLocationName organizationName = OrganizationLocationName.of(organizationId,
location);
ListBigQueryExportsRequest request = ListBigQueryExportsRequest.newBuilder()
.setParent(organizationName.toString())
.build();
ListBigQueryExportsPagedResponse response = client.listBigQueryExports(request);
System.out.println("Listing BigQuery exports:");
for (BigQueryExport bigQueryExport : response.iterateAll()) {
System.out.println(bigQueryExport.getName());
}
return response;
}
}
}
```
### Python
To authenticate to Security Command Center, set up Application Default
Credentials. For more information, see
[Set up ADC for a local development environment](https://docs.cloud.google.com/docs/authentication/set-up-adc-local-dev-environment.md.txt).
```python
def list_bigquery_exports(parent: str):
from google.cloud import securitycenter_v2
"""
List BigQuery exports in the given parent.
Args:
parent: The parent which owns the collection of BigQuery exports.
Use any one of the following resource paths:
- organizations/{organization_id}/locations/{location_id}
- folders/{folder_id}/locations/{location_id}
- projects/{project_id}/locations/{location_id}
"""
client = securitycenter_v2.SecurityCenterClient()
request = securitycenter_v2.ListBigQueryExportsRequest()
request.parent = parent
response = client.list_big_query_exports(request)
print("Listing BigQuery exports:")
for bigquery_export in response:
print(bigquery_export.name)
return response
```
## Delete an export configuration
If you no longer require an export configuration, you can delete it.
### gcloud
1. Go to the Google Cloud console.
[Go to the Google Cloud console](https://console.cloud.google.com/projectselector2/projectselector2?supportedpurview=organizationId)
2. Select the project for which you enabled the Security Command Center API.
3. Click **Activate Cloud Shell** .

4. To delete an export configuration, run the following command:
```bash
gcloud scc bqexports delete BIGQUERY_EXPORT \
--folder=FOLDER_ID | --organization=ORGANIZATION_ID | --project=PROJECT_ID \
--location=LOCATION
```
Replace the following:
- `BIGQUERY_EXPORT` with a name for the export configuration that you want to delete.
- `FOLDER_ID`, `ORGANIZATION_ID`, or `PROJECT_ID` with the name of your folder, organization, or project. You must set one of these options. For folders and organizations, the name is the folder ID or the organization ID. For projects, the name is the project number or the project ID.
- `LOCATION`:
the
[Security Command Center
location](https://docs.cloud.google.com/security-command-center/docs/data-residency-support#supported_data_locations) in which to delete the export configuration; if data residency is enabled, use `eu`,
`sa`, or `us`; otherwise, use the value `global`.
For example, to delete an export configuration named `my-bq-export`
from an organization with an organization ID set to `123`, run:
```bash
gcloud scc bqexports delete my-bq-export \
--organization=123 \
--location=global
```
### Java
To authenticate to Security Command Center, set up Application Default
Credentials. For more information, see
[Set up ADC for a local development environment](https://docs.cloud.google.com/docs/authentication/set-up-adc-local-dev-environment.md.txt).
```java
import com.google.cloud.securitycenter.v2.BigQueryExportName;
import com.google.cloud.securitycenter.v2.DeleteBigQueryExportRequest;
import com.google.cloud.securitycenter.v2.SecurityCenterClient;
import java.io.IOException;
public class DeleteBigQueryExport {
public static void main(String[] args) throws IOException {
// TODO(Developer): Modify the following variable values.
// organizationId: Google Cloud Organization id.
String organizationId = "{google-cloud-organization-id}";
// Specify the location to list the findings.
String location = "global";
// bigQueryExportId: Unique identifier that is used to identify the export.
String bigQueryExportId = "{bigquery-export-id}";
deleteBigQueryExport(organizationId, location, bigQueryExportId);
}
// Delete an existing BigQuery export.
public static void deleteBigQueryExport(String organizationId, String location,
String bigQueryExportId)
throws IOException {
// Initialize client that will be used to send requests. This client only needs to be created
// once, and can be reused for multiple requests.
try (SecurityCenterClient client = SecurityCenterClient.create()) {
// Optionally BigQueryExportName or String can be used
// String bigQueryExportName = String.format("organizations/%s/locations/%s
// /bigQueryExports/%s",organizationId,location, bigQueryExportId);
BigQueryExportName bigQueryExportName = BigQueryExportName.of(organizationId, location,
bigQueryExportId);
DeleteBigQueryExportRequest bigQueryExportRequest =
DeleteBigQueryExportRequest.newBuilder()
.setName(bigQueryExportName.toString())
.build();
client.deleteBigQueryExport(bigQueryExportRequest);
System.out.printf("BigQuery export request deleted successfully: %s", bigQueryExportId);
}
}
}
```
### Python
To authenticate to Security Command Center, set up Application Default
Credentials. For more information, see
[Set up ADC for a local development environment](https://docs.cloud.google.com/docs/authentication/set-up-adc-local-dev-environment.md.txt).
```python
def delete_bigquery_export(parent: str, bigquery_export_id: str):
"""
Delete an existing BigQuery export.
Args:
parent: Use any one of the following resource paths:
- organizations/{organization_id}/locations/{location_id}
- folders/{folder_id}/locations/{location_id}
- projects/{project_id}/locations/{location_id}
bigquery_export_id: Unique identifier that is used to identify the export.
"""
from google.cloud import securitycenter_v2
client = securitycenter_v2.SecurityCenterClient()
request = securitycenter_v2.DeleteBigQueryExportRequest()
request.name = f"{parent}/bigQueryExports/{bigquery_export_id}"
client.delete_big_query_export(request)
print(f"BigQuery export request deleted successfully: {bigquery_export_id}")
```
After you delete the export configuration, you can remove the data from
Data Studio. For more information, see
[Remove, delete, and restore a data source](https://support.google.com/looker-studio/answer/6300783).
## Review findings in BigQuery
After you create an export configuration, new findings are exported to the
BigQuery dataset in the project that you specified.
To review findings in BigQuery, do the following:
1. Go to the project in BigQuery.
[Go to BigQuery](https://console.cloud.google.com/projectselector2/bigquery?supportedpurview=project&supportedpurview=organizationId)
2. Select a project.
3. In the **Explorer** pane, expand the node for your project.
4. Expand your dataset.
5. Click the **findings** table.
6. On the tab that opens, click **Preview**. A sample set of data is
displayed.
## Useful queries
This section provides example [queries](https://docs.cloud.google.com/bigquery/docs/running-queries.md.txt#queries)
for analyzing findings data. In the following examples, replace
`DATASET` with the name assigned to your dataset and
`PROJECT_ID` with the project name for your dataset.
To troubleshoot any errors you encounter, see [Error messages](https://docs.cloud.google.com/bigquery/docs/error-messages.md.txt).
### The number of new findings created and updated every day
```sql
SELECT
FORMAT_DATETIME("%Y-%m-%d", event_time) AS date,
count(DISTINCT finding_id)
FROM `PROJECT_ID.DATASET.findings`
GROUP BY date
ORDER BY date DESC
```
### The latest finding record for each finding
```sql
SELECT
* EXCEPT(row)
FROM (
SELECT *, ROW_NUMBER() OVER(
PARTITION BY finding_id
ORDER BY event_time DESC, finding.mute_update_time DESC
) AS row
FROM `PROJECT_ID.DATASET.findings`
)
WHERE row = 1
```
### Current findings that are active, ordered by time
```sql
WITH latestFindings AS (
SELECT * EXCEPT(row)
FROM (
SELECT *, ROW_NUMBER() OVER(
PARTITION BY finding_id
ORDER BY event_time DESC, finding.mute_update_time DESC
) AS row
FROM `PROJECT_ID.DATASET.findings`
) WHERE row = 1
)
SELECT finding_id, event_time, finding
FROM latestFindings
WHERE finding.state = "ACTIVE"
ORDER BY event_time DESC
```
### Current findings that are in a project
```sql
WITH latestFindings AS (
SELECT * EXCEPT(row)
FROM (
SELECT *, ROW_NUMBER() OVER(
PARTITION BY finding_id
ORDER BY event_time DESC, finding.mute_update_time DESC
) AS row
FROM `PROJECT_ID.DATASET.findings`
) WHERE row = 1
)
SELECT finding_id, event_time, finding, resource
FROM latestFindings
WHERE resource.project_display_name = 'PROJECT'
```
Replace `PROJECT` with the project name.
### Current findings that are in a folder
```sql
WITH latestFindings AS(
SELECT * EXCEPT(row)
FROM (
SELECT *, ROW_NUMBER() OVER(
PARTITION BY finding_id
ORDER BY event_time DESC, finding.mute_update_time DESC
) AS row
FROM `PROJECT_ID.DATASET.findings`
) WHERE row = 1
)
SELECT finding_id, event_time, finding, resource
FROM latestFindings
CROSS JOIN UNNEST(resource.folders) AS folder
WHERE folder.resource_folder_display_name = 'FOLDER'
```
Replace `FOLDER` with the folder name.
### Current findings from scanner `Logging Scanner`
```sql
WITH latestFindings AS (
SELECT * EXCEPT(row)
FROM (
SELECT *, ROW_NUMBER() OVER(
PARTITION BY finding_id
ORDER BY event_time DESC, finding.mute_update_time DESC
) AS row
FROM `PROJECT_ID.DATASET.findings`
) WHERE row = 1
)
SELECT finding_id, event_time, finding
FROM latestFindings
CROSS JOIN UNNEST(finding.source_properties) AS source_property
WHERE source_property.key = "ScannerName"
AND source_property.value = "LOGGING_SCANNER"
```
### Current active findings of type `Persistence: IAM Anomalous Grant`
```sql
WITH latestFindings AS(
SELECT * EXCEPT(row)
FROM (
SELECT *, ROW_NUMBER() OVER(
PARTITION BY finding_id
ORDER BY event_time DESC, finding.mute_update_time DESC
) AS row
FROM `PROJECT_ID.DATASET.findings`
) WHERE row = 1
)
SELECT finding_id, event_time, finding
FROM latestFindings
WHERE finding.state = "ACTIVE"
AND finding.category = "Persistence: IAM Anomalous Grant"
```
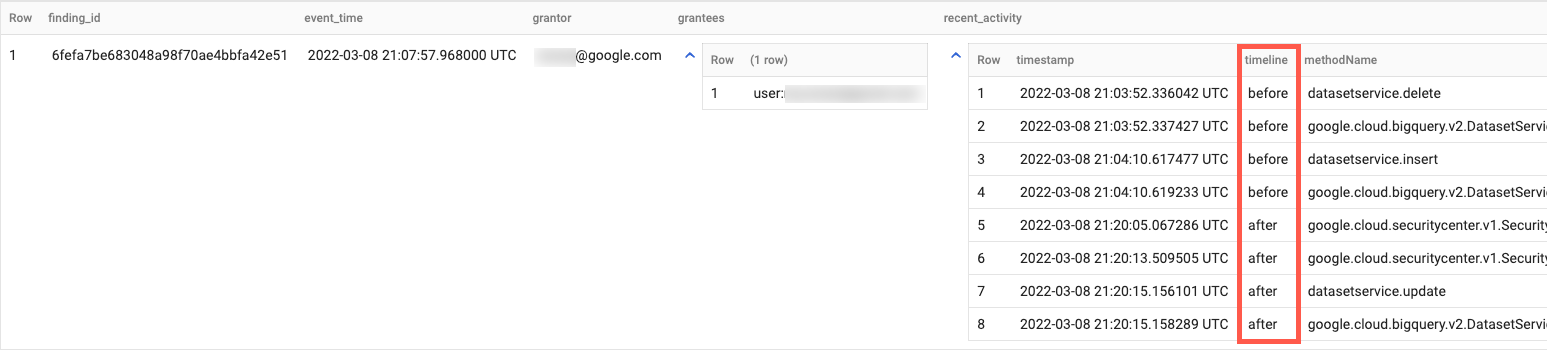
### Correlate active findings of a given type with Cloud Audit Logs
This example query helps investigate anomalous IAM grant findings
from Event Threat Detection using Cloud Audit Logs by displaying the grantor's sequence of
Admin Activity actions during the time window preceding and succeeding the
anomalous IAM grant action. This following query correlates Admin
Activity logs between 1 hour before and 1 hour after the finding's timestamp.
```sql
WITH latestFindings AS(
SELECT * EXCEPT(row)
FROM (
SELECT *, ROW_NUMBER() OVER(
PARTITION BY finding_id
ORDER BY event_time DESC, finding.mute_update_time DESC
) AS row
FROM `PROJECT_ID.DATASET.findings`
) WHERE row = 1
)
SELECT
finding_id,
ANY_VALUE(event_time) as event_time,
ANY_VALUE(finding.access.principal_email) as grantor,
JSON_VALUE_ARRAY(ANY_VALUE(finding.source_properties_json), '$.properties.sensitiveRoleGrant.members') as grantees,
ARRAY_AGG(
STRUCT(
timestamp,
IF(timestamp < event_time, 'before', 'after') as timeline,
protopayload_auditlog.methodName,
protopayload_auditlog.resourceName,
protopayload_auditlog.serviceName
)
ORDER BY timestamp ASC
) AS recent_activity
FROM (
SELECT
f.*,
a.*,
FROM latestFindings AS f
LEFT JOIN `PROJECT_ID.DATASET.cloudaudit_googleapis_com_activity` AS a
ON a.protopayload_auditlog.authenticationInfo.principalEmail = f.finding.access.principal_email
WHERE f.finding.state = "ACTIVE"
AND f.finding.category = "Persistence: IAM Anomalous Grant"
AND a.timestamp >= TIMESTAMP_SUB(f.event_time, INTERVAL 1 HOUR)
AND a.timestamp <= TIMESTAMP_ADD(f.event_time, INTERVAL 1 HOUR)
)
GROUP BY
finding_id
ORDER BY
event_time DESC
```
The output is similar to the following:
## Create charts in Data Studio
[Data Studio](https://lookerstudio.google.com/overview) lets
you create interactive reports and dashboards.
In general, you incur [BigQuery usage costs](https://cloud.google.com/bigquery/pricing)
when accessing BigQuery through Data Studio.
For more information, see
[Visualizing BigQuery data using Data Studio](https://docs.cloud.google.com/bigquery/docs/visualize-looker-studio.md.txt).
To create a chart that visualizes findings data by severity and category, do the
following:
1. Open [Data Studio](https://lookerstudio.google.com/) and sign in.
2. If prompted, provide additional information and set up other preferences. Read the terms of service and, if you're satisfied, continue.
3. Click **Blank Report**.
4. On the **Connect to data** tab, click the **BigQuery** card.
5. If prompted, authorize Data Studio to access BigQuery projects.
6. Connect to your findings data:
1. For **Project** , select that project for your dataset. Or, in the **My projects** tab, enter your project ID to search for it.
2. For **Dataset**, click the name of your dataset.
3. For **Table** , click **findings**.
4. Click **Add**.
5. In the dialog, click **Add to report**.
7. After the report is added, click **Add a chart**.
8. Click **Stacked column chart**, and then click the area where you want to
place it.
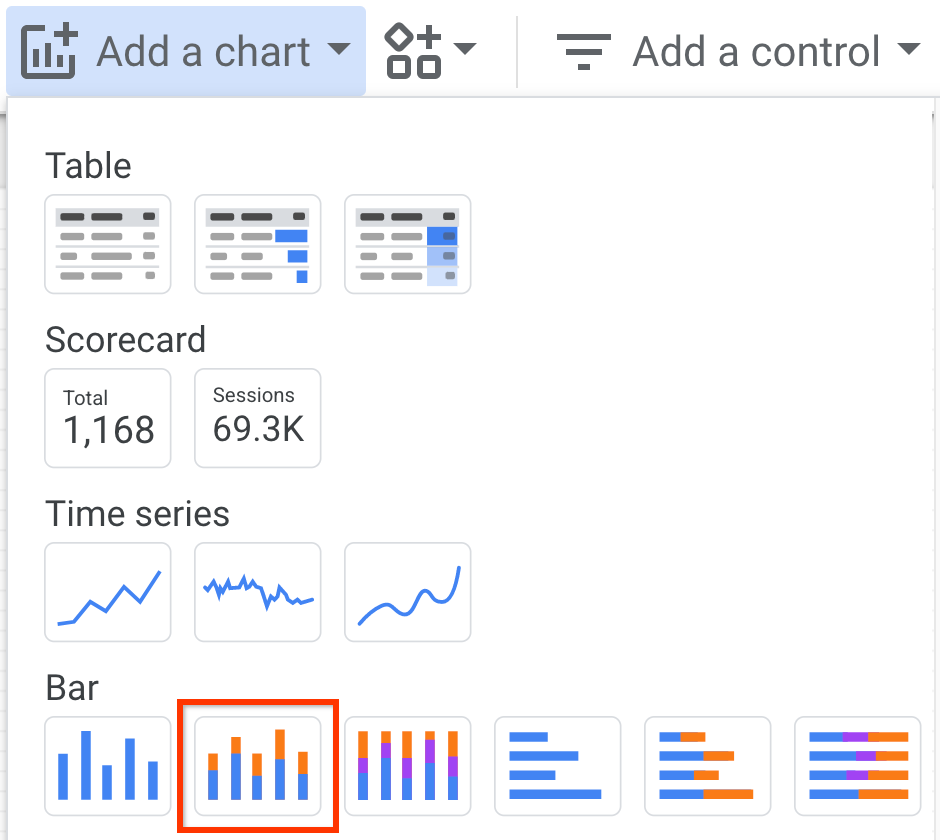
9. In the **Chart \> Bar** pane, on the **Data** tab, set the following fields:
1. In the **Dimension** field, select **finding.severity**.
2. In the **Breakdown Dimension** field, select **finding.category**.
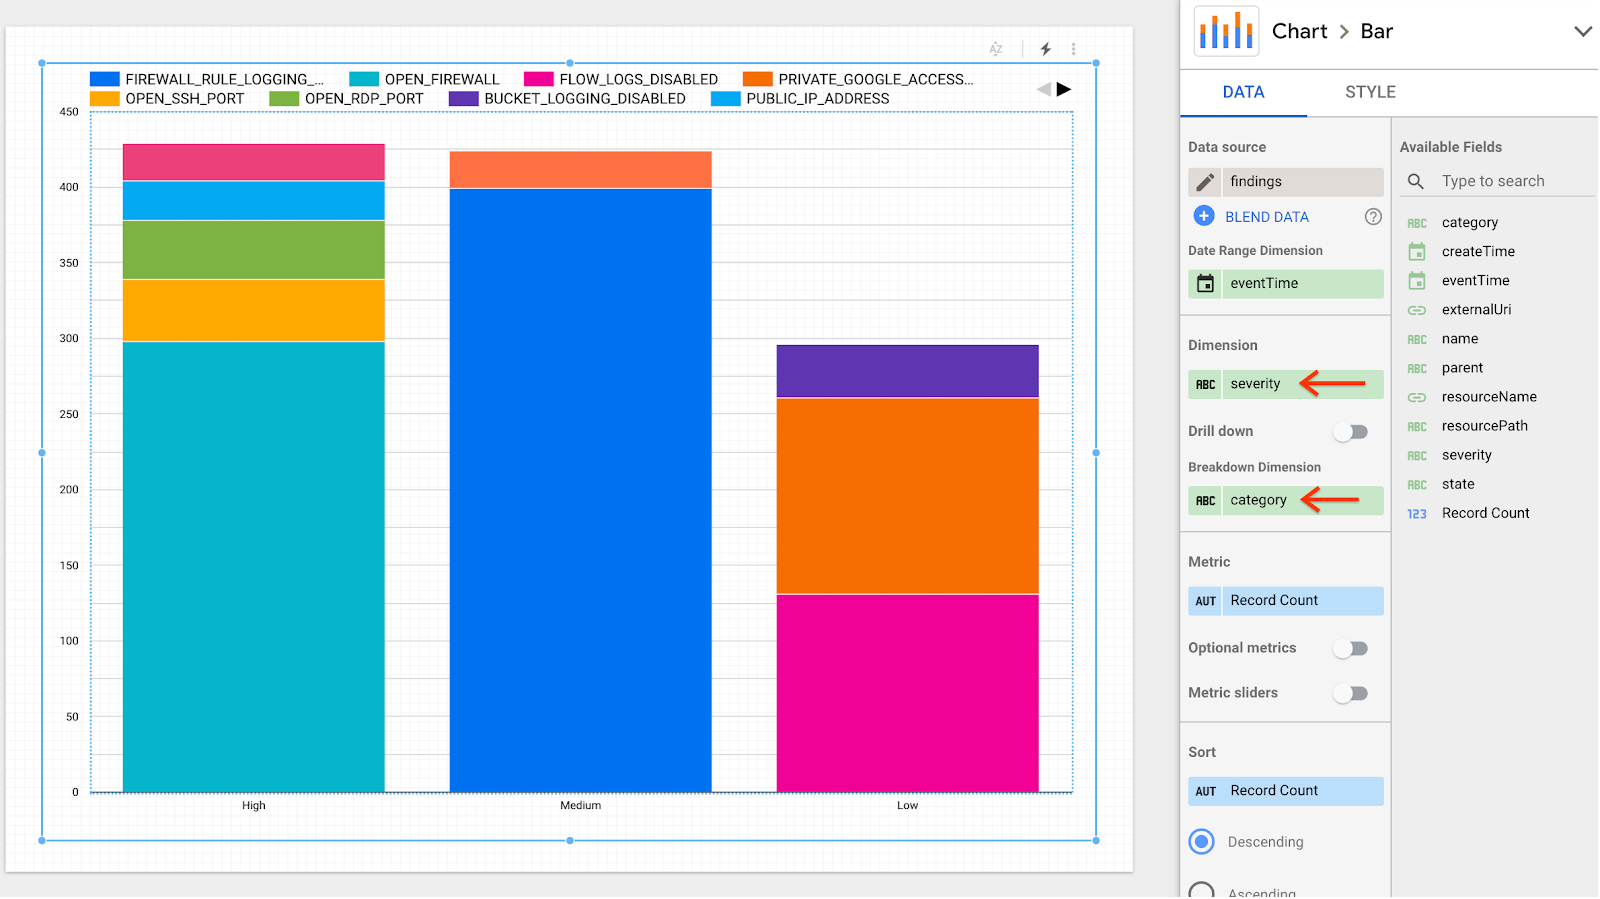
The report is updated to show multiple columns with findings split by severity
and category.
## What's next
- Learn how to create a [bulk export to BigQuery](https://docs.cloud.google.com/security-command-center/docs/bulk-exports-to-big-query.md.txt).
- Learn how to [run a query in BigQuery](https://docs.cloud.google.com/bigquery/docs/running-queries.md.txt).