> [!NOTE]
> **Note:** Google Compute Engine now has an [Instance Schedules feature](https://docs.cloud.google.com/compute/docs/instances/schedule-instance-start-stop) that can be used to start and stop instances through the Google Cloud console, Google Cloud CLI, or using the API. The approach provided in this tutorial of using Cloud Scheduler is still functional and is necessary for scheduling the starting and stopping of other resources that are not Compute Engine VM instances, for example, Cloud SQL instances.
This tutorial shows how to use Cloud Scheduler and Cloud Run functions to
automatically start and stop Compute Engine instances on a regular schedule
using [resource labels](https://docs.cloud.google.com/compute/docs/labeling-resources).
## Objectives
- Write and deploy a set of functions with Cloud Run functions that start and stop Compute Engine instances.
- Create a set of jobs with Cloud Scheduler that schedule instances with a `dev` resource label to run 09:00-17:00, Monday-Friday to match typical business hours.
## Costs
In this document, you use the following billable components of Google Cloud:
- Cloud Scheduler
- Cloud Run functions
- Pub/Sub
- Compute Engine
To generate a cost estimate based on your projected usage,
use the [pricing calculator](https://docs.cloud.google.com/products/calculator).
New Google Cloud users might be eligible for a [free trial](https://docs.cloud.google.com/free).
## Before you begin
1. Set up your environment for Cloud Scheduler. [Set up your environment](https://docs.cloud.google.com/scheduler/docs/setup)
2.
Enable the Cloud Run functions, Pub/Sub, and Compute Engine APIs.
**Roles required to enable APIs**
To enable APIs, you need the `serviceusage.services.enable` permission. If you
created the project, then you likely already have this permission through the
Owner role (`roles/owner`). Otherwise, you can get this permission through the
Service Usage Admin role (`roles/serviceusage.serviceUsageAdmin`).
[Learn how to grant roles](https://docs.cloud.google.com/iam/docs/granting-changing-revoking-access).
[Enable the APIs](https://console.cloud.google.com/apis/enableflow?apiid=cloudfunctions,pubsub,compute_component&redirect=/scheduler/docs/scheduling-instances-with-cloud-scheduler)
## Application architecture
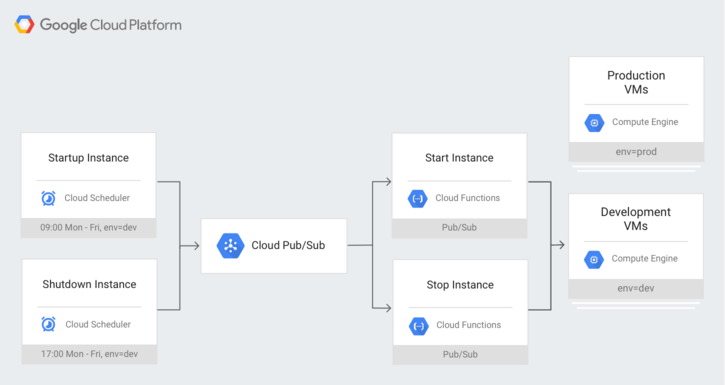
This solution includes the following Google Cloud components:
- [Compute Engine instance](https://docs.cloud.google.com/compute/docs/instances) we want to run on a schedule.
- [Cloud Run functions](https://docs.cloud.google.com/functions/docs/concepts/overview) to start and stop the instance we want to schedule.
- [Pub/Sub messages](https://docs.cloud.google.com/pubsub/docs/overview) sent and received for each start and stop event.
- [Cloud Scheduler jobs](https://docs.cloud.google.com/scheduler/docs) to make calls on a set schedule to start and stop the instance.
### Location requirements
Some components are only supported in certain regions:
- Compute Engine instance: supported in any region listed in [Regions and zones](https://docs.cloud.google.com/compute/docs/regions-zones).
- Cloud Run functions: supported in the regions listed in [Locations](https://docs.cloud.google.com/functions/docs/locations).
- Pub/Sub messages: supported globally as Pub/Sub is a global service.
- Cloud Scheduler jobs with Pub/Sub targets: supported in any [Google Cloud location](https://cloud.google.com/about/locations).
> [!NOTE]
> **Note:** Fortunately, for this application, no component needs to be run in the same region as any other component. **So even if you deploy your
> Cloud Scheduler jobs to a certain region, you are free to locate your
> Compute Engine instance anywhere else.** With that said, it is also true that locating your components in the same region will result in better latency.
### Why not HTTP instead of Pub/Sub?
You may want to simplify this architecture by using Cloud Run functions
[HTTP Triggers](https://docs.cloud.google.com/functions/docs/calling/http)
instead of
[Pub/Sub Triggers](https://docs.cloud.google.com/functions/docs/calling/pubsub).
This tutorial uses Pub/Sub as the Cloud Run functions
trigger because this method was formerly more secure than using HTTP. However,
HTTP is also a valid choice and can now be secured by requiring authentication.
To learn about securing Cloud Run functions, see the
Cloud Run functions security [overview](https://docs.cloud.google.com/functions/docs/securing). For a
comparison between HTTP and Pub/Sub triggers, see the
[Cloud Run functions triggers](https://docs.cloud.google.com/functions/docs/concepts/events-triggers)
documentation.
## Set up the Compute Engine instance
### Console
1. Go to the **VM instances** page in the Google Cloud console.
[Go to the VM instances page](https://console.cloud.google.com/compute/instances).
2. Click **Create instance**.
3. Set the **Name** to `dev-instance`.
4. Under **Labels** , click **Add labels**.
5. Click **Add label**.
6. Enter `env` for **Key** and `dev` for **Value**.
7. For **Region** select **us-west1**.
8. For **Zone** select **us-west1-b**.
9. Click **Save**.
10. Click **Create** at the bottom of the page.
### gcloud
```bash
gcloud compute instances create dev-instance \
--network default \
--zone us-west1-b \
--labels=env=dev
```
> [!NOTE]
> **Note:** For simplicity, this tutorial creates only one instance. However, the architecture here can be used to stop and start multiple instances where the [resource label](https://docs.cloud.google.com/compute/docs/labeling-resources) `env` has the value `dev`.
## Deploy functions triggered by Pub/Sub through Cloud Run functions
### Create and deploy the functions
### Console
#### Create the start function.
1. Go to the **Cloud Run functions** page in the Google Cloud console.
[Go to the Cloud Run functions page](https://console.cloud.google.com/functions).
2. Click **Create Function**.
3. For **Environment** , select **1st gen**.
4. Set **Function name** to `startInstancePubSub`.
5. Leave **Region** at its default value.
6. For **Trigger type** , select **Cloud Pub/Sub**.
7. For **Select a Cloud Pub/Sub topic** , click **Create a topic**.
8. A **Create topic** dialog should appear.
1. Under **Topic ID** , enter `start-instance-event`.
2. Click **Create** to finish the dialog.
9. Click **Save** at the bottom of the **Trigger** box.
10. Click **Next** at the bottom of the page.
11. For **Runtime** , select **Node.js 16** or later.
12. For **Entry point** , enter `startInstancePubSub`.
13. On the left side of the code editor, select **index.js**.
14. Replace the starter code with the following code:
const compute = require('https://docs.cloud.google.com/nodejs/docs/reference/compute/latest/overview.html');
const instancesClient = new compute.https://docs.cloud.google.com/nodejs/docs/reference/compute/latest/overview.html();
const operationsClient = new compute.https://docs.cloud.google.com/nodejs/docs/reference/compute/latest/overview.html();
async function waitForOperation(projectId, operation) {
while (operation.status !== 'DONE') {
[operation] = await operationsClient.wait({
operation: operation.name,
project: projectId,
zone: operation.zone.split('/').pop(),
});
}
}
/**
* Starts Compute Engine instances.
*
* Expects a PubSub message with JSON-formatted event data containing the
* following attributes:
* zone - the GCP zone the instances are located in.
* label - the label of instances to start.
*
* @param {!object} event Cloud Function PubSub message event.
* @param {!object} callback Cloud Function PubSub callback indicating
* completion.
*/
exports.startInstancePubSub = async (event, context, callback) => {
try {
const project = await instancesClient.getProjectId();
const payload = _validatePayload(event);
const options = {
filter: `labels.${payload.label}`,
project,
zone: payload.zone,
};
const [instances] = await instancesClient.list(options);
await Promise.all(
instances.map(async instance => {
const [response] = await instancesClient.start({
project,
zone: payload.zone,
instance: instance.name,
});
return waitForOperation(project, response.latestResponse);
})
);
// Operation complete. Instance successfully started.
const message = 'Successfully started instance(s)';
console.log(message);
callback(null, message);
} catch (err) {
console.log(err);
callback(err);
}
};
/**
* Validates that a request payload contains the expected fields.
*
* @param {!object} payload the request payload to validate.
* @return {!object} the payload object.
*/
const _validatePayload = event => {
let payload;
try {
payload = JSON.parse(Buffer.from(event.data, 'base64').toString());
} catch (err) {
throw new Error('Invalid Pub/Sub message: ' + err);
}
if (!payload.zone) {
throw new Error("Attribute 'zone' missing from payload");
} else if (!payload.label) {
throw new Error("Attribute 'label' missing from payload");
}
return payload;
};
15. On the left side of the code editor, select the **package.json**.
16. Replace the starter code with the following code:
{
"name": "cloud-functions-schedule-instance",
"version": "0.1.0",
"private": true,
"license": "Apache-2.0",
"author": "Google Inc.",
"repository": {
"type": "git",
"url": "https://github.com/GoogleCloudPlatform/nodejs-docs-samples.git"
},
"engines": {
"node": ">=16.0.0"
},
"scripts": {
"test": "c8 mocha -p -j 2 test/*.test.js --timeout=20000"
},
"devDependencies": {
"c8": "^10.0.0",
"mocha": "^10.0.0",
"proxyquire": "^2.0.0",
"sinon": "^18.0.0"
},
"dependencies": {
"@google-cloud/compute": "^4.0.0"
}
}
17. Click **Deploy** at the bottom of the page.
#### Create the stop function.
1. You should be on the **Cloud Run functions** page in the Google Cloud console.
2. Click **Create Function**.
3. For **Environment** , select **1st gen**.
4. Set **Function name** to `stopInstancePubSub`.
5. Leave **Region** at its default value.
6. For **Trigger type** , select **Cloud Pub/Sub**.
7. For **Select a Cloud Pub/Sub topic** , click **Create a topic**.
8. A **Create topic** dialog should appear.
1. Under **Topic ID** , enter `stop-instance-event`.
2. Click **Create** to finish the dialog.
9. Click **Save** at the bottom of the **Trigger** box.
10. Click **Next** at the bottom of the page.
11. For **Runtime** , select **Node.js 16** or later.
12. For **Entry point** , enter `stopInstancePubSub`.
13. On the left side of the code editor, select **index.js**.
14. Replace the starter code with the following code:
const compute = require('https://docs.cloud.google.com/nodejs/docs/reference/compute/latest/overview.html');
const instancesClient = new compute.https://docs.cloud.google.com/nodejs/docs/reference/compute/latest/overview.html();
const operationsClient = new compute.https://docs.cloud.google.com/nodejs/docs/reference/compute/latest/overview.html();
async function waitForOperation(projectId, operation) {
while (operation.status !== 'DONE') {
[operation] = await operationsClient.wait({
operation: operation.name,
project: projectId,
zone: operation.zone.split('/').pop(),
});
}
}
/**
* Stops Compute Engine instances.
*
* Expects a PubSub message with JSON-formatted event data containing the
* following attributes:
* zone - the GCP zone the instances are located in.
* label - the label of instances to stop.
*
* @param {!object} event Cloud Function PubSub message event.
* @param {!object} callback Cloud Function PubSub callback indicating completion.
*/
exports.stopInstancePubSub = async (event, context, callback) => {
try {
const project = await instancesClient.getProjectId();
const payload = _validatePayload(event);
const options = {
filter: `labels.${payload.label}`,
project,
zone: payload.zone,
};
const [instances] = await instancesClient.list(options);
await Promise.all(
instances.map(async instance => {
const [response] = await instancesClient.stop({
project,
zone: payload.zone,
instance: instance.name,
});
return waitForOperation(project, response.latestResponse);
})
);
// Operation complete. Instance successfully stopped.
const message = 'Successfully stopped instance(s)';
console.log(message);
callback(null, message);
} catch (err) {
console.log(err);
callback(err);
}
};
/**
* Validates that a request payload contains the expected fields.
*
* @param {!object} payload the request payload to validate.
* @return {!object} the payload object.
*/
const _validatePayload = event => {
let payload;
try {
payload = JSON.parse(Buffer.from(event.data, 'base64').toString());
} catch (err) {
throw new Error('Invalid Pub/Sub message: ' + err);
}
if (!payload.zone) {
throw new Error("Attribute 'zone' missing from payload");
} else if (!payload.label) {
throw new Error("Attribute 'label' missing from payload");
}
return payload;
};
15. On the left side of the code editor, select the **package.json**.
16. Replace the starter code with the following code:
{
"name": "cloud-functions-schedule-instance",
"version": "0.1.0",
"private": true,
"license": "Apache-2.0",
"author": "Google Inc.",
"repository": {
"type": "git",
"url": "https://github.com/GoogleCloudPlatform/nodejs-docs-samples.git"
},
"engines": {
"node": ">=16.0.0"
},
"scripts": {
"test": "c8 mocha -p -j 2 test/*.test.js --timeout=20000"
},
"devDependencies": {
"c8": "^10.0.0",
"mocha": "^10.0.0",
"proxyquire": "^2.0.0",
"sinon": "^18.0.0"
},
"dependencies": {
"@google-cloud/compute": "^4.0.0"
}
}
17. Click **Deploy** at the bottom of the page.
### gcloud
#### Create the Pub/Sub topics.
```bash
gcloud pubsub topics create start-instance-event
```
```bash
gcloud pubsub topics create stop-instance-event
```
#### Get the code
1. Download the code.
```bash
git clone https://github.com/GoogleCloudPlatform/nodejs-docs-samples.git
```
Alternatively, you can
[download the sample](https://github.com/GoogleCloudPlatform/nodejs-docs-samples/archive/main.zip)
as a zip file and extract it.
2. Go to the correct directory.
```bash
cd nodejs-docs-samples/functions/scheduleinstance/
```
#### Create the start and stop functions.
You should be in the `nodejs-docs-samples/functions/scheduleinstance/`
directory.
```bash
gcloud functions deploy startInstancePubSub \
--trigger-topic start-instance-event \
--runtime nodejs18 \
--allow-unauthenticated
```
```bash
gcloud functions deploy stopInstancePubSub \
--trigger-topic stop-instance-event \
--runtime nodejs18 \
--allow-unauthenticated
```
> [!NOTE]
> **Note:** If you have trouble deploying your functions, see the documentation [Deploying from Your Local Machine](https://docs.cloud.google.com/functions/docs/deploying/filesystem).
### (Optional) Verify the functions work
### Console
#### Stop the instance
1. Go to the **Cloud Run functions** page in the Google Cloud console.
[Go to the Cloud Run functions page](https://console.cloud.google.com/functions).
2. Click the function named `stopInstancePubSub`.
3. You should see a number of tabs: **General** , **Trigger** , **Source** , **Permissions** , and **Testing** . Click the **Testing** tab.
4. For **Triggering event** enter the following:
```json
{"data":"eyJ6b25lIjoidXMtd2VzdDEtYiIsICJsYWJlbCI6ImVudj1kZXYifQo="}
```
- This is the base64-encoded string for
`{"zone":"us-west1-b", "label":"env=dev"}`
- If you want to encode your own string, feel free to use any online
[base64 encoding tool](https://www.google.com/search?q=base64+encoding+tool).
> [!NOTE]
> **Note:** If you want to learn more about publishing data to Pub/Sub, see the [Publisher Guide](https://docs.cloud.google.com/pubsub/docs/publisher#publish).
5. Click the **Test the function** button.
6. When it is done running, you should see
`Successfully stopped instance dev-instance` printed under
**Output**. It may take up to 60 seconds to finish running.
- If instead you see `error: 'Error: function failed to load.'`, just
wait 10 seconds or so for the function to finish deploying and try
again.
- If instead you see
`error: 'Error: function execution attempt timed out.'`, just move
on to the next step to see if the instance is just taking a long
time to shut down.
- If instead it finishes running, but shows nothing, it probably also
just timed out. Just move on to the next step to see if the instance
is just taking a long time to shut down.
7. Go to the **VM instances** page in the Google Cloud console.
[Go to the VM instances page](https://console.cloud.google.com/compute/instances).
8. Verify that the instance named `dev-instance` has a grey square
next to its name, indicating that it has stopped. It may take up to 30
seconds to finish shutting down.
- If it doesn't seem to be finishing, try clicking **Refresh** at the top of the page.
#### Start the instance
1. Go to the **Cloud Run functions** page in the Google Cloud console.
[Go to the Cloud Run functions page](https://console.cloud.google.com/functions).
2. Click the function named `startInstancePubSub`.
3. You should see a number of tabs: **General** , **Trigger** , **Source** , **Permissions** , and **Testing** . Click the **Testing** tab.
4. For **Triggering event** enter the following:
```json
{"data":"eyJ6b25lIjoidXMtd2VzdDEtYiIsICJsYWJlbCI6ImVudj1kZXYifQo="}
```
- Again, this is the base64-encoded string for `{"zone":"us-west1-b", "label":"env=dev"}`
5. Click the **Test the function** button.
6. When it is done running, you should see
`Successfully started instance dev-instance` printed under
**Output**.
7. Go to the **VM instances** page in the Google Cloud console.
[Go to the VM instances page](https://console.cloud.google.com/compute/instances).
8. Verify that the instance named `dev-instance` has a green checkmark
next to its name, indicating that it is running. It may take up to 30
seconds to finish starting up.
### gcloud
#### Stop the instance
1. Call the function to stop the instance.
```bash
gcloud functions call stopInstancePubSub \
--data '{"data":"eyJ6b25lIjoidXMtd2VzdDEtYiIsICJsYWJlbCI6ImVudj1kZXYifQo="}'
```
- This is the base64-encoded string for
`{"zone":"us-west1-b", "label":"env=dev"}`
- If you want to encode your own string, feel free to use any tool.
Here's an example using the `base64` command line tool:
```json
echo '{"zone":"us-west1-b", "label":"env=dev"}' | base64
```
```json
eyJ6b25lIjoidXMtd2VzdDEtYiIsICJsYWJlbCI6ImVudj1kZXYifQo=
```
> [!NOTE]
> **Note:** If you want to learn more about publishing data to Pub/Sub, see the [Publisher Guide](https://docs.cloud.google.com/pubsub/docs/publisher#publish).
When the function has finished you should see the following:
```bash
result: Successfully stopped instance dev-instance
```
It may take up to 60 seconds to finish running.
- If instead you get the error:
```bash
error: 'Error: function failed to load.`
```
Just wait 10 seconds or so for the function to finish deploying and
try again.
- If instead you get the error:
```bash
error: `Error: function execution attempt timed out.`
```
Move on to the next step to see if the instance is just taking a
long time to shut down.
- If instead you get no result, the function probably just timed out.
Move on to the next step to see if the instance is just taking a
long time to shut down.
2. Check that the instance has a status of `TERMINATED`. It may take up to
30 seconds to finish shutting down.
```bash
gcloud compute instances describe dev-instance \
--zone us-west1-b \
| grep status
```
```bash
status: TERMINATED
```
#### Start the instance
1. Call the function to start the instance.
```bash
gcloud functions call startInstancePubSub \
--data '{"data":"eyJ6b25lIjoidXMtd2VzdDEtYiIsICJsYWJlbCI6ImVudj1kZXYifQo="}'
```
- Again, this is the base64-encoded string for `{"zone":"us-west1-b", "label":"env=dev"}`
When the function has finished you should see the following:
```bash
result: Successfully started instance dev-instance
```
2. Check that the instance has a status of `RUNNING`. It may take up to 30
seconds to finish starting up.
```bash
gcloud compute instances describe dev-instance \
--zone us-west1-b \
| grep status
```
```bash
status: RUNNING
```
## Set up the Cloud Scheduler jobs to call Pub/Sub
### Create the jobs
### Console
#### Create the start job.
1. Go to the **Cloud Scheduler** page in the Google Cloud console.
[Go to the Cloud Scheduler page](https://console.cloud.google.com/cloudscheduler).
2. Click **Create job**.
3. For **Region** , select `us-east1`.
4. Set the **Name** to `startup-dev-instances`.
5. For **Frequency** , enter `0 9 * * 1-5`.
- This will execute at 9:00 every day Mon-Fri.
6. For **Timezone** , select a country and timezone. This example will use `United States` and `Los Angeles`.
7. Click **Continue**.
8. For **Target type** , select `Pub/Sub`.
9. Select `start-instance-event` from the topic drop-down.
10. For **Message** , enter the following:
```json
{"zone":"us-west1-b","label":"env=dev"}
```
11. Click **Create**.
#### Create the stop job.
1. You should be on the **Cloud Scheduler** page in the Google Cloud console.
2. Click **Create job**.
3. For **Region** , select `us-east1`.
4. Set the **Name** to `shutdown-dev-instances`.
5. For **Frequency** , enter `0 17 * * 1-5`.
- This will execute at 17:00 every day Mon-Fri.
6. For **Timezone** , select a country and timezone. This example will use `United States` and `Los Angeles`.
7. Click **Continue**.
8. For **Target type** , select `Pub/Sub`.
9. Select `stop-instance-event` from the topic drop-down..
10. For **Message** , enter the following:
```json
{"zone":"us-west1-b","label":"env=dev"}
```
11. Click **Create**.
### gcloud
#### Create the start job.
```bash
gcloud scheduler jobs create pubsub startup-dev-instances \
--schedule '0 9 * * 1-5' \
--topic start-instance-event \
--message-body '{"zone":"us-west1-b", "label":"env=dev"}' \
--time-zone 'America/Los_Angeles' \
--location us-east1
```
#### Create the stop job.
```bash
gcloud scheduler jobs create pubsub shutdown-dev-instances \
--schedule '0 17 * * 1-5' \
--topic stop-instance-event \
--message-body '{"zone":"us-west1-b", "label":"env=dev"}' \
--time-zone 'America/Los_Angeles' \
--location us-east1
```
> [!NOTE]
> **Note:** Your Cloud Scheduler jobs are deployed to the region you selected when you created them. The job's region cannot be changed.
### (Optional) Verify the jobs work
### Console
#### Stop the instance
1. Go to the **Cloud Scheduler** page in the Google Cloud console.
[Go to the Cloud Scheduler page](https://console.cloud.google.com/cloudscheduler).
2. For the job named `shutdown-dev-instances`, click the **Run now** button on the far right side of the page.
3. Go to the **VM instances** page in the Google Cloud console.
[Go to the VM instances page](https://console.cloud.google.com/compute/instances).
4. Verify that the instance named `dev-instance` has a grey square next to its name, indicating that it has stopped. It may take up to 30 seconds for it to finish shutting down.
#### Start the instance
1. Go to the **Cloud Scheduler** page in the Google Cloud console.
[Go to the Cloud Scheduler page](https://console.cloud.google.com/cloudscheduler).
2. For the job named `startup-dev-instances`, click the **Run now** button on the far right side of the page.
3. Go to the **VM instances** page in the Google Cloud console.
[Go to the VM instances page](https://console.cloud.google.com/compute/instances).
4. Verify that the instance named `dev-instance` has a green checkmark next to its name, indicating that it is running. It may take up to 30 seconds for it to finish starting up.
### gcloud
#### Stop the instance
1. Run the scheduler job to stop the instance.
```bash
gcloud scheduler jobs run shutdown-dev-instances --location="us-east1"
```
2. Check that the instance has a status of `TERMINATED`. It may take up to
30 seconds for it to finish shutting down.
```bash
gcloud compute instances describe dev-instance \
--zone us-west1-b \
| grep status
```
```bash
status: TERMINATED
```
#### Start the instance
1. Run the scheduler job to start the instance.
```bash
gcloud scheduler jobs run startup-dev-instances --location="us-east1"
```
2. Check that the instance has a status of `RUNNING`. It may take up to 30
seconds to finish starting up.
```bash
gcloud compute instances describe dev-instance \
--zone us-west1-b \
| grep status
```
```bash
status: RUNNING
```
## Clean up
After you finish the tutorial, you can clean up the resources that you created so that they
stop using quota and incurring charges. The following sections describe how to delete or turn off
these resources.
### Delete the Cloud Scheduler jobs
1. Go to the **Cloud Scheduler** page in the Google Cloud console.
[Go to the Cloud Scheduler page](https://console.cloud.google.com/cloudscheduler).
2. Click the checkboxes next to your jobs.
3. Click the **Delete** button at the top of the page and confirm your delete.
### Delete the Pub/Sub topics
1. Go to the **Pub/Sub** page in the Google Cloud console.
[Go to the Pub/Sub page](https://console.cloud.google.com/cloudpubsub/)
2. Click the checkboxes next to your topics.
3. Click **Delete** at the top of the page and confirm your delete.
### Delete the functions deployed through Cloud Run functions
1. Go to the **Cloud Run functions** page in the Google Cloud console.
[Go to the Cloud Run functions page](https://console.cloud.google.com/functions).
2. Click the checkboxes next to your functions.
3. Click the **Delete** button at the top of the page and confirm your delete.
### Delete the Compute Engine instance
To delete a Compute Engine instance:
1. In the Google Cloud console, go to the **VM instances** page.
[Go to VM instances](https://console.cloud.google.com/compute/instances)
2. Select the checkbox for the instance that you want to delete.
3. To delete the instance, click **More actions** , click **Delete**, and then follow the instructions.
### Delete the project
The easiest way to eliminate billing is to delete the project that you
created for the tutorial.
To delete the project:
> [!CAUTION]
> **Caution** : Deleting a project has the following effects:
>
> - **Everything in the project is deleted.** If you used an existing project for the tasks in this document, when you delete it, you also delete any other work you've done in the project.
> - **Custom project IDs are lost.** When you created this project, you might have created a custom project ID that you want to use in the future. To preserve the URLs that use the project ID, such as an `appspot.com` URL, delete selected resources inside the project instead of deleting the whole project.
>
>
> If you plan to explore multiple architectures, tutorials, or quickstarts, reusing projects
> can help you avoid exceeding project quota limits.
1. In the Google Cloud console, go to the **Manage resources** page.
[Go to Manage resources](https://console.cloud.google.com/iam-admin/projects)
2. In the project list, select the project that you want to delete, and then click **Delete**.
3. In the dialog, type the project ID, and then click **Shut down** to delete the project.
## What's next
- Explore reference architectures, diagrams, and best practices about Google Cloud. Take a look at our [Cloud Architecture Center](https://docs.cloud.google.com/architecture).