**DEPRECATED:** This solution is deprecated.
The Cloud Service Broker (`cloud-service-broker`) replaced the Open Service Broker for Google Cloud (`gcp-service-broker`) as the service broker for Cloud Foundry.
For information from SAP about SAP Business Technology Platform (SAP BTP), see [SAP BTP](https://www.sap.com/products/technology-platform.html).
These instructions show you how to integrate Google Cloud
services into a Cloud Foundry environment on SAP Business Technology Platform (SAP BTP) by using
the Open Service Broker for Google Cloud (Google Cloud Service Broker).
The Google Cloud Service Broker simplifies the delivery of
Google Cloud services to
applications that run in a Cloud Foundry environment on SAP BTP.
By creating Google Cloud
resources and managing their corresponding permissions, the
Google Cloud Service Broker makes it easy to consume Google Cloud
services from within an SAP BTP application environment.
The following diagram is a high-level view of the setup steps with some example
Google Cloud services.

## Core solution components
The following components are required for the set up of the
Google Cloud Service Broker on SAP BTP for Cloud Foundry.
| **Service** | **Use case** |
|---|---|
| [Open Service Broker for Google Cloud](https://github.com/GoogleCloudPlatform/gcp-service-broker) | Integration of Google Cloud services into a SAP BTP Cloud Foundry environment |
| [Cloud SQL for MySQL](https://docs.cloud.google.com/sql/docs/mysql.md.txt) | A database for back-end storage for Google Cloud Service Broker |
| [SAP BTP Account](https://account.hana.ondemand.com/#/home/welcome) | Provide the SAP BTP Cloud Foundry environment in the selected Google Cloud region |
| [Google Cloud Project](https://docs.cloud.google.com/resource-manager/docs/creating-managing-projects.md.txt) | Provide the Google Cloud services |
| [Cloud Foundry CLI](https://docs.cloudfoundry.org/cf-cli/install-go-cli.html) | Command-line interface for configuring Cloud Foundry |
## Costs
Cloud SQL, which is recommended for use with Google Cloud Service Broker,
is a billable Google Cloud component.
The use of Google Cloud services through their respective APIs might also
be billable.
Use the [Pricing Calculator](https://cloud.google.com/products/calculator/#id=411d8ca1-210f-4f2c-babd-34c6af2b5538) to generate a cost
estimate based on your projected usage.
## Prerequisites
Before you can set up the Cloud Foundry environment on SAP BTP
you must first set up both your local development environment and create a
project on Google Cloud.
### Set up your development environment
1. Install the Cloud Foundry Command-Line Interface (CLI) on your development workstation as per [SAP Portal documentation](https://help.sap.com/viewer/65de2977205c403bbc107264b8eccf4b/Cloud/en-US/4ef907afb1254e8286882a2bdef0edf4.html).
### Set up a Google Cloud project
If you do not already have a Google Cloud project with billing
enabled, you must create one.
## Set up the Google Cloud environment
You need certain Google Cloud APIs enabled,
a Google Cloud service account, and a database for the
Google Cloud Service Broker.
### Enable the required Google Cloud APIs
Enable the following APIs in
[API Manager \> Library](https://console.cloud.google.com/apis/library).
1. Enable the [Cloud Resource Manager API](https://console.cloud.google.com/apis/api/cloudresourcemanager.googleapis.com/overview).
2. Enable the [Identity and Access Management API](https://console.cloud.google.com/apis/api/iam.googleapis.com/overview).
3. Enable the [Cloud SQL Admin API](https://console.cloud.google.com/apis/api/sqladmin.googleapis.com).
4. Enable the API for any other [supported Google Cloud service](https://github.com/GoogleCloudPlatform/gcp-service-broker/blob/master/README.md) that you need.
### Create a root service account
1. In the Google Cloud console, go to the **Service accounts** page.
[Go to the Service Accounts page](https://console.cloud.google.com/iam-admin/serviceaccounts)
2. Select your Google Cloud project.
3. Click **Create Service Account**.
4. Enter a name in the **Service account name** field.
5. Click **Create and Continue**.
6. In the **Select a role** list, click **Project** \> **Owner**, which
provides the permissions that are necessary for the Google Cloud Service Broker
to work with Google Cloud services.
7. Click **Continue**.
8. As appropriate, grant other users access to the service account.
9. Click **Done**.
10. On the **Service accounts** page in the Google Cloud console,
click the email address of the service account that you just created.
11. Under the service account name, click the **Keys** tab.
12. Click the **Add Key** drop-down menu, and then select **Create new key**.
13. Make sure the **JSON** key type is specified.
14. Click **Create**. The JSON key file is automatically downloaded to your
workstation.
15. Move the JSON key file to a secure location.
### Set up a backing database
The Google Cloud Service Broker requires a MySQL database to store the state of
provisioned resources. A Second Generation instance of Cloud SQL
for MySQL, which provides a fully managed MySQL Community Edition
database with automatic backups, high availability, and automatic maintenance,
is recommended.
However, you can use any database compatible with the MySQL protocol.
The following steps create a database by using a Second Generation
Cloud SQL instance on Google Cloud, but should be
applicable to any database compatible with the MySQL protocol.
#### Create a Cloud SQL for MySQL instance
Before you can create a database, you need to create a Cloud SQL for
MySQL instance on Google Cloud.
1. In the Google Cloud console, go to the **Cloud SQL Instances** page.
[OPEN Cloud SQL Instances page](https://console.cloud.google.com/sql/instances)
2. Click **Create instance**.
1. Select **MySQL** and click **Next**.
2. Click **Choose Second Generation**.
3. Define an **Instance ID**.
4. Define a **Root password**.
5. In the **Region** field, select the region in which your Cloud Foundry environment will be located.
6. Click **Create**.
#### Create a database
1. After the Cloud SQL instance boots, open Cloud Shell.
[OPEN Cloud Shell](https://console.cloud.google.com/cloudshell)
2. Connect to the Cloud SQL instance.
```
gcloud sql connect your-cloud-sql-instance --user=root
```
Where `your-cloud-sql-instance` is the name of the
Cloud SQL instance you created on Google Cloud.
3. Create a database called `servicebroker`.
```
CREATE DATABASE servicebroker;
```
4. Define a username and password for the Google Cloud Service Broker.
```
CREATE USER 'SB_DB_UserName'@'%' IDENTIFIED BY 'SB_DB_Password';
```
Where:
- `SB_DB_UserName` is the username that represents Google Cloud Service Broker as a user of the database.
- `SB_DB_Password` is the password that identifies the Google Cloud Service Broker to the database.
5. Set access privileges for the Google Cloud Service Broker.
```
GRANT ALL PRIVILEGES ON servicebroker.* TO 'SB_DB_UserName'@'%' WITH GRANT OPTION;
```
6. Set up SSL and get the SSL certificates.
1. In the Google Cloud console, open the **Cloud SQL Instances** page.
[OPEN Cloud SQL Instances page](https://console.cloud.google.com/sql/instances)
2. Click the name of your Cloud SQL instance.
3. On the **Instance details** page, click the **Connections** tab.
4. In the **SSL** section under **SSL connections** , click
**Allow only SSL Connections**. The update might take a few seconds.
5. In the **SSL** section, under **Configure SSL client certificates** ,
click **Create a client certificate**.
6. Enter a name and click **Create**.
7. Download the three certificate files and save them to a secure location.
7. In the **Connectivity** section of the **Connections** tab on the
**Instance details** page:
1. Confirm that the **Public IP** box is selected.
2. Under **Authorized networks** , click **Add network**.
3. In the **Network** field, enter `0.0.0.0/0`.
4. Click **Done**.
8. Click **Save** to save authorization changes.
## Get an SAP BTP trial account for Cloud Foundry on Google Cloud infrastructure
1. Register for an [SAP BTP trial account](https://developers.sap.com/tutorials/hcp-create-trial-account.html). You need an active SAP account to get an SAP BTP trial account.
2. Log in to the [SAP BTP Cockpit](https://account.hana.ondemand.com/cockpit).
3. In the SAP BTP Cockpit, choose **Home** at the top of the screen.
4. In the navigation pane on the left side of the screen, click **Regions**.
5. Under **Cloud Foundry Environment** , select a region that uses Google Cloud infrastructure, such as **US-Central (IA)**. This creates an organization and space within the SAP BTP Cloud Foundry environment.
## Install and configure Google Cloud Service Broker for Cloud Foundry
### Deploy Google Cloud Service Broker for Cloud Foundry
In a terminal on your development workstation:
1. Install the latest version of Google Cloud Service Broker for Cloud Foundry from
GitHub.
```
curl -s https://api.github.com/repos/GoogleCloudPlatform/gcp-service-broker/releases/latest \
|grep 'tag_name' \
|cut -d\" -f4 \
|xargs -I {} curl -sOL "https://github.com/GoogleCloudPlatform/gcp-service-broker/archive/"{}'.tar.gz'
```
2. Extract the Google Cloud Service Broker files.
```
tar zxvf *.tar.gz
```
3. Switch directories.
```
cd gcp-service-broker*
```
4. Log in to the SAP BTP Cloud Foundry environment.
```
cf login
```
5. Enter the API endpoint.
```
https://api.techkey.hana.ondemand.com
```
Where `techkey` is an SAP-defined technical key that
identifies the region of the API endpoint. For example, the technical key
for the US Central region that includes the Google Cloud
infrastructure is `cf.us30`. For a list of all of the regions for the
SAP BTP Cloud Foundry environment, see [SAP Help Portal](https://help.sap.com/viewer/65de2977205c403bbc107264b8eccf4b/Cloud/en-US/350356d1dc314d3199dca15bd2ab9b0e.html#loiof344a57233d34199b2123b9620d0bb41).
6. Enter your username and password for your SAP BTP account.
7. Deploy the Google Cloud Service Broker app to the Cloud Foundry environment.
```
cf push APP_NAME --no-start
```
Where `APP_NAME` is a unique name that you choose for
the Google Cloud Service Broker application. For example, `gcp-service-broker-001`
or `mycompany-gcp-svc-broker-app`.
You see information similar to the following example after
Cloud Foundry deploys the Google Cloud Service Broker app:
```
name: gcp-service-broker-example-app
requested state: stopped
routes: gcp-service-broker-example-app.cfapps.us30.hana.ondemand.com
last uploaded:
stack:
buildpacks:
type: web
instances: 0/1
memory usage: 1024M
state since cpu memory disk details
#0 down 2018-12-19T23:49:13Z 0.0% 0 of 0 0 of 0
```
### Configure the Google Cloud Service Broker app for Cloud Foundry
1. Log in to [SAP BTP Cockpit](https://account.hana.ondemand.com/cockpit).
2. In the SAP BTP Cockpit, go to **Trial Home** \> **Regions** \> **Your Google Cloud region** \> **Your global account** \> **Your subaccount** \> **Spaces** \> **Your space**.
3. Click the name of the Google Cloud Service Broker app that you deployed in [the preceding section](https://docs.cloud.google.com/sap/docs/scp/scp-cf-gcp-service-broker-guide.md.txt#deploy_gcpsb).
4. In the menu on the left hand side, click **User-provided variables**.
5. Use the **Add variable** button to define the following Google Cloud Service Broker
variables as key-value pairs:
| **Key** | **Value** |
|---|---|
| ``` CA_CERT ``` | The contents of the server certificate file, `server-ca.pem`, that you downloaded when you set up SSL in [Set up a backing database](https://docs.cloud.google.com/sap/docs/scp/scp-cf-gcp-service-broker-guide.md.txt#set_up_a_backing_database). |
| ``` CLIENT_CERT ``` | The contents of the client certificate file, `client-cert.pem`, that you downloaded when you set up SSL in [Set up a backing database](https://docs.cloud.google.com/sap/docs/scp/scp-cf-gcp-service-broker-guide.md.txt#set_up_a_backing_database). |
| ``` CLIENT_KEY ``` | The contents of the client key file, `client-key.pem`, that you downloaded when you set up SSL in [Set up a backing database](https://docs.cloud.google.com/sap/docs/scp/scp-cf-gcp-service-broker-guide.md.txt#set_up_a_backing_database). |
| ``` DB_HOST ``` | The public IP address of your Cloud SQL instance, as shown in the **Connect to this instance** section of the **Instance details** page for your Cloud SQL instance in the [Google Cloud console](https://console.cloud.google.com/sql/instances). |
| ``` DB_PASSWORD ``` | The password that you defined for Google Cloud Service Broker to access the database that you configured in [Set up a backing database](https://docs.cloud.google.com/sap/docs/scp/scp-cf-gcp-service-broker-guide.md.txt#set_up_a_backing_database). |
| ``` DB_USERNAME ``` | The username that you defined for the Google Cloud Service Broker when you created the database. For a Cloud SQL database, you can see the username under **MySQL user accounts** on the **Users** tab of the **Instance details** page for your Cloud SQL instance in the [Google Cloud console](https://console.cloud.google.com/sql/instances). |
| ``` ROOT_SERVICE_ACCOUNT_JSON ``` | The contents of the JSON key file that you downloaded when you [created the root service account](https://docs.cloud.google.com/sap/docs/scp/scp-cf-gcp-service-broker-guide.md.txt#create_service_account). |
| ``` SECURITY_USER_NAME ``` | A username that you define for the service broker to use when authenticating broker requests. You specify this same username later in the `cf create-service-broker` command when you create the broker service. |
| ``` SECURITY_USER_PASSWORD ``` | A password that you define for the service broker to use when authenticating broker requests. You specify this same password later in the `cf create-service-broker` command when you create the broker service. |
| Optional environment variables | For a list of optional variables that you can use to customize the Google Cloud Service Broker, see [Installation Customization](https://github.com/GoogleCloudPlatform/gcp-service-broker/blob/master/docs/customization.md). |
### Start the Google Cloud Service Broker app for Cloud Foundry
1. Click **Overview** in the menu on the left hand side.
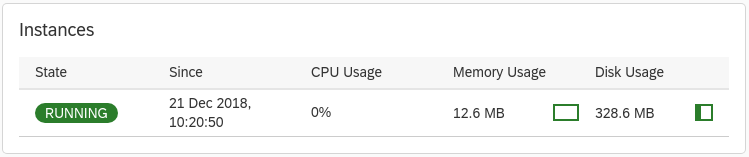
2. To start the broker application, click **Start** . When
the application is up and running, green **Started** and **Running**
indicators appear on the **Overview** page, as shown in the
following images.

3. If the Google Cloud Service Broker app won't start or shows **Error** or
**Crashed**, check the application logs from your development workstation
and adjust the variables or configuration accordingly.
```
cf logs APP_NAME --recent
```
### Register Google Cloud Service Broker for Cloud Foundry
On your development workstation:
1. Connect to SAP BTP Cloud Foundry environment.
```
cf login
```
2. List the deployed applications.
```
cf apps
```
You see output similar to the following example:
```
name requested state instances memory disk urls
broker-test-app started 1/1 1G 1G broker-test-app.cfapps.us30.hana.ondemand.com
```
3. Register the broker service.
```
cf create-service-broker BROKER_SERVICE_NAME SECURITY_USER_NAME
SECURITY_USER_PASSWORD https://BROKER_APPLICATION_ROUTE --space-scoped
```
Where:
- `BROKER_SERVICE_NAME` is a unique name that you choose for your broker service.
- `SECURITY_USER_NAME` is the username that was defined to authenticate broker requests in [Configure the
Google Cloud Service Broker app for Cloud Foundry](https://docs.cloud.google.com/sap/docs/scp/scp-cf-gcp-service-broker-guide#configure_gcpsb_app).
- `SECURITY_USER_PASSWORD` is the password that was defined to authenticate broker requests in [Configure the
Google Cloud Service Broker app for Cloud Foundry](https://docs.cloud.google.com/sap/docs/scp/scp-cf-gcp-service-broker-guide#configure_gcpsb_app).
- `BROKER_APPLICATION_ROUTE` is the URL of the
service broker application as displayed in the previous step. For
example:
```
broker-test-app.cfapps.us30.hana.ondemand.com
```
4. Verify the registration of the broker service.
```
cf service-brokers
```
You should see output similar to the following example:
```
name url
broker-service-name https://broker-service-name.cfapps.us30.hana.ondemand.com
```
5. Verify that Google Cloud services are now available
in the SAP BTP Service Marketplace.
```
cf marketplace
```
The following example, which was edited for readability and to fit the
page, shows two services from a listing of Google Cloud services
in the marketplace.
```
service plans description
...
google-bigquery default A fast, economical and fully managed data warehouse for large-scale data analytics.
google-bigtable three-node-production-hdd A high performance NoSQL database service for large analytical and operational workloads.
```
For a list of the available Google Cloud services, see
[Open Service Broker for Google Cloud](https://github.com/GoogleCloudPlatform/gcp-service-broker/blob/master/README.md).
## What's next
Create Google Cloud service instances and bind them to your
SAP BTP applications.
For more information about creating and binding Google Cloud
services, see:
- [Using Services in the Cloud Foundry Environment](https://help.sap.com/viewer/65de2977205c403bbc107264b8eccf4b/Cloud/en-US/f22029f0e7404448ab65f71ff5b0804d.html)
in the SAP Help Portal.
- [The Google Cloud Service Broker documentation](https://github.com/GoogleCloudPlatform/gcp-service-broker/blob/master/docs/use.md)
in GitHub.