> [!CAUTION]
> **Note:** Cloud Deployment Manager reached end of support on December 31, 2025. For more information, see [Cloud Deployment Manager deprecation](https://docs.cloud.google.com/deployment-manager/docs/deprecations.md.txt).
>
> To manually configure a high-availability (HA) cluster for an SAP HANA
> scale-up system on SLES on Google Cloud, we recommend that you instead see
> [HA scale-up
> cluster configuration guide for SAP HANA on SLES](https://docs.cloud.google.com/sap/docs/sap-hana-scaleup-ha-manual-config-sles), which uses Terraform.
This guide shows you how to deploy and configure a performance-optimized
SUSE Linux Enterprise Server (SLES) high-availability (HA) cluster for an
SAP HANA scale-up system on Google Cloud.
This guide includes the steps for:
- Configuring an [internal passthrough Network Load Balancer](https://docs.cloud.google.com/load-balancing/docs/internal/failover-overview) to reroute traffic in the event of a failure
- Configuring a Pacemaker cluster on SLES to manage the SAP systems and other resources during a failover
This guide also includes steps for configuring SAP HANA system replication,
but refer to the SAP documentation for the definitive instructions.
To deploy a SAP HANA system without a Linux high-availability cluster or a standby node
host, see the following resources:
- [Terraform: SAP HANA scale-up deployment guide](https://docs.cloud.google.com/sap/docs/sap-hana-deployment-guide-tf.md.txt)
- [Terraform: SAP HANA multi-host scale-out deployment guide](https://docs.cloud.google.com/sap/docs/sap-hana-scaleout-deployment-tf.md.txt)
To configure an HA cluster for SAP HANA on Red Hat Enterprise Linux (RHEL),
see the [HA cluster configuration guide for SAP HANA scale-up on RHEL](https://docs.cloud.google.com/sap/docs/sap-hana-scaleup-ha-manual-config-rhel.md.txt).
This guide is intended for advanced SAP HANA users who are familiar with
Linux high-availability configurations for SAP HANA.
## The system that this guide deploys
Following this guide, you deploy two SAP HANA instances and set up an
HA cluster on SLES.
You deploy each SAP HANA instance on a Compute Engine instance in
a different zone within the same region. A high-availability installation of
SAP NetWeaver is not covered in this guide.
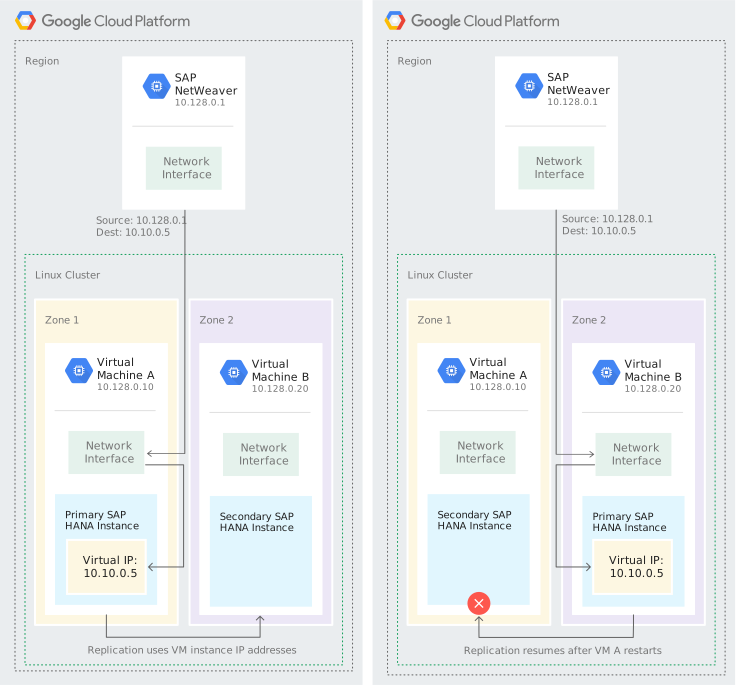
The deployed cluster includes the following functions and features:
- Two host Compute Engine instances, each hosting an instance of SAP HANA.
- Synchronous SAP HANA system replication.
- The Pacemaker high-availability cluster resource manager.
- A STONITH fencing mechanism.
- Automatic restart of the failed instance as the new secondary instance.
This guide has you use the Cloud Deployment Manager templates that
are provided by Google Cloud to deploy the Compute Engine instances
and the SAP HANA instances, which ensures that the compute instances
and the base SAP HANA systems meet SAP supportability requirements and
conform to best practices.
This guide also uses SAP HANA Studio to test SAP HANA system replication.
If you prefer, you can use SAP HANA Cockpit instead. For information about
installing SAP HANA Studio, see the following resources:
- [Installing SAP HANA Studio on a Compute Engine Windows VM](https://docs.cloud.google.com/sap/docs/sap-hana-deployment-guide.md.txt#install_hana_studio)
- [SAP HANA Studio Installation and Update Guide](https://help.sap.com/viewer/a2a49126a5c546a9864aae22c05c3d0e/2.0.02/en-US)
## Before you begin
Before you create the SAP HANA high availability cluster, make sure that you
satisfy the following prerequisites:
- You have read the [SAP HANA planning guide](https://docs.cloud.google.com/sap/docs/sap-hana-planning-guide.md.txt) and the [SAP HANA high-availability planning guide](https://docs.cloud.google.com/sap/docs/sap-hana-ha-planning-guide.md.txt).
- You or your organization has a Google Cloud account and you have created a project for the SAP HANA deployment. For information about creating Google Cloud accounts and projects, see [Setting up your Google account](https://docs.cloud.google.com/sap/docs/sap-hana-deployment-guide-tf.md.txt#setting-up-your-google-account).
- If you require your SAP workload to run in compliance with data residency, access control, support personnel, or regulatory requirements, then you must create the required Assured Workloads folder. For more information, see [Compliance and sovereign controls
for SAP on Google Cloud](https://docs.cloud.google.com/sap/docs/compliance-and-sovereign-controls).
- The SAP HANA installation media is stored in a Cloud Storage bucket that is
available in your deployment project and region. For information about how to
upload SAP HANA installation media to a Cloud Storage bucket, see
[Creating a Cloud Storage bucket for the SAP HANA installation files](https://docs.cloud.google.com/sap/docs/sap-hana-deployment-guide-tf.md.txt#creating_a_cloud_storage_bucket_for_the_sap_hana_installation_files).
- If [OS login](https://docs.cloud.google.com/compute/docs/instances/access-overview.md.txt#oslogin)
is enabled in your project metadata, then you need to disable
OS login temporarily until your deployment is complete. For deployment
purposes, this procedure configures SSH keys in instance metadata.
When OS login is enabled, metadata-based SSH key configurations are
disabled, and this deployment
fails.
After deployment is complete, you can enable OS login again.
For more information, see:
- [Enabling or disabling OS Login](https://docs.cloud.google.com/compute/docs/instances/managing-instance-access#enable_oslogin)
- [Add SSH keys to VMs that use metadata-based SSH keys](https://docs.cloud.google.com/compute/docs/connect/add-ssh-keys.md.txt#metadata)
- If you're using
[VPC internal DNS](https://docs.cloud.google.com/compute/docs/internal-dns.md.txt),
then the value of the `vmDnsSetting` variable
in your project metadata must be either `GlobalOnly` or `ZonalPreferred`
to enable the resolution of the node names across zones.
The default setting of `vmDnsSetting` is `ZonalOnly`. For more information,
see:
- [Configuring DNS names for your project or instances](https://docs.cloud.google.com/compute/docs/networking/zonal-dns.md.txt#setting-zonal-dns)
- [Querying custom metadata](https://docs.cloud.google.com/compute/docs/storing-retrieving-metadata#querying_custom_metadata)
- [Setting project-wide custom metadata](https://docs.cloud.google.com/compute/docs/storing-retrieving-metadata#projectwide)
To avoid unintentionally exposing your VM instance to the internet, follow these recommendations:
- Use a NAT gateway.
- [Create firewall rules](https://docs.cloud.google.com/vpc/docs/using-firewalls#creating_firewall_rules) that block all external access that you don't require.
- When you create your VMs:
- Specify a network tag for each VM for use in routing and firewall rules. If you use the Deployment Manager template that Google Cloud provides, specify a tag with `networkTag: [TAG]`.
- Create the VMs without an external IP. If you use the Deployment Manager templates that Google Cloud provides, specify `publicIP: No`.
## Creating a network
For security purposes, create a new network. You can control who has access by
adding firewall rules or by using another access control method.
If your project has a default VPC network, then don't use it.
Instead, create your own VPC network so that the only firewall rules
in effect are those that you create explicitly.
During deployment, Compute Engine instances typically require access to the internet to
download Google Cloud's Agent for SAP. If you are using one of the SAP-certified Linux
images that are available from Google Cloud, then the compute instance also requires access
to the internet in order to register the license and to access OS vendor repositories.
A configuration with a NAT gateway and with VM network tags supports this access, even if the
target compute instances don't have external IPs.
To set up networking:
### Console
1. In the Google Cloud console, go to the **VPC networks** page.
[Go to VPC networks](https://console.cloud.google.com/networking/networks/list)
2. Click **Create VPC network**.
3. Enter a **Name** for the network.
The name must adhere to the
[naming convention](https://docs.cloud.google.com/compute/docs/naming-resources.md.txt#resource-name-format).
VPC networks use the Compute Engine naming convention.
4. For **Subnet creation mode** , choose **Custom**.
5. In the **New subnet** section, specify the following configuration parameters for a subnet:
1. Enter a **Name** for the subnet.
2. For **Region** , select the [Compute Engine region](https://docs.cloud.google.com/compute/docs/regions-zones.md.txt) where you want to create the subnet.
3. For **IP stack type** , select **IPv4 (single-stack)** and then enter an IP address range in the [CIDR format](https://wikipedia.org/wiki/Classless_Inter-Domain_Routing), such as `10.1.0.0/24`.
This is the [primary
IPv4 range](https://docs.cloud.google.com/vpc/docs/vpc#manually_created_subnet_ip_ranges) for the subnet. If you plan to add more than one subnet, then
assign non-overlapping CIDR IP ranges for each subnetwork in the network.
Note that each subnetwork and its internal IP ranges are mapped to a single
region.
4. Click **Done**.
6. To add more subnets, click **Add subnet** and repeat the preceding steps. You can add more subnets to the network after you have created the network.
7. Click **Create**.
### gcloud
1. Go to Cloud Shell. [Go to Cloud Shell](https://console.cloud.google.com/?cloudshell=true)
2. To create a new network in the custom subnetworks mode, run:
```
gcloud compute networks create NETWORK_NAME --subnet-mode custom
```
Replace `NETWORK_NAME` with the name of the new network. The
name must adhere to the
[naming convention](https://docs.cloud.google.com/compute/docs/naming-resources.md.txt#resource-name-format).
VPC networks use the Compute Engine naming convention.
Specify `--subnet-mode custom` to avoid using the default auto mode, which
automatically creates a subnet in each Compute Engine region. For more
information, see [Subnet creation mode](https://docs.cloud.google.com/vpc/docs/vpc.md.txt#subnet-ranges).
3. Create a subnetwork, and specify the region and IP range:
```
gcloud compute networks subnets create SUBNETWORK_NAME \
--network NETWORK_NAME --region REGION --range RANGE
```
Replace the following:
- `SUBNETWORK_NAME`: the name of the new subnetwork
- `NETWORK_NAME`: the name of the network you created in the previous step
- `REGION`: the [region](https://docs.cloud.google.com/compute/docs/regions-zones.md.txt) where you want the subnetwork
- `RANGE`: the IP address range, [specified in CIDR format](https://wikipedia.org/wiki/Classless_Inter-Domain_Routing), such as `10.1.0.0/24`
If you plan to add more than one subnetwork, assign
non-overlapping CIDR IP ranges for each subnetwork in the network. Note that
each subnetwork and its internal IP ranges are mapped to a single region.
4. Optionally, repeat the previous step and add additional subnetworks.
## Setting up a NAT gateway
If you need to create one or more compute instances without public IP addresses, then you need to use network
address translation (NAT) to enable the instances to access the internet. Use Cloud NAT, a
Google Cloud distributed, software-defined managed service that lets the compute instances send outbound
packets to the internet and receive any corresponding established inbound response packets.
Alternatively, you can set up a separate compute instance as a NAT gateway.
> [!IMPORTANT]
> **Key Point:** When you configure Cloud NAT, specify at least 160 as the minimum number of ports per compute instance. Certain operating system updates run concurrent processes that might exceed the Cloud NAT default for the number of ports, which can result in activation or download errors.
>
> When you create a Cloud NAT instance, specify the number of ports in the **Minimum
> ports per VM** field under **Advanced configurations** on the Create a NAT gateway page in the
> Google Cloud console.
To create a Cloud NAT instance for your project, see
[Using Cloud NAT](https://docs.cloud.google.com/nat/docs/set-up-network-address-translation).
After you configure Cloud NAT for your project, your compute instances can
securely access the internet without a public IP address.
## Adding firewall rules
By default, an *implied firewall rule* blocks incoming connections from outside
your Virtual Private Cloud (VPC) network. To allow incoming connections,
set up a firewall rule for your VM. After an incoming connection is established
with a VM, traffic is permitted in both directions over that connection.
You can also create a firewall rule to allow external access to specified ports,
or to restrict access between VMs on the same network. If the `default`
VPC network type is used, some additional default rules also
apply, such as the `default-allow-internal` rule, which allows connectivity
between VMs on the same network on all ports.
Depending on the IT policy that is applicable to your environment, you might
need to isolate or otherwise restrict connectivity to your database host, which
you can do by creating firewall rules.
Depending on your scenario, you can create firewall rules to allow access
for:
- The default SAP ports that are listed in [TCP/IP of All SAP Products](https://help.sap.com/viewer/575a9f0e56f34c6e8138439eefc32b16/2.0/en-US/616a3c0b1cc748238de9c0341b15c63c.html).
- Connections from your computer or your corporate network environment to your Compute Engine instance. If you are unsure of what IP address to use, talk to your company's network administrator.
- Communication between VMs in the SAP HANA subnetwork, including communication between nodes in an SAP HANA scale-out system or communication between the database server and application servers in a 3-tier architecture. You can enable communication between VMs by creating a firewall rule to allow traffic that originates from within the subnetwork.
> [!NOTE]
> **Note:** The following procedure is a simplified version of the instructions for creating firewall rules. For more detailed instructions, see [Creating firewall rules](https://docs.cloud.google.com/vpc/docs/using-firewalls#creating_firewall_rules).
To create a firewall rule:
### Console
1. In the Google Cloud console, go to the VPC network **Firewall** page.
[Go to Firewall](https://console.cloud.google.com/networking/firewalls/list)
2. At the top of the page, click **Create firewall rule**.
- In the **Network** field, select the network where your VM is located.
- In the **Targets** field, specify the resources on Google Cloud that this rule applies to. For example, specify **All instances in the network** . Or to to limit the rule to specific instances on Google Cloud, enter tags in **Specified target tags**.
- In the **Source filter** field, select one of the following:
- **IP ranges** to allow incoming traffic from specific IP addresses. Specify the range of IP addresses in the **Source IP
ranges** field.
- **Subnets** to allow incoming traffic from a particular subnetwork. Specify the subnetwork name in the following **Subnets** field. You can use this option to allow access between the VMs in a 3-tier or scaleout configuration.
- In the **Protocols and ports** section, select **Specified protocols and
ports** and enter `tcp:PORT_NUMBER`.
3. Click **Create** to create your firewall rule.
### gcloud
Create a firewall rule by using the following command:
```sh
$ gcloud compute firewall-rules create FIREWALL_NAME
--direction=INGRESS --priority=1000 \
--network=NETWORK_NAME --action=ALLOW --rules=PROTOCOL:PORT \
--source-ranges IP_RANGE --target-tags=NETWORK_TAGS
```
## Deploying the VMs and SAP HANA
Before you begin configuring the HA cluster, you define and deploy the VM
instances and SAP HANA systems that serve as the primary and secondary
nodes in your HA cluster.
To define and deploy the systems, you use the same Cloud Deployment Manager
template that you use to deploy a SAP HANA system in the [SAP HANA deployment
guide](https://docs.cloud.google.com/sap/docs/sap-hana-deployment-guide).
However, to deploy two systems instead of one, you need to add the
definition for the second system to the configuration file by copying and
pasting the definition of the first system. After you create the second
definition, you need to change the resource and instance names in the
second definition. To protect against a zonal failure, specify a different
zone in the same region. All other property values in the two definitions
stay the same.
After the SAP HANA systems have deployed successfully, you define and configure
the HA cluster.
The following instructions use the Cloud Shell, but are generally applicable
to the Google Cloud CLI.
1. Confirm that your current quotas for resources such as persistent disks and
CPUs are sufficient for the SAP HANA systems you are about to install. If
your quotas are insufficient, deployment fails. For the SAP HANA quota
requirements, see [Pricing and quota considerations for SAP HANA](https://docs.cloud.google.com/sap/docs/sap-hana-planning-guide.md.txt#costs).
[Go to the quotas page](https://console.cloud.google.com/iam-admin/quotas)
2. Open the Cloud Shell or, if you installed the
gcloud CLI on your local workstation, open a terminal.
[Go to the Cloud Shell](https://console.cloud.google.com/?cloudshell=true)
3. Download the `template.yaml` configuration file template for the SAP HANA
high-availability cluster to your working directory by entering the following
command in the Cloud Shell or gcloud CLI:
```sh
wget https://storage.googleapis.com/cloudsapdeploy/deploymentmanager/latest/dm-templates/sap_hana/template.yaml
```
4. Optionally, rename the `template.yaml` file to identify the configuration it
defines.
5. Open the `template.yaml` file in the Cloud Shell code editor or, if
you are using the gcloud CLI, the text editor of your choice.
To open the Cloud Shell code editor, click the pencil icon in the
upper right corner of the Cloud Shell terminal window.
6. In the `template.yaml` file, complete the definition of the primary
SAP HANA system. Specify the property values by replacing the
brackets and their contents with the values for your installation. The
properties are described in the following table.
To create the VM instances without installing SAP HANA, delete or comment
out all of the lines that begin with `sap_hana_`.
| Property | Data type | Description |
|---|---|---|
| type | String | Specifies the location, type, and version of the Deployment Manager template to use during deployment. The YAML file includes two `type` specifications, one of which is commented out. The `type` specification that is active by default specifies the template version as `latest`. The `type` specification that is commented out specifies a specific template version with a timestamp. If you need all of your deployments to use the same template version, use the `type` specification that includes the timestamp. |
| `instanceName` | String | The name of the VM instance currently being defined. Specify different names in the primary and secondary VM definitions. Names must be specified in lowercase letters, numbers, or hyphens. |
| `instanceType` | String | The type of Compute Engine virtual machine that you need to run SAP HANA on. If you need a custom VM type, specify a [predefined VM type](https://docs.cloud.google.com/sap/docs/sap-hana-planning-guide.md.txt#hana-cert-table-vms) with a number of vCPUs that is closest to the number you need while still being larger. After deployment is complete, [modify the number of vCPUs and the amount of memory](https://docs.cloud.google.com/sap/docs/modifying_vm_configurations.md.txt) . |
| `zone` | String | The Google Cloud zone in which to deploy the VM instance that your are defining. Specify different zones in the same region for the primary and secondary HANA definitions. The zones must be in the same region that you selected for your subnet. |
| `subnetwork` | String | The name of the subnetwork you created in a previous step. If you are deploying to a shared VPC, specify this value as `[SHAREDVPC_PROJECT]/[SUBNETWORK]`. For example, `myproject/network1`. |
| `linuxImage` | String | The name of the Linux operating-system image or image family that you are using with SAP HANA. To specify an image family, add the prefix `family/` to the family name. For example, `family/sles-15-sp1-sap`. To specify a specific image, specify only the image name. For the list of available images and families, see the [Images](https://console.cloud.google.com/compute/images) page in Google Cloud console. |
| `linuxImageProject` | String | The Google Cloud project that contains the image you are going to use. This project might be your own project or a Google Cloud image project, such as `suse-sap-cloud`. For more information about Google Cloud image projects, see the [Images](https://docs.cloud.google.com/compute/docs/images.md.txt) page in the Compute Engine documentation. |
| `sap_hana_deployment_bucket` | String | The name of the Google Cloud storage bucket in your project that contains the SAP HANA installation and revision files that you uploaded in a previous step. Any upgrade revision files in the bucket are applied to SAP HANA during the deployment process. |
| `sap_hana_sid` | String | The SAP HANA system ID (SID). The ID must consist of three alphanumeric characters and begin with a letter. All letters must be uppercase. |
| `sap_hana_instance_number` | Integer | The instance number, 0 to 99, of the SAP HANA system. The default is 0. |
| `sap_hana_sidadm_password` | String | The password for the operating system (OS) administrator. Passwords must be at least eight characters and include at least one uppercase letter, one lowercase letter, and one number. > [!CAUTION] > **Caution**: Change the password after the installation is complete. |
| `sap_hana_system_password` | String | The password for the database superuser. Passwords must be at least 8 characters and include at least one uppercase letter, one lowercase letter, and one number. > [!CAUTION] > **Caution**: Change the password after the installation is complete. |
| `sap_hana_sidadm_uid` | Integer | The default value for the `SID_LCadm` user ID is `900` to avoid user-created groups conflicting with SAP HANA. You can change this to a different value if you need to. |
| `sap_hana_sapsys_gid` | Integer | The default group ID for sapsys is `79`. By specifying a value above you can override this value to your requirements. |
| `sap_hana_scaleout_nodes` | Integer | Specify `0`. These instructions are for scale-up SAP HANA systems only. |
| `networkTag` | String | A network tag that represents your VM instance for firewall or routing purposes. If you specify `publicIP: No` and do not specify a network tag, be sure to provide another means of access to the internet. |
| `nic_type` | String | Optional but recommended if available for the target machine and OS version. Specifies the network interface to use with the VM instance. You can specify the value `GVNIC` or `VIRTIO_NET`. To use a [Google Virtual NIC](https://docs.cloud.google.com/compute/docs/networking/using-gvnic.md.txt) (gVNIC), you need to specify an OS image that supports gVNIC as the value for the `linuxImage` property. For the OS image list, see [Operating system details](https://docs.cloud.google.com/compute/docs/images/os-details.md.txt#networking). If you do not specify a value for this property, then the network interface is automatically selected based on the machine type that you specify for the `instanceType` property. This argument is available in Deployment Manager template versions `202302060649` or later. |
| `publicIP` | Boolean | Optional. Determines whether a public IP address is added to your VM instance. The default is `Yes`. > [!NOTE] > **Note** : Do not specify `No` unless you have a NAT gateway configured with a network tag defined for the VM or you have provided the VM with another route to the internet. If there is no route to the internet, the installation fails. |
| `serviceAccount` | String | Optional. Specifies a service account to be used by the host VMs and by the programs that run on the host VMs. Specify the email address of the service account. For example, svc-acct-name@project-id.iam.gserviceaccount.com. By default, the Compute Engine default service account is used. For more information, see [Identity and access management for SAP programs on Google Cloud](https://docs.cloud.google.com/sap/docs/security-for-sap/iam-for-sap-programs.md.txt). |
7. Create the definition of the secondary SAP HANA system by copying the
definition of the primary SAP HANA system and pasting the copy after
the primary SAP HANA system definition. See the example following these steps.
8. In the definition of the secondary SAP HANA system, specify different values for the
following properties than you specified in the primary SAP HANA system definition:
- `name`
- `instanceName`
- `zone`
9. Create the instances:
```sh
gcloud deployment-manager deployments create DEPLOYMENT_NAME --config TEMPLATE_NAME.yaml
```
The above command invokes the Deployment Manager, which
deploys the VMs, downloads the SAP HANA software from your storage bucket,
and installs SAP HANA, all according to the specifications in your
`template.yaml` file.
Deployment processing consists of two stages. In the first stage,
Deployment Manager writes its status to the console. In the second stage,
the deployment scripts write their status to Cloud Logging.
### Example of a complete `template.yaml` configuration file
The following example shows a completed `template.yaml` configuration file
that deploys two VM
instances with a SAP HANA system installed.
The file contains the definitions of two resources to deploy:
`sap_hana_primary` and `sap_hana_secondary`. Each resource definition
contains the definitions for a VM and a SAP HANA instance.
The `sap_hana_secondary` resource definition was created by copying and pasting
the first definition, and then modifying the values of `name`,
`instanceName`, and `zone` properties. All other property values in the
two resource definitions are the same.
The properties `networkTag`, `serviceAccount`, `sap_hana_sidadm_uid`, and
`sap_hana_sapsys_gid` are from the Advanced Options section of the
configuration file template. The properties `sap_hana_sidadm_uid` and
`sap_hana_sapsys_gid` are included to show their default values, which are used
because the properties are commented out.
```
resources:
- name: sap_hana_primary
type: https://storage.googleapis.com/cloudsapdeploy/deploymentmanager/latest/dm-templates/sap_hana/sap_hana.py
#
# By default, this configuration file uses the latest release of the deployment
# scripts for SAP on Google Cloud. To fix your deployments to a specific release
# of the scripts, comment out the type property above and uncomment the type property below.
#
# type: https://storage.googleapis.com/cloudsapdeploy/deploymentmanager/yyyymmddhhmm/dm-templates/sap_hana/sap_hana.py
#
properties:
instanceName: hana-ha-vm-1
instanceType: n2-highmem-32
zone: us-central1-a
subnetwork: example-subnet-us-central1
linuxImage: family/sles-15-sp1-sap
linuxImageProject: suse-sap-cloud
sap_hana_deployment_bucket: hana2-sp4-rev46
sap_hana_sid: HA1
sap_hana_instance_number: 22
sap_hana_sidadm_password: Tempa55word
sap_hana_system_password: Tempa55word
sap_hana_scaleout_nodes: 0
networkTag: cluster-ntwk-tag
serviceAccount: limited-roles@example-project-123456.iam.gserviceaccount.com
# sap_hana_sidadm_uid: 900
# sap_hana_sapsys_gid: 79
- name: sap_hana_secondary
type: https://storage.googleapis.com/cloudsapdeploy/deploymentmanager/latest/dm-templates/sap_hana/sap_hana.py
#
# By default, this configuration file uses the latest release of the deployment
# scripts for SAP on Google Cloud. To fix your deployments to a specific release
# of the scripts, comment out the type property above and uncomment the type property below.
#
# type: https://storage.googleapis.com/cloudsapdeploy/deploymentmanager/yyyymmddhhmm/dm-templates/sap_hana/sap_hana.py
#
properties:
instanceName: hana-ha-vm-2
instanceType: n2-highmem-32
zone: us-central1-c
subnetwork: example-subnet-us-central1
linuxImage: family/sles-15-sp1-sap
linuxImageProject: suse-sap-cloud
sap_hana_deployment_bucket: hana2-sp4-rev46
sap_hana_sid: HA1
sap_hana_instance_number: 22
sap_hana_sidadm_password: Google123
sap_hana_system_password: Google123
sap_hana_scaleout_nodes: 0
networkTag: cluster-ntwk-tag
serviceAccount: limited-roles@example-project-123456.iam.gserviceaccount.com
# sap_hana_sidadm_uid: 900
# sap_hana_sapsys_gid: 79
```
## Create firewall rules that allow access to the host VMs
If you haven't done so already, create firewall rules that allow access to
each host VM from the following sources:
- For configuration purposes, your local workstation, a bastion host, or a jump server
- For access between the cluster nodes, the other host VMs in the HA cluster
When you create VPC firewall rules, you specify the network
tags that you defined in the `template.yaml` configuration file to designate
your host VMs as the target for the rule.
To verify deployment, define a rule to allow SSH connections on port 22 from
a bastion host or your local workstation.
For access between the cluster nodes, add a firewall rule that allows all
connection types on any port from other VMs in the same subnetwork.
Make sure that the firewall rules for verifying deployment and for
intra-cluster communication are created before proceeding to the next
section. For instructions, see [Adding firewall rules](https://docs.cloud.google.com/sap/docs/sap-hana-ha-config-sles.md.txt#adding_firewall_rules).
## Verifying the deployment of the VMs and SAP HANA
To verify deployment, you check the deployment logs in Cloud Logging and check the disks and services on the VMs of primary and secondary hosts.
1. In the Google Cloud console, open Cloud Logging to monitor installation
progress and check for errors.
> [!NOTE]
> **Note:** You might incur costs when completing this step in Cloud Logging. For more information, see [Cloud Logging pricing](https://cloud.google.com/stackdriver/pricing).
[Go to Cloud Logging](https://console.cloud.google.com/logs/query)
2. Filter the logs:
1. In the **Logs Explorer** page, go to the **Query** pane.
2. From the **Resource** drop-down menu, select **Global** , and then click
**Add**.
If you don't see the **Global** option, then in the query editor, enter
the following query:
resource.type="global"
"Deployment"
3. Click **Run query**.
3. Analyze the filtered logs:
- If `"--- Finished"` is displayed, then the deployment processing is complete and you can proceed to the next step.
- If you see a quota error:
1. On the IAM \& Admin
[Quotas](https://console.cloud.google.com/iam-admin/quotas)
page, increase any of your quotas that do not meet the
SAP HANA requirements that are listed in the
[SAP HANA planning guide](https://docs.cloud.google.com/sap/docs/sap-hana-planning-guide.md.txt#quotas).
2. On the Deployment Manager
[Deployments](https://console.cloud.google.com/dm/deployments)
page, delete the deployment to clean up the VMs and persistent
disks from the failed installation.
3. Rerun your deployment.
### Check the configuration of the VMs and SAP HANA
1. After the SAP HANA system deploys without errors, connect to each VM by
using SSH. From the Compute Engine [VM instances page](https://console.cloud.google.com/compute/instances),
you can click the SSH button for each VM instance, or you can use your
preferred SSH method.

2. Change to the root user.
```sh
$ sudo su -
```
3. At the command prompt, enter `df -h`. On each VM, ensure that you see the `/hana`
directories, such as `/hana/data`.
```
Filesystem Size Used Avail Use% Mounted on
/dev/sda2 30G 4.0G 26G 14% /
devtmpfs 126G 0 126G 0% /dev
tmpfs 126G 0 126G 0% /dev/shm
tmpfs 126G 17M 126G 1% /run
tmpfs 126G 0 126G 0% /sys/fs/cgroup
/dev/sda1 200M 9.7M 191M 5% /boot/efi
/dev/mapper/vg_hana-shared 251G 49G 203G 20% /hana/shared
/dev/mapper/vg_hana-sap 32G 240M 32G 1% /usr/sap
/dev/mapper/vg_hana-data 426G 7.0G 419G 2% /hana/data
/dev/mapper/vg_hana-log 125G 4.2G 121G 4% /hana/log
/dev/mapper/vg_hanabackup-backup 512G 33M 512G 1% /hanabackup
tmpfs 26G 0 26G 0% /run/user/900
tmpfs 26G 0 26G 0% /run/user/899
tmpfs 26G 0 26G 0% /run/user/1000
```
4. Change to the SAP admin user by replacing `SID_LC`
in the following
command with the system ID that you specified in the configuration file
template. Use lowercase for any letters.
```sh
# su - SID_LCadm
```
5. Ensure that the SAP HANA services, such as `hdbnameserver`,
`hdbindexserver`, and others, are running on the instance by entering the
following command:
```sh
> HDB info
```
6. If you are using RHEL for SAP 9.0 or later, then make sure that the packages
`chkconfig` and `compat-openssl11` are installed on your VM instance.
For more information from SAP, see the SAP note
[3108316 - Red Hat Enterprise Linux 9.x:
Installation and Configuration](https://me.sap.com/notes/3108316).
## Validate your installation of Google Cloud's Agent for SAP
After you have deployed a VM and installed your SAP system, validate that
Google Cloud's Agent for SAP is functioning properly.
### Verify that Google Cloud's Agent for SAP is running
To verify that the agent is running, follow these steps:
1. Establish an SSH connection with your
Compute Engine instance.
2. Run the following command:
```
systemctl status google-cloud-sap-agent
```
If the agent is functioning properly, then the output
contains `active (running)`. For example:
```
google-cloud-sap-agent.service - Google Cloud Agent for SAP
Loaded: loaded (/usr/lib/systemd/system/google-cloud-sap-agent.service; enabled; vendor preset: disabled)
Active: active (running) since Fri 2022-12-02 07:21:42 UTC; 4 days ago
Main PID: 1337673 (google-cloud-sa)
Tasks: 9 (limit: 100427)
Memory: 22.4 M (max: 1.0G limit: 1.0G)
CGroup: /system.slice/google-cloud-sap-agent.service
└─1337673 /usr/bin/google-cloud-sap-agent
```
If the agent isn't running, then [restart the agent](https://docs.cloud.google.com/sap/docs/agent-for-sap/latest/operations.md.txt#agent4sap-restart).
### Verify that SAP Host Agent is receiving metrics
To verify that the infrastructure metrics are collected by
Google Cloud's Agent for SAP and sent correctly to the SAP Host Agent,
follow these steps:
1. In your SAP system, enter transaction `ST06`.
2. In the overview pane, check the availability and content of the
following fields for the correct end-to-end setup of the SAP and Google
monitoring infrastructure:
- **Cloud Provider** : `Google Cloud Platform`
- **Enhanced Monitoring Access** : `TRUE`
- **Enhanced Monitoring Details** : `ACTIVE`
## Set up monitoring for SAP HANA
Optionally, you can monitor your SAP HANA instances by using
Google Cloud's Agent for SAP. From version 2.0, you can configure the agent to
collect the SAP HANA monitoring metrics and send them to
[Cloud Monitoring](https://docs.cloud.google.com/monitoring/docs.md.txt).
Cloud Monitoring lets you create dashboards to visualize these metrics,
set up alerts based on metric thresholds, and more.
For more information about the collection of SAP HANA monitoring metrics using
Google Cloud's Agent for SAP, see
[SAP HANA monitoring metrics collection](https://docs.cloud.google.com/sap/docs/agent-for-sap/latest/planning.md.txt#sap_hana_monitoring_metrics).
## Disable SAP HANA autostart
For each SAP HANA instance in the cluster, make sure that SAP HANA autostart
is disabled. For failovers, Pacemaker manages the starting and stopping of
the SAP HANA instances in a cluster.
1. On each host as SID_LCadm, stop SAP HANA:
```sh
> HDB stop
```
2. On each host, open the SAP HANA profile by using an editor, such as vi:
```sh
vi /usr/sap/SID/SYS/profile/SID_HDBINST_NUM_HOST_NAME
```
3. Set the `Autostart` property to `0`:
```sh
Autostart=0
```
4. Save the profile.
5. On each host as SID_LCadm, start SAP HANA:
```sh
> HDB start
```
## Enable SAP HANA Fast Restart
Google Cloud **strongly** recommends enabling SAP HANA
Fast Restart for each instance of SAP HANA, especially for larger instances.
SAP HANA Fast Restart reduces restart time in the event that SAP HANA
terminates, but the operating system remains running.
> [!NOTE]
> **Note:** If you deploy SAP HANA using Google Cloud's Terraform module `sap_hana` or `sap_hana_ha`, version `202309280828` or later, or the Terraform module `manual_sap_hana_scaleup_ha`, then fast restart is automatically enabled.
As configured by the automation scripts that Google Cloud provides,
the operating system and kernel settings already support SAP HANA Fast Restart.
You need to define the `tmpfs` file system and configure SAP HANA.
To define the `tmpfs` file system and configure SAP HANA, you can follow
the manual steps or use the automation script that
Google Cloud provides to enable SAP HANA Fast Restart. For more
information, see:
- [Manual steps: Enable SAP HANA Fast Restart](https://docs.cloud.google.com/sap/docs/sap-hana-ha-config-sles.md.txt#manual-setup-fast-restart)
- [Automated steps: Enable SAP HANA Fast Restart](https://docs.cloud.google.com/sap/docs/sap-hana-ha-config-sles.md.txt#automation-fast-restart)
For the complete authoritative instructions for SAP HANA Fast Restart, see the
[SAP HANA Fast Restart Option documentation](https://help.sap.com/viewer/6b94445c94ae495c83a19646e7c3fd56/LATEST/en-US/ce158d28135147f099b761f8b1ee43fc.html).
### Manual steps
#### Configure the `tmpfs` file system
After the host VMs and the base SAP HANA systems are successfully deployed,
you need to create and mount directories for the NUMA nodes in the `tmpfs`
file system.
##### Display the NUMA topology of your VM
Before you can map the required `tmpfs` file system, you need to know how
many NUMA nodes your VM has. To display the available NUMA nodes on
a Compute Engine VM, enter the following command:
```
lscpu | grep NUMA
```
For example, an `m2-ultramem-208` VM type has four NUMA nodes,
numbered 0-3, as shown in the following example:
```
NUMA node(s): 4
NUMA node0 CPU(s): 0-25,104-129
NUMA node1 CPU(s): 26-51,130-155
NUMA node2 CPU(s): 52-77,156-181
NUMA node3 CPU(s): 78-103,182-207
```
##### Create the NUMA node directories
Create a directory for each NUMA node in your VM and set the permissions.
For example, for four NUMA nodes that are numbered 0-3:
```
mkdir -pv /hana/tmpfs{0..3}/SID
chown -R SID_LCadm:sapsys /hana/tmpfs*/SID
chmod 777 -R /hana/tmpfs*/SID
```
##### Mount the NUMA node directories to `tmpfs`
Mount the `tmpfs` file system directories and specify
a NUMA node preference for each with `mpol=prefer`:
SID specify the SID with uppercase letters.
```
mount tmpfsSID0 -t tmpfs -o mpol=prefer:0 /hana/tmpfs0/SID
mount tmpfsSID1 -t tmpfs -o mpol=prefer:1 /hana/tmpfs1/SID
mount tmpfsSID2 -t tmpfs -o mpol=prefer:2 /hana/tmpfs2/SID
mount tmpfsSID3 -t tmpfs -o mpol=prefer:3 /hana/tmpfs3/SID
```
> [!NOTE]
> **Note:** if you change machine types and the NUMA nodes increase or decrease, you need to modify the `tmpfs` file system and the `[persistence]` section of the SAP HANA INI file, shown in the next section, to match the new number of NUMA nodes.
##### Update `/etc/fstab`
To ensure that the mount points are available after an operating system
reboot, add entries into the file system table, `/etc/fstab`:
```
tmpfsSID0 /hana/tmpfs0/SID tmpfs rw,nofail,relatime,mpol=prefer:0
tmpfsSID1 /hana/tmpfs1/SID tmpfs rw,nofail,relatime,mpol=prefer:1
tmpfsSID1 /hana/tmpfs2/SID tmpfs rw,nofail,relatime,mpol=prefer:2
tmpfsSID1 /hana/tmpfs3/SID tmpfs rw,nofail,relatime,mpol=prefer:3
```
#### Optional: set limits on memory usage
The `tmpfs` file system can grow and shrink dynamically.
To limit the memory used by the `tmpfs` file system, you
can set a size limit for a NUMA node volume with the `size` option.
For example:
```
mount tmpfsSID0 -t tmpfs -o mpol=prefer:0,size=250G /hana/tmpfs0/SID
```
You can also limit overall `tmpfs` memory usage for all NUMA nodes for
a given SAP HANA instance and a given server node by setting the
`persistent_memory_global_allocation_limit` parameter in the `[memorymanager]`
section of the `global.ini` file.
#### SAP HANA configuration for Fast Restart
To configure SAP HANA for Fast Restart, update the `global.ini` file
and specify the tables to store in persistent memory.
##### Update the `[persistence]` section in the `global.ini` file
Configure the `[persistence]` section in the SAP HANA `global.ini` file
to reference the `tmpfs` locations. Separate each `tmpfs` location with
a semicolon:
```
[persistence]
basepath_datavolumes = /hana/data
basepath_logvolumes = /hana/log
basepath_persistent_memory_volumes = /hana/tmpfs0/SID;/hana/tmpfs1/SID;/hana/tmpfs2/SID;/hana/tmpfs3/SID
```
The preceding example specifies four memory volumes for four NUMA nodes,
which corresponds to the `m2-ultramem-208`. If you were running on
the `m2-ultramem-416`, you would need to configure eight memory volumes (0..7).
Restart SAP HANA after modifying the `global.ini` file.
SAP HANA can now use the `tmpfs` location as persistent memory space.
##### Specify the tables to store in persistent memory
Specify specific column tables or partitions to store in persistent memory.
For example, to turn on persistent memory for an existing table, execute
the SQL query:
```
ALTER TABLE exampletable persistent memory ON immediate CASCADE
```
To change the default for new tables add the parameter
`table_default` in the `indexserver.ini` file. For example:
```
[persistent_memory]
table_default = ON
```
For more information on how to control columns, tables and which
monitoring views provide detailed information, see [SAP HANA Persistent Memory](https://help.sap.com/viewer/6b94445c94ae495c83a19646e7c3fd56/LATEST/en-US/1f61b13e096d4ef98e62c676debf117e.html).
### Automated steps
The automation script that Google Cloud provides to enable
SAP HANA Fast Restart
makes changes to directories `/hana/tmpfs*`, file `/etc/fstab`, and
SAP HANA configuration. When you run the script, you might need to perform
additional steps depending on whether this is the initial deployment of your
SAP HANA system or you are resizing your machine to a different NUMA size.
For the initial deployment of your SAP HANA system or resizing
the machine to increase the number of NUMA nodes, make sure that SAP HANA
is running during the execution of automation script that Google Cloud
provides to enable SAP HANA Fast Restart.
When you resize your machine to decrease the number of NUMA nodes,
make sure that SAP HANA is stopped during the execution of the automation script
that Google Cloud provides to enable SAP HANA Fast Restart.
After the script is executed, you need to manually update the SAP HANA
configuration to complete the SAP HANA Fast Restart setup. For more information,
see [SAP HANA configuration for Fast Restart](https://docs.cloud.google.com/sap/docs/sap-hana-ha-config-sles.md.txt#hana-config-fast-restart).
> [!NOTE]
> **Note:** We strongly recommend that you run the script that Google Cloud provides to enable SAP HANA Fast Restart in a non-production environment and verify the results thoroughly before running the script in production environments. You assume the responsibility for correctly enabling SAP HANA Fast Restart.
To enable SAP HANA Fast Restart, follow these steps:
1. Establish an SSH connection with your host VM.
2. Switch to root:
```sh
sudo su -
```
3. Download the `sap_lib_hdbfr.sh` script:
```sh
wget https://storage.googleapis.com/cloudsapdeploy/terraform/latest/terraform/lib/sap_lib_hdbfr.sh
```
4. Make the file executable:
```sh
chmod +x sap_lib_hdbfr.sh
```
5. Verify that the script has no errors:
```sh
vi sap_lib_hdbfr.sh
./sap_lib_hdbfr.sh -help
```
If the command returns an error, contact Cloud Customer Care.
For more information about contacting Customer Care, see [Getting support for SAP on Google Cloud](https://docs.cloud.google.com/sap/docs/getting-support.md.txt).
6. Run the script after replacing SAP HANA system ID (SID) and password for
the SYSTEM user of the SAP HANA database. To securely provide the password,
we recommend that you use a secret
in [Secret Manager](https://docs.cloud.google.com/secret-manager/docs/overview.md.txt).
Run the script by using the name of a secret in Secret Manager. This
secret must exist in the Google Cloud project that contains your host VM
instance.
```sh
sudo ./sap_lib_hdbfr.sh -h 'SID' -s SECRET_NAME
```
Replace the following:
- `SID`: specify the SID with uppercase letters. For example, `AHA`.
- `SECRET_NAME`: specify the name of the secret that corresponds to the password for the SYSTEM user of the SAP HANA database. This secret must exist in the Google Cloud project that contains your host VM instance.
Alternatively, you can run the script using a plain text password.
After SAP HANA Fast Restart is enabled, make sure to change your
password. Using plain text password is not recommended as your password
would be recorded in the command-line history of your VM.
```sh
sudo ./sap_lib_hdbfr.sh -h 'SID' -p 'PASSWORD'
```
Replace the following:
- `SID`: specify the SID with uppercase letters. For example, `AHA`.
- `PASSWORD`: specify the password for the SYSTEM user of the SAP HANA database.
For a successful initial run, you should see an output similar to the following:
```
INFO - Script is running in standalone mode
ls: cannot access '/hana/tmpfs*': No such file or directory
INFO - Setting up HANA Fast Restart for system 'TST/00'.
INFO - Number of NUMA nodes is 2
INFO - Number of directories /hana/tmpfs* is 0
INFO - HANA version 2.57
INFO - No directories /hana/tmpfs* exist. Assuming initial setup.
INFO - Creating 2 directories /hana/tmpfs* and mounting them
INFO - Adding /hana/tmpfs* entries to /etc/fstab. Copy is in /etc/fstab.20220625_030839
INFO - Updating the HANA configuration.
INFO - Running command: select * from dummy
DUMMY
"X"
1 row selected (overall time 4124 usec; server time 130 usec)
INFO - Running command: ALTER SYSTEM ALTER CONFIGURATION ('global.ini', 'SYSTEM') SET ('persistence', 'basepath_persistent_memory_volumes') = '/hana/tmpfs0/TST;/hana/tmpfs1/TST;'
0 rows affected (overall time 3570 usec; server time 2239 usec)
INFO - Running command: ALTER SYSTEM ALTER CONFIGURATION ('global.ini', 'SYSTEM') SET ('persistent_memory', 'table_unload_action') = 'retain';
0 rows affected (overall time 4308 usec; server time 2441 usec)
INFO - Running command: ALTER SYSTEM ALTER CONFIGURATION ('indexserver.ini', 'SYSTEM') SET ('persistent_memory', 'table_default') = 'ON';
0 rows affected (overall time 3422 usec; server time 2152 usec)
```
## Configure SSH keys on the primary and secondary VMs
The SAP HANA secure store (SSFS) keys need to be synchronized between the
hosts in the HA cluster. To simplify the synchronization, and to allow
files like backups to be copied between the hosts in the HA cluster, these
instructions have you create root SSH connections between the two hosts.
Your organization is likely to have guidelines that govern internal network
communications. If necessary, after deployment is complete you can remove
the metadata from the VMs and the keys from the `authorized_keys` directory.
If setting up direct SSH connections does not comply with your
organization's guidelines, you can synchronize the SSFS keys and transfer files
by using other methods, such as:
- Transfer smaller files through your local workstation by using the Cloud Shell **Upload file** and **Download file** menu options. See [Managing files with Cloud Shell](https://docs.cloud.google.com/shell/docs/uploading-and-downloading-files.md.txt).
- Exchange files using a Cloud Storage bucket. See *Working with
objects* in the [Cloud Storage documentation](https://docs.cloud.google.com/storage/docs.md.txt).
- Use the Cloud Storage Backint agent for SAP HANA to backup and restore HANA databases. See [Cloud Storage Backint agent for SAP HANA](https://docs.cloud.google.com/sap/docs/sap-hana-operations-guide.md.txt#backint_operations).
- Use a file storage solution such as Filestore or Google Cloud NetApp Volumes to create a shared folder. For more information, see [File server options](https://docs.cloud.google.com/sap/docs/sap-hana-planning-guide.md.txt#file_server_options).
To enable SSH connections between the primary and secondary instances,
follow these steps.
1. On the primary host VM:
1. SSH into the VM.
2. Switch to root:
```sh
$ sudo su -
```
1. As root, generate an SSH key.
```sh
# ssh-keygen
```
2. Update the primary VM's metadata with
information about the SSH key for the secondary VM.
```sh
# gcloud compute instances add-metadata secondary-host-name \
--metadata "ssh-keys=$(whoami):$(cat ~/.ssh/id_rsa.pub)" --zone secondary-zone
```
3. Authorize the primary VM to itself
```sh
# cat ~/.ssh/id_rsa.pub >> ~/.ssh/authorized_keys
```
2. On the secondary host VM:
1. SSH into the VM.
2. Switch to root:
```sh
$ sudo su -
```
1. As root, generate an SSH key.
```sh
# ssh-keygen
```
2. Update the secondary VM's metadata with information about the SSH key
for the primary VM.
```sh
# gcloud compute instances add-metadata primary-host-name \
--metadata "ssh-keys=$(whoami):$(cat ~/.ssh/id_rsa.pub)" --zone primary-zone
```
3. Authorize the secondary VM to itself
```sh
# cat ~/.ssh/id_rsa.pub >> ~/.ssh/authorized_keys
```
4. Confirm that the SSH keys are set up properly by opening an SSH connection
from the secondary system to the primary system.
```sh
# ssh primary-host-name
```
3. On the primary host VM as root, confirm the
connection by opening an SSH connection to the secondary host VM:
```sh
# ssh secondary-host-name
```
## Back up the databases
Create backups of your databases to initiate database logging for SAP HANA
system replication and create a
recovery point.
If you have multiple tenant databases in an MDC configuration, then back up each
tenant database.
The Deployment Manager template
uses `/hanabackup/data/SID` as the default backup directory.
To create backups of new SAP HANA databases, complete the following steps:
1. On the primary host, switch to the `SID_LCadm` user.
Depending on your OS image, the command might be different.
```sh
sudo -i -u SID_LCadm
```
2. Create database backups:
- For a SAP HANA single-database-container system:
```sh
> hdbsql -t -u system -p SYSTEM_PASSWORD -i INST_NUM \
"backup data using file ('full')"
```
The following example shows a successful response from a new SAP HANA system:
```
0 rows affected (overall time 18.416058 sec; server time 18.414209 sec)
```
- For a SAP HANA multi-database-container system (MDC), create a backup of
the system database as well as any tenant databases:
```sh
> hdbsql -t -d SYSTEMDB -u system -p SYSTEM_PASSWORD -i INST_NUM \
"backup data using file ('full')"
```
```sh
> hdbsql -t -d SID -u system -p SYSTEM_PASSWORD -i INST_NUM \
"backup data using file ('full')"
```
The following example shows a successful response from a new SAP HANA system:
```
0 rows affected (overall time 16.590498 sec; server time 16.588806 sec)
```
3. Confirm that the logging mode is set to normal:
```sh
> hdbsql -u system -p SYSTEM_PASSWORD -i INST_NUM \
"select value from "SYS"."M_INIFILE_CONTENTS" where key='log_mode'"
```
The output is similar to the following:
```
VALUE
"normal"
```
## Enable SAP HANA system replication
As a part of enabling SAP HANA system replication, you need to copy the data
and key files for the SAP HANA secure stores on the file system (SSFS) from
the primary host to the secondary host. The method that this procedure uses
to copy the files is just one possible method that you can use.
1. On the primary host as `SID_LCadm`, enable system
replication:
```sh
> hdbnsutil -sr_enable --name=PRIMARY_HOST_NAME
```
2. On the secondary host:
1. As `SID_LCadm`, stop SAP HANA:
```sh
> HDB stop
```
2. As root, archive the existing SSFS data and key files:
```sh
# cd /usr/sap/SID/SYS/global/security/rsecssfs/
# mv data/SSFS_SID.DAT data/SSFS_SID.DAT-ARC
# mv key/SSFS_SID.KEY key/SSFS_SID.KEY-ARC
```
3. Copy the data file from the primary host:
```sh
# scp -o StrictHostKeyChecking=no \
PRIMARY_HOST_NAME:/usr/sap/SID/SYS/global/security/rsecssfs/data/SSFS_SID.DAT \
/usr/sap/SID/SYS/global/security/rsecssfs/data/SSFS_SID.DAT
```
4. Copy the key file from the primary host:
```sh
# scp -o StrictHostKeyChecking=no \
PRIMARY_HOST_NAME:/usr/sap/SID/SYS/global/security/rsecssfs/key/SSFS_SID.KEY \
/usr/sap/SID/SYS/global/security/rsecssfs/key/SSFS_SID.KEY
```
5. Update ownership of the files:
```sh
# chown SID_LCadm:sapsys /usr/sap/SID/SYS/global/security/rsecssfs/data/SSFS_SID.DAT
# chown SID_LCadm:sapsys /usr/sap/SID/SYS/global/security/rsecssfs/key/SSFS_SID.KEY
```
6. Update permissions for the files:
```sh
# chmod 644 /usr/sap/SID/SYS/global/security/rsecssfs/data/SSFS_SID.DAT
# chmod 640 /usr/sap/SID/SYS/global/security/rsecssfs/key/SSFS_SID.KEY
```
7. As SID_LCadm, register the secondary SAP HANA system with SAP
HANA system replication:
```sh
> hdbnsutil -sr_register --remoteHost=PRIMARY_HOST_NAME --remoteInstance=INST_NUM \
--replicationMode=syncmem --operationMode=logreplay --name=SECONDARY_HOST_NAME
```
8. As SID_LCadm, start SAP HANA:
```sh
> HDB start
```
### Validating system replication
On the primary host as `SID_LCadm`, confirm that SAP
HANA system replication is active by running the following python script:
```sh
$ python $DIR_INSTANCE/exe/python_support/systemReplicationStatus.py
```
If replication is set up properly, among other indicators, the following values
are displayed for the `xsengine`, `nameserver`, and `indexserver` services:
- The `Secondary Active Status` is `YES`
- The `Replication Status` is `ACTIVE`
Also, the `overall system replication status` shows `ACTIVE`.
## Install the required HA packages
For SLES for SAP 15 SP6 or later, using the `SAPHanaSR-angi` package is
recommended. For SLES for SAP 15 SP5 or earlier, you can use the `SAPHanaSR`
package.
- To install the `SAPHanaSR` package, run the following command as the root
user:
```sh
zypper install SAPHanaSR
```
- To install the `SAPHanaSR-angi` package, run the following command as the
root user:
1. If the `SAPHanaSR` or `SAPHanaSR-doc` packages are already installed, then
remove them:
```sh
zypper remove SAPHanaSR SAPHanaSR-doc
```
2. Install the `SAPHanaSR-angi` package:
```sh
zypper install SAPHanaSR-angi
```
## Enable the SAP HANA HA/DR provider hooks
SUSE recommends
that you enable the SAP HANA HA/DR provider hooks, which let
SAP HANA to send out notifications for certain events and improves failure
detection.
The SAP HANA HA/DR provider hooks
require SAP HANA 2.0 SPS 03 or a later version for the `SAPHanaSR` hook, and SAP
HANA 2.0 SPS 05 or a later version for `SAPHanaSR-angi` hook.
> [!NOTE]
> **Note:** If you want to implement the HA/DR provider hooks on a pre-existing SAP HANA system with near-zero downtime, then instead refer to the [SAP HANA operations
> guide](https://docs.cloud.google.com/sap/docs/sap-hana-operations-guide).
On both the primary and secondary site, complete the following steps:
1. As `SID_LCadm`, stop SAP HANA:
```sh
> HDB stop
```
2. As root or `SID_LCadm`, open the `global.ini` file for
editing:
```sh
> vi /hana/shared/SID/global/hdb/custom/config/global.ini
```
3. Add the following definitions to the `global.ini` file:
### SLES for SAP 15 SP5 or earlier
```sh
[ha_dr_provider_SAPHanaSR]
provider = SAPHanaSR
path = /usr/share/SAPHanaSR/
execution_order = 1
[ha_dr_provider_suschksrv]
provider = susChkSrv
path = /usr/share/SAPHanaSR/
execution_order = 3
action_on_lost = stop
[trace]
ha_dr_saphanasr = info
```
### SLES for SAP 15 SP6 or SP7
```sh
[ha_dr_provider_susHanaSR]
provider = susHanaSR
path = /usr/share/SAPHanaSR-angi
execution_order = 1
[ha_dr_provider_suschksrv]
provider = susChkSrv
path = /usr/share/SAPHanaSR-angi
execution_order = 3
action_on_lost = kill
[ha_dr_provider_susTkOver]
provider = susTkOver
path = /usr/share/SAPHanaSR-angi
execution_order = 2
sustkover_timeout = 30
[trace]
ha_dr_sushanasr = info
ha_dr_suschksrv = info
ha_dr_sustkover = info
```
The `action_on_lost` parameter defines the action that the hook must take when it identifies a lost `indexserver`.
For the `action_on_lost` parameter, you can choose one of the following values:
- `ignore`: The hook does nothing and writes to trace files.
- `stop`: The hook triggers `sapcontrol ... StopSystem`.
- `kill`: The hook triggers `HDB kill-`.
- `fence`: The hook triggers `crm node fence `.
For more information, see the [`susCheckSrv.py`](https://github.com/SUSE/SAPHanaSR/blob/main/man/susChkSrv.py.7) man page.
### SLES for SAP 16 or later
```sh
[ha_dr_provider_susHanaSR]
provider = susHanaSR
path = /usr/share/SAPHanaSR-angi
execution_order = 1
[ha_dr_provider_suschksrv]
provider = susChkSrv
path = /usr/share/SAPHanaSR-angi
execution_order = 3
action_on_lost = kill
[ha_dr_provider_susTkOver]
provider = susTkOver
path = /usr/share/SAPHanaSR-angi
execution_order = 2
sustkover_timeout = 30
[trace]
ha_dr_sushanasr = info
ha_dr_suschksrv = info
ha_dr_sustkover = info
```
The `action_on_lost` parameter defines the action that the hook must take when it identifies a lost `indexserver`.
For the `action_on_lost` parameter, you can choose one of the following values:
- `ignore`: The hook does nothing and writes to trace files.
- `stop`: The hook triggers `sapcontrol ... StopSystem`.
- `kill`: The hook triggers `HDB kill-`.
- `fence`: The hook triggers `crm node fence `.
For more information, see the [`susCheckSrv.py`](https://github.com/SUSE/SAPHanaSR/blob/main/man/susChkSrv.py.7) man page.
4. As root, create a custom configuration file in the `/etc/sudoers.d` directory
by running the following command. This new configuration file allows the
`SID_LCadm` user to access the cluster node attributes
when the `srConnectionChanged()` hook method is called.
```sh
> visudo -f /etc/sudoers.d/SAPHanaSR
```
5. In the `/etc/sudoers.d/SAPHanaSR` file, add the following text:
### SLES for SAP 15 SP5 or earlier
Replace the following:
- `SITE_A`: the site name of the primary SAP HANA server
- `SITE_B`: the site name of the secondary SAP HANA server
- `SID_LC`: the SID, specified using lowercase letters
To view the site names, you can run the `crm_mon -A1 | grep site` command as the root user, on either the SAP HANA primary server or the secondary server.
```sh
Cmnd_Alias SOK_SITEA = /usr/sbin/crm_attribute -n hana_SID_LC_site_srHook_SITE_A -v SOK -t crm_config -s SAPHanaSR
Cmnd_Alias SFAIL_SITEA = /usr/sbin/crm_attribute -n hana_SID_LC_site_srHook_SITE_A -v SFAIL -t crm_config -s SAPHanaSR
Cmnd_Alias SOK_SITEB = /usr/sbin/crm_attribute -n hana_SID_LC_site_srHook_SITE_B -v SOK -t crm_config -s SAPHanaSR
Cmnd_Alias SFAIL_SITEB = /usr/sbin/crm_attribute -n hana_SID_LC_site_srHook_SITE_B -v SFAIL -t crm_config -s SAPHanaSR
SID_LCadm ALL=(ALL) NOPASSWD: SOK_SITEA, SFAIL_SITEA, SOK_SITEB, SFAIL_SITEB
```
### SLES for SAP 15 SP6 or SP7
Replace the following:
- `SITE_A`: the site name of the primary SAP HANA server
- `SITE_B`: the site name of the secondary SAP HANA server
- `SID_LC`: the SID, specified using lowercase letters
To view the site names, you can run the `crm_mon -A1 | grep site` command as the root user, on either the SAP HANA primary server or the secondary server.
```sh
Cmnd_Alias SOK_SITEA = /usr/sbin/crm_attribute -n hana_SID_LC_site_srHook_SITE_A -v SOK -t crm_config -s SAPHanaSR
Cmnd_Alias SFAIL_SITEA = /usr/sbin/crm_attribute -n hana_SID_LC_site_srHook_SITE_A -v SFAIL -t crm_config -s SAPHanaSR
Cmnd_Alias SOK_SITEB = /usr/sbin/crm_attribute -n hana_SID_LC_site_srHook_SITE_B -v SOK -t crm_config -s SAPHanaSR
Cmnd_Alias SFAIL_SITEB = /usr/sbin/crm_attribute -n hana_SID_LC_site_srHook_SITE_B -v SFAIL -t crm_config -s SAPHanaSR
Cmnd_Alias HOOK_HELPER = /usr/bin/SAPHanaSR-hookHelper --sid=SID --case=*
SID_LCadm ALL=(ALL) NOPASSWD: SOK_SITEA, SFAIL_SITEA, SOK_SITEB, SFAIL_SITEB, HOOK_HELPER
```
### SLES for SAP 16 or later
Replace the following:
- `SITE_A`: the site name of the primary SAP HANA server
- `SITE_B`: the site name of the secondary SAP HANA server
- `SID_LC`: the SID, specified using lowercase letters
To view the site names, you can run the `crm_mon -A1 | grep site` command as the root user, on either the SAP HANA primary server or the secondary server.
```sh
Cmnd_Alias SOK_SITEA = /usr/sbin/crm_attribute -n hana_SID_LC_site_srHook_SITE_A -v SOK -t crm_config -s SAPHanaSR
Cmnd_Alias SFAIL_SITEA = /usr/sbin/crm_attribute -n hana_SID_LC_site_srHook_SITE_A -v SFAIL -t crm_config -s SAPHanaSR
Cmnd_Alias SOK_SITEB = /usr/sbin/crm_attribute -n hana_SID_LC_site_srHook_SITE_B -v SOK -t crm_config -s SAPHanaSR
Cmnd_Alias SFAIL_SITEB = /usr/sbin/crm_attribute -n hana_SID_LC_site_srHook_SITE_B -v SFAIL -t crm_config -s SAPHanaSR
Cmnd_Alias HOOK_HELPER = /usr/bin/SAPHanaSR-hookHelper --sid=SID --case=*
SID_LCadm ALL=(ALL) NOPASSWD: SOK_SITEA, SFAIL_SITEA, SOK_SITEB, SFAIL_SITEB, HOOK_HELPER
```
6. In your `/etc/sudoers` file, make sure that the following text is included:
- For SLES for SAP 15 SP3 or later:
```sh
@includedir /etc/sudoers.d
```
- For versions up to SLES for SAP 15 SP2:
```sh
#includedir /etc/sudoers.d
```
Note that the `#` in this text is part of the syntax and does not mean that
the line is a comment.
> [!NOTE]
> **Note:** While the procedure in this section is recommended by SUSE, you can use an alternative approach. Instead of creating a drop-in configuration file, you can add the required access directly to your `/etc/sudoers` file.
7. As `SID_LCadm`, start SAP HANA:
```sh
> HDB start
```
8.
After you complete the cluster configuration for SAP HANA, you can verify that
the hook functions correctly during a failover test as described in
[Troubleshooting the SAPHanaSR python hook](https://www.suse.com/support/kb/doc/?id=000019865) and [HA cluster takeover takes too long on HANA indexserver failure](https://www.suse.com/support/kb/doc/?id=000020845).
## Configure the Cloud Load Balancing failover support
The internal passthrough Network Load Balancer service with failover support routes traffic
to the active host in an SAP HANA cluster based on a health check service.
### Reserve an IP address for the virtual IP
The virtual IP (VIP) address
, which is sometimes referred to as a *floating*
IP address, follows the active SAP HANA system. The load balancer
routes traffic that is sent to the VIP to the VM that is currently hosting the
active SAP HANA system.
1. Open Cloud Shell:
[Go to Cloud Shell](https://console.cloud.google.com/?cloudshell=true)
2. Reserve an IP address for
the virtual IP. This is the
IP address that applications use to access SAP HANA. If you
omit the `--addresses` flag, an IP address in the specified subnet is
chosen for you:
```sh
$ gcloud compute addresses create VIP_NAME \
--region CLUSTER_REGION --subnet CLUSTER_SUBNET \
--addresses VIP_ADDRESS
```
For more information about reserving a static IP, see [Reserving a static internal IP address](https://docs.cloud.google.com/vpc/docs/reserve-static-internal-ip-address.md.txt).
3. Confirm IP address reservation:
```sh
$ gcloud compute addresses describe VIP_NAME \
--region CLUSTER_REGION
```
You should see output similar to the following example:
```
address: 10.0.0.19
addressType: INTERNAL
creationTimestamp: '2020-05-20T14:19:03.109-07:00'
description: ''
id: '8961491304398200872'
kind: compute#address
name: vip-for-hana-ha
networkTier: PREMIUM
purpose: GCE_ENDPOINT
region: https://www.googleapis.com/compute/v1/projects/example-project-123456/regions/us-central1
selfLink: https://www.googleapis.com/compute/v1/projects/example-project-123456/regions/us-central1/addresses/vip-for-hana-ha
status: RESERVED
subnetwork: https://www.googleapis.com/compute/v1/projects/example-project-123456/regions/us-central1/subnetworks/example-subnet-us-central1
```
### Create instance groups for your host VMs
1. In Cloud Shell, create two unmanaged instance groups and assign
the primary master host VM to one and the secondary master host VM to the other:
```sh
$ gcloud compute instance-groups unmanaged create PRIMARY_IG_NAME \
--zone=PRIMARY_ZONE
$ gcloud compute instance-groups unmanaged add-instances PRIMARY_IG_NAME \
--zone=PRIMARY_ZONE \
--instances=PRIMARY_HOST_NAME
$ gcloud compute instance-groups unmanaged create SECONDARY_IG_NAME \
--zone=SECONDARY_ZONE
$ gcloud compute instance-groups unmanaged add-instances SECONDARY_IG_NAME \
--zone=SECONDARY_ZONE \
--instances=SECONDARY_HOST_NAME
```
2. Confirm the creation of the instance groups:
```sh
$ gcloud compute instance-groups unmanaged list
```
You should see output similar to the following example:
```
NAME ZONE NETWORK NETWORK_PROJECT MANAGED INSTANCES
hana-ha-ig-1 us-central1-a example-network example-project-123456 No 1
hana-ha-ig-2 us-central1-c example-network example-project-123456 No 1
```
### Create a Compute Engine health check
1. In Cloud Shell, create the health check. For the port used
by the health check, choose a port that is in the private
range, 49152-65535, to avoid clashing
with other services. The check-interval and timeout values
are slightly longer than the defaults so as to increase failover tolerance
during Compute Engine live migration events.
You can adjust the values, if necessary:
```sh
$ gcloud compute health-checks create tcp HEALTH_CHECK_NAME --port=HEALTHCHECK_PORT_NUM \
--proxy-header=NONE --check-interval=10 --timeout=10 --unhealthy-threshold=2 \
--healthy-threshold=2
```
2. Confirm the creation of the health check:
```sh
$ gcloud compute health-checks describe HEALTH_CHECK_NAME
```
You should see output similar to the following example:
```
checkIntervalSec: 10
creationTimestamp: '2020-05-20T21:03:06.924-07:00'
healthyThreshold: 2
id: '4963070308818371477'
kind: compute#healthCheck
name: hana-health-check
selfLink: https://www.googleapis.com/compute/v1/projects/example-project-123456/global/healthChecks/hana-health-check
tcpHealthCheck:
port: 60000
portSpecification: USE_FIXED_PORT
proxyHeader: NONE
timeoutSec: 10
type: TCP
unhealthyThreshold: 2
```
### Create a firewall rule for the health checks
Define a firewall rule for a port in the private range that allows access
to your host VMs from the IP ranges that are used by Compute Engine
health checks, `35.191.0.0/16` and `130.211.0.0/22`. For more information,
see [Creating firewall rules for health checks](https://docs.cloud.google.com/load-balancing/docs/health-checks.md.txt#fw-rule).
1. If you don't already have one, add a network tag to your host VMs. This
network tag is used by the firewall rule for health checks.
```sh
$ gcloud compute instances add-tags PRIMARY_HOST_NAME \
--tags NETWORK_TAGS \
--zone PRIMARY_ZONE
$ gcloud compute instances add-tags SECONDARY_HOST_NAME \
--tags NETWORK_TAGS \
--zone SECONDARY_ZONE
```
2. If you don't already have one, create a firewall rule to allow the health
checks:
```sh
$ gcloud compute firewall-rules create RULE_NAME \
--network NETWORK_NAME \
--action ALLOW \
--direction INGRESS \
--source-ranges 35.191.0.0/16,130.211.0.0/22 \
--target-tags NETWORK_TAGS \
--rules tcp:HLTH_CHK_PORT_NUM
```
For example:
```
gcloud compute firewall-rules create fw-allow-health-checks \
--network example-network \
--action ALLOW \
--direction INGRESS \
--source-ranges 35.191.0.0/16,130.211.0.0/22 \
--target-tags cluster-ntwk-tag \
--rules tcp:60000
```
### Configure the load balancer and failover group
1. Create the load balancer backend service:
```sh
$ gcloud compute backend-services create BACKEND_SERVICE_NAME \
--load-balancing-scheme internal \
--health-checks HEALTH_CHECK_NAME \
--no-connection-drain-on-failover \
--drop-traffic-if-unhealthy \
--failover-ratio 1.0 \
--region CLUSTER_REGION \
--global-health-checks
```
2. Add the primary instance group to the backend service:
```sh
$ gcloud compute backend-services add-backend BACKEND_SERVICE_NAME \
--instance-group PRIMARY_IG_NAME \
--instance-group-zone PRIMARY_ZONE \
--region CLUSTER_REGION
```
3. Add the secondary, failover instance group to the backend service:
```sh
$ gcloud compute backend-services add-backend BACKEND_SERVICE_NAME \
--instance-group SECONDARY_IG_NAME \
--instance-group-zone SECONDARY_ZONE \
--failover \
--region CLUSTER_REGION
```
4. Create a forwarding rule. For the
IP address, specify the IP address
that you reserved for the VIP.
If you need to access the SAP HANA system from outside of the region
that is specified below, include the flag `--allow-global-access` in the
definition:
```sh
$ gcloud compute forwarding-rules create RULE_NAME \
--load-balancing-scheme internal \
--address VIP_ADDRESS \
--subnet CLUSTER_SUBNET \
--region CLUSTER_REGION \
--backend-service BACKEND_SERVICE_NAME \
--ports ALL
```
For more information about cross-region access to your SAP HANA
high-availability system, see [Internal TCP/UDP Load Balancing](https://docs.cloud.google.com/load-balancing/docs/internal.md.txt#client-access).
> [!NOTE]
> **Note:** Your backend instance groups won't register as healthy until you have completed the Pacemaker cluster configuration.
### Test the load balancer configuration
Even though your backend instance groups won't register as healthy until
later, you can test the load balancer configuration
by setting up a listener to respond to the health checks. After setting up
a listener, if the load balancer is configured correctly,
the status of the backend instance groups changes to healthy.
The following sections present different methods that you can use to test
the configuration.
#### Testing the load balancer with the `socat` utility
You can use the `socat` utility to temporarily listen on the health check
port. You need to install the `socat`utility anyway, because
you use it later when you configure cluster resources.
1. On both host VMs as root, install the `socat`
utility:
```sh
# zypper install -y socat
```
2. Start a `socat` process to listen for 60 seconds on the health check port:
```sh
# timeout 60s socat - TCP-LISTEN:HLTH_CHK_PORT_NUM,fork
```
3. In Cloud Shell, after waiting a few seconds for the health check
to detect the listener, check the health of your backend instance groups:
```sh
$ gcloud compute backend-services get-health BACKEND_SERVICE_NAME \
--region CLUSTER_REGION
```
You should see output similar to the following:
```
---
backend: https://www.googleapis.com/compute/v1/projects/example-project-123456/zones/us-central1-a/instanceGroups/hana-ha-ig-1
status:
healthStatus:
‐ healthState: HEALTHY
instance: https://www.googleapis.com/compute/v1/projects/example-project-123456/zones/us-central1-a/instances/hana-ha-vm-1
ipAddress: 10.0.0.35
port: 80
kind: compute#backendServiceGroupHealth
---
backend: https://www.googleapis.com/compute/v1/projects/example-project-123456/zones/us-central1-c/instanceGroups/hana-ha-ig-2
status:
healthStatus:
‐ healthState: HEALTHY
instance: https://www.googleapis.com/compute/v1/projects/example-project-123456/zones/us-central1-c/instances/hana-ha-vm-2
ipAddress: 10.0.0.34
port: 80
kind: compute#backendServiceGroupHealth
```
#### Testing the load balancer using port 22
If port 22 is open for SSH connections on your host VMs, you can
temporarily edit the health checker to use port 22, which has a listener
that can respond to the health checker.
To temporarily use port 22, follow these steps:
1. Click your health check in the console:
[Go to Health checks page](https://console.cloud.google.com/compute/healthChecks)
2. Click **Edit**.
3. In the **Port** field, change the port number to 22.
4. Click **Save** and wait a minute or two.
5. In Cloud Shell, check the health of your backend instance groups:
```sh
$ gcloud compute backend-services get-health BACKEND_SERVICE_NAME \
--region CLUSTER_REGION
```
You should see output similar to the following:
```
---
backend: https://www.googleapis.com/compute/v1/projects/example-project-123456/zones/us-central1-a/instanceGroups/hana-ha-ig-1
status:
healthStatus:
‐ healthState: HEALTHY
instance: https://www.googleapis.com/compute/v1/projects/example-project-123456/zones/us-central1-a/instances/hana-ha-vm-1
ipAddress: 10.0.0.35
port: 80
kind: compute#backendServiceGroupHealth
---
backend: https://www.googleapis.com/compute/v1/projects/example-project-123456/zones/us-central1-c/instanceGroups/hana-ha-ig-2
status:
healthStatus:
‐ healthState: HEALTHY
instance: https://www.googleapis.com/compute/v1/projects/example-project-123456/zones/us-central1-c/instances/hana-ha-vm-2
ipAddress: 10.0.0.34
port: 80
kind: compute#backendServiceGroupHealth
```
6. When you are done, change the health check port number back to the original
port number.
## Set up Pacemaker
The following procedure configures the SUSE implementation of a Pacemaker
cluster on Compute Engine VMs for SAP HANA.
For more information about the configuring high-availability clusters on SLES,
see the [SUSE Linux Enterprise High Availability Extension](https://documentation.suse.com/#sle-ha)
documentation for your version of SLES.
### Create the Corosync configuration files
1. Create a Corosync configuration file on the primary host:
1. Create the following file:
```sh
vi /etc/corosync/corosync.conf
```
2. In the `corosync.conf` file on the primary host, add the following
configuration, replacing the italic variable text with your values:
```sh
totem {
version: 2
secauth: off
crypto_hash: sha1
crypto_cipher: aes256
cluster_name: hacluster
clear_node_high_bit: yes
token: 20000
token_retransmits_before_loss_const: 10
join: 60
max_messages: 20
transport: udpu
interface {
ringnumber: 0
Bindnetaddr: static-ip-of-hdb-on-this-host
mcastport: 5405
ttl: 1
}
}
logging {
fileline: off
to_stderr: no
to_logfile: no
logfile: /var/log/cluster/corosync.log
to_syslog: yes
debug: off
timestamp: on
logger_subsys {
subsys: QUORUM
debug: off
}
}
nodelist {
node {
ring0_addr: this-host-name
nodeid: 1
}
node {
ring0_addr: other-host-name
nodeid: 2
}
}
quorum {
provider: corosync_votequorum
expected_votes: 2
two_node: 1
}
```
2. Create a Corosync configuration file on the secondary host by repeating the
same steps you used for the primary host. Except for the static IP of the
HDB on the `Bindnetaddr` property and the order of the host names in the
`nodelist`, the configuration file property values are the same for each
host.
### Initialize the cluster
1. On the primary host as root:
1. Change the password for the `hacluster` user:
```sh
# passwd hacluster
```
2. Initialize the cluster:
```sh
# corosync-keygen
# crm cluster init --yes ssh
# crm cluster init -y csync2
```
3. Start Pacemaker on the primary host:
```sh
# systemctl enable pacemaker
# systemctl start pacemaker
```
2. On the secondary host as root:
1. Change the password for the `hacluster` user:
```sh
# passwd hacluster
```
2. Join the secondary host to the cluster that is initialized on the
primary host:
```sh
# crm cluster join --yes ssh
# crm cluster join -y -c primary-host-name csync2
```
3. Start Pacemaker on the secondary host:
```sh
# systemctl enable pacemaker
# systemctl start pacemaker
```
3. On either host as root, confirm that the cluster shows both nodes:
```sh
# crm_mon -s
```
You should see output similar to the following:
```
CLUSTER OK: 2 nodes online, 0 resources configured
```
### Set up fencing
You set up fencing by defining a cluster resource with a fence
agent for each host VM.
To ensure the correct sequence of events after a fencing action, you also
configure the operating system to delay the restart of Corosync after a VM
is fenced. You also adjust the Pacemaker timeout for reboots to account
for the delay.
#### Create the fencing device resources
1. On the primary host as root, create the fencing resources:
```sh
# crm configure primitive STONITH-"primary-host-name" stonith:fence_gce \
op monitor interval="300s" timeout="120s" \
op start interval="0" timeout="60s" \
params port="primary-host-name" zone="primary-zone" project="project_id" \
pcmk_reboot_timeout=300 pcmk_monitor_retries=4 pcmk_delay_max=30
```
```sh
# crm configure primitive STONITH-"secondary-host-name" stonith:fence_gce \
op monitor interval="300s" timeout="120s" \
op start interval="0" timeout="60s" \
params port="secondary-host-name" zone="secondary-zone" project="project_id" \
pcmk_reboot_timeout=300 pcmk_monitor_retries=4
```
2. Set the location of each fencing device:
```sh
# crm configure location LOC_STONITH_"primary-host-name" \
STONITH-"primary-host-name" -inf: "primary-host-name"
```
```sh
# crm configure location LOC_STONITH_"secondary-host-name" \
STONITH-"secondary-host-name" -inf: "secondary-host-name"
```
### Configure the cluster
To configure the cluster, you define general cluster properties and the
cluster primitive resources.
#### Enable maintenance mode
1. On either host as root, put the cluster in maintenance mode:
```sh
# crm configure property maintenance-mode="true"
```
#### Configure the general cluster properties
1. On the primary host, set the general cluster properties:
```sh
# crm configure property stonith-timeout="300s"
# crm configure property stonith-enabled="true"
# crm configure rsc_defaults resource-stickiness="1000"
# crm configure rsc_defaults migration-threshold="5000"
# crm configure op_defaults timeout="600"
```
#### Set a delay for the restart of Corosync
1. On both hosts as root, create a `systemd` drop-in file
that delays the startup of Corosync to ensure the proper sequence
of events after a fenced VM is rebooted:
```sh
systemctl edit corosync.service
```
2. Add the following lines to the file:
```sh
[Service]
ExecStartPre=/bin/sleep 60
```
3. Save the file and exit the editor.
4. Reload the systemd manager configuration.
```sh
systemctl daemon-reload
```
5. Confirm the drop-in file was created:
```sh
service corosync status
```
You should see a line for the drop-in file, as shown in the
following example:
```
● corosync.service - Corosync Cluster Engine
Loaded: loaded (/usr/lib/systemd/system/corosync.service; disabled; vendor preset: disabled)
Drop-In: /etc/systemd/system/corosync.service.d
└─override.conf
Active: active (running) since Tue 2021-07-20 23:45:52 UTC; 2 days ago
```
### Create a local cluster IP resource for the VIP address
To configure the VIP address in the operating system, create a local
cluster IP resource for the VIP address that you reserved earlier:
```sh
# crm configure primitive rsc_vip_int-primary IPaddr2 \
params ip=vip-address cidr_netmask=32 nic="lo" op monitor interval=3600s timeout=60s
```
> [!NOTE]
> **Note:** To ensure that the SAP HANA cluster is future compatible and supports `systemd` dynamic NIC naming convention, use the loopback interface (`lo`) with the `IPaddr2` resource configuration instead of a static interface name like `ethX` or `ensX`.
### Set up the helper health-check service
The load balancer uses a listener on the
health-check port of each host to determine where the
primary instance of the SAP HANA cluster is running.
To manage the listeners in the cluster, you create a resource for the
listener.
These instructions use the `socat` utility as the listener.
1. On both hosts as root, install the `socat utility`:
```sh
# zypper in -y socat
```
2. On the primary host, create a resource for the helper health-check service:
```sh
# crm configure primitive rsc_healthcheck-primary anything \
params binfile="/usr/bin/socat" \
cmdline_options="-U TCP-LISTEN:healthcheck-port-num,backlog=10,fork,reuseaddr /dev/null" \
op monitor timeout=20s interval=10s \
op_params depth=0
```
#### Group the VIP and the helper health-check service resources
Group the VIP and helper health-check service resources:
```sh
# crm configure group g-primary rsc_vip_int-primary rsc_healthcheck-primary meta resource-stickiness=0
```
### Create the `SAPHanaTopology` primitive resource
You define the `SAPHanaTopology` primitive resource in a temporary configuration
file, which you then upload to Corosync.
On the primary host as root:
1. Create a temporary configuration file for the `SAPHanaTopology`
configuration parameters:
```sh
# vi /tmp/cluster.tmp
```
2. Copy and paste the SAPHanaTopology resource definitions into the
`/tmp/cluster.tmp` file:
### SLES for SAP 15 SP5 or earlier
```sh
primitive rsc_SAPHanaTopology_SID_HDBinst_num ocf:suse:SAPHanaTopology \
operations \$id="rsc_sap2_SID_HDBinst_num-operations" \
op monitor interval="10" timeout="600" \
op start interval="0" timeout="600" \
op stop interval="0" timeout="300" \
params SID="SID" InstanceNumber="inst_num"
clone cln_SAPHanaTopology_SID_HDBinst_num rsc_SAPHanaTopology_SID_HDBinst_num \
meta clone-node-max="1" target-role="Started" interleave="true"
```
### SLES for SAP 15 SP6 or later
```sh
primitive rsc_SAPHanaTopology_SID_HDBinst_num ocf:suse:SAPHanaTopology \
operations \$id="rsc_sap2_SID_HDBinst_num-operations" \
op monitor interval="10" timeout="600" \
op start interval="0" timeout="600" \
op stop interval="0" timeout="300" \
params SID="SID" InstanceNumber="inst_num"
clone cln_SAPHanaTopology_SID_HDBinst_num rsc_SAPHanaTopology_SID_HDBinst_num \
meta clone-node-max="1" interleave="true"
```
3. Edit the `/tmp/cluster.tmp` file to replace the variable text with the
SID and instance number for your SAP HANA system.
4. On the primary as root, load the contents of the
`/tmp/cluster.tmp` file into Corosync:
```sh
crm configure load update /tmp/cluster.tmp
```
### Create the `SAPHana` or `SAPHanaController` primitive resource
You define the resource by using the same method that you
used for the `SAPHanaTopology` resource: in a temporary configuration
file, which you then upload to Corosync.
1. Replace the temporary configuration file:
```sh
# rm /tmp/cluster.tmp
# vi /tmp/cluster.tmp
```
2. Copy and paste the resource definitions into the
`/tmp/cluster.tmp` file:
### SLES for SAP 15 SP5 or earlier
```sh
primitive rsc_SAPHana_SID_HDBinst_num ocf:suse:SAPHana \
operations \$id="rsc_sap_SID_HDBinst_num-operations" \
op start interval="0" timeout="3600" \
op stop interval="0" timeout="3600" \
op promote interval="0" timeout="3600" \
op demote interval="0" timeout="3600" \
op monitor interval="60" role="Master" timeout="700" \
op monitor interval="61" role="Slave" timeout="700" \
params SID="SID" InstanceNumber="inst_num" PREFER_SITE_TAKEOVER="true"
DUPLICATE_PRIMARY_TIMEOUT="7200" AUTOMATED_REGISTER="true"
ms msl_SAPHana_SID_HDBinst_num rsc_SAPHana_SID_HDBinst_num \
meta notify="true" clone-max="2" clone-node-max="1" \
target-role="Started" interleave="true"
colocation col_saphana_ip_SID_HDBinst_num 4000: g-primary:Started \
msl_SAPHana_SID_HDBinst_num:Master
order ord_SAPHana_SID_HDBinst_num Optional: cln_SAPHanaTopology_SID_HDBinst_num \
msl_SAPHana_SID_HDBinst_num
```
### SLES for SAP 15 SP6 or later
```sh
primitive rsc_SAPHana_SID_HDBinst_num ocf:suse:SAPHanaController \
operations \$id="rsc_sap_SID_HDBinst_num-operations" \
op start interval="0" timeout="3600" \
op stop interval="0" timeout="3600" \
op promote interval="0" timeout="3600" \
op demote interval="0" timeout="3600" \
op monitor interval="60" role="Promoted" timeout="700" \
op monitor interval="61" role="Unpromoted" timeout="700" \
params SID="SID" InstanceNumber="inst_num" PREFER_SITE_TAKEOVER="true" \
DUPLICATE_PRIMARY_TIMEOUT="7200" AUTOMATED_REGISTER="true"
clone mst_SAPHana_SID_HDBinst_num rsc_SAPHana_SID_HDBinst_num \
meta clone-node-max="1" interleave="true" promotable="true"
colocation col_saphana_ip_SID_HDBinst_num 4000: g-primary:Started \
mst_SAPHana_SID_HDBinst_num:Promoted
order ord_SAPHana_SID_HDBinst_num Optional: cln_SAPHanaTopology_SID_HDBinst_num \
mst_SAPHana_SID_HDBinst_num
```
Optionally, you can add the `ON_FAIL_ACTION` parameter to the `SAPHanaController` resource.
This parameter defines how the resource agent escalates monitoring failures on
the SAP HANA primary node.
The `ON_FAIL_ACTION` parameter accepts following values:
- `proceed`: This value directs the resource agent to proceed with the failure as usual and initiate the "demote-stop" sequence. This is the default value.
- `fence`: This value directs the resource agent to trigger the sequence of actions that follow a failed "stop" action, which includes fencing the concerned node.
For more information, see the [`SAPHanaController-scale-up`](https://github.com/SUSE/SAPHanaSR/blob/main/man/SAPHanaController-scale-up.7) man page.
For a
[multi-tier](https://help.sap.com/viewer/4e9b18c116aa42fc84c7dbfd02111aba/2.0.05/en-US/2e6c71ab55f147e19b832565311a8e4e.html)
SAP HANA HA cluster, if you are using a version earlier than SAP HANA 2.0
SP03, then set `AUTOMATED_REGISTER` to `false`. This prevents a recovered
instance from attempting to self-register for replication to a HANA system that
already has a replication target configured. For SAP HANA 2.0 SP03 or later,
you can set `AUTOMATED_REGISTER` to `true` for SAP HANA configurations that use multitier system replication.
For additional information, see:
- [SAP HANA System Replication Scale-Up](https://documentation.suse.com/sbp/all/single-html/SLES4SAP-hana-sr-guide-PerfOpt-15/)
- [HANA Scale-Up HA with System Replication \& Automated Failover](https://blogs.sap.com/2018/10/23/hana-scale-up-ha-with-system-replication-automated-failover-using-suse-hae-on-sles-12-sp-3-part-3/)
3. On the primary as root, load the contents of the
`/tmp/cluster.tmp` file into Corosync:
```sh
crm configure load update /tmp/cluster.tmp
```
### Create the `SAPHanaFilesystem` primitive resource
This section is applicable only when you're using the `SAPHanaSR-angi` hook. If
you're using the `SAPHanaSR` hook, then you can skip this section.
You create the `SAPHanaFilesystem` resource by using the same method that you
used for the `SAPHanaTopology` resource: in a temporary configuration file,
which you then upload to Corosync.
1. Replace the temporary configuration file:
```sh
rm /tmp/cluster.tmp
vi /tmp/cluster.tmp
```
2. Copy and paste the `SAPHana` resource definitions into the `/tmp/cluster.tmp`
file:
```sh
primitive rsc_SAPHanaFileSystem_SID_HDBinst_num ocf:suse:SAPHanaFilesystem \
operations \$id="rsc_sap3_SID_HDBinst_num-operations" \
op monitor interval="10" timeout="600" \
op start interval="0" timeout="600" \
op stop interval="0" timeout="300" \
params SID="SID" InstanceNumber="inst_num"
clone cln_SAPHanaFileSystem_SID_HDBinst_num rsc_SAPHanaFileSystem_SID_HDBinst_num \
meta clone-node-max="1" interleave="true"
```
Optionally, you can add the `ON_FAIL_ACTION` parameter to the `SAPHanaFilesystem` resource.
This parameter defines the internal resource agent decision in case of a monitoring failure.
The `ON_FAIL_ACTION` parameter accepts following values:
- `ignore`: This value directs the resource agent to report the failure information into the logs and take no further action.
- `fence`: This value directs the resource agent to trigger the sequence of actions that follow a failed "stop" action, which includes fencing the concerned node. This is the default value.
For more information, see the [`SAPHanaFilesystem`](https://github.com/SUSE/SAPHanaSR/blob/main/man/ocf_suse_SAPHanaFilesystem.7) man page.
### Confirm SAP HANA system replication is active
1. On the primary host, as `SID_LCadm`, sign into the
SAP HANA database interactive terminal:
```sh
> hdbsql -u system -p "system-password" -i inst_num
```
2. In the interactive terminal, check replication status:
```sh
=> select distinct REPLICATION_STATUS from SYS.M_SERVICE_REPLICATION
```
The `REPLICATION_STATUS` should be `"ACTIVE"`.
Alternatively, you can check the replication status by running the following
python script as `SID_LCadm`:
```sh
# python $DIR_INSTANCE/exe/python_support/systemReplicationStatus.py
```
### Activate the cluster
1. On the primary host as root, take the cluster out of maintenance mode:
```sh
# crm configure property maintenance-mode="false"
```
If you receive a prompt that asks you to remove "maintenance", then enter
`y`.
2. Wait 15 seconds and then on the primary host as root, check the status of
the cluster:
```sh
# crm status
```
The following examples shows the status of an active, properly configured
cluster:
### SLES for SAP 15 SP5 or earlier
```
Stack: corosync
Current DC: hana-ha-vm-1 (version 2.0.1+20190417.13d370ca9-3.9.1-2.0.1+20190417.13d370ca9) - partition with quorum
Last updated: Sun Jun 7 00:36:56 2020
Last change: Sun Jun 7 00:36:53 2020 by root via crm_attribute on hana-ha-vm-1
2 nodes configured
8 resources configured
Online: [ hana-ha-vm-1 hana-ha-vm-2 ]
Full list of resources:
STONITH-hana-ha-vm-1 (stonith:fence_gce): Started hana-ha-vm-2
STONITH-hana-ha-vm-2 (stonith:fence_gce): Started hana-ha-vm-1
Clone Set: cln_SAPHanaTopology_HA1_HDB22 [rsc_SAPHanaTopology_HA1_HDB22]
Started: [ hana-ha-vm-1 hana-ha-vm-2 ]
Resource Group: g-primary
rsc_vip_int-primary (ocf::heartbeat:IPaddr2): Started hana-ha-vm-1
rsc_healthcheck-primary (ocf::heartbeat:anything): Started hana-ha-vm-1
Clone Set: msl_SAPHana_HA1_HDB22 [rsc_SAPHana_HA1_HDB22] (promotable)
Masters: [ hana-ha-vm-1 ]
Slaves: [ hana-ha-vm-2 ]
```
### SLES for SAP 15 SP6 or SP7
```
Stack: corosync
Current DC: hana-ha-vm-1 (version 2.1.7+20231219.0f7f88312-150600.6.3.1-2.1.7+20231219.0f7f88312) - partition with quorum
Last updated: Tue Oct 15 03:26:11 2024
Last change: Tue Oct 15 03:26:08 2024 by root via via crm_attribute on hana-ha-vm-1
2 nodes configured
10 resources configured
Online: [ hana-ha-vm-1 hana-ha-vm-2 ]
Full list of resources:
STONITH-hana-ha-vm-1 (stonith:fence_gce): Started hana-ha-vm-2
STONITH-hana-ha-vm-2 (stonith:fence_gce): Started hana-ha-vm-1
Resource Group: g-primary
rsc_vip_int-primary (ocf::heartbeat:IPaddr2): Started hana-ha-vm-1
rsc_healthcheck-primary (ocf::heartbeat:anything): Started hana-ha-vm-1
Clone Set: cln_SAPHanaTopology_HA1_HDB22 [rsc_SAPHanaTopology_HA1_HDB22]
Started: [ hana-ha-vm-1 hana-ha-vm-2 ]
Clone Set: cln_SAPHanaFileSystem_HA1_HDB22 [rsc_SAPHanaFilesystem_HA1_HDB22]
Started: [ hana-ha-vm-1 hana-ha-vm-2 ]
Clone Set: mst_SAPHana_HA1_HDB22 [rsc_SAPHana_HA1_HDB22] (promotable)
Masters: [ hana-ha-vm-1 ]
Slaves: [ hana-ha-vm-2 ]
```
### SLES for SAP 16 or later
```
Stack: corosync
Current DC: hana-ha-vm-1 (version 2.1.7+20231219.0f7f88312-150600.6.3.1-2.1.7+20231219.0f7f88312) - partition with quorum
Last updated: Tue Oct 15 03:26:11 2024
Last change: Tue Oct 15 03:26:08 2024 by root via via crm_attribute on hana-ha-vm-1
2 nodes configured
10 resources configured
Online: [ hana-ha-vm-1 hana-ha-vm-2 ]
Full list of resources:
STONITH-hana-ha-vm-1 (stonith:fence_gce): Started hana-ha-vm-2
STONITH-hana-ha-vm-2 (stonith:fence_gce): Started hana-ha-vm-1
Resource Group: g-primary
rsc_vip_int-primary (ocf::heartbeat:IPaddr2): Started hana-ha-vm-1
rsc_healthcheck-primary (ocf::heartbeat:anything): Started hana-ha-vm-1
Clone Set: cln_SAPHanaTopology_HA1_HDB22 [rsc_SAPHanaTopology_HA1_HDB22]
Started: [ hana-ha-vm-1 hana-ha-vm-2 ]
Clone Set: cln_SAPHanaFileSystem_HA1_HDB22 [rsc_SAPHanaFilesystem_HA1_HDB22]
Started: [ hana-ha-vm-1 hana-ha-vm-2 ]
Clone Set: mst_SAPHana_HA1_HDB22 [rsc_SAPHana_HA1_HDB22] (promotable)
Masters: [ hana-ha-vm-1 ]
Slaves: [ hana-ha-vm-2 ]
```
## Test failover
Test your cluster by simulating a failure on the primary host. Use a
test system or run the test on your production system before you release
the system for use.
Backup the system before the test.
You can simulate a failure in a variety of ways, including:
- `HDB stop`
- `HDB kill`
- `iptables ... DROP` for instances with multiple network interfaces
- `echo c > /proc/sysrq-trigger`
These instructions use `iptables` to simulate a
network disruption between your two hosts in the cluster. Use the `ip link`
command on an instance with a single network interface and use the `iptables`
command on instances with one or more network interfaces. The test validates
both failover as well as fencing. In the case where your instances have multiple
network interfaces defined, you use the `iptables` command on the secondary
host to drop incoming and outgoing traffic based on the IP used by the primary
host for cluster communication, thereby simulating a network connection loss to
the primary.
1. On the secondary host, as root, use the `iptables` command to drop all incoming and outgoing network traffic to primary host.
```sh
# iptables -A INPUT -s PRIMARY_CLUSTER_IP -j DROP; iptables -A OUTPUT -d PRIMARY_CLUSTER_IP -j DROP
```
2. Once the primary host is fenced and restarted, delete the added lines from iptable on secondary host to re-initiate the network traffic to primary host. Reconnect to either host by using SSH and change to the root user.
```sh
# iptables -D INPUT -s PRIMARY_CLUSTER_IP -j DROP; iptables -D OUTPUT -d PRIMARY_CLUSTER_IP -j DROP
```
3. Enter `crm status`
to confirm that the primary host is now active on the VM
that used to contain the secondary host. Automatic restart is enabled in the
cluster, so the stopped host restarts and assumes the role of secondary
host, as shown in the following example.
### SLES for SAP 15 SP5 or earlier
```
Stack: corosync
Current DC: hana-ha-vm-2 (version 2.0.1+20190417.13d370ca9-3.9.1-2.0.1+20190417.13d370ca9) - partition with quorum
Last updated: Fri Jun 12 16:46:07 2020
Last change: Fri Jun 12 16:46:07 2020 by root via crm_attribute on hana-ha-vm-2
2 nodes configured
8 resources configured
Online: [ hana-ha-vm-1 hana-ha-vm-2 ]
Full list of resources:
STONITH-hana-ha-vm-1 (stonith:fence_gce): Started hana-ha-vm-2
STONITH-hana-ha-vm-2 (stonith:fence_gce): Started hana-ha-vm-1
Clone Set: cln_SAPHanaTopology_HA1_HDB22 [rsc_SAPHanaTopology_HA1_HDB22]
Started: [ hana-ha-vm-1 hana-ha-vm-2 ]
Resource Group: g-primary
rsc_vip_int-primary (ocf::heartbeat:IPaddr2): Started hana-ha-vm-2
rsc_healthcheck-primary (ocf::heartbeat:anything): Started hana-ha-vm-2
Clone Set: msl_SAPHana_HA1_HDB22 [rsc_SAPHana_HA1_HDB22] (promotable)
Masters: [ hana-ha-vm-2 ]
Slaves: [ hana-ha-vm-1 ]
```
### SLES for SAP 15 SP6 or later
```
Stack: corosync
Current DC: hana-ha-vm-2 (version 2.1.7+20231219.0f7f88312-150600.6.3.1-2.1.7+20231219.0f7f88312) - partition with quorum
Last updated: Tue Oct 15 05:26:18 2024
Last change: Tue Oct 15 05:26:18 2024 by root via via crm_attribute on hana-ha-vm-1
2 nodes configured
10 resources configured
Online: [ hana-ha-vm-1 hana-ha-vm-2 ]
Full list of resources:
STONITH-hana-ha-vm-1 (stonith:fence_gce): Started hana-ha-vm-2
STONITH-hana-ha-vm-2 (stonith:fence_gce): Started hana-ha-vm-1
Resource Group: g-primary
rsc_vip_int-primary (ocf::heartbeat:IPaddr2): Started hana-ha-vm-2
rsc_healthcheck-primary (ocf::heartbeat:anything): Started hana-ha-vm-2
Clone Set: cln_SAPHanaTopology_HA1_HDB22 [rsc_SAPHanaTopology_HA1_HDB22]
Started: [ hana-ha-vm-1 hana-ha-vm-2 ]
Clone Set: cln_SAPHanaFileSystem_HA1_HDB22 [rsc_SAPHanaFileSystem_HA1_HDB22]
Started: [ hana-ha-vm-1 hana-ha-vm-2 ]
Clone Set: mst_SAPHana_HA1_HDB22 [rsc_SAPHana_HA1_HDB22] (promotable)
Masters: [ hana-ha-vm-2 ]
Slaves: [ hana-ha-vm-1 ]
```
## Configure HANA Active/Active (Read Enabled)
Starting with SAP HANA 2.0 SPS1, you can configure
[HANA Active/Active (Read Enabled)](https://docs.cloud.google.com/sap/docs/sap-hana-ha-planning-guide.md.txt#sap_hana_activeactive_read_enabled)
in a Pacemaker cluster. This is optional.
To configure HANA Active/Active (Read Enabled) in a Pacemaker cluster, complete
the following steps.
### Configure the Cloud Load Balancing failover support for the secondary host
The internal passthrough Network Load Balancer service with failover support routes traffic
to the secondary host in an SAP HANA cluster based on a health check service.
To configure failover support for the secondary host, follow these steps:
1. Open Cloud Shell:
[Go to Cloud Shell](https://console.cloud.google.com/?cloudshell=true)
2. Reserve an IP address for the virtual IP by running the following command.
The virtual IP (VIP) address follows the secondary SAP HANA system. This is
the IP address that applications use to access your secondary SAP HANA
system. The load balancer routes traffic that is sent to the VIP to the VM
instance that currently hosts the secondary system.
If you omit the `--addresses` flag in the following command, then an IP
address in the specified subnet is chosen for you. For more information
about reserving a static IP, see
[Reserving a static internal IP address](https://docs.cloud.google.com/vpc/docs/reserve-static-internal-ip-address.md.txt).
```sh
$ gcloud compute addresses create secondary-vip-name \
--region cluster-region --subnet cluster-subnet \
--addresses secondary-vip-address
```
3. Create a Compute Engine health check by running the following command.
For the port used by the
health check, choose a port that is in the private range, 49152-65535, to
avoid clashing with other services. The port should be different from the one
configured for the health check used for the HANA primary system access. The
check-interval and timeout values are slightly longer than the defaults so as
to increase failover tolerance during Compute Engine live migration
events. You can adjust the values if necessary.
```sh
$ gcloud compute health-checks create tcp secondary-health-check-name \
--port=secondary-healthcheck-port-num \
--proxy-header=NONE --check-interval=10 --timeout=10 --unhealthy-threshold=2 \
--healthy-threshold=2
```
4. Configure the load balancer and failover group by running the following
commands.
Here you create an additional backend service and use the same instance
groups that you created earlier for the backend service behind the Internal
TCP/UDP Load Balancer for your SAP HANA primary system.
1. Create the load balancer backend service:
```sh
$ gcloud compute backend-services create secondary-backend-service-name \
--load-balancing-scheme internal \
--health-checks secondary-health-check-name \
--no-connection-drain-on-failover \
--drop-traffic-if-unhealthy \
--failover-ratio 1.0 \
--region cluster-region \
--global-health-checks
```
2. Add the primary instance group to the backend service:
```sh
$ gcloud compute backend-services add-backend secondary-backend-service-name \
--instance-group primary-ig-name \
--instance-group-zone primary-zone \
--region cluster-region
```
3. Add the secondary, failover instance group to the backend service:
```sh
$ gcloud compute backend-services add-backend secondary-backend-service-name \
--instance-group secondary-ig-name \
--instance-group-zone secondary-zone \
--failover \
--region cluster-region
```
4. Create a forwarding rule.
For the IP address flag, specify the IP address that you reserved for the
VIP. If you need to access the HANA secondary system from outside of the
region that you specify in the following command, then include the flag
`--allow-global-access` in the forwarding rule's definition.
```sh
$ gcloud compute forwarding-rules create secondary-rule-name \
--load-balancing-scheme internal \
--address secondary-vip-name \
--subnet cluster-subnet \
--region cluster-region \
--backend-service secondary-backend-service-name \
--ports ALL
```
For more information about cross-region access to your SAP HANA
high-availability system, see [Internal TCP/UDP Load Balancing](https://docs.cloud.google.com/load-balancing/docs/internal.md.txt#client-access).
### Enable HANA Active/Active (Read Enabled)
On your secondary host, enable Active/Active (read enabled) for SAP HANA system
replication by following these steps:
1. As root, place the cluster in maintenance mode:
```sh
# crm configure property maintenance-mode="true"
```
2. As `SID_LCadm`, stop SAP HANA:
```sh
> HDB stop
```
3. As `SID_LCadm`, re-register the HANA secondary system
with SAP HANA system replication using the operation mode
`logreplay_readaccess`:
```sh
> hdbnsutil -sr_register --remoteHost=primary-host-name --remoteInstance=inst_num \
--replicationMode=syncmem --operationMode=logreplay_readaccess --name=secondary-host-name
```
4. As `SID_LCadm`, start SAP HANA:
```sh
> HDB start
```
5. As `SID_LCadm`, confirm that HANA synchronization
status is `ACTIVE`:
```sh
> cdpy; python systemReplicationStatus.py --sapcontrol=1 | grep overall_replication_status
```
You should see an output similar to the following example:
```
overall_replication_status=ACTIVE
```
### Configure Pacemaker
Configure your Pacemaker HA cluster for Active/Active (read enabled) by running
the following commands as root:
1. Create a local cluster IP resource for the VIP address that you reserver for
the secondary system:
```sh
# crm configure primitive rsc_vip_int-secondary IPaddr2 \
params ip=secondary-vip-address cidr_netmask=32 nic="lo" \
op monitor interval=3600s timeout=60s
```
2. Set up the helper health-check service by running the following commands:
The load balancer uses a listener on the health-check port of each host to
determine where the secondary instance of the SAP HANA cluster is running.
1. To manage the listeners in the cluster, create a resource for the
listener. These instructions use the *socat* utility as the listener.
Create a resource for the helper health-check service:
```sh
# crm configure primitive rsc_healthcheck-secondary anything \
params binfile="/usr/bin/socat" \
cmdline_options="-U TCP-LISTEN:secondary-healthcheck-port-num,backlog=10,fork,reuseaddr /dev/null" \
op monitor timeout=20s interval=10s \
op_params depth=0
```
2. Group the VIP and the helper health-check service resources:
```sh
# crm configure group g-secondary rsc_vip_int-secondary rsc_healthcheck-secondary meta resource-stickiness=0
```
3. Create a colocation constraint:
### SLES for SAP 15 SP5 or earlier
```sh
# crm configure colocation col_saphana_secondary 4000: g-secondary:Started \
msl_SAPHana_SID_HDBinst_num:Slave
```
### SLES for SAP 15 SP6 or later
```sh
# crm configure colocation col_saphana_secondary 4000: g-secondary:Started \
mst_SAPHana_SID_HDBinst_num:Unpromoted
```
4. Exit cluster maintenance mode:
```sh
# crm configure property maintenance-mode="false"
```
5. Check the status of the cluster:
```sh
# crm status
```
The following examples shows the status of an active, properly configured
cluster for SAP HANA system replication with Active/Active (read enabled).
You should see an additional resource group for the secondary system's VIP
resources. In the following example, the name of that resource group is
`g-secondary`.
### SLES for SAP 15 SP5 or earlier
```
Cluster Summary:
Stack: corosync
Current DC: hana-ha-vm-1 (version 2.0.4+20200616.2deceaa3a-3.15.1-2.0.4+20200616.2deceaa3a) - partition with quorum
Last updated: Fri Oct 7 21:52:46 2022
Last change: Fri Oct 7 21:51:42 2022 by root via crm_attribute on hana-ha-vm-1
2 nodes configured
10 resource instances configured
Node List:
Online: [ hana-ha-vm-1 hana-ha-vm-2 ]
Active Resources:
STONITH-hana-ha-vm-1 (stonith:fence_gce): Started hana-ha-vm-2
STONITH-hana-ha-vm-2 (stonith:fence_gce): Started hana-ha-vm-1
Resource Group: g-primary:
rsc_vip_int-primary (ocf::heartbeat:IPaddr2): Started hana-ha-vm-1
rsc_vip_hc-primary (ocf::heartbeat:anything): Started hana-ha-vm-1
Clone Set: cln_SAPHanaTopology_HA1_HDB00 [rsc_SAPHanaTopology_HA1_HDB00]:
Started: [ hana-ha-vm-1 hana-ha-vm-2 ]
Clone Set: msl_SAPHana_HA1_HDB00 [rsc_SAPHana_HA1_HDB00] (promotable):
Masters: [ hana-ha-vm-1 ]
Slaves: [ hana-ha-vm-2 ]
Resource Group: g-secondary:
rsc_vip_int-secondary (ocf::heartbeat:IPaddr2): Started hana-ha-vm-2
rsc_healthcheck-secondary (ocf::heartbeat:anything): Started hana-ha-vm-2
```
### SLES for SAP 15 SP6 or later
```
Cluster Summary:
Stack: corosync
Current DC: hana-ha-vm-1 (version 2.1.7+20231219.0f7f88312-150600.6.3.1-2.1.7+20231219.0f7f88312) - partition with quorum
Last updated: Tue Oct 15 05:46:18 2024
Last change: Tue Oct 15 05:46:18 2024 by root via via crm_attribute on hana-ha-vm-1
2 nodes configured
10 resource instances configured
Node List:
Online: [ hana-ha-vm-1 hana-ha-vm-2 ]
Active Resources:
STONITH-hana-ha-vm-1 (stonith:fence_gce): Started hana-ha-vm-2
STONITH-hana-ha-vm-2 (stonith:fence_gce): Started hana-ha-vm-1
Resource Group: g-primary:
rsc_vip_int-primary (ocf::heartbeat:IPaddr2): Started hana-ha-vm-1
rsc_vip_hc-primary (ocf::heartbeat:anything): Started hana-ha-vm-1
Clone Set: cln_SAPHanaTopology_HA1_HDB00 [rsc_SAPHanaTopology_HA1_HDB00]:
Started: [ hana-ha-vm-1 hana-ha-vm-2 ]
Clone Set: cln_SAPHanaFileSystem_HA1_HDB00 [rsc_SAPHanaFileSystem_HA1_HDB00]:
Started: [ hana-ha-vm-1 hana-ha-vm-2 ]
Clone Set: mst_SAPHana_HA1_HDB00 [rsc_SAPHana_HA1_HDB00] (promotable):
Masters: [ hana-ha-vm-1 ]
Slaves: [ hana-ha-vm-2 ]
Resource Group: g-secondary:
rsc_vip_int-secondary (ocf::heartbeat:IPaddr2): Started hana-ha-vm-2
rsc_healthcheck-secondary (ocf::heartbeat:anything): Started hana-ha-vm-2
```
## Evaluate your SAP HANA workload
To automate continuous validation checks for your SAP HANA high-availability
workloads running on Google Cloud, you can use
[Workload Manager](https://docs.cloud.google.com/workload-manager/docs/overview.md.txt).
Workload Manager lets you automatically scan and evaluate
your SAP HANA high-availability
workloads against best practices from SAP, Google Cloud, and OS vendors.
This helps improve the quality, performance, and reliability of your workloads.
For information about the best practices that Workload Manager
supports for evaluating SAP HANA high-availability
workloads running on Google Cloud, see
[Workload Manager best practices for SAP](https://docs.cloud.google.com/workload-manager/docs/reference/best-practices). For information
about creating and running an evaluation using Workload Manager,
see
[Create and run an evaluation](https://docs.cloud.google.com/workload-manager/docs/create-evaluation).
## Troubleshooting
To troubleshoot problems with high-availability configurations for SAP HANA on
SLES, see [Troubleshooting high-availability configurations for SAP](https://docs.cloud.google.com/sap/docs/troubleshooting/troubleshooting-sap-ha.md.txt).
## Getting support for SAP HANA on SLES
If you need help resolving a problem with high-availability clusters for
SAP HANA on SLES, gather the required diagnostic information and contact Cloud Customer Care.
For more information, see [High-availability clusters on SLES diagnostic information](https://docs.cloud.google.com/sap/docs/getting-support-diag-info-ha-sles.md.txt).
## Support
For issues with Google Cloud infrastructure or services, contact Customer Care. You can find the contact information on the
[Support Overview page](https://console.cloud.google.com/support)
in the Google Cloud console. If Customer Care determines that a problem
resides in your SAP systems, then you are referred to SAP Support.
For SAP product-related issues, log your support request with
[SAP support](https://support.sap.com/support-programs-services/about/getting-started.html).
SAP evaluates the support ticket and, if it appears to be a Google Cloud
infrastructure issue, then SAP transfers that ticket to the appropriate
Google Cloud component in its system: `BC-OP-LNX-GOOGLE` or
`BC-OP-NT-GOOGLE`.
### Support requirements
Before you can receive support for SAP systems and the
Google Cloud
infrastructure and services that they use, you must meet the minimum
support plan requirements.
For more information about the minimum support requirements for SAP on
Google Cloud, see:
- [Getting support for SAP on Google Cloud](https://docs.cloud.google.com/sap/docs/getting-support.md.txt)
- [SAP Note 2456406 - SAP on Google Cloud Platform: Support Prerequisites](https://launchpad.support.sap.com/#/notes/2456406) (An SAP user account is required)
### Connecting to SAP HANA
If the host VMs don't have an external IP address for SAP
HANA, you can only connect to the SAP HANA instances through the bastion
instance using SSH or through the Windows server through SAP HANA Studio.
- To connect to SAP HANA through the bastion instance, connect to the bastion
host, and then to the SAP HANA instance(s) by using an SSH client of
your choice.
- To connect to the SAP HANA database through SAP HANA Studio, use a remote
desktop client to connect to the Windows Server instance. After connection,
manually [install SAP HANA Studio](https://help.sap.com/hana/SAP_HANA_Studio_Installation_Update_Guide_en.pdf)
and access your SAP HANA database.
## Post-deployment tasks
After you complete the deployment, finish with the following steps:
1. Change the temporary passwords for the SAP HANA system administrator and
database superuser. For example:
```sh
sudo passwd SID_LCadm
```
For information from SAP about changing the password, see
[Reset the `SYSTEM` User Password of the System Database](https://help.sap.com/viewer/6b94445c94ae495c83a19646e7c3fd56/LATEST/en-US/6b13cdd1982f4aa6b90b443663d17d7e.html).
2. Before using your SAP HANA instance, configure and backup your new
SAP HANA database.
3.
If your SAP HANA system is deployed on a VirtIO network interface, then we recommend that you ensure
the value of the TCP parameter `/proc/sys/net/ipv4/tcp_limit_output_bytes` is set to
`1048576`. This modification helps improve the overall network throughput on the VirtIO
network interface without affecting the network latency.
For more information, see:
- [SAP HANA operations guide](https://docs.cloud.google.com/sap/docs/sap-hana-operations-guide.md.txt#backup_and_recovery).
- [SAP HANA Installation and Update Guide](http://help.sap.com/hana/SAP_HANA_Server_Installation_Guide_en.pdf).
## What's next
See the following resource for more information:
- If you're using SLES for SAP 15 SP4 or SP5, then for information about how to upgrade to the SUSE `SAPHanaSR-angi` resource agent in your HA cluster, see [Upgrade `SAPHanaSR` to
`SAPHanaSR-angi` in a scale-up HA cluster on SLES](https://docs.cloud.google.com/sap/docs/upgrade-suse-scale-up-to-angi).
- [Automated SAP HANA System Replication in Scale-Up in pacemaker cluster](https://access.redhat.com/articles/3004101)
- [SAP HANA high-availability planning guide](https://docs.cloud.google.com/sap/docs/sap-hana-ha-planning-guide.md.txt)
- [SAP HANA disaster recovery planning guide](https://docs.cloud.google.com/sap/docs/sap-hana-dr-planning-guide.md.txt)
- For more information about VM administration and monitoring, see the [SAP HANA operations guide](https://docs.cloud.google.com/sap/docs/sap-hana-operations-guide.md.txt)