These instructions show you how to set up a solution for replicating data from
SAP applications, such as SAP S/4HANA or SAP Business Suite, to
BigQuery by using SAP Landscape Transformation (LT) Replication Server
and SAP Data Services (DS).
You can use data replication to backup your SAP data in near real time or to
consolidate the data from your SAP systems with consumer data from other
systems in BigQuery to draw insights from machine learning and
for petabyte-scale data analytics.
The instructions are intended for SAP system administrators who have basic
experience with the configuration of SAP Basis, SAP LT Replication Server,
SAP DS and Google Cloud.
## Architecture
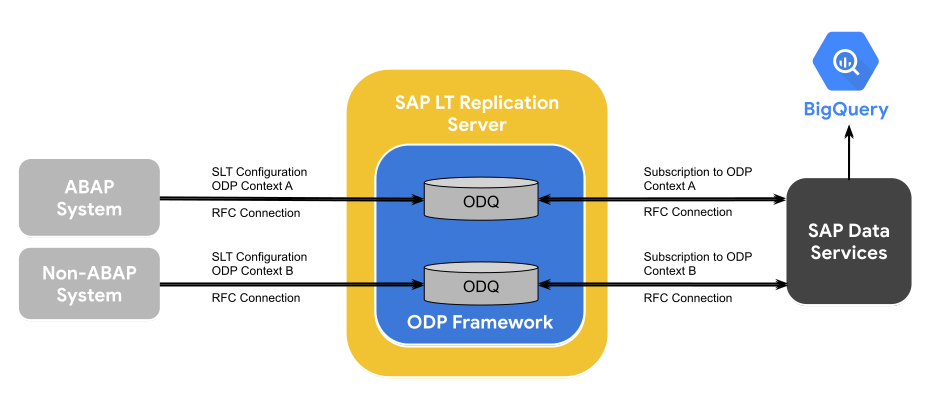
SAP LT Replication Server can act as a data provider for the SAP NetWeaver
Operational Data Provisioning Framework (ODP). SAP LT Replication Server
receives data from connected SAP systems and stores it in the ODP framework
in an Operational Delta Queue (ODQ) of the SAP LT Replication Server
system. Thus, SAP LT Replication Server itself also acts as the target of
the SAP LT Replication Server configurations. The
ODP framework makes the data available as ODP objects that correspond to the
source system tables.
The ODP framework supports extraction and replication scenarios for various
target SAP applications, known as *subscribers*. The subscribers retrieve the
data from the delta queue for further processing.
Data gets replicated as soon as a subscriber requests the data from a data
source through an ODP *context*. Several subscribers can use the same ODQ
as source.
SAP LT Replication Server leverages the changed-data capture (CDC) support
of SAP Data Services 4.2 SP1 or later, which includes real-time data
provisioning and delta capabilities for all source tables.
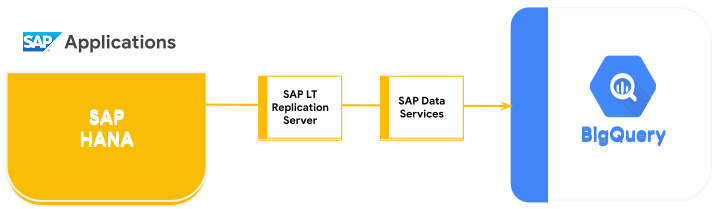
The following diagram explains the flow of data through the systems:
- SAP applications update data in the source system.
- SAP SAP LT Replication Server replicates the data changes and stores the data in the Operational Delta Queue.
- SAP DS is a subscriber of the Operational Delta Queue and periodically polls the queue for data changes.
- SAP DS retrieves the data from the delta queue, transforms the data to be compatible with BigQuery format, and initiates the load job that moves the data to BigQuery.
- The data is available in BigQuery for analysis.
In this scenario, the SAP source system, SAP LT Replication Server, and
SAP Data Services can be
running either on or off of Google Cloud. For more information from SAP,
see [Operational Data Provisioning in Real-time with SAP Landscape Transformation Replication Server](https://help.sap.com/doc/178d81a27b5344cf899cf50011fa5a0d/3.0.03/en-US/Installation_Guide_ODP_DMIS_2018_SP03.pdf).
## Core solution components
The following components are required to replicate data from SAP applications
to BigQuery by using SAP Landscape Transformation Replication
Server and SAP Data Services:
| **Component** | **Required versions** | **Notes** |
|---|---|---|
| SAP application server stack | Any ABAP-based SAP System starting with R/3 4.6C SAP_Basis (min requirement): - 730 SP10 or SP5-9 + Note 1817467 - 731 SP8 or SP3-7 + Note 1817467 - 740 SP4 or SP0-3 + Note 1817467 PI_Basis (min requirement): - 730 SP10 or SP8-9 + Note 1848320 - 731 SP9 or SP5-8 + Note 1848320 - 740 SP4 or SP2-3 + Note 1848320 | In this guide, the application server and database server are collectively referred to as the *source system* , even if they are running on different machines. Define RFC user with appropriate authorization Optional: define separate table space for logging tables |
| Database (DB) system | Any DB version that is listed as supported in the SAP Product Availability Matrix (PAM), subject to any restrictions of the SAP NetWeaver stack that are listed in the PAM. See service.sap.com/pam. | |
| Operating system (OS) | Any OS version that is listed as supported in the SAP PAM, subject to any restrictions of the SAP NetWeaver stack that are listed in the PAM. See service.sap.com/pam. | |
| SAP Data Migration Server (DMIS) | DMIS: - DMIS 2011 SP6 or later - DMIS 2011 SP3/SP4/SP5 + Note 1863476 - DMIS 2010 SP8/SP9 + Note 1863476 DMIS add-on: - DMIS 2011 SP6 or later add-on | |
| SAP Landscape Transformation Replication Server | SAP LT Replication Server 2.0 or later | Requires an RFC connection to source system. Sizing of the SAP LT Replication Server system depends very much on the amount of data which is stored in ODQ and the planned retention periods. |
| SAP Data Services | SAP Data Services 4.2 SP1 or higher | |
| BigQuery | N/A | |
## Costs
BigQuery is a billable Google Cloud component.
Use the [Pricing Calculator](https://cloud.google.com/products/calculator/#id=411d8ca1-210f-4f2c-babd-34c6af2b5538)
to generate a cost estimate based on your projected usage.
## Prerequisites
These instructions assume that the SAP application server, database server,
SAP LT Replication Server, and SAP Data Services are already installed and
configured for normal operation.
Before you can use BigQuery, you need a Google Cloud
project.
### Set up a Google Cloud project in Google Cloud
You need to enable the BigQuery API, and if you haven't already created a
Google Cloud project, you need to do that, too.
#### Create Google Cloud project
1. Go to the Google Cloud console and sign up, walking through the setup wizard.
[Go to Google Cloud console](https://console.cloud.google.com/)
2. Next to the Google Cloud logo in the upper left-hand corner, click
the dropdown and select **Create Project**.
3. Give your project a name and click **Create**.
4. After the project is created (a notification is displayed in the upper
right), refresh the page.
#### Enable APIs
Enable the BigQuery API:
[Go to BigQuery API](https://console.cloud.google.com/apis/enableflow?apiid=bigquery)
#### Enable private access to the Google Cloud APIs
For SAP workloads running outside Google Cloud, after you
establish a network connection to Google Cloud, you need to
enable private access to the Google Cloud APIs.
For more information, see
[Private Google Access options for services](https://docs.cloud.google.com/vpc/docs/private-access-options.md.txt).
#### Create a service account
The service account (specifically its key file) is used to authenticate SAP DS
to BigQuery. You use the key file later when you
[create the target datastore](https://docs.cloud.google.com/sap/docs/bigquery-replication-from-sap-apps.md.txt#create_the_target_datastore).
1. In the Google Cloud console, go to the **Service accounts** page.
[Go to Service accounts](https://console.cloud.google.com/iam-admin/serviceaccounts)
2. Select your Google Cloud project.
3. Click **Create Service Account**.
4. Enter a **Service account name**.
5. Click **Create and Continue**.
6. In the **Select a role** list, choose **BigQuery \> BigQuery Data Editor**.
7. Click **Add Another Role**.
8. In the **Select a role** list, choose **BigQuery \> BigQuery Job User**.
9. Click **Continue**.
10. As appropriate, grant other users access to the service account.
11. Click **Done**.
12. On the **Service accounts** page in the Google Cloud console,
click the email address of the service account that you just created.
13. Under the service account name, click the **Keys** tab.
14. Click the **Add Key** drop-down menu, and then select **Create new key**.
15. Make sure the **JSON** key type is specified.
16. Click **Create**.
17. Save the automatically downloaded key file to a secure location.
## Configuring replication between SAP applications and BigQuery
Configuring this solution includes the following high-level steps:
- Configuring SAP LT Replication Server
- Configuring SAP Data Services
- Creating the data flow between SAP Data Services and BigQuery
### SAP Landscape Transformation Replication Server Configuration
The following steps configure SAP LT Replication Server to act as a provider
within the operational data provisioning framework and create an Operational
Delta Queue. In this configuration, SAP LT Replication Server uses trigger-based
replication to copy the data from the source SAP system into tables in the delta
queue. SAP Data Services, acting as a subscriber in the ODP framework, retrieves
the data from the delta queue, transforms it, and loads into
BigQuery.
#### Configure the Operational Delta Queue (ODQ)
1. In SAP LT Replication Server, use transaction `SM59` to create an RFC destination for the SAP application system that is the data source.
2. In SAP LT Replication Server, use transaction `LTRC` to create a configuration. In the configuration, define the source and target of the SAP LT Replication Server. The target for data transfer using ODP is the SAP LT Replication Server itself.
1. To specify the source, enter the RFC destination for the SAP application system to be used as the data source.
2. To specify the target:
1. Enter **NONE** as the RFC connection.
2. Choose **ODQ Replication Scenario** for RFC communication. Using this scenario, specify that data is transferred by using the operational data provisioning infrastructure with operational delta queues.
3. Assign a queue alias.
The queue alias is used in SAP Data Services for datasource ODP context
setting.
### SAP Data Services Configuration
#### Create a data services project
1. Open the SAP Data Services Designer application.
2. Go to **File \> New \> Project.**
3. Specify a name in the **Project name** field.
4. In **Data Services Repository**, select your data services repository.
5. Click **Finish**. Your project appears in the Project Explorer on the left.
SAP Data Services connects to the source systems to collect metadata and then
to the SAP Replication Server agent to retrieve the configuration and change
data.
#### Create a source datastore
The following steps create a connection to SAP LT Replication Server and add
the data tables to the applicable datastore node in the Designer object library.
To use SAP LT Replication Server with SAP Data Services, you must connect SAP
DataServices to the correct operational delta queue in ODP by connecting a
datastore to the ODP infrastructure.
1. Open the SAP Data Services Designer application.
2. Right-click on your SAP Data Services project name in Project Explorer.
3. Select **New \> Datastore**.
4. Fill in **Datastore Name**. For example, DS_SLT.
5. In the **Datastore type** field, select **SAP Applications.**
6. In the **Application server name** field, provide the instance name of the SAP LT Replication Server.
7. Specify the SAP LT Replication Server access credentials.
8. Open the **Advanced** tab.
9. In **ODP Context,** enter SLT\~ALIAS, where ALIAS is the queue alias that you specified in [Configure the Operational Delta Queue (ODQ)](https://docs.cloud.google.com/sap/docs/bigquery-replication-from-sap-apps.md.txt#configure_odq).
10. Click **OK**.
The new datastore appears in the **Datastore** tab in the local object library
in Designer.
#### Create the target datastore
These steps create a BigQuery datastore that uses the service
account that you created previously in the
[Create a service account](https://docs.cloud.google.com/sap/docs/bigquery-replication-from-sap-apps.md.txt#create_a_service_account)
section.
The service account enables SAP Data Services to securely access
BigQuery.
For more information, see
[Obtain your Google service account email](https://help.sap.com/viewer/497053670ed1451d9cf24afc40de68ea/4.2.11/en-US/fc236cb735714f02b0e322a19ad73203.html)
and
[Obtain a Google service account private key file](https://help.sap.com/viewer/497053670ed1451d9cf24afc40de68ea/4.2.11/en-US/fa5192d438bd42ec8547c7c8e809b2e0.html)
in the SAP Data Services documentation.
1. Open the SAP Data Services Designer application.
2. Right-click on your SAP Data Services project name in Project Explorer.
3. Select **New \> Datastore**.
4. Fill in the **Name** field. For example, BQ_DS.
5. Click **Next.**
6. In the **Datastore type** field, select **Google BigQuery.**
7. The **Web Service URL** option appears. The software automatically completes the option with the default BigQuery web service URL.
8. Select **Advanced**.
9. Complete the Advanced options based on the [Datastore option descriptions](https://help.sap.com/viewer/497053670ed1451d9cf24afc40de68ea/4.2.11/en-US/041c48f50d244b3cb30fb2e9600fd8ad.html) for BigQuery in the SAP Data Services documentation.
10. Click **OK**.
The new datastore appears in the **Datastore** tab in the Designer local object
library.
#### Import the source ODP object(s) for replication
These steps import ODP objects from the source datastore for the initial and
delta loads and make them available in SAP Data Services.
1. Open the SAP Data Services Designer application.
2. Expand the source datastore for replication load in the Project Explorer.
3. Select the **External Metadata** option in the upper portion of the right panel. The list of nodes with available tables and ODP objects appears.
4. Click on the ODP objects node to retrieve the list of available ODP objects. The list might take a long time to display.
5. Click on the **Search** button.
6. In the dialog, select **External data** in the **Look in** menu and **ODP object** in the **Object type** menu.
7. In the Search dialog, select the search criteria to filter the list of source ODP object(s).
8. Select the ODP object to import from the list.
9. Right-click and select the **Import** option.
10. Fill in the **Name of Consumer**.
11. Fill in the **Name of project**.
12. Select **Changed-data capture (CDC)** option in **Extraction mode**.
13. Click **Import**. This starts the import of the ODP object into Data Services. The ODP object is now available in the object library under the DS_SLT node.
For more information, see
[Importing ODP source metadata](https://help.sap.com/viewer/df959412681b4619a38f03ff90207e6b/4.2.9/en-US/577669b06d6d1014b3fc9283b0e91070.html)
in the SAP Data Services documentation.
#### Create a schema file
These steps create a data flow in SAP Data Services to generate a schema file
that reflects the structure of the source tables. Later, you use the schema file
to create a BigQuery table.
The schema ensures that the BigQuery loader data flow populates
the new BigQuery table successfully.
##### Create a data flow
1. Open the SAP Data Services Designer application.
2. Right-click on your SAP Data Services project name in Project Explorer.
3. Select **Project \> New \> Data flow**.
4. Fill in the **Name** field. For example, DF_BQ.
5. Click on **Finish**.
##### Refresh the object library
- Right-click on the source datastore for initial load in Project Explorer and select the **Refresh Object Library** option. This updates the list of datasource database tables that you can use in your data flow.
##### Build your data flow
1. Build your data flow by dragging and dropping the source tables onto the data flow workspace and choosing **Import as Source** when prompted.
2. In the **Transforms** tab of the object library, drag an **XML_Map
transform** from the **Platform** node i onto the data flow and choose **Batch Load** option when prompted.
3. Connect all of the source tables in the workspace to the XML Map transform.
4. Open the **XML Map transform** and complete the input and output schema sections based on the data you are including in the BigQuery table.
5. Right-click the **XML_Map** node in the **Schema Out** column and select **Generate Google BigQuery Schema** from the dropdown menu.
6. Enter a name and location for the schema.
7. Click **Save**.
8. Right-click on the data flow in Project Explorer and select **Remove**.
SAP Data Services generates a schema file with the .json file extension.
#### Create the BigQuery tables
You need to create tables in your BigQuery dataset on
Google Cloud for both the initial load and the delta loads. You use the
schemas you created in SAP Data Services to create the tables.
The table for initial load is used for the initial replication of the entire
source dataset. The table for delta loads is used for the replication of the
changes in the source dataset that occur after the initial load. The tables are
based on the schema that you generated in the previous step. The table for the
delta loads includes an additional timestamp field that identifies the time of
each delta load.
##### Create a BigQuery table for the initial load
These steps create a table for the initial load in your BigQuery
dataset.
1. Access your Google Cloud project in the Google Cloud console.
2. Select **BigQuery.**
3. Click on the applicable dataset.
4. Click on **Create table**.
5. Enter a Table name. For example, BQ_INIT_LOAD.
6. Under **Schema** , toggle the setting to enable the **Edit as text** mode.
7. Set the schema of the new table in BigQuery by copying and pasting the contents of the schema file that you created in [Create a schema file](https://docs.cloud.google.com/sap/docs/bigquery-replication-from-sap-apps.md.txt#create_a_schema_file).
8. Click **Create table**.
##### Create a BigQuery table for the delta loads
These steps create a table for the delta loads of your BigQuery
dataset.
1. Access your Google Cloud project in the Google Cloud console.
2. Select **BigQuery.**
3. Click on the applicable dataset.
4. Click on **Create table**.
5. Enter Table name. For example, BQ_DELTA_LOAD.
6. Under **Schema,** toggle the setting to enable **Edit as text** mode.
7. Set the schema of the new table in BigQuery by copying and pasting the contents of the schema file that you created in [Create a schema file](https://docs.cloud.google.com/sap/docs/bigquery-replication-from-sap-apps.md.txt#create_a_schema_file).
8. In the JSON list in the schema file, right before the field definition
of the DI_SEQUENCE_NUMBER field, add the following DL_TIMESTAMP field
definition. This field stores the timestamp of each delta load execution):
```
{
"name": "DL_TIMESTAMP",
"type": "TIMESTAMP",
"mode": "REQUIRED",
"description": "Delta load timestamp"
},
```
9. Click **Create table**.
### Set up the data flow between SAP Data Services and BigQuery
To set up the data flow, you need to import the BigQuery tables
into SAP Data Services as external metadata and create the replication job and
the BigQuery loader data flow.
#### Import the BigQuery tables
These steps import the BigQuery tables that you created in the
previous step and make them available in SAP Data Services.
1. In the SAP Data Services Designer object library, open the BigQuery datastore that you created previously.
2. In the upper part of the right panel, select **External Metadata**. The BigQuery tables that you created appear.
3. Right-click the applicable BigQuery table name and select **Import**.
4. The import of the selected table into SAP Data Services starts. The table is now available in the object library under the target datastore node.
#### Create a replication job and the BigQuery loader data flow
These steps create a replication job and the data flow in SAP Data Services
that is used to load the data from SAP LT Replication Server to the
BigQuery table.
The data flow consists of two parts. The first executes the initial load of data
from the source ODP object(s) to the BigQuery table and the
second enables the subsequent delta loads.
##### Create a global variable
So that the replication job can determine whether to execute an initial load or
a delta load, you need to create a global variable to track the load type in the
data flow logic.
1. In the SAP Data Services Designer application menu, go to **Tools** \> **Variables**.
2. Right-click on **Global Variables** and select **Insert**.
3. Right-click on variable **Name** and select **Properties**.
4. Enter $INITLOAD in variable **Name**.
5. In **Data Type** , select **Int**.
6. Enter 0 in the **Value** field.
7. Click **OK**.
##### Create the replication job
1. Right-click on your project name in Project Explorer.
2. Select **New** \> **Batch Job**
3. **Fill in** the **Name** field. For example, JOB_SRS_DS_BQ_REPLICATION.
4. Click **Finish**.
##### Create data flow logic for the initial load
###### Create a conditional
1. Right-click on **Job Name** and select option **Add New** \> **Conditional**.
2. Right-click on the conditional icon and select **Rename**.
3. Change the name to **InitialOrDelta**.

4. Open the Conditional Editor by double-clicking on the conditional icon.
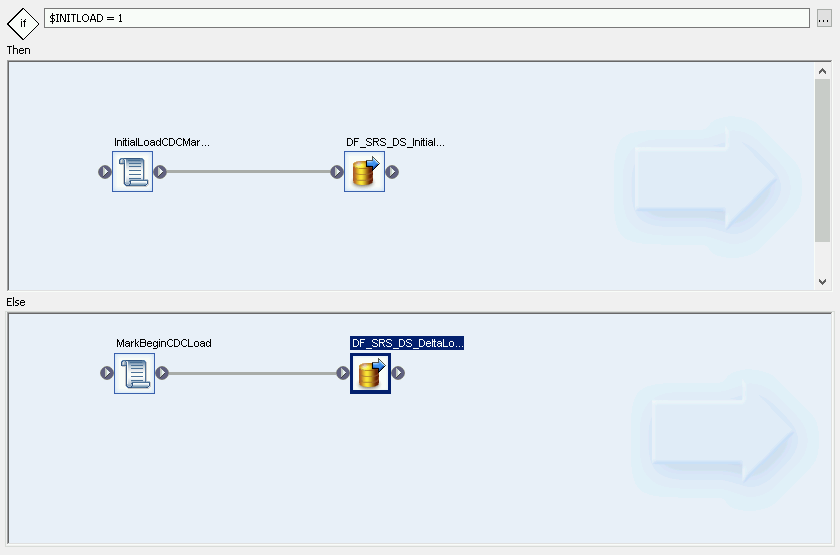
5. In the **If statement** field, enter $INITLOAD = 1, which sets the
condition to execute the initial load.
6. Right-click in the **Then** pane and select **Add New** \> **Script**.
7. Right-click on the **Script** icon and select **Rename**.
8. Change the name. For example, these instructions use InitialLoadCDCMarker.
9. Double-click on the **Script** icon to open the Function editor.
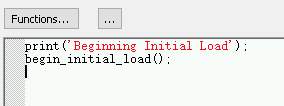
10. Enter `print('Beginning Initial Load');`
11. Enter `begin_initial_load();`
12. Click on the Back icon in the application toolbar to exit the
**Function Editor**.
###### Create a data flow for the initial load
1. Right-click in the **Then** pane and select **Add New** \> **Data Flow**.
2. Rename the data flow. For example, DF_SRS_DS_InitialLoad.
3. Connect InitialLoadCDCMarker with DF_SRS_DS_InitialLoad by clicking on the connection output icon of InitialLoadCDCMarker and then dragging the connection line to the input icon of DF_SRS_DS_InitialLoad.
4. Double-click on DF_SRS_DS_InitialLoad data flow.
###### Import and connect the data flow with the source datastore objects
1. From the datastore, drag and drop the source ODP object(s) onto the data flow workspace. In these instructions, the datastore is named DS_SLT. The name of your datastore might be different.
2. Drag **Query transform** from the **Platform** node in the **Transforms** tab of the object library onto the data flow.
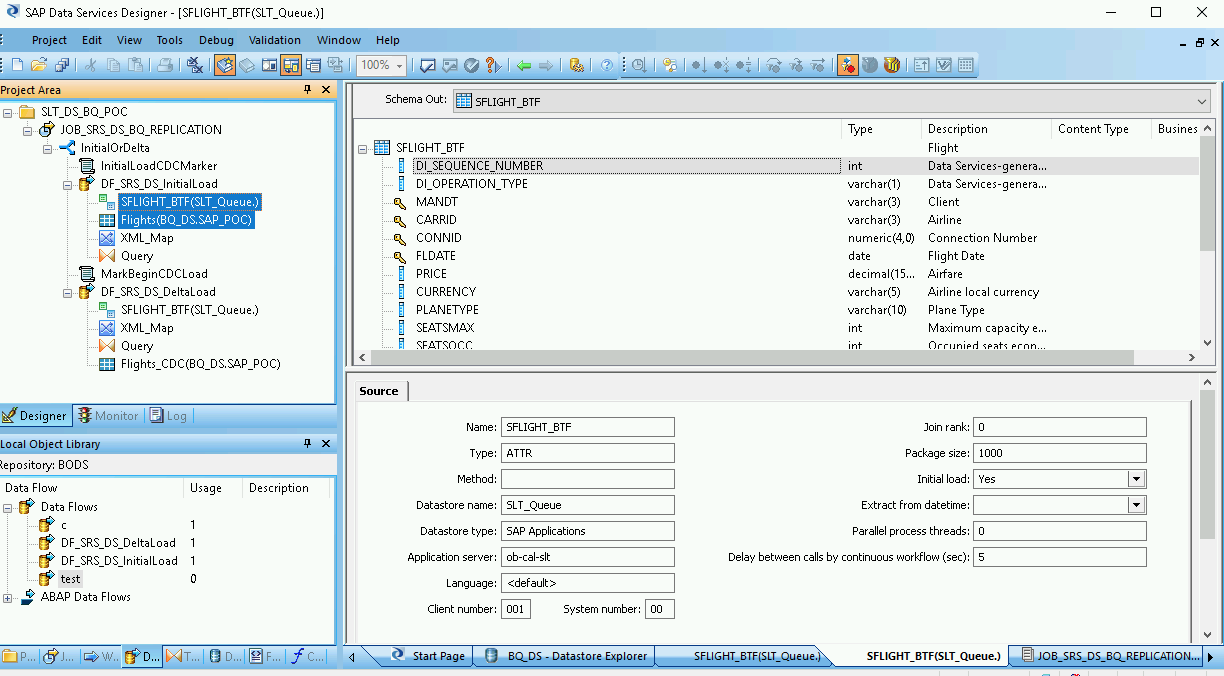
3. Double-click on the ODP object(s) and in **Source** tab set **Initial
Load** option to **Yes**.
[](https://docs.cloud.google.com/static/sap/docs/images/bigquery/bq-repl-from-sap-apps-sds-designer.png)
4. Connect all of the source ODP object(s) in the workspace to the **Query
transform**.
5. Double-click on **Query transform**.
6. Select all of the table fields under **Schema In** on the left and drag
them to **Schema Out** on the right.
> [!IMPORTANT]
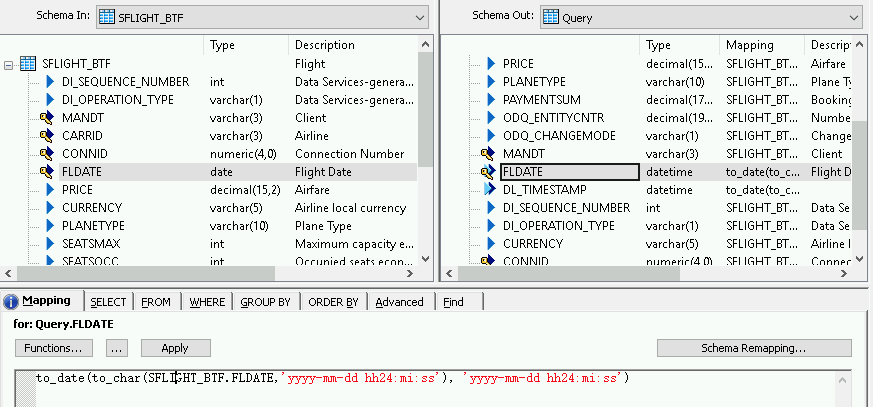
> **Important:** If the data type of a field is Datetime, you must add a conversion function to convert the datetime value that is used in SAP Data Services to the timestamp format that is used by BigQuery.
To add a conversion function for a datetime
field:
1. Select the datetime field in the **Schema Out** list on the right.
2. Select the **Mapping** tab below the schema lists.
3. Replace the field name with the following function:
to_date(to_char(FIELDNAME,'yyyy-mm-dd hh24:mi:ss'), 'yyyy-mm-dd hh24:mi:ss')
Where FIELDNAME is the name of the field you selected.
[](https://docs.cloud.google.com/static/sap/docs/images/bigquery/bq-repl-from-sap-apps-schemas-init.png)
7. Click on the Back icon in application toolbar to get back to the data flow.
###### Import and connect the data flow with the target datastore objects
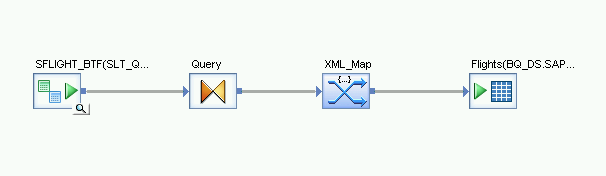
1. From the datastore in the object library, drag the imported BigQuery table for the **initial load** onto the data flow. The name of the datastore in these instructions is BQ_DS. Your datastore name might be different.
2. From the **Platform** node in the **Transforms** tab of the object library, drag an **XML_Map** transform onto the data flow.
3. Select **Batch mode** in the dialog.
4. Connect the **Query** transform to the **XML_Map** transform.
5. Connect the **XML_Map** transform to the imported
BigQuery table.
6. Open the **XML_Map** transform and complete the input and output schema
sections based on the data you are including in the BigQuery
table.
7. Double-click the BigQuery table in the workspace to open
it and complete the options in the **Target** tab as indicated in the
following table:
| **Option** | **Description** |
|---|---|
| **Make Port** | Specify **No** , which is the default.
Specifying **Yes** makes a source or target file an embedded data flow port. |
| **Mode** | Specify **Truncate** for the initial load, which replaces any existing records in the BigQuery table with the data loaded by SAP Data Services. **Truncate** is the default. |
| **Number of loaders** | Specify a positive integer to set the number of loaders (threads) to use for processing. The default is 4. Each loader starts one resumable load job in BigQuery. You can specify any number of loaders. For help determining an appropriate number of loaders, see the SAP documentation, including: - [SAP Data Services Sizing Guide](https://help.sap.com/doc/796ee6f713b64ce8aaca5b8bd06f9d4a/4.2.7/en-US/ds_42_sizing_en.pdf) - [The SAP Quicksizer tool](https://service.sap.com/quicksizer) - [The SAP Product Availability Matrix](https://service.sap.com/pam) |
| **Maximum failed records per loader** | Specify 0 or a positive integer to set the maximum number of records that can fail per load job before BigQuery stops loading records. The default is zero (0). |
1. Click on Validate icon in the top toolbar.
2. Click on the Back icon in application toolbar to return to the **Conditional** Editor.
##### Create a data flow for the delta load
You need to create a data flow to replicate the changed-data capture records
that accumulate after the initial load.
###### Create a conditional delta flow:
1. Double-click on the **InitialOrDelta** conditional.
2. Right-click in the **Else** section and select **Add New** \> **Script**.
3. Rename the script. For example, MarkBeginCDCLoad.
4. Double-click on the Script icon to open the Function editor.
5. Enter print('Beginning Delta Load');

6. Click on the Back icon in the application toolbar to return to the
Conditional Editor.
###### Create the data flow for the delta load
1. In the Conditional Editor, right-click and select **Add New** \> **Data
Flow**.
2. Rename data flow. For example, DF_SRS_DS_DeltaLoad.
3. Connect **MarkBeginCDCLoad** with **DF_SRS_DS_DeltaLoad**, as shown in following the diagram.
4. Double-click on the **DF_SRS_DS_DeltaLoad** data flow.
[](https://docs.cloud.google.com/static/sap/docs/images/bigquery/bq-repl-from-sap-apps-conditional-flows.png)
###### Import and connect the data flow with the source datastore objects
1. Drag and drop the source ODP object(s) from the datastore onto the data flow workspace. The datastore in these instructions uses the name DS_SLT. The name of your datastore might be different.
2. From the **Platform** node in the **Transforms** tab of the object library, drag the **Query** transform onto the data flow.
3. Double-click on the ODP object(s) and in the **Source** tab, set the **Initial Load** option to **No**.
4. Connect all of the source ODP object(s) in the workspace to the **Query** transform.
5. Double-click on **Query** transform.
6. Select all of the table fields in the Schema In list on the left and drag them to the Schema Out list on the right
###### Enable the timestamp for the delta loads
The following steps enable SAP Data Services to automatically record the
timestamp of each delta load execution in a field in the delta load table.
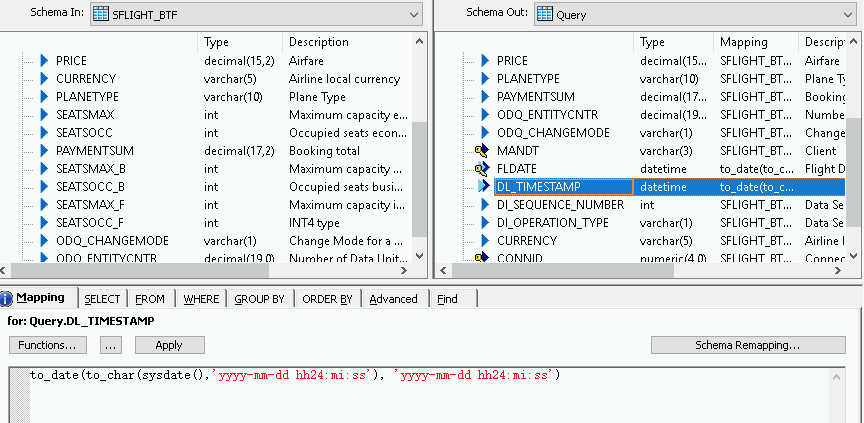
1. Right-click on the **Query** node in the Schema Out pane on the right.
2. Select **New Output Column**.
3. Enter DL_TIMESTAMP in **Name**.
4. Select datetime in **Data type**.
5. Click **OK**.
6. Click on newly created **DL_TIMESTAMP** field.
7. Go to **Mapping** tab below
8. Enter the following function:
- to_date(to_char(sysdate(),'yyyy-mm-dd hh24:mi:ss'), 'yyyy-mm-dd hh24:mi:ss')
[](https://docs.cloud.google.com/static/sap/docs/images/bigquery/bq-repl-from-sap-apps-schemas-delta.png)
###### Import and connect the data flow to the target datastore objects
1. From the datastore in the object library, drag the imported BigQuery table for the **delta load** onto the data flow workspace after the **XML_Map** transform. These instructions use the example datastore name **BQ_DS**. Your datastore name might be different.
2. From the **Platform** node in the **Transforms** tab of the object library, drag an **XML_Map** transform onto the data flow.
3. Connect **Query** transform to the **XML_Map** transform.
4. Connect the **XML_Map** transform to the imported
BigQuery table.
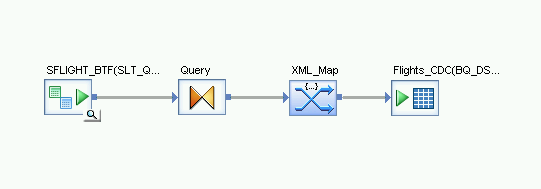
5. Open the **XML_Map** transform and complete the input and output schema
sections based on the data you are including in the BigQuery
table.
[](https://docs.cloud.google.com/static/sap/docs/images/bigquery/bq-repl-from-sap-apps-transform-editor.png)
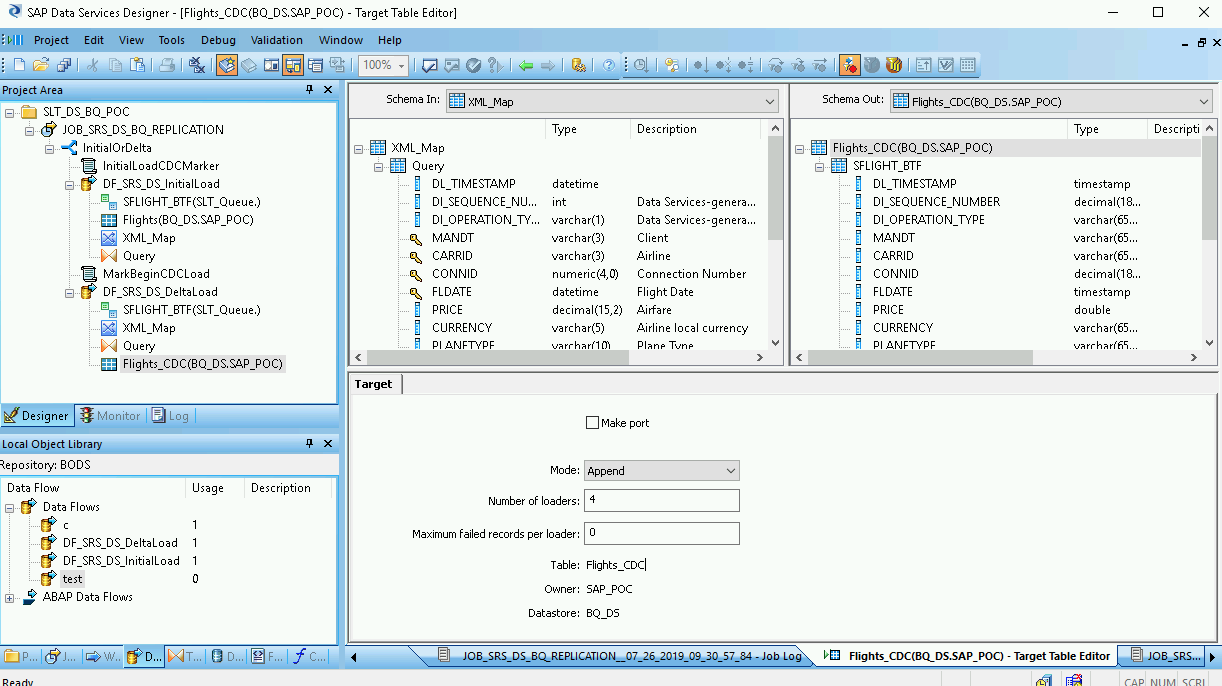
6. Double-click the BigQuery table in the workspace to open
it and complete the options in the **Target** tab based on the following
descriptions:
| **Option** | **Description** |
|---|---|
| **Make Port** | Specify **No** , which is the default.
Specifying **Yes** makes a source or target file an embedded data flow port. |
| **Mode** | Specify **Append** for the delta loads, which preserves the existing records in the BigQuery table when new records are loaded from SAP Data Services. |
| Number of loaders | Specify a positive integer to set the number of loaders (threads) to use for processing.
Each loader starts one resumable load job in BigQuery. You can specify any number of loaders. Generally, delta loads need fewer loaders than the initial load.
For help determining an appropriate number of loaders, see the SAP documentation, including:
- [SAP Data Services Sizing Guide](https://help.sap.com/doc/796ee6f713b64ce8aaca5b8bd06f9d4a/4.2.7/en-US/ds_42_sizing_en.pdf) - [The SAP Quick Sizer tool](https://service.sap.com/quicksizer) - [The SAP Product Availability Matrix](https://service.sap.com/pam) |
| Maximum failed records per loader | Specify 0 or a positive integer to set the maximum number of records that can fail per load job before BigQuery stops loading records. The default is zero (0). |
1. Click on Validate icon in the top toolbar.
2. Click on the Back icon in the application toolbar to return to the **Conditional** editor.
[](https://docs.cloud.google.com/static/sap/docs/images/bigquery/bq-repl-from-sap-apps-target-table-editor.png)
## Loading the data into BigQuery
The steps for an initial load and a delta load are similar. For each, you
start the replication job and execute the data flow in SAP Data Services to load
the data from SAP LT Replication Server to BigQuery. An important
difference between the two load procedures is the value of the $INITLOAD global
variable. For an initial load, $INITLOAD must be set to 1. For a delta load,
$INITLOAD must be 0.
### Execute an initial load
When you execute an initial load, all of the data in the source dataset is
replicated to the target BigQuery table that is connected to the
initial load data flow. Any data in the target table is overwritten.
1. In the SAP Data Services Designer, open Project Explorer.
2. Right-click on the replication job name and select **Execute**. A dialog displays.
3. In the dialog, go to the **Global Variable** tab and change the value of `$INITLOAD` to **1**, so that the initial load runs first.
4. Click **OK**. The loading process starts and debug messages start appearing in the SAP Data Services log. The data is loaded into the table that you created in BigQuery for initial loads. The name of the initial load table in these instructions is BQ_INIT_LOAD. The name of your table might be different.
5. To see if loading is complete, go to the Google Cloud console and open the BigQuery dataset that contains the table. If the data is still loading, "**Loading**" appears next to the table name.
After loading, the data is ready for processing in BigQuery.
From this point on, all changes in the source table are recorded in the SAP LT
Replication Server delta queue. To load the data from the delta queue to
BigQuery, execute a delta load job.
### Execute a delta load
When you execute a delta load, only the changes that occurred in source dataset
since the last load are replicated to the target BigQuery
table that is connected to the delta load data flow.
1. Right-click on the job name and select **Execute**.
2. Click **OK**. The loading process starts and debug messages begin to appear in the SAP Data Services log. The data is loaded into the table that you created in BigQuery for the delta loads. In these instructions, the name of the delta load table is BQ_DELTA_LOAD. The name of your table might be different.
3. To see if loading is complete, go to the Google Cloud console and open the BigQuery dataset that contains the table. If the data is still loading, "**Loading**" appears next to the table name.
4. After loading, the data is ready for processing in BigQuery.
To keep track of the changes to the source data, SAP LT Replication Server
records the order of changed-data operations in the DI_SEQUENCE_NUMBER column
and the type of changed-data operation in the DI_OPERATION_TYPE column
(D=delete, U=update, I=insert). SAP LT Replication Server stores the data in the
columns in the delta queue tables, from which it is replicated to
BigQuery.
## Scheduling delta loads
You can schedule a delta load job to run on at regular intervals by using the
SAP Data Services Management Console.
1. Open the SAP Data Services Management Console application.
2. Click on **Administrator**.
3. Expand the **Batch** node in the menu tree on the left side.
4. Click on the name of your SAP Data Services repository.
5. Click on the **Batch Job Configuration** tab.
6. Click on **Add Schedule**.
7. Fill in **Schedule name**.
8. Check **Active**.
9. In the **Select scheduled time for executing the jobs** section, specify the frequency for your delta load execution.
1. **Important** : Google Cloud limits the number of [BigQuery load jobs](https://docs.cloud.google.com/bigquery/docs/reference/rest/v2/jobs.md.txt) that you can run in a day. Make sure that your schedule does not exceed the limit, which cannot be raised. For more information about the limit for BigQuery load jobs, see [Quotas \& limits](https://docs.cloud.google.com/bigquery/quotas.md.txt#load_jobs) in the BigQuery documentation.
10. Expand **Global Variables** and check whether $INITLOAD is set to 0.
11. Click on **Apply**.
[](https://docs.cloud.google.com/static/sap/docs/images/bigquery/bq-repl-from-sap-apps-sds-mgmt-console.png)
## What's next
Query and analyze replicated data in BigQuery.
For more information about querying, see:
- [Overview of querying BigQuery data](https://docs.cloud.google.com/bigquery/docs/query-overview.md.txt) in the BigQuery documentation.
For some ideas about how to consolidate initial and delta load data in
BigQuery at scale, see:
- [Performing large-scale mutations in BigQuery](https://cloud.google.com/blog/products/gcp/performing-large-scale-mutations-in-bigquery) solution available in Google Cloud blog.
- [Data Manipulation Language](https://docs.cloud.google.com/bigquery/docs/reference/standard-sql/data-manipulation-language) in the BigQuery documentation.
Explore reference architectures, diagrams, and best practices about Google Cloud.
Take a look at our
[Cloud Architecture Center](https://docs.cloud.google.com/architecture).