This document is part of a series that discusses architectural patterns that
enterprises can use to optimize their cloud footprint at scale using Active
Assist. The tutorial shows you how to build an automation pipeline for Active
Assist recommendations that works with the GKE Enterprise toolchain. It's
intended for people who are using Config Sync to manage
their GKE Enterprise environments and
[Config Connector](https://docs.cloud.google.com/config-connector/docs/overview.md.txt)
to manage Google Cloud resources. The other parts of the series are as
follows:
- [Patterns for using Active Assist at scale](https://docs.cloud.google.com/recommender/docs/patterns-for-using-active-assist-at-scale.md.txt)
- [Using serverless pipelines with Active Assist](https://docs.cloud.google.com/recommender/docs/using-serverless-pipelines-with-active-assist)
- Using the GKE Enterprise toolchain with Active Assist (this document)
The automation pipeline that you build in this tutorial can help you to achieve
the following:
- Scaling the use of the Active Assist portfolio in your organization.
- Making Active Assist a part of your continuous integration and continuous delivery (CI/CD) pipeline.
- Controlling the review and actuation of Active Assist recommendations using constructs such as GitHub issues and pull requests.
This tutorial also uses
[kpt](https://googlecontainertools.github.io/kpt/),
an open source toolkit developed by Google to help you manage, manipulate,
customize, and apply Kubernetes resource configuration data files.
### Architecture
The following architectural diagram shows the components that you use in this
tutorial.
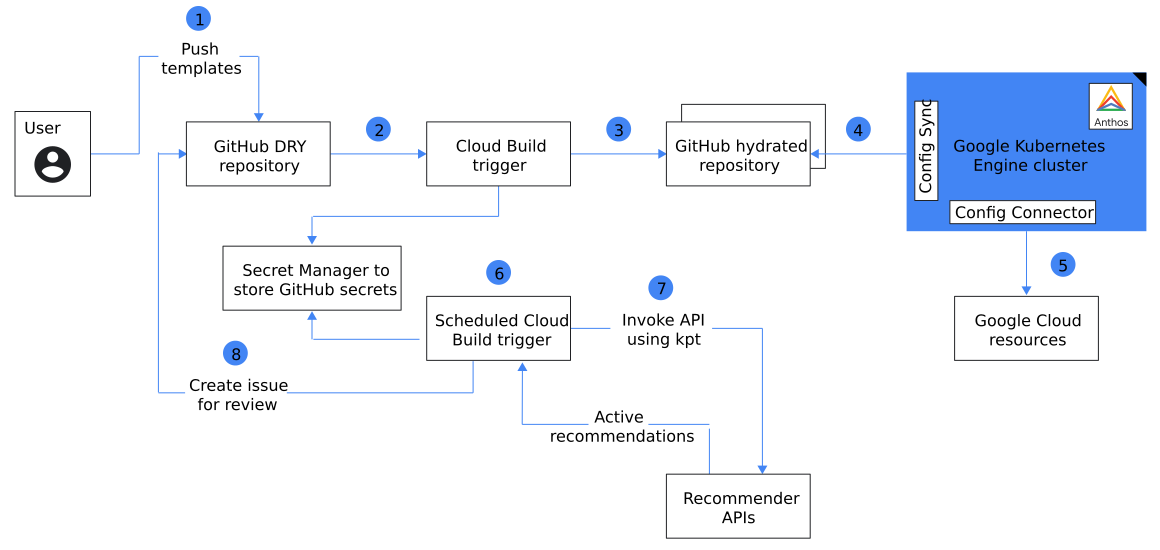
The components are used in the following ways:
- A GitHub [don't repeat yourself (DRY)](https://wikipedia.org/wiki/Don%27t_repeat_yourself) repository, which is used for Config Connector templates that you deploy across projects in your Google Cloud organization.
- One or more GitHub repositories which are specific to a project or environment and hold hydrated configuration files. These hydrated repositories are for the environments that Config Sync manages. They use Config Connector to actuate and manage Google Cloud resources in the Google Cloud organization.
- An GKE cluster that uses Config Sync for version control and drift detection. This cluster also has Config Connector installed. Config Connector enables the cluster to manage Google Cloud resources across the Google Cloud organization.
- A Cloud Build trigger that triggers a build when a template is pushed into the GitHub DRY repository.
- A scheduled Cloud Build trigger that triggers a build periodically. The build job uses a kpt function. The function invokes the Active Assist Recommender APIs to fetch active recommendations. It reviews and parses recommendations to determine if the Google Cloud resources that Config Connector manages need to be resized or optimized. The kpt function creates a GitHub issue in the DRY repository with the details of the recommended change if the Config Connector-managed Google Cloud resources need to be resized or optimized.
The workflow for this architecture is as follows:
1. Authorized teams with access to the DRY repository create and manage Config Connector templates in the repository.
2. A Cloud Build job is triggered when a template is created or modified and checked into the `main` branch.
3. The Cloud Build job hydrates the templates by invoking kpt setters. The job pushes the hydrated config files to the hydrated GitHub repository. [Secret Manager](https://docs.cloud.google.com/secret-manager) is used to store GitHub deployment keys for the private repository.
4. Config Sync monitors for changes to the hydrated repository and applies updates found in the repository to the managed cluster.
5. Config Connector monitors for changes and actuates Google Cloud resources if any resources need to be created or updated as a result of the [Kubernetes Resource Model (KRM)](https://cloud.google.com/blog/topics/developers-practitioners/build-platform-krm-part-1-whats-platform) changes applied by the Config Sync.
6. A scheduled Cloud Build trigger runs periodically to invoke the Recommender API to fetch active recommendations for the projects that Config Connector managed.
7. The scheduled Cloud Build job executes a custom kpt function to invoke the Recommender API and fetch and parse active recommendations.
8. The kpt function creates a GitHub issue that shows a comparison of the current resource configuration and the recommended configuration for the resource. With this approach, GitHub issues are created in the DRY repository, which makes it easier to keep track of repository changes.
## Objectives
- Create the following sample GitHub repositories:
- A DRY repository for Config Connector KRMs.
- A repository to hold hydrated configuration files generated using kpt setters.
- Create an GKE cluster with Config Sync and Config Connector.
- Create a sample kpt function to retrieve Active Assist recommendations for projects managed by Config Connector.
- Create a Cloud Build trigger that gets triggered when a template is pushed to the `main` branch of the DRY repository.
- Create a scheduled Cloud Build job that runs periodically to retrieve available Active Assist recommendations for the resources being managed by Config Connector.
- Test the end to end pipeline with the stub recommendations provided in the GitHub repository for this tutorial.
## Costs
In this document, you use the following billable components of Google Cloud:
- [Cloud Build](https://docs.cloud.google.com/cloud-build/pricing)
- [Cloud Run](https://docs.cloud.google.com/run/pricing)
- [Firestore](https://docs.cloud.google.com/firestore/pricing)
- [Pub/Sub](https://docs.cloud.google.com/pubsub/pricing)
- [Container Registry](https://docs.cloud.google.com/container-registry/pricing)
- [Cloud Scheduler](https://docs.cloud.google.com/scheduler/pricing)
- [Google Kubernetes Engine (GKE) Enterprise edition](https://docs.cloud.google.com/scheduler/pricing)
To generate a cost estimate based on your projected usage,
use the [pricing calculator](https://docs.cloud.google.com/products/calculator).
New Google Cloud users might be eligible for a [free trial](https://docs.cloud.google.com/free).
When you finish the tasks that are described in this document, you can avoid
continued billing by deleting the resources that you created. For more information, see
[Clean up](https://docs.cloud.google.com/recommender/docs/use-anthos-toolchain-with-active-assist.md.txt#clean-up).
## Before you begin
1. In the Google Cloud console, go to the project selector page.
[Go to project selector](https://console.cloud.google.com/projectselector2/home/dashboard)
2. Select or create a Google Cloud project.
**Roles required to select or create a project**
- **Select a project**: Selecting a project doesn't require a specific IAM role---you can select any project that you've been granted a role on.
- **Create a project** : To create a project, you need the Project Creator role (`roles/resourcemanager.projectCreator`), which contains the `resourcemanager.projects.create` permission. [Learn how to grant
roles](https://docs.cloud.google.com/iam/docs/granting-changing-revoking-access).
> [!NOTE]
> **Note**: If you don't plan to keep the resources that you create in this procedure, create a project instead of selecting an existing project. After you finish these steps, you can delete the project, removing all resources associated with the project.
3. Make a note of the Google Cloud project ID. You use this ID in the next section when you set up your environment. This project is referred to throughout the tutorial as the `build` project.
4.
Enable the
Cloud Build, Firestore, App Engine, Pub/Sub,
Cloud Run, Cloud Scheduler, and Cloud Source Repositories
APIs, if any are not already enabled.
**Roles required to enable APIs**
To enable APIs, you need the `serviceusage.services.enable` permission. If you
created the project, then you likely already have this permission through the
Owner role (`roles/owner`). Otherwise, you can get this permission through the
Service Usage Admin role (`roles/serviceusage.serviceUsageAdmin`).
[Learn how to grant roles](https://docs.cloud.google.com/iam/docs/granting-changing-revoking-access.md.txt).
[Enable the APIs](https://console.cloud.google.com/apis/enableflow?apiid=sourcerepo.googleapis.com,cloudscheduler.googleapis.com,%0Afirestore.googleapis.com,pubsub.googleapis.com,appengine.googleapis.com,run.googleapis.com,cloudbuild.googleapis.com)
You use the default application credentials for this tutorial. If you are prompted to create credentials on the **Add credentials to your
project** page, click **Cancel.**
5.
[Verify that billing is enabled for your Google Cloud project](https://docs.cloud.google.com/billing/docs/how-to/verify-billing-enabled.md.txt#confirm_billing_is_enabled_on_a_project).
### Setting up your environment
In this tutorial, you run all of the commands in Cloud Shell.
1.
In the Google Cloud console, activate Cloud Shell.
[Activate Cloud Shell](https://console.cloud.google.com/?cloudshell=true)
2. Set variables for the project ID and project number of the current `build`
Google Cloud project:
```bash
export RECO_MGR_PROJECT=PROJECT_ID
gcloud config set project $RECO_MGR_PROJECT
export RECO_MGR_PROJECT_NUMBER=$(gcloud projects describe $RECO_MGR_PROJECT --format='value(projectNumber)')
```
Replace `PROJECT_ID` with the
project ID that you noted in the previous section.
3. Set variables for the deployment region:
```bash
export REGION=us-central1
export ZONE=us-central1-a
```
4. Clone the repository that contains the code for the sample app used in
this tutorial:
```bash
git clone https://github.com/GoogleCloudPlatform/activeassist-anthos-toolchain.git
```
5. Go to the project directory:
```bash
cd activeassist-anthos-toolchain
```
## Build the pipeline
In this section, you create the components to build the
pipeline. Active Assist recommendations are generated based on
usage patterns and system metrics. Each recommendation category can use a
different default window of time to analyze usage data and metrics
based on which recommendations are generated. To test the end-to-end pipeline,
the repository that you cloned in an earlier step provides sample
recommendations (stubs) that you use to run the end-to-end pipeline.
Alternatively, if you are running the pipeline in a sample project that has
existing resources and recommendations, you can make appropriate changes to the
sample code and then run the pipeline.
### Set up sample private GitHub repositories
In the following sections, you set up the sample GitHub repositories for
this tutorial.
#### Set up a private DRY GitHub repository
1. Create a [private GitHub repository](https://docs.github.com/en/get-started/quickstart/create-a-repo) for the DRY repository. Make a note of the
name you give the repository.
2. In Cloud Shell, create an environment variable for your GitHub
username and the name of the DRY repository:
```bash
export REPO_OWNER=YOUR_GITHUB_USERNAME
export DRY_REPO_NAME=YOUR_PRIVATE_DRY_REPO
```
Replace the following:
- `YOUR_GITHUB_USERNAME`: your GitHub username.
- `YOUR_PRIVATE_DRY_REPO`: the name of your DRY repository.
3. Create a personal access token (PAT) to create issues in this
repository. The pipeline creates GitHub issues if there are
Active Assist recommendations that need to be reviewed. For
more information about creating PATs in GitHub, see the [GitHub documentation](https://docs.github.com/github/authenticating-to-github/keeping-your-account-and-data-secure/creating-a-personal-access-token).
When you set a **scope** for this token, select **Full control of private
repositories**.
4. In Cloud Shell, create an environment variable for the PAT that you
generated:
```bash
export GITHUB_TOKEN=YOUR_PERSONAL_ACCESS_TOKEN
```
Replace `YOUR_PERSONAL_ACCESS_TOKEN`
with your own token.
#### Set up a private hydrated GitHub repository
1. Create a [private GitHub repository](https://docs.github.com/get-started/quickstart/create-a-repo) for the hydrated repository.
Make a note of the name you give the repository.
2. In Cloud Shell, set an environment variable for the hydrated
repository:
```bash
export HYDRATED_REPO_NAME=YOUR_PRIVATE_HYDRATED_REPO
export HYDRATED_REPO='git@github.com:$REPO_OWNER/$HYDRATED_REPO_NAME.git'
```
Replace `YOUR_PRIVATE_HYDRATED_REPO`
with the name of your hydrated repository.
3. Create a deploy key pair:
```bash
ssh-keygen -t rsa -b 4096 \
-C 'active-assist-robot' \
-N '' \
-f $(pwd)/active-assist-robot
```
A deploy key lets you deploy to your private GitHub repository
when you run a Cloud Build job to hydrate config files.
4. Print the generated key:
```bash
cat $(pwd)/active-assist-robot.pub
```
5. Add the deploy key to the private GitHub repository. Make sure to select
**Allow write access** when you add the deploy key. To learn how to add
deploy keys to GitHub repositories, see the GitHub documentation for
[Managing deploy keys](https://docs.github.com/developers/overview/managing-deploy-keys#setup-2).
### Upload GitHub keys to Secret Manager
1. In Cloud Shell, create a secret to store the private key from the
deploy key pair:
```bash
gcloud secrets create github-ssh-key \
--data-file=$(pwd)/active-assist-robot
```
2. Create a secret to store the PAT:
```bash
echo $GITHUB_TOKEN | gcloud secrets create github-pat --data-file=-
```
### Create an GKE cluster
In this section, you create a GKE cluster with the Config Connector
add-on, create an identity, and configure Config Connector. You also configure
[Config Sync](https://docs.cloud.google.com/anthos-config-management/docs/config-sync-overview#the_nomos_command).
You can use Config Sync to create a common configuration across all
your infrastructure, including custom policies, and apply it both on-premises
and in the cloud. Config Sync evaluates changes and rolls
them out to all Kubernetes clusters so that your desired state is always
reflected in your clusters.
1. In Cloud Shell, create a new GKE cluster with the
[Config Connector add-on](https://docs.cloud.google.com/config-connector/docs/overview.md.txt)
enabled:
```bash
gcloud container clusters create sample-ops \
--machine-type n1-standard-4 \
--zone $ZONE \
--release-channel regular \
--addons ConfigConnector \
--workload-pool=$RECO_MGR_PROJECT.svc.id.goog \
--enable-stackdriver-kubernetes \
--enable-ip-alias
```
2. Complete the following sections in the
[Installing with the GKE add-on](https://docs.cloud.google.com/config-connector/docs/how-to/install-upgrade-uninstall.md.txt) guide, to create an identity and configure Config Connector.
1. [Creating an identity](https://docs.cloud.google.com/config-connector/docs/how-to/install-upgrade-uninstall.md.txt#identity)
2. [Configuring Config Connector](https://docs.cloud.google.com/config-connector/docs/how-to/install-upgrade-uninstall.md.txt#addon-configuring)
3. [Install Config Sync](https://docs.cloud.google.com/anthos-config-management/docs/how-to/installing-config-sync)
in the GKE cluster that you created. When you configure Config Sync, you must do the following:
1. Use a [token](https://docs.cloud.google.com/anthos-config-management/docs/how-to/installing-config-sync#token) to [grant Config Sync read-only access to Git](https://docs.cloud.google.com/anthos-config-management/docs/how-to/installing-config-sync#git-creds-secret). Use the GitHub token that you [created when you set up a private DRY GitHub repository](https://docs.cloud.google.com/recommender/docs/use-anthos-toolchain-with-active-assist.md.txt#set_up_a_private_dry_github_repository). The token is available through the `$GITHUB_TOKEN` environment variable.
2. [Configure Config Sync using gcloud](https://docs.cloud.google.com/anthos-config-management/docs/how-to/installing-config-sync). Set the following settings:
1. **sourceFormat** : `hierarchy`
2. **syncRepo** : `https://github.com/YOUR_GITHUB_USERNAME/YOUR_PRIVATE_HYDRATED_REPO`
3. **syncBranch** : `main`
4. **secretType** : `token`
5. **policyDir**: Don't fill in this option
### Create a Cloud Build trigger to push to the hydrated repository
In the following sections, you create a Cloud Build trigger that is
triggered when templates are pushed to the main branch of your `YOUR_PRIVATE_DRY_REPO`
repository. This trigger runs the steps that hydrate the config-as-data KRM
templates in the `YOUR_PRIVATE_DRY_REPO`
repository and pushes the hydrated configuration files to your `YOUR_PRIVATE_HYDRATED_REPO`
repository.
#### Connect Cloud Build to your GitHub repositories
In this section, you
[connect](https://docs.cloud.google.com/build/docs/automating-builds/build-repos-from-github#installing_the_google_cloud_build_app)
the `YOUR_PRIVATE_DRY_REPO`
and `YOUR_PRIVATE_HYDRATED_REPO`
GitHub repositories to Cloud Build.
1. Go to the GitHub marketplace page for the Cloud Build app.
[Go to the Cloud Build app page](https://github.com/marketplace/google-cloud-build)
2. Click **Setup with Google Cloud Build**.
3. If prompted, sign in to GitHub.
4. Select **Only select repositories**.
Use the **Select repositories** drop-down to enable access to your
`YOUR_PRIVATE_DRY_REPO`
and `YOUR_PRIVATE_HYDRATED_REPO`
repositories through the Cloud Build app.
5. Click **Install**.
6. Sign in to Google Cloud. The **Authorization** page is displayed and
you are prompted to authorize the **Google Cloud Build** app to connect
to Google Cloud.
7. Click **Authorize Google Cloud Build by GoogleCloudBuild**.
You are redirected to the Google Cloud console.
8. Select your Google Cloud project.
9. Select the consent checkbox and click **Next**.
10. Click **Install**.
11. Sign in to Google Cloud. The **Authorization** page is displayed and
you are prompted to authorize the **Google Cloud Build** app to connect
to Google Cloud.
12. Click **Authorize Google Cloud Build by GoogleCloudBuild**.
You are redirected to the Google Cloud console.
13. Select your Google Cloud project.
14. Select the consent checkbox and click **Next**.
15. In the **Select repository** page that appears, select the following GitHub
repositories:
- `YOUR_PRIVATE_DRY_REPO`
- `YOUR_PRIVATE_HYDRATED_REPO`
16. Click **Connect** and then click **Done**.
#### Create a Cloud Build trigger for the DRY repository
1. In Cloud Shell, run the following command:
```bash
envsubst < cloudbuild.template.yaml > cloudbuild.yaml
```
The command generates a `cloudbuild.yaml` file.
2. Create the trigger:
```bash
gcloud beta builds triggers create github \
--name ActiveAssistDemo \
--repo-name=$DRY_REPO_NAME \
--repo-owner=$REPO_OWNER \
--branch-pattern="main" \
--build-config=cloudbuild.yaml
```
3. Give the Cloud Build service account permission to access
Secret Manager:
```bash
gcloud secrets add-iam-policy-binding github-ssh-key \
--member="serviceAccount:${RECO_MGR_PROJECT_NUMBER}@cloudbuild.gserviceaccount.com" \
--role="roles/secretmanager.secretAccessor"
gcloud secrets add-iam-policy-binding github-pat \
--member="serviceAccount:${RECO_MGR_PROJECT_NUMBER}@cloudbuild.gserviceaccount.com" \
--role="roles/secretmanager.secretAccessor"
```
## Create a scheduled Cloud Build trigger for Active Assist recommendations
> [!NOTE]
> **Note:** You use stubs to test the pipeline in this tutorial. When you use the pipeline for your Google Cloud projects, make sure to give the Cloud Build service account the [permissions](https://docs.cloud.google.com/recommender/docs/overview#granting_permissions_to_view_and_update_recommendations_and_insights) that it needs to fetch Active Assist recommendations.
In the following sections, you create a scheduled Cloud Build trigger
that runs periodically. This trigger fetches Active Assist
recommendations using a kpt function and determines if there are any active
recommendations for the resources in your
`YOUR_PRIVATE_HYDRATED_REPO`
repository. The kpt function also creates a GitHub issue in your
`YOUR_PRIVATE_HYDRATED_REPO`
repository if there are active recommendations for resource configuration that
need to be reviewed and actuated.
### Generate a Cloud Build image
In this section, you generate a
[Cloud Build](https://docs.cloud.google.com/cloud-build/docs/cloud-builders)
image that has kpt, [gh](https://github.com/cli/cli),
and Node components.
1. In Cloud Shell, build and push a Docker image to
[Container Registry](https://docs.cloud.google.com/container-registry):
```bash
gcloud auth configure-docker
docker build -t gcr.io/$RECO_MGR_PROJECT/kpt-dev-gh:1 ./recommender-kpt-function
docker push gcr.io/$RECO_MGR_PROJECT/kpt-dev-gh:1
```
### Create a Cloud Build trigger for your hydrated repo
1. In Cloud Shell, create the configuration file needed to set up the scheduled
Cloud Build trigger:
```bash
envsubst < cloudbuild-scheduled-recommendations.template.yaml > cloudbuild-scheduled-recommendations.yaml
```
2. Create the Cloud Build trigger:
```bash
gcloud beta builds triggers create github \
--name ActiveAssistScheduledRecommendations \
--repo-name=YOUR_PRIVATE_HYDRATED_REPO \
--repo-owner=$REPO_OWNER \
--branch-pattern="main" \
--build-config=cloudbuild-scheduled-recommendations.yaml
```
3. Get the ID of this trigger:
```bash
export TRIGGER_ID=`gcloud beta builds triggers describe \
ActiveAssistScheduledRecommendations \
--format="value(id)"`
```
### Create a Cloud Scheduler job to invoke your trigger
1. In Cloud Shell, create a service account:
```bash
gcloud iam service-accounts create build-invoker \
--description "Service Account used by Cloud Scheduler to invoke the sample scheduled Cloud Build job" \
--display-name "recommender-scheduler-sa" \
--project $RECO_MGR_PROJECT
```
Cloud Scheduler jobs use this service account to run the
`recommender-parser` service.
2. Give the service account the permissions to invoke a
Cloud Build job:
```bash
gcloud projects add-iam-policy-binding $RECO_MGR_PROJECT \
--member serviceAccount:build-invoker@$RECO_MGR_PROJECT.iam.gserviceaccount.com \
--role roles/cloudbuild.builds.editor \
--project $RECO_MGR_PROJECT
gcloud projects add-iam-policy-binding $RECO_MGR_PROJECT \
--member serviceAccount:build-invoker@$RECO_MGR_PROJECT.iam.gserviceaccount.com \
--role roles/serviceusage.serviceUsageConsumer \
--project $RECO_MGR_PROJECT
```
3. Create a Cloud Scheduler job to invoke the trigger that you
created in the previous step:
```bash
gcloud scheduler jobs create http scheduled-build \
--project $RECO_MGR_PROJECT \
--time-zone "America/Los_Angeles" \
--schedule="0 */3 * * *" \
--uri="https://cloudbuild.googleapis.com/v1/projects/${RECO_MGR_PROJECT}/triggers/${TRIGGER_ID}:run" \
--description="Scheduler job to invoke Cloud Build" \
--oauth-service-account-email="build-invoker@$RECO_MGR_PROJECT.iam.gserviceaccount.com" \
--headers="Content-Type=application/json" \
--http-method="POST" \
```
Select `Y` if your see the following message:
`There is no App Engine app in the project.`
If you are prompted to choose the region where you want your
App Engine application located, select the `us-central` region.
### Commit and push the Cloud Build configuration files to GitHub
Push the two Cloud Build configuration files that you created to your
`YOUR_PRIVATE_DRY_REPO`
repository:
```bash
git remote add dry https://github.com/$REPO_OWNER/$DRY_REPO_NAME.git
git add cloudbuild.yaml
git add cloudbuild-scheduled-recommendations.yaml
git commit -m "Added cloudbuild configuration YAMLs"
git push dry main
```
You might be prompted to enter your GitHub credentials when you push to
your private repository.
### Review the outcome of the Cloud Build job
When you commit and push changes to your
`YOUR_PRIVATE_DRY_REPO` repository, the
Cloud Build job is triggered. If the Cloud Build job runs
successfully, several resources are created. In this section, you verify whether
the resources are created after the Cloud Build job completes.
1. In Cloud Shell, in your `sample-ops` cluster, validate that you
have a namespace called `activeassist-kcc`:
```bash
kubectl get ns | grep activeassist-kcc
```
2. Config Connector deploys a running sample Compute Engine instance to
your `PROJECT_ID`
project.
Validate that the Compute Engine instance is in the project:
```bash
gcloud compute instances list | grep \
computeinstance-sample-cloudmachine
```
The `MACHINE_TYPE` type for this machine is `n1-standard-1`.
## Run end-to-end tests
To let you test the end-to-end pipeline, the repository that you cloned for this
tutorial provides sample recommendations (stubs). You use these stubs to run the
end-to-end pipeline. The stub imitates an Active Assist
recommendation payload and has a recommendation to change the machine type for
the compute engine instance that was deployed from the `n1-standard-1` instance
type to the `g1-small` instance type.
In this section, you invoke the scheduled Cloud Build trigger
manually to run the job that uses a kpt function to fetch
Active Assist recommendations. You also verify that a GitHub
issue is created in your `YOUR_PRIVATE_DRY_REPO`
repository.
1. Open the **Build Triggers page** in the Google Cloud console.
[Open the Build Triggers page](https://console.cloud.google.com/cloud-build/triggers)
2. Select the `ActiveAssistScheduledRecommendations` trigger.
3. To manually test the trigger, click **Run** on the entry for your trigger on
the triggers list.
The trigger creates a GitHub issue in your
`YOUR_PRIVATE_DRY_REPO`
repository. The issue is similar to the following:
```bash
gcloud auth configure-docker
docker build -t gcr.io/$RECO_MGR_PROJECT/kpt-dev-gh:1 ./recommender-kpt-function
docker push gcr.io/$RECO_MGR_PROJECT/kpt-dev-gh:1
```
In the sample issue, the kpt function output shows that the current
`MACHINE_TYPE` type for the Compute Engine
instance is `n1-standard-1` type. The Active Assist
recommendation is to change it to a `g1-small` type.
Version control reviewers in your enterprise can review automated GitHub
issues and action them as appropriate for your enterprise.
## Clean up
To avoid incurring charges to your Google Cloud account for the resources used in this
tutorial, either delete the project that contains the resources, or keep the project and
delete the individual resources.
> [!CAUTION]
> **Caution** : Deleting a project has the following effects:
>
> - **Everything in the project is deleted.** If you used an existing project for the tasks in this document, when you delete it, you also delete any other work you've done in the project.
> - **Custom project IDs are lost.** When you created this project, you might have created a custom project ID that you want to use in the future. To preserve the URLs that use the project ID, such as an `appspot.com` URL, delete selected resources inside the project instead of deleting the whole project.
1. In the Google Cloud console, go to the **Manage resources** page.
[Go to Manage resources](https://console.cloud.google.com/iam-admin/projects)
2. In the project list, select the project that you want to delete, and then click **Delete**.
3. In the dialog, type the project ID, and then click **Shut down** to delete the project.
## What's next
- Learn more about Google Cloud [serverless](https://docs.cloud.google.com/serverless) technologies.
- Read about how to [integrate Policy Intelligence recommendations into an Infrastructure as Code (IaC) pipeline](https://cloud.google.com/blog/products/devops-sre/how-to-integrate-policy-intelligence-recommendations-into-an-iac-pipeline).