> [!NOTE]
>
>
> This feature is
>
> subject to the "Pre-GA Offerings Terms" in the General Service Terms section of the
> [Service Specific
> Terms](https://docs.cloud.google.com/terms/service-terms#1).
>
> Pre-GA features are available "as is" and might have limited support.
>
> For more information, see the
> [launch stage descriptions](https://cloud.google.com/products/#product-launch-stages).
This page describes how to configure Multi-factor authentication (MFA) that lets
you verify your users' identity by sending a verification code by email.
With this feature, you can verify that your users own the email address that is
associated with their account. MFA can help protect your users against
credential stuffing attacks and account takeovers (ATOs).
MFA is available for score-based keys and is not available for checkbox keys.
> [!NOTE]
> **Note:** MFA is not supported in Android and iOS SDKs.
## Understand the configuration process of MFA
The MFA feature of reCAPTCHA is implemented on top of the regular
[reCAPTCHA](https://docs.cloud.google.com/recaptcha/docs/implementation-workflow.md.txt)
workflow.
At a high level, the MFA workflow is as follows:
1. [Instrument the critical workflow on your website](https://docs.cloud.google.com/recaptcha/docs/integrate-account-verification.md.txt#instrument_client).
2. [Create an assessment](https://docs.cloud.google.com/recaptcha/docs/create-assessment-website.md.txt) by using the token that is returned by the `execute()` call and the MFA parameters to obtain an MFA `requestToken`.
3. [Trigger an MFA challenge](https://docs.cloud.google.com/recaptcha/docs/integrate-account-verification.md.txt#trigger_challenge) with the `requestToken` according to the channel that you want to use (only email supported).
4. [Verify the PIN entered by the end user](https://docs.cloud.google.com/recaptcha/docs/integrate-account-verification.md.txt#verify_challenge) on your website.
5. [Create a new assessment](https://docs.cloud.google.com/recaptcha/docs/integrate-account-verification.md.txt#request_new_assessment) by using the token that is returned in the verification request.
## Before you begin
> [!IMPORTANT]
> **Important:** There are strict [Quotas](https://docs.cloud.google.com/recaptcha/quotas.md.txt) for MFA by default, both per second and per day. If you need to increase quota limits during or after implementation, contact [reCAPTCHA Enterprise Support](https://docs.cloud.google.com/recaptcha/docs/getting-support.md.txt) with a sufficient notice period. Email quota changes can usually be made with at least a week's notice.
1.
[Prepare your environment for Google Cloud Fraud Defense](https://docs.cloud.google.com/recaptcha/docs/prepare-environment.md.txt).
2. MFA is accessible after a security review, which is initiated when you add
a billing account to your project.
[Add a billing account](https://docs.cloud.google.com/billing/docs/how-to/create-billing-account.md.txt) to
onboard your site to this feature.
3. If you want to enable the email verification feature of MFA, do the following:
> [!NOTE]
> **Note:** We highly encourage you to provide end users multiple verification methods, such as contacting customer support to verify their account, to prevent the possibility of them being unable to access their accounts because MFA is unavailable.
1. In the Google Cloud console, go to the **reCAPTCHA** page.
[Go to reCAPTCHA](https://console.cloud.google.com/security/recaptcha)
2. Verify that the name of your project appears in the resource selector.
If you don't see the name of your project, click the resource selector,
then select your project.
3. Click **Settings**.
4. In the **Multi Factor Authentication** pane, click **Configure**.
5. In the **Configure MFA** dialog, do the following:
1. To enable email verification, click the **Enable email** toggle.
2. In the **Sender name** box, enter your name.
3. In the **Sender email** box, enter your email address.
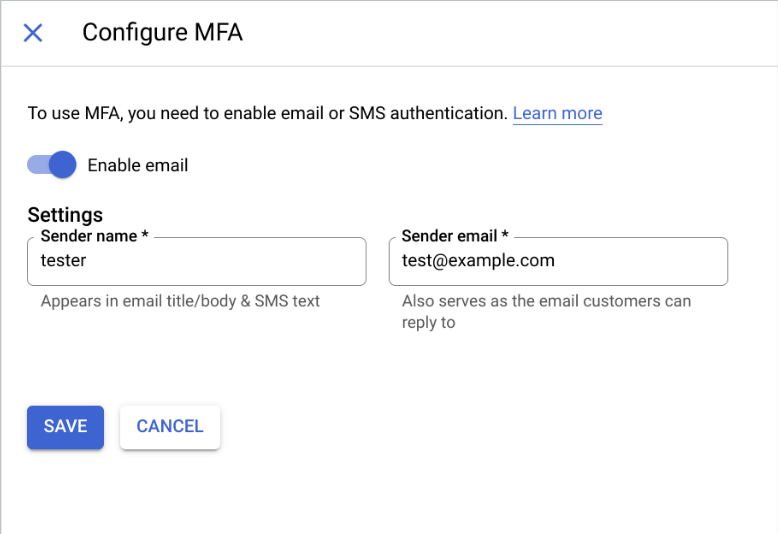
6. Click **Save**.
> [!NOTE]
> **Note:** By default, the email sent out is generic and unbranded. If you need to brand or customize this email, contact your assigned technical specialist.
4. After you have configure your sender email address, configure your DNS
records to avoid delivery issues. In the following steps, replace
`example.com` with your domain.
1. Add an [SPF](https://support.google.com/a/answer/33786) record to allow
reCAPTCHA to send emails on your behalf:
Host: example.com
Value: v=spf1 include:_spf.recaptchamail.goog ~all
2. Include the following CNAME entries for the servers to find the
[DKIM](https://support.google.com/a/answer/174124) signature:
Host: recaptcha1._domainkey.example.com
Value: recaptcha1._domainkey.recaptchamail.goog.
Host: recaptcha2._domainkey.example.com
Value: recaptcha2._domainkey.recaptchamail.goog.
5. [Set up reCAPTCHA on your website by using score-based keys](https://docs.cloud.google.com/recaptcha/docs/setup-overview-web.md.txt).
## Instrument the critical workflow on your website
Pass the necessary information to reCAPTCHA through the
`execute()` function for the risk assessment. The `execute()` function returns
a promise that is resolved upon token generation.
Append an additional `twofactor` parameter to your `execute()`
function as shown in the following sample code:
```javascript
grecaptcha.enterprise.execute(KEY_ID, {
action: 'login',
twofactor: true
}).then(token => {
// Handle the generated token.
});
```
Replace KEY_ID with the score-based key that
you created for your website.
## Create an assessment
With the token that is generated by the `execute()`
function, create an assessment by using either the reCAPTCHA
Client Libraries or the REST API from your backend.
This document shows how to create an assessment for MFA using the REST API.
To learn how to create an assessment using Client Libraries, see [Create assessments for websites](https://docs.cloud.google.com/recaptcha/docs/create-assessment-website.md.txt).
Before you create an assessment, do the following:
-
Set up authentication to Fraud Defense.
The authentication method you choose depends on the environment where
Fraud Defense is set up. The following table helps you choose the
appropriate authentication method and the supported interface to set up
authentication:
| Environment | Interface | Authentication method |
|---|---|---|
| Google Cloud | - REST - Client libraries | Use [attached service accounts](https://docs.cloud.google.com/recaptcha/docs/authentication.md.txt#on-gcp). |
| On-premises or a different cloud provider | REST | Use [API keys](https://docs.cloud.google.com/docs/authentication/api-keys.md.txt) or [Workload Identity Federation](https://docs.cloud.google.com/docs/authentication/set-up-adc-on-premises.md.txt). If you want to use API keys, then we recommend securing the API keys by [applying API key restrictions](https://docs.cloud.google.com/docs/authentication/api-keys.md.txt#api_key_restrictions). |
| On-premises or a different cloud provider | Client libraries | Use the following: - For Python or Java, use [API keys](https://docs.cloud.google.com/docs/authentication/api-keys.md.txt) or [Workload Identity Federation](https://docs.cloud.google.com/docs/authentication/set-up-adc-on-premises.md.txt). If you want to use API keys, then we recommend securing the API keys by [applying API key restrictions](https://docs.cloud.google.com/docs/authentication/api-keys.md.txt#api_key_restrictions). - For other languages, use [Workload Identity Federation](https://docs.cloud.google.com/docs/authentication/set-up-adc-on-premises.md.txt). |
-
Choose a stable account identifier `accountId` that is not often changed by the user
and provide it to the assessment in the
[`projects.assessments.create`](https://docs.cloud.google.com/recaptcha/docs/reference/rest/v1/projects.assessments/create.md.txt) method. This stable account identifier should have the
same value for all the events related to the same user. You can provide the following as the account
identifier:
### User identifiers
If every account can be uniquely associated with a stable username, email address, or phone
number, you can use it as the `accountId`. When you provide such cross-site
identifiers (identifiers that can be reused across sites), Fraud Defense uses this
information to improve protection for your user accounts based on cross-site models by
flagging abusive account identifiers and using knowledge of cross-site abuse patterns related
to these identifiers.
Alternatively, if you have an internal user ID uniquely associated with each account, you can
provide it as the `accountId`.
### Hashed or encrypted
If you do not have an internal user ID uniquely associated with each account, you can turn
any stable identifier into an opaque, site-specific account identifier. This identifier is
still needed for Fraud Defense account defender to understand user activity
patterns and detect anomalous behaviour, but it is not shared across other sites.
Pick any stable account identifier and make it opaque before sending to Fraud Defense by
using encryption or hashing:
- encryption (recommended): encrypt the account identifier using a deterministic
encryption method that produces a stable ciphertext. For detailed instructions, see
[encrypt data
deterministically](https://developers.google.com/tink/deterministic-encryption). When you choose symmetric encryption over hashing, you don't need to
keep a mapping between your user identifiers and the corresponding opaque user identifiers.
Decrypt the opaque identifiers that are returned by Fraud Defense to turn them into the
user identifier.
- hashing: we recommend hashing the account identifier using the SHA256-HMAC method with
a custom salt of your choice. Because hashes are one-way only, you need to keep a mapping
between the generated hashes and your user identifiers so that you can map the hashed
account identifier that are returned back to the original accounts.
Add the `accountId` parameter and an endpoint, such as an email address to
verify in the assessment in the [`projects.assessments.create`](https://docs.cloud.google.com/recaptcha/docs/reference/rest/v1/projects.assessments/create.md.txt) method.
Before using any of the request data,
make the following replacements:
- PROJECT_ID: your Google Cloud project ID.
- TOKEN: token returned from the `grecaptcha.enterprise.execute()` call.
- KEY_ID: the score-based key that you installed on your website.
- ACCOUNT_ID: an identifier for a user account that is unique to your website.
- EMAIL_ID: the email address for which the verification request needs to be triggered.
HTTP method and URL:
```
POST https://recaptchaenterprise.googleapis.com/v1/projects/PROJECT_ID/assessments
```
Request JSON body:
```
{
"event": {
"token": "TOKEN",
"siteKey": "KEY_ID",
"userInfo": {
"accountId": "ACCOUNT_ID"
}
}
"accountVerification": {
"endpoints": [{
"emailAddress": "EMAIL_ID",
}]
}
}
```
To send your request, choose one of these options:
#### curl
> [!NOTE]
> **Note:** The following command assumes that you have logged in to the `gcloud` CLI with your user account by running [`gcloud init`](https://docs.cloud.google.com/sdk/gcloud/reference/init) or [`gcloud auth login`](https://docs.cloud.google.com/sdk/gcloud/reference/auth/login.md.txt) , or by using [Cloud Shell](https://docs.cloud.google.com/shell/docs.md.txt), which automatically logs you into the `gcloud` CLI . You can check the currently active account by running [`gcloud auth list`](https://docs.cloud.google.com/sdk/gcloud/reference/auth/list.md.txt).
Save the request body in a file named `request.json`,
and execute the following command:
```
curl -X POST \
-H "Authorization: Bearer $(gcloud auth print-access-token)" \
-H "Content-Type: application/json; charset=utf-8" \
-d @request.json \
"https://recaptchaenterprise.googleapis.com/v1/projects/PROJECT_ID/assessments"
```
#### PowerShell
> [!NOTE]
> **Note:** The following command assumes that you have logged in to the `gcloud` CLI with your user account by running [`gcloud init`](https://docs.cloud.google.com/sdk/gcloud/reference/init) or [`gcloud auth login`](https://docs.cloud.google.com/sdk/gcloud/reference/auth/login.md.txt) . You can check the currently active account by running [`gcloud auth list`](https://docs.cloud.google.com/sdk/gcloud/reference/auth/list.md.txt).
Save the request body in a file named `request.json`,
and execute the following command:
```
$cred = gcloud auth print-access-token
$headers = @{ "Authorization" = "Bearer $cred" }
Invoke-WebRequest `
-Method POST `
-Headers $headers `
-ContentType: "application/json; charset=utf-8" `
-InFile request.json `
-Uri "https://recaptchaenterprise.googleapis.com/v1/projects/PROJECT_ID/assessments" | Select-Object -Expand Content
```
You should receive a JSON response similar to the following:
```
{
[...],
"accountVerification": {
"endpoints": [{
"emailAddress": "foo@bar.com",
"requestToken": "tplIUFvvJUIpLaOH0hIVj2H71t5Z9mDK2RhB1SAGSIUOgOIsBv",
"lastVerificationTime": "",
}],
"latestVerificationResult": "RESULT_UNSPECIFIED"
}
}
```
The assessment contains the date and time of the latest successful verification
for the given endpoints on the device that issued the token, if any. It also
contains one `requestToken` field per endpoint, which contains an encrypted
string. If you decide to trigger an MFA challenge for that endpoint, you must
send this encrypted string back to the web page. The request tokens are valid
for 15 minutes.
## Recommended actions
If you have [reCAPTCHA Account defense](https://docs.cloud.google.com/recaptcha/docs/account-defender.md.txt)
enabled for your project, the assessment response contains information related
to Account defense in addition to the information related to MFA. The
`recommended_action` field shows the possible action you can take before
triggering the MFA challenge.
The following example shows a sample assessment that shows skip MFA as the
recommended action:
```json
{
[...],
"accountDefenderAssessment": {
labels: ["PROFILE_MATCH"],
"recommended_action": "SKIP_2FA"
}
}
```
The `recommended_action` field can have any of the following values:
| Value | Description |
|---|---|
| `RECOMMENDED_ACTION_UNSPECIFIED` | Indicates that Account defense was not able to make a judgment for this request. |
| `SKIP_2FA` | Indicates that Account defense considers it is safe to skip MFA for this assessment. This usually means that the user has been verified recently for your site on this device. |
| `REQUEST_2FA` | Indicates that you trigger an MFA challenge for the user. For more information, see [Account defense assessment response](https://docs.cloud.google.com/recaptcha/docs/account-defender.md.txt#interpret-assessment-details). |
## Trigger an MFA challenge on your website
To challenge the user based on the information contained in
the assessment, send the MFA `requestToken` for the endpoint you want to
verify from the assessment back to the web page.
Trigger the MFA challenge with a call to `challengeAccount()`.
The `challengeAccount()` function returns a promise that is resolved after the
challenge is completed, or rejected if there was an error or timeout.
Upon completion, a new token that contains updated information is generated,
which is then sent for assessment.
To trigger an MFA challenge, do the following:
1. Test the MFA integration.
Trigger an MFA challenge with a
call to the `challengeAccount()` by providing the following values:
- KEY_ID: the score-based key that you installed on your website.
- REQUEST_TOKEN_FROM_ASSESSMENT: value of the `requestToken` field from the assessment response.
- CONTAINER_HTML_COMPONENT_ID: ID of the HTML component in which the verification challenge must be rendered. If you don't specify this parameter, then the challenge is rendered in an overlay on top of the page.
The following example shows how to trigger the MFA challenge with a
call to `challengeAccount()`:
```javascript
grecaptcha.enterprise.challengeAccount(KEY_ID, {
'account-token': REQUEST_TOKEN_FROM_ASSESSMENT,
'container': CONTAINER_HTML_COMPONENT_ID
}).then(newToken => {
// Handle the new token.
});
```
If the `challengeAccount()` request is successful, the HTML component is
displayed to enter the PIN received. After the correct PIN is entered, the
`newToken` variable is passed to the chained function containing the
verdict token to be verified through an assessment that is created in the backend.
> [!NOTE]
> **Note:** This default challenge UI does not have error-handling or other customization features that are suitable for a production environment. Therefore, we recommend that you don't use this prototype beyond the integration phase.
2. Create a verification handle and initiate a challenge with the following parameters:
> [!IMPORTANT]
> **Important:** The following code snippet does not illustrate all the error-handling capabilities of the API. Contact your assigned technical specialist for the full API documentation.
```javascript
// Initialize verification handle.
const verificationHandle = grecaptcha.enterprise.eap.initTwoFactorVerificationHandle(
KEY_ID,
REQUEST_TOKEN_FROM_ASSESSMENT
);
// Call the challenge API.
verificationHandle.challengeAccount().then(
(challengeResponse) => {
if (challengeResponse.isSuccess()) {
// Handle success: This means displaying an input for the end user to
// enter the PIN that they received and then call the `verifyAccount(pin)`
// method.
} else {
// Handle API failure
}
});
```
## Verify an MFA code from the web page
After you get the PIN from the end user, you must validate whether the PIN is
correct.
To validate the PIN, call `verificationHandle.verifyAccount()` with the PIN
entered by the end user.
```javascript
verificationHandle.verifyAccount(pin).then(
(verifyResponse) => {
if (verifyResponse.isSuccess()) {
// Handle success: Send the result of `verifyResponse.getVerdictToken()`
// to the backend in order to determine if the code was valid.
} else {
// Handle API failure
}
},
(error) => {
// Handle other errors
}
);
```
## Create a new assessment
Create a new assessment with `accountId` and `endpoints`. For instructions, see
[create an assessment for MFA](https://docs.cloud.google.com/recaptcha/docs/integrate-account-verification.md.txt#request_assessment).
After the workflow is completed on the client, you receive a new
token that you can use to get the verdict of the verification you triggered.
The assessment contains a recent timestamp regarding the latest
successful verification, along with a success result status.
The following example shows a sample assessment that you receive
upon creating a new assessment using the new token obtained from the website:
```json
{
[...],
"accountVerification": {
"endpoints": [{
"emailAddress": "foo@bar.com",
"requestToken": "tplIUFvvJUIpLaOH0hIVj2H71t5Z9mDK2RhB1SAGSIUOgOIsBv",
"lastVerificationTime": "2020-03-23 08:27:12 PST",
}],
"latestVerificationResult": "SUCCESS_USER_VERIFIED"
}
}
```
The `latestVerificationResult` field can show a different status as listed in
the following table:
| Verification result status | Description |
|---|---|
| SUCCESS_USER_VERIFIED | The user was successfully verified. |
| ERROR_USER_NOT_VERIFIED | The user failed the verification challenge. |
| ERROR_SITE_ONBOARDING_INCOMPLETE | Your site is not properly onboarded to use the feature. |
| ERROR_RECIPIENT_NOT_ALLOWED | This recipient is not approved for sending email to (during testing only). |
| ERROR_RECIPIENT_ABUSE_LIMIT_EXHAUSTED | This recipient has already received too many verification codes in a short period. |
| ERROR_CUSTOMER_QUOTA_EXHAUSTED | You have exceeded your available MFA quota. |
| ERROR_CRITICAL_INTERNAL | The verification is not completed due to an internal error in our systems. |
| RESULT_UNSPECIFIED | No information about the latest verification (never verified). |
## What's next
- [Detect and prevent account-related fraudulent activities using reCAPTCHA Account defense](https://docs.cloud.google.com/recaptcha/docs/account-defender.md.txt)