This tutorial illustrates a way for a frontend app---in this case, a web
page---to handle high volumes of incoming data when you use
Google Cloud. The tutorial describes some of the
challenges of high-volume streams. An example app is provided with this
tutorial that illustrates how to use
[WebSockets](https://wikipedia.org/wiki/WebSocket)
to visualize a dense stream of
messages published to a Pub/Sub topic, processing them in a timely
manner that maintains a performant frontend.
This tutorial is for developers who are familiar with browser-to-server
communication over HTTP and with writing frontend apps using HTML, CSS,
and JavaScript. The tutorial assumes that you have some experience with
Google Cloud
and are familiar with Linux command-line tools.
## Objectives
- Create and configure a virtual machine (VM) instance with the necessary components to stream the payloads of a Pub/Sub subscription to browser clients.
- Configure a process on the VM to subscribe to a Pub/Sub topic and output the individual messages to a log.
- Install a web server to serve static content and to stream shell command output to WebSocket clients.
- Visualize the WebSocket stream aggregations and individual message samples in a browser using HTML, CSS, and JavaScript.
## Costs
In this document, you use the following billable components of Google Cloud:
- [Compute Engine](https://docs.cloud.google.com/compute/docs.md.txt)
- [Pub/Sub](https://docs.cloud.google.com/pubsub/docs.md.txt)
To generate a cost estimate based on your projected usage,
use the [pricing calculator](https://docs.cloud.google.com/products/calculator).
New Google Cloud users might be eligible for a [free trial](https://docs.cloud.google.com/free).
## Before you begin
1. Open Cloud Shell to execute the commands listed in this tutorial. [GO TO Cloud Shell](https://console.cloud.google.com/?cloudshell=true)
You run all the terminal commands in this tutorial from
Cloud Shell.
2. Enable the Compute Engine API and Pub/Sub API:
```
gcloud services enable compute pubsub
```
When you finish this tutorial, you can avoid continued billing by deleting the
resources you created. See
[Cleaning up](https://docs.cloud.google.com/pubsub/docs/streaming-cloud-pub-sub-messages-over-websockets.md.txt#cleaning_up)
for more detail.
## Introduction
As more apps embrace event-driven models, it's important that frontend
apps are able to make simple, low-friction connections to the messaging
services that form the cornerstone of these architectures.
There are several options for streaming data to web browser clients; the most
common of these is WebSockets. This tutorial takes you through installing a
process that subscribes to a stream of messages being published to a
Pub/Sub topic, and route those messages through the web server
en route to clients connected over WebSockets.
For this tutorial, you work with the publicly available Pub/Sub
topic used in the
[NYC Taxi Tycoon Google Dataflow CodeLab](https://codelabs.developers.google.com/codelabs/dataflow-notebooks-streamingwordcount#0).
This topic provides you with a real-time stream of simulated taxi telemetry
based on historical ride data taken in New York City from the Taxi \& Limousine
Commission's trip record
[datasets](https://www1.nyc.gov/site/tlc/about/tlc-trip-record-data.page).
## Architecture
The following diagram shows the architecture of the tutorial that you build in
this tutorial.

The diagram shows a message publisher that's outside the project that contains
the Compute Engine resource; the publisher sends messages to a
Pub/Sub topic. The Compute Engine instance makes the
messages available over WebSockets to a browser that runs a dashboard based on
HTML5 and JavaScript.
This tutorial uses a combination of tools to bridge Pub/Sub and
Websockets:
- `pulltop` is a Node.js program that you install as part of this tutorial. The tool subscribes to a Pub/Sub topic and streams received messages to standard output.
- [`websocketd`](https://github.com/joewalnes/websocketd) is a small command-line tool that wraps an existing command-line interface program and allows it to be accessed using a WebSocket.
By combining `pulltop` and `websocketd`, you can have messages that are received
from the Pub/Sub topic streamed to a browser using WebSockets.
## Adjusting Pub/Sub topic throughput
The NYC Taxi Tycoon public Pub/Sub topic generates 2000 to 2500
simulated taxi ride updates per second---up to 8 Mbps or more per second. The
built-in flow control in Pub/Sub slows down a subscriber's message
rate automatically if Pub/Sub detects a growing queue of
unacknowledged messages. Therefore, you might see high message-rate variability
across different workstations, network connections, and frontend processing
code.
## Effective browser message processing
Given the high volume of messages coming over the WebSocket stream, you
need to be thoughtful in writing the frontend code that processes this stream.
For example, you might dynamically create HTML elements for each message. But at
the expected message rate, updating the page for each message could lock up the
browser window. Frequent memory allocations that result from dynamically
creating HTML elements also extend garbage collection durations, degrading the
user experience. In short, you don't want to call `document.createElement()` for
each of the approximately 2000 messages arriving each second.
The approach taken by this tutorial for managing this dense stream of messages
is as follows:
- Calculate and continually update a set of stream metrics in real time, displaying the majority of information about the observed messages as aggregate values.
- Use a browser-based dashboard to visualize a small sample of individual messages on a predefined schedule, showing only dropoff and pickup events in real time.
The following figure shows the dashboard that's created as part of this
tutorial.
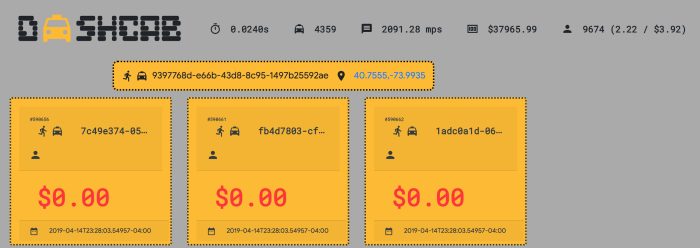
The figure depicts a last-message latency of 24 milliseconds at a rate
of nearly 2100 messages per second. If the critical code paths for processing
each individual message don't complete in time, the number of observed messages
per second decrease as the last message latency increases.
The ride sampling is done using the JavaScript `setInterval` API set to cycle
once every three seconds, which prevents the frontend from creating an enormous
number of DOM elements over its lifetime. (The overwhelming majority of those
are practically unobservable at rates higher than 10 per second anyway.)
The dashboard starts processing events in the middle of the stream, so rides
already in progress are recognized as new by the dashboard unless they've been
seen before. The code uses an associative array to store each observed ride,
indexed by the `ride_id` value, and removes the reference to a particular ride
when the passenger has been dropped off. Rides in an "en route" or "pickup" state
add a reference to that array unless (for the case of "en route") the ride has
been previously observed.
## Install and configure the WebSocket server
To begin, you create a Compute Engine instance that you'll use as the
WebSocket server. After you create the instance, you install tools on it that
you need later.
1. In Cloud Shell, set the default Compute Engine zone.
The following example shows `us-central1-a`, but you can use any zone that
you want.
gcloud config set compute/zone us-central1-a
2. Create a Compute Engine instance named `websocket-server` in
the default zone:
gcloud compute instances create websocket-server --tags wss
3. Add a firewall rule that allows TCP traffic on port `8000` to any
instance tagged as `wss`:
gcloud compute firewall-rules create websocket \
--direction=IN \
--allow=tcp:8000 \
--target-tags=wss
4. If you're using an existing project, make sure that TCP port `22` is
open to allow SSH connectivity to the instance.
By default, the `default-allow-ssh` firewall rule is enabled in the default
network. However, if you or your administrator removed the default
rule in an existing project, TCP port `22` might not be open. (If you
created a new project for this tutorial, the rule is enabled by default,
and you don't need to do anything.)
Add a firewall rule that allows TCP traffic on port `22` to any
instance tagged as `wss`:
gcloud compute firewall-rules create wss-ssh \
--direction=IN \
--allow=tcp:22 \
--target-tags=wss
5. Connect to the instance using SSH:
gcloud compute ssh websocket-server
6. At the terminal command of the instance, switch accounts to `root` so
that you can install software:
sudo -s
7. Install the `git` and `unzip` tools:
apt-get install -y unzip git
8. Install the `websocketd` binary on the instance:
cd /var/tmp/
wget \
https://github.com/joewalnes/websocketd/releases/download/v0.3.0/websocketd-0.3.0-linux_386.zip
unzip websocketd-0.3.0-linux_386.zip
mv websocketd /usr/bin
## Install Node.js and the tutorial code
1. In a terminal on the instance, install Node.js:
curl -sL https://deb.nodesource.com/setup_10.x | bash -
apt-get install -y nodejs
2. Download the tutorial source repository:
exit
cd ~
git clone https://github.com/GoogleCloudPlatform/solutions-pubsub-websockets.git
3. Change permissions on `pulltop` to allow execution:
cd solutions-pubsub-websockets
chmod 755 pulltop/pulltop.js
4. Install `pulltop` dependencies:
cd pulltop
npm install
sudo npm link
## Test that pulltop can read messages
1. On the instance, run `pulltop` against the public topic:
pulltop projects/pubsub-public-data/topics/taxirides-realtime
> [!WARNING]
> **Warning:** Don't use the public topic for production workloads.
If `pulltop` is working, you see a stream of results like the following:
```
{"ride_id":"9729a68d-fcde-484b-bc32-bf29f5188628","point_idx":328,"latitude"
:40.757360000000006,"longitude":-73.98228,"timestamp":"2019-03-22T20:03:51.6
593-04:00","meter_reading":11.069151,"meter_increment":0.033747412,"ride_stat
us":"enroute","passenger_count":1}
```
2. Press `Ctrl+C` to stop the stream.
## Establish message flow to websocketd
Now that you've established that `pulltop` can read the Pub/Sub
topic, you can start the `websocketd` process to begin sending messages to the
browser.
### Capture topic messages to a local file
For this tutorial, you capture the message stream that you get from `pulltop`
and write it to a local file. Capturing message traffic to a local file adds a
storage requirement, but it also decouples the operation of the `websocketd`
process from the streaming Pub/Sub topic messages. Capturing
the information locally allows scenarios where you might want to temporarily
halt Pub/Sub streaming (perhaps to adjust flow control parameters)
but not force a reset of
currently connected WebSocket clients. When the message stream is reestablished,
`websocketd` automatically resumes message streaming to clients.
1. On the instance, run `pulltop` against the public topic, and redirect
message output to the local `taxi.json` file. The `nohup` command instructs
the OS to keep the `pulltop` process running if you log out or close the
terminal.
nohup pulltop \
projects/pubsub-public-data/topics/taxirides-realtime > \
/var/tmp/taxi.json &
> [!WARNING]
> **Warning:** Don't use the public topic for production workloads.
2. Verify that JSON messages are being written to the file:
tail /var/tmp/taxi.json
If the messages are being written to the `taxi.json` file, the output is
similar to the following:
```
{"ride_id":"9729a68d-fcde-484b-bc32-bf29f5188628","point_idx":328,"latitude"
:40.757360000000006,"longitude":-73.98228,"timestamp":"2019-03-22T20:03:51.6
593-04:00","meter_reading":11.069151,"meter_increment":0.033747412,"ride_sta
tus":"enroute","passenger_count":1}
```
3. Change to the web folder of your app:
cd ../web
4. Start `websocketd` to begin streaming the contents of the local file
using WebSockets:
nohup websocketd --port=8000 --staticdir=. tail -f /var/tmp/taxi.json &
This runs the `websocketd` command in the background. The `websocketd` tool
consumes the output of the `tail` command and streams each element as a
WebSocket message.
5. Check the contents of `nohup.out` to verify that the server started
correctly:
tail nohup.out
If everything is working properly, the output is similar to the following:
```
Mon, 25 Mar 2019 14:03:53 -0400 | INFO | server | | Serving using application : /usr/bin/tail -f /var/tmp/taxi.json
Mon, 25 Mar 2019 14:03:53 -0400 | INFO | server | | Serving static content from : .
```
## Visualizing messages
Individual ride messages published to the Pub/Sub topic have a
structure like this:
```
{
"ride_id": "562127d7-acc4-4af9-8fdd-4eedd92b6e69",
"point_idx": 248,
"latitude": 40.74644000000001,
"longitude": -73.97144,
"timestamp": "2019-03-24T00:46:08.49094-04:00",
"meter_reading": 8.40615,
"meter_increment": 0.033895764,
"ride_status": "enroute",
"passenger_count": 1
}
```
Based on these values, you calculate several metrics for the dashboard's header.
The calculations are executed once per inbound ride event. The values include
the following:
- **Last message latency**. The number of seconds between the timestamp of the last observed ride's event timestamp and the current time (derived from the clock on the system that's hosting the web browser).
- **Active rides** . The number of rides currently in progress. This number can grow rapidly, and the number decreases when a `ride_status` value of `dropoff` is observed.
- **Message rate**. The average number of ride events processed per second.
- **Total metered amount**. The sum of the meters from all active rides. This number decreases as rides are dropped off.
- **Total number of passengers**. The number of passengers across all rides. This number decreases as rides are completed.
- **Average number of passengers per ride**. The total number of rides, divided by the total number of passengers.
- **Average metered amount per passenger**. The total metered amount divided by the total number of passengers.
In addition to the metrics and individual ride samples, when a passenger is
picked up or dropped off, the dashboard shows an alert notification above the
grid of ride samples.
1. Get the external IP address of the current instance:
curl -H "Metadata-Flavor: Google" http://metadata/computeMetadata/v1/instance/network-interfaces/0/access-configs/0/external-ip; echo
2. Copy the IP address.
3. On your local machine, open a new web browser and enter the URL:
`http://$ip-address:8000`.
You see a page that shows the dashboard for this tutorial:

4. Click the taxi icon at the top to open a connection to the stream and begin
processing messages.
Individual rides are visualized with a sample of nine active rides being
rendered every three seconds:
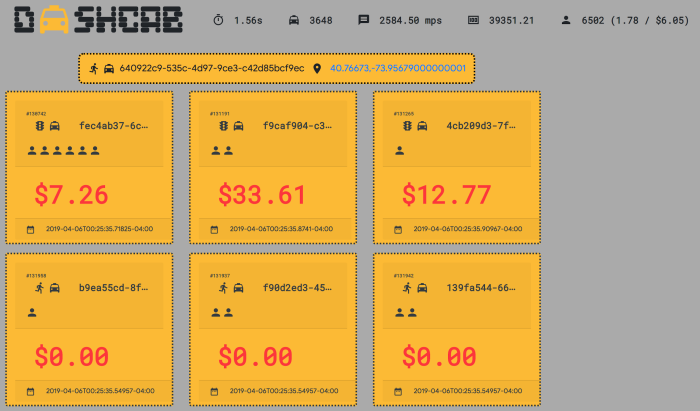
You can click the taxi icon at any time to start or stop the WebSocket
stream. If the WebSocket connection is severed, the icon turns red, and
updates to metrics and individual rides are halted. To reconnect, click the
taxi icon again.
## Performance
The following screenshot shows the Chrome Developer Tools performance monitor
while the browser tab is processing around 2100 messages per second.

With message dispatch happening at a latency of approximately 30ms, the CPU
utilization averages at around 80%. Memory utilization is shown at a minimum of
29 MB, with 57 MB in total being allocated, and growing and shrinking freely.
## Clean up
### Remove firewall rules
If you used an existing project for this tutorial, you can remove the firewall
rules you created. It's good practice to minimize open ports.
1. Delete the firewall rule you created to allow TCP on port `8000`:
gcloud compute firewall-rules delete websocket
2. If you also created a firewall rule to allow SSH connectivity, delete the
firewall rule to allow TCP on port `22`:
gcloud compute firewall-rules delete wss-ssh
### Delete the project
If you don't want to use this project again, you can delete the project.
> [!CAUTION]
> **Caution** : Deleting a project has the following effects:
>
> - **Everything in the project is deleted.** If you used an existing project for the tasks in this document, when you delete it, you also delete any other work you've done in the project.
> - **Custom project IDs are lost.** When you created this project, you might have created a custom project ID that you want to use in the future. To preserve the URLs that use the project ID, such as an `appspot.com` URL, delete selected resources inside the project instead of deleting the whole project.
1. In the Google Cloud console, go to the **Manage resources** page.
[Go to Manage resources](https://console.cloud.google.com/iam-admin/projects)
2. In the project list, select the project that you want to delete, and then click **Delete**.
3. In the dialog, type the project ID, and then click **Shut down** to delete the project.
## What's next
- Read more about [Pub/Sub](https://docs.cloud.google.com/pubsub) and the [WebSockets protocol](https://wikipedia.org/wiki/WebSocket)
- Add your [Google Maps Platform](https://developers.google.com/maps/documentation/) API key to `cabdash.js` to geo-locate picked up and dropped off rides.
- Explore reference architectures, diagrams, and best practices about Google Cloud. Take a look at our [Cloud Architecture Center](https://docs.cloud.google.com/architecture).