


במדריך הזה מוסבר איך לנהל סשנים ב-App Engine.
באפליקציות רבות נדרש ניהול סשנים לצורך אימות והעדפות משתמש. PHP מגיעה עם הטמעה מבוססת-זיכרון לביצוע הפונקציה הזו. עם זאת, ההטמעה הזו לא מתאימה לאפליקציה שאפשר להציג מכמה מופעים, כי הסשן שמתועד במופע אחד עשוי להיות שונה ממופעים אחרים.
מטרות
- כותבים את האפליקציה.
- מריצים את האפליקציה באופן מקומי.
- פורסים את האפליקציה ב-App Engine.
עלויות
במסמך הזה משתמשים ברכיבים הבאים של Google Cloud, והשימוש בהם כרוך בתשלום:
כדי ליצור הערכת עלויות בהתאם לשימוש החזוי, אתם יכולים להשתמש במחשבון התמחור.
כשמסיימים את המשימות שמתוארות במסמך הזה אפשר למחוק את המשאבים שיצרתם כדי להימנע מחיובים נוספים. מידע נוסף זמין בקטע הסרת המשאבים.
לפני שמתחילים
- נכנסים לחשבון Google Cloud . אנחנו ממליצים למשתמשים חדשים ב- Google Cloud ליצור חשבון כדי שיוכלו להעריך את הביצועים של המוצרים שלנו בתרחישים מהעולם האמיתי. לקוחות חדשים מקבלים בחינם גם קרדיט בשווי 300$ להרצה, לבדיקה ולפריסה של עומסי העבודה.
-
In the Google Cloud console, on the project selector page, select or create a Google Cloud project.
Roles required to select or create a project
- Select a project: Selecting a project doesn't require a specific IAM role—you can select any project that you've been granted a role on.
-
Create a project: To create a project, you need the Project Creator role
(
roles/resourcemanager.projectCreator), which contains theresourcemanager.projects.createpermission. Learn how to grant roles.
-
Verify that billing is enabled for your Google Cloud project.
Enable the Firestore API, if it is not already enabled.
Roles required to enable APIs
To enable APIs, you need the
serviceusage.services.enablepermission. If you created the project, then you likely already have this permission through the Owner role (roles/owner). Otherwise, you can get this permission through the Service Usage Admin role (roles/serviceusage.serviceUsageAdmin). Learn how to grant roles.-
Install the Google Cloud CLI.
-
If you're using an external identity provider (IdP), you must first sign in to the gcloud CLI with your federated identity.
-
To initialize the gcloud CLI, run the following command:
gcloud init -
In the Google Cloud console, on the project selector page, select or create a Google Cloud project.
Roles required to select or create a project
- Select a project: Selecting a project doesn't require a specific IAM role—you can select any project that you've been granted a role on.
-
Create a project: To create a project, you need the Project Creator role
(
roles/resourcemanager.projectCreator), which contains theresourcemanager.projects.createpermission. Learn how to grant roles.
-
Verify that billing is enabled for your Google Cloud project.
Enable the Firestore API, if it is not already enabled.
Roles required to enable APIs
To enable APIs, you need the
serviceusage.services.enablepermission. If you created the project, then you likely already have this permission through the Owner role (roles/owner). Otherwise, you can get this permission through the Service Usage Admin role (roles/serviceusage.serviceUsageAdmin). Learn how to grant roles.-
Install the Google Cloud CLI.
-
If you're using an external identity provider (IdP), you must first sign in to the gcloud CLI with your federated identity.
-
To initialize the gcloud CLI, run the following command:
gcloud init - מגדירים שה-CLI של gcloud ישתמש בפרויקט החדש Google Cloud :
# Configure gcloud for your project
gcloud config set project PROJECT_ID
PROJECT_IDבמזהה Google Cloud הפרויקט שיצרתם או שבחרתם קודם.
הגדרת הפרויקט
בחלון הטרמינל, מתחילים בספרייה לפי בחירתכם ויוצרים ספרייה חדשה בשם
sessions. כל הקוד של המדריך הזה נמצא בספרייהsessions.עוברים לספרייה
sessions:cd sessionsמתקינים את יחסי התלות:
composer require google/cloud-firestore
בסוף המדריך הזה, מבנה הקובץ הסופי יהיה דומה לזה:
sessions
├── app.yaml
└── composer.json
├── index.php
כתיבת האפליקציה
בחלון הטרמינל, יוצרים קובץ בשם
index.phpעם התוכן הבא:
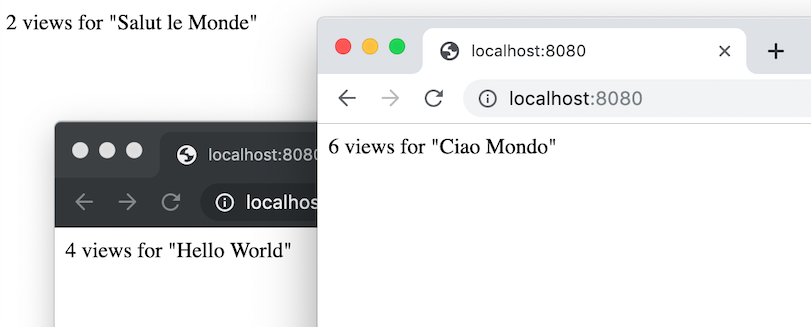
האפליקציה הזו מציגה ברכות בשפות שונות לכל משתמש. משתמשים חוזרים תמיד מקבלים את פניית המערכת באותה שפה.
כדי שהאפליקציה תוכל לאחסן העדפות של משתמש, צריך לאחסן מידע על המשתמש הנוכחי בסשן. אפליקציית הדוגמה הזו משתמשת ב-Firestore כדי לאחסן נתוני סשנים.
אפשר להשתמש ב-Firestore session handler כדי להשתמש ב-Firestore עבור סשנים של PHP.
הדיאגרמה הבאה ממחישה איך Firestore מטפל בסשנים באפליקציית App Engine.
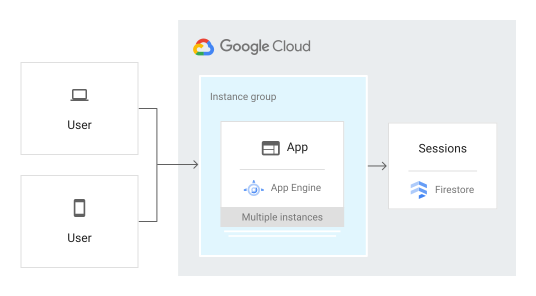
אחרי שמגדירים את session_set_save_handler, לכל בקשה יש משתנה גלובלי $_SESSION שאפשר להשתמש בו כדי לגשת לסשן. נתוני הסשן מאוחסנים ב-Firestore.
הרצה באופן מקומי
מפעילים את שרת האינטרנט המובנה של PHP:
php -S localhost:8080צפייה באפליקציה בדפדפן האינטרנט:
Cloud Shell
בסרגל הכלים של Cloud Shell, לוחצים על Web preview (תצוגה מקדימה של אתר)
 ובוחרים באפשרות Preview on port 8080 (תצוגה מקדימה ביציאה 8080).
מכונה מקומית
בדפדפן, עוברים אל
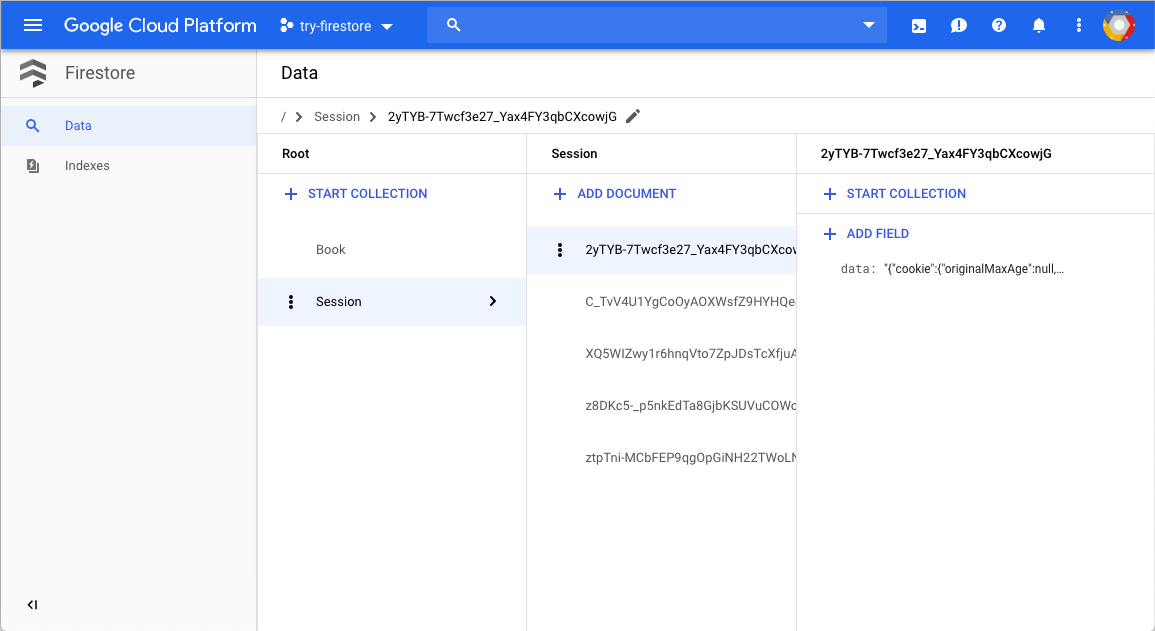
http://localhost:8080מופיעה אחת מחמש ברכות: "Hello World", "Hallo Welt", "Hola mundo", "Salut le Monde" או "Ciao Mondo". השפה משתנה אם פותחים את הדף בדפדפן אחר או במצב פרטי. אפשר לראות ולערוך את נתוני הסשן Google Cloud במסוף.
כדי לעצור את שרת ה-HTTP, בחלון הטרמינל, לוחצים על
Control+C.
פריסה והפעלה ב-App Engine
אתם יכולים להשתמש בסביבת ברירת המחדל ב-App Engine כדי לפתח ולפרוס אפליקציה שפועלת בצורה מהימנה בעומס כבד ועם כמויות גדולות של נתונים.
במדריך הזה משתמשים בסביבת ברירת המחדל ב-App Engine כדי לפרוס את השרת.
בחלון הטרמינל, יוצרים קובץ
app.yamlומעתיקים את הטקסט הבא:פורסים את האפליקציה ב-App Engine:
gcloud app deployכדי לראות את האפליקציה הפעילה, מזינים את כתובת ה-URL הבאה:
https://PROJECT_ID.REGION_ID.r.appspot.comמחליפים את מה שכתוב בשדות הבאים:
-
PROJECT_ID: מזהה הפרויקט ב- Google Cloud -
REGION_ID: קוד ש-App Engine מקצה לאפליקציה
-
הברכה נשלחת עכשיו על ידי שרת אינטרנט שפועל במכונה של App Engine.
מחיקת סשנים
PHP מבצע איסוף (GC) של סשנים, שמסיר סשנים ישנים שפג תוקפם בהתאם להגדרות של php.ini. כברירת מחדל, ה-session handler של Firestore לא מנקה סשנים, אבל אפשר להגדיר אותו לעשות את זה על ידי העברת האפשרות gcLimit כשיוצרים את ה-session handler:
הסשנים מוסרים באמצעות איסוף אשפה (GC) של סשנים שמבוסס על הסתברות, או כשקוראים לפונקציה session_gc באופן מפורש.
ניפוי באגים באפליקציה
אם אתם לא מצליחים להתחבר לאפליקציית App Engine, כדאי לבדוק את הדברים הבאים:
- בודקים שהפקודות
gclouddeploy הושלמו בהצלחה ולא הוחזרו שגיאות. אם היו שגיאות (לדוגמה,message=Build failed), תקנו אותן ונסו לפרוס את אפליקציית App Engine שוב. נכנסים לדף Logs Explorer במסוף Google Cloud .
ברשימה הנפתחת Recently selected resources, לוחצים על App Engine Application ואז על All module_id. תופיע רשימה של בקשות מהביקור באפליקציה. אם לא מופיעה רשימה של בקשות, ודאו שבחרתם באפשרות All module_id מהרשימה הנפתחת. אם הודעות השגיאה מודפסות ב Google Cloud מסוף, צריך לוודא שהקוד של האפליקציה זהה לקוד שבקטע על כתיבת אפליקציית האינטרנט.
מוודאים ש-Firestore API מופעל.
הסרת המשאבים
מחיקת הפרויקט
- במסוף Google Cloud , נכנסים לדף Manage resources.
- ברשימת הפרויקטים, בוחרים את הפרויקט שרוצים למחוק ולוחצים על Delete.
- כדי למחוק את הפרויקט, כותבים את מזהה הפרויקט בתיבת הדו-שיח ולוחצים על Shut down.
מחיקת המכונה של App Engine
- במסוף Google Cloud , נכנסים לדף Versions של App Engine.
- מסמנים את התיבה שלצד גרסת האפליקציה שלא מוגדרת כברירת מחדל ושרוצים למחוק.
- כדי למחוק את גרסת האפליקציה, לוחצים על Delete.