This tutorial describes how to use a Network Connectivity Center hub and Cloud VPN spokes
to set up [data transfer](https://docs.cloud.google.com/network-connectivity/docs/network-connectivity-center/concepts/use-cases#data-transfer)
between two branch offices.
For more information about creating hubs and spokes,
see
[Work with hubs and spokes](https://docs.cloud.google.com/network-connectivity/docs/network-connectivity-center/how-to/working-with-hubs-spokes).
## Before you begin
Before you begin, review the following sections.
### Create or select a project
To make it easier to configure NCC, start by identifying a valid
project.
1. If you are using the Google Cloud CLI, set your project
ID by using the
[`gcloud config set` command](https://docs.cloud.google.com/sdk/gcloud/reference/config/set).
```
gcloud config set project PROJECT_ID
```
Replace `PROJECT_ID` with your unique project ID.
The gcloud CLI instructions on this page assume that you have set your project ID.
2. To confirm that you set the project ID correctly, use the
[`gcloud config list` command](https://docs.cloud.google.com/sdk/gcloud/reference/config/list).
```
gcloud config list --format='text(core.project)'
```
### Conventions for identifying resources
When you reference resources by using the
gcloud CLI or the API, use the conventions described in the
following table.
| Convention | Supported for | Notes | Example |
|---|---|---|---|
| Full URI | All resources | Use one of these methods to reference Router appliance instances. | ``` "https://www.googleapis.com/compute/projects/PROJECT_ID/zones/ZONE/instances/INSTANCE_NAME" ``` |
| [Relative resource name](https://google.aip.dev/122) | All resources | Use one of these methods to reference Router appliance instances. | ``` "projects/PROJECT_ID/zones/ZONE/instances/INSTANCE_NAME" ``` |
| Name | Regional and global resources | Use this method for hubs, spokes, VPN tunnels, and VLAN attachments. | ``` "HUB_NAME" ``` |
## Sample topology
The following diagram describes the sample resources used in this tutorial.
[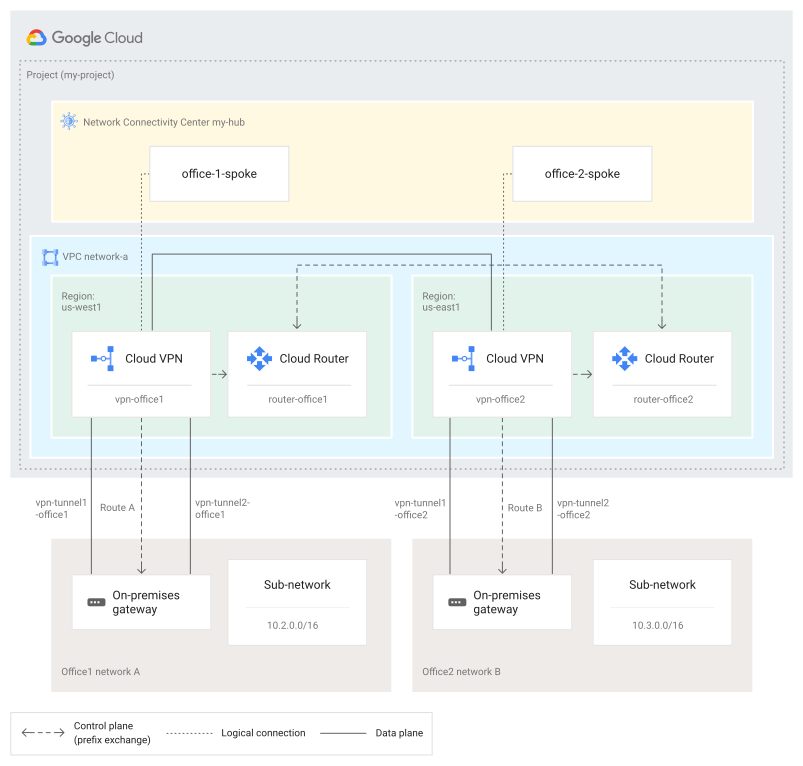](https://docs.cloud.google.com/static/network-connectivity/docs/network-connectivity-center/images/ncc-tutorial.svg) Topology for NCC tutorial (click to enlarge)
## Configure data transfer connectivity
To set up data transfer connectivity, follow these steps:
1. [Create Google Cloud resources](https://docs.cloud.google.com/network-connectivity/docs/network-connectivity-center/tutorials/connecting-two-offices-with-vpns#cloud-resources) such as a Virtual Private Cloud (VPC) network, HA VPN gateways and tunnels, and Cloud Routers.
2. [Create a hub](https://docs.cloud.google.com/network-connectivity/docs/network-connectivity-center/tutorials/connecting-two-offices-with-vpns#create-hub).
3. Define a spoke for the [first](https://docs.cloud.google.com/network-connectivity/docs/network-connectivity-center/tutorials/connecting-two-offices-with-vpns#create-spoke-1) and [second](https://docs.cloud.google.com/network-connectivity/docs/network-connectivity-center/tutorials/connecting-two-offices-with-vpns#create-spoke-2) branch office. Each spoke should use a VPN tunnel as its underlying resource.
4. [Verify the configuration](https://docs.cloud.google.com/network-connectivity/docs/network-connectivity-center/tutorials/connecting-two-offices-with-vpns#verify).
### Create Google Cloud resources
This tutorial assumes that you have already created the following
Google Cloud resources:
- A VPC network that has its [dynamic routing mode](https://docs.cloud.google.com/vpc/docs/create-modify-vpc-networks#switch-dynamic-routing) set to `global`
- In the region closest to `Office1`, a subnet, an HA VPN gateway, a Cloud Router, and a tunnel that connects the gateway interface to `Office1`
- In the region closest to `Office2`, a subnet, an HA VPN gateway, a Cloud Router, and a tunnel that connects the gateway interface to `Office2`
If you need to create these resources, see the following documents:
- To create a VPC network, see [Creating
networks](https://docs.cloud.google.com/vpc/docs/create-modify-vpc-networks#creating_networks). Because this configuration uses spokes in different regions, set the network's dynamic routing mode to `global`.
- To create subnets, see [Adding subnets](https://docs.cloud.google.com/vpc/docs/create-modify-vpc-networks#add-subnets).
- To create HA VPN gateways, tunnels, and a Cloud Router, see [Creating an HA VPN gateway to a peer VPN gateway](https://docs.cloud.google.com/network-connectivity/docs/vpn/how-to/creating-ha-vpn).
After you identify existing Google Cloud resources or create new
ones, continue to the next section.
### Create the hub
First, you create a hub. Later, you attach spokes to this hub.
#### Permissions required for this task
To perform this task, you must have been granted the following permissions
*or* the following IAM roles.
**Permissions**
- `networkconnectivity.hubs.create`
- If you are working in the Google Cloud console:
- `networkconnectivity.hubs.get`
- `networkconnectivity.hubs.list`
- `networkconnectivity.spokes.list`
- `compute.projects.get`
**Roles**
- [Hub \& Spoke Admin](https://docs.cloud.google.com/iam/docs/roles-permissions/networkconnectivity) (`roles/networkconnectivity.hubAdmin)`
- If you are working in the Google Cloud console:
[Compute Network Viewer](https://docs.cloud.google.com/iam/docs/roles-permissions/compute) (`roles/compute.networkViewer)`
### Console
1. In the Google Cloud console, go to the **NCC** page.
[Go to NCC](https://console.cloud.google.com/hybrid/hubs/list)
2. In the project pull-down menu, select a project---in the example
diagram, the project is `my-project`.
3. Enter a **Hub name** ---in this case, `my-hub`.
4. Enter an optional **Description**.
5. Verify the **Project ID**. If the project ID is incorrect, select a
different project by using the pull-down menu at the top of the screen.
6. Click **Continue**.
7. To add the `Office1` spoke to the hub, continue to
[Create the spoke for Office 1](https://docs.cloud.google.com/network-connectivity/docs/network-connectivity-center/tutorials/connecting-two-offices-with-vpns#create-spoke-office-1).
### gcloud
To create a hub, use the
[`gcloud network-connectivity hubs create` command](https://docs.cloud.google.com/sdk/gcloud/reference/network-connectivity/hubs/create).
```
gcloud network-connectivity hubs create HUB_NAME \
--description="DESCRIPTION" \
--labels="KEY"="VALUE"
```
Replace the following values:
- `HUB_NAME`: the name of the new hub---in this case, `my-hub`
- `DESCRIPTION`: optional text that describes the hub
- `KEY`: the key in the key-value pair for the optional label text
- `VALUE`: the value in the key-value pair for the optional label text
To add the `Office1` spoke to the hub, continue to
[Create the spoke for Office 1](https://docs.cloud.google.com/network-connectivity/docs/network-connectivity-center/tutorials/connecting-two-offices-with-vpns#create-spoke-office-1).
### API
To create a hub, use the
[`networkconnectivity.hubs.create` method](https://docs.cloud.google.com/network-connectivity/docs/reference/networkconnectivity/rest/v1/projects.locations.global.hubs/create).
```
POST https://networkconnectivity.googleapis.com/v1/projects/PROJECT_ID/locations/global/hubs
{
"name":"HUB_NAME",
"description":"DESCRIPTION",
"labels": {
"KEY": "VALUE"
}
}
```
Replace the following values:
- `PROJECT_ID`: the project ID of the project that contains the new hub---for example, `my-project`
- `HUB_NAME`: the name of the new hub---for example, `my-hub`
- `DESCRIPTION`: optional text that describes the hub
- `KEY`: the key in the key-value pair for the optional label text
- `VALUE`: the value in the key-value pair for the optional label text
To add the `Office1` spoke to the hub, continue to
[Create the spoke for Office 1](https://docs.cloud.google.com/network-connectivity/docs/network-connectivity-center/tutorials/connecting-two-offices-with-vpns#create-spoke-office-1).
### Create the spoke for Office 1
Create a spoke for `Office1`. Use two HA VPN tunnels as
the spoke's underlying resources. Each tunnel should originate from a HA VPN gateway in the region closest to the office. In
the sample diagram, these tunnels are represented as `vpn-tunnel1-office1` and
`vpn-tunnel2-office1`.
#### Permissions required for this task
To perform this task, you must have been granted the following permissions
*or* the following IAM roles.
**Permissions**
- `networkconnectivity.spokes.create`
- `compute.routers.get`
- `compute.vpnTunnels.get`
- If you are working in the Google Cloud console, you need permission to view certain network resources. For details, see [Roles and permissions](https://docs.cloud.google.com/network-connectivity/docs/network-connectivity-center/concepts/access-control#permission-console).
**Roles**
- One of the following:
- [Spoke Admin](https://docs.cloud.google.com/iam/docs/roles-permissions/networkconnectivity) (`roles/networkconnectivity.spokeAdmin`)
- [Hub \& Spoke Admin](https://docs.cloud.google.com/iam/docs/roles-permissions/networkconnectivity) (`roles/networkconnectivity.hubAdmin`)
- A role---such as [Compute Network Viewer](https://docs.cloud.google.com/iam/docs/roles-permissions/compute) (`roles/compute.networkViewer)`---that grants you permission to read Cloud Router resources and your spoke's resource type (in this case, VPN tunnels)
- If you are working in the Google Cloud console, [Compute Network Viewer](https://docs.cloud.google.com/iam/docs/roles-permissions/compute) (`roles/compute.networkViewer`)
### Console
The following steps are continued from [Create the hub](https://docs.cloud.google.com/network-connectivity/docs/network-connectivity-center/tutorials/connecting-two-offices-with-vpns#create-the-hub).
They explain how to create a spoke immediately after specifying the hub
name and description.
1. In the **New spoke** form, set the **Spoke type** field to **VPN tunnel**.
2. Enter a **Spoke name** ---in this case, `office-1-spoke`.
3. Optionally, enter a **Description** of the spoke.
4. Select the **Region** for the spoke--- in the example diagram, the spoke is located in `us-west1`.
5. Under **Site-to-site data transfer** , select **On**.
6. Select the appropriate **VPC network** ;in the example diagram, the spoke is located in `network-a`.
7. Select a **VPN tunnel** . If appropriate, click **Add tunnel** to add another **VPN tunnel** field. In the example diagram, two tunnels are used: `vpn-tunnel1-office1` and `vpn-tunnel2-office1`. When you are finished adding tunnels, click **Done**.
8. Click **Create**.
> [!NOTE]
> **Note:** If you want to create a new tunnel, click the link named **Create VPN tunnel** to navigate to the **VPN** page. After you have added tunnels, they appear in the **VPN tunnels** drop-down list.
The **Network Connectivity Center** page updates to show details about
spokes you've created. To add the `Office2` spoke to the hub,
continue to [Create the spoke for Office 2](https://docs.cloud.google.com/network-connectivity/docs/network-connectivity-center/tutorials/connecting-two-offices-with-vpns#create-spoke-office-2).
### gcloud
To create the spoke, use the
[`gcloud network-connectivity spokes linked-vpn-tunnels create` command](https://docs.cloud.google.com/sdk/gcloud/reference/network-connectivity/spokes/linked-vpn-tunnels/create).
```
gcloud network-connectivity spokes linked-vpn-tunnels create SPOKE_NAME \
--hub=HUB_NAME \
--description="DESCRIPTION" \
--vpn-tunnels=TUNNEL_NAME,TUNNEL_NAME_2 \
--region=REGION \
--labels="KEY"="VALUE" \
--site-to-site-data-transfer
```
Replace the following values:
- `SPOKE_NAME`: the name of the spoke---in this case, `office-1-spoke`
- `HUB_NAME`: the name of the hub that you are attaching the spoke to---in this case, `my-hub`
- `DESCRIPTION`: optional text that describes the spoke
- `TUNNEL_NAME`: the name of the first HA VPN tunnel---in this case, `vpn-tunnel1-office1`
- `TUNNEL_NAME_2`: the name of the redundant tunnel---in this case, `vpn-tunnel2-office1`; when including a second tunnel, do not use a space between the comma and the name of second tunnel
- `REGION`: the Google Cloud region where the spoke is located--- in this case, `us-west1`
- `KEY`: the key in the key-value pair for the optional label text
- `VALUE`: the value in the key-value pair for the optional label text
To add the `Office2` spoke to the hub, continue to
[Create the spoke for Office 2](https://docs.cloud.google.com/network-connectivity/docs/network-connectivity-center/tutorials/connecting-two-offices-with-vpns#create-spoke-office-2).
### API
To create the spoke, use the
[`networkconnectivity.spokes.create` method](https://docs.cloud.google.com/network-connectivity/docs/reference/networkconnectivity/rest/v1/projects.locations.spokes/create).
```
POST https://networkconnectivity.googleapis.com/v1/projects/PROJECT_ID/locations/REGION/spokes/SPOKE_NAME
{
"hub": "HUB_NAME",
"labels": {"KEY": "VALUE"},
"linkedVpnTunnels": {
"uris: [
"TUNNEL_NAME",
"TUNNEL_NAME_2"
],
"siteToSiteDataTransfer": true
}
}
```
Replace the following values:
- `PROJECT_ID`: the project ID of your project
- `REGION`: the Google Cloud region where you want to locate the spoke---in this case, `us-west1`
- `SPOKE_NAME`: the name for the spoke
- `HUB_NAME`: the name of the hub that you are attaching the spoke to
- `KEY`: the key in the key-value pair for the optional label text
- `VALUE`: the value in the key-value pair for the optional label text
- `TUNNEL_NAME`: the name of the first HA VPN tunnel---in this case, `vpn-tunnel1-office1`
- `TUNNEL_NAME_2`: the name of the redundant tunnel---in this case, `vpn-tunnel2-office1`; when including a second tunnel, do not use a space between the comma and the name of second tunnel
### Create the spoke for Office 2
Create a spoke for `Office2`. Use two HA VPN tunnels as
the spoke's underlying resources. Each tunnel should originate from a HA VPN gateway in the region closest to the office. In
the sample diagram, these tunnels are represented as `vpn-tunnel1-office2` and
`vpn-tunnel2-office2`.
#### Permissions required for this task
To perform this task, you must have been granted the following permissions
*or* the following IAM roles.
**Permissions**
- `networkconnectivity.spokes.create`
- `compute.routers.get`
- `compute.vpnTunnels.get`
- If you are working in the Google Cloud console, you need permission to view certain network resources. For details, see [Roles and permissions](https://docs.cloud.google.com/network-connectivity/docs/network-connectivity-center/concepts/access-control#permission-console).
**Roles**
- One of the following:
- [Spoke Admin](https://docs.cloud.google.com/iam/docs/roles-permissions/networkconnectivity) (`roles/networkconnectivity.spokeAdmin`)
- [Hub \& Spoke Admin](https://docs.cloud.google.com/iam/docs/roles-permissions/networkconnectivity) (`roles/networkconnectivity.hubAdmin`)
- A role---such as [Compute Network Viewer](https://docs.cloud.google.com/iam/docs/roles-permissions/compute) (`roles/compute.networkViewer)`---that grants you permission to read Cloud Router resources and your spoke's resource type (in this case, VPN tunnels)
- If you are working in the Google Cloud console, [Compute Network Viewer](https://docs.cloud.google.com/iam/docs/roles-permissions/compute) (`roles/compute.networkViewer`)
### Console
To create the second spoke, do the following:
1. Go to the NCC page.
[Go to NCC](https://console.cloud.google.com/hybrid/hubs/list)
2. In the project pull-down menu, select a project---in the example
diagram, the project is `my-project`.
3. Click the **Spokes** tab.
4. Click **Add spokes** to open the **Add spokes** page.
5. In the **New spoke** form, set the **Spoke type** field to
**VPN tunnel**.
6. Enter a **Spoke name** ---in this case,
`office-2-spoke`.
7. Optionally, enter a **Description** of the spoke.
8. Select the **Region** for the spoke--- in the example diagram, the
spoke is located in `us-east1`.
9. Under **Site-to-site data transfer** , select **On**.
10. Verify that the **VPC network** field is set to the same network as the
last spoke you created; in the example diagram, this is `network-a`.
11. Select a **VPN tunnel** . If appropriate, click **Add tunnel** to add
another **VPN tunnel** field. In the example diagram, two tunnels are
used: `vpn-tunnel1-office2` and `vpn-tunnel2-office2`. When you are
finished adding tunnels, click **Done**.
12. Click **Create**.
### gcloud
To create the spoke, use the
[`gcloud network-connectivity spokes linked-vpn-tunnels create` command](https://docs.cloud.google.com/sdk/gcloud/reference/network-connectivity/spokes/linked-vpn-tunnels/create).
```
gcloud network-connectivity spokes linked-vpn-tunnels create SPOKE_NAME \
--hub=HUB_NAME \
--description="DESCRIPTION" \
--vpn-tunnels=TUNNEL_NAME,TUNNEL_NAME_2 \
--region=REGION \
--labels="KEY"="VALUE" \
--site-to-site-data-transfer
```
Replace the following values:
- `SPOKE_NAME`: the name of the spoke---in this case, `office-2-spoke`
- `HUB_NAME`: the name of the hub that you are attaching the spoke to---in this case, `my-hub`
- `DESCRIPTION`: optional text that describes the spoke
- `TUNNEL_NAME`: the name of the first HA VPN tunnel---in this case, `vpn-tunnel1-office2`
- `TUNNEL_NAME_2`: the name of the redundant tunnel---in this case, `vpn-tunnel2-office2`; when including a second tunnel, do not use a space between the comma and the name of second tunnel
- `REGION`: the Google Cloud region where the spoke is located---in this case, in`us-east1`
- `KEY`: the key in the key-value pair for the optional label text
- `VALUE`: the value in the key-value pair for the
optional label text
To add the `Office2` spoke to the hub, continue to
[Create the spoke for Office 2](https://docs.cloud.google.com/network-connectivity/docs/network-connectivity-center/tutorials/connecting-two-offices-with-vpns#create-spoke-office-2).
### API
To create the spoke, use the
[`networkconnectivity.spokes.create` method](https://docs.cloud.google.com/network-connectivity/docs/reference/networkconnectivity/rest/v1/projects.locations.spokes/create).
```
POST https://networkconnectivity.googleapis.com/v1/projects/PROJECT_ID/locations/REGION/spokes/SPOKE_NAME
{
"hub": "HUB_NAME",
"labels": {"KEY": "VALUE"},
"linkedVpnTunnels": {
"uris": [
"TUNNEL_NAME",
"TUNNEL_NAME_2"
],
"siteToSiteDataTransfer": true
}
}
```
Replace the following values:
- `PROJECT_ID`: the project ID of your project
- `REGION`: the Google Cloud region where you want to locate the spoke---in this case, `us-east1`
- `SPOKE_NAME`: the name for the spoke
- `HUB_NAME`: the name of the hub that you are attaching the spoke to
- `KEY`: the key in the key-value pair for the optional label text
- `VALUE`: the value in the key-value pair for the optional label text
- `TUNNEL_NAME`: the name of the first HA VPN tunnel---in this case, `vpn-tunnel1-office2`
- `TUNNEL_NAME_2`: the name of the redundant tunnel---in this case, `vpn-tunnel2-office2`;when including a second tunnel, do not use a space between the comma and the name of second tunnel
## Verify the configuration
After configuring the hub and its spokes, you should be able to pass traffic
from the virtual machine (VM) instance in one office to the VM instance in the
other office. To do this, each VM must have access to the VPN tunnel in its
region.
## Clean up the configuration
Use the steps in the following sections to clean up your sample configuration.
To avoid continued billing, delete the resources that you created.
### Delete the project
> [!WARNING]
> **Warning:** Make sure not to delete projects that carry production traffic.
If you want to delete the project that you created, use the following steps.
Alternatively, you can retain the project and delete individual resources,
as described in the following sections.
> [!CAUTION]
> **Caution** : Deleting a project has the following effects:
>
> - **Everything in the project is deleted.** If you used an existing project for the tasks in this document, when you delete it, you also delete any other work you've done in the project.
> - **Custom project IDs are lost.** When you created this project, you might have created a custom project ID that you want to use in the future. To preserve the URLs that use the project ID, such as an `appspot.com` URL, delete selected resources inside the project instead of deleting the whole project.
>
>
> If you plan to explore multiple architectures, tutorials, or quickstarts, reusing projects
> can help you avoid exceeding project quota limits.
1. In the Google Cloud console, go to the **Manage resources** page.
[Go to Manage resources](https://console.cloud.google.com/iam-admin/projects)
2. In the project list, select the project that you want to delete, and then click **Delete**.
3. In the dialog, type the project ID, and then click **Shut down** to delete the project.
### Delete both spokes
You must delete all spokes before you can delete a hub.
#### Permissions required for this task
To perform this task, you must have been granted the following permissions
*or* the following IAM roles.
**Permissions**
- `networkconnectivity.spokes.delete`
- Additionally, if you are working in the Google Cloud console:
- `networkconnectivity.hubs.get`
- `networkconnectivity.hubs.list`
- `networkconnectivity.spokes.list`
- `compute.projects.get`
**Roles**
- One of the following:
- [Spoke Admin](https://docs.cloud.google.com/iam/docs/roles-permissions/networkconnectivity) (`roles/networkconnectivity.spokeAdmin`
- [Hub \& Spoke Admin](https://docs.cloud.google.com/iam/docs/roles-permissions/networkconnectivity) (`roles/networkconnectivity.hubAdmin)`
- Additionally, if you are working in the Google Cloud console:
- [Compute Network Viewer](https://docs.cloud.google.com/iam/docs/roles-permissions/compute) (`roles/compute.networkViewer)`
### Console
1. Go to the **NCC** page.
[Go to NCC](https://console.cloud.google.com/hybrid/hubs/list)
2. In the project pull-down menu, select a project---in the example
diagram, the project is `my-project`.
3. Click the **Spokes** tab.
4. View the list of **Spoke names** for the project.
5. Select the checkboxes for the spokes you want to
delete---in this case, `office-1-spoke` and `office-2-spoke`.
6. Click **Delete spokes**.
7. In the confirmation dialog, click **Delete**.
### gcloud
To delete spokes, use the [`gcloud network-connectivity spokes delete` command](https://docs.cloud.google.com/sdk/gcloud/reference/network-connectivity/spokes/delete).
Use the command twice, once to delete `office-1-spoke` and
again to delete `office-2-spoke`.
```
gcloud network-connectivity spokes delete SPOKE_NAME \
--region=REGION
```
Replace the following values:
- `SPOKE_NAME`: the name of the spoke to delete---in this case, `office-1-spoke` and `office-2-spoke`
- `REGION`: the Google Cloud region where the spoke is located
### API
To delete spokes, use the
[`networkconnectivity.spokes.delete` method](https://docs.cloud.google.com/network-connectivity/docs/reference/networkconnectivity/rest/v1/projects.locations.spokes/delete).
Use this method twice, once to delete `office-1-spoke` and again to delete
`office-2-spoke`.
```
DELETE https://networkconnectivity.googleapis.com/v1/projects/PROJECT_ID/locations/REGION/spokes/SPOKE_NAME
```
Replace the following values:
- `PROJECT_ID`: the project ID of the project that contains the spoke---in the example diagram, the project is `my-project`
- `REGION`: the Google Cloud region where the spoke is located
- `SPOKE_NAME`: the name of the spoke to delete---in this case, `office-1-spoke` and `office-2-spoke`
### Delete the hub
After you have deleted the spokes, you can delete the hub.
#### Permissions required for this task
To perform this task, you must have been granted the following permissions
*or* the following IAM roles.
**Permissions**
- `networkconnectivity.hubs.delete`
- Additionally, if you are working in the Google Cloud console:
- `networkconnectivity.hubs.get`
- `networkconnectivity.hubs.list`
- `networkconnectivity.spokes.list`
- `compute.projects.get`
**Roles**
- [Hub \& Spoke Admin](https://docs.cloud.google.com/iam/docs/roles-permissions/networkconnectivity) (`roles/networkconnectivity.hubAdmin)`
- Additionally, if you are working in the Google Cloud console, [Compute Network Viewer](https://docs.cloud.google.com/iam/docs/roles-permissions/compute) (`roles/compute.networkViewer)`
### Console
1. In the Google Cloud console, go to the **NCC** page.
[Go to NCC](https://console.cloud.google.com/hybrid/hubs/list)
2. In the project pull-down menu, select a project---in the
example diagram, the project is `my-project`.
3. Click **Delete hub**.
4. In the confirmation dialog, click **Delete** to delete the hub.
### gcloud
To delete the hub, use the
[`gcloud network-connectivity hubs delete` command](https://docs.cloud.google.com/sdk/gcloud/reference/network-connectivity/hubs/delete).
```
gcloud network-connectivity hubs delete HUB_NAME /
--project=PROJECT_ID
```
Replace the following values:
- `HUB_NAME`: the name of the hub to delete---in this case, `my-hub`.
- `PROJECT_ID`: the project ID of the project that contains the hub;in the example diagram, the project is `my-project`
### API
To delete the hub, use the
[`networkconnectivity.hubs.delete` method](https://docs.cloud.google.com/network-connectivity/docs/reference/networkconnectivity/rest/v1/projects.locations.global.hubs/delete).
```
DELETE https://networkconnectivity.googleapis.com/v1/projects/PROJECT_ID/locations/global/hubs/HUB_NAME
```
Replace the following values:
- `PROJECT_ID`: the project ID of the project that contains the hub;in the example diagram, the project is `my-project`
- `HUB_NAME`: the name of the hub to delete
### Delete the VPC network and subnet
> [!WARNING]
> **Warning:** Make sure not to delete VPC networks that carry production traffic.
Delete the VPC [network](https://docs.cloud.google.com/vpc/docs/create-modify-vpc-networks#deleting_a_network)
and [subnet](https://docs.cloud.google.com/vpc/docs/create-modify-vpc-networks#deleting_subnets) that you configured for
this tutorial.
## What's next
- To view a sample topology, see [Sample topology for site-to-site data transfer](https://docs.cloud.google.com/network-connectivity/docs/network-connectivity-center/concepts/data-transfer-topology).
- To learn more about how NCC enables full mesh connectivity, see [Route exchange with site-to-site data transfer](https://docs.cloud.google.com/network-connectivity/docs/network-connectivity-center/concepts/route-exchange).
- To learn about high availability requirements, see [High availability requirements for spoke resources](https://docs.cloud.google.com/network-connectivity/docs/network-connectivity-center/concepts/high-availability).
- To create hubs and spokes, see [Work with hubs and spokes](https://docs.cloud.google.com/network-connectivity/docs/network-connectivity-center/how-to/working-with-hubs-spokes).
- To find solutions for NCC issues, see [Troubleshooting](https://docs.cloud.google.com/network-connectivity/docs/network-connectivity-center/support/troubleshooting).