Network Connectivity Center (NCC) lets you use a third-party network virtual appliance to establish
connectivity between an external site and your Virtual Private Cloud (VPC)
network resources. To establish connectivity in this way, you use the
Router appliance feature.
Router appliance is one of several supported spoke types for
NCC. For
information about NCC, see the
[NCC overview](https://docs.cloud.google.com/network-connectivity/docs/network-connectivity-center/concepts/overview). For more
information about Router appliance, see the
[Router appliance overview](https://docs.cloud.google.com/network-connectivity/docs/network-connectivity-center/concepts/ra-overview).
## Sample configuration
In the following topology, an external site connects to two VPC
networks by using a Router appliance spoke.
The VM that hosts the router appliance instance has an interface in each
VPC network. The router appliance instance maintains Border
Gateway Protocol (BGP) sessions with the Cloud Routers in both of these
networks.
Each Cloud Router has two interfaces. The router appliance
interface in each network peers with both interfaces of the appropriate
Cloud Router, for a total of four peering sessions.
[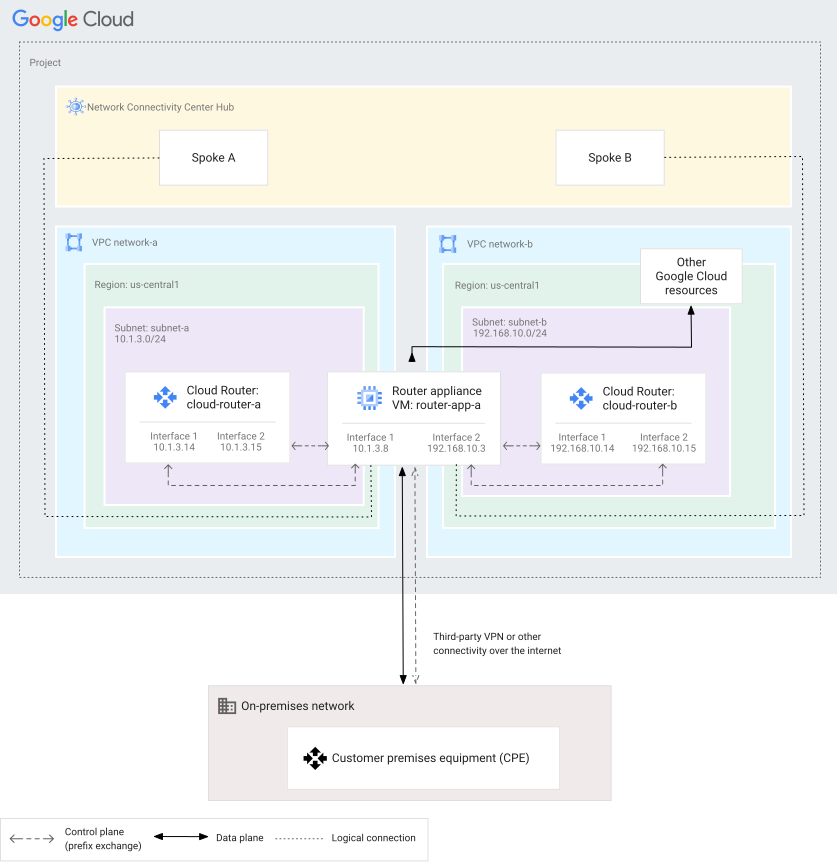](https://docs.cloud.google.com/static/network-connectivity/docs/network-connectivity-center/images/site-to-cloud-sample-topology.svg) Site-to-cloud sample topology (click to enlarge)
> [!NOTE]
> **Note:** When you set up site-to-cloud connectivity, you have many options. The following sections describe how to establish connectivity by using the sample configuration. For other options, see [Site-to-cloud topologies](https://docs.cloud.google.com/network-connectivity/docs/network-connectivity-center/concepts/site-to-cloud).
## Required tasks
To set up the sample configuration, make sure you meet the
[prerequisites](https://docs.cloud.google.com/network-connectivity/docs/network-connectivity-center/how-to/connect-site-to-cloud#before-you-begin) for doing this procedure, and then complete
the required tasks:
1. [Create the Compute Engine virtual machine (VM)](https://docs.cloud.google.com/network-connectivity/docs/network-connectivity-center/how-to/connect-site-to-cloud#create-ra-vm) that acts
as a router appliance instance. You
can create the VM by using a supported partner solution or
your own custom image.
2. Ensure that the router appliance instance is accessible to BGP traffic
through TCP port 179. To make it accessible, you might need to
[create firewall rules](https://docs.cloud.google.com/network-connectivity/docs/network-connectivity-center/how-to/creating-router-appliances#create-ra-firewall-rules).
3. [Create two spokes](https://docs.cloud.google.com/network-connectivity/docs/network-connectivity-center/how-to/connect-site-to-cloud#create-spoke), one in each VPC network.
Each spoke uses the same router appliance instance as its backing resource.
4. [Set up two Cloud Routers](https://docs.cloud.google.com/network-connectivity/docs/network-connectivity-center/how-to/connect-site-to-cloud#set-up-cloud-router), one in each
VPC network. For each Cloud Router, this task includes
the following sub-tasks:
1. [Create a Cloud Router](https://docs.cloud.google.com/network-connectivity/docs/network-connectivity-center/how-to/connect-site-to-cloud#create-cloud-routers) in the same
region as the router appliance instance.
2. [Create two interfaces](https://docs.cloud.google.com/network-connectivity/docs/network-connectivity-center/how-to/connect-site-to-cloud#create-redundant-interfaces) on each
Cloud Router.
3. [Configure BGP peering](https://docs.cloud.google.com/network-connectivity/docs/network-connectivity-center/how-to/connect-site-to-cloud#create-peers) on each Cloud Router.
5. [Configure BGP peering](https://docs.cloud.google.com/network-connectivity/docs/network-connectivity-center/how-to/connect-site-to-cloud#config-bgp-ra) on the router appliance instance.
The way that you complete these tasks can vary significantly. For example, if
you create a router appliance instance by using a partner solution, some of the
later tasks might be automated for you.
## Before you begin
Before you get started, review the following sections.
### Create or select a project
To make it easier to configure NCC, start by identifying a valid
project.
1. If you are using the Google Cloud CLI, set your project
ID by using the
[`gcloud config set` command](https://docs.cloud.google.com/sdk/gcloud/reference/config/set).
```
gcloud config set project PROJECT_ID
```
Replace `PROJECT_ID` with your unique project ID.
The gcloud CLI instructions on this page assume that you have set your project ID.
2. To confirm that you set the project ID correctly, use the
[`gcloud config list` command](https://docs.cloud.google.com/sdk/gcloud/reference/config/list).
```
gcloud config list --format='text(core.project)'
```
### Enable the Network Connectivity API
Before you can perform *any* tasks using NCC, you must enable the
Network Connectivity API.
### Console
To enable the Network Connectivity API:
1. In the Google Cloud console, go to the **Network Connectivity Center** page.
[Go to Network Connectivity Center](https://console.cloud.google.com/hybrid/hubs/list)
2. Click **Enable**.
Alternatively, you can enable the API by
using the
[Google Cloud console API Library](https://console.cloud.google.com/apis/library?project=_),
as described in [Enabling APIs](https://docs.cloud.google.com/apis/docs/getting-started#enabling_apis).
### Get access
To work with NCC, you need the permissions described in
[Roles and permissions](https://docs.cloud.google.com/network-connectivity/docs/network-connectivity-center/concepts/access-control).
When you configure NCC, you also work with Google Cloud
resources such as VPC networks, subnets,
and firewall rules. For more information about the permissions you need to work
with these resources, see the
[Compute Engine access control documentation](https://docs.cloud.google.com/compute/docs/access).
### IP addresses and router appliance instances
To set up a router appliance instance, you must establish peering between the
instance and the Cloud Router. To set up peering, the VM must use an
RFC 1918 internal IP address. You cannot peer these two resources if the VM
uses a different type of address. Also, both IP addresses must be in the same
region.
For information about how to view a VM's IP addresses, see the following
documents:
- [View the network configuration for an instance](https://docs.cloud.google.com/compute/docs/instances/view-network-properties)
- [Viewing IP addresses not attached to a VM instance](https://docs.cloud.google.com/sdk/gcloud/reference/compute/addresses/list)
For definitions and detailed information about IP address types, see
[IP addresses](https://docs.cloud.google.com/vpc/docs/ip-addresses).
#### Reserve a static internal IP address (recommended)
We recommend that you give your router appliance instance a static internal IP
address so that the address doesn't change during reboot. If the address
changes, BGP peering fails.
You have several options for assigning a reserved IP address. You can reserve
the IP address in advance. Alternatively, you can reserve the IP address when
you create the VM. If you mistakenly give the VM an ephemeral address, you can
later convert the address into a static address. For more information
about static IP addresses, see
[Reserving static IP addresses](https://docs.cloud.google.com/vpc/docs/reserve-static-internal-ip-address).
#### IP addresses for BGP peering
A router appliance instance uses its internal IP address to
peer with the Cloud Router. The instance does *not* use a link-local
address (such as `169.254.x.x`) for BGP peering.
Similarly, the Cloud Router uses two RFC 1918 internal IP addresses to
peer with the router appliance instance, one address for each interface.
These IP addresses can be manually or automatically assigned from the subnet
that contains both the router appliance instance interface and the
Cloud Router interface.
### Create VPC resources
The following sections describe how to create VPC networks and
subnets.
#### Create two VPC networks
If you haven't already, create two VPC networks. Set
each network's
[dynamic routing mode](https://docs.cloud.google.com/vpc/docs/create-modify-vpc-networks#switch-dynamic-routing) to `global`.
For more information about creating VPC networks, see
[Creating networks](https://docs.cloud.google.com/vpc/docs/create-modify-vpc-networks#creating_networks).
### Console
To create a custom VPC network using the Google Cloud console,
see
[Creating a custom mode network](https://docs.cloud.google.com/vpc/docs/create-modify-vpc-networks#create-custom-network).
Make sure to set **Dynamic routing mode** to **Global** . If you want to
follow the naming conventions used in the sample configuration, call your
networks `network-a` and `network-b`.
### gcloud
To create a custom VPC network, use the
[`gcloud compute networks create` command](https://docs.cloud.google.com/sdk/gcloud/reference/compute/networks/create).
```
gcloud compute networks create NAME \
--subnet-mode custom \
--bgp-routing-mode global
```
Replace `NAME` with the name of the VPC
network---for example, `network-a` or `network-b`.
### API
To create a custom VPC network by using the
Compute Engine API, see
[Using VPC](https://docs.cloud.google.com/vpc/docs/create-modify-vpc-networks#api_1).
#### Create a subnet
Create one subnet in `network-a` and one subnet in `network-b`.
### Console
To add a subnet using the Google Cloud console, see
[Adding subnets](https://docs.cloud.google.com/vpc/docs/create-modify-vpc-networks#add-subnets).
If you want to follow the naming conventions used in the sample
configuration, use the following values for the subnet in `network-a`:
- **Name** : `subnet-a`
- **Region** : `us-central1`
- **Range** : `10.1.3.0/24`
Use the following values for the subnet in `network-b`:
- **Name** : `subnet-b`
- **Region** : `us-central1`
- **Range** : `192.168.10.0/24`
### gcloud
To create a VPC subnet, use the
[`gcloud compute networks subnets create` command](https://docs.cloud.google.com/sdk/gcloud/reference/compute/networks/subnets/create).
```
gcloud compute networks subnets create NAME \
--network=NETWORK \
--region=REGION \
--range=RANGE
```
Replace the following:
- `NAME`: the name of the subnet that contains the router appliance VM---for example, `subnet-a` or `subnet-b`
- `NETWORK`: the network that contains the subnet---for example, `network-a` or `network-b`
- `REGION`: the region that contains the subnet---for example, `us-central1`
- `RANGE`: the IP range of the subnet in CIDR notation---for example, `10.1.3.0/24` or `192.168.10.0/24`
### API
To create a VPC subnet by using the Compute Engine API,
see [Using VPC](https://docs.cloud.google.com/vpc/docs/create-modify-vpc-networks#api_5).
## Create the router appliance VM
Create the Compute Engine VM that acts as a router appliance instance. The
VM is represented in the sample topology as `router-app-a`. It has two
interfaces, one in `network-a` and one in `network-b`.
When you create the VM, you must select a network virtual appliance image.
This image can be any of the following:
- A solution provided by a
[supported NCC partner](https://docs.cloud.google.com/network-connectivity/docs/network-connectivity-center/partners)
- A custom image, such as an image that you created
> [!NOTE]
> **Note:** If you are using an image from a vendor, see your vendor's documentation.
For more information about specifying images, see the following resources:
- [Images overview](https://docs.cloud.google.com/compute/docs/images)
- [Image families best practices](https://docs.cloud.google.com/compute/docs/images/image-families-best-practices)
- [Creating, deleting, and deprecating
custom images](https://docs.cloud.google.com/compute/docs/images/create-delete-deprecate-private-images)
For detailed information about creating a VM,
see [Creating and starting a VM instance](https://docs.cloud.google.com/compute/docs/instances/create-start-instance).
The examples in this section assume that you have reserved IP addresses for
the router appliance instance. For more information, see
[IP addresses for Router appliance](https://docs.cloud.google.com/network-connectivity/docs/network-connectivity-center/how-to/connect-site-to-cloud#ip-recommendations).
### Console
To create the VM used in the example configuration, see
[Creating and starting a VM instance](https://docs.cloud.google.com/compute/docs/instances/create-start-instance).
When you create the VM, make the following choices:
- If you want to follow the naming conventions used in the sample
configuration, use the following values:
- **Name** : `router-app-a`
- **Region** :`us-central1`
- **Zone** : `us-central1-a`
- To select an image, go the **Boot disk** area of the page, click
**Change**, and navigate to the appropriate image for the VM.
- Expand **Advanced options** , and then expand **Networking**. Use the
following values:
- Under **IP forwarding** , select **Enable**.
- Under **Network interfaces** , create two interfaces---one in `network-a` and one in `network-b`. To create each interface, select the appropriate network, and then click **Add a Network Interface** . Fill in the following fields:
- Select the **Subnet** where you want to locate the router appliance instance---for example, `subnet-a` or `subnet-b`.
- Under **Primary internal IP** , select the reserved RFC 1918 internal IP address that you want to use---for example, `10.1.3.8` or `192.168.10.3`.
- Under **Network Service Tier** , select **Premium** ; this [choice](https://docs.cloud.google.com/network-tiers/docs/overview) maximizes the extent to which traffic uses Google's network.
### gcloud
To create the two router appliance VMs used in the example
configuration, use the
[`gcloud compute instances create` command](https://docs.cloud.google.com/sdk/gcloud/reference/compute/instances/create).
Run the command twice---once for each router appliance instance. Replace
INSTANCE_NAME with the name of the VM that acts as a router
appliance instance.
In the following example, you assign the static internal IP address
and static external IP address that you reserved earlier to the VM.
You also specify the project that contains a vendor-provided image for the
VM along with the name of the image.
```
gcloud compute instances create INSTANCE_NAME \
--project=PROJECT \
--zone=ZONE \
--machine-type=MACHINE_TYPE \
--network-tier=NETWORK_TIER \
--network-interface=[subnet=SUBNET,private-network-ip=INTERNAL_IP_ADDRESS] \
--can-ip-forward \
--image-project=IMAGE_PROJECT \
--image=IMAGE
```
Replace the following:
- `INSTANCE_NAME`: the name of the VM acting as a router appliance instance---for example, `router-app-a` or `router-app-b`
- `PROJECT`: the name of the project that contains the router appliance VMs---for example, `my-project`
- `ZONE`: the Google Cloud zone that the VM is located in---for example, `us-west1-a`
- `MACHINE_TYPE`: the machine type resource to use for the VM---for example, `n1-standard-2`
- `NETWORK_TIER`: when creating the router appliance VMs, set the [network tier](https://docs.cloud.google.com/network-tiers/docs/overview) to `premium`; this choice maximizes the extent to which traffic uses Google's network
- `SUBNET`: the subnet assigned to the primary network interface for the VM---for example, `subnet-a-1`
- `INTERNAL_IP_ADDRESS`: the RFC 1918 internal IP address that is assigned to the VM interface that connects to the Cloud Router---for example, `10.0.1.10`
- `IMAGE_PROJECT`: the name of the project that contains the image specified in the `image` field---for example, `debian-cloud`
- `IMAGE`: the name of the image to install---for example, `debian-10-buster-v20210217`
### API
To create the two router appliance VMs used in the example
configuration, use the
[`compute.instances.insert` method](https://docs.cloud.google.com/compute/docs/reference/rest/v1/instances/insert).
For additional creation methods, see [Creating and
starting a VM instance](https://docs.cloud.google.com/compute/docs/instances/create-start-instance).
```
POST https://compute.googleapis.com/compute/v1/projects/PROJECT/zones/ZONE/instances
{
"machineType": "zones/ZONE/machineTypes/MACHINE_TYPE",
"name": "INSTANCE_NAME",
"canIpForward": "true",
"networkInterfaces": [{
"subnetwork": "regions/REGION/subnetworks/SUBNET",
"networkIP": "INTERNAL_IP_ADDRESS",
"accessConfigs": [{
"networkTier": "NETWORK_TIER,
}]
}],
"disks": [{
"initializeParams": {
"sourceImage": "projects/IMAGE_PROJECT/global/images/IMAGE"
},
"boot": true
}]
}
```
Replace the following:
- `PROJECT`: the name of the project that contains the router appliance VMs---for example, `my-project`
- `ZONE`: the Google Cloud zone that the VM is located in---for example, `us-west1-a`
- `MACHINE_TYPE`: the machine type resource to use for the VM---for example, `zones/us-west1-a/machineTypes/n1-standard-2`
- `INSTANCE_NAME`: the name of the VM---for example, `router-app-a` or `router-app-b`
- `REGION`: the region that contains the VM---for example, `us-west1`
- `SUBNET`: the subnet assigned to the primary network interface for the VM---for example, `regions/us-west1/subnetworks/subnet-a-1`
- `INTERNAL_IP_ADDRESS`: the RFC 1918 internal IP address that is assigned to the VM; configure the address for the VM interface that connects to the Cloud Router---for example, `10.0.1.10`
- `NETWORK_TIER`: when creating the router appliance VMs, set the [network tier](https://docs.cloud.google.com/network-tiers/docs/overview) to `premium`; this choice maximizes the extent to which traffic uses Google's network
- `IMAGE_PROJECT`: the name of the project that contains the image that you specify when creating the VM---for example, `debian-cloud`
- `IMAGE`: the name of the image to use when creating the VM---for example, `debian-10-buster-v20210217`
## Create a firewall rule to allow BGP
Create two firewall rules, one in `network-a` and `network-b`. Each rule
should allow BGP traffic on TCP port `179`.
For more information about firewall commands, see
[Using firewall rules](https://docs.cloud.google.com/vpc/docs/using-firewalls).
### Console
To create a VPC firewall rule using the
Google Cloud console, see
[Creating firewall rules](https://docs.cloud.google.com/vpc/docs/using-firewalls#console).
### gcloud
To create a VPC firewall rule by using the
Google Cloud CLI, see
[Creating firewall rules](https://docs.cloud.google.com/vpc/docs/using-firewalls#gcloud).
### API
To create a VPC firewall rule by using the
Compute Engine API, see
[Creating firewall rules](https://docs.cloud.google.com/vpc/docs/using-firewalls#api).
## Create NCC resources
Before you can use a router appliance VM, you must create the required
NCC resources.
### Create a hub
Before you can create NCC spokes, you must create a hub.
### Console
1. In the Google Cloud console, go to the **Network Connectivity Center** page.
[Go to Network Connectivity Center](https://console.cloud.google.com/hybrid/hubs/list)
2. In the project menu, select a project.
3. Enter a **Hub name**.
4. Enter an optional **Description**.
5. Verify the **Project ID**. If the project ID is incorrect, select a
different project by using the menu at the top of the screen.
6. Click **Continue**.
7. The console displays a form that lets you create a spoke. To fill it out
now, use the steps described in
[Create a Router appliance spoke](https://docs.cloud.google.com/network-connectivity/docs/network-connectivity-center/how-to/connect-site-to-cloud#create-spoke).
8. Click **Done**.
### gcloud
To create a hub, use the
[`gcloud network-connectivity hubs create` command](https://docs.cloud.google.com/sdk/gcloud/reference/network-connectivity/hubs/create).
```
gcloud network-connectivity hubs create HUB_NAME \
--description="DESCRIPTION" \
--labels="KEY"="VALUE"
```
Replace the following values:
- `HUB_NAME`: the name of the new hub
- `DESCRIPTION`: optional text that describes the hub
- `KEY`: the key in the key-value pair for the optional label text
- `VALUE`: the value in the key-value pair for the optional label text
### API
To create a hub, use the
[`networkconnectivity.hubs.create` method](https://docs.cloud.google.com/network-connectivity/docs/reference/networkconnectivity/rest/v1/projects.locations.global.hubs/create).
```
POST https://networkconnectivity.googleapis.com/v1/projects/PROJECT_ID/locations/global/hubs
{
"name":"HUB_NAME",
"description":"DESCRIPTION",
"labels": {
"KEY": "VALUE"
}
}
```
Replace the following values:
- `PROJECT_ID`: the project ID of the project that contains the new hub
- `HUB_NAME`: the name of the new hub
- `DESCRIPTION`: optional text that describes the hub
- `KEY`: the key in the key-value pair for the optional label text
- `VALUE`: the value in the key-value pair for the optional label text
### Create two Router appliance spokes
Create two Router appliance spokes. Both spokes use the same backing
resource: the router appliance instance that you just created. One spoke
uses the interface in `network-a` and the other uses the interface in `network-
b`.
Creating a spoke is required for enabling BGP
peering between the router appliance instance and the Cloud Router,
which you create in the next step.
For more information about how to create a spoke, see
[Work with hubs and spokes](https://docs.cloud.google.com/network-connectivity/docs/network-connectivity-center/how-to/working-with-hubs-spokes#create-ra-spoke).
### Console
**Enter basic spoke details**
1. In the Google Cloud console, go to the **Network Connectivity Center** page.
[Go to Network Connectivity Center](https://console.cloud.google.com/hybrid/hubs/list)
2. In the project menu, select a project.
3. Click the **Spokes** tab.
4. Click **Add spokes**.
5. In the **New spoke** form, set the **Spoke type** to
**Router appliance**.
6. Enter a **Spoke name** ---for example, `spoke-a` or `spoke-b`
7. Optionally, enter a **Description**.
8. Select the **Region** field for the new spoke.
9. Under **Site-to-site data transfer** , select **Off**.
10. In the **VPC network** drop-down list, select a network.
**Enter router appliance details**
1. Under **Attach instance(s) to the spoke** , use the drop-down list to select a router appliance---for example, `router-app-a`.
2. To add more router appliance instances to this spoke, click **Add instance** and repeat the preceding step.
3. When you are finished, click **Done** and continue to **Save your spoke**.
**Save your spokes**
1. To add the second spokes, click **Add spoke** and begin the process again, starting with entering a **Spoke name**.
2. When you are finished adding spokes, click **Create** . The **NCC** page updates to show details about the spokes that you created.
### gcloud
To create the Router appliance spokes, use the
[`gcloud network-connectivity spokes linked-router-appliances create` command](https://docs.cloud.google.com/sdk/gcloud/reference/network-connectivity/spokes/linked-router-appliances/create).
Run the command twice---once for each spoke.
```
gcloud network-connectivity spokes linked-router-appliances create NAME \
--hub="HUB_URI" \
--description="DESCRIPTION" \
--router-appliance=instance="ROUTER_APPLIANCE_URI",ip=IP_ADDRESS \
--region=REGION \
--labels="KEY"="VALUE"
```
Replace the following values:
- `NAME`: the name of the spoke---for example, `spoke-a`
- `HUB_URI`: the URI of the hub that you are attaching the spoke to
- `DESCRIPTION`: optional text that describes the spoke
- `ROUTER_APPLIANCE_URI`: the URI of the router appliance instance---for example,
```
https://www.googleapis.com/compute/projects/PROJECT_ID/zones/ZONE/instances/INSTANCE_NAME
```
- `IP_ADDRESS`: the internal IP address of the router appliance instance, in the appropriate VPCnetwork---for example, `10.1.3.8` or `192.168.10.3`
- `REGION`: the Google Cloud region where you want to locate the spoke---for example, `us-central1`
- `KEY`: the key in the key-value pair for the optional label text
- `VALUE`: the value in the key-value pair for the
optional label text
For example, the following command creates a router appliance spoke that
uses `router-app-a` as its underlying resources. This command references
the router appliance instance by using its `network-a` interface:
```
gcloud network-connectivity spokes linked-router-appliances create spoke-a \
--hub=my-hub \
--description="Test spoke 1" \
--router-appliance=instance="https://www.googleapis.com/compute/v1/projects/my-project/zones/us-central1-a/instances/router-app-a",ip=10.1.3.8 \
--region=us-central1 \
```
For example, the following command creates a router appliance spoke that
uses `router-app-a` as its underlying resources. This command references
the router appliance instance by using its `network-b` interface:
```
gcloud network-connectivity spokes linked-router-appliances create spoke-b \
--hub=my-hub \
--description="Test spoke 1" \
--router-appliance=instance="https://www.googleapis.com/compute/v1/projects/my-project/zones/us-central1-a/instances/router-app-a",ip=192.168.10.3\
--region=us-central1 \
```
### API
To create a Router appliance spoke, use the
[`networkconnectivity.spokes.create` method](https://docs.cloud.google.com/network-connectivity/docs/reference/networkconnectivity/rest/v1/projects.locations.spokes/create).
For each router appliance instance that you want to associate with
the spoke, add an [instance](https://docs.cloud.google.com/network-connectivity/docs/reference/networkconnectivity/rest/v1/projects.locations.spokes#RouterApplianceInstance)
by using the `linkedRouterApplianceInstances.instances` array.
```
POST https://networkconnectivity.googleapis.com/v1/projects/PROJECT_ID/locations/REGION/spokes/SPOKE_NAME
{
"hub": "HUB_URI",
"labels": {"KEY": "VALUE"},
"linkedRouterApplianceInstances": {
"instances": [
{
"virtualMachine": "ROUTER_APPLIANCE_URI",
"ipAddress": INTERNAL_IP_ADDRESS,
},
],
"siteToSiteDataTransfer": BOOLEAN
}
}
```
Replace the following values:
- `PROJECT_ID`: the project ID of your project
- `REGION`: the Google Cloud region where you want to locate the spoke---for example, `us-west1`
- `SPOKE_NAME`: the name you want to give the spoke
- `HUB_URI`: the URI of the hub that you are attaching the spoke to---for example,
```
http://networkconnectivity.googleapis.com/v1/projects/PROJECT_NAME/locations/global/hubs/HUB_NAME
```
- `KEY`: the key in the key-value pair for the optional label text
- `VALUE`: the value in the key-value pair for the optional label text
- `ROUTER_APPLIANCE_URI`: the URI of the router appliance instance---for example,
```
https://www.googleapis.com/compute/projects/PROJECT_ID/zones/ZONE/instances/INSTANCE_NAME
```
- `IP_ADDRESS`: the internal IP address of the router appliance instance for the appropriateVPC network---for example, `10.1.3.8` or `192.168.10.3`
- `BOOLEAN`: a value that determines whether site-to-site
data transfer is enabled for this spoke; for this use case, set the option
to `false`
For example, to create a spoke that uses `router-app-a` for the interface
in `network-a`, the body of your request should be structured
as follows:
```
{
"hub": "http://networkconnectivity.googleapis.com/v1/projects/my-project/locations/global/hubs/my-hub",
"labels": {
"environment" : "test"
},
"linkedRouterApplianceInstances": {
"instances": [
{
"virtualMachine": "https://www.googleapis.com/compute/v1/projects/my-project/zones/us-central1-a/instances/router-app-a",
"ipAddress": "10.1.3.8",
},
],
"siteToSiteDataTransfer": false
}
}
```
To create a spoke that uses `router-app-a` for the interface
in `network-b`, the body of your request should be structured
as follows:
```
{
"hub": "http://networkconnectivity.googleapis.com/v1/projects/my-project/locations/global/hubs/my-hub",
"labels": {
"environment" : "test"
},
"linkedRouterApplianceInstances": {
"instances": [
{
"virtualMachine": "https://www.googleapis.com/compute/v1/projects/my-project/zones/us-central1-a/instances/router-app-a",
"ipAddress": "192.168.10.3",
},
],
"siteToSiteDataTransfer": false
}
}
```
## Set up Cloud Routers
Router appliance uses Cloud Routers to exchange routes with
VPC networks. For this reason, you must create a
Cloud Router in each VPC network and complete a few
other setup tasks.
### Create the Cloud Routers
If you are using the same values as the sample topology, create two
Cloud Routers, one in `network-a` and one in `network-b`. Both
Cloud Routers should be in `us-central1`.
For more information, see
[Creating Cloud Routers](https://docs.cloud.google.com/network-connectivity/docs/router/how-to/create-router-vpc-on-premises-network).
### Console
To create a Cloud Router in the Google Cloud console, use one of the following approaches:
- Use the **Cloud Router** page, as described in
[Create a Cloud Router](https://docs.cloud.google.com/network-connectivity/docs/router/how-to/create-router-vpc-on-premises-network#create_a).
- Use the **Network Connectivity Center** page. The advantage
of this approach is that it lets you create the router, the interfaces, and
the BGP sessions at the same time. For more information about completing all of
these steps together, see
[Configuring BGP peering on the Cloud Router](https://docs.cloud.google.com/network-connectivity/docs/network-connectivity-center/how-to/connect-site-to-cloud#create-peers).
### gcloud
To create a Cloud Router, use the
[`gcloud compute routers create` command](https://docs.cloud.google.com/sdk/gcloud/reference/compute/routers/create).
```
gcloud compute routers create NAME \
--region=REGION \
--network=NETWORK \
--asn=ASN \
--project=PROJECT_ID
```
Replace the following:
- `NAME`: the name of the Cloud Router---for example, `cloud-router-a` or `cloud-router-b`
- `REGION`: the region that contains the Cloud Router---for example, `us-central1`
- `NETWORK`: the VPC network that contains the Cloud Router---for example, `network-a` or `network-b`
- `ASN`: the autonomous system number (ASN) for the Cloud Router---this ASN must be a 16-bit or 32-bit private ASN as defined in [RFC 6996](https://tools.ietf.org/html/rfc6996)---for example, `65000`
- `PROJECT_ID`: the project ID for the Cloud Router---for example, `my-project`
### API
To create a Cloud Router, use the
[`compute.routers.insert` method](https://docs.cloud.google.com/compute/docs/reference/rest/v1/routers/insert).
```
POST https://compute.googleapis.com/compute/v1/projects/PROJECT_ID/regions/REGION/routers
{
"name": "NAME",
"network": "NETWORK",
"bgp": {
"asn": ASN
}
}
```
Replace the following:
- `PROJECT_ID`: the project ID for the Cloud Router---for example, `my-project`
- `REGION`: the region that contains the Cloud Router---for example, `us-central1`
- `NAME`: the name of the Cloud Router---for example, `cloud-router-a` or `cloud-router-b`
- `NETWORK`: the URI of the VPC network that contains the Cloud Router---for example, `/global/networks/network-a` or `/global/networks/network-b`
- `ASN`: the autonomous system number (ASN) for the Cloud Router---this ASN must be a 16-bit or 32-bit private ASN as defined in [RFC 6996](https://tools.ietf.org/html/rfc6996)---for example, `65000`
### Create two interfaces on each Cloud Router
To establish redundancy, create two interfaces on each Cloud Router.
On each Cloud Router, the two interfaces must be associated with the
same subnet as the corresponding router appliance interface. If you're using
the values from the sample topology, do the following:
- For `cloud-router-a`, create two interfaces in `subnet-a`.
- For `cloud-router-b`, create two interfaces in `subnet-b`.
Each Cloud Router interface uses a regional internal IP address. If you
explicitly specify the internal IP address for the interface, the IP address
must belong to the primary IP address range of the subnet. It cannot already be
in use by another resource, such as a VM or another Cloud Router
interface.
There are no Google Cloud console instructions for this step. If you're
using the Google Cloud console, when you complete the next task
([Creating BGP peering on each Cloud Router)](https://docs.cloud.google.com/network-connectivity/docs/network-connectivity-center/how-to/connect-site-to-cloud#create-peers),
the interfaces are created automatically.
### gcloud
To create redundant interfaces on your Cloud Routers, use the
[`gcloud compute routers add-interface` command](https://docs.cloud.google.com/sdk/gcloud/reference/compute/routers/add-interface).
Complete the following steps twice---once for `cloud-router-a` and
again for `cloud-router-b`:
1. For each Cloud Router, create the first interface:
```
gcloud compute routers add-interface ROUTER_NAME \
--interface-name=FIRST_INTERFACE_NAME \
--ip-address=FIRST_INTERFACE_IP_ADDRESS \
--subnetwork=SUBNET \
--region=REGION \
--project=PROJECT_ID
```
Replace the following:
- `ROUTER_NAME`: the name of the Cloud Router to update---for example, `cloud-router-a` or `cloud-router-b`
- `FIRST_INTERFACE_NAME`: the name of the interface---for example, `interface-1`
- `FIRST_INTERFACE_IP_ADDRESS`: the RFC 1918 internal IP address to use for the first interface; if you don't specify a value, Google tries to find a free address in the primary IP address range of the subnet
- `SUBNET`: the subnet that contains the Cloud Router interface and the corresponding router appliance instance interface
- `REGION`: the Google Cloud region where the Cloud Router is---for example, `us-central1`
- `PROJECT_ID`: the project ID for the Cloud Router---for example, `my-project`
2. For each Cloud Router, create the second interface:
```
gcloud compute routers add-interface ROUTER_NAME \
--interface-name=SECOND_INTERFACE_NAME \
--ip-address=SECOND_INTERFACE_IP_ADDRESS \
--subnetwork=SUBNET \
--redundant-interface=FIRST_INTERFACE_NAME \
--region=REGION \
--project=PROJECT_ID
```
Replace the following:
- `ROUTER_NAME`: the name of the Cloud Router to update---for example, `cloud-router-a` or `cloud-router-b`
- `SECOND_INTERFACE_NAME`: the name of the interface---for example, `interface-2`
- `SECOND_INTERFACE_IP_ADDRESS`: the RFC 1918 internal IP address to use for the second interface; if you don't specify a value, Google tries to find a free address in the primary IP address range of the subnet
- `SUBNET`: the subnet that contains the two Cloud Router interfaces and the corresponding router appliance instance interface
- `FIRST_INTERFACE_NAME`: the name of the interface that you created in Step 1
- `REGION`: the Google Cloud region where the Cloud Router is---for example, `us-central1`
- `PROJECT_ID`: the project ID for the Cloud Router---for example, `my-project`
#### Sample commands for `cloud-router-a`
The following command creates the first interface on `cloud-router-a`:
```
gcloud compute routers add-interface cloud-router-a \
--interface-name=interface-1 \
--ip-address=10.1.3.14 \
--subnetwork=subnet-a \
--region=us-central1 \
--project=my-project
```
The following command creates the second interface on `cloud-router-a`:
```
gcloud compute routers add-interface cloud-router-a \
--interface-name=interface-2 \
--ip-address=10.1.3.15 \
--subnetwork=subnet-a \
--redundant-interface=interface-1 \
--region=us-central1 \
--project=my-project
```
#### Sample commands for `cloud-router-b`
The following command creates the first interface on `cloud-router-b`:
```
gcloud compute routers add-interface cloud-router-b \
--interface-name=interface-1 \
--ip-address=192.168.10.14 \
--subnetwork=subnet-b \
--region=us-central1 \
--project=my-project
```
The following command creates the second interface on `cloud-router-b`:
```
gcloud compute routers add-interface cloud-router-b \
--interface-name=interface-2 \
--ip-address=192.168.10.15 \
--subnetwork=subnet-b \
--redundant-interface=interface-1 \
--region=us-central1 \
--project=my-project
```
### API
To create redundant interfaces on your Cloud Routers,
use the
[`compute.routers.patch` method](https://docs.cloud.google.com/compute/docs/reference/rest/v1/routers/patch).
Use the following request twice---once for `cloud-router-a` and
again for `cloud-router-b`:
```
"PATCH
https"://www.googleapis.com/compute/v1/projects/PROJECT_ID/regions/REGION/routers/NAME
{
"region":"REGION",
"interfaces":[
{
"name":"FIRST_INTERFACE_NAME",
"privateIpAddress:"FIRST_INTERFACE_IP_ADDRESS",
"subnetwork": "https://www.googleapis.com/compute/v1/projects/PROJECT_ID/regions/REGION/subnetworks/SUBNET"
},
{
"name":"SECOND_INTERFACE_NAME",
"privateIpAddress:"SECOND_INTERFACE_IP_ADDRESS",
"subnetwork": "https://www.googleapis.com/compute/v1/projects/PROJECT_ID/regions/REGION/subnetworks/SUBNET",
"redundantInterface": "FIRST_INTERFACE_NAME"
}
]
}
```
Replace the following:
- `PROJECT_ID`: the project ID for the Cloud Router---for example, `my-project`
- `REGION`: the Google Cloud region where the Cloud Router is---for example, `us-central1`
- `NAME`: the name of the Cloud Router to update---for example, `cloud-router-a` or `cloud-router-b`
- `NETWORK`: the VPC network that contains the Cloud Router---for example,`network-a`
- `FIRST_INTERFACE_NAME`: the name of the first interface---for example, `interface-1`
- `FIRST_INTERFACE_IP_ADDRESS`: the RFC 1918 internal IP address to use for the first interface; if you don't specify a value, Google tries to find a free address in the primary IP address range of the subnet
- `SUBNET`: the subnet that contains the two Cloud Router interfaces and the corresponding router appliance instance interface
- `SECOND_INTERFACE_NAME`: the name of the second interface---for example, `interface-2`
- `SECOND_INTERFACE_IP_ADDRESS`: the RFC 1918 internal
IP address to use for the second interface; if you don't specify a value,
Google tries to find a free address in the primary IP address
range of the subnet
#### Sample commands for `cloud-router-a`
The following command creates two interfaces on `cloud-router-a`:
```
"PATCH https"://www.googleapis.com/compute/v1/projects/my-project/regions/us-central1/routers/cloud-router-a
{
"region":"us-central1",
"interfaces":[
{
"name":"router-appliance-interface-0",
"privateIpAddress:"10.1.3.14",
"subnetwork": "https://www.googleapis.com/compute/v1/projects/my-project/regions/us-west1/subnetworks/subnet-a"
},
{
"name":"router-appliance-interface-1",
"privateIpAddress:"10.1.3.15",
"subnetwork": "https://www.googleapis.com/compute/v1/projects/my-project/regions/us-west1/subnetworks/subnet-a",
"redundantInterface": "router-appliance-interface-0"
}
]
}
```
#### Sample command for `cloud-router-b`
The following command creates two interfaces on `cloud-router-b`:
```
"PATCH https"://www.googleapis.com/compute/v1/projects/my-project/regions/us-central1/routers/cloud-router-b
{
"region":"us-central1",
"interfaces":[
{
"name":"router-appliance-interface-0",
"privateIpAddress:"192.168.10.14",
"subnetwork": "https://www.googleapis.com/compute/v1/projects/my-project/regions/us-central1/subnetworks/subnet-b"
},
{
"name":"router-appliance-interface-1",
"privateIpAddress:"192.168.10.15",
"subnetwork": "https://www.googleapis.com/compute/v1/projects/my-project/regions/us-central1/subnetworks/subnet-b",
"redundantInterface": "router-appliance-interface-0"
}
]
}
```
### Configure BGP peering on each Cloud Router
For each interface on the router appliance instance, you must create two BGP
peering sessions---one for each Cloud Router interface. If you are
using the values from the sample topology, do the following:
- Create two peering sessions between `cloud-router-a` and the
`network-a` interface of `router-app-a`.
- Create two peering sessions between `cloud-router-b` and the
`network-b` interface of `router-app-a`.
### Console
Complete the following steps twice---once for `spoke-a` and
again for `spoke-b`:
1. Go to the **Network Connectivity Center** page.
[Go to Network Connectivity Center](https://console.cloud.google.com/hybrid/hubs/list)
2. In the project menu, select a project.
3. Click the **Spokes** tab.
4. In the **Spoke name** column, select a spoke to view the **Spoke details** page. For example, select `spoke-a` or `spoke-b`.
1. In the **Name** column, locate `router-app-a`.
Click the expand icon to display the **Configure BGP session**
links. Click either of these links. In response, the system
displays the **Configure Cloud Router and BGP sessions**
panel.
1. In the **Cloud Router** section, do one of the following:
- To select an existing Cloud Router, click **Use existing** . Use the **Cloud Router** field to identify the appropriate resource, and then click **Select and continue**.
- To create a Cloud Router on the **Network Connectivity Center** page, click **Create new** , and follow the prompts to create the Cloud Router. Then click **Create and continue**.
2. Under **BGP Sessions** , set up the two BGP sessions. Complete the following steps twice, once for each session:
1. Click **Edit BGP session**.
2. Fill in the form by entering a **Name** , a **Peer ASN** , and an **Advertised route priority (MED)** . Click **Save and continue**.
3. Click **Create**.
### gcloud
To create BGP peers on your Cloud Routers, use the
[`gcloud compute routers add-bgp-peer` command](https://docs.cloud.google.com/sdk/gcloud/reference/compute/routers/add-bgp-peer).
Complete the following steps twice---once for `cloud-router-a` and
again for `cloud-router-b`:
1. Create the first BGP peer:
```
gcloud compute routers add-bgp-peer NAME \
--peer-name=PEER_NAME \
--interface=INTERFACE \
--peer-ip-address=PEER_IP_ADDRESS \
--peer-asn=PEER_ASN \
--instance=ROUTER_APPLIANCE \
--instance-zone=ROUTER_APPLIANCE_ZONE \
--region=REGION
```
2. Create the second BGP peer:
```
gcloud compute routers add-bgp-peer NAME \
--peer-name=PEER_NAME \
--interface=INTERFACE \
--peer-ip-address=PEER_IP_ADDRESS \
--peer-asn=PEER_ASN \
--instance=ROUTER_APPLIANCE \
--instance-zone=ROUTER_APPLIANCE_ZONE \
--region=REGION
```
Replace the following:
- `NAME`: the name of the Cloud Router to update---for example, `cloud-router-a` or `cloud-router-b`
- `PEER_NAME`: the name of the BGP peering session to establish with the router appliance instance
- `INTERFACE`: the name of the interface for this BGP peer
- `PEER_IP_ADDRESS`: the [internal IP address](https://docs.cloud.google.com/vpc/docs/ip-addresses) of the peer router (the router appliance instance)---for example, `10.1.3.8` or `192.168.10.3`
- `PEER_ASN`: the BGP autonomous system number (ASN) for this BGP peer---this ASN must be a 16-bit or 32-bit private ASN as defined in [RFC 6996](https://tools.ietf.org/html/rfc6996)
- `ROUTER_APPLIANCE`: the name of the VM acting as the router appliance instance---for example, `router-app-a`
- `ROUTER_APPLIANCE_ZONE`: the zone where the VM acting as the router appliance instance is located---for example, `us-central1-a`
- `REGION`: the region where the VM acting as the router appliance instance is located---for example, `us-central1`
#### Sample commands for `cloud-router-a`
Use the follow commands to create the BGP peers for `cloud-router-a`:
```
gcloud compute routers add-bgp-peer cloud-router-a \
--peer-name=router-appliance-bgp-peer-router-app-a-0 \
--interface=router-appliance-interface-0 \
--peer-ip-address=10.1.3.8 \
--peer-asn=65001 \
--instance=router-app-a \
--instance-zone=us-central1-a \
--region=us-central1
```
```
gcloud compute routers add-bgp-peer cloud-router-a \
--peer-name=router-appliance-bgp-peer-router-app-a-1 \
--interface=router-appliance-interface-1 \
--peer-ip-address=10.1.3.8 \
--peer-asn=65001 \
--instance=router-app-a \
--instance-zone=us-central1-a \
--region=us-central1
```
#### Sample commands for `cloud-router-b`
Use the follow commands to create the BGP peers for `cloud-router-b`:
```
gcloud compute routers add-bgp-peer cloud-router-b \
--peer-name=router-appliance-bgp-peer-router-app-a-0 \
--interface=router-appliance-interface-0 \
--peer-ip-address=192.168.10.3 \
--peer-asn=65001 \
--instance=router-app-a \
--instance-zone=us-central1-a \
--region=us-central1
```
```
gcloud compute routers add-bgp-peer cloud-router-b \
--peer-name=router-appliance-bgp-peer-router-app-a-1 \
--interface=router-appliance-interface-1 \
--peer-ip-address=192.168.10.3 \
--peer-asn=65001 \
--instance=router-app-a \
--instance-zone=us-central1-a \
--region=us-central1
```
### API
To create BGP peers on a Cloud Router, use the
[`compute.routers.patch` method](https://docs.cloud.google.com/compute/docs/reference/rest/v1/routers/patch).
Use this method twice---once for `cloud-router-a` and again for
`cloud-router-b`.
```
PATCH
https://compute.googleapis.com/compute/v1/projects/PROJECT_ID/regions/REGION/routers/NAME
{
"bgpPeers": [
{
"name": "PEER_NAME",
"interfaceName": "INTERFACE_NAME",
"ipAddress": "IP_ADDRESS",
"peerIpAddress": "PEER_IP_ADDRESS",
"routerApplianceInstance": "https://compute.googleapis.com/compute/v1/projects/PROJECT_ID/zone/ROUTER_APPLIANCE_ZONE/instances/ROUTER_APPLIANCE_INSTANCE",
"peerAsn": PEER_ASN,
}
{
"name": "PEER_NAME",
"interfaceName": "INTERFACE_NAME",
"ipAddress": "IP_ADDRESS",
"peerIpAddress": "PEER_IP_ADDRESS",
"routerApplianceInstance": "https://compute.googleapis.com/compute/v1/projects/PROJECT_ID/zone/ROUTER_APPLIANCE_ZONE/instances/ROUTER_APPLIANCE_INSTANCE",
"peerAsn": PEER_ASN
}
]
}
```
Replace the following:
- `PROJECT_ID`: the project ID for the Cloud Router
- `REGION`: the region where the VM acting as the router appliance instance is located
- `NAME`: the name of the Cloud Router to update
- `PEER_NAME`: the name of the BGP peering session to establish with the router appliance instance
- `INTERFACE_NAME`: the name of the Cloud Router interface to add the peer to
- `IP_ADDRESS`: the RFC 1918 internal IP address of the Cloud Router to use for the peering session
- `PEER_IP_ADDRESS`: the internal IP address of the VM acting as a router appliance instance;---for example, `10.1.3.8` or `192.168.10.3`
- `ROUTER_APPLIANCE_INSTANCE`: the name in URL format for the VM acting as the router appliance instance
- `ROUTER_APPLIANCE_ZONE`: the zone where the VM acting as the router appliance instance is located
- `PEER_ASN`: the BGP autonomous system number (ASN)
for this BGP peer---this ASN must be a 16-bit or 32-bit private ASN
as defined in [RFC 6996](https://tools.ietf.org/html/rfc6996)
#### Sample commands for `cloud-router-a`
```
PATCH
https://compute.googleapis.com/compute/v1/projects/my-project/regions/us-west1/routers/cloud-router-a
{
"bgpPeers": [
{
"name": "router-appliance-bgp-peer-router-app-a-0",
"interfaceName": "router-appliance-interface-0",
"ipAddress": "10.1.3.14",
"peerIpAddress": "10.1.3.8",
"routerApplianceInstance": "https://compute.googleapis.com/compute/v1/projects/my-project/zone/us-central1-a/instances/router-app-a",
"peerAsn": 65001,
}
{
"name": "router-appliance-bgp-peer-router-app-a-1",
"interfaceName": "router-appliance-interface-1",
"ipAddress": "10.1.3.15",
"peerIpAddress": "10.1.3.8",
"routerApplianceInstance": "https://compute.googleapis.com/compute/v1/projects/my-project/zone/us-central1-a/instances/router-app-a",
"peerAsn": 65001
}
]
}
```
#### Sample commands for `cloud-router-b`
```
PATCH
https://compute.googleapis.com/compute/v1/projects/my-project/regions/us-west1/routers/cloud-router-b
{
"bgpPeers": [
{
"name": "router-appliance-bgp-peer-router-app-a-0",
"interfaceName": "router-appliance-interface-0",
"ipAddress": "192.168.10.14",
"peerIpAddress": "192.168.10.3",
"routerApplianceInstance": "https://compute.googleapis.com/compute/v1/projects/my-project/zone/us-central1-a/instances/router-app-a",
"peerAsn": 65001,
}
{
"name": "router-appliance-bgp-peer-router-app-a-1",
"interfaceName": "router-appliance-interface-1",
"ipAddress": "192.168.10.15,
"peerIpAddress": "192.168.10.3",
"routerApplianceInstance": "https://compute.googleapis.com/compute/v1/projects/my-project/zone/us-central1-a/instances/router-app-a",
"peerAsn": 65001
}
]
}
```
## Configure BGP on the router appliance instance
Configure your router appliance instance for BGP connectivity to
the two Cloud Routers. To do this, refer to the vendor documentation
for your router appliance image.
## What's next
- To delete a router appliance instance, see [Delete router appliance instances](https://docs.cloud.google.com/network-connectivity/docs/network-connectivity-center/how-to/deleting-router-appliances).
- To view a list of partners whose solutions are integrated with NCC, see [NCC partners](https://docs.cloud.google.com/network-connectivity/docs/network-connectivity-center/partners).
- To learn about resources that you can add to spokes, see [Spokes](https://docs.cloud.google.com/network-connectivity/docs/network-connectivity-center/concepts/overview#supported-spoke-resources).
- To view Router appliance monitoring and logging information, see [Viewing logs and metrics](https://docs.cloud.google.com/network-connectivity/docs/network-connectivity-center/how-to/viewing-logs-metrics).
- To find solutions for Router appliance issues, see [Troubleshooting](https://docs.cloud.google.com/network-connectivity/docs/network-connectivity-center/support/troubleshooting#troubleshooting-ra).
- For information about interacting with NCC by using the API or the gcloud CLI, see [APIs and reference](https://docs.cloud.google.com/network-connectivity/docs/network-connectivity-center/apis).