You can view the dashboards and topology map that Application Monitoring creates for your
[App Hub](https://docs.cloud.google.com/app-hub/docs/overview) applications, services, and
workloads to monitor resource performance, inspect golden signals and
alerts, register services and workloads, and diagnose issues.
## What Application Monitoring displays
The Application Monitoring dashboards display the following:
- Details about your registered applications, including their location, criticality, and registered services () and workloads ().
- Details about your discovered and registered services and workloads,
including their functional type, which lets you identify agents
() and MCP servers ().
- Telemetry data for your applications, services, and workloads:
- Log and metric data that [supported infrastructure](https://docs.cloud.google.com/monitoring/docs/application-monitoring-services) generates.
- Trace spans that [instrumented applications](https://docs.cloud.google.com/monitoring/docs/instrument-for-application-monitoring#add_application_attributes_to_trace_spans) generate.
- OpenTelemetry-defined golden signals for traffic, latency, and error rate when a workload runs on Google Kubernetes Engine. To learn more, see [Instrument for
Application Monitoring](https://docs.cloud.google.com/monitoring/docs/instrument-for-application-monitoring).
- Open alerts for your applications, services, and workloads.
For applications and for registered services and workloads, these
alerts are from
[alerting policies associated with an App Hub application](https://docs.cloud.google.com/monitoring/docs/setup-application-monitoring#alert).
For discovered services and workloads,
Google Cloud Observability uses the [Cloud Asset Inventory](https://docs.cloud.google.com/asset-inventory/docs/asset-names)
name to identify relevant alerting policies.
- A [topology graph](https://docs.cloud.google.com/monitoring/docs/application-topology) that provides a
dynamic view of the relationships between services and workloads. This graph
also displays alerts and traffic.
## Google Cloud console navigation when using an app-enabled folder
App Hub supports two configurations: app-enabled folder
and App Hub host projects. This section applies only when
you use an app-enabled folder.
When you use an app-enabled folder, the Google Cloud console automatically
resets the resource picker from an app-enabled folder to the
folder's management project when you navigate to a Google Cloud Observability page.
If you navigate to another page in the Google Cloud console, then the
resource picker is reset to the app-enabled folder.
Cloud Logging supports folders as a resource. For example, folders store
system-created log sinks and log buckets named `_Default` and `_Required`.
To access the folder resource, use the resource picker and
manually select the app-enabled folder.
## Before you begin
Before you can use Application Monitoring, make sure that you configure
your
[App Hub](https://docs.cloud.google.com/app-hub/docs/overview) host project or
management project. This is the project
that you use to view your application's telemetry data:
-
To get the permissions that
you need to view log and metric data, create alerting policies, and customize dashboards,
ask your administrator to grant you the
following IAM roles:
- [Logs Viewer](https://docs.cloud.google.com/iam/docs/roles-permissions/logging#logging.viewer) (`roles/logging.viewer`) on your [App Hub](https://docs.cloud.google.com/app-hub/docs/overview) host project or management project and any other projects listed in its default log scope. This role grants access to most log entries in the `_Default` log bucket. For more information, see [Logging roles](https://docs.cloud.google.com/logging/docs/access-control#considerations).
- [Logs View Accessor](https://docs.cloud.google.com/iam/docs/roles-permissions/logging#logging.viewAccessor) (`roles/logging.viewAccessor`) on the log views listed in the default log scope of your [App Hub](https://docs.cloud.google.com/app-hub/docs/overview) host project or management project. To learn more about granting access to a log view, see [Control access to a log view](https://docs.cloud.google.com/logging/docs/logs-views#about-iam-policies).
- [Monitoring Editor](https://docs.cloud.google.com/iam/docs/roles-permissions/monitoring#monitoring.editor) (`roles/monitoring.editor`) on your [App Hub](https://docs.cloud.google.com/app-hub/docs/overview) host project or management project. For principals who don't need to create or modify alerting policies or dashboards, consider granting the [Monitoring Viewer](https://docs.cloud.google.com/iam/docs/roles-permissions/monitoring#monitoring.editor) role (`roles/monitoring.viewer`).
- [Cloud Trace User](https://docs.cloud.google.com/iam/docs/roles-permissions/cloudtrace#cloudtrace.user) (`roles/cloudtrace.user`) on your [App Hub](https://docs.cloud.google.com/app-hub/docs/overview) host project or management project, and the projects in the default trace scope.
- [App Hub viewer](https://docs.cloud.google.com/iam/docs/roles-permissions/apphub#apphub.viewer) (`roles/apphub.viewer`) on your [App Hub](https://docs.cloud.google.com/app-hub/docs/overview) host project or management project. For more information, see [App Hub roles and permissions](https://docs.cloud.google.com/app-hub/docs/roles-permissions).
For more information about granting roles, see [Manage access to projects, folders, and organizations](https://docs.cloud.google.com/iam/docs/granting-changing-revoking-access).
You might also be able to get
the required permissions through [custom
roles](https://docs.cloud.google.com/iam/docs/creating-custom-roles) or other [predefined
roles](https://docs.cloud.google.com/iam/docs/roles-overview#predefined).
- Make sure that you've configured the observability scope of
your
[App Hub](https://docs.cloud.google.com/app-hub/docs/overview) host project or
management project. For more information, see
[Set up Application Monitoring](https://docs.cloud.google.com/monitoring/docs/setup-application-monitoring).
The observability scope controls which data is available to
your
[App Hub](https://docs.cloud.google.com/app-hub/docs/overview) host project or
management project. The default settings for these
scopes might not let you view all log or metric data.
- Update the alerting policies that monitor your application data to
include application-specific labels. For more information, see
[Associate an alerting policy with a service or workload](https://docs.cloud.google.com/monitoring/docs/setup-application-monitoring#alert).
## List applications
To list the applications you have registered with App Hub, along with
information like the number of alerts and the application's location,
criticality, and environment, do the following:
1. In the Google Cloud console, go to the **Application monitoring** page:
[Go to **Application monitoring**](https://console.cloud.google.com/monitoring/applications)
If you use the search bar to find this page, then select the result whose subheading is
**Monitoring**.
2. In the toolbar of the Google Cloud console, select your [App Hub](https://docs.cloud.google.com/app-hub/docs/overview) host project or management project.
3. Select the **Applications** tab.
The following screenshot illustrates the summary dashboard:

From the **Applications** tab, you have several options:
- To open an application in App Hub,
click **More** , and select **Manage in AppHub**.
- To investigate an application, select the application's name.
From the dashboard that opens, you can explore the application's log, trace,
and metric data and its topology. You can also open dashboards that are
specific to each service or workload that is part of the application.
To learn more, see the
[Investigate an application](https://docs.cloud.google.com/monitoring/docs/application-monitoring#investigate-application)
section of this document.
## List registered and discovered services and workloads
App Hub lets you [register](https://docs.cloud.google.com/app-hub/docs/register-resources)
infrastructure resources as services or workloads. It can also discover
infrastructure resources that are candidates for registration.
Services and workloads can have one of the following registration statuses:
- **Registered**: Services and workloads registered to an application and
managed by App Hub.
- **Discovered** : Services and workloads that you can register to an
application because they are part of the
[application management boundary](https://docs.cloud.google.com/app-hub/docs/key-concepts#app-mgmt-boundary) and
that aren't registered to any other application or can be registered to
multiple applications. The discovered status also includes services and
workloads that you delete or unregister from an application but that you can
register again.
- **Detached**: Services or workloads that have been registered to an
application, but that App Hub can't manage or monitor because their
underlying Google Cloud resources are no longer part of the
application management boundary that you have defined.
To list your registered and discovered services and workloads, do the following:
1. In the Google Cloud console, go to the **Application monitoring** page:
[Go to **Application monitoring**](https://console.cloud.google.com/monitoring/applications)
If you use the search bar to find this page, then select the result whose subheading is
**Monitoring**.
2. In the toolbar of the Google Cloud console, select your [App Hub](https://docs.cloud.google.com/app-hub/docs/overview) host project or management project.
3. Select the **Services and Workloads** tab.

The **Services and Workloads** page lists all registered services and
workloads. For each supported
[App Hub region](https://docs.cloud.google.com/app-hub/docs/locations), it also
lists at most 100
discovered services and
100 discovered
workloads.
To help you identify the type of each resource, the table includes the
following columns:
- **App Hub Type** : Displays the [App Hub registration type](https://docs.cloud.google.com/app-hub/docs/overview#properties-and-attributes), which is either **Service** () or **Workload** ().
- **Functional Type** : Displays the [App Hub functional type](https://docs.cloud.google.com/app-hub/docs/overview#properties-and-attributes), such as **Agent** () or **MCP server** ().
From the **Services and Workloads** tab, you can do all of the following:
- Modify the data the table displays by using the **Columns** button. For example, you might display the **Functional Type** column.
- Apply filters to modify the list of services and workloads. For example, you can filter by functional type to find services and workloads that are for agents or MCP servers. Similarly, filters can help you find a specific service or workload.
- Register one or more discovered services or
workloads to a new or existing application:
- To register a single service or workload, in the **Application** column,
select **Register**.
- To register multiple services or workloads, do the following:
1. For each service or workload, select the
**checkbox**.
You can make at most 100 selections. Also, if a checkbox isn't
enabled, then the service or workload is already registered.
2. In the table selection banner, select **Register**.
3. In the registration dialog, choose between creating a new application
or using an existing application, and then complete the dialog.
- **New application** : Enter the details for the application and
set the location to `global` or `regional`. You must use `global`
when the services and workloads reside in multiple locations.
- **Existing application** : Select an application. You can register
any service or workload with an application whose location is
`global`. If an application has a specific location, then you
can only register services and workloads that have the same
location.
For information about application locations, see
[Global and regional applications](https://docs.cloud.google.com/app-hub/docs/global-regional-applications).
- For registered services and workloads, you can open the associated
application in App Hub.
- Open a dashboard that shows telemetry data for a service or workload.
To learn more, see the
[Investigate a service or application](https://docs.cloud.google.com/monitoring/docs/application-monitoring#explore-service)
section of this document.
## View topology for your application management boundary
Google Cloud Observability builds a dynamic topology graph of your registered and discovered
services and workloads by using trace data. To determine what trace data to
analyze, Google Cloud Observability queries the resources listed in the
[default trace scope](https://docs.cloud.google.com/trace/docs/trace-scope/create-and-manage)
for trace data, and then retains only the data that is for projects within
your application management boundary.
To display a dynamic topology graph of your applications and your
discovered services and workloads, do the following:
1. Complete the steps in
[View application topology: Before you begin](https://docs.cloud.google.com/monitoring/docs/application-topology#before_you_begin).
2. In the Google Cloud console, go to the **Application monitoring** page:
[Go to **Application monitoring**](https://console.cloud.google.com/monitoring/applications)
If you use the search bar to find this page, then select the result whose subheading is
**Monitoring**.
3. In the toolbar of the Google Cloud console,
select your
[App Hub](https://docs.cloud.google.com/app-hub/docs/overview) host project or
management project.
4. Select the **Topology** tab.
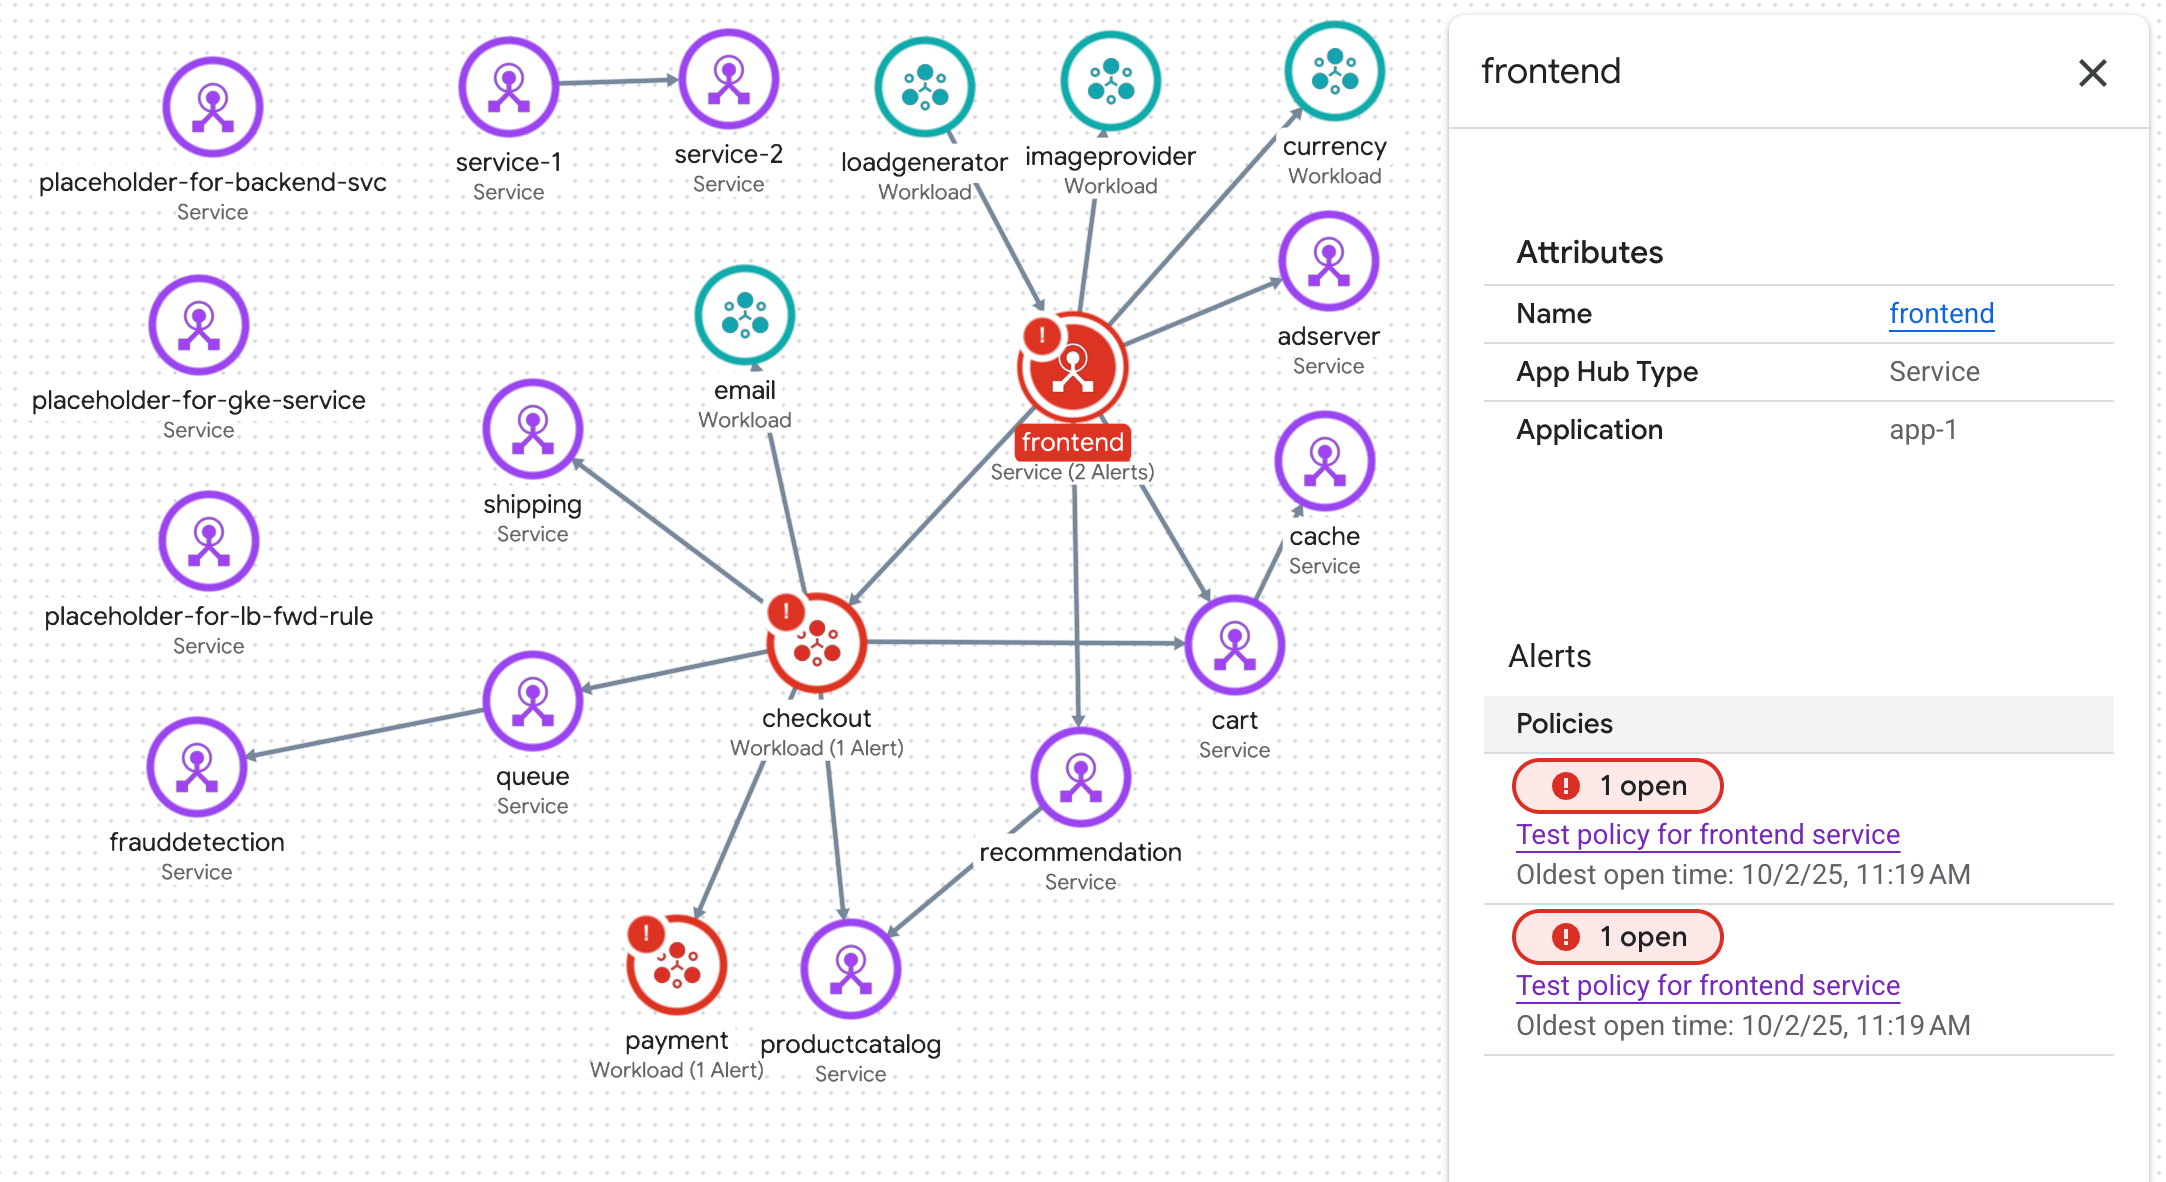
The **Topology** page displays a blue circle for each registered
application:
- For two applications, the blue circle displays a
**Collapse** button. For these applications,
the services and workloads are shown.
- For one application, a single node is shown and the blue circle displays
the **Expand** button. The value in the
button is the number of registered services and workloads.
For registered and discovered services and workloads, the topology graph
displays a node with an icon, which denotes the type of resource. It
also displays edges that represent traffic between two nodes.
The topology graph displays at most 1000 nodes.
For each supported
[App Hub region](https://docs.cloud.google.com/app-hub/docs/locations), the graph can display
at most 100
discovered services and
100
discovered workloads.
From the interactive topology graph, you can do the following:
- Change the visualization by zooming in or out, repositioning nodes, or
collapsing an application circle to a point.
- Get information about attributes and alerts by selecting
an application or a node.
- Get information about traffic between nodes by selecting the edge. A flyout
displays the node names and key metrics, such as
the error rate and the 95th latency percentile.
To learn more about this tab, see
[View application topology](https://docs.cloud.google.com/monitoring/docs/application-topology).
## Investigate an application
To investigate the health of an application, do the following:
1. In the Google Cloud console, go to the **Application monitoring** page:
[Go to **Application monitoring**](https://console.cloud.google.com/monitoring/applications)
If you use the search bar to find this page, then select the result whose subheading is
**Monitoring**.
2. In the toolbar of the Google Cloud console, select your [App Hub](https://docs.cloud.google.com/app-hub/docs/overview) host project or management project.
3. Select the **Overview** tab and in the list of applications, select the
application.
A dashboard for the application opens with the **Overview** tab
selected. This tab displays summary information. The following sections
describe the information that you can find on the
**Overview** , **Dashboards** , and **Topology** tabs.
### View summary information
To view general information about the application
along with a list of services and workloads, select the **Overview** tab:

As shown, this tab provides general information about the application
along with a list of services and workloads that are registered to the
application. For each service or workload, this tab also shows the following:
- The number of open alerts. To view the details of these alerts, select the number.
- The App Hub type.
- In the example, the columns of the table were modified to also display the
[App Hub functional type](https://docs.cloud.google.com/app-hub/docs/overview#properties-and-attributes).
The functional type helps you identify agentic workloads and services:
- Agent ()
- MCP server ()
- Values for golden signals:
- **Traffic** : Incoming request rates on the service or workload over the selected time period. For some configurations, this chart contains tabs. The **Request** tab displays the networking L7 metric and the **Bytes** tab displays the networking L4 metric.
- **Server error rate**: Ratio of incoming requests whose response code is equivalent to an 5xx HTTP response code to all incoming requests over the selected time period.
- **P95 latency**: 95th percentile of latency for a request served over the selected time period, in milliseconds.
- **Saturation**: Measures how full your service or workload is. For example, for managed instance groups (MIGs), Cloud Run, and Google Kubernetes Engine deployments, this field shows the CPU utilization.
Options on the **Overview** tab let you do the following:
- Open the application, a service, or a workload in App Hub.
- Open the dashboard for a service or workload.
- Reset the time range. When you open the dashboard, the time range is set to the most recent hour.
### View aggregated telemetry
To view log, metric, trace, and alerts information for your
application, select the **Dashboards** tab.

Charts on this tab automatically aggregate metric data for the services and
workloads in your application. These charts also display
[event annotations](https://docs.cloud.google.com/monitoring/dashboards/show-events), which can help you
correlate data from different sources when you are troubleshooting an issue.
To view which annotations are enabled, in the toolbar,
click  **Annotations**.
The **Dashboards** tab contains filters, which you can use to restrict what
data the tab displays. For more information about how to explore the data shown
on this tab, see the
[Use dashboard options to explore telemetry](https://docs.cloud.google.com/monitoring/docs/application-monitoring#use-dashboard-options)
section of this document.
### View AI resources
Application Monitoring uses trace data to derive metrics, such as the token usage
and error rates, for the AI resources that your application uses. These metrics
can help you understand the health, behavior, and costs of your application.
To view information about the AI resources associated with your application,
do the following:
1. Select the **Dashboards** tab.
2. In the dashboard's **Table of contents** , select **AI resources**.
If you don't see an **AI resources** entry, then there aren't any AI
resources associated with your application.
The **AI resources** section of the dashboard lets you view and explore
the following information:
- Total queries per second and token count.
- Average error rate, latency, and tool-call error rate.
- Token usage.
- Error rates and latency for agents.

To learn how to explore this dashboard, see
[View AI resources](https://docs.cloud.google.com/monitoring/docs/application-monitoring-ai-resources).
### View topology
To see a dynamic view of your application's services and workloads,
alerts, and traffic, select the **Topology** tab.
To learn about the **Topology** tab, see
[View topology](https://docs.cloud.google.com/monitoring/docs/application-topology).
## Investigate a service or workload
Application Monitoring creates a dashboard for each service and workload. These dashboards
display telemetry data and alert information, and they can
help you understand the health of a specific service or workload.
You can explore the data on these dashboards similarly to exploring the data
shown on an application's **Dashboard** tab.
The following screenshot illustrates the dashboard for a workload:

The registration status of a service or workload affects what data Application Monitoring
displays on the dashboard for the service or workload:
- **Registered** : Application Monitoring uses the
[application-specific labels and attributes](https://docs.cloud.google.com/monitoring/docs/application-monitoring-labels)
that [supported infrastructure](https://docs.cloud.google.com/monitoring/docs/application-monitoring-services)
and [instrumented applications](https://docs.cloud.google.com/monitoring/docs/instrument-for-application-monitoring#add_application_attributes_to_trace_spans)
attach to the telemetry they generate.
These dashboards display log, metric, and trace data.
- **Discovered** : Application Monitoring derives the resource type by using the asset
name, as defined by [Cloud Asset Inventory](https://docs.cloud.google.com/asset-inventory/docs/asset-names). It
then uses the resource type to identify and filter log and metric data for
[supported infrastructure](https://docs.cloud.google.com/monitoring/docs/application-monitoring-services).
For example, if the resource type is determined to be
[`cloud_run-revision`](https://docs.cloud.google.com/monitoring/api/resources#tag_cloud_run_revision),
then charts might filter the data by the values of the `location` and
`service_name` labels.
To open the Application Monitoring dashboard for a service or workload, do the following:
1. In the Google Cloud console, go to the **Application monitoring** page:
[Go to **Application monitoring**](https://console.cloud.google.com/monitoring/applications)
If you use the search bar to find this page, then select the result whose subheading is
**Monitoring**.
2. In the toolbar of the Google Cloud console, select your [App Hub](https://docs.cloud.google.com/app-hub/docs/overview) host project or management project.
3. Select the **Services and Workloads** tab and then select the service
or workload.
> [!NOTE]
> **Note:** For services and workloads that are registered to an application, you can also open their dashboards from the [summary page](https://docs.cloud.google.com/monitoring/docs/application-monitoring#app-summary-tab) for the application.
A dashboard opens for the service or workload you selected.
### View summary information
To view general information about your service or workload, in the dashboard's
**Table of contents** , select the **Overview** option.
This section displays the following:
- Information about the application such as the infrastructure type and
criticality. When the infrastructure type can't be identified, this field
displays **App Hub Service** . For more information, see [Application Monitoring
supported
infrastructure](https://docs.cloud.google.com/monitoring/docs/application-monitoring-services).
- A table of alerts.
- Golden signals.
If a service or workload isn't registered, then this section also displays a
banner like the following:
This service is not registered. Register it to gain a unified view of your application's performance and stability.
No action is required. However, we recommend that you register your services and
workloads.
### View telemetry
To view telemetry data, use the dashboard's **Table of contents** to navigate to
the relevant content:
- To view golden signals and other metric information, select **Infrastructure**.
- To explore trace data, select **Traces**.
- To explore log data, select **Logs**.
Telemetry charts display [event annotations](https://docs.cloud.google.com/monitoring/dashboards/show-events)
that can help you correlate data from different sources when you are
troubleshooting an issue. To view which annotations are enabled, in the toolbar,
click  **Annotations**.
For information about how to explore the data in these charts, see the
[Use dashboard options to explore telemetry](https://docs.cloud.google.com/monitoring/docs/application-monitoring#use-dashboard-options)
section of this document.
### View AI resources
To view information about AI resources, use the dashboard's
**Table of contents**:
- **Agent**: Available for agents. This section displays information
about sessions, agent invocations, and token usage.
- **Tools**: Available for agents. This section displays information
about tool calls, including error rate, call count, and P95 latency.
- **Models**: Available for some agents. This section displays information
about the number of model calls made by the agent, error rate, and
token usage.
To learn how to explore the data in these sections, see
[View AI resources](https://docs.cloud.google.com/monitoring/docs/application-monitoring-ai-resources).
## Use dashboard options to explore telemetry
The Application Monitoring dashboards display log, metric, trace, and alert
information. This section describes how you can use options on a dashboard
or on a widget, like a chart, to get more information about the data that
is shown. You can also use these options to modify what data is shown.
### Filter a dashboard
You can add filters to a dashboard that apply to all widgets on the dashboard.
For example, the toolbar of the **Dashboard** tab for an application
contains a filter like `apphub_service_id: *`. To view data for specific
services, click **Menu**, and select those services
from the list.
### Explore log data
> [!NOTE]
> **Note:** If your dashboards aren't displaying the log data that you expect, then you might need to configure the default log scope or you might need additional Identity and Access Management permissions. For more information, see [Configure and set the default log scope](https://docs.cloud.google.com/monitoring/docs/setup-application-monitoring#setup-logging) and [Your application's log data is missing or incomplete](https://docs.cloud.google.com/monitoring/docs/troubleshoot-application-monitoring#your_applications_log_data_is_missing_or_incomplete).
If you are viewing the **Dashboard** tab of an application dashboard, then
your log data is shown in the **Application Logs** section. Otherwise, your
data is shown in the **Logs** section.
The **Application Logs** and **Logs** sections of a dashboard display
log entries that match a filter and are stored by the resources listed in the
default log scope of your
[App Hub](https://docs.cloud.google.com/app-hub/docs/overview) host project or
management project.
For applications, the filter is similar to the following:
-- Application logs
(apphub_application_location=global)
(apphub_application_id=my-app)
For services and workloads, the filter contains additional clauses.
To view the filter applied to your log data, click **Show query**.
If you want to write queries, then either open a flyout or open
the **Logs Explorer** page. Both options let you write and run queries
and change the scope. However, the flyout retains your current context and
lets you save your exploration results to a custom dashboard:
- To open a flyout, click **Explore data**.
When your exploration is complete, click **Cancel** to close the flyout and
discard your changes. If you want to save your changes to a custom dashboard,
then click **Save to dashboard** and complete the dialog. You can't save your
changes to the dashboard you were viewing when you opened the flyout.
The flyout doesn't list the filters shown by the **Show query** button.
Those filters are applied at the dashboard level and can't be removed.
- To open the **Logs Explorer** page in a new browser tab,
click **View in Logs Explorer**.
The query is preconfigured to show log entries that match specific application
labels and that are in the time range specified by the dashboard.
When you close the browser tab, your changes are discarded.
For more information about how to explore your logs, see the following
documents:
- [Build and save queries by using the Logging query language](https://docs.cloud.google.com/logging/docs/view/building-queries).
- [View logs by using the Logs Explorer](https://docs.cloud.google.com/logging/docs/view/logs-explorer-interface).
### Explore metric data
The charts and tables on your dashboard display [golden signals](https://docs.cloud.google.com/monitoring/docs/application-monitoring#golden-signal)
and other metric data that is relevant for the resources used by your
application, service, or workload. The displayed data can be stored in any
project listed by the metrics scope of the
your
[App Hub](https://docs.cloud.google.com/app-hub/docs/overview) host project or
management project.
#### View chart configuration
To view details like the metric type and the aggregation options for a chart
that displays metric data, go to the toolbar of a chart or table, and then
click **Information**.
#### Explore data
To explore a chart or table in more detail, either open a flyout or open
the **Metrics Explorer** page. Both options let you try different chart
settings and save the results to a custom dashboard. However, the flyout retains
your current context:
- To open a flyout, click **Explore data**.
When your exploration is complete, click **Cancel** to close the flyout and
discard your changes. If you want to save your changes to a custom dashboard,
then click **Save to dashboard** and complete the dialog. You can't save your
changes to the dashboard you were viewing when you opened the flyout.
- To view the chart or table in the Metrics Explorer, go to the
toolbar, click **More** , and then select
**View in Metrics Explorer**.
You now have a temporary chart that you can modify and explore. For
example, you might change the aggregation options or change the
display style. To save your chart to a custom dashboard,
click **Save to dashboard** and complete the dialog.
### Correlate metric and log data
When you view a chart, you might want to explore log data that was
written against the same resource as the charted metric data. For example, if
you see a spike or a dip in a chart, then you might want to explore log entries
so that you can get additional information about the system.
One way you can correlate your metric and log data, is to use chart options to
open a flyout that displays both the chart and selected log entries. You can
then use the toolbars and menus in the flyout to explore your metric and
log data. For example, you might add filters to the metric query, modify the
logging query, or expand and explore log entries.
The following screenshot illustrates the flyout:

The flyout doesn't display all log entries that match the dashboard's
time-range selector. Instead, the system creates a logging query that is based
on the metric query. The logging query includes any applicable
[variables](https://docs.cloud.google.com/monitoring/dashboards/filter-permanent), but it doesn't include
dashboard-level filters.
#### View metric and log data
You can correlate metric and log data when a chart displays any metric type
except a log-based metric or a Prometheus metric. When a chart displays
a log-based metric, a Prometheus metric, or when it doesn't display metric data,
you can't correlate metric and log data.
To open the flyout that displays both metric and log data, do one of the
following:
- To filter log data only by the resource type and applicable variables,
in the chart's toolbar, click **More chart options** ,
and then select **Inspect related logs**.
- To show log entries that correlate with a specific time series,
in the chart, use your pointer to select a point on the time series,
and then go to the tooltip and
select **Inspect related logs**.
In this mode, the flyout modifies the time-range selector to be five minutes
before and after the timestamp of the selected point.
If your chart doesn't display an **Inspect related logs** option, then it
doesn't support metric and log correlation.
#### Save your changes
You can save the chart or logs panel shown in the flyout, including any
changes that you make, to a custom dashboard. If you save the chart to the
same dashboard from which you opened the flyout, then a new chart is created
on the dashboard.
To save the chart or logs panel to a custom dashboard, open the
widget's **Actions** menu, select **Save to dashboard**, and then complete
the dialog. You can select an existing custom dashboard or you can create
a dashboard and then save the widget.
#### Close the flyout
To close the flyout, in the toolbar, click **Cancel**.
### Explore alerts
The **Alerts** section of a dashboard lists open alerts
for alerting policies that are associated with your application. If you are
viewing a dashboard for a service or workload, then this section displays
alerts for that service or workload.
To get more information about your alerts and alerting policies,
do the following:
- To find details about the alerting policy that caused the alert,
click the policy name. The dashboard that opens displays detailed
information about the alerting policy, including a chart that displays the
monitored data and the labels.
- To view all alerting policies associated with the application, go to the
toolbar and click **Explore data** . A flyout opens
that lists all policies. To return to the dashboard, click **Cancel**.
If you don't see any entries in the **Alerts** section, then one
of the following is true:
- There aren't any open alerts.
To view closed alerts and those that opened outside the dashboard's
time range setting, in the toolbar of the **Alerts**
section, disable **Grouped by policy** , and then enable
**Show closed alerts**.
If the table remains empty, then either you don't have any associated
alerting policies or none of the associated policies have
reported an alert.
- None of the alerting policies stored in
your
[App Hub](https://docs.cloud.google.com/app-hub/docs/overview) host project or
management project are associated with a
service or workload. To make this association, add labels to the
alerting policy. For more information, see
[Associate an alerting policy with a service or workload](https://docs.cloud.google.com/monitoring/docs/setup-application-monitoring#alert).
### Explore trace data
> [!NOTE]
> **Note:** If your dashboards aren't displaying the trace data that you expect, then you might need to configure the default trace scope or you might need additional Identity and Access Management permissions. For more information, see [Configure and set the default trace scope](https://docs.cloud.google.com/monitoring/docs/setup-application-monitoring#view-trace). Trace data isn't available for discovered services or workloads.
The **Traces** section of a dashboard lists information about spans generated by
your registered services and workloads when those spans contain
[application-specific resource attributes](https://docs.cloud.google.com/monitoring/docs/application-monitoring-labels#trace-resource-attributes).
The required resource attributes are available when you
[instrument your application](https://docs.cloud.google.com/monitoring/docs/instrument-for-application-monitoring#add_application_attributes_to_trace_spans).
Only spans that satisfy the dashboard-level filters are shown.
For trace data, the application-level dashboard groups spans by their name and
by the service or workload name, and then displays the following information
in a tabular format:
- Span name.
- Service or workload name.
- The number of spans in the grouping.
- The 50th, 90th, and 95th latency percentiles of the spans in the grouping.
- The error rate.
To get more information about a grouping, select it. An
interactive flyout opens:

The interactive flyout displays the following:
- Individual spans in the group. The first entry is automatically selected.
- Information about the parent trace for the selected span. This information
includes the following:
- Statistical information, such as the total duration.
- The call hierarchy that shows the span in the context of the trace. If
the **GenAI** icon, , appears with a name, then the span has generative AI events or attributes.
By default, the call hierarchy appears as a timeline. If you want to view
the hierarchy as a directed acyclic graph (DAG), then in the toolbar,
select **Graph**.

- The service or workload associated with each call. The service icon,
, identifies
App Hub-registered services. Similarly, the workload
icon, , identifies workloads.
- Latency of each call.
- Success status of each call, indicated by blue or red.
- A collection of tabs that let you explore attributes, log entries,
or other information.
Because the flyout is interactive, to view a different span, select it from the
timeline or DAG view.
You can also view your trace spans by using the **Trace Explorer** page.
To do so, on the toolbar of the **Traces** section,
click **View in Trace Explorer**:
- Application-specific filters are automatically applied.
- You can add, remove, or modify any filters. However, changes that you make are discarded when you close the **Trace Explorer** page.
To learn more about exploring your trace data, see
[Find and explore traces](https://docs.cloud.google.com/trace/docs/finding-traces#explore).
## Troubleshoot
For information that might help you understand what data you are viewing, or
why a dashboard doesn't display data, see
[Troubleshoot Application Monitoring](https://docs.cloud.google.com/monitoring/docs/troubleshoot-application-monitoring).
## What's next
- [View AI resources](https://docs.cloud.google.com/monitoring/docs/application-monitoring-ai-resources).
- [View topology](https://docs.cloud.google.com/monitoring/docs/application-topology).
- [Instrument an application for Application Monitoring](https://docs.cloud.google.com/monitoring/docs/instrument-for-application-monitoring).
- [Application Monitoring supported infrastructure](https://docs.cloud.google.com/monitoring/docs/application-monitoring-services).