基本配置
标准 Manufacturing Data Engine (MDE) 部署默认情况下不会应用任何配置设置,而这些设置是开始提取数据所必需的。
本指南将引导您完成基本的 MDE 设置。例如,测试系统是否端到端正常运行。借助本指南,您可以为所有三种原型创建消息类、类型和解析器。
如果您打算使用 Manufacturing Connect Edge (MCe) 注入数据,请改为部署 默认配置软件包 。
您可以使用 MDE API 或网页界面来完成此配置。
消息类
本部分提供了 MDE 中提供的消息类的示例。
numeric 的消息类
以下是 basic-numeric 消息类的示例:
REST
POST /configuration/v1/message-classes
{
   "name": "basic-numeric",
   "priority": 2000,
   "expression": "#root.event['value'] instanceof T(Number) && #root.event['timestamp'] != null && #root.event['tagName'] != null"
}
网页界面
消息类名称:basic-numeric
- 在 MDE 网页界面上,点击消息类 。
- 点击添加新消息类 。
- 将消息类名称 填写为
basic-numeric。 复制以下表达式并将其粘贴到表达式 框中:
#root.event['value'] instanceof T(Number) && #root.event['timestamp'] != null && #root.event['tagName'] != null将优先级更改为
2000。点击创建 。

discrete 的消息类
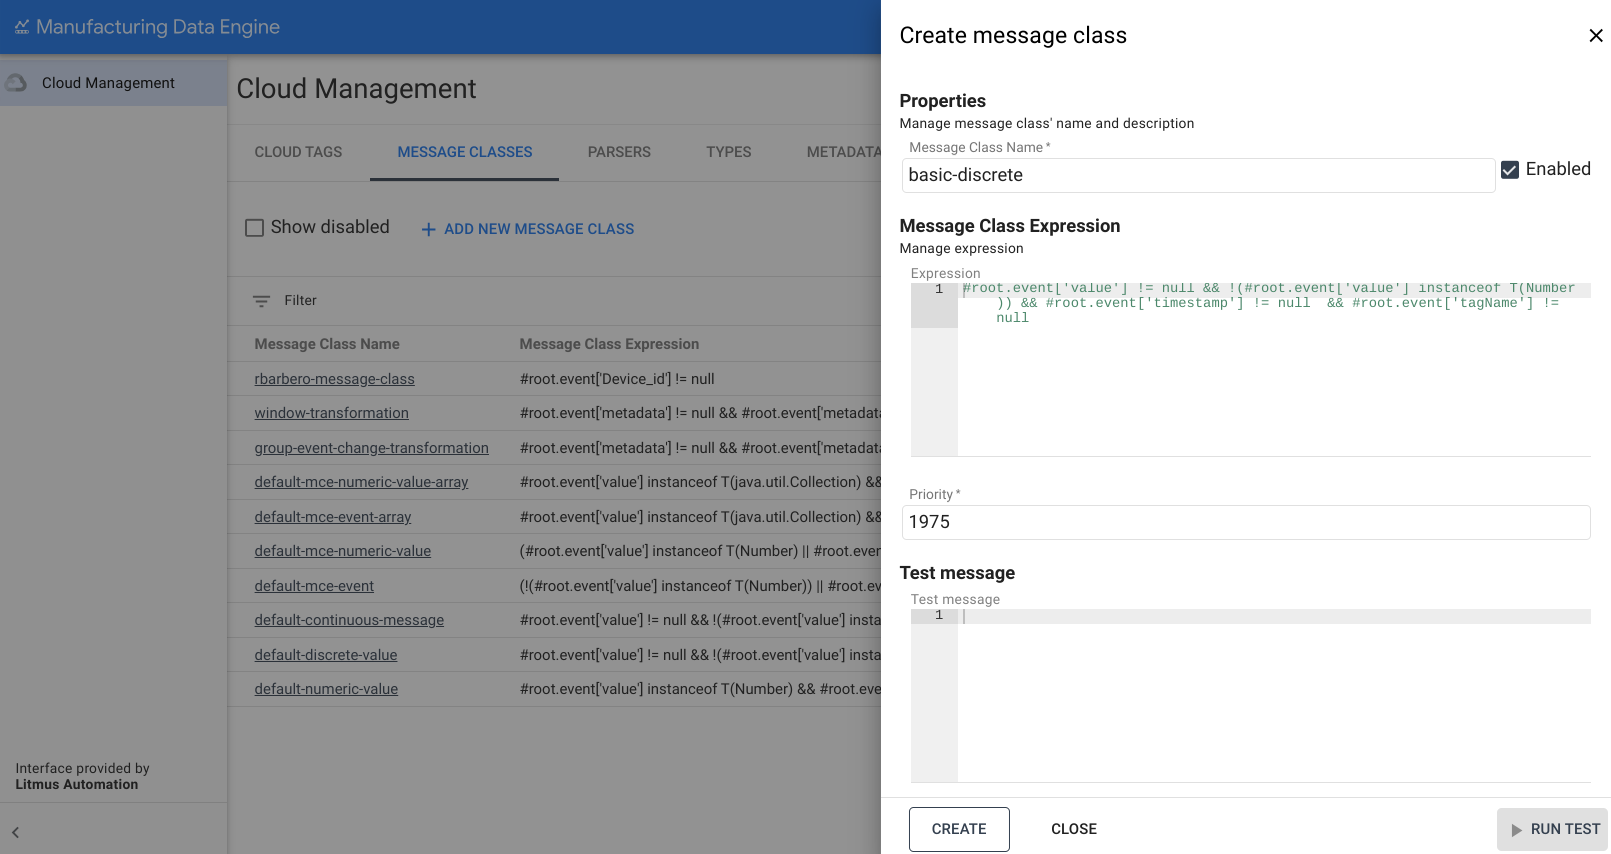
以下是 basic-discrete 消息类的示例:
REST
POST /configuration/v1/message-classes
   {
      "name": "basic-discrete",
      "priority": 1975,
      "expression": "#root.event['value'] != null && !(#root.event['value'] instanceof T(Number)) && #root.event['timestamp'] != null && #root.event['tagName'] != null"
   }
网页界面
消息类名称:basic-discrete
- 在 MDE 网页界面上,点击消息类 。
- 点击添加新消息类 。
- 将消息类名称 填写为
basic-discrete。 复制以下表达式并将其粘贴到表达式 框中:
#root.event['value'] != null && !(#root.event['value'] instanceof T(Number)) && #root.event['timestamp'] != null && #root.event['tagName'] != null将优先级更改为
1975。点击创建 。
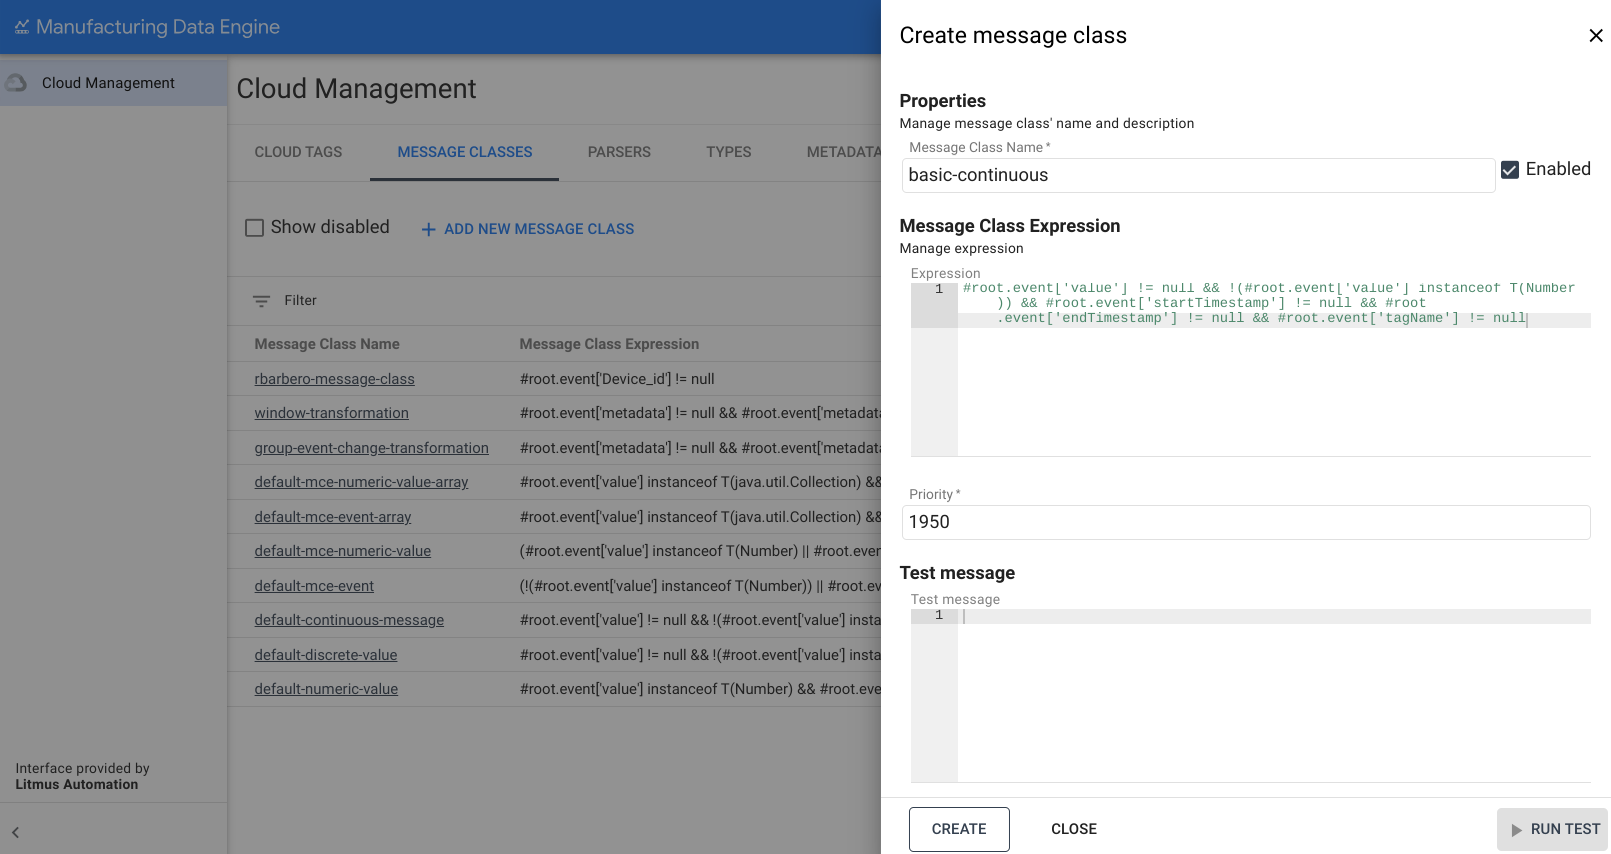
continuous 的消息类
以下是 basic-continuous 消息类的示例:
REST
POST /configuration/v1/message-classes
   {
      "name": "basic-continuous",
      "priority": 1950,
      "expression": "#root.event['value'] != null && !(#root.event['value'] instanceof T(Number)) && #root.event['startTimestamp'] != null && #root.event['endTimestamp'] != null && #root.event['tagName'] != null"
   }
网页界面
消息类名称:basic-continuous
- 在 MDE 网页界面上,点击消息类 。
- 点击添加新消息类 。
- 将消息类名称 填写为
basic-continuous。 复制以下表达式并将其粘贴到表达式 框中:
#root.event['value'] != null && !(#root.event['value'] instanceof T(Number)) && #root.event['startTimestamp'] != null && #root.event['endTimestamp'] != null && #root.event['tagName'] != null将优先级更改为
1950。点击创建 。
类型
本部分简要介绍了 MDE 中提供的类型。
numeric 的类型
以下是 basic-numeric 类型的示例:
REST
POST /configuration/v1/types
{
   "archetype": "NUMERIC_DATA_SERIES",
   "name": "basic-numeric"
}
网页界面
名称:basic-numeric
- 在 MDE 网页界面上,点击类型 。
- 点击添加新类型 。
- 将类型名称 填写为
basic-numeric。 在原型 的下拉列表中选择
NUMERIC_DATA_SERIES: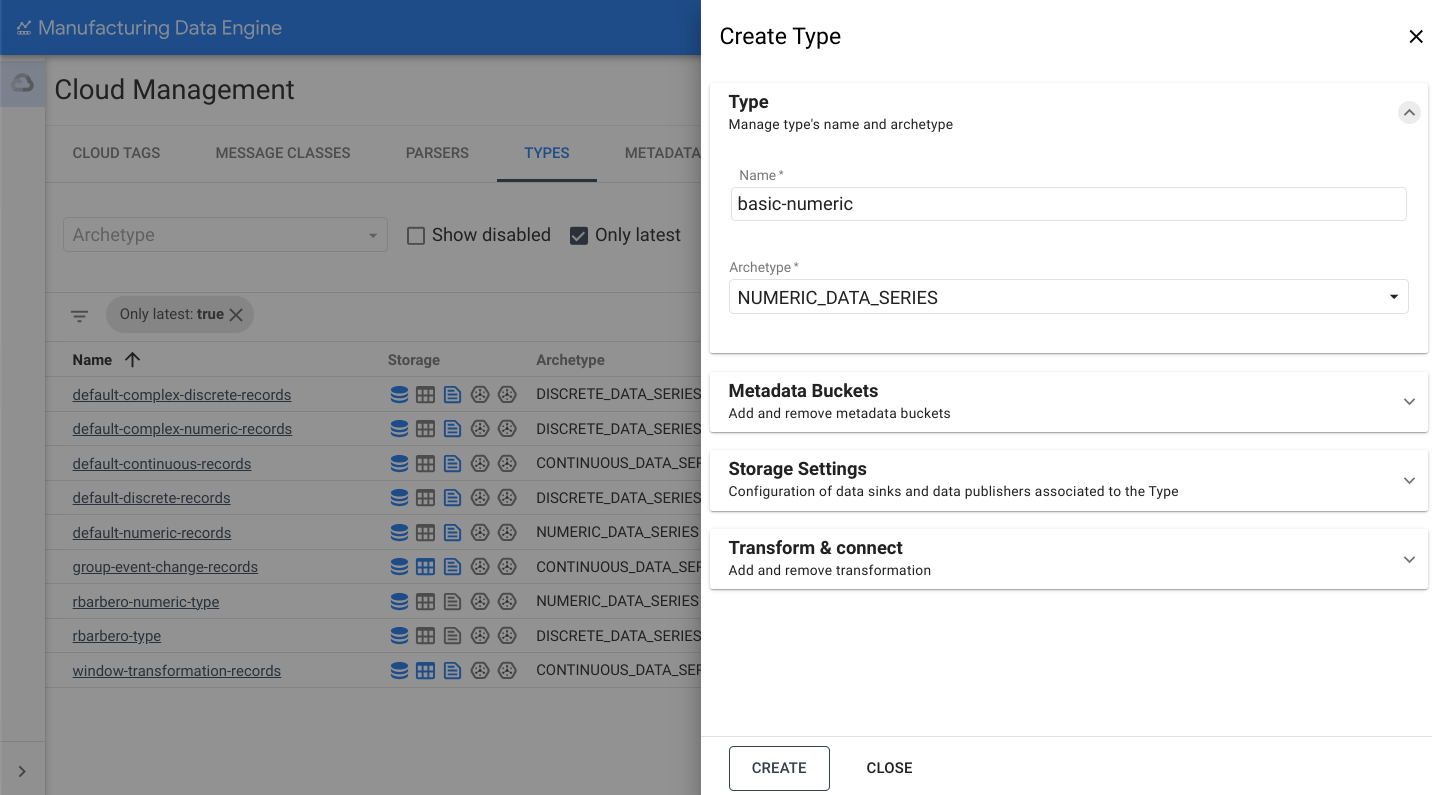
打开存储设置 部分。
切换发送到 BigQuery 选项。
点击创建 。
discrete 的类型
以下是 basic-discrete 类型的示例:
REST
POST /configuration/v1/types
{
   "archetype": "DISCRETE_DATA_SERIES",
   "name": "basic-discrete"
}
网页界面
名称:basic-discrete
- 在 MDE 网页界面上,点击类型 。
- 点击添加新类型 。
- 将类型名称 填写为
basic-discrete。 在原型 的下拉列表中选择
DISCRETE_DATA_SERIES: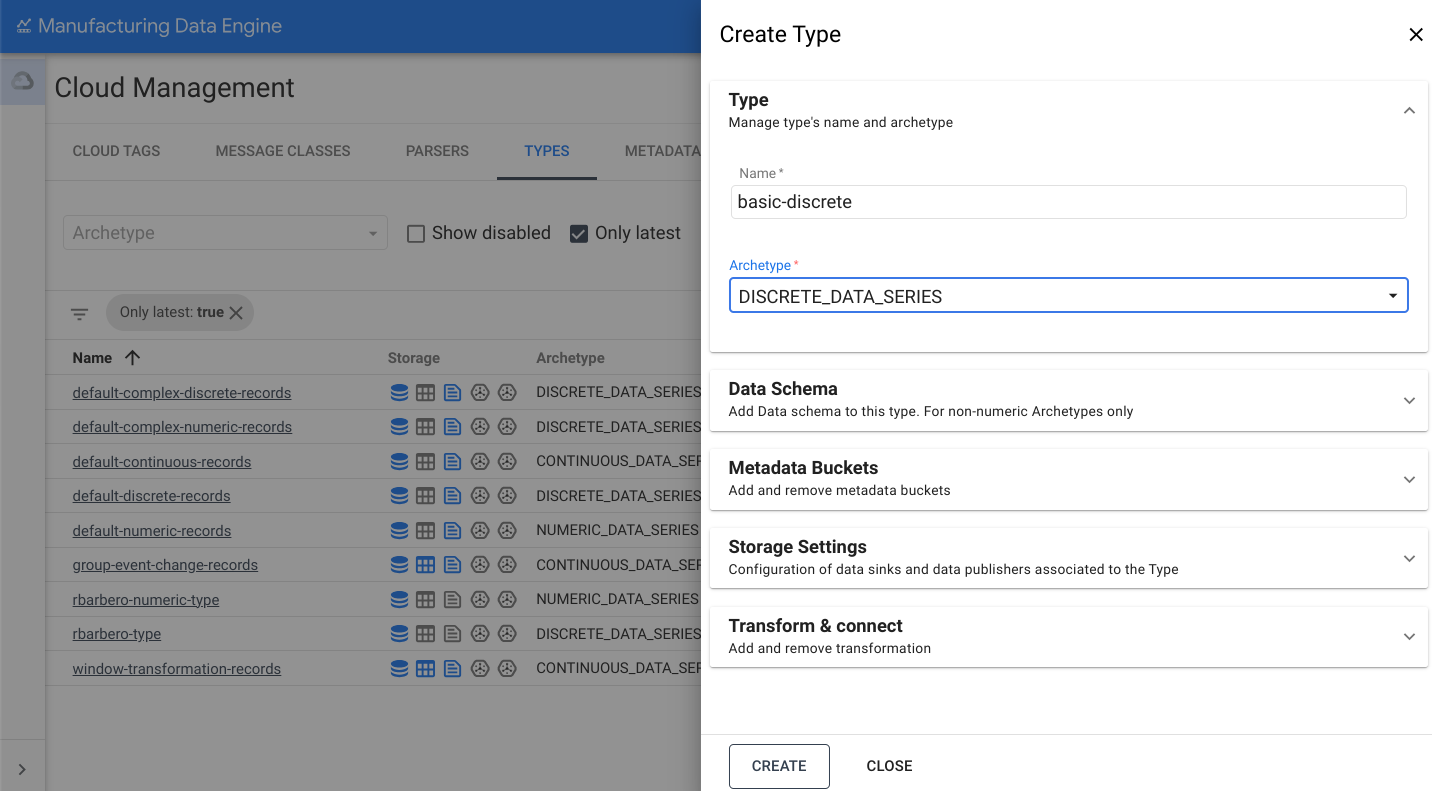
打开存储设置 部分。
切换发送到 BigQuery 选项。
点击创建 。
continuous 的类型
以下是 basic-continuous 类型的示例:
REST
POST /configuration/v1/types
{
   "archetype": "CONTINUOUS_DATA_SERIES",
   "name": "basic-continuous"
}
网页界面
名称:basic-continuous
- 在 MDE 网页界面上,点击类型 。
- 点击添加新类型 。
- 将类型名称 填写为
basic-continuous。 在原型 的下拉列表中选择
CONTINUOUS_DATA_SERIES: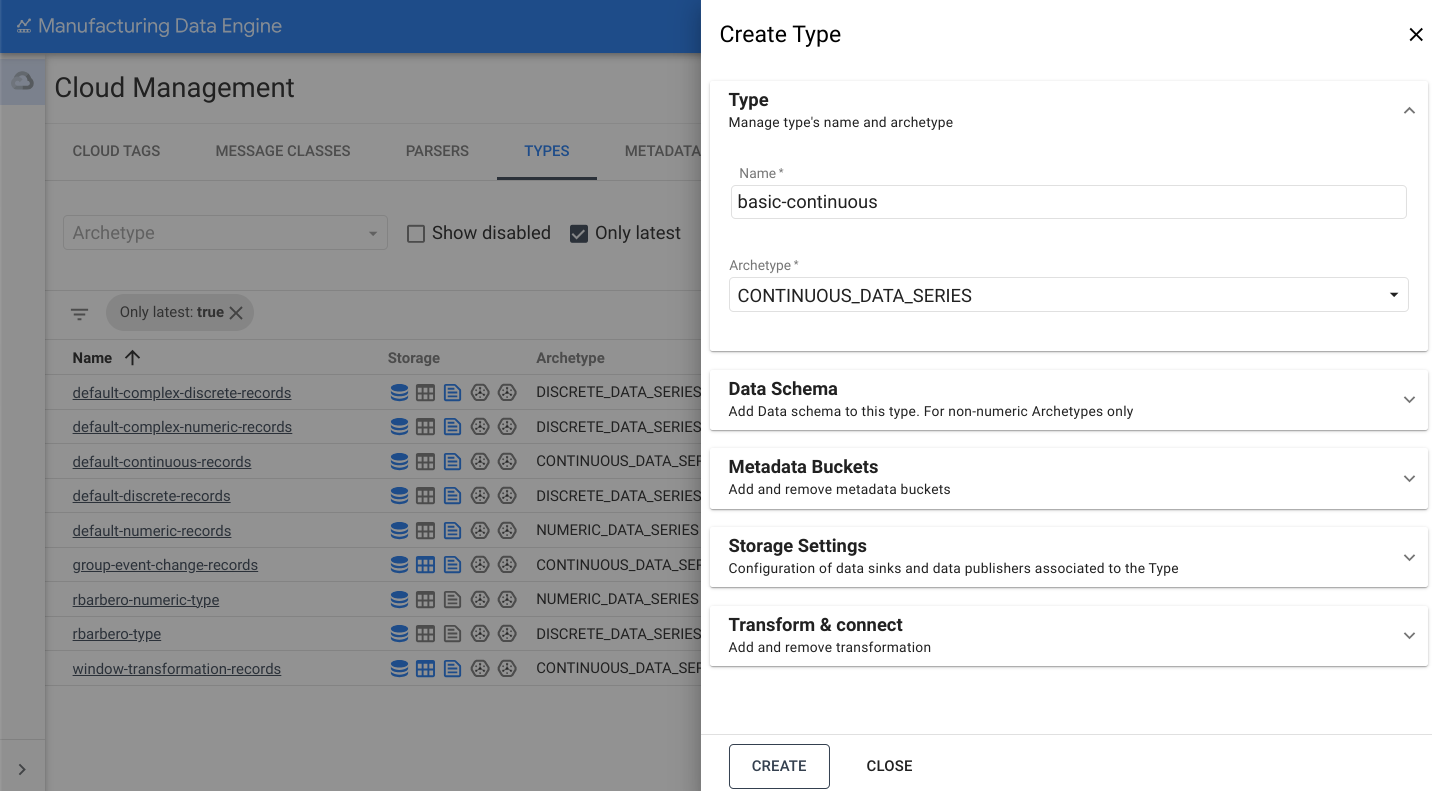
打开存储设置 部分。
切换发送到 BigQuery 选项。
点击创建 。
解析器
本部分简要介绍了 MDE 中提供的各种解析器。请确保类型已完全预配并处于 active 状态,然后再创建解析器。此过程可能需要三分钟。
numeric 的解析器
以下是 basic-numeric 解析器的示例:
REST
POST /configuration/v1/parsers
{
   "name": "basic-numeric-to-basic-numeric",
   "messageClassName": "basic-numeric",
   "typeReference": {
         "name": "basic-numeric",
         "version": 1
   },
   "script": "package mde\n\n[{\ntagName: $root.tagName;\ntimestamps: MapTimestamp($root);\ndata: MapData($root);\nembeddedMetadata: $root[where ($.field != \"value\" and $.field != \"tagName\" and $.field != \"timestamp\" and $.field != \"messageId\")];\n}]\n\ndef MapTimestamp(input) {\n    eventTimestamp: input.timestamp;\n}\n\ndef MapData(input) {\n    numeric: input.value;\n}"
}
网页界面
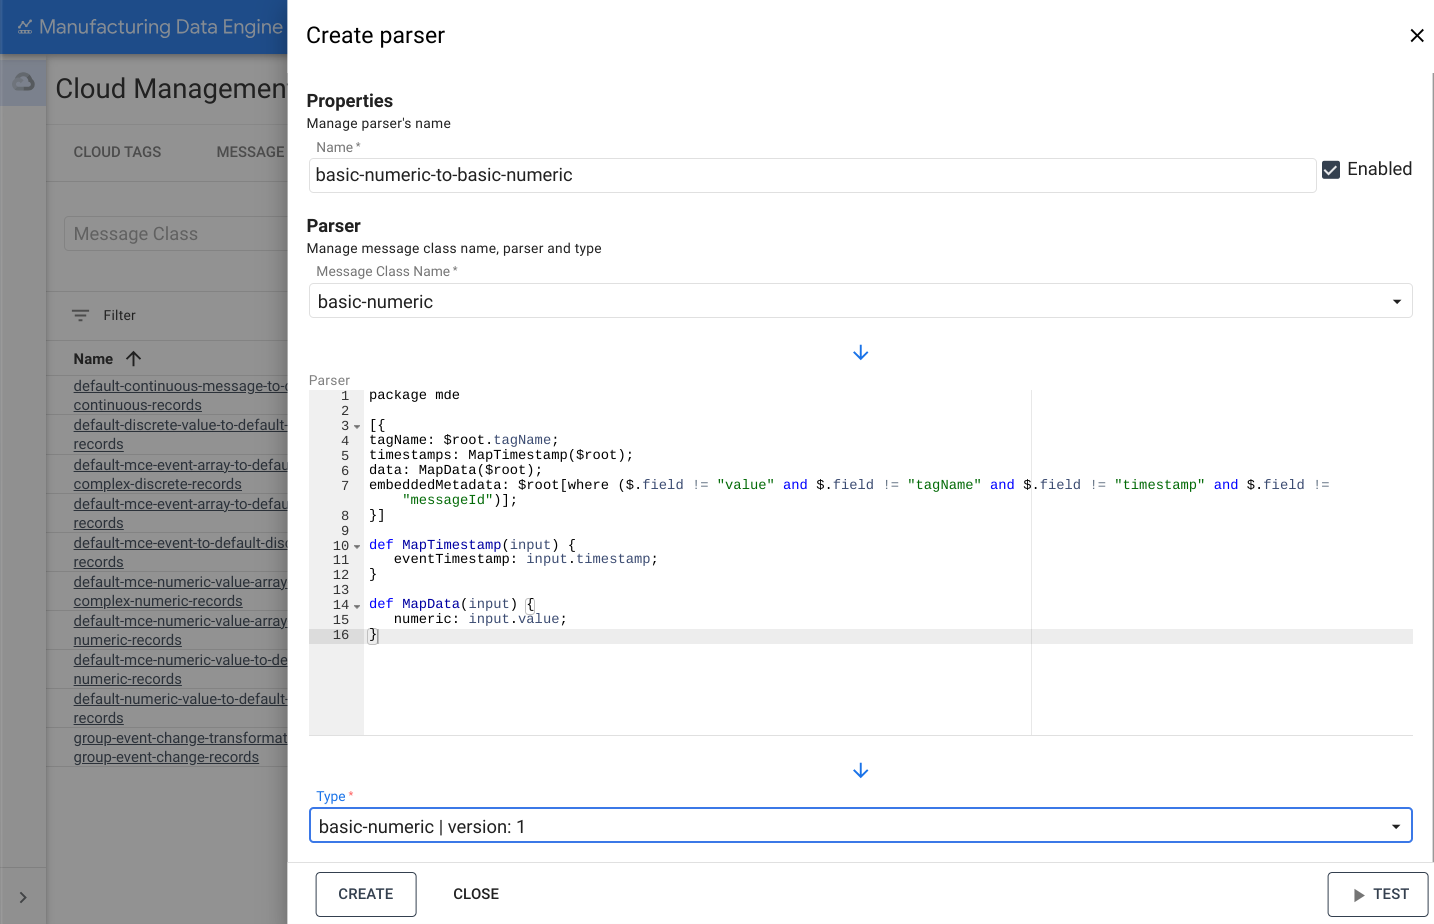
名称:basic-numeric-to-basic-numeric
- 在 MDE 网页界面上,点击解析器 。
- 点击添加新解析器 。
- 将解析器名称 填写为
basic-numeric-to-basic-numeric。 - 在消息类名称 的下拉列表中选择
basic-numeric。 将以下 Whistle 代码复制并粘贴到解析器 框中:
package mde [{ tagName: $root.tagName; timestamps: MapTimestamp($root); data: MapData($root); embeddedMetadata: $root[where ($.field != "value" and $.field != "tagName" and $.field != "timestamp" and $.field != "messageId")]; }] def MapTimestamp(input) { eventTimestamp: input.timestamp; } def MapData(input) { numeric: input.value; }在类型 的下拉列表中选择
basic-numeric | version: 1。点击创建 。
discrete 的解析器
以下是 basic-discrete 解析器的示例:
REST
POST /configuration/v1/parsers
{
   "name": "basic-discrete-to-basic-discrete",
   "messageClassName": "basic-discrete",
   "typeReference": {
         "name": "basic-discrete",
         "version": 1
   },
   "script": "package mde\n\n[{\ntagName: $root.tagName;\ntimestamps: MapTimestamp($root);\ndata: MapData($root);\nembeddedMetadata: $root[where ($.field != \"value\" and $.field != \"tagName\" and $.field != \"timestamp\" and $.field != \"messageId\")];\n}]\n\ndef MapTimestamp(input) {\n    eventTimestamp: input.timestamp;\n}\n\ndef MapData(input) {\n    complex: input.value;\n}\n"
}
网页界面
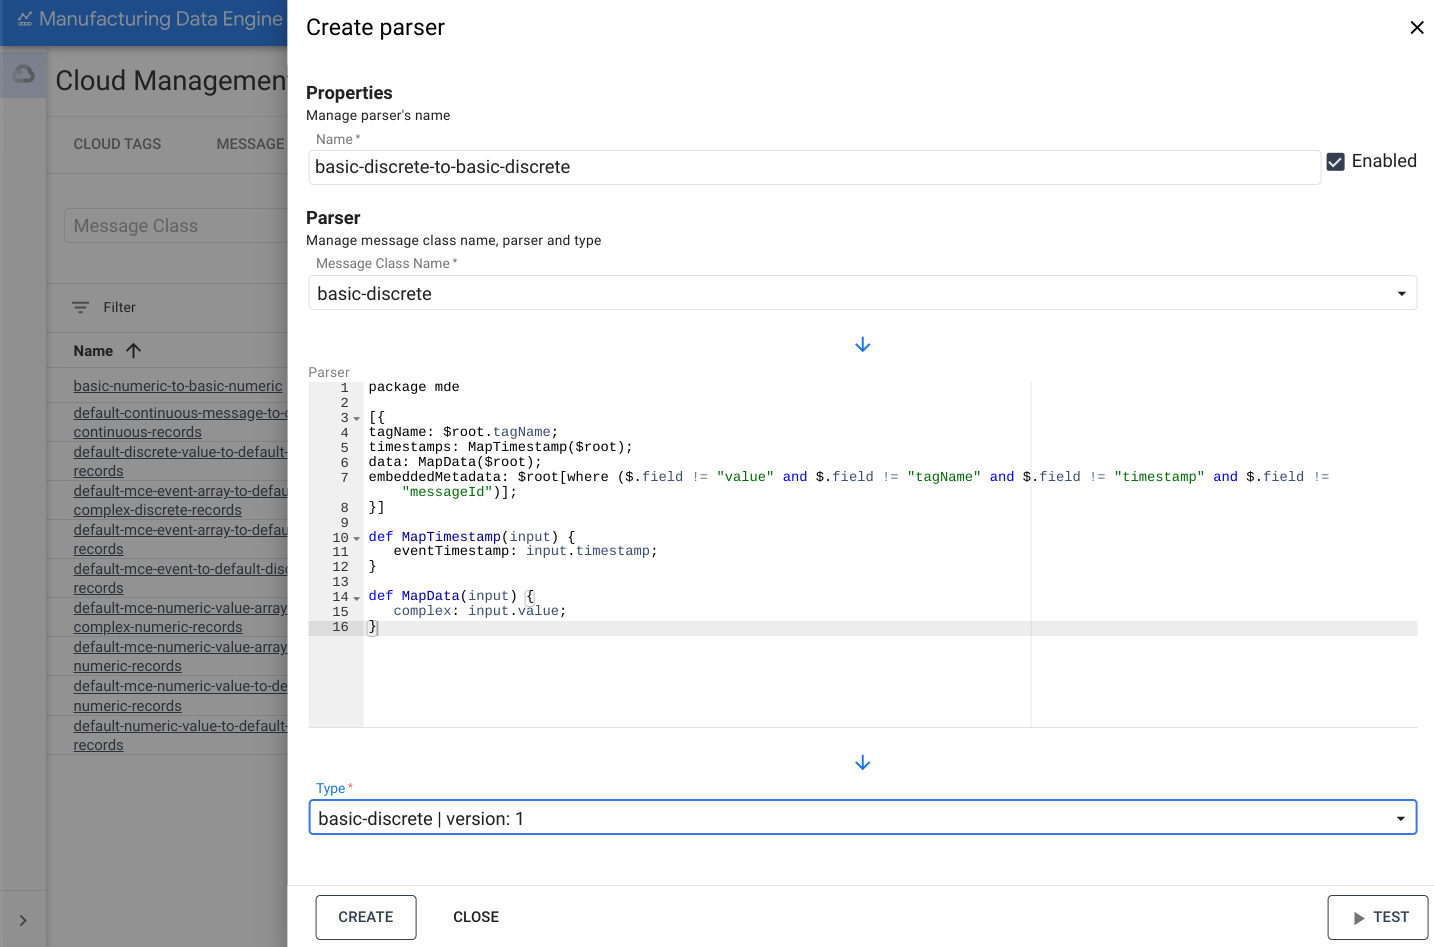
名称:basic-discrete-to-basic-discrete
- 在 MDE 网页界面上,点击解析器 。
- 点击添加新解析器 。
- 将解析器名称 填写为
basic-numeric-to-basic-discrete。 - 在消息类名称 的下拉列表中选择
basic-discrete。 将以下 Whistle 代码复制并粘贴到解析器 框中:
package mde [{ tagName: $root.tagName; timestamps: MapTimestamp($root); data: MapData($root); embeddedMetadata: $root[where ($.field != "value" and $.field != "tagName" and $.field != "timestamp" and $.field != "messageId")]; }] def MapTimestamp(input) { eventTimestamp: input.timestamp; } def MapData(input) { complex: input.value; }在类型 的下拉列表中选择
basic-discrete | version: 1。点击创建 。
continuous 的解析器
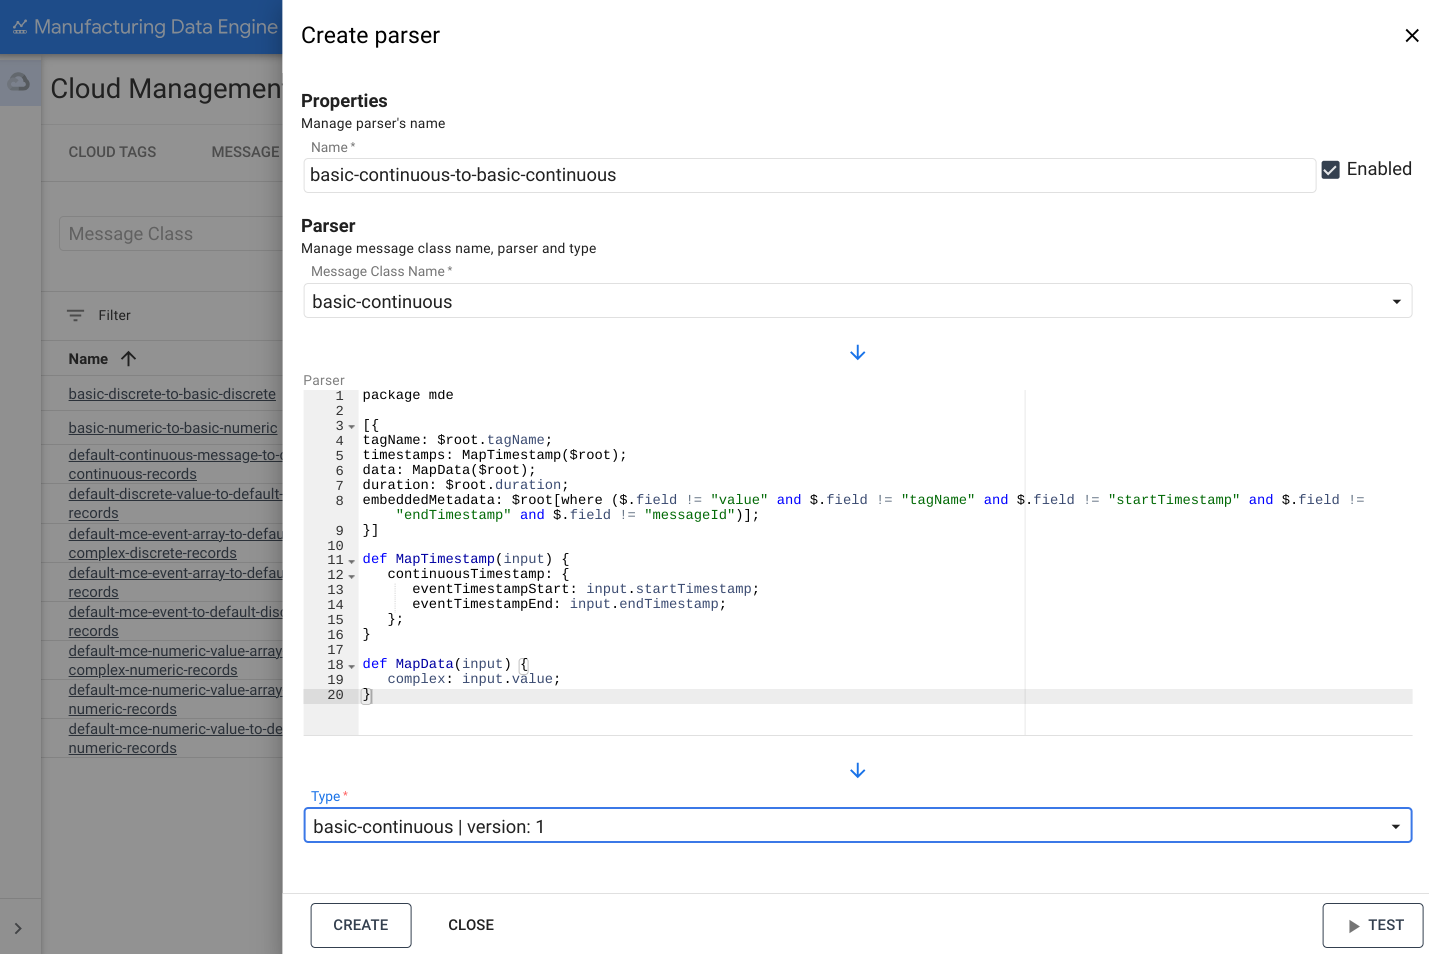
以下是 basic-continuous 解析器的示例:
REST
POST /configuration/v1/parsers
{
   "name": "basic-continuous-to-basic-continuous",
   "messageClassName": "basic-continuous",
   "typeReference": {
         "name": "basic-continuous",
         "version": 1
   },
   "script": "package mde\n\n[{\ntagName: $root.tagName;\ntimestamps: MapTimestamp($root);\ndata: MapData($root);\nduration: $root.duration;\nembeddedMetadata: $root[where ($.field != \"value\" and $.field != \"tagName\" and $.field != \"startTimestamp\" and $.field != \"endTimestamp\" and $.field != \"messageId\")];\n}]\n\ndef MapTimestamp(input) {\n    continuousTimestamp: {\n        eventTimestampStart: input.startTimestamp;\n        eventTimestampEnd: input.endTimestamp;\n    };\n}\n\ndef MapData(input) {\n    complex: input.value;\n}\n"
}
网页界面
名称:basic-continuous-to-basic-continuous
- 在 MDE 网页界面上,点击解析器 。
- 点击添加新解析器 。
- 将解析器名称 填写为
basic-numeric-to-basic-continuous。 - 在消息类名称 的下拉列表中选择
basic-continuous。 将以下 Whistle 代码复制并粘贴到解析器 框中:
package mde [{ tagName: $root.tagName; timestamps: MapTimestamp($root); data: MapData($root); duration: $root.duration; embeddedMetadata: $root[where ($.field != "value" and $.field != "tagName" and $.field != "startTimestamp" and $.field != "endTimestamp" and $.field != "messageId")]; }] def MapTimestamp(input) { continuousTimestamp: { eventTimestampStart: input.startTimestamp; eventTimestampEnd: input.endTimestamp; }; } def MapData(input) { complex: input.value; }在类型 的下拉列表中选择
basic-continuous | version: 1。点击创建 。