基本構成
標準の Manufacturing Data Engine(MDE)のデプロイでは、データの取り込みを開始するために必要な構成設定はデフォルトで適用されません。
このガイドでは、MDE の基本的な設定について説明します。たとえば、システムがエンドツーエンドで動作することをテストする場合などです。このガイドでは、3 つのアーキタイプすべてについて、メッセージ クラス、タイプ、パーサーを作成する方法を説明します。
Manufacturing Connect edge(MCe)を使用してデータを取り込む場合は、代わりにデフォルトの構成パッケージをデプロイします。
この構成は、MDE API またはウェブ インターフェースを使用して完了できます。
メッセージ クラス
このセクションでは、MDE で使用可能なメッセージ クラスの例を示します。
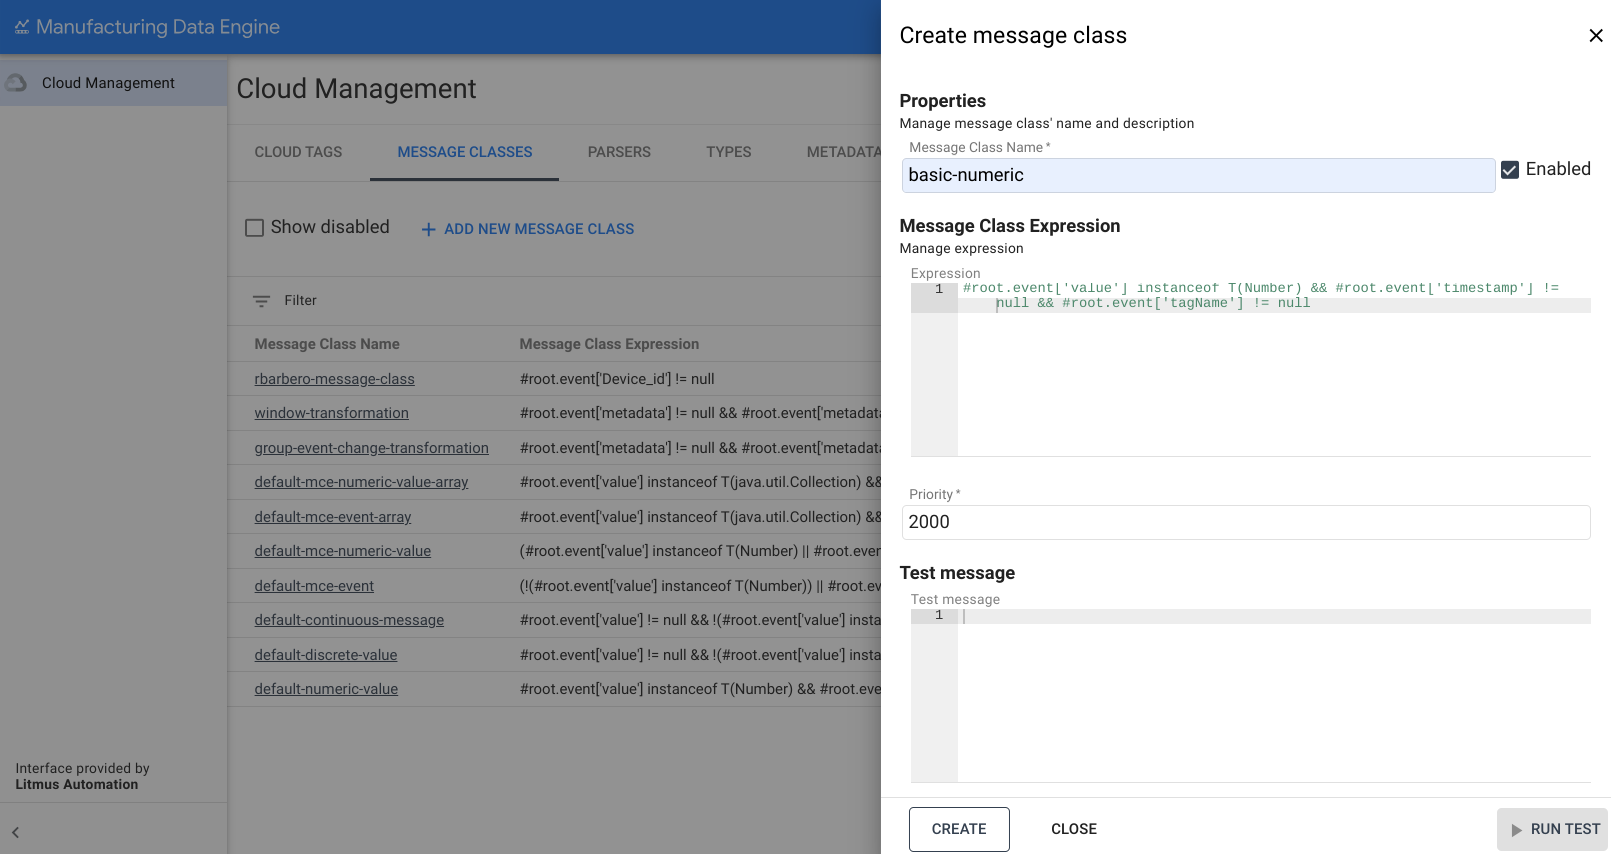
numeric のメッセージ クラス
basic-numeric メッセージ クラスの例を次に示します。
REST
POST /configuration/v1/message-classes
{
   "name": "basic-numeric",
   "priority": 2000,
   "expression": "#root.event['value'] instanceof T(Number) && #root.event['timestamp'] != null && #root.event['tagName'] != null"
}
ウェブ インターフェース
メッセージ クラス名: basic-numeric
- MDE ウェブ インターフェースで、[メッセージ クラス] をクリックします。
- [Add new Message Class] をクリックします。
- [Message Class name] に
basic-numericと入力します。 次の式をコピーして、[式] ボックスに貼り付けます。
#root.event['value'] instanceof T(Number) && #root.event['timestamp'] != null && #root.event['tagName'] != null優先度を
2000に変更します。[作成] をクリックします。
discrete のメッセージ クラス
basic-discrete メッセージ クラスの例を次に示します。
REST
POST /configuration/v1/message-classes
   {
      "name": "basic-discrete",
      "priority": 1975,
      "expression": "#root.event['value'] != null && !(#root.event['value'] instanceof T(Number)) && #root.event['timestamp'] != null && #root.event['tagName'] != null"
   }
ウェブ インターフェース
メッセージ クラス名: basic-discrete
- MDE ウェブ インターフェースで、[メッセージ クラス] をクリックします。
- [Add new Message Class] をクリックします。
- [Message Class name] に
basic-discreteと入力します。 次の式をコピーして、[式] ボックスに貼り付けます。
#root.event['value'] != null && !(#root.event['value'] instanceof T(Number)) && #root.event['timestamp'] != null && #root.event['tagName'] != null優先度を
1975に変更します。[作成] をクリックします。

continuous のメッセージ クラス
basic-continuous メッセージ クラスの例を次に示します。
REST
POST /configuration/v1/message-classes
   {
      "name": "basic-continuous",
      "priority": 1950,
      "expression": "#root.event['value'] != null && !(#root.event['value'] instanceof T(Number)) && #root.event['startTimestamp'] != null && #root.event['endTimestamp'] != null && #root.event['tagName'] != null"
   }
ウェブ インターフェース
メッセージ クラス名: basic-continuous
- MDE ウェブ インターフェースで、[メッセージ クラス] をクリックします。
- [Add new Message Class] をクリックします。
- [Message Class name] に
basic-continuousと入力します。 次の式をコピーして、[式] ボックスに貼り付けます。
#root.event['value'] != null && !(#root.event['value'] instanceof T(Number)) && #root.event['startTimestamp'] != null && #root.event['endTimestamp'] != null && #root.event['tagName'] != null優先度を
1950に変更します。[作成] をクリックします。

型
このセクションでは、MDE で使用可能な型について説明します。
numeric のタイプ
basic-numeric タイプの例を次に示します。
REST
POST /configuration/v1/types
{
   "archetype": "NUMERIC_DATA_SERIES",
   "name": "basic-numeric"
}
ウェブ インターフェース
名前: basic-numeric
- MDE ウェブ インターフェースで、[タイプ] をクリックします。
- [Add new Type] をクリックします。
- [Type name] に「
basic-numeric」と入力します。 [アーキタイプ] のプルダウンで
NUMERIC_DATA_SERIESを選択します。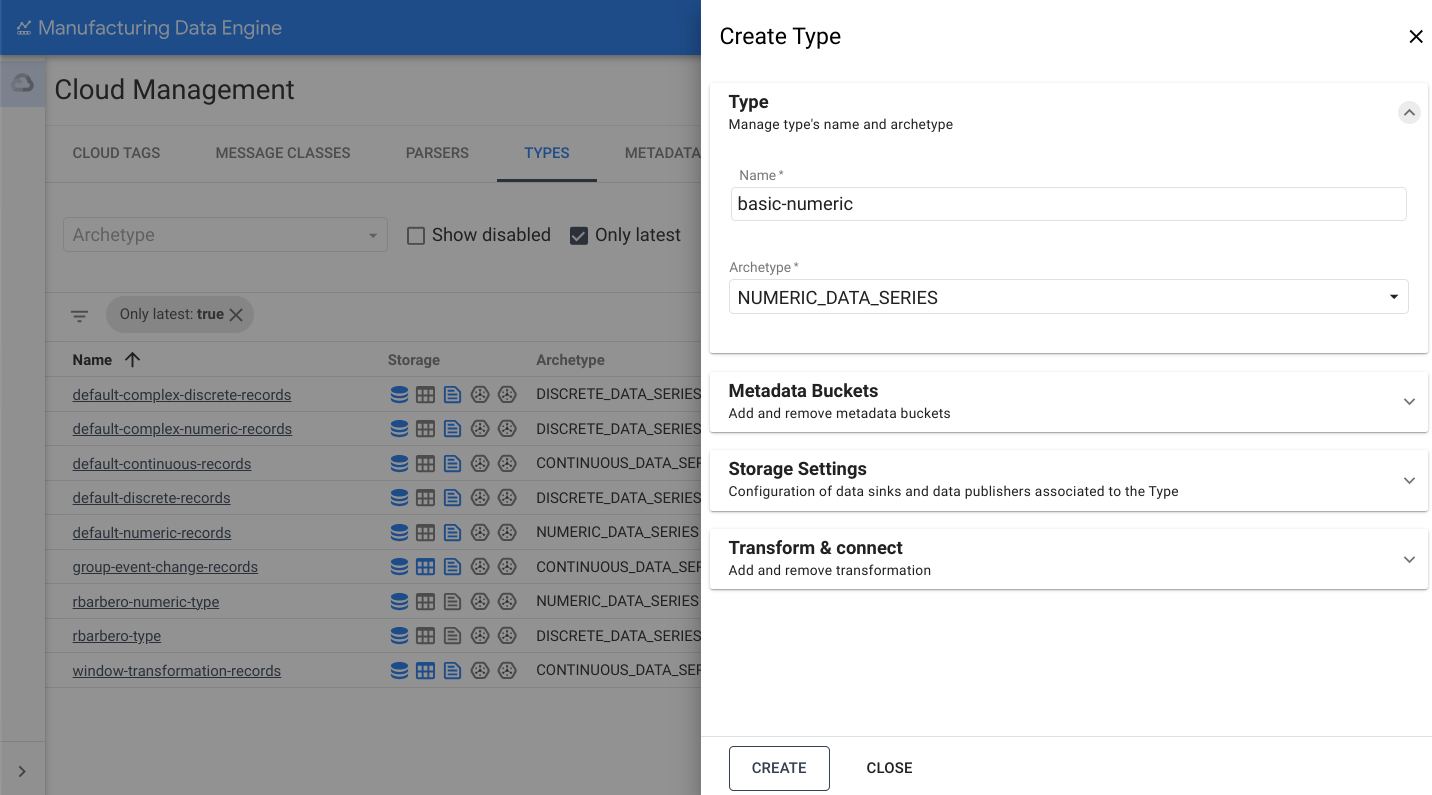
[ストレージ設定] セクションを開きます。
[BigQuery に送信] オプションを切り替えます。
[作成] をクリックします。
discrete のタイプ
basic-discrete タイプの例を次に示します。
REST
POST /configuration/v1/types
{
   "archetype": "DISCRETE_DATA_SERIES",
   "name": "basic-discrete"
}
ウェブ インターフェース
名前: basic-discrete
- MDE ウェブ インターフェースで、[タイプ] をクリックします。
- [Add new Type] をクリックします。
- [Type name] に「
basic-discrete」と入力します。 [アーキタイプ] のプルダウンで [
DISCRETE_DATA_SERIES] を選択します。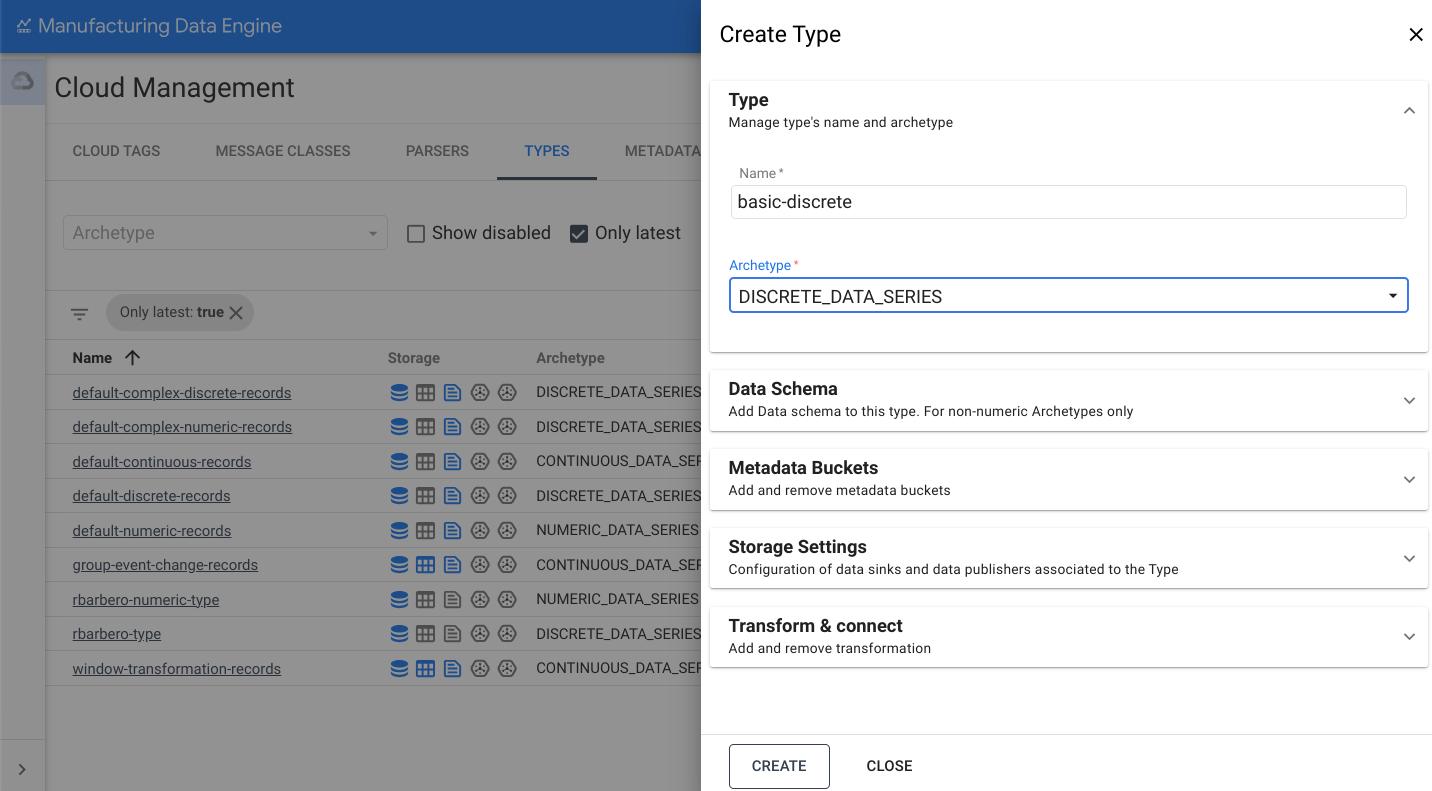
[ストレージ設定] セクションを開きます。
[BigQuery に送信] オプションを切り替えます。
[作成] をクリックします。
continuous のタイプ
basic-continuous タイプの例を次に示します。
REST
POST /configuration/v1/types
{
   "archetype": "CONTINUOUS_DATA_SERIES",
   "name": "basic-continuous"
}
ウェブ インターフェース
名前: basic-continuous
- MDE ウェブ インターフェースで、[タイプ] をクリックします。
- [Add new Type] をクリックします。
- [Type name] に「
basic-continuous」と入力します。 [アーキタイプ] のプルダウンで [
CONTINUOUS_DATA_SERIES] を選択します。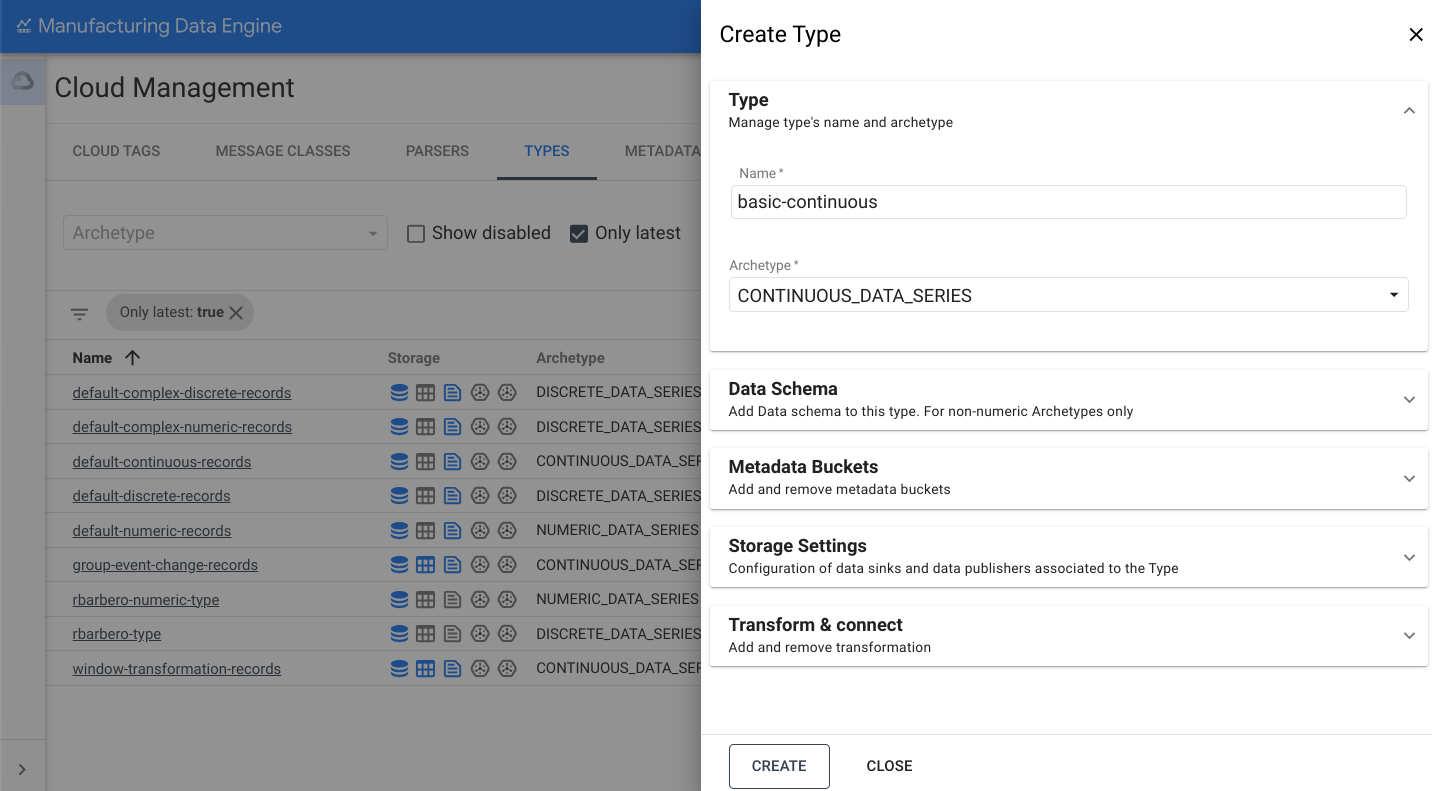
[ストレージ設定] セクションを開きます。
[BigQuery に送信] オプションを切り替えます。
[作成] をクリックします。
パーサー
このセクションでは、MDE で使用できるさまざまなパーサーの概要について説明します。パーサーを作成する前に、タイプが完全にプロビジョニングされ、active であることを確認してください。この処理には 3 分ほどかかることがあります。
numeric のパーサー
basic-numeric パーサーの例を次に示します。
REST
POST /configuration/v1/parsers
{
   "name": "basic-numeric-to-basic-numeric",
   "messageClassName": "basic-numeric",
   "typeReference": {
         "name": "basic-numeric",
         "version": 1
   },
   "script": "package mde\n\n[{\ntagName: $root.tagName;\ntimestamps: MapTimestamp($root);\ndata: MapData($root);\nembeddedMetadata: $root[where ($.field != \"value\" and $.field != \"tagName\" and $.field != \"timestamp\" and $.field != \"messageId\")];\n}]\n\ndef MapTimestamp(input) {\n    eventTimestamp: input.timestamp;\n}\n\ndef MapData(input) {\n    numeric: input.value;\n}"
}
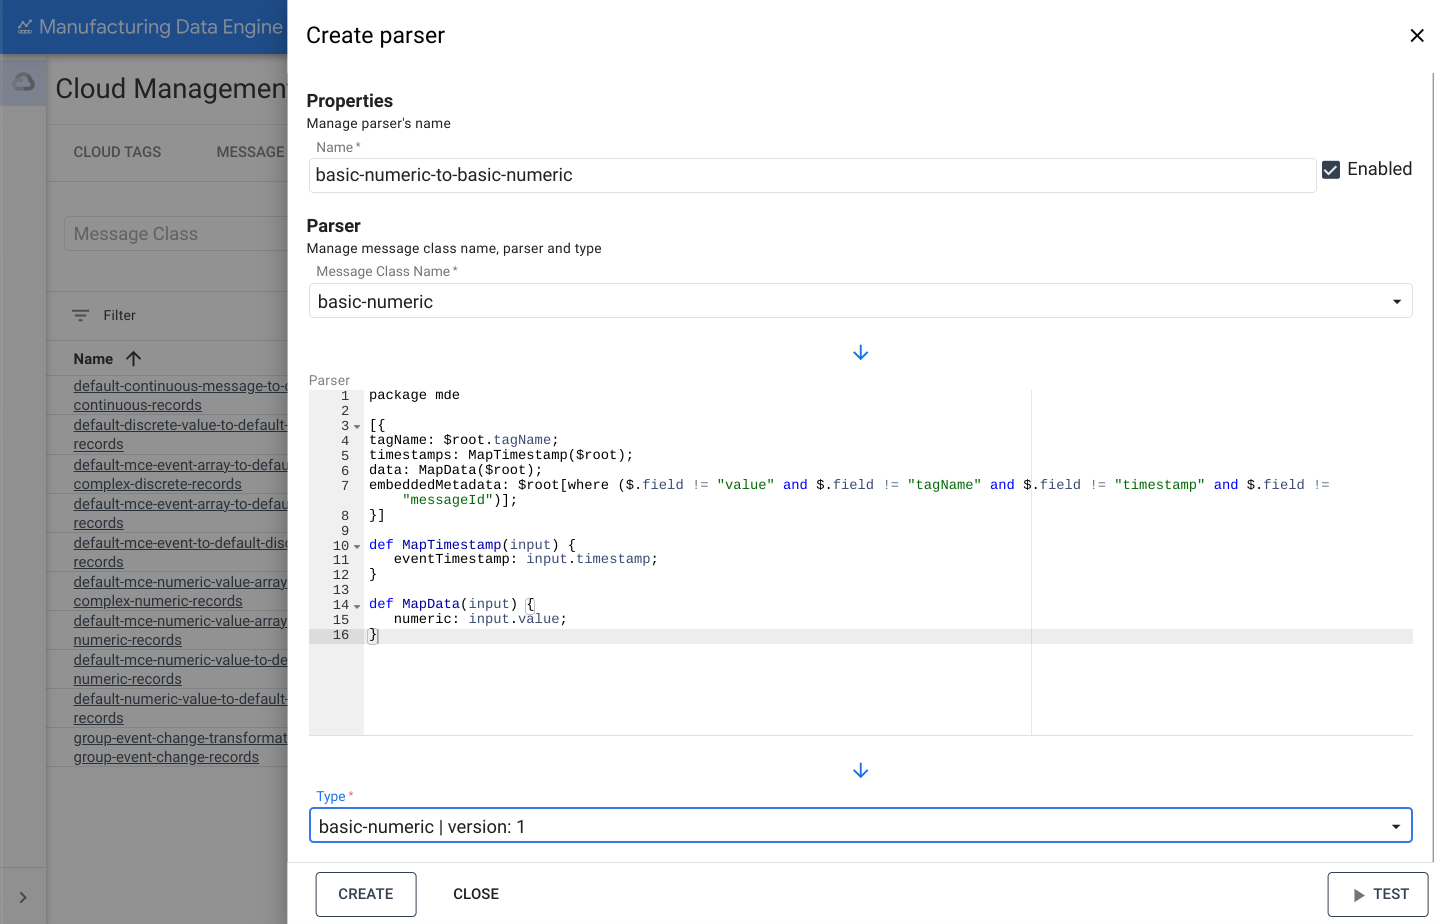
ウェブ インターフェース
名前: basic-numeric-to-basic-numeric
- MDE ウェブ インターフェースで、[パーサー] をクリックします。
- [新しいパーサーを追加] をクリックします。
- [Parser name] に「
basic-numeric-to-basic-numeric」と入力します。 - [メッセージ クラス名] のプルダウンで [
basic-numeric] を選択します。 次の Whistle コードをコピーして [Parser] ボックスに貼り付けます。
package mde [{ tagName: $root.tagName; timestamps: MapTimestamp($root); data: MapData($root); embeddedMetadata: $root[where ($.field != "value" and $.field != "tagName" and $.field != "timestamp" and $.field != "messageId")]; }] def MapTimestamp(input) { eventTimestamp: input.timestamp; } def MapData(input) { numeric: input.value; }[Type] のプルダウンで [
basic-numeric | version: 1] を選択します。[作成] をクリックします。
discrete のパーサー
basic-discrete パーサーの例を次に示します。
REST
POST /configuration/v1/parsers
{
   "name": "basic-discrete-to-basic-discrete",
   "messageClassName": "basic-discrete",
   "typeReference": {
         "name": "basic-discrete",
         "version": 1
   },
   "script": "package mde\n\n[{\ntagName: $root.tagName;\ntimestamps: MapTimestamp($root);\ndata: MapData($root);\nembeddedMetadata: $root[where ($.field != \"value\" and $.field != \"tagName\" and $.field != \"timestamp\" and $.field != \"messageId\")];\n}]\n\ndef MapTimestamp(input) {\n    eventTimestamp: input.timestamp;\n}\n\ndef MapData(input) {\n    complex: input.value;\n}\n"
}
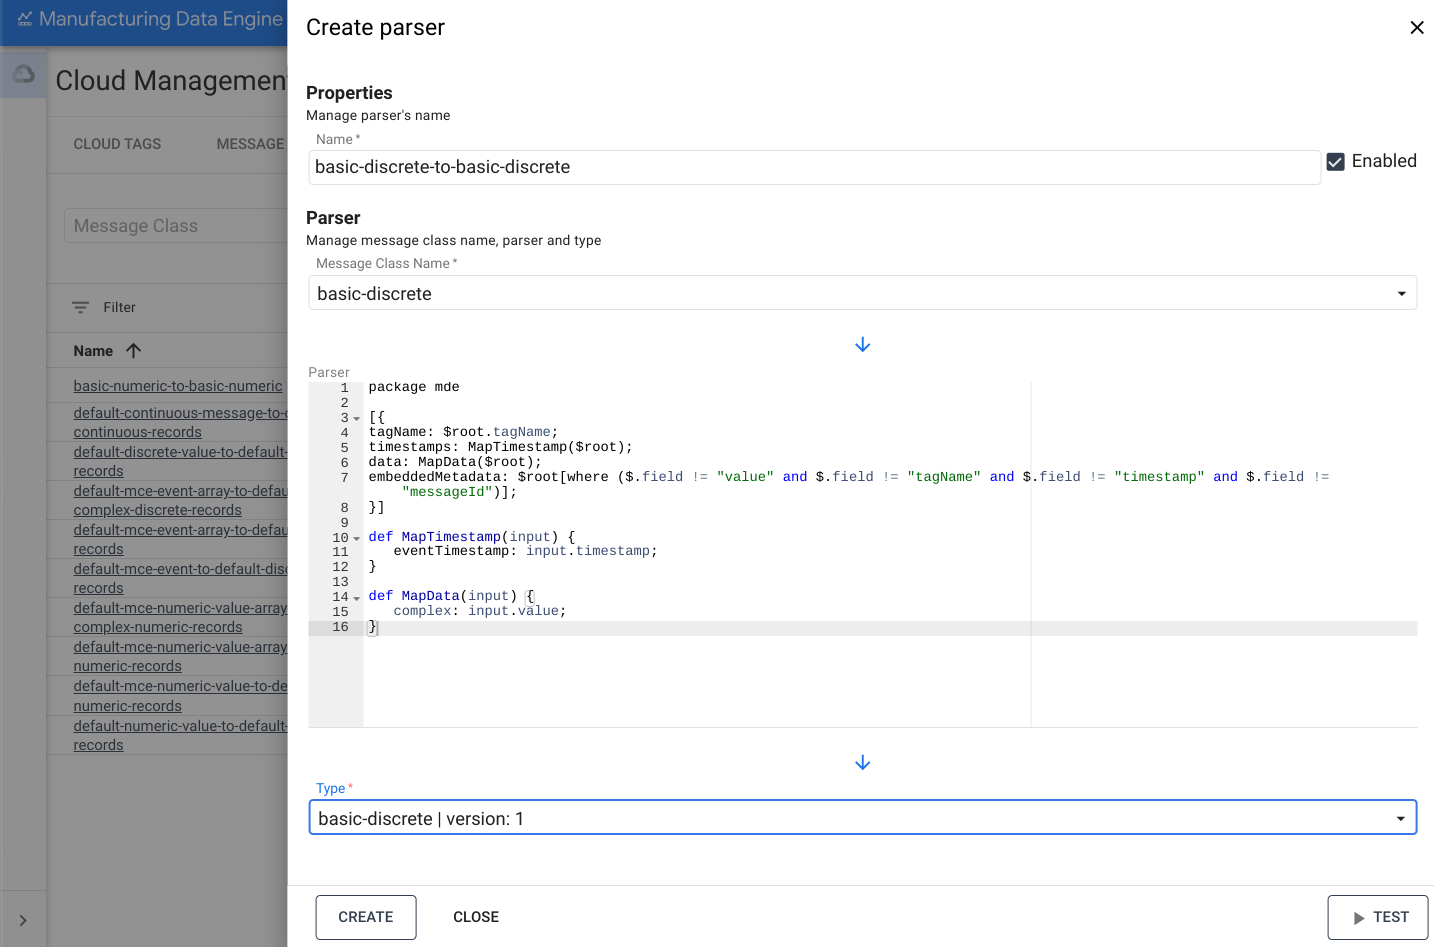
ウェブ インターフェース
名前: basic-discrete-to-basic-discrete
- MDE ウェブ インターフェースで、[パーサー] をクリックします。
- [新しいパーサーを追加] をクリックします。
- [Parser name] に「
basic-numeric-to-basic-discrete」と入力します。 - [メッセージ クラス名] のプルダウンで [
basic-discrete] を選択します。 次の Whistle コードをコピーして [Parser] ボックスに貼り付けます。
package mde [{ tagName: $root.tagName; timestamps: MapTimestamp($root); data: MapData($root); embeddedMetadata: $root[where ($.field != "value" and $.field != "tagName" and $.field != "timestamp" and $.field != "messageId")]; }] def MapTimestamp(input) { eventTimestamp: input.timestamp; } def MapData(input) { complex: input.value; }[Type] のプルダウンで [
basic-discrete | version: 1] を選択します。[作成] をクリックします。
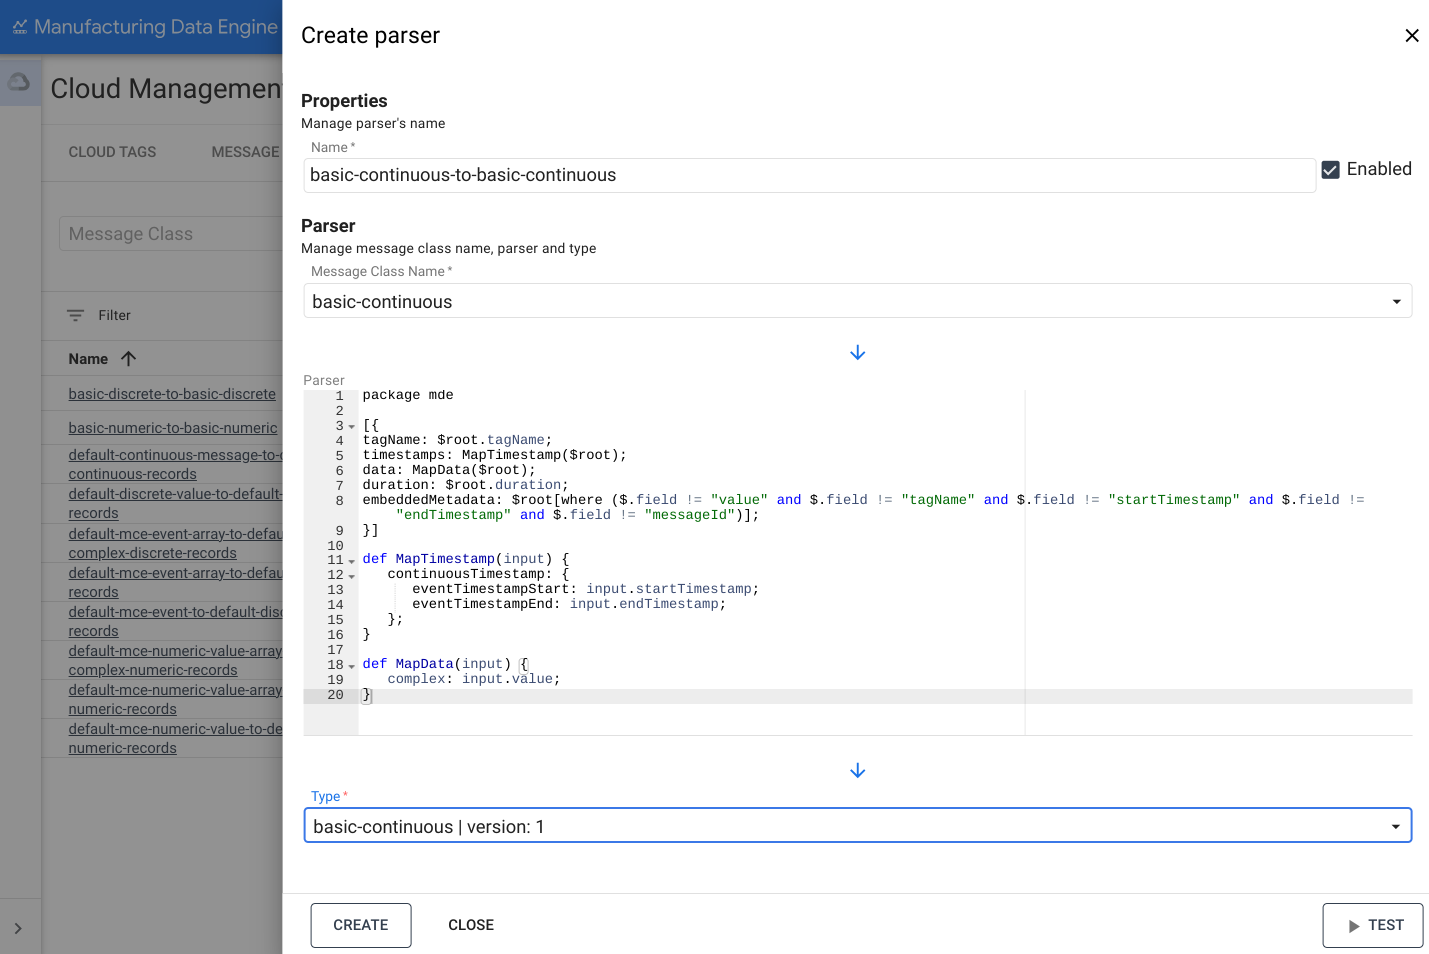
continuous のパーサー
basic-continuous パーサーの例を次に示します。
REST
POST /configuration/v1/parsers
{
   "name": "basic-continuous-to-basic-continuous",
   "messageClassName": "basic-continuous",
   "typeReference": {
         "name": "basic-continuous",
         "version": 1
   },
   "script": "package mde\n\n[{\ntagName: $root.tagName;\ntimestamps: MapTimestamp($root);\ndata: MapData($root);\nduration: $root.duration;\nembeddedMetadata: $root[where ($.field != \"value\" and $.field != \"tagName\" and $.field != \"startTimestamp\" and $.field != \"endTimestamp\" and $.field != \"messageId\")];\n}]\n\ndef MapTimestamp(input) {\n    continuousTimestamp: {\n        eventTimestampStart: input.startTimestamp;\n        eventTimestampEnd: input.endTimestamp;\n    };\n}\n\ndef MapData(input) {\n    complex: input.value;\n}\n"
}
ウェブ インターフェース
名前: basic-continuous-to-basic-continuous
- MDE ウェブ インターフェースで、[パーサー] をクリックします。
- [新しいパーサーを追加] をクリックします。
- [Parser name] に「
basic-numeric-to-basic-continuous」と入力します。 - [メッセージ クラス名] のプルダウンで [
basic-continuous] を選択します。 次の Whistle コードをコピーして [Parser] ボックスに貼り付けます。
package mde [{ tagName: $root.tagName; timestamps: MapTimestamp($root); data: MapData($root); duration: $root.duration; embeddedMetadata: $root[where ($.field != "value" and $.field != "tagName" and $.field != "startTimestamp" and $.field != "endTimestamp" and $.field != "messageId")]; }] def MapTimestamp(input) { continuousTimestamp: { eventTimestampStart: input.startTimestamp; eventTimestampEnd: input.endTimestamp; }; } def MapData(input) { complex: input.value; }[Type] のプルダウンで [
basic-continuous | version: 1] を選択します。[作成] をクリックします。