> [!NOTE]
> **Objective:**
> 1. Create a Managed Service for Apache Spark workflow template that runs a [Spark PI job](https://spark.apache.org/examples.html)
> 2. Create an Apache Airflow DAG that [Managed Airflow](https://docs.cloud.google.com/composer/docs.md.txt) will use to start the workflow at a specific time.
In this document, you use the following billable components of Google Cloud:
- Managed Service for Apache Spark
- Compute Engine
- Managed Airflow
To generate a cost estimate based on your projected usage,
use the [pricing calculator](https://docs.cloud.google.com/products/calculator).
New Google Cloud users might be eligible for a [free trial](https://docs.cloud.google.com/free).
## Before you begin
### Set up your project
## Create a Managed Service for Apache Spark workflow template
Copy and run the following commands in a local terminal window or in
[Cloud Shell](https://console.cloud.google.com/?cloudshell=true) to create and
define a [workflow template](https://docs.cloud.google.com/managed-spark/docs/concepts/workflows/using-workflows).
1. Create the `sparkpi` workflow template.
```
gcloud dataproc workflow-templates create sparkpi \
--region=us-central1
```
2. Add the spark job to the `sparkpi` workflow template. The "compute" `step-id` flag identifies the SparkPi job.
```
gcloud dataproc workflow-templates add-job spark \
--workflow-template=sparkpi \
--step-id=compute \
--class=org.apache.spark.examples.SparkPi \
--jars=file:///usr/lib/spark/examples/jars/spark-examples.jar \
--region=us-central1 \
-- 1000
```
3. Use a [managed](https://docs.cloud.google.com/managed-spark/docs/concepts/workflows/overview.md.txt#managed_cluster), [single-node](https://docs.cloud.google.com/managed-spark/docs/concepts/configuring-clusters/single-node-clusters.md.txt) cluster to run the workflow. Managed Service for Apache Spark will create the cluster, run the workflow on it, then delete the cluster when the workflow completes.
```
gcloud dataproc workflow-templates set-managed-cluster sparkpi \
--cluster-name=sparkpi \
--single-node \
--region=us-central1
```
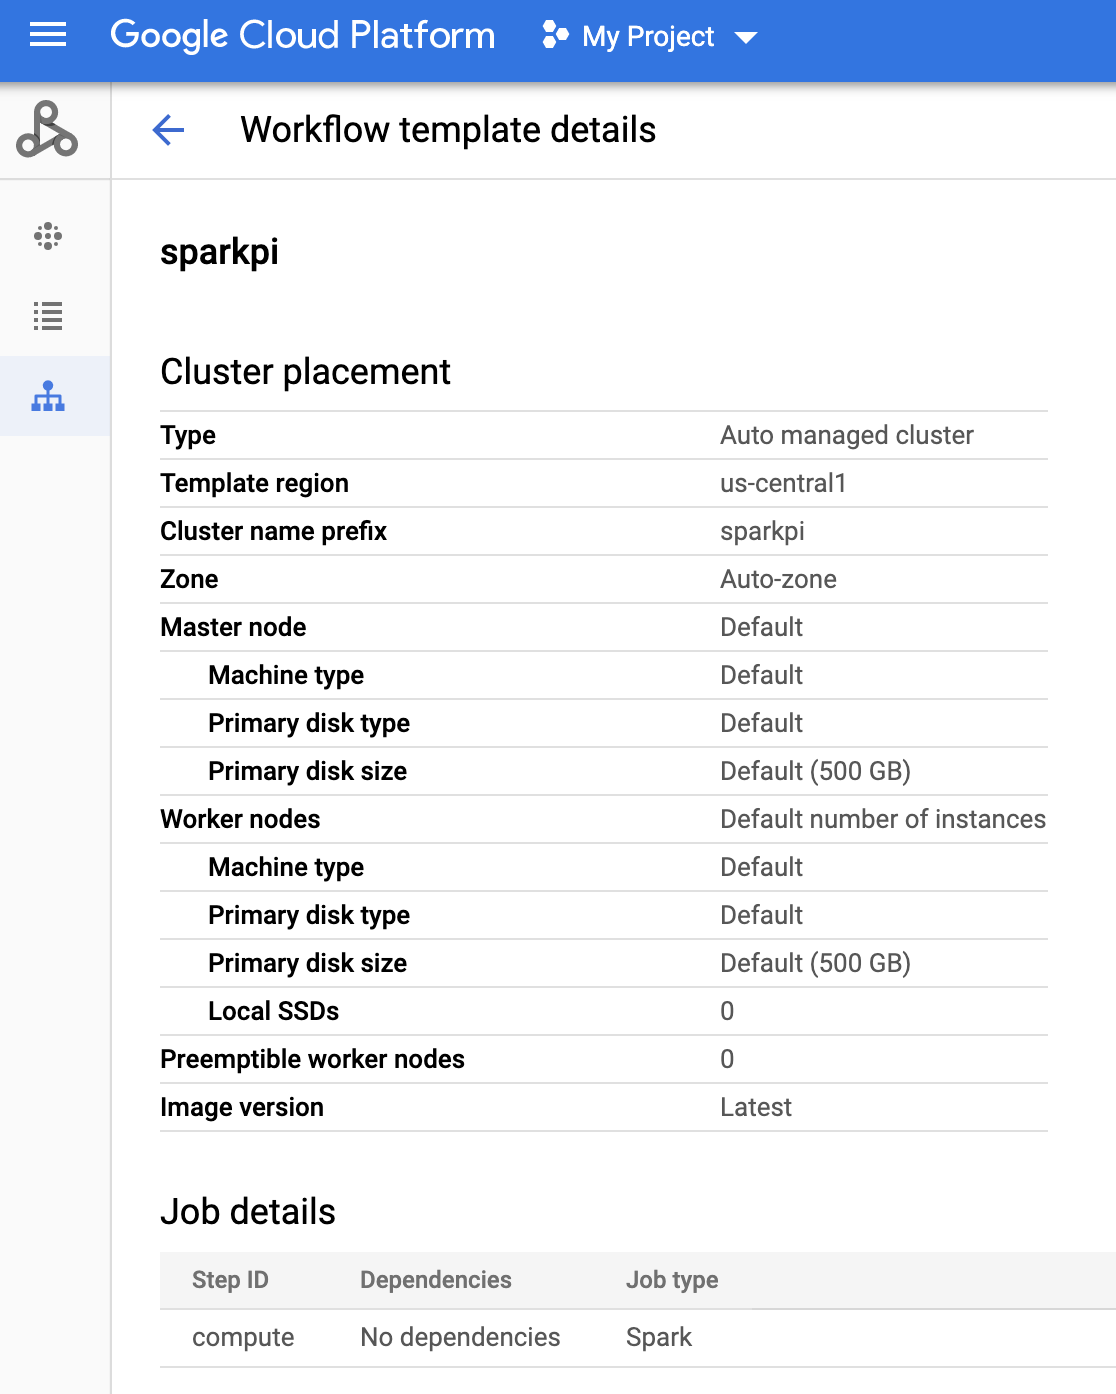
4. Confirm workflow template creation.
### Console
Click the `sparkpi` name on the Managed Service for Apache Spark
[**Workflows**](https://console.cloud.google.com/dataproc/workflows/templates)
page in the Google Cloud console to open the
**Workflow template details** page. Click the name of your
workflow template to confirm the `sparkpi` template attributes.
### gcloud command
Run the following command:
```
gcloud dataproc workflow-templates describe sparkpi --region=us-central1
```
## Create and upload a DAG to Cloud Storage
1. Create or use an existing [Managed Airflow environment](https://docs.cloud.google.com/composer/docs/how-to/managing/creating#creating_a_new_environment).
2. Set environment variables.
### Airflow UI
1. In the toolbar, click **Admin \> Variables** . 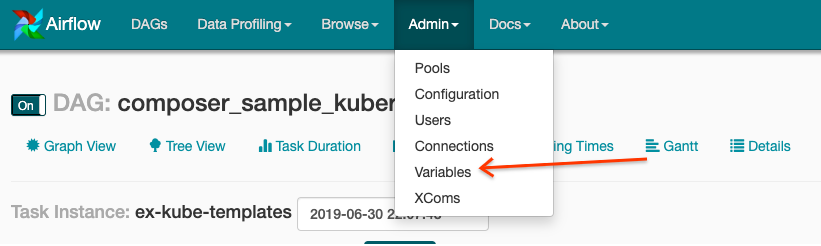
2. Click **Create** . 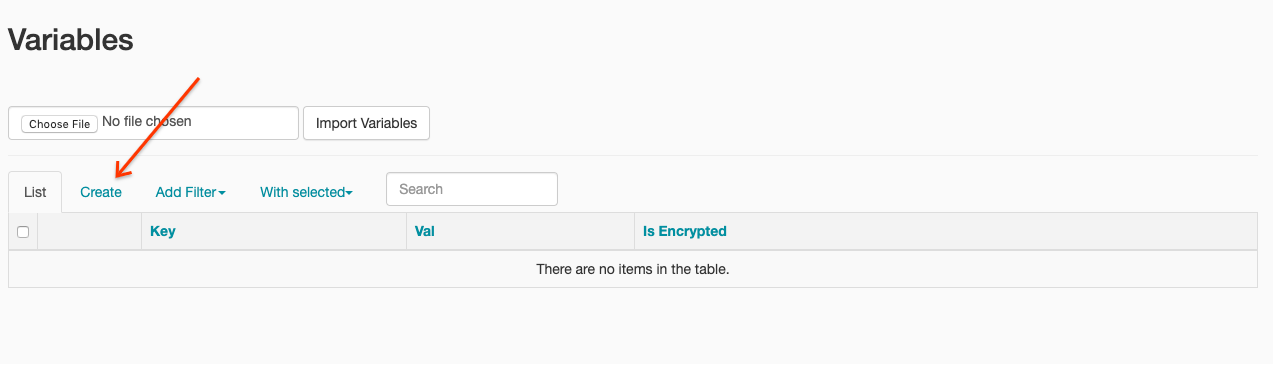
3. Enter the following information:
- Key:`project_id`
- Val: PROJECT_ID --- your Google Cloud project ID
4. Click **Save**.
### gcloud command
Enter the following commands:
- `ENVIRONMENT` is the name of the Managed Airflow environment
- `LOCATION` is the region where the Managed Airflow environment is located
- `PROJECT_ID` is the project ID for the project that contains the Managed Airflow environment
```
gcloud composer environments run ENVIRONMENT --location LOCATION variables set -- project_id PROJECT_ID
```
3. Copy the following DAG code locally into a file titled "composer-dataproc-dag.py", which uses the [DataprocInstantiateWorkflowTemplateOperator](https://airflow.apache.org/docs/apache-airflow-providers-google/stable/_api/airflow/providers/google/cloud/operators/dataproc/index.html#airflow.providers.google.cloud.operators.dataproc.DataprocInstantiateWorkflowTemplateOperator).
### Airflow 2
```python
"""Example Airflow DAG that kicks off a Cloud Dataproc Template that runs a
Spark Pi Job.
This DAG relies on an Airflow variable
https://airflow.apache.org/docs/apache-airflow/stable/concepts/variables.html
* project_id - Google Cloud Project ID to use for the Cloud Dataproc Template.
"""
import datetime
from airflow import models
from airflow.providers.google.cloud.operators.dataproc import (
DataprocInstantiateWorkflowTemplateOperator,
)
from airflow.utils.dates import days_ago
project_id = "{{var.value.project_id}}"
default_args = {
# Tell airflow to start one day ago, so that it runs as soon as you upload it
"start_date": days_ago(1),
"project_id": project_id,
}
# Define a DAG (directed acyclic graph) of tasks.
# Any task you create within the context manager is automatically added to the
# DAG object.
with models.DAG(
# The id you will see in the DAG airflow page
"dataproc_workflow_dag",
default_args=default_args,
# The interval with which to schedule the DAG
schedule_interval=datetime.timedelta(days=1), # Override to match your needs
) as dag:
start_template_job = DataprocInstantiateWorkflowTemplateOperator(
# The task id of your job
task_id="dataproc_workflow_dag",
# The template id of your workflow
template_id="sparkpi",
project_id=project_id,
# The region for the template
region="us-central1",
)
```
### Airflow 1
```python
"""Example Airflow DAG that kicks off a Cloud Dataproc Template that runs a
Spark Pi Job.
This DAG relies on an Airflow variable
https://airflow.apache.org/docs/apache-airflow/stable/concepts/variables.html
* project_id - Google Cloud Project ID to use for the Cloud Dataproc Template.
"""
import datetime
from airflow import models
from airflow.contrib.operators import dataproc_operator
from airflow.utils.dates import days_ago
project_id = "{{var.value.project_id}}"
default_args = {
# Tell airflow to start one day ago, so that it runs as soon as you upload it
"start_date": days_ago(1),
"project_id": project_id,
}
# Define a DAG (directed acyclic graph) of tasks.
# Any task you create within the context manager is automatically added to the
# DAG object.
with models.DAG(
# The id you will see in the DAG airflow page
"dataproc_workflow_dag",
default_args=default_args,
# The interval with which to schedule the DAG
schedule_interval=datetime.timedelta(days=1), # Override to match your needs
) as dag:
start_template_job = dataproc_operator.DataprocWorkflowTemplateInstantiateOperator(
# The task id of your job
task_id="dataproc_workflow_dag",
# The template id of your workflow
template_id="sparkpi",
project_id=project_id,
# The region for the template
# For more info on regions where Dataflow is available see:
# https://cloud.google.com/dataflow/docs/resources/locations
region="us-central1",
)
```
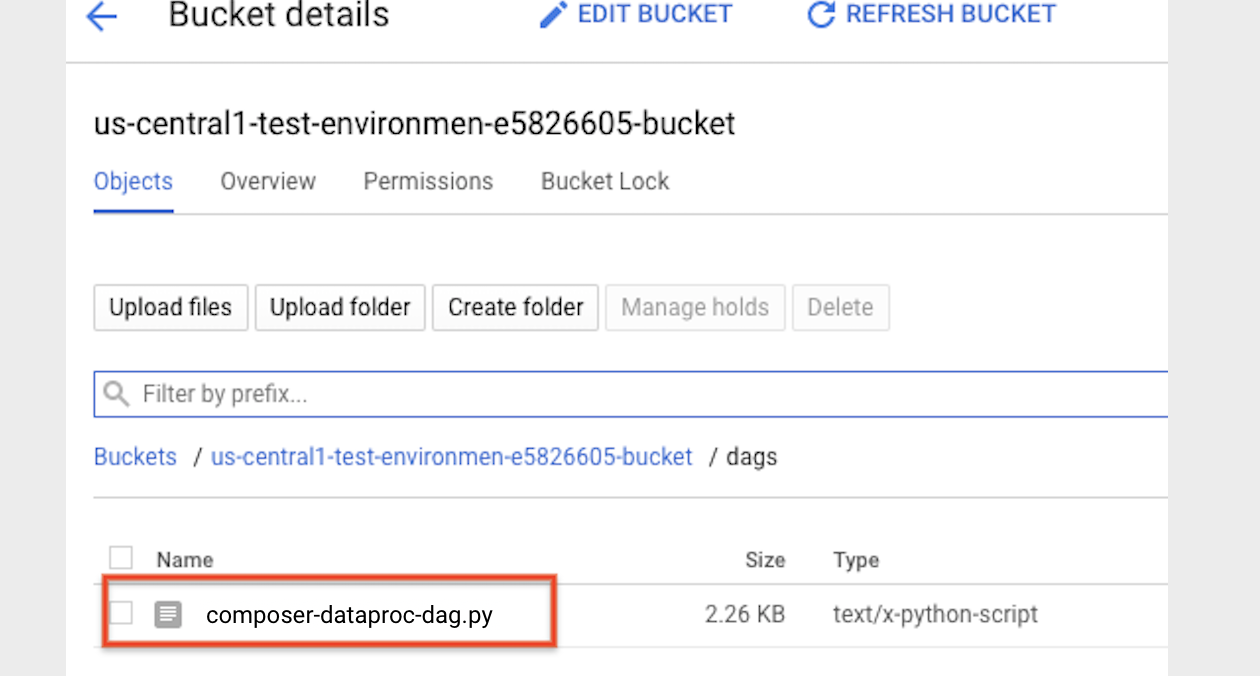
4. [Upload your
DAG](https://docs.cloud.google.com/composer/docs/how-to/using/managing-dags) to your environment folder in Cloud Storage. After the upload has been completed successfully, click the **DAGs Folder** link on the Managed Airflow Environment's page.
### View a task's status
### Airflow UI
1. Open the [Airflow web interface](https://docs.cloud.google.com/composer/docs/how-to/accessing/airflow-web-interface#accessing_the_web_interface).
2. On the DAGs page, click the DAG name (for example, `dataproc_workflow_dag`).
3. On the DAGs Details page, click **Graph View**.
4. Check status:
- Failed: The task has a red box around it. You can also hold the pointer over task and look for **State: Failed** . 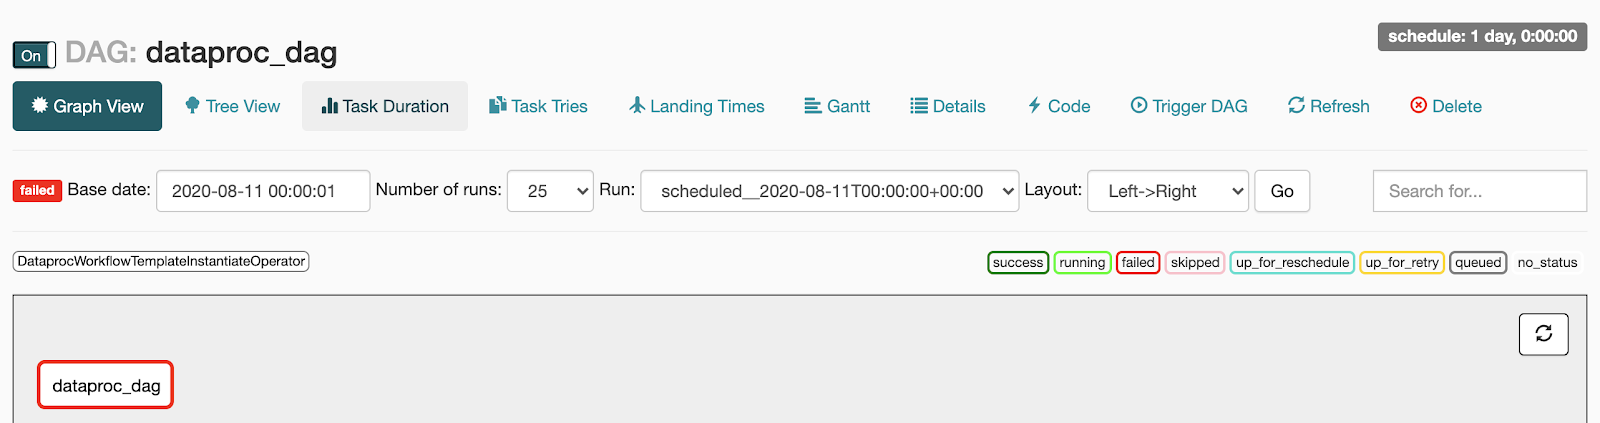
- Success: The task has a green box around it. You can also hold the pointer over the task and check for **State: Success** . 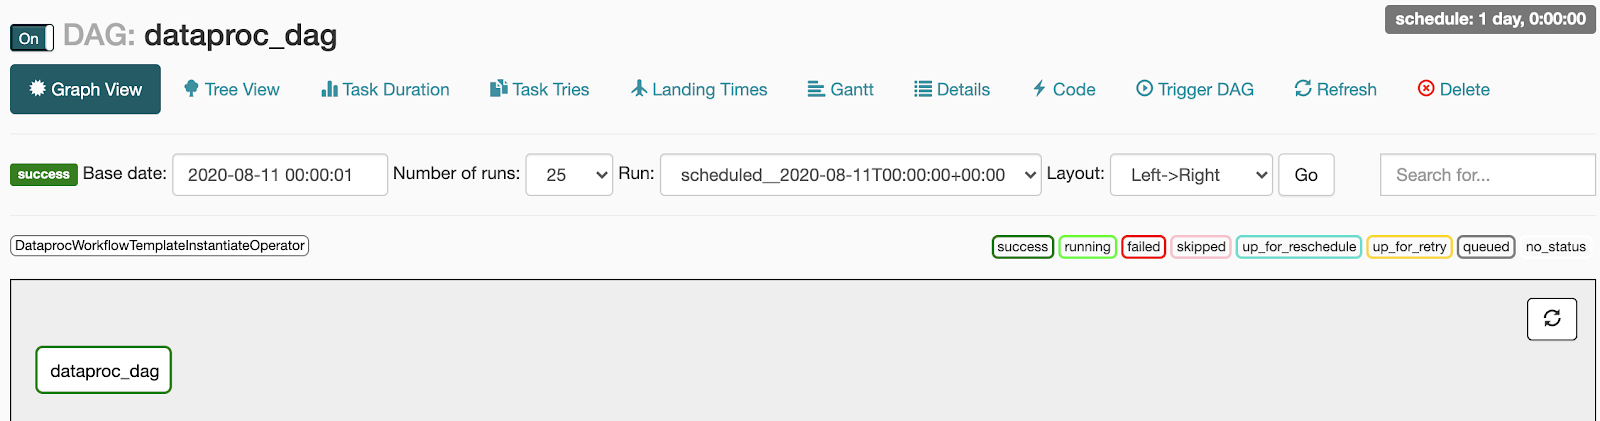
### Console
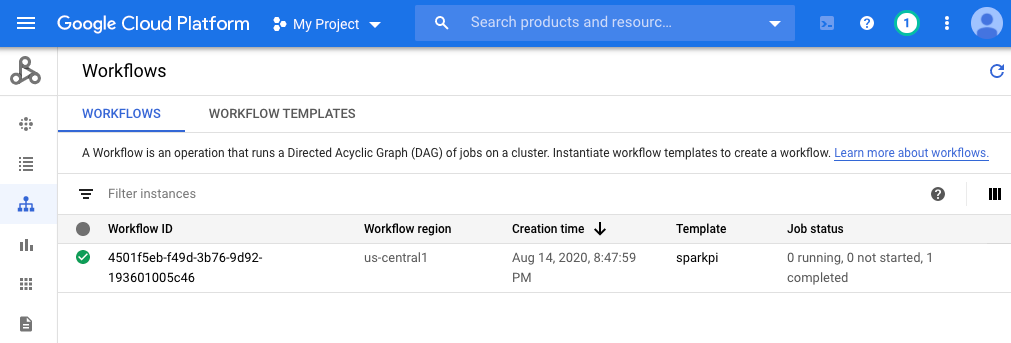
Click the Workflows tab to see workflow status.
### gcloud command
```
gcloud dataproc operations list \
--region=us-central1 \
--filter="labels.goog-dataproc-workflow-template-id=sparkpi"
```
## Clean up
To avoid incurring charges to your Google Cloud account, you can delete the
resources used in this tutorial:
1. [Delete the Managed Airflow environment](https://console.cloud.google.com/composer/environments).
2. [Delete the workflow template](https://docs.cloud.google.com/managed-spark/docs/concepts/workflows/using-workflows#deleting_a_workflow_template).
## What's next
- See [Overview of Managed Service for Apache Spark workflow templates](https://docs.cloud.google.com/managed-spark/docs/concepts/workflows/overview.md.txt).
- See [Workflow scheduling solutions](https://docs.cloud.google.com/managed-spark/docs/concepts/workflows/workflow-schedule-solutions.md.txt).