[Trino](https://trino.io/) (formerly Presto) is a distributed SQL query
engine designed to query large data sets distributed over one or more
heterogeneous data sources. Trino can query Hive, MySQL, Kafka and other data
sources through connectors. This tutorial shows you how to:
- Install the Trino service on a Managed Service for Apache Spark cluster
- Query public data from a Trino client installed on your local machine that communicates with a Trino service on your cluster
- Run queries from a Java application that communicates with the Trino service on your cluster through the Trino Java JDBC driver.
## Objectives
- Create a Managed Service for Apache Spark cluster with Trino installed
- Prepare data. This tutorial uses the [Chicago Taxi Trips](https://docs.cloud.google.com/bigquery/public-data/chicago-taxi) public dataset, available in [BigQuery](https://docs.cloud.google.com/bigquery/docs).
1. Extract the data from BigQuery
2. Load the data into [Cloud Storage](https://docs.cloud.google.com/storage/docs) as CSV files
3. Transform data:
1. Expose the data as a Hive external table to make the data queryable by Trino
2. Convert the data from CSV format into Parquet format to make querying faster
- Send Trino CLI or application code queries using an SSH tunnel or Trino JDBC driver, respectively, to the Trino coordinator running on the cluster
- Check logs and monitor the Trino service through the Trino Web UI 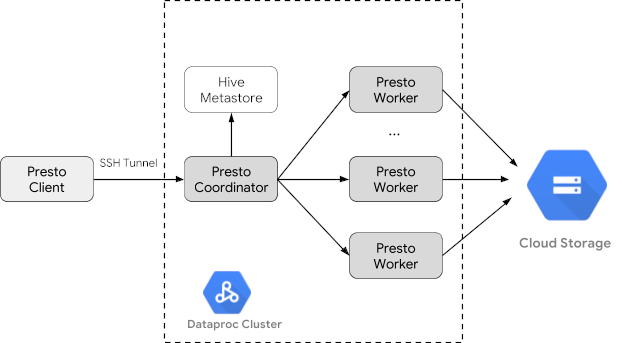
## Costs
In this document, you use the following billable components of Google Cloud:
- [Managed Service for Apache Spark](https://docs.cloud.google.com/managed-spark/pricing)
- [Cloud Storage](https://docs.cloud.google.com/storage/pricing)
- [BigQuery](https://cloud.google.com/bigquery/pricing)
To generate a cost estimate based on your projected usage,
use the [pricing calculator](https://docs.cloud.google.com/products/calculator).
New Google Cloud users might be eligible for a [free trial](https://docs.cloud.google.com/free).
## Before you begin
If you haven't already done so, create a Google Cloud project and a Cloud Storage bucket to hold the data used in this tutorial. 1. **Setting up your project**
1. **Creating a Cloud Storage [bucket](https://docs.cloud.google.com/storage/docs/xml-api/put-bucket-create)** in your project to hold the data used in this tutorial.
1. In the Google Cloud console, go to the Cloud Storage **Buckets** page.
[Go to Buckets](https://console.cloud.google.com/storage/browser)
2. Click **Create**.
3. On the **Create a bucket** page, enter your bucket information. To go to the next step, click **Continue** .
1. In the **Get started** section, do the following:
- Enter a globally unique name that meets the [bucket naming requirements](https://docs.cloud.google.com/storage/docs/bucket-naming#requirements).
- To add a [bucket label](https://docs.cloud.google.com/storage/docs/tags-and-labels#bucket-labels), expand the **Labels** section (), click **Add label** , and specify a `key` and a `value` for your label.
2. In the **Choose where to store your data** section, do the following:
1. Select a [Location type](https://docs.cloud.google.com/storage/docs/locations).
2. Choose a location where your bucket's data is permanently stored from the **[Location type](https://docs.cloud.google.com/storage/docs/locations#available-locations)** drop-down menu.
- If you select the [dual-region](https://docs.cloud.google.com/storage/docs/locations#location-dr) location type, you can also choose to enable [turbo replication](https://docs.cloud.google.com/storage/docs/availability-durability#turbo-replication) by using the relevant checkbox.
3. To set up [cross-bucket replication](https://docs.cloud.google.com/storage/docs/availability-durability#cross-bucket-replication), select **Add cross-bucket replication via Storage Transfer Service** and follow these steps:
#### Set up cross-bucket replication
1. In the **Bucket** menu, select a bucket.
2. In the **Replication settings** section,
click **Configure** to configure settings for the
replication job.
The **Configure cross-bucket replication** pane
appears.
- To filter objects to replicate by object name prefix, enter a prefix that you want to include or exclude objects from, then click **Add a prefix**.
- To set a storage class for the replicated objects, select a storage class from the **Storage class** menu. If you skip this step, the replicated objects will use the destination bucket's storage class by default.
- Click **Done**.
3. In the **Choose how to store your data** section, do the following:
1. Select a [default storage class](https://docs.cloud.google.com/storage/docs/storage-classes) for the bucket or [Autoclass](https://docs.cloud.google.com/storage/docs/autoclass) for automatic storage class management of your bucket's data.
2. To enable [hierarchical namespace](https://docs.cloud.google.com/storage/docs/hns-overview), in the **Optimize storage for data-intensive workloads** section, select **Enable hierarchical namespace on this bucket** . **Note:** You cannot enable hierarchical namespace in existing buckets.
4. In the **Choose how to control access to objects** section, select whether or not your bucket enforces [public access prevention](https://docs.cloud.google.com/storage/docs/public-access-prevention), and select an [access control method](https://docs.cloud.google.com/storage/docs/access-control) for your bucket's objects. **Note:** You cannot change the **Prevent public access** setting if this setting is enforced at an [organization policy](https://docs.cloud.google.com/storage/docs/org-policy-constraints#public-access-prevention).
5. In the **Choose how to protect object data** section, do the following:
- Select any of the options under **Data protection** that you want to set for your bucket.
- To enable [soft delete](https://docs.cloud.google.com/storage/docs/soft-delete), click the **Soft delete policy (For data recovery)** checkbox, and specify the number of days you want to retain objects after deletion.
- To set [Object Versioning](https://docs.cloud.google.com/storage/docs/object-versioning), click the **Object versioning (For version control)** checkbox, and specify the maximum number of versions per object and the number of days after which the noncurrent versions expire.
- To enable the retention policy on objects and buckets, click the **Retention (For compliance)** checkbox, and then do the following:
- To enable [Object Retention Lock](https://docs.cloud.google.com/storage/docs/object-lock), click the **Enable object retention** checkbox.
- To enable [Bucket Lock](https://docs.cloud.google.com/storage/docs/bucket-lock), click the **Set bucket retention policy** checkbox, and choose a unit of time and a length of time for your retention period.
- To choose how your object data will be encrypted, expand the **Data encryption** section (), and select a [**Data encryption** method](https://docs.cloud.google.com/storage/docs/encryption).
4. Click **Create**.
## Create a Managed Service for Apache Spark cluster
Create a cluster by running the commands shown in this section from a terminal window on your local machine.
Create a Managed Service for Apache Spark cluster using the `optional-components` flag
(available on image version 2.1 and later) to install the
[Trino optional component](https://docs.cloud.google.com/managed-spark/docs/concepts/components/trino) on the
cluster and the `enable-component-gateway` flag to enable the
[Component Gateway](https://docs.cloud.google.com/managed-spark/docs/concepts/accessing/gateways) to allow
you to access the Trino Web UI from the Google Cloud console.
1. Set environment variables:
- **PROJECT:** your [project ID](https://console.cloud.google.com/)
- **BUCKET_NAME:** the name of the Cloud Storage bucket you created in [Before you begin](https://docs.cloud.google.com/managed-spark/docs/tutorials/trino-dataproc#before-you-begin)
- **REGION:** [region](https://docs.cloud.google.com/compute/docs/regions-zones#available) where the cluster used in this tutorial will be created, for example, "us-west1"
- **WORKERS:** 3 - 5 workers are recommended for this tutorial
```
export PROJECT=project-id
export WORKERS=number
export REGION=region
export BUCKET_NAME=bucket-name
```
2. Run the Google Cloud CLI on your local machine to create the cluster.
```
gcloud beta dataproc clusters create trino-cluster \
--project=${PROJECT} \
--region=${REGION} \
--num-workers=${WORKERS} \
--scopes=cloud-platform \
--optional-components=TRINO \
--image-version=2.1 \
--enable-component-gateway
```
> [!CAUTION]
> Creating a [High-Availability cluster](https://docs.cloud.google.com/managed-spark/docs/concepts/configuring-clusters/high-availability)---a cluster with multiple master nodes -- is not recommended since the coordinator is started on master node 0, and any other other master nodes will remain idle.
## Prepare data
Export the `bigquery-public-data` [chicago_taxi_trips](https://console.cloud.google.com/bigquery)
dataset to Cloud Storage as CSV files, then create a Hive external table
to reference the data.
1. On your local machine, run the following command to import the taxi data from BigQuery as CSV files without headers into the Cloud Storage bucket you created in [Before you begin](https://docs.cloud.google.com/managed-spark/docs/tutorials/trino-dataproc#before-you-begin).
```
bq --location=us extract --destination_format=CSV \
--field_delimiter=',' --print_header=false \
"bigquery-public-data:chicago_taxi_trips.taxi_trips" \
gs://${BUCKET_NAME}/chicago_taxi_trips/csv/shard-*.csv
```
2. Create Hive external tables that are backed by the CSV and Parquet files in your Cloud Storage bucket.
1. Create the Hive external table `chicago_taxi_trips_csv`.
```
gcloud dataproc jobs submit hive \
--cluster trino-cluster \
--region=${REGION} \
--execute "
CREATE EXTERNAL TABLE chicago_taxi_trips_csv(
unique_key STRING,
taxi_id STRING,
trip_start_timestamp TIMESTAMP,
trip_end_timestamp TIMESTAMP,
trip_seconds INT,
trip_miles FLOAT,
pickup_census_tract INT,
dropoff_census_tract INT,
pickup_community_area INT,
dropoff_community_area INT,
fare FLOAT,
tips FLOAT,
tolls FLOAT,
extras FLOAT,
trip_total FLOAT,
payment_type STRING,
company STRING,
pickup_latitude FLOAT,
pickup_longitude FLOAT,
pickup_location STRING,
dropoff_latitude FLOAT,
dropoff_longitude FLOAT,
dropoff_location STRING)
ROW FORMAT DELIMITED
FIELDS TERMINATED BY ','
STORED AS TEXTFILE
location 'gs://${BUCKET_NAME}/chicago_taxi_trips/csv/';"
```
2. Verify the creation of the Hive external table.
> [!IMPORTANT]
> **Skip this step to save time and resource usage.** If your cluster has 3 or fewer nodes, this query can take several minutes. You can skip this query step and only verify the creation of the final Hive Parquet, below, since that query step is significantly faster.
```
gcloud dataproc jobs submit hive \
--cluster trino-cluster \
--region=${REGION} \
--execute "SELECT COUNT(*) FROM chicago_taxi_trips_csv;"
```
3. Create another Hive external table `chicago_taxi_trips_parquet` with the same columns, but with data stored in [Parquet](https://parquet.apache.org)format for better query performance.
```
gcloud dataproc jobs submit hive \
--cluster trino-cluster \
--region=${REGION} \
--execute "
CREATE EXTERNAL TABLE chicago_taxi_trips_parquet(
unique_key STRING,
taxi_id STRING,
trip_start_timestamp TIMESTAMP,
trip_end_timestamp TIMESTAMP,
trip_seconds INT,
trip_miles FLOAT,
pickup_census_tract INT,
dropoff_census_tract INT,
pickup_community_area INT,
dropoff_community_area INT,
fare FLOAT,
tips FLOAT,
tolls FLOAT,
extras FLOAT,
trip_total FLOAT,
payment_type STRING,
company STRING,
pickup_latitude FLOAT,
pickup_longitude FLOAT,
pickup_location STRING,
dropoff_latitude FLOAT,
dropoff_longitude FLOAT,
dropoff_location STRING)
STORED AS PARQUET
location 'gs://${BUCKET_NAME}/chicago_taxi_trips/parquet/';"
```
4. Load the data from the Hive CSV table into the Hive Parquet table.
```
gcloud dataproc jobs submit hive \
--cluster trino-cluster \
--region=${REGION} \
--execute "
INSERT OVERWRITE TABLE chicago_taxi_trips_parquet
SELECT * FROM chicago_taxi_trips_csv;"
```
5. Verify that the data loaded correctly.
```
gcloud dataproc jobs submit hive \
--cluster trino-cluster \
--region=${REGION} \
--execute "SELECT COUNT(*) FROM chicago_taxi_trips_parquet;"
```
## Run queries
You can run queries locally from the Trino CLI or from an application.
### Trino CLI queries
This section demonstrates how to query the Hive Parquet taxi dataset using the
Trino CLI.
1. Run the following command on your local machine to SSH into your cluster's master node. The local terminal will stop responding during the execution of the command.
```
gcloud compute ssh trino-cluster-m
```
2. In SSH terminal window on your cluster's master node, run the Trino CLI, which connects to the Trino server running on the master node.
```
trino --catalog hive --schema default
```
3. At the `trino:default` prompt, verify that Trino can find the Hive tables.
```
show tables;
```
```
Table
‐‐‐‐‐‐‐‐‐‐‐‐‐‐‐‐‐‐‐‐‐‐‐‐‐‐‐‐‐
chicago_taxi_trips_csv
chicago_taxi_trips_parquet
(2 rows)
```
4. Run queries from the `trino:default` prompt, and compare the performance of querying Parquet versus CSV data.
- **Parquet data query**
```
select count(*) from chicago_taxi_trips_parquet where trip_miles > 50;
```
```
_col0
‐‐‐‐‐‐‐‐
117957
(1 row)
Query 20180928_171735_00006_2sz8c, FINISHED, 3 nodes
Splits: 308 total, 308 done (100.00%)
0:16 [113M rows, 297MB] [6.91M rows/s, 18.2MB/s]
```
- **CSV data query**
```
select count(*) from chicago_taxi_trips_csv where trip_miles > 50;
```
```
_col0
‐‐‐‐‐‐‐‐
117957
(1 row)
Query 20180928_171936_00009_2sz8c, FINISHED, 3 nodes
Splits: 881 total, 881 done (100.00%)
0:47 [113M rows, 41.5GB] [2.42M rows/s, 911MB/s]
```
### Java application queries
To run queries from a Java application through the Trino Java JDBC driver:
1. Download the
[Trino Java JDBC driver](https://trinodb.github.io/docs.trino.io/current/client/jdbc.html).
1. Add a `trino-jdbc` dependency in
[Maven pom.xml](https://maven.apache.org/guides/introduction/introduction-to-the-pom.html).
```
io.trino
trino-jdbc
376
```
**Sample Java code**
```
package dataproc.codelab.trino;
import java.sql.Connection;
import java.sql.DriverManager;
import java.sql.ResultSet;
import java.sql.SQLException;
import java.sql.Statement;
import java.util.Properties;
public class TrinoQuery {
private static final String URL = "jdbc:trino://trino-cluster-m:8080/hive/default";
private static final String SOCKS_PROXY = "localhost:1080";
private static final String USER = "user";
private static final String QUERY =
"select count(*) as count from chicago_taxi_trips_parquet where trip_miles > 50";
public static void main(String[] args) {
try {
Properties properties = new Properties();
properties.setProperty("user", USER);
properties.setProperty("socksProxy", SOCKS_PROXY);
Connection connection = DriverManager.getConnection(URL, properties);
try (Statement stmt = connection.createStatement()) {
ResultSet rs = stmt.executeQuery(QUERY);
while (rs.next()) {
int count = rs.getInt("count");
System.out.println("The number of long trips: " + count);
}
}
} catch (SQLException e) {
e.printStackTrace();
}
}
}
```
## Logging and monitoring
### Logging
The Trino logs are located at `/var/log/trino/` on the cluster's master and
worker nodes.
### Web UI
See [Viewing and Accessing Component Gateway URLs](https://docs.cloud.google.com/managed-spark/docs/concepts/accessing/gateways#viewing_and_accessing_component_gateway_urls)
to open the Trino Web UI running on the cluster's master node in your local browser.
### Monitoring
Trino exposes cluster runtime information through runtime tables.
In a Trino session (from the `trino:default`) prompt,
run the following query to view runtime table data:
```
select * FROM system.runtime.nodes;
```
## Clean up
After you finish the tutorial, you can clean up the resources that you created so that they
stop using quota and incurring charges. The following sections describe how to delete or turn off
these resources.
### Delete the project
The easiest way to eliminate billing is to delete the project that you
created for the tutorial.
To delete the project:
> [!CAUTION]
> **Caution** : Deleting a project has the following effects:
>
> - **Everything in the project is deleted.** If you used an existing project for the tasks in this document, when you delete it, you also delete any other work you've done in the project.
> - **Custom project IDs are lost.** When you created this project, you might have created a custom project ID that you want to use in the future. To preserve the URLs that use the project ID, such as an `appspot.com` URL, delete selected resources inside the project instead of deleting the whole project.
>
>
> If you plan to explore multiple architectures, tutorials, or quickstarts, reusing projects
> can help you avoid exceeding project quota limits.
1. In the Google Cloud console, go to the **Manage resources** page.
[Go to Manage resources](https://console.cloud.google.com/iam-admin/projects)
2. In the project list, select the project that you want to delete, and then click **Delete**.
3. In the dialog, type the project ID, and then click **Shut down** to delete the project.
### Delete the cluster
- To delete your cluster:
```
gcloud dataproc clusters delete --project=${PROJECT} trino-cluster \
--region=${REGION}
```
### Delete the bucket
- To delete the Cloud Storage bucket you created in [Before you begin](https://docs.cloud.google.com/managed-spark/docs/tutorials/trino-dataproc#before-you-begin), including the data files stored in the bucket:
```
gcloud storage rm gs://${BUCKET_NAME} --recursive
```