> [!WARNING]
>
> **Preview**
>
>
> This product or feature is
>
> subject to the "Pre-GA Offerings Terms" in the General Service Terms section
> of the [Service Specific
> Terms](https://docs.cloud.google.com/terms/service-terms#1).
>
> Pre-GA products and features are available "as is" and might have limited support.
>
> For more information, see the
> [launch stage descriptions](https://cloud.google.com/products/#product-launch-stages).
> [!NOTE]
> **Note:** To provide feedback or ask questions that are related to this preview feature, contact [dataproc-previews@google.com](mailto:dataproc-previews@google.com).
This document shows you how to run Managed Service for Apache Spark SQL and PySpark
batch workloads to create an Apache Iceberg table with metadata stored in Lakehouse runtime catalog.
For information on other ways to run Spark code, see
[Run PySpark code in a BigQuery notebook](https://docs.cloud.google.com/managed-spark/docs/use-spark)
and [Run an Apache Spark workload](https://docs.cloud.google.com/managed-spark/docs/quickstarts/spark-batch)
> [!IMPORTANT]
> **Key Point:** Managed Service for Apache Spark supports [Iceberg version 1.6.1](https://iceberg.apache.org/releases/#161-release).
## Before you begin
If you haven't already done so, create a Google Cloud project and a
Cloud Storage [bucket](https://docs.cloud.google.com/storage/docs/xml-api/put-bucket-create).
1. **Set up your project**
2. **Create a Cloud Storage [bucket](https://docs.cloud.google.com/storage/docs/xml-api/put-bucket-create)**
in your project.
1. In the Google Cloud console, go to the Cloud Storage **Buckets** page.
[Go to Buckets](https://console.cloud.google.com/storage/browser)
2. Click **Create**.
3. On the **Create a bucket** page, enter your bucket information. To go to the next step, click **Continue** .
1. In the **Get started** section, do the following:
- Enter a globally unique name that meets the [bucket naming requirements](https://docs.cloud.google.com/storage/docs/bucket-naming#requirements).
- To add a [bucket label](https://docs.cloud.google.com/storage/docs/tags-and-labels#bucket-labels), expand the **Labels** section (), click **Add label** , and specify a `key` and a `value` for your label.
2. In the **Choose where to store your data** section, do the following:
1. Select a [Location type](https://docs.cloud.google.com/storage/docs/locations).
2. Choose a location where your bucket's data is permanently stored from the **[Location type](https://docs.cloud.google.com/storage/docs/locations#available-locations)** drop-down menu.
- If you select the [dual-region](https://docs.cloud.google.com/storage/docs/locations#location-dr) location type, you can also choose to enable [turbo replication](https://docs.cloud.google.com/storage/docs/availability-durability#turbo-replication) by using the relevant checkbox.
3. To set up [cross-bucket replication](https://docs.cloud.google.com/storage/docs/availability-durability#cross-bucket-replication), select **Add cross-bucket replication via Storage Transfer Service** and follow these steps:
#### Set up cross-bucket replication
1. In the **Bucket** menu, select a bucket.
2. In the **Replication settings** section,
click **Configure** to configure settings for the
replication job.
The **Configure cross-bucket replication** pane
appears.
- To filter objects to replicate by object name prefix, enter a prefix that you want to include or exclude objects from, then click **Add a prefix**.
- To set a storage class for the replicated objects, select a storage class from the **Storage class** menu. If you skip this step, the replicated objects will use the destination bucket's storage class by default.
- Click **Done**.
3. In the **Choose how to store your data** section, do the following:
1. Select a [default storage class](https://docs.cloud.google.com/storage/docs/storage-classes) for the bucket or [Autoclass](https://docs.cloud.google.com/storage/docs/autoclass) for automatic storage class management of your bucket's data.
2. To enable [hierarchical namespace](https://docs.cloud.google.com/storage/docs/hns-overview), in the **Optimize storage for data-intensive workloads** section, select **Enable hierarchical namespace on this bucket** . **Note:** You cannot enable hierarchical namespace in existing buckets.
4. In the **Choose how to control access to objects** section, select whether or not your bucket enforces [public access prevention](https://docs.cloud.google.com/storage/docs/public-access-prevention), and select an [access control method](https://docs.cloud.google.com/storage/docs/access-control) for your bucket's objects. **Note:** You cannot change the **Prevent public access** setting if this setting is enforced at an [organization policy](https://docs.cloud.google.com/storage/docs/org-policy-constraints#public-access-prevention).
5. In the **Choose how to protect object data** section, do the following:
- Select any of the options under **Data protection** that you want to set for your bucket.
- To enable [soft delete](https://docs.cloud.google.com/storage/docs/soft-delete), click the **Soft delete policy (For data recovery)** checkbox, and specify the number of days you want to retain objects after deletion.
- To set [Object Versioning](https://docs.cloud.google.com/storage/docs/object-versioning), click the **Object versioning (For version control)** checkbox, and specify the maximum number of versions per object and the number of days after which the noncurrent versions expire.
- To enable the retention policy on objects and buckets, click the **Retention (For compliance)** checkbox, and then do the following:
- To enable [Object Retention Lock](https://docs.cloud.google.com/storage/docs/object-lock), click the **Enable object retention** checkbox.
- To enable [Bucket Lock](https://docs.cloud.google.com/storage/docs/bucket-lock), click the **Set bucket retention policy** checkbox, and choose a unit of time and a length of time for your retention period.
- To choose how your object data will be encrypted, expand the **Data encryption** section (), and select a [**Data encryption** method](https://docs.cloud.google.com/storage/docs/encryption).
4. Click **Create**.
3. Grant the [BigQuery Data Editor (`roles/bigquery.dataEditor`)](https://docs.cloud.google.com/iam/docs/roles-permissions/bigquery#bigquery.dataEditor) role to the
[Compute Engine default service account](https://docs.cloud.google.com/compute/docs/access/service-accounts#default_service_account),
`PROJECT_NUMBER-compute@developer.gserviceaccount.com`.
For instructions, see
[Grant a single role](https://docs.cloud.google.com/iam/docs/granting-changing-revoking-access#grant-single-role).
Google Cloud CLI example:
```
gcloud projects add-iam-policy-binding PROJECT_ID \
--member PROJECT_NUMBER-compute@developer.gserviceaccount.com \
--role roles/bigquery.dataEditor
```
Notes:
- PROJECT_ID and PROJECT_NUMBER are listed in the **Project info** section in the Google Cloud console [Dashboard](https://console.cloud.google.com/home/dashboard).
## OSS resources to BigQuery resources mapping
Note the following mapping between open source resource and BigQuery
resource terms:
| **OSS resource** | **BigQuery resource** |
|---|---|
| Namespace, Database | Dataset |
| Partitioned or Unpartitioned Table | Table |
| View | View |
## Create an Iceberg table
This section shows you how to create an Iceberg table with metadata in
Lakehouse runtime catalog using Managed Service for Apache Spark
Spark SQL and PySpark batch workloads.
### Spark SQL
## Run a Spark SQL workload to create an Iceberg table
The following steps show you how to run a Managed Service for Apache Spark SQL batch
workload to create an Iceberg table with table metadata stored in
Lakehouse runtime catalog.
1. Copy the following Spark SQL commands locally or in
[Cloud Shell](https://console.cloud.google.com/?cloudshell=true)
into an `iceberg-table.sql` file.
```
USE CATALOG_NAME;
CREATE NAMESPACE IF NOT EXISTS example_namespace;
USE example_namespace;
DROP TABLE IF EXISTS example_table;
CREATE TABLE example_table (id int, data string) USING ICEBERG LOCATION 'gs://BUCKET/WAREHOUSE_FOLDER';
INSERT INTO example_table VALUES (1, 'first row');
ALTER TABLE example_table ADD COLUMNS (newDoubleCol double);
DESCRIBE TABLE example_table;
```
Replace the following:
- CATALOG_NAME: Iceberg catalog name.
- BUCKET and WAREHOUSE_FOLDER: Cloud Storage bucket and folder used as Iceberg warehouse directory.
2. Run the following command locally or in
[Cloud Shell](https://console.cloud.google.com/?cloudshell=true)
from the directory containing `iceberg-table.sql` to submit the Spark SQL workload.
```
gcloud dataproc batches submit spark-sql iceberg-table.sql \
--project=PROJECT_ID \
--region=https://docs.cloud.google.com/compute/docs/regions-zones#available \
--deps-bucket=BUCKET_NAME \
--version=2.2 \
--subnet=SUBNET_NAME \
--properties="spark.sql.catalog.CATALOG_NAME=org.apache.iceberg.spark.SparkCatalog,spark.sql.catalog.CATALOG_NAME.catalog-impl=org.apache.iceberg.gcp.bigquery.BigQueryMetastoreCatalog,spark.sql.catalog.CATALOG_NAME.gcp_project=PROJECT_ID,spark.sql.catalog.CATALOG_NAME.gcp_location=LOCATION,spark.sql.catalog.CATALOG_NAME.warehouse=gs://BUCKET/WAREHOUSE_FOLDER"
```
Notes:
- PROJECT_ID: Your Google Cloud project ID. Project IDs are listed in the **Project info** section on the Google Cloud console [Dashboard](https://console.cloud.google.com/home/dashboard).
- REGION: An available Compute Engine [region](https://docs.cloud.google.com/compute/docs/regions-zones#available) to run the workload.
- BUCKET_NAME: The name of your Cloud Storage bucket. Spark uploads workload dependencies to a `/dependencies` folder in this bucket before running the batch workload. The WAREHOUSE_FOLDER is located in this bucket.
- **`--version`:** Managed Service for Apache Spark runtime version 2.2 or later.
- SUBNET_NAME: The name of a VPC subnet in the `REGION`. If you omit this flag, Managed Service for Apache Spark selects the `default` subnet in the session region. Managed Service for Apache Spark enables [Private Google Access (PGA)](https://docs.cloud.google.com/vpc/docs/private-google-access) on the subnet. For network connectivity requirements, see [Managed Service for Apache Spark network configuration](https://docs.cloud.google.com/managed-spark/docs/concepts/network#open_subnet_connectivity).
- LOCATION: A supported [BigQuery location](https://docs.cloud.google.com/bigquery/docs/locations#supported_locations). The default location is "US".
- **`--properties`** [Catalog properties](https://iceberg.apache.org/docs/latest/spark-configuration/).
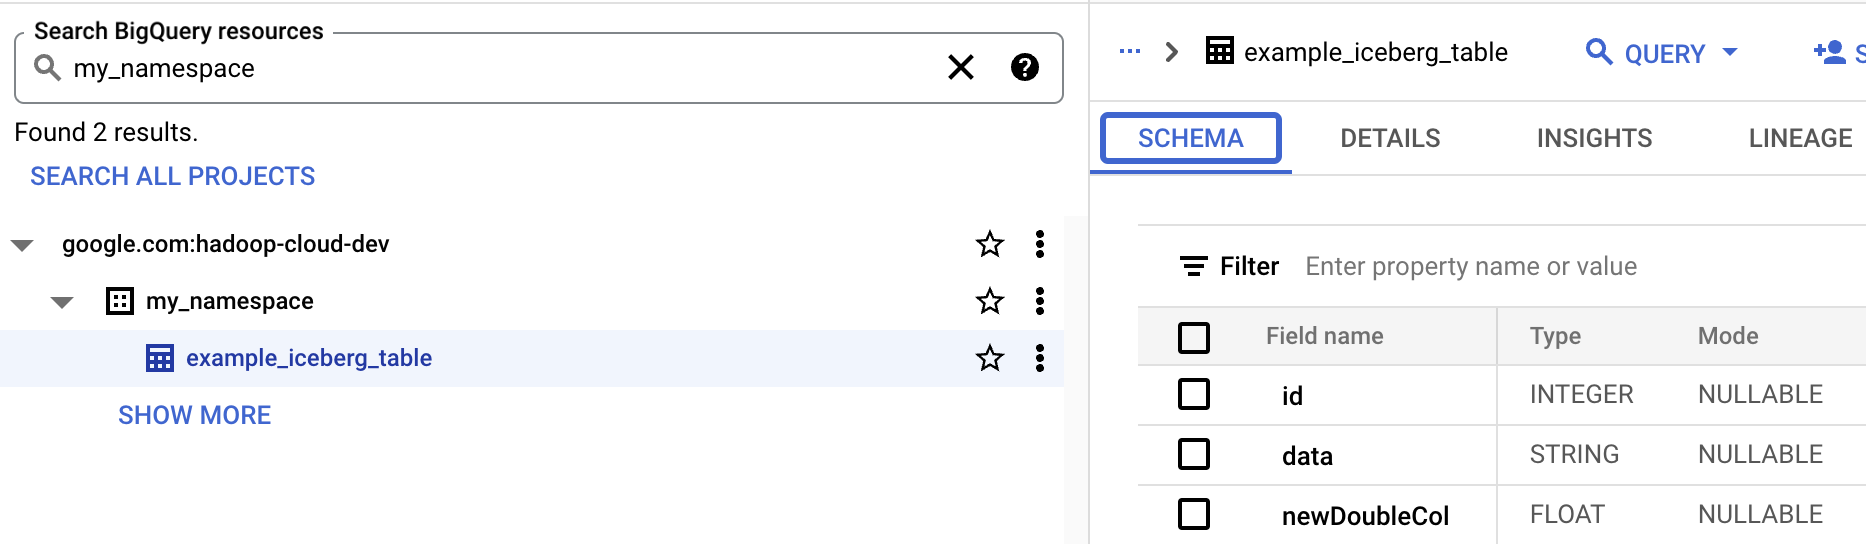
3. View table metadata in BigQuery
1. In the Google Cloud console, go to the **BigQuery** page.
[Go to BigQuery Studio](https://console.cloud.google.com/bigquery)
2. View Iceberg table metadata.
### PySpark
The following steps show you how to run a Managed Service for Apache Spark PySpark batch
workload to create an Iceberg table with table metadata stored in
Lakehouse runtime catalog.
1. Copy the following PySpark code locally or in [Cloud Shell](https://console.cloud.google.com/?cloudshell=true) into an `iceberg-table.py` file.
```bash
from pyspark.sql import SparkSession
spark = SparkSession.builder.appName("iceberg-table-example").getOrCreate()
catalog = "CATALOG_NAME"
namespace = "NAMESPACE"
spark.sql(f"USE `{catalog}`;")
spark.sql(f"CREATE NAMESPACE IF NOT EXISTS `{namespace}`;")
spark.sql(f"USE `{namespace}`;")
# Create table and display schema
spark.sql("DROP TABLE IF EXISTS example_iceberg_table")
spark.sql("CREATE TABLE example_iceberg_table (id int, data string) USING ICEBERG")
spark.sql("DESCRIBE example_iceberg_table;")
# Insert table data.
spark.sql("INSERT INTO example_iceberg_table VALUES (1, 'first row');")
# Alter table, then display schema.
spark.sql("ALTER TABLE example_iceberg_table ADD COLUMNS (newDoubleCol double);")
spark.sql("DESCRIBE example_iceberg_table;")
```
Replace the following:
- CATALOG_NAME and NAMESPACE: The Iceberg catalog name and namespace combine to identify the Iceberg table (`catalog.namespace.table_name`).
2. Run the following command locally or in [Cloud Shell](https://console.cloud.google.com/?cloudshell=true) from the directory containing `iceberg-table.py` to submit the PySpark workload.
```
gcloud dataproc batches submit pyspark iceberg-table.py \
--project=PROJECT_ID \
--region=REGION \
--deps-bucket=BUCKET_NAME \
--version=2.2 \
--subnet=SUBNET_NAME \
--properties="spark.sql.catalog.CATALOG_NAME=org.apache.iceberg.spark.SparkCatalog,spark.sql.catalog.CATALOG_NAME.catalog-impl=org.apache.iceberg.gcp.bigquery.BigQueryMetastoreCatalog,spark.sql.catalog.CATALOG_NAME.gcp_project=PROJECT_ID,spark.sql.catalog.CATALOG_NAME.gcp_location=LOCATION,spark.sql.catalog.CATALOG_NAME.warehouse=gs://BUCKET/WAREHOUSE_FOLDER"
```
Notes:
- PROJECT_ID: Your Google Cloud project ID. Project IDs are listed in the **Project info** section on the Google Cloud console [Dashboard](https://console.cloud.google.com/home/dashboard).
- REGION: An available Compute Engine [region](https://docs.cloud.google.com/compute/docs/regions-zones#available) to run the workload.
- BUCKET_NAME: The name of your Cloud Storage bucket. Spark uploads workload dependencies to a `/dependencies` folder in this bucket before running the batch workload.
- **`--version`:** Managed Service for Apache Spark runtime version 2.2 or later.
- SUBNET_NAME: The name of a VPC subnet in the `REGION`. If you omit this flag, Managed Service for Apache Spark selects the `default` subnet in the session region. Managed Service for Apache Spark enables [Private Google Access (PGA)](https://docs.cloud.google.com/vpc/docs/private-google-access) on the subnet. For network connectivity requirements, see [Managed Service for Apache Spark network configuration](https://docs.cloud.google.com/managed-spark/docs/concepts/network#open_subnet_connectivity).
- LOCATION: A [supported BigQuery location](https://docs.cloud.google.com/bigquery/docs/locations#supported_locations). The default location is "US".
- BUCKET and WAREHOUSE_FOLDER: Cloud Storage bucket and folder used as the Iceberg warehouse directory.
- `--properties`: [Catalog properties](https://iceberg.apache.org/docs/latest/spark-configuration/).
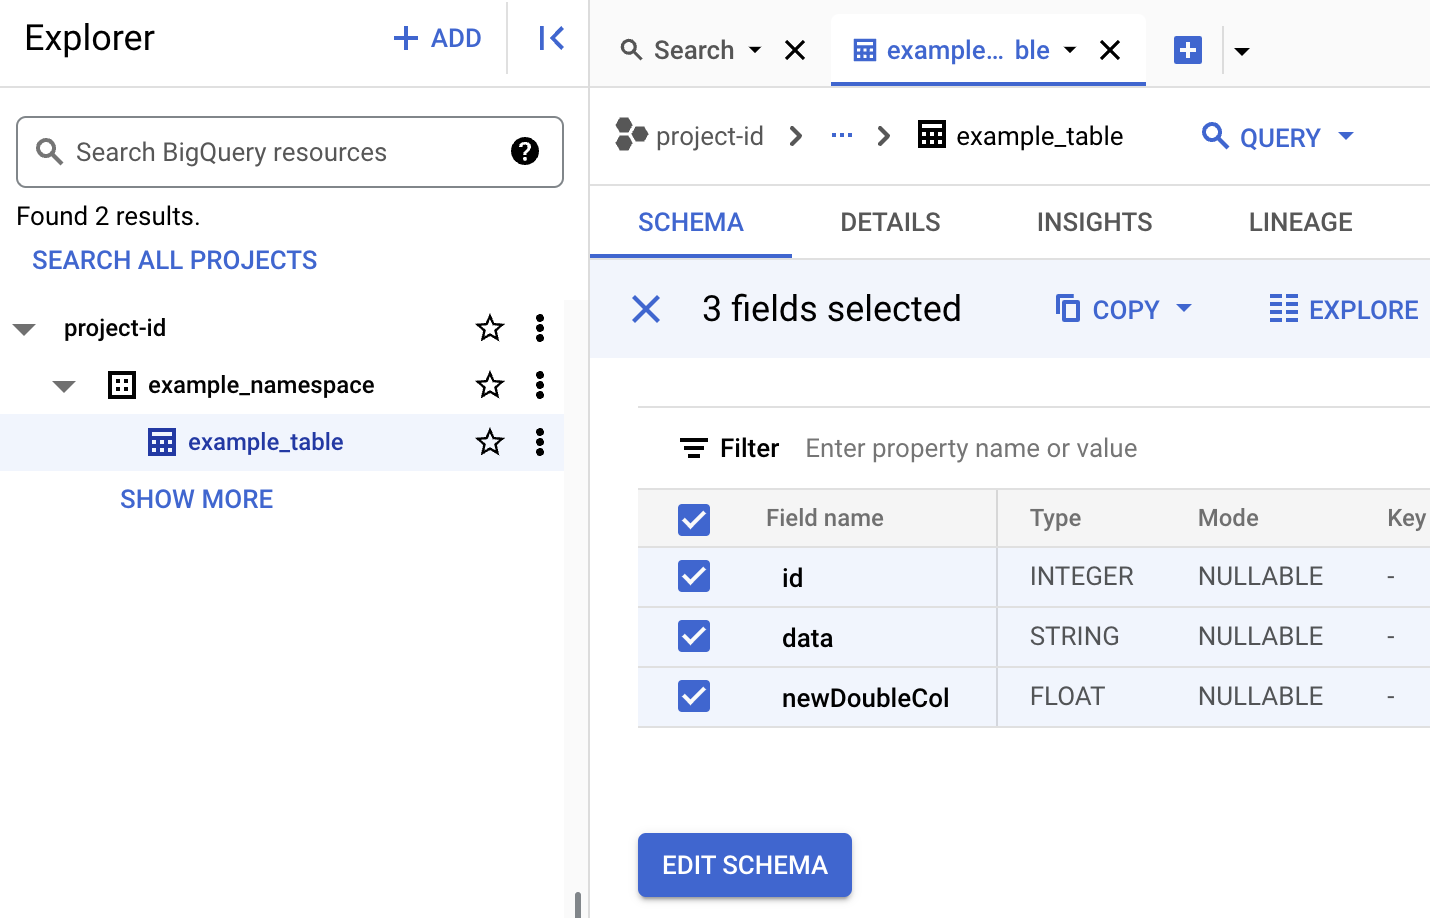
3. View table schema in BigQuery.
1. In the Google Cloud console, go to the **BigQuery** page. [Go to BigQuery Studio](https://console.cloud.google.com/bigquery)
2. View Iceberg table metadata.