You can create a Managed Service for Apache Spark cluster with a
[custom image](https://docs.cloud.google.com/compute/docs/images.md.txt#custom_images) that includes
your pre-installed packages. This page shows you how to create a custom
image and install it on a Managed Service for Apache Spark cluster.
## Usage considerations and limitations
- **Custom image lifetime:** To make sure that the clusters receive the latest
service updates and bug fixes, the creation of clusters with a custom image is
limited to **365 days** from the custom image creation date. Note that
existing clusters created with a custom-image can run indefinitely.
You may need to use automation if you want to create clusters with a specific
custom image for a period of greater than 365 days. For more information, see
[Create a cluster with an expired custom image](https://docs.cloud.google.com/managed-spark/docs/guides/images.md.txt#expired-custom-image).
- **Linux only:** The instructions in this document apply to Linux operating
systems only. Other operating systems may be supported in future
Managed Service for Apache Spark [releases](https://docs.cloud.google.com/managed-spark/docs/release-notes.md.txt).
- **Supported base images:** Custom image builds require starting from a
Managed Service for Apache Spark base image. The following base images are supported:
[Debian, Rocky Linux, and Ubuntu](https://docs.cloud.google.com/managed-spark/docs/concepts/versioning/dataproc-versions#supported-dataproc-image-versions).
- **Base image availability:** New images announced in the [Managed Service for Apache Spark release notes](https://docs.cloud.google.com/managed-spark/docs/release-notes.md.txt) are not available for use as the base for custom images until one week from their announcement date.
\* **Using optional components:**
- `2.2` and earlier base images: By default, all of the
[Managed Service for Apache Spark optional components](https://docs.cloud.google.com/managed-spark/docs/concepts/components/overview.md.txt#available_optional_components)
(OS packages and configs) are installed on the custom image.
You can customize the OS package versions and configs.
- `2.3` and later base images: Only the selected optional components are installed on
the custom image (see the
[`generate_custom_image.py` --optional-components flag](https://docs.cloud.google.com/managed-spark/docs/guides/images.md.txt#optional-flags)).
Regardless of the base image used for your custom image, when you
[create your cluster](https://docs.cloud.google.com/managed-spark/docs/concepts/components/overview.md.txt#add_optional_components),
you must list or select optional components.
Example: [Google Cloud CLI cluster creation command](https://docs.cloud.google.com/managed-spark/docs/guides/images.md.txt#create_a_cluster_with_a_custom_image):
```
gcloud dataproc clusters create CLUSTER_NAME
--image=CUSTOM_IMAGE_URI \
--optional-components=COMPONENT_NAME \
... other flags
```
If the component name is not specified when you create the cluster, the
optional component, including any custom OS packages and configs, will be
deleted.
- **Using hosted custom images:** If you use a custom image hosted in another project, the
[Managed Service for Apache Spark Service Agent service account](https://docs.cloud.google.com/managed-spark/docs/concepts/configuring-clusters/service-accounts.md.txt#service_agent_account)
in your project must have `compute.images.get` permission on
the image in the host project. You can grant this permission by granting the
[`roles/compute.imageUser`](https://docs.cloud.google.com/compute/docs/access/iam.md.txt#compute.imageUser)
role on the hosted image to your project's
Managed Service for Apache Spark Service Agent service account (see
[Sharing custom images within an organization](https://docs.cloud.google.com/compute/docs/images/managing-access-custom-images.md.txt#share-images-within-organization)).
- **Using secure boot MOK (Machine Owner Key) secrets:**
To enable
[secure boot](https://github.com/cjac/custom-images/blob/secure-boot-readme-20241009/examples/secure-boot/README.md)
with your Managed Service for Apache Spark custom image, do the following:
1. Enable the
[Secret Manager API (`secretmanager.googleapis.com`](https://docs.cloud.google.com/secret-manager/docs/configuring-secret-manager.md.txt). Managed Service for Apache Spark generates and manages a key pair
using the [Secret Manager](https://docs.cloud.google.com/secret-manager/docs/overview.md.txt) service.
2. Add the
[`--service-account="SERVICE_ACCOUNT"` flag](https://github.com/GoogleCloudDataproc/custom-images/blob/main/README.md#optional-arguments)
to the `generate_custom_image.py` command when you
[generate a custom image](https://docs.cloud.google.com/managed-spark/docs/guides/images.md.txt#generate_a_custom_image).
Note: You must grant to the service account the Secret Manager Viewer role (`roles/secretmanager.viewer`)
on the project and the Secret Manager Accessor role (`roles/secretmanager.secretAccessor`)
on' the public and private secrets.
For more information with examples, see the `README.md` and other files
within the
[examples/secure-boot directory](https://github.com/GoogleCloudDataproc/custom-images/blob/main/examples/secure-boot/) of the `GoogleCloudDataproc/custom-images` repository on GitHub.
**To disable secure boot:** By default, the Managed Service for Apache Spark custom image
scripts generate and manage a key pair using [Secret Manager](https://docs.cloud.google.com/secret-manager/docs/overview.md.txt)
when run from a Managed Service for Apache Spark cluster. If you don't want to use
secure-boot with your custom image, include the `--trusted-cert=""`
(empty flag value) to the `generate_custom_image.py` command when you
[generate your custom image](https://docs.cloud.google.com/managed-spark/docs/guides/images.md.txt#generate_a_custom_image).
## Before you begin
Make sure to set up your project before generating your custom image.
### Set up your project
1. [Install Python 3.11+](https://www.python.org/downloads/)
2. Prepare a customization script that installs custom packages and/or updates configurations, for example:
```
#! /usr/bin/bash
apt-get -y update
apt-get install python-dev
apt-get install python-pip
pip install numpy
```
### Create a Cloud Storage bucket in your project
1. In the Google Cloud console, go to the Cloud Storage **Buckets** page.
[Go to Buckets](https://console.cloud.google.com/storage/browser)
2. Click **Create**.
3. On the **Create a bucket** page, enter your bucket information. To go to the next step, click **Continue** .
1. In the **Get started** section, do the following:
- Enter a globally unique name that meets the [bucket naming requirements](https://docs.cloud.google.com/storage/docs/bucket-naming#requirements).
- To add a [bucket label](https://docs.cloud.google.com/storage/docs/tags-and-labels.md.txt#bucket-labels), expand the **Labels** section (), click **Add label** , and specify a `key` and a `value` for your label.
2. In the **Choose where to store your data** section, do the following:
1. Select a [Location type](https://docs.cloud.google.com/storage/docs/locations.md.txt).
2. Choose a location where your bucket's data is permanently stored from the **[Location type](https://docs.cloud.google.com/storage/docs/locations.md.txt#available-locations)** drop-down menu.
- If you select the [dual-region](https://docs.cloud.google.com/storage/docs/locations.md.txt#location-dr) location type, you can also choose to enable [turbo replication](https://docs.cloud.google.com/storage/docs/availability-durability.md.txt#turbo-replication) by using the relevant checkbox.
3. To set up [cross-bucket replication](https://docs.cloud.google.com/storage/docs/availability-durability.md.txt#cross-bucket-replication), select **Add cross-bucket replication via Storage Transfer Service** and follow these steps:
#### Set up cross-bucket replication
1. In the **Bucket** menu, select a bucket.
2. In the **Replication settings** section,
click **Configure** to configure settings for the
replication job.
The **Configure cross-bucket replication** pane
appears.
- To filter objects to replicate by object name prefix, enter a prefix that you want to include or exclude objects from, then click **Add a prefix**.
- To set a storage class for the replicated objects, select a storage class from the **Storage class** menu. If you skip this step, the replicated objects will use the destination bucket's storage class by default.
- Click **Done**.
3. In the **Choose how to store your data** section, do the following:
1. Select a [default storage class](https://docs.cloud.google.com/storage/docs/storage-classes.md.txt) for the bucket or [Autoclass](https://docs.cloud.google.com/storage/docs/autoclass.md.txt) for automatic storage class management of your bucket's data.
2. To enable [hierarchical namespace](https://docs.cloud.google.com/storage/docs/hns-overview.md.txt), in the **Optimize storage for data-intensive workloads** section, select **Enable hierarchical namespace on this bucket** . **Note:** You cannot enable hierarchical namespace in existing buckets.
4. In the **Choose how to control access to objects** section, select whether or not your bucket enforces [public access prevention](https://docs.cloud.google.com/storage/docs/public-access-prevention.md.txt), and select an [access control method](https://docs.cloud.google.com/storage/docs/access-control.md.txt) for your bucket's objects. **Note:** You cannot change the **Prevent public access** setting if this setting is enforced at an [organization policy](https://docs.cloud.google.com/storage/docs/org-policy-constraints.md.txt#public-access-prevention).
5. In the **Choose how to protect object data** section, do the following:
- Select any of the options under **Data protection** that you want to set for your bucket.
- To enable [soft delete](https://docs.cloud.google.com/storage/docs/soft-delete.md.txt), click the **Soft delete policy (For data recovery)** checkbox, and specify the number of days you want to retain objects after deletion.
- To set [Object Versioning](https://docs.cloud.google.com/storage/docs/object-versioning.md.txt), click the **Object versioning (For version control)** checkbox, and specify the maximum number of versions per object and the number of days after which the noncurrent versions expire.
- To enable the retention policy on objects and buckets, click the **Retention (For compliance)** checkbox, and then do the following:
- To enable [Object Retention Lock](https://docs.cloud.google.com/storage/docs/object-lock.md.txt), click the **Enable object retention** checkbox.
- To enable [Bucket Lock](https://docs.cloud.google.com/storage/docs/bucket-lock.md.txt), click the **Set bucket retention policy** checkbox, and choose a unit of time and a length of time for your retention period.
- To choose how your object data will be encrypted, expand the **Data encryption** section (), and select a [**Data encryption** method](https://docs.cloud.google.com/storage/docs/encryption.md.txt).
4. Click **Create**.
## Generate a custom image
You use [generate_custom_image.py](https://github.com/GoogleCloudDataproc/custom-images/blob/master/generate_custom_image.py),
a Python program, to create a Managed Service for Apache Spark custom image.
### How it works
The `generate_custom_image.py` program launches a temporary
Compute Engine VM instance with the specified Managed Service for Apache Spark
base image, then runs the customization script inside the VM instance to install
custom packages and or update configurations. After the customization script
finishes, it shuts down the VM instance and creates a Managed Service for Apache Spark custom
image from the VM instance disk. The temporary VM is deleted after the
custom image is created. The custom image is saved and can be used to
[create Managed Service for Apache Spark clusters](https://docs.cloud.google.com/managed-spark/docs/guides/images.md.txt#create_a_cluster_with_a_custom_image).
The `generate_custom_image.py` program uses gcloud CLI
to run multi-step workflows on Compute Engine.
> [!NOTE]
> **Note:** You incur Google Cloud charges for the temporary Compute Engine VM and your Cloud Storage bucket. See the [Google Cloud pricing calculator](https://cloud.google.com/products/calculator).
### Run the code
Fork or clone the files on GitHub at
[Managed Service for Apache Spark custom images](https://github.com/GoogleCloudDataproc/custom-images).
Then, run the `generate_custom_image.py` script to have Managed Service for Apache Spark
generate and save your custom image.
```
python3 generate_custom_image.py \
--image-name=CUSTOM_IMAGE_NAME \
[--family=CUSTOM_IMAGE_FAMILY_NAME] \
--dataproc-version=IMAGE_VERSION \
--customization-script=LOCAL_PATH \
--zone=ZONE \
--gcs-bucket=gs://BUCKET_NAME \
[--no-smoke-test]
```
**Required flags**
- `--image-name`: the output name for your custom image.
> [!NOTE]
> **Note:** The image name must match the regular expression `[a-z](?:[-a-z0-9]{0,61}[a-z0-9])` with no underscores or spaces, and less than 64 characters.
- `--dataproc-version`: the [Managed Service for Apache Spark image version](https://docs.cloud.google.com/managed-spark/docs/concepts/versioning/dataproc-versions#supported-dataproc-image-versions)
to use in your custom image. Specify the version in `x.y.z-os` or `x.y.z-rc-os` format,
for example, "2.0.69-debian10".
> [!WARNING]
> **Custom image limitation:** New images announced in [Managed Service for Apache Spark Release Notes](https://docs.cloud.google.com/managed-spark/docs/release-notes.md.txt) are not available for use as the base for custom images until one week from their announcement date.
- `--customization-script`: a local path to
your script that the tool will run to install your custom packages or perform
other customizations. This script is run as a
[Linux startup script](https://docs.cloud.google.com/compute/docs/instances/startup-scripts/linux.md.txt#metadata-keys)
only on the temporary VM used to create the custom image. You can specify a
different initialization script for other initialization actions you want to
perform when you
[create a cluster with your custom image](https://docs.cloud.google.com/managed-spark/docs/guides/images.md.txt#create_a_cluster_with_a_custom_image).
**Cross-project images:** If your custom image is used to create
clusters in different projects, an error can occur due to the
`gcloud` or `gsutil` command cache stored within the image. You can avoid
this issue by including the following command in your customization script
to clear cached credentials.
```
rm -r /root/.gsutil /root/.config/gcloud
```
- `--zone`: the [Compute Engine zone](https://docs.cloud.google.com/compute/docs/regions-zones.md.txt#available)
where `generate_custom_image.py` will create a temporary VM to use to create
your custom image.
- `--gcs-bucket`: a URI, in the format `gs://BUCKET_NAME`,
that points to your [Cloud Storage bucket](https://docs.cloud.google.com/managed-spark/docs/guides/images.md.txt#create-a-cloud-storage-bucket-in-your-project).
`generate_custom_image.py` writes log files to this bucket.
**Optional flags**
- `--family`: the image family for the custom image. Image families are used to group similar images together, and can be used when creating a cluster as a pointer to the most recent image in the family. For example, `custom-2-2-debian12`.
- `--no-smoke-test`: This is an optional flag that disables smoke testing the newly built custom image. The smoke test creates a Managed Service for Apache Spark test cluster with the newly built image, runs a small job, and then deletes the cluster at the end of the test. The smoke test runs by default to verify that the newly built custom image can create a functional Managed Service for Apache Spark cluster. Disabling this step by using the `--no-smoke-test` flag speeds up the custom image build process, but its use is not recommended.
- `--subnet`: The subnetwork to use to create the VM that builds the custom Managed Service for Apache Spark image. If your project is part of a [shared VPC](https://docs.cloud.google.com/vpc/docs/shared-vpc.md.txt), you must specify the full subnetwork URL in the following format: `projects/HOST_PROJECT_ID/regions/REGION/subnetworks/SUBNET`.
- `--optional-components`: This flag is available only when using base image
versions `2.3` and later. A list of
[optional components](https://docs.cloud.google.com/managed-spark/docs/concepts/components/overview.md.txt#available_optional_components),
such as SOLR, RANGER, TRINO, DOCKER, FLINK, HIVE_WEBHCAT, ZEPPELIN, HUDI, ICEBERG,
and PIG (PIG is available as an optional component in image versions `2.3` and
later), to install in the image.
> [!NOTE]
> **Note:** You must also list or select the optional components when you [createthe cluster](https://docs.cloud.google.com/managed-spark/docs/guides/create-cluster.md.txt) using the Google Cloud console, Google Cloud CLI, or Dataproc API.
Example: Google Cloud CLI cluster creation command:
```
gcloud dataproc clusters create CLUSTER_NAME
--image=CUSTOM_IMAGE_URI \
--optional-components=COMPONENT_NAME \
... other flags
```
For a listing of available optional flags, see
[Optional Arguments](https://github.com/GoogleCloudDataproc/custom-images#optional-arguments)
on GitHub.
If `generate_custom_image.py` is successful, the `imageURI` of the custom image is
displayed in the terminal window output (the full `imageUri` is shown in **bold** below):
```
...
managedCluster:
clusterName: verify-image-20180614213641-8308a4cd
config:
gceClusterConfig:
zoneUri: ZONE
masterConfig:
imageUri: **https://www.googleapis.com/compute/beta/projects/PROJECT_ID/global/images/CUSTOM_IMAGE_NAME**
...
INFO:__main__:Successfully built Dataproc custom image: CUSTOM_IMAGE_NAME
INFO:__main__:
#####################################################################
WARNING: DATAPROC CUSTOM IMAGE 'CUSTOM_IMAGE_NAME'
WILL EXPIRE ON 2018-07-14 21:35:44.133000.
#####################################################################
```
> [!IMPORTANT]
> **Confirm image creation in the Google Cloud console** . After creation, Your custom image is listed in the Google Cloud console [**Images**](https://console.cloud.google.com/compute/images) page.
### Custom image version labels (advanced usage)
When using the Managed Service for Apache Spark standard custom image tool, the tool
sets a `goog-dataproc-version` label on the created
custom image. The label reflects the feature capabilities and protocols used by
Managed Service for Apache Spark to manage the software on the image.
> [!NOTE]
> **Note:** If a **base image** does not have the `goog-dataproc-version` label, it is not considered finalized, and a different base image must be used to create the custom image.
Advanced usage: If you use your own process to create a custom Managed Service for Apache Spark
image, you must add the `goog-dataproc-version` label manually to your custom
image, as follows:
1. Extract the `goog-dataproc-version` label from the base Managed Service for Apache Spark
image used to create the custom image.
```
gcloud compute images describe ${BASE_DATAPROC_IMAGE} \
--project cloud-dataproc \
--format="value(labels.goog-dataproc-version)"
```
2. Set the label on the custom image.
```
gcloud compute images add-labels IMAGE_NAME --labels=[KEY=VALUE,...]
```
## Use a custom image
You specify the custom image when you create a Managed Service for Apache Spark cluster.
A custom image is saved in
[Cloud Compute Images](https://docs.cloud.google.com/compute/docs/images.md.txt#custom_images), and
is valid to create a Managed Service for Apache Spark cluster for 365 days from its
creation date (see [Create a cluster with an expired custom image](https://docs.cloud.google.com/managed-spark/docs/guides/images.md.txt#expired-custom-image)
to use a custom image after its 365-day expiration date).
### Custom image URI
You pass the `imageUri` of the custom image to the cluster creation operation.
This URI can be specified in one of three ways:
1. Full URI:
``https://www.googleapis.com/compute/beta/projects/PROJECT_ID/global/images/`gs://`BUCKET_NAME` ``
2. Partial URI: `projects/PROJECT_ID/global/images/CUSTOM_IMAGE_NAME`
3. Short name: CUSTOM_IMAGE_NAME
Custom images can also be specified by their family URI, which always chooses
the most recent image within the image family.
1. Full URI:
`https://www.googleapis.com/compute/beta/projects/PROJECT_ID/global/images/family/CUSTOM_IMAGE_FAMILY_NAME/var>`
2. Partial URI: `projects/PROJECT_ID/global/images/family/CUSTOM_IMAGE_FAMILY_NAME`
#### Find the custom image URI
### Google Cloud CLI
Run the following command to list the names of your custom images.
```
gcloud compute images list
```
Pass the name of your custom image to the following command to list
the URI (`selfLink`) of your custom image.
```
gcloud compute images describe custom-image-name
```
Output snippet:
```
...
name: CUSTOM_IMAGE_NAME
selfLink: https://www.googleapis.com/compute/v1/projects/PROJECT_ID/global/images/CUSTOM_IMAGE_NAME
...
```
### Google Cloud console
1. Open the [**Compute Engine→Images**](https://console.cloud.google.com/compute/images) page in the Google Cloud console, and then click the image name. You can insert a query in the `filter images` field to limit the number of displayed images. 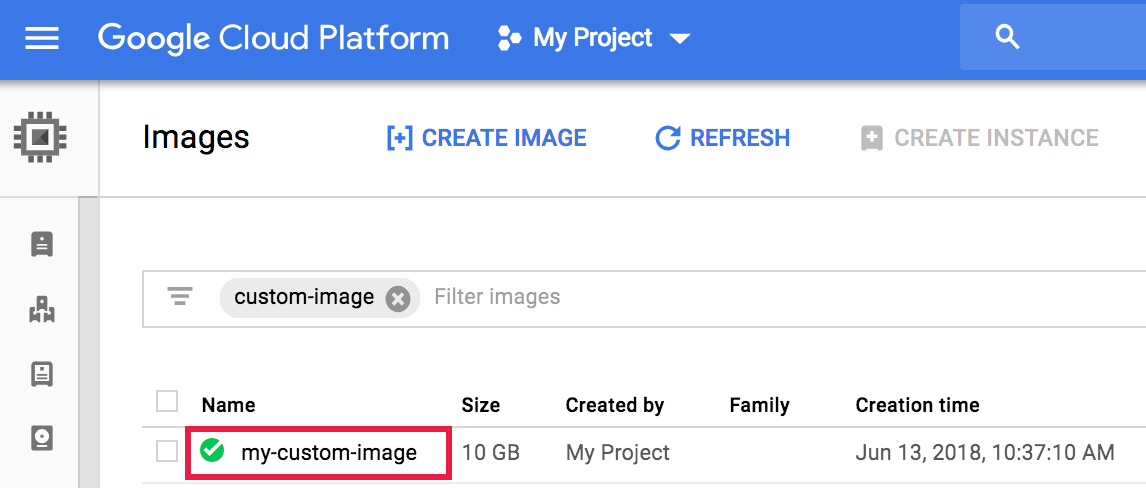
2. The **Images details** page opens. Click **Equivalent REST** . 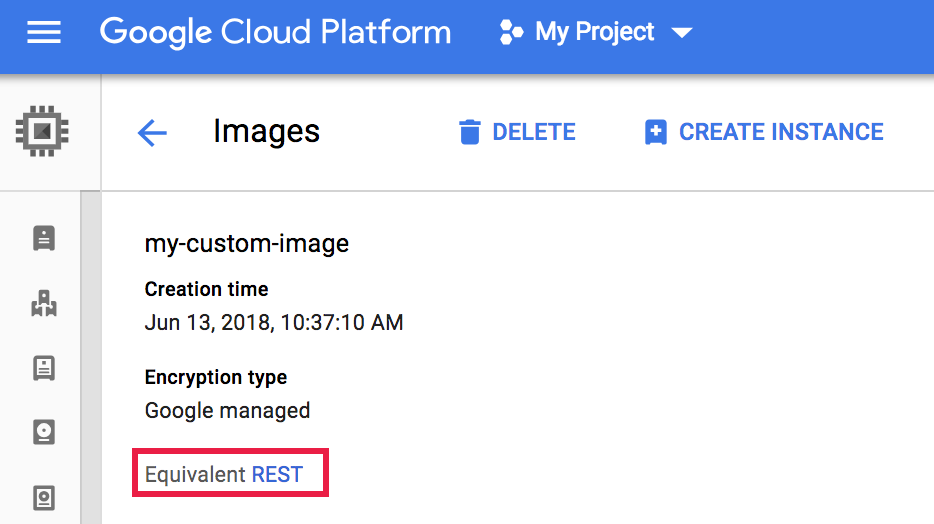
3. The REST response lists additional information about the image, including the `selfLink`, which is the image URI.
```
{
...
"name": "my-custom-image",
"selfLink": "projects/PROJECT_ID/global/images/CUSTOM_IMAGE_NAME",
"sourceDisk": ...,
...
}
```
### Create a cluster with a custom image
[create a cluster](https://docs.cloud.google.com/managed-spark/docs/guides/create-cluster.md.txt) with
using the gcloud CLI, the Dataproc API, or the
Google Cloud console.
### Google Cloud console
1. Open the [**Create cluster**](https://console.cloud.google.com/dataproc/clusters/create) page.
2. In the **Define your cluster** section, click **Image type and version** , select **Custom image**, then confirm or change the project and select an available custom image.
### gcloud CLI
Create a Managed Service for Apache Spark cluster with a custom image using the
[`dataproc clusters create`](https://docs.cloud.google.com/sdk/gcloud/reference/dataproc/clusters/create.md.txt)
command with the `--image` flag.
**Example:**
```
gcloud dataproc clusters create CLUSTER-NAME \
--image=CUSTOM_IMAGE_URI \
--region=REGION \
... other flags
```
### REST API
Create a cluster with a custom image by specifying custom image URI
in the
[InstanceGroupConfig.imageUri](https://docs.cloud.google.com/managed-spark/docs/reference/rest/v1/ClusterConfig.md.txt#InstanceGroupConfig)
field in the `masterConfig`, `workerConfig`, and, if applicable,
`secondaryWorkerConfig` object included in a
[cluster.create](https://docs.cloud.google.com/managed-spark/docs/reference/rest/v1/projects.regions.clusters/create.md.txt)
API request.
**Example:** REST request to create a standard
Managed Service for Apache Spark cluster (one master, two worker nodes) with a custom
image.
```
POST /v1/projects/PROJECT_ID/regions/REGION/clusters/
{
"clusterName": "CLUSTER_NAME",
"config": {
"masterConfig": {
"imageUri": "projects/PROJECT_ID/global/images/CUSTOM_IMAGE_NAME"
},
"workerConfig": {
"imageUri": "projects/PROJECT_ID/global/images/CUSTOM_IMAGE_NAME"
}
}
}
```
### Override Managed Service for Apache Spark cluster properties with a custom image
You can use custom images to overwrite
[cluster properties](https://docs.cloud.google.com/managed-spark/docs/concepts/configuring-clusters/cluster-properties.md.txt)
that are set during cluster creation. If you create a cluster with
a custom image, and the cluster creation operation sets properties with values
that are different from those that are set by your custom image, the property
values set by your custom image will take precedence.
To set cluster properties with your custom image:
1. In your custom image
[customization script](https://docs.cloud.google.com/managed-spark/docs/guides/images.md.txt#run_the_code),
create a `dataproc.custom.properties` file in `/etc/google-dataproc`, then
set cluster property values in the file.
- Sample `dataproc.custom.properties` file:
```
dataproc.conscrypt.provider.enable=VALUE
dataproc.logging.stackdriver.enable=VALUE
```
- Sample customization script file-creation snippet to override two cluster properties:
```
cat </etc/google-managed-spark/dataproc.custom.properties
dataproc.conscrypt.provider.enable=true
dataproc.logging.stackdriver.enable=false
EOF
```
### Create a cluster with an expired custom image
> [!CAUTION]
> Managed Service for Apache Spark cannot guarantee support of issues that arise with clusters created with expired custom images.
By default, custom images expire 365 days from the date of creation of the image.
You can create a cluster that uses an expired custom image by completing
the following steps.
1. Attempt to create a Managed Service for Apache Spark cluster with an expired custom
image or a custom image that will expire within 10 days.
```
gcloud dataproc clusters create CLUSTER-NAME \
--image=CUSTOM-IMAGE-NAME \
--region=REGION \
... other flags
```
2. The gcloud CLI will issue an error message that includes the
cluster `dataproc:dataproc.custom.image.expiration.token` property name
and token value.
```
dataproc:dataproc.custom.image.expiration.token=TOKEN_VALUE
```
Copy the TOKEN_VALUE string to the clipboard.
1. Use the gcloud CLI to create the Managed Service for Apache Spark cluster again,
adding the copied TOKEN_VALUE as a cluster property.
```
gcloud dataproc clusters create CLUSTER-NAME \
--image=CUSTOM-IMAGE-NAME \
--properties=dataproc:dataproc.custom.image.expiration.token=TOKEN_VALUE \
--region=REGION \
... other flags
```
Cluster creation with the custom image should succeed.