This document describes how to query and analyze your log data by using
Observability Analytics, which provides a SQL-based query interface. By using SQL, you can
perform tasks like
[count the log entries with a field that match a pattern](https://docs.cloud.google.com/logging/docs/analyze/examples#match-pattern).
Observability Analytics provides a SQL editor and a menu-based system for building queries.
To view your query results, you can use the tabular form, or you can visualize
the data as a chart. You can save your charts to your custom dashboards.
You can query either a [log view on a log bucket](https://docs.cloud.google.com/logging/docs/logs-views) or an
[analytics view](https://docs.cloud.google.com/logging/docs/analyze/about-analytics-views). When you query a log view, the
schema corresponds to that of the [`LogEntry`](https://docs.cloud.google.com/logging/docs/reference/v2/rest/v2/LogEntry) data structure.
Because the creator of an analytics view determines the schema, one use
case for analytics views is to transform log data from the
`LogEntry` format into a format that is more suitable for you.
You can also use Observability Analytics to query your trace data. For more information,
see [Query and analyze traces](https://docs.cloud.google.com/trace/docs/analytics).
Observability Analytics doesn't deduplicate log entries, which might affect how you write
your queries. Also, there are some restrictions when using Observability Analytics.
For more information about these topics, see the following documents:
- [Troubleshoot: There are duplicate log entries in my Observability Analytics results](https://docs.cloud.google.com/logging/docs/analyze/troubleshoot#duplicate-analytics).
- [Observability Analytics: Restrictions](https://docs.cloud.google.com/logging/docs/log-analytics#restrictions).
## About linked BigQuery datasets
You don't need a [linked BigQuery dataset](https://docs.cloud.google.com/bigquery/docs/analytics-hub-introduction#linked_datasets) when you
want to query your log data, or query your log and trace data.
For those scenarios, you can use the **Observability Analytics** page. You can also save
and share your queries, and you can save the query to a custom dashboard.
For information about querying your trace data,
see [Query and analyze traces](https://docs.cloud.google.com/trace/docs/analytics).
You do need a linked BigQuery dataset when you want to do
any of the following:
- Join log entry data with other **BigQuery** datasets.
- Query log data from another service like the **BigQuery Studio** page or Data Studio.
- Improve the performance of the queries that you run from the **Observability Analytics** by running them on your [BigQuery reserved slots](https://docs.cloud.google.com/bigquery/docs/reservations-intro#reservations).
- Create an [alerting policy](https://docs.cloud.google.com/monitoring/alerts) that monitors the result of a SQL query. For more information, see [Monitor your SQL query results with an alerting policy](https://docs.cloud.google.com/logging/docs/analyze/sql-in-alerting).
If you choose to create a linked BigQuery dataset on a log bucket,
then you expand the security boundary of your log data to include
BigQuery services. That is, BigQuery services
can now query your log data by issuing a query to the
linked BigQuery dataset.
Before you create a linked BigQuery dataset,
we recommend that your review
[Data security with Observability Analytics](https://docs.cloud.google.com/logging/docs/analyze/data-security-with-analytics).
## Before you begin
> [!NOTE]
> **Note:** The Logs Explorer can query log data that is stored in log buckets. However, to query this data by using Observability Analytics, you must [upgrade the log bucket](https://docs.cloud.google.com/logging/docs/buckets#upgrade-bucket).
This section describes steps that you must complete before you
can use Observability Analytics.
### Configure log buckets
Ensure that your log buckets have been upgraded to use Observability Analytics:
1. In the Google Cloud console, go to the **Logs Storage** page:
[Go to **Logs Storage**](https://console.cloud.google.com/logs/storage)
If you use the search bar to find this page, then select the result whose subheading is
**Logging**.
2. For each log bucket that has a log view that you want to query, ensure that the **Observability Analytics available** column displays **Open** . If **Upgrade** is shown, then click **Upgrade** and complete the dialog.
### Configure IAM roles and permissions
This section describes the IAM roles or permissions that
are required to use Observability Analytics:
-
To get the permissions that
you need to use Observability Analytics and query log views,
ask your administrator to grant you the
following IAM roles on your project:
- To query the `_Required` and `_Default` log buckets: [Logs Viewer](https://docs.cloud.google.com/iam/docs/roles-permissions/logging#logging.viewer) (`roles/logging.viewer`)
- To query all log views in a project: [Logs View Accessor](https://docs.cloud.google.com/iam/docs/roles-permissions/logging#logging.viewAccessor) (`roles/logging.viewAccessor`)
You can restrict a principal to a specific log view either by adding an
IAM condition to the Logs View Accessor role grant made at
the project level, or by adding an IAM binding to the
policy file of the log view. For more information, see
[Control access to a log view](https://docs.cloud.google.com/logging/docs/logs-views#about-iam-policies).
These are the same permissions that you need to view log entries
on the **Logs Explorer** page. For information about
additional roles that you need to query views on user-defined buckets or
to query the `_AllLogs` view of the `_Default`
log bucket, see
[Cloud Logging roles](https://docs.cloud.google.com/logging/docs/access-control#considerations).
-
To get the permissions that
you need to query analytics views,
ask your administrator to grant you the
[Observability Analytics User](https://docs.cloud.google.com/iam/docs/roles-permissions/observability#observability.analyticsUser) (`roles/observability.analyticsUser`) IAM role on your project.
## Query log data
This section describes the approaches that you can use to query your
log data:
- Load a system-defined query, edit this query, and then run the query.
- Enter and run a custom query. For example, you might paste in a query you have or write one. Custom queries can include joins, nested queries, and other complex SQL statements. For examples, see [Sample SQL queries](https://docs.cloud.google.com/logging/docs/analyze/examples).
- Build a query by making menu selections and then run that query. Observability Analytics converts your selections into a SQL query, which you can both view and edit.
### Load, edit, and run the system-defined query
1. In the Google Cloud console, go to the
**Observability Analytics** page:
[Go to **Observability Analytics**](https://console.cloud.google.com/logs/analytics)
If you use the search bar to find this page, then select the result whose subheading is
**Logging**.
> [!NOTE]
> **Note:** If a window on the **Observability Analytics** page displays a "Get started with Observability Analytics" message, then on the window, click **Close**.
2. In the **Views** menu, go to the
**Logs** or
**Analytics Views** section, and select
the view that you want to query.
To find the view to query, use the **Filter** bar
or scroll through the list:
- Log views are listed by `BUCKET_ID.LOG_VIEW_ID`, where these fields refer to the IDs of the log bucket and log view.
- Analytics views are listed by `LOCATION.ANALYTICS_VIEW_ID`, where these fields refer to the location and ID of an analytics view. Analytics views are in Public Preview.
3. Do one of the following:
- To load a system-defined query that relies on the **Query Builder** , which
lets you define the query with menu selections, make sure that the
**Query** pane displays **Query Builder** . If a SQL editor is shown, then
click **Builder**.
- To load a system-defined query that extracts JSON values, then make sure
that **Query** pane displays the SQL editor. If this pane displays
**Query Builder** , then click **SQL**.
4. In the **Schema** pane, select **Query** , and then click **Overwrite**.
The **Query** pane displays a system-defined query. If you selected the
**Query Builder** mode but want to view the SQL query, click **SQL**.
5. Optional: Modify the query.
6.
To run the query, go to the toolbar and select
**Run Query**.
Observability Analytics presents the query results in a table. However, you can create
a chart, and you can also save the table or chart to
a [custom dashboard](https://docs.cloud.google.com/monitoring/charts/dashboards).
For more information, see [Chart SQL query results](https://docs.cloud.google.com/logging/docs/analyze/charts).
If the toolbar displays **Run in BigQuery** , then you need to switch
Observability Analytics to use the default query engine. To make this change, in the
toolbar of the **Query** pane, click **Settings**
and then select **Analytics (default)**.
### Enter and run a custom query
To enter a SQL query, do the following:
1. In the Google Cloud console, go to the
**Observability Analytics** page:
[Go to **Observability Analytics**](https://console.cloud.google.com/logs/analytics)
If you use the search bar to find this page, then select the result whose subheading is
**Logging**.
> [!NOTE]
> **Note:** If a window on the **Observability Analytics** page displays a "Get started with Observability Analytics" message, then on the window, click **Close**.
2. In the **Query** pane, click the **SQL**.
- To specify a time range, we recommend that you use the time-range
selector. If you add a `WHERE` clause that specifies the
`timestamp` field, then that value overrides the setting in the
time-range selector and that selector is disabled.
- For examples, see [Sample SQL queries](https://docs.cloud.google.com/logging/docs/analyze/examples).
-
You can query [log views](https://docs.cloud.google.com/logging/docs/logs-views) or
[analytics views](https://docs.cloud.google.com/logging/docs/analyze/about-analytics-views).
Use the following format for the `FROM` clause:
- Log views:
```sql
FROM `PROJECT_ID.LOCATION.BUCKET_ID.LOG_VIEW_ID`
```
- Analytics views:
```sql
FROM `analytics_view.PROJECT_ID.LOCATION.ANALYTICS_VIEW_ID`
```
The fields in the previous expressions have the following meaning:
- PROJECT_ID: The identifier of the project.
- LOCATION: The location of the log view or the analytics view.
- BUCKET_ID: The name or ID of the log bucket.
- LOG_VIEW_ID: The identifier of the log view, which is limited to 100 characters and can include only letters, digits, underscores, and hyphens.
- ANALYTICS_VIEW_ID: The ID of the analytics view, which is limited to 100 characters and can include only letters, digits, underscores, and hyphens.
If the query pane displays an error message that references the
`FROM` statement, then the view can't be found.
For information about how to resolve this failure, see
[Error `FROM` clause must contain exactly one log view](https://docs.cloud.google.com/logging/docs/analyze/troubleshoot#bad-table-name).
3.
To run the query, go to the toolbar and select
**Run Query**.
Observability Analytics presents the query results in a table. However, you can create
a chart, and you can also save the table or chart to
a [custom dashboard](https://docs.cloud.google.com/monitoring/charts/dashboards).
For more information, see [Chart SQL query results](https://docs.cloud.google.com/logging/docs/analyze/charts).
If the toolbar displays **Run in BigQuery** , then you need to switch
Observability Analytics to use the default query engine. To make this change, in the
toolbar of the **Query** pane, click **Settings**
and then select **Analytics (default)**.
### Build, edit, and run a query
The **Query Builder** interface lets you build a query by making selections from
menus. Observability Analytics converts your selections into a SQL query, which you can
view and edit. For example, you might start by using the
**Query Builder** interface and then switch to the SQL editor to refine your
query.
Observability Analytics can always convert your menu-selections from the **Query Builder**
interface into a SQL query. However, not all SQL queries can be represented
by the **Query Builder** interface. For example, queries with joins can't
be represented by this interface.
> [!NOTE]
> **Note:** There might be cases where fields that you want to query aren't listed by the [query builder interface](https://docs.cloud.google.com/logging/docs/analyze/query-and-view#query-builder). When the data type of a column is JSON, Observability Analytics automatically infers the fields of the column. If you want your query to use a JSON field that wasn't automatically inferred, then switch to the SQL editor and write a query.
To build a query, do the following:
1. In the Google Cloud console, go to the
**Observability Analytics** page:
[Go to **Observability Analytics**](https://console.cloud.google.com/logs/analytics)
If you use the search bar to find this page, then select the result whose subheading is
**Logging**.
> [!NOTE]
> **Note:** If a window on the **Observability Analytics** page displays a "Get started with Observability Analytics" message, then on the window, click **Close**.
2. If the **Query** pane displays a SQL editor, then select
**Builder** , which opens the **Query Builder** pane.
3. Use the **Source** menu to select the view you want to query. Your selections
are mapped to the `FROM` clause in the SQL query.
4. Optional: Use the following menus to restrict or format the result table:
- **Search all fields** : Search for matching strings. Your selections are
mapped to the `WHERE` clause in the SQL query.
- **Columns** : Select the columns that appear in the result table. Your
selections are mapped to the `SELECT` clauses in the SQL query.
When you select a field name in this menu, a dialog opens. In this dialog,
you can do the following:
- Use the menu to aggregate or group your data.
To prevent syntax errors, any aggregation and grouping you apply
to one column is automatically applied to other columns as well.
For an example of how to aggregate and group entries, see
[Group and aggregate data by using the Query Builder](https://docs.cloud.google.com/logging/docs/analyze/query-and-view#example-aggregate).
- Cast a value of any type into another specified data type. For more
information, see the [`CAST`](https://docs.cloud.google.com/bigquery/docs/reference/standard-sql/conversion_functions#cast)
documentation.
- Extract a substring of values by using regular expressions. For more
information, see the [`REGEXP_EXTRACT`](https://docs.cloud.google.com/bigquery/docs/reference/standard-sql/string_functions#regexp_extract)
documentation.
- **Filters** : Add filters when you want to restrict the query to spans
that contain a specific attribute or span ID. The menu lists all
available filter options. Your selections are mapped to the `WHERE`
clause in the SQL query.
- **Sort By** : Set the columns to sort by, and whether the sort is
ascending or descending. Your selections are mapped to the `ORDER BY`
clause in the SQL query.
- **Limit** : Set the maximum number of rows in the result table. Your
selections are mapped to the `LIMIT` clause in the SQL query.
5.
To run the query, go to the toolbar and select
**Run Query**.
Observability Analytics presents the query results in a table. However, you can create
a chart, and you can also save the table or chart to
a [custom dashboard](https://docs.cloud.google.com/monitoring/charts/dashboards).
For more information, see [Chart SQL query results](https://docs.cloud.google.com/logging/docs/analyze/charts).
If the toolbar displays **Run in BigQuery** , then you need to switch
Observability Analytics to use the default query engine. To make this change, in the
toolbar of the **Query** pane, click **Settings**
and then select **Analytics (default)**.
### Example: Group and aggregate data by using the Query Builder
When you select a column in the Query Builder, each field includes a menu where
you can add grouping and aggregation. Grouping lets you organize your data into
groups based on the value of one or more columns, and aggregation lets you
perform calculations on these groups to return a single value.
Each field that you select in the **Columns** element has an attached menu with
the following options:
- **None**: Don't group or aggregate by this field.
- **Aggregate** : Group fields listed in the **Columns** element except when the field has an **Aggregate** selection. For those fields, compute the value by performing an operation on all entries in each grouping. The operation might be to compute the average of a field or to do something like count the number of entries in each grouping.
- **Group By** : Group entries by all fields listed in the **Columns** element.
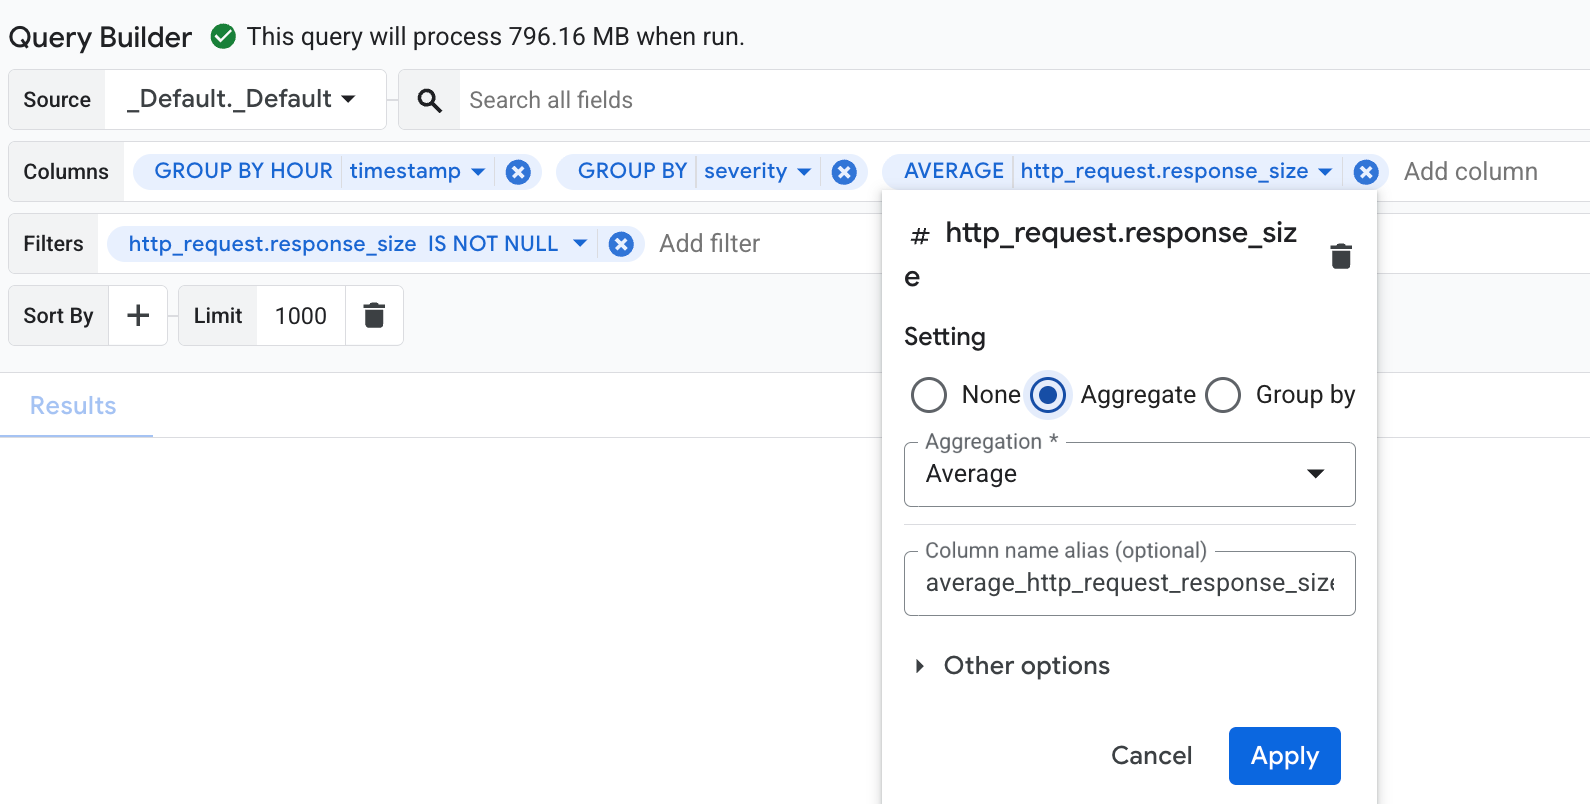
This example shows you how to use the **Query Builder** to group
log entries by severity and timestamp, and then compute the average of the
`http_request.response_size` field for each group:
1. In the **Columns** menu, select the `timestamp`, `severity`, and
`http_request.response_size` fields.
1. To group your data, click the `timestamp` field to open the settings
dialog. In this dialog, select the **Group by** option, and set the
**Truncation Granularity** to `HOUR`. Grouping is then automatically
applied to all other fields to prevent syntax errors. If there are
invalid fields where grouping can't be applied, then you see an error
message. Remove the invalid fields from the menu to resolve this error.
2. To perform aggregation on the `http_request.response_size` field, click
the field to open the settings dialog. In this dialog, select
**Aggregate** . In the **Aggregation** menu, click **Average**.
> [!NOTE]
> **Note:** Selecting the **Aggregate** option also automatically applies grouping to your columns.
2. In the **Filters** menu, add `http_request.response_size` and set the
comparator to `IS NOT NULL`. This filter matches log entries that
contain a `response_size` value.
Your Query Builder menus look similar to the following:
3. To run the query, go to the toolbar and select **Run Query**.
The result of this query is similar to the following:
+---+---+---+
| Row | hour_timestamp | severity | response_size |
| | TIMESTAMP | STRING | INTEGER |
+---+---+---+---+
| 1 | 2025-10-06 16:00:00.000 UTC | NOTICE | 3082 |
| 2 | 2025-10-06 17:00:00.000 UTC | WARNING | 338 |
| 3 | 2025-10-06 16:00:00.000 UTC | INFO | 149 |
The corresponding SQL query for the previous example is as follows:
SELECT
-- Truncate the timestamp by hour.
TIMESTAMP_TRUNC( timestamp, HOUR ) AS hour_timestamp,
severity,
-- Compute average response_size.
AVG( http_request.response_size ) AS average_http_request_response_size
FROM
`PROJECT_ID.LOCATION.BUCKET_ID.LOG_VIEW_ID`
WHERE
-- Matches log entries that have a response_size.
http_request.response_size IS NOT NULL
GROUP BY
-- Group log entries by timestamp and severity.
TIMESTAMP_TRUNC( timestamp, HOUR ),
severity
LIMIT
1000
## Display the schema
The schema defines how the data is stored, which includes the fields and their
data types. This information is important to you because the schema determines
the fields you query and whether you need to cast fields to different data
types. For example, to write a query that computes the average latency of
HTTP requests, you need to know how to access the latency field and whether it
is stored as an integer like `100` or as a string like `"100"`. If the latency
data is stored as a string, then the query must cast the value to a numeric
value before computing an average.
To identify the schema, do the following:
1. In the Google Cloud console, go to the
**Observability Analytics** page:
[Go to **Observability Analytics**](https://console.cloud.google.com/logs/analytics)
If you use the search bar to find this page, then select the result whose subheading is
**Logging**.
2. In the **Views** menu, go to the
**Logs** or
**Analytics Views** section, and select
the view that you want to query.
The **Schema** pane is updated. Observability Analytics
automatically infers the fields of a column when the data type is JSON.
To view how often these inferred fields appear in your data,
click **Options** and
select **View info and description**.
For log views, the schema is fixed and corresponds to the
[`LogEntry`](https://docs.cloud.google.com/logging/docs/reference/v2/rest/v2/LogEntry).
For analytics views, you can modify the SQL query to change the schema.
## What's next
- Learn about [analytics views](https://docs.cloud.google.com/logging/docs/analyze/about-analytics-views).
- [Save and share a SQL query](https://docs.cloud.google.com/logging/docs/analyze/save-share-query).
- [Chart SQL query results](https://docs.cloud.google.com/logging/docs/analyze/charts).
- [Sample SQL queries](https://docs.cloud.google.com/logging/docs/analyze/examples).
- [Query a linked BigQuery dataset in BigQuery](https://docs.cloud.google.com/logging/docs/analyze/query-linked-dataset).