A regional external proxy Network Load Balancer is a proxy-based regional Layer 4 load balancer that
lets you run and scale your TCP service traffic in a single region behind
an external regional IP address. These load balancers distribute
external TCP traffic from the internet to backends in the same region.
Before you begin, read the
[External proxy Network Load Balancer overview](https://docs.cloud.google.com/load-balancing/docs/tcp.md.txt).
This guide contains instructions to set up a regional external proxy Network Load Balancer
with a managed instance group (MIG) backend. For this example, you configure the
deployment shown in the following diagram.
[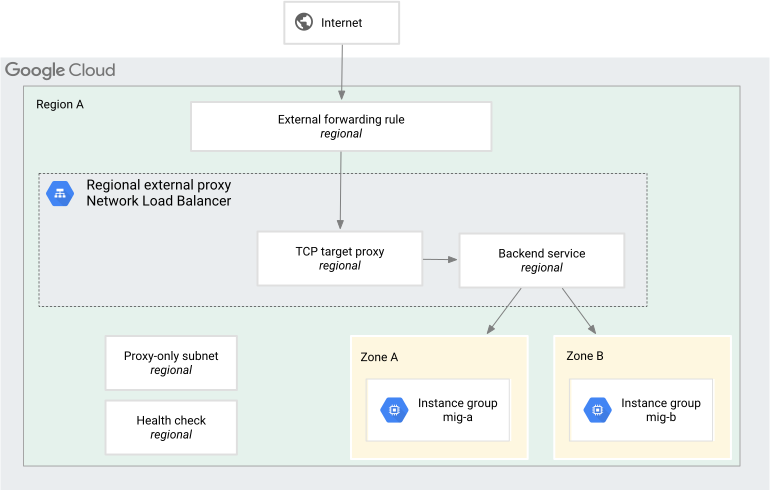](https://docs.cloud.google.com/static/load-balancing/images/ext-reg-tcp-proxy-migs.svg) External proxy Network Load Balancer example configuration with instance group backends
> [!NOTE]
> **Note:** Regional external proxy Network Load Balancers support both the
> Premium and Standard Network Service Tiers. This procedure demonstrates the setup
> with Standard Tier.
For this example, we'll use the load balancer to distribute TCP traffic across
backend VMs in two zonal managed instance groups in Region A. For
purposes of the example, the service is a set of
[Apache](https://httpd.apache.org/) servers configured
to respond on port `110`. Many browsers don't allow port `110`, so the
testing section uses `curl`.
A regional external proxy Network Load Balancer is a regional load balancer. All load balancer
components must be in the same region as the load balancer.
> [!NOTE]
> **SNI-based routing** : This page also shows you an alternative deployment
> architecture that you can use to configure SNI-based routing. For SNI-based
> routing, you use TLS routes to define how traffic is distributed. For
> details, see [Create a load balancer with TLS
> routes](https://docs.cloud.google.com/load-balancing/docs/tcp/set-up-ext-reg-tcp-proxy-migs#configure-lb-tls-routes).
>
>
## Permissions
To follow this guide, you must be able to create instances and modify a
network in a project. You must be either a project
[Owner or Editor](https://docs.cloud.google.com/iam/docs/roles-overview.md.txt#basic), or you must
have all of the following
[Compute Engine IAM roles](https://docs.cloud.google.com/compute/docs/access/iam.md.txt).
| Task | Required role |
|---|---|
| Create networks, subnets, and load balancer components | [Compute Network Admin](https://docs.cloud.google.com/compute/docs/access/iam.md.txt#compute.networkAdmin) (`roles/compute.networkAdmin`) |
| Add and remove firewall rules | [Compute Security Admin](https://docs.cloud.google.com/compute/docs/access/iam.md.txt#compute.securityAdmin) (`roles/compute.securityAdmin`) |
| Create instances | [Compute Instance Admin](https://docs.cloud.google.com/compute/docs/access/iam.md.txt#compute.instanceAdmin) (`roles/compute.instanceAdmin`) |
For more information, see the following guides:
- [Roles and permissions](https://docs.cloud.google.com/load-balancing/docs/access-control.md.txt)
- [IAM Conditions](https://docs.cloud.google.com/load-balancing/docs/access-control/iam-conditions.md.txt)
## Optional: Use BYOIP addresses
With bring your own IP (BYOIP), you can import your own public addresses to
Google Cloud to use the addresses with Google Cloud resources. For
example, if you import your own IPv4 addresses, you can assign one to the
forwarding rule when you configure your load balancer. When you follow the
instructions in this document to
[configure the load balancer](https://docs.cloud.google.com/load-balancing/docs/tcp/set-up-ext-reg-tcp-proxy-migs.md.txt#configure-lb), provide the BYOIP address as the
**IP address**.
For more information about using BYOIP, see
[Bring your own IP addresses](https://docs.cloud.google.com/vpc/docs/bring-your-own-ip.md.txt).
## Configure the network and subnets
You need a VPC network with two subnets, one for the load
balancer's backends and the other for the load balancer's proxies. This
load balancer is regional. Traffic within the VPC
network is routed to the load balancer if the traffic's source is in a
subnet in the same region as the load balancer.
This example uses the following VPC network, region, and
subnets:
- **Network:** a [custom-mode VPC
network](https://docs.cloud.google.com/vpc/docs/vpc#subnet-ranges) named `lb-network`
- **Subnet for backends:** a subnet named `backend-subnet` in
Region A that uses `10.1.2.0/24` for its primary IP address range
- **Subnet for proxies:** a subnet named `proxy-only-subnet` in
Region B that uses `10.129.0.0/23` for its primary IP address range
> [!NOTE]
> **Note:** You can change the name of the network, the region, and the parameters for the subnets; however, subsequent steps in this guide use the network, region, and subnet parameters as named here.
### Create the network and subnets
### Console
1. In the Google Cloud console, go to the **VPC networks** page.
[Go to VPC networks](https://console.cloud.google.com/networking/networks/list)
2. Click **Create VPC network**.
3. For **Name** , enter `lb-network`.
4. In the **Subnets** section, set the **Subnet creation mode** to
**Custom**.
5. Create a subnet for the load balancer's backends. In the **New subnet**
section, enter the following information:
- **Name** : `backend-subnet`
- **Region** : `REGION_A`
- **IP address range** : `10.1.2.0/24`
6. Click **Done**.
7. Click **Create**.
### gcloud
1. To create the custom VPC network, use the [`gcloud compute
networks create` command](https://docs.cloud.google.com/sdk/gcloud/reference/compute/networks/create):
```
gcloud compute networks create lb-network --subnet-mode=custom
```
2. To create a subnet in the `lb-network` network in the `REGION_A` region,
use the [`gcloud compute networks subnets create` command](https://docs.cloud.google.com/sdk/gcloud/reference/compute/networks/subnets/create):
```
gcloud compute networks subnets create backend-subnet \
--network=lb-network \
--range=10.1.2.0/24 \
--region=REGION_A
```
### Create the proxy-only subnet
A [proxy-only subnet](https://docs.cloud.google.com/load-balancing/docs/proxy-only-subnets.md.txt) provides a
set of IP addresses that Google uses to run Envoy proxies on your behalf. The
proxies terminate connections from the client and create new connections to the
backends.
This proxy-only subnet is used by all Envoy-based load balancers in
Region A of the `lb-network` VPC network.
> [!IMPORTANT]
> **Important:** Don't try to assign addresses from the proxy-only subnet to your load balancer's forwarding rule or backends. You assign the forwarding rule's IP address and the backend instance IP addresses from [a different subnet range (or ranges)](https://docs.cloud.google.com/load-balancing/docs/tcp/set-up-ext-reg-tcp-proxy-migs.md.txt#create-network-subnets), not this one. Google Cloud reserves this subnet range for Google Cloud-managed proxies.
### Console
If you're using the Google Cloud console, you can wait and create the
proxy-only subnet later on the **Load balancing** page.
If you want to create the proxy-only subnet now, use the following steps:
1. In the Google Cloud console, go to the **VPC networks** page.
[Go to VPC networks](https://console.cloud.google.com/networking/networks/list)
2. Click the name of the VPC network: `lb-network`.
3. Click **Add subnet**.
4. For **Name** , enter `proxy-only-subnet`.
5. For **Region** , select `REGION_A`.
6. Set **Purpose** to **Regional Managed Proxy**.
7. For **IP address range** , enter `10.129.0.0/23`.
8. Click **Add**.
### gcloud
To create the proxy-only subnet, use the [`gcloud compute networks subnets
create` command](https://docs.cloud.google.com/sdk/gcloud/reference/compute/networks/subnets/create):
```
gcloud compute networks subnets create proxy-only-subnet \
--purpose=REGIONAL_MANAGED_PROXY \
--role=ACTIVE \
--region=REGION_A \
--network=lb-network \
--range=10.129.0.0/23
```
## Create firewall rules
In this example, you create the following firewall rules:
- **`fw-allow-ssh`.** An ingress rule, applicable to the instances being load
balanced, that allows incoming SSH connectivity on TCP port `22` from any
address. You can choose a more restrictive source IP range for this rule; for
example, you can specify only the IP ranges of the system from which you
initiate SSH sessions. This example uses the target tag `allow-ssh`.
- **`fw-allow-health-check`.** An ingress rule, applicable to the instances being
load balanced, that allows all TCP traffic from the
[Google Cloud health check probe ranges](https://docs.cloud.google.com/load-balancing/docs/health-check-concepts.md.txt#ip-ranges). This
example uses the target tag `allow-health-check`.
- **`fw-allow-proxy-only-subnet`.** An ingress rule that allows connections from the
proxy-only subnet to reach the backends.
Without these firewall rules, the [default deny
ingress](https://docs.cloud.google.com/firewall/docs/firewalls#default_firewall_rules) rule blocks incoming
traffic to the backend instances.
The [target tags](https://docs.cloud.google.com/vpc/docs/add-remove-network-tags.md.txt#targets_for_firewall_rules)
define the backend instances. Without the target tags, the firewall
rules apply to all of your backend instances in the VPC network.
When you create the backend VMs, make sure to
include the specified target tags, as shown in [Create a managed instance
group](https://docs.cloud.google.com/load-balancing/docs/l7-internal/setting-up-l7-internal#creating_a_managed_instance_group).
### Console
1. In the Google Cloud console, go to the **Firewall policies** page.
[Go to Firewall policies](https://console.cloud.google.com/net-security/firewall-manager/firewall-policies/list)
2. Click **Create firewall rule** to create the rule to allow incoming
SSH connections. Complete the following fields:
- **Name** : `fw-allow-ssh`
- **Network** : `lb-network`
- **Direction of traffic** : **Ingress**
- **Action on match** : **Allow**
- **Targets** : **Specified target tags**
- **Target tags** : `allow-ssh`
- **Source filter** : **IPv4 ranges**
- **Source IPv4 ranges** : `0.0.0.0/0`
- **Protocols and ports** :
- Choose **Specified protocols and ports**.
- Select the **TCP** checkbox, and then enter `22` for the port number.
3. Click **Create**.
4. Click **Create firewall rule** a second time to create the rule to allow
Google Cloud health checks:
- **Name** : `fw-allow-health-check`
- **Network** : `lb-network`
- **Direction of traffic** : **Ingress**
- **Action on match** : **Allow**
- **Targets** : **Specified target tags**
- **Target tags** : `allow-health-check`
- **Source filter** : **IPv4 ranges**
- **Source IPv4 ranges** : `35.191.0.0/16`
- **Protocols and ports**:
- Choose **Specified protocols and ports**.
- Select the **TCP** checkbox, and then enter `80` for the port number.
As a best practice, limit this rule to just the protocols and ports
that match those used by your health check. If you use `tcp:80` for
the protocol and port, Google Cloud can use
HTTP on port `80` to contact your VMs, but it cannot use HTTPS on
port `443` to contact them.
5. Click **Create**.
6. Click **Create firewall rule** a third time to create the rule to allow
the load balancer's proxy servers to connect to the backends:
- **Name** : `fw-allow-proxy-only-subnet`
- **Network** : `lb-network`
- **Direction of traffic** : **Ingress**
- **Action on match** : **Allow**
- **Targets** : **Specified target tags**
- **Target tags** : `allow-proxy-only-subnet`
- **Source filter** : **IPv4 ranges**
- **Source IPv4 ranges** : `10.129.0.0/23`
- **Protocols and ports** :
- Choose **Specified protocols and ports**.
- Select the **TCP** checkbox, and then enter `80` for the port number.
7. Click **Create**.
### gcloud
1. Create the `fw-allow-ssh` firewall rule to allow SSH connectivity to
VMs with the network tag `allow-ssh`. When you omit `source-ranges`,
Google Cloud [interprets the rule to mean any
source](https://docs.cloud.google.com/vpc/docs/firewalls#sources_for_the_rule).
```
gcloud compute firewall-rules create fw-allow-ssh \
--network=lb-network \
--action=allow \
--direction=ingress \
--target-tags=allow-ssh \
--rules=tcp:22
```
2. Create the `fw-allow-health-check` rule to allow Google Cloud
health checks. This example allows all TCP traffic from health check
probers; however, you can configure a narrower set of ports to meet your
needs.
gcloud compute firewall-rules create fw-allow-health-check \
--network=lb-network \
--action=allow \
--direction=ingress \
--source-ranges=35.191.0.0/16 \
--target-tags=allow-health-check \
--rules=tcp:80
3. Create the `fw-allow-proxy-only-subnet` rule to allow the region's Envoy
proxies to connect to your backends. Set `--source-ranges` to the
allocated ranges of your proxy-only subnet---in this example,
`10.129.0.0/23`.
```
gcloud compute firewall-rules create fw-allow-proxy-only-subnet \
--network=lb-network \
--action=allow \
--direction=ingress \
--source-ranges=10.129.0.0/23 \
--target-tags=allow-proxy-only-subnet \
--rules=tcp:80
```
## Reserve the load balancer's IP address
Reserve a static IP address for the load balancer.
### Console
1. In the Google Cloud console, go to the **Reserve a static address** page.
[Go to Reserve a static address](https://console.cloud.google.com/networking/addresses/add)
2. Choose a name for the new address.
3. For **Network Service Tier** , select **Standard**.
4. For **IP version** , select **IPv4**. IPv6 addresses are not supported.
5. For **Type** , select **Regional**.
6. For **Region** , select `REGION_A`.
7. Leave the **Attached to** option set to **None**. After you create the
load balancer, this IP address is attached to the load
balancer's forwarding rule.
8. Click **Reserve** to reserve the IP address.
### gcloud
1. To reserve a static external IP address, use the
[`gcloud compute addresses create` command](https://docs.cloud.google.com/sdk/gcloud/reference/compute/addresses/create.md.txt):
```
gcloud compute addresses create ADDRESS_NAME \
--region=REGION_A \
--network-tier=STANDARD
```
Replace `ADDRESS_NAME` with the name that you want to call this
address.
2. To view the result,
use the [`gcloud compute addresses describe` command](https://docs.cloud.google.com/sdk/gcloud/reference/compute/addresses/describe):
```
gcloud compute addresses describe ADDRESS_NAME
```
## Create a managed instance group
This section shows you how to create two managed instance group (MIG) backends
in Region A for the load balancer. The MIG provides VM instances
running the backend Apache servers for this example.
Typically, a regional external proxy Network Load Balancer isn't used for HTTP traffic, but
Apache software is commonly used for testing.
### Console
**Create an instance template**
1. In the Google Cloud console, go to the **Instance templates** page.
[Go to Instance templates](https://console.cloud.google.com/compute/instanceTemplates/list)
2. Click **Create instance template**.
3. For **Name** , enter `ext-reg-tcp-proxy-backend-template`.
4. Ensure that the **Boot disk** is set to a Debian image, such as
**Debian GNU/Linux 12 (bookworm)** . These instructions use commands that
are only available on Debian, such as `apt-get`.
5. Click **Advanced options**.
6. Click **Networking** and configure the following fields:
1. For **Network tags** , enter `allow-ssh`, `allow-health-check`, and `allow-proxy-only-subnet`.
2. For **Network interfaces** , select the following:
- **Network** : `lb-network`
- **Subnet** : `backend-subnet`
7. Click **Management** . Enter the following script into the
**Startup script** field:
```
#! /bin/bash
apt-get update
apt-get install apache2 -y
a2ensite default-ssl
a2enmod ssl
vm_hostname="$(curl -H "Metadata-Flavor:Google" \
http://metadata.google.internal/computeMetadata/v1/instance/name)"
echo "Page served from: $vm_hostname" | \
tee /var/www/html/index.html
systemctl restart apache2
```
8. Click **Create**.
**Create a managed instance group**
1. In the Google Cloud console, go to the **Instance groups** page.
[Go to Instance groups](https://console.cloud.google.com/compute/instanceGroups)
2. Click **Create instance group**.
3. Select **New managed instance group (stateless)** . For more information,
see [Create a MIG with stateful disks](https://docs.cloud.google.com/compute/docs/instance-groups/create-mig-with-basic-stateful-disks.md.txt).
4. For **Name** , enter `mig-a`.
5. For **Location** , select **Single zone**.
6. For **Region** , select `REGION_A`.
7. For **Zone** , select `ZONE_A`.
8. For **Instance template** , select `ext-reg-tcp-proxy-backend-template`.
9. Specify the number of instances that you want to create in the group.
For this example, specify the following options for **Autoscaling**:
- For **Autoscaling mode** , select `Off:do not autoscale`.
- For **Maximum number of instances** , enter `2`.
10. For **Port mapping** , click **Add port**.
- For **Port name** , enter `tcp80`.
- For **Port number** , enter `80`.
11. Click **Create**.
12. To create a second managed instance group, repeat the
**Create a managed instance group** steps and use the following
settings:
- **Name** : `mig-b`
- **Zone** : `ZONE_B`
Keep all the other settings the same.
### gcloud
The Google Cloud CLI instructions in this guide assume that you are using
[Cloud Shell](https://docs.cloud.google.com/shell/docs.md.txt) or another environment with `bash` installed.
1. To create a VM instance template with HTTP server, use the
[`gcloud compute instance-templates create` command](https://docs.cloud.google.com/sdk/gcloud/reference/compute/instance-templates/create.md.txt):
```
gcloud compute instance-templates create ext-reg-tcp-proxy-backend-template \
--region=REGION_A \
--network=lb-network \
--subnet=backend-subnet \
--tags=allow-ssh,allow-health-check,allow-proxy-only-subnet \
--image-family=debian-12 \
--image-project=debian-cloud \
--metadata=startup-script='#! /bin/bash
apt-get update
apt-get install apache2 -y
a2ensite default-ssl
a2enmod ssl
vm_hostname="$(curl -H "Metadata-Flavor:Google" \
http://metadata.google.internal/computeMetadata/v1/instance/name)"
echo "Page served from: $vm_hostname" | \
tee /var/www/html/index.html
systemctl restart apache2'
```
2. Create a managed instance group in the `ZONE_A` zone:
```
gcloud compute instance-groups managed create mig-a \
--zone=ZONE_A \
--size=2 \
--template=ext-reg-tcp-proxy-backend-template
```
3. Create a managed instance group in the `ZONE_B` zone:
```
gcloud compute instance-groups managed create mig-b \
--zone=ZONE_B \
--size=2 \
--template=ext-reg-tcp-proxy-backend-template
```
## Configure the load balancer
### Console
#### Start your configuration
1. In the Google Cloud console, go to the **Load balancing** page.
[Go to Load balancing](https://console.cloud.google.com/net-services/loadbalancing/list)
2. Click **Create load balancer**.
3. For **Type of load balancer** , select **Network Load Balancer
(TCP/UDP/SSL)** and click **Next**.
4. For **Proxy or passthrough** , select **Proxy load balancer** and click **Next**.
5. For **Public facing or internal** , select **Public facing
(external)** and click **Next**.
6. For **Global or single region deployment** , select **Best for regional
workloads** and click **Next**.
7. Click **Configure**.
#### Basic configuration
1. For **Name** , enter `my-ext-tcp-lb`.
2. For **Region** , select `REGION_A`.
3. For **Network** , select `lb-network`.
#### Reserve a proxy-only subnet
> [!NOTE]
> **Note:** If you already [created the proxy-only subnet](https://docs.cloud.google.com/load-balancing/docs/tcp/set-up-ext-reg-tcp-proxy-migs.md.txt#create-proxy-only-subnet), the **Reserve subnet** button isn't displayed. You can skip this section and continue with the steps in the **Configure the backends** section.
1. Click **Reserve**.
2. In the **Name** field, enter `proxy-only-subnet`.
3. In the **IP address range** field, enter `10.129.0.0/23`.
4. Click **Add**.
#### Configure the backends
1. Click **Backend configuration**.
2. In the **Backend type** list, select **Instance group**.
3. In the **Protocol** list, select **TCP**.
4. In the **Named port** field, enter `tcp80`.
5. Configure the health check:
1. In the **Health check** list, select **Create a health check**.
2. In the **Name** field, enter `tcp-health-check`.
3. In the **Protocol** list, select **TCP**.
4. In the **Port** field enter `80`.
5. Click **Create**.
6. Configure the first backend:
1. For **New backend** , select instance group `mig-a`.
2. For **Port numbers** , enter `80`.
3. Retain the remaining default values, and then click **Done**.
7. Configure the second backend:
1. Click **Add backend**.
2. For **New backend** , select instance group `mig-b`.
3. For **Port numbers** , enter `80`.
4. Retain the remaining default values, and then click **Done**.
8. Retain the remaining default values, and then click **Save**.
9. In the Google Cloud console, verify that there is a check mark next to **Backend configuration**. If not, double-check that you have completed all of the steps.
#### Configure the frontend
1. Click **Frontend configuration**.
2. For **Name** , enter `ext-reg-tcp-forwarding-rule`.
3. For **Network Service Tier** , select **Standard**.
4. For **IP address** , select the IP address reserved previously: LB_IP_ADDRESS
5. For **Port number** , enter `110`. The forwarding rule only forwards packets with a matching destination port.
6. For **Proxy protocol** , select **Off** because the PROXY protocol doesn't work with the Apache HTTP Server software. For more information, see [PROXY protocol](https://docs.cloud.google.com/load-balancing/docs/tcp/setting-up-tcp.md.txt#proxy-protocol).
7. Click **Done**.
8. In the Google Cloud console, verify that there is a check mark next to **Frontend configuration**. If not, double-check that you have completed all the previous steps.
**Review and finalize**
1. Click **Review and finalize**.
2. Review your load balancer configuration settings.
3. Optional: Click **Equivalent code** to view the REST API request that is used to create the load balancer.
4. Click **Create**.
### gcloud
1. Create a regional health check:
```
gcloud compute health-checks create tcp tcp-health-check \
--region=REGION_A \
--use-serving-port
```
2. Create a backend service:
```
gcloud compute backend-services create ext-reg-tcp-proxy-bs \
--load-balancing-scheme=EXTERNAL_MANAGED \
--protocol=TCP \
--port-name=tcp80 \
--region=REGION_A \
--health-checks=tcp-health-check \
--health-checks-region=REGION_A
```
3. Add instance groups to your backend service:
```
gcloud compute backend-services add-backend ext-reg-tcp-proxy-bs \
--region=REGION_A \
--instance-group=mig-a \
--instance-group-zone=ZONE_A \
--balancing-mode=UTILIZATION \
--max-utilization=0.8
```
```
gcloud compute backend-services add-backend ext-reg-tcp-proxy-bs \
--region=REGION_A \
--instance-group=mig-b \
--instance-group-zone=ZONE_B \
--balancing-mode=UTILIZATION \
--max-utilization=0.8
```
4. Create a target TCP proxy:
```
gcloud compute target-tcp-proxies create ext-reg-tcp-target-proxy \
--backend-service=ext-reg-tcp-proxy-bs \
--proxy-header=NONE \
--region=REGION_A
```
If you want to turn on the proxy header,
set it to `PROXY_V1` instead of `NONE`.
In this example, don't enable the PROXY protocol because it
doesn't work with the Apache HTTP Server software. For more
information, see [PROXY protocol](https://docs.cloud.google.com/load-balancing/docs/tcp/set-up-ext-reg-tcp-proxy-migs.md.txt#proxy-protocol).
5. Create the forwarding rule. For `--ports`, specify a single port number
from 1-65535. This example uses port `110`. The forwarding rule only
forwards packets with a matching destination port.
```
gcloud compute forwarding-rules create ext-reg-tcp-forwarding-rule \
--load-balancing-scheme=EXTERNAL_MANAGED \
--network-tier=STANDARD \
--network=lb-network \
--region=REGION_A \
--target-tcp-proxy=ext-reg-tcp-target-proxy \
--target-tcp-proxy-region=REGION_A \
--address=LB_IP_ADDRESS \
--ports=110
```
### Test the load balancer
> [!NOTE]
> **Note:** It might take a few minutes for the load balancer configuration to propagate after you first deploy it.
Now that you have configured your load balancer, you can test sending
traffic to the load balancer's IP address.
1. Get the load balancer's IP address.
To get the IPv4 address, run the following command:
```
gcloud compute addresses describe ADDRESS_NAME
```
2. Send traffic to your load balancer by running the
following command. Replace `LB_IP_ADDRESS` with your load
balancer's IPv4 address.
```
curl -m1 LB_IP_ADDRESS:9090
```
## Additional configuration options
This section expands on the configuration example to provide alternative and
additional configuration options. All of the tasks are optional. You can
perform them in any order.
### Create a load balancer with TLS routes
This section shows you how to create a load balancer that can use SNI-based
routing. SNI-based routing lets your proxy Network Load Balancers route traffic to specific
backend services based on the Server Name Indication (SNI) hostname provided
during the TLS handshake.
To create this load balancer we use the same networks, subnets, and firewall
rules created previously on this page. You configure the deployment shown in the
following diagram:
[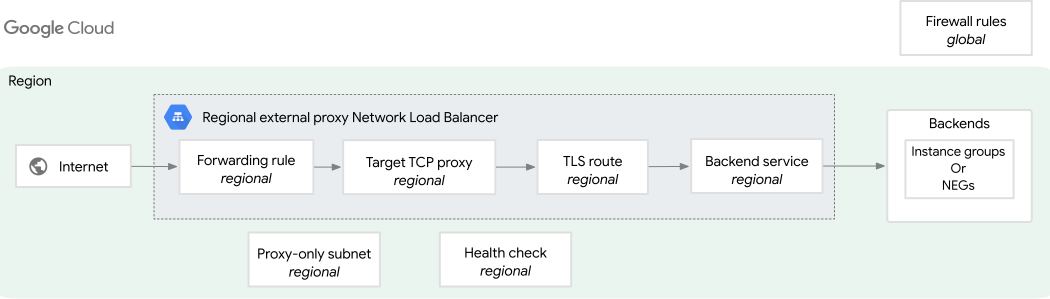](https://docs.cloud.google.com/static/load-balancing/images/reg-ext-tcp-proxy-tls-routes.svg) Regional external proxy Network Load Balancer configuration with TLS routes.
### Create a managed instance group backend
This section shows you how to create a managed instance group (MIG) backends for
the load balancer. The MIG provides VM instances running the backend servers for
this example.
The Google Cloud CLI instructions in this guide assume that you are using
[Cloud Shell](https://docs.cloud.google.com/shell/docs.md.txt) or another environment with `bash` installed.
1. Create an instance template with an "echo" HTTPS service that is exposed on
port 443.
```
gcloud compute instance-templates create INSTANCE_TEMPLATE_NAME \
--region=REGION_A \
--network=NETWORK \
--subnet=SUBNET_A \
--stack-type=IPv4_ONLY \
--tags=allow-ssh,allow-health-check,allow-proxy-only-subnet \
--image-family=debian-12 \
--image-project=debian-cloud \
--metadata=startup-script='#! /bin/bash
sudo sed -i "s/^#DNS=.*/DNS=8.8.8.8 8.8.4.4/" /etc/systemd/resolved.conf
sudo systemctl restart systemd-resolved
sudo rm -rf /var/lib/apt/lists/*
sudo apt-get -y clean
sudo apt-get -y update
sudo apt-get -y install ca-certificates curl gnupg software-properties-common
sudo curl -fsSL https://download.docker.com/linux/debian/gpg | sudo apt-key add -
sudo add-apt-repository -y "deb [arch=amd64] https://download.docker.com/linux/debian $(lsb_release -cs) stable"
sudo apt-get -y update
sudo apt-get -y install docker-ce
sudo which docker
echo "{ \"registry-mirrors\": [\"https://mirror.gcr.io\"] }" | sudo tee -a /etc/docker/daemon.json
sudo service docker restart
sudo docker run -e HTTPS_PORT=9999 -p 443:9999 --rm -dt mendhak/http-https-echo:22'
```
Replace the following:
- `INSTANCE_TEMPLATE_NAME`: a name for the instance template.
- `REGION_A`: the region for the instance template.
- `NETWORK`: the name of the network.
- `SUBNET_A`: the name of the subnetwork.
2. Create a managed instance group based on the instance template:
```
gcloud compute instance-groups managed create INSTANCE_GROUP_NAME \
--zone=ZONE_A \
--size=2 \
--template=INSTANCE_TEMPLATE_NAME
```
Replace `ZONE_A` with the zone for the instance group.
3. Set the name of the serving port for the managed instance group:
```
gcloud compute instance-groups managed set-named-ports INSTANCE_GROUP_NAME \
--named-ports=PORT_NAME:PORT_NUMBER \
--zone=ZONE_A
```
Replace the following:
- `PORT_NAME`: a name for the serving port---for example, `tcp443`.
- `PORT_NUMBER`: a port number for the serving port---for example, `443`.
### Configure the firewall
Configure a firewall rule to allow traffic from the load balancer and from the
health check probes to the backend instances.
gcloud compute firewall-rules create FIREWALL_RULE_NAME \
--network=NETWORK \
--action=allow \
--direction=ingress \
--source-ranges=35.191.0.0/16 \
--target-tags=allow-health-check \
--rules=tcp:443
Replace `FIREWALL_RULE_NAME` with a name for the firewall
rule.
### Configure the load balancer
1. Create an HTTPS health check:
```
gcloud compute health-checks create https HTTPS_HEALTH_CHECK_NAME \
--region=REGION_A \
--port=HC_PORT
```
Replace the following:
- `HTTPS_HEALTH_CHECK_NAME`: a name for the health check.
- `HC_PORT`: the port for the health check---for example, `443`.
- `REGION_A`: the region for the health check.
2. Create a backend service:
```
gcloud compute backend-services create BACKEND_SERVICE_NAME \
--load-balancing-scheme=EXTERNAL_MANAGED \
--protocol=TCP \
--port-name=PORT_NAME \
--health-checks=HTTPS_HEALTH_CHECK_NAME \
--health-checks-region=REGION_A \
--enable-logging \
--logging-sample-rate=1.0 \
--logging-optional=INCLUDE_ALL_OPTIONAL \
--region=REGION_A
```
Replace the following:
- `BACKEND_SERVICE_NAME`: a name for the backend service.
- `PORT_NAME`: the port name for the backend service. Use the same named port configured on the instance group---for example, `tcp443`.
- `HTTPS_HEALTH_CHECK_NAME`: the name of the HTTPS health check.
3. Add the backend instance group to your backend service:
```
gcloud compute backend-services add-backend BACKEND_SERVICE_NAME \
--balancing-mode=UTILIZATION \
--max-utilization=0.8 \
--instance-group=INSTANCE_GROUP_NAME \
--instance-group-zone=ZONE_A \
--region=REGION_A
```
Replace the following:
- `INSTANCE_GROUP_NAME`: the name of the backend instance group.
- `ZONE_A`: the zone of the instance group.
4. Create a target TCP proxy.
```
gcloud beta compute target-tcp-proxies create TARGET_TCP_PROXY_NAME \
--load-balancing-scheme=EXTERNAL_MANAGED \
--proxy-header=NONE \
--region=REGION_A
```
Replace `TARGET_TCP_PROXY_NAME` with the name of the
target TCP proxy.
5. Create a TLS route specification and save it to a YAML file.
```yaml
cat < [!NOTE]
> **Note:** It might take a few minutes for the load balancer configuration to propagate after you first deploy it.
Now that you have configured your load balancer, you can test sending
traffic to the load balancer's IP address.
1. Verify that you can access the HTTPS service through the load balancer.
```
curl https://example.com --resolve example.com:443:IP_ADDRESS -k
```
You will see the command returning a response from one of the VMs in the managed
instance group with the following printed to the console.
```
"path": "/",
"headers": {
"host": "example.com",
"user-agent": "curl/7.81.0",
"accept": "*/*"
},
"method": "GET",
"body": "",
"fresh": false,
"hostname": "example.com",
"ip": "::ffff:10.142.0.2",
"ips": [],
"protocol": "https",
"query": {},
"subdomains": [],
"xhr": false,
"os": {
"hostname": "0cd3aec9b351"
},
"connection": {
"servername": "example.com"
}
```
You can further verify that if you provide a different SNI hostname that
doesn't match a TLS route, or if you don't provide an SNI hostname at all, the
request is dropped.
- Run a test with an SNI hostname that doesn't match example.com, to ensure that the connection is rejected.
```
curl https://unknown.com --resolve unknown.com:443:IP_ADDRESS -k
```
- Run a test with a plain text connection without TLS, to ensure that the connection is rejected.
```
curl example.com:443 --resolve example.com:443:IP_ADDRESS -k
```
These commands return the following error.
```
curl: (35) OpenSSL SSL_connect: Connection reset by peer in connection
```
You'll see the `connection_refused` error code in the [`proxyStatus`
logs](https://docs.cloud.google.com/load-balancing/docs/tcp/tcp-ssl-proxy-logging-monitoring#proxy-status)
when the load balancer refuses such invalid connections.
### Enable session affinity
The example configuration creates a backend service without session affinity.
These procedures show you how to update a backend service for the example load
balancer created previously so that the backend service uses client IP affinity
or generated cookie affinity.
When client IP affinity is enabled, the load balancer directs a particular
client's requests to the same backend VM based on a hash created from the
client's IP address and the load balancer's IP address (the internal IP address
of an internal forwarding rule).
To enable client IP session affinity, complete the following steps.
### Console
1. In the Google Cloud console, go to the **Load balancing** page.
[Go to Load balancing](https://console.cloud.google.com/net-services/loadbalancing/loadBalancers/list)
2. Click **Backends**.
3. Click `ext-reg-tcp-proxy-bs` (the name of the backend service
that you created for this example), and then click **Edit**.
4. On the **Backend service details** page, click **Advanced
configuration**.
5. For **Session affinity** , select **Client IP**.
6. Click **Update**.
### gcloud
To update the `ext-reg-tcp-proxy-bs` backend service and specify client
IP session affinity, use the `gcloud compute backend-services update ext-reg-tcp-proxy-bs`
command:
```
gcloud compute backend-services update ext-reg-tcp-proxy-bs \
--region=REGION_A \
--session-affinity=CLIENT_IP
```
## What's next
- [Convert proxy Network Load Balancer to IPv6](https://docs.cloud.google.com/load-balancing/docs/tcp/convert-proxynetlb-dualstack.md.txt)
- [External proxy Network Load Balancer overview](https://docs.cloud.google.com/load-balancing/docs/tcp.md.txt).
- [Proxy Network Load Balancer logging and
monitoring](https://docs.cloud.google.com/load-balancing/docs/tcp/tcp-ssl-proxy-logging-monitoring).
- [Clean up the load balancer setup](https://docs.cloud.google.com/load-balancing/docs/cleaning-up-lb-setup.md.txt).