A regional external proxy Network Load Balancer is a proxy-based regional Layer 4 load balancer that
enables you to run and scale your TCP service traffic in a single region behind
an external regional IP address. These load balancers distribute
external TCP traffic from the internet to backends in the same region.
This page describes how to configure a regional external proxy Network Load Balancer to load
balance traffic to backends in on-premises environments or in other cloud
environments that are connected by using [hybrid
connectivity](https://cloud.google.com/hybrid-connectivity). Configuring hybrid connectivity to connect
your networks to Google Cloud is not in scope for this page.
Before you begin, read the [External proxy Network Load Balancer
overview](https://docs.cloud.google.com/load-balancing/docs/tcp).
> [!NOTE]
> **Note:** Regional external proxy Network Load Balancers support both the
> Premium and Standard Network Service Tiers. This procedure demonstrates the setup
> with Standard Tier.
In this example, we'll use the load balancer to distribute TCP traffic across
backend VMs located on-premises or in other cloud environments.
In this example, you configure the deployment shown in the following diagram.
[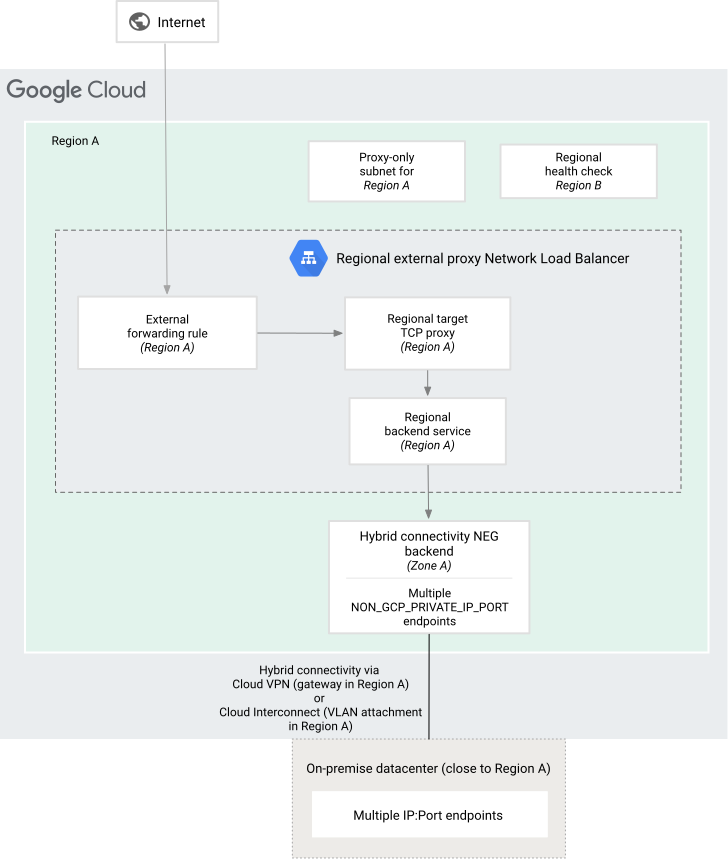](https://docs.cloud.google.com/static/load-balancing/images/ext-reg-tcp-lb-hybrid-only.svg) External proxy Network Load Balancer example configuration with hybrid NEG backends
This is a regional load balancer. All load balancer components
(backend instance group, backend service, target proxy, and forwarding rule)
must be in the same region.
## Permissions
To set up hybrid load balancing, you must have the following permissions:
- **On Google Cloud**
- Permissions to establish hybrid connectivity between Google Cloud and your on-premises environment or other cloud environments. For the list of permissions needed, see the relevant [Network Connectivity product
documentation](https://docs.cloud.google.com/network-connectivity/docs).
- Permissions to create a hybrid connectivity NEG and the load balancer. The [Compute Load Balancer Admin
role](https://docs.cloud.google.com/compute/docs/access/iam#compute.loadBalancerAdmin) (`roles/compute.loadBalancerAdmin`) contains the permissions required to perform the tasks described in this guide.
- **On your on-premises environment or other non-Google Cloud cloud
environment**
- Permissions to configure network endpoints that allow services on your on-premises environment or other cloud environments to be reachable from Google Cloud by using an `IP:Port` combination. For more information, contact your environment's network administrator.
- Permissions to create firewall rules on your on-premises environment or other cloud environments to allow Google's health check probes to reach the endpoints.
Additionally, to complete the instructions on this page, you need to create a
hybrid connectivity NEG, a load balancer, and zonal NEGs (and their endpoints)
to serve as Google Cloud-based backends for the load balancer.
You should be either a project [Owner
or Editor](https://docs.cloud.google.com/iam/docs/roles-overview#basic), or you should have the
following [Compute Engine IAM
roles](https://docs.cloud.google.com/compute/docs/access/iam).
| Task | Required role |
|---|---|
| Create networks, subnets, and load balancer components | [Compute Network Admin](https://docs.cloud.google.com/compute/docs/access/iam.md.txt#compute.networkAdmin) (`roles/compute.networkAdmin`) |
| Add and remove firewall rules | [Compute Security Admin](https://docs.cloud.google.com/compute/docs/access/iam.md.txt#compute.securityAdmin) (`roles/compute.securityAdmin`) |
| Create instances | [Compute Instance Admin](https://docs.cloud.google.com/compute/docs/access/iam.md.txt#compute.instanceAdmin) (`roles/compute.instanceAdmin`) |
## Optional: Use BYOIP addresses
With bring your own IP (BYOIP), you can import your own public addresses to
Google Cloud to use the addresses with Google Cloud resources. For
example, if you import your own IPv4 addresses, you can assign one to the
forwarding rule when you configure your load balancer. When you follow the
instructions in this document to
[configure the load balancer](https://docs.cloud.google.com/load-balancing/docs/tcp/set-up-ext-reg-tcp-proxy-hybrid.md.txt#configure-the-load-balancer), provide the BYOIP address as the
**IP address**.
For more information about using BYOIP, see
[Bring your own IP addresses](https://docs.cloud.google.com/vpc/docs/bring-your-own-ip.md.txt).
## Establish hybrid connectivity
Your Google Cloud and on-premises environment or other cloud environments
must be connected through [hybrid connectivity](https://cloud.google.com/hybrid-connectivity) by using
either Cloud Interconnect VLAN attachments or Cloud VPN
tunnels with Cloud Router or Router appliance VMs. We recommend that you
use a high availability connection.
A Cloud Router enabled with [global dynamic
routing](https://docs.cloud.google.com/network-connectivity/docs/router/concepts/advertised-routes#overview-am-default)
learns about the specific endpoint through Border Gateway Protocol (BGP) and
programs it into your Google Cloud VPC network. Regional
dynamic routing is not supported. Static routes are also not supported.
You can use either the same network or a different VPC network
within the same project to configure both hybrid networking
(Cloud Interconnect or Cloud VPN or a Router appliance VM) and the load balancer. Note
the following:
- If you use different VPC networks, the two networks must be
connected using either VPC Network Peering or they must be
[VPC
spokes](https://docs.cloud.google.com/network-connectivity/docs/network-connectivity-center/concepts/vpc-spokes-overview)
on the same [NCC
hub](https://docs.cloud.google.com/network-connectivity/docs/network-connectivity-center/concepts/overview).
- If you use the same VPC network, ensure that your
VPC network's subnet CIDR ranges don't conflict with your
remote CIDR ranges. When IP addresses overlap, subnet routes are prioritized
over remote connectivity.
For instructions, see the following documentation:
- [Cloud VPN](https://docs.cloud.google.com/network-connectivity/docs/vpn/concepts/overview.md.txt)
- [Cloud Interconnect](https://docs.cloud.google.com/network-connectivity/docs/interconnect/concepts/overview.md.txt)
> [!IMPORTANT]
> **Important:** Don't proceed with the instructions on this page until you set up hybrid connectivity between your environments.
## Set up your environment that is outside Google Cloud
Perform the following steps to set up your on-premises environment or other cloud
environment for hybrid load balancing:
- Configure network endpoints to expose on-premises services to Google Cloud (`IP:Port`).
- Configure firewall rules on your on-premises environment or other cloud environment.
- Configure Cloud Router to advertise certain required routes to your private environment.
### Set up network endpoints
After you set up hybrid connectivity, you configure one or more network
endpoints within your on-premises environment or other cloud environments that
are reachable through Cloud Interconnect or Cloud VPN or
Router appliance by using an `IP:port` combination. This `IP:port`
combination is configured as one or more endpoints for the hybrid connectivity
NEG that is created in Google Cloud later on in this process.
If there are multiple paths to the IP endpoint, routing
follows the behavior described in the [Cloud Router
overview](https://docs.cloud.google.com/network-connectivity/docs/router/concepts/overview).
### Set up firewall rules
The following firewall rules must be created on your on-premises environment
or other cloud environment:
- Create an ingress allow firewall rule in on-premises or other cloud environments to allow traffic from the region's [proxy-only subnet](https://docs.cloud.google.com/load-balancing/docs/proxy-only-subnets.md.txt) to reach the endpoints.
-
Allowing traffic from Google's health check probe ranges isn't required for hybrid
NEGs. However, if you're using a combination of hybrid and zonal NEGs in
a single backend service, you need to allow traffic from the [Google
health check probe ranges](https://docs.cloud.google.com/load-balancing/docs/health-check-concepts#ip-ranges) for the zonal NEGs.
### Advertise routes
Configure Cloud Router to
[advertise the following custom IP
ranges](https://docs.cloud.google.com/network-connectivity/docs/router/how-to/advertising-custom-ip) to your
on-premises environment or other cloud environment:
- The range of the region's proxy-only subnet.
## Set up your Google Cloud environment
For the following steps, make sure that you use the same VPC network
(called `NETWORK` in this procedure) that
was used to configure hybrid connectivity between the environments. You can
select any subnet from this network to reserve the load balancer's IP address
and create the load balancer. This subnet is referred to as
`LB_SUBNET` in this procedure.
Additionally, make sure that the region used (called
`REGION_A` in this procedure) is the same region
that was used to create the Cloud VPN tunnel or
Cloud Interconnect VLAN attachment.
### Configure the proxy-only subnet
A [proxy-only subnet](https://docs.cloud.google.com/load-balancing/docs/proxy-only-subnets.md.txt) provides a
set of IP addresses that Google uses to run Envoy proxies on your behalf. The
proxies terminate connections from the client and create new connections to the
backends.
This proxy-only subnet is used by all [Envoy-based regional load
balancers](https://docs.cloud.google.com/load-balancing/docs/proxy-only-subnets) in the
region (`REGION_A`) of the
VPC network (`NETWORK`).
There can only be one active proxy-only subnet per region, per
VPC network. You can skip this step if there's already a
proxy-only subnet in this region.
### Console
If you're using the Google Cloud console, you can wait and create the
proxy-only subnet later on the **Load balancing** page.
If you want to create the proxy-only subnet now, use the following steps:
1. In the Google Cloud console, go to the **VPC networks** page.
[Go to VPC networks](https://console.cloud.google.com/networking/networks/list)
2. Go to the network that was used to configure
hybrid connectivity between the environments.
3. Click **Add subnet**.
4. For **Name** , enter `proxy-only-subnet`.
5. For **Region** , select `REGION_A`.
6. Set **Purpose** to **Regional Managed Proxy**.
7. For **IP address range** , enter `10.129.0.0/23`.
8. Click **Add**.
### gcloud
To create the proxy-only subnet, use the [`gcloud compute networks subnets
create` command](https://docs.cloud.google.com/sdk/gcloud/reference/compute/networks/subnets/create):
```
gcloud compute networks subnets create proxy-only-subnet \
--purpose=REGIONAL_MANAGED_PROXY \
--role=ACTIVE \
--region=REGION_A \
--network=NETWORK \
--range=10.129.0.0/23
```
### Reserve the load balancer's IP address
Reserve a static IP address for the load balancer.
### Console
1. In the Google Cloud console, go to the **Reserve a static address** page.
[Go to Reserve a static address](https://console.cloud.google.com/networking/addresses/add)
2. Choose a name for the new address.
3. For **Network Service Tier** , select **Standard**.
4. For **IP version** , select **IPv4**. IPv6 addresses are not supported.
5. For **Type** , select **Regional**.
6. For **Region** , select `REGION_A`.
7. Leave the **Attached to** option set to **None**. After you create the
load balancer, this IP address is attached to the load
balancer's forwarding rule.
8. Click **Reserve** to reserve the IP address.
### gcloud
1. To reserve a static external IP address, use the
[`gcloud compute addresses create` command](https://docs.cloud.google.com/sdk/gcloud/reference/compute/addresses/create.md.txt):
```
gcloud compute addresses create ADDRESS_NAME \
--region=REGION_A \
--network-tier=STANDARD
```
Replace `ADDRESS_NAME` with the name that
you want to call this address.
2. To view the result, use the
[`gcloud compute addresses describe` command](https://docs.cloud.google.com/sdk/gcloud/reference/compute/addresses/describe):
```
gcloud compute addresses describe ADDRESS_NAME
```
### Set up the hybrid connectivity NEG
When you create the NEG, use a `ZONE` that minimizes the
geographic distance between Google Cloud and your on-premises or other
cloud environment. For example, if you are hosting a service in an on-premises
environment in Frankfurt, Germany, you can specify the `europe-west3-a`
Google Cloud zone when you create the NEG.
Moreover, the zone that you use to create the NEG should be in the same region
where the Cloud VPN tunnel or the Cloud Interconnect VLAN
attachment was configured for hybrid connectivity.
For the available regions and zones, see [Available regions and
zones](https://docs.cloud.google.com/compute/docs/regions-zones#available) in the
Compute Engine documentation.
### Console
> [!NOTE]
> **Note:** You can either create the hybrid connectivity NEG now, or you can wait to create it while configuring the load balancer's backend.
**Create a hybrid connectivity NEG**
1. In the Google Cloud console, go to the **Network endpoint groups** page.
[Go to Network endpoint groups](https://console.cloud.google.com/compute/networkendpointgroups/list)
2. Click **Create network endpoint group**.
3. For **Name** , enter `HYBRID_NEG_NAME`.
4. For **Network endpoint group type** , select **Hybrid connectivity network
endpoint group (Zonal)**.
5. For **Network** , select `NETWORK`.
6. For **Subnet** , select `LB_SUBNET`.
7. For **Zone** , select `HYBRID_NEG_ZONE`.
8. For **Default port**, select the default.
9. For **Maximum connections** , enter `2`.
10. Click **Create**.
**Add endpoints to the hybrid connectivity NEG**
1. In the Google Cloud console, go to the **Network endpoint groups** page.
[Go to Network endpoint groups](https://console.cloud.google.com/compute/networkendpointgroups/list)
2. Click the name of the network endpoint group that you created in
the previous step (`HYBRID_NEG_NAME`).
3. On the **Network endpoint group details** page,
in the **Network endpoints in this group** section, click **Add network
endpoint**.
4. On the **Add network endpoint** page, enter the IP address of
the new network endpoint.
5. Select the **Port type**:
- If you select **Default**, the endpoint uses the default port for all endpoints in the network endpoint group.
- If you select **Custom**, you can enter a different port number for the endpoint to use.
6. To add more endpoints, click **Add network endpoint** and repeat the
previous steps.
7. After you add all the non-Google Cloud endpoints,
click **Create**.
### gcloud
1. To create a hybrid connectivity NEG, use the
[`gcloud compute network-endpoint-groups
create` command](https://docs.cloud.google.com/sdk/gcloud/reference/compute/network-endpoint-groups/create):
```
gcloud compute network-endpoint-groups create HYBRID_NEG_NAME \
--network-endpoint-type=NON_GCP_PRIVATE_IP_PORT \
--zone=HYBRID_NEG_ZONE \
--network=NETWORK
```
2. Add the on-premises IP:Port endpoint to the hybrid NEG:
```
gcloud compute network-endpoint-groups update HYBRID_NEG_NAME \
--zone=HYBRID_NEG_ZONE \
--add-endpoint="ip=ENDPOINT_IP_ADDRESS,port=ENDPOINT_PORT"
```
You can use this command to add the network endpoints that you [previously
configured on-premises or in your cloud environment](https://docs.cloud.google.com/load-balancing/docs/tcp/set-up-ext-reg-tcp-proxy-hybrid#on-prem-endpoint).
Repeat `--add-endpoint` as many times as needed.
You can repeat these steps to create multiple hybrid NEGs if needed.
## Configure the load balancer
### Console
#### Start your configuration
1. In the Google Cloud console, go to the **Load balancing** page.
[Go to Load balancing](https://console.cloud.google.com/net-services/loadbalancing/list)
2. Click **Create load balancer**.
3. For **Type of load balancer** , select **Network Load Balancer
(TCP/UDP/SSL)** and click **Next**.
4. For **Proxy or passthrough** , select **Proxy load balancer** and click **Next**.
5. For **Public facing or internal** , select **Public facing
(external)** and click **Next**.
6. For **Global or single region deployment** , select **Best for regional
workloads** and click **Next**.
7. Click **Configure**.
#### Basic configuration
1. For **Name**, enter a name for the load balancer.
2. For **Region** , select `REGION_A`.
3. For **Network** , select `NETWORK`.
#### Reserve a proxy-only subnet
> [!NOTE]
> **Note:** If you already [created the proxy-only subnet](https://docs.cloud.google.com/load-balancing/docs/tcp/set-up-ext-reg-tcp-proxy-hybrid.md.txt#create-proxy-only-subnet), the **Reserve subnet** button isn't displayed. You can skip this section and continue with the steps in the **Configure the backend** section.
1. Click **Reserve subnet**.
2. For **Name** , enter `proxy-only-subnet`.
3. For **IP address range** , enter `10.129.0.0/23`.
4. Click **Add**.
#### Configure the backend
1. Click **Backend configuration**.
2. For **Backend type** , select **Hybrid connectivity network endpoint
group (Zonal)**.
3. For **Protocol** , select **TCP**.
4. In the **Health check** list, click **Create a health check** , and then enter the following information:
- In the **Name** field, enter a name for the health check.
- In the **Protocol** list, select **TCP**.
- In the **Port** list, enter `80`.
5. Click **Create**.
6. For **New backend** , select the hybrid NEG that you created previously (`HYBRID_NEG_NAME`). Or, you can click **Create a network endpoint group** to create the hybrid NEG now. For guidance about configuring the NEG, see [Set up the hybrid
NEG](https://docs.cloud.google.com/load-balancing/docs/tcp/set-up-ext-reg-tcp-proxy-hybrid#create-hybrid-neg).
7. Retain the remaining default values, and then click **Done**.
8. In the Google Cloud console, verify that there is a check mark next to **Backend configuration**. If not, double-check that you have completed all of the steps.
#### Configure the frontend
1. Click **Frontend configuration**.
2. For **Name**, enter a name for the forwarding rule.
3. For **Network Service Tier** , select **Standard**.
4. For **IP address** , select `LB_IP_ADDRESS`.
5. For **Port number**, enter any port number from 1-65535. The forwarding rule only forwards packets with a matching destination port.
6. Enable **Proxy protocol** only if it works with the service running on your on-premises or other cloud endpoints. For example, PROXY protocol doesn't work with the Apache HTTP Server software. For more information, see [PROXY protocol](https://docs.cloud.google.com/load-balancing/docs/tcp/setting-up-tcp.md.txt#proxy-protocol).
7. Click **Done**.
8. In the Google Cloud console, verify that there is a check mark next to **Frontend configuration**. If not, double-check that you have completed all the previous steps.
#### Review and finalize
1. Click **Review and finalize**.
2. Double-check your settings.
3. Click **Create**.
### gcloud
1. Create a regional health check for the backends:
```
gcloud compute health-checks create tcp TCP_HEALTH_CHECK_NAME \
--region=REGION_A \
--use-serving-port
```
2. Create a backend service:
```
gcloud compute backend-services create BACKEND_SERVICE_NAME \
--load-balancing-scheme=EXTERNAL_MANAGED \
--protocol=TCP \
--region=REGION_A \
--health-checks=TCP_HEALTH_CHECK_NAME \
--health-checks-region=REGION_A
```
3. Add the hybrid NEG backend to the backend service:
```
gcloud compute backend-services add-backend BACKEND_SERVICE_NAME \
--network-endpoint-group=HYBRID_NEG_NAME \
--network-endpoint-group-zone=HYBRID_NEG_ZONE \
--region=REGION_A \
--balancing-mode=CONNECTION \
--max-connections=MAX_CONNECTIONS
```
For `MAX_CONNECTIONS`, enter the maximum concurrent
connections that the backend should handle.
4. Create the target TCP proxy:
```
gcloud compute target-tcp-proxies create TARGET_TCP_PROXY_NAME \
--backend-service=BACKEND_SERVICE_NAME \
--region=REGION_A
```
5. Create the forwarding rule. Use the
[`gcloud compute forwarding-rules
create` command](https://docs.cloud.google.com/sdk/gcloud/reference/compute/forwarding-rules/create).
Replace `FWD_RULE_PORT` with a single port number
from 1-65535. The forwarding rule only forwards packets with a matching
destination port.
```
gcloud compute forwarding-rules create FORWARDING_RULE \
--load-balancing-scheme=EXTERNAL_MANAGED \
--network=NETWORK \
--network-tier=STANDARD \
--address=LB_IP_ADDRESS \
--ports=FWD_RULE_PORT \
--region=REGION_A \
--target-tcp-proxy=TARGET_TCP_PROXY_NAME \
--target-tcp-proxy-region=REGION_A
```
## Test your load balancer
> [!NOTE]
> **Note:** It might take a few minutes for the load balancer configuration to propagate after you first deploy it.
Now that you have configured your load balancer, you can test sending
traffic to the load balancer's IP address.
1. Get the load balancer's IP address.
To get the IPv4 address, run the following command:
```
gcloud compute addresses describe ADDRESS_NAME
```
2. Send traffic to your load balancer by running the
following command. Replace `LB_IP_ADDRESS` with your load
balancer's IPv4 address.
```
curl -m1 LB_IP_ADDRESS:FWD_RULE_PORT
```
## What's next
- To learn how external proxy Network Load Balancers work, see the [External proxy Network Load Balancer
overview](https://docs.cloud.google.com/load-balancing/docs/tcp).
- To set up logging and monitoring for your load balancer, see [Proxy Network Load Balancer logging and
monitoring](https://docs.cloud.google.com/load-balancing/docs/tcp/tcp-ssl-proxy-logging-monitoring).
- To delete the resources that you created so you are not billed for them in the future, see [Clean up the load balancer setup](https://docs.cloud.google.com/load-balancing/docs/cleaning-up-lb-setup.md.txt).