This document shows you how to create a
regional internal Application Load Balancer to route requests for static content
to [Cloud Storage buckets](https://docs.cloud.google.com/storage/docs/buckets.md.txt).
## Before you begin
Make sure that your setup meets the following prerequisites.
### Install the Google Cloud CLI
Some of the instructions in this guide can only be
carried out using the gcloud CLI. To install it, see
[Install the Google Cloud CLI](https://docs.cloud.google.com/sdk/docs/install).
You can find commands related to load balancing in the
[API and gcloud CLI references](https://docs.cloud.google.com/load-balancing/docs/apis.md.txt) document.
### Required roles
If you are the project creator, you are granted the
[Owner role](https://docs.cloud.google.com/iam/docs/roles-overview.md.txt#basic)
(`roles/owner`). By default, the Owner role (`roles/owner`) or the
Editor role (`roles/editor`) includes the permissions necessary to follow this
document.
If you aren't the project creator, required permissions must be granted on the
project to the appropriate [*principal*](https://docs.cloud.google.com/iam/docs/overview.md.txt#how_cloud_iam_works).
For example, a principal can be a Google Account (for end users) or a service
account.
To get the permissions that
you need to create Cloud Storage buckets
and network resources,
ask your administrator to grant you the
following IAM roles on your project:
- Create networks, subnets, and load balancer components: [Compute Network Admin](https://docs.cloud.google.com/iam/docs/roles-permissions/compute.md.txt#compute.networkAdmin) (`roles/compute.networkAdmin`)
- Add and remove firewall rules: [Compute Security Admin](https://docs.cloud.google.com/iam/docs/roles-permissions/compute.md.txt#compute.securityAdmin) (`roles/compute.securityAdmin`)
- Create Cloud Storage buckets: [Storage Object Admin](https://docs.cloud.google.com/iam/docs/roles-permissions/storage.md.txt#storage.objectAdmin) (`roles/storage.objectAdmin`)
For more information about granting roles, see [Manage access to projects, folders, and organizations](https://docs.cloud.google.com/iam/docs/granting-changing-revoking-access.md.txt).
You might also be able to get
the required permissions through [custom
roles](https://docs.cloud.google.com/iam/docs/creating-custom-roles) or other [predefined
roles](https://docs.cloud.google.com/iam/docs/roles-overview#predefined).
For more information about roles and permissions for Cloud Load Balancing, see
[Roles and permissions](https://docs.cloud.google.com/load-balancing/docs/access-control.md.txt). For more
information about defining IAM policies with conditional grants,
see
[IAM Conditions for forwarding rules](https://docs.cloud.google.com/load-balancing/docs/access-control/iam-conditions.md.txt).
### Set up an SSL certificate resource
For a regional internal Application Load Balancer that uses HTTPS as the
request-and-response protocol, create an SSL certificate resource using
Certificate Manager as described in one of the following documents:
- [Deploy a regional Google-managed certificate issued by your
CA Service instance](https://docs.cloud.google.com/certificate-manager/docs/deploy-google-managed-cas-regional)
- [Deploy a regional Google-managed certificate with DNS authorization](https://docs.cloud.google.com/certificate-manager/docs/deploy-google-managed-regional.md.txt)
- [Deploy a regional self-managed
certificate](https://docs.cloud.google.com/certificate-manager/docs/deploy-self-managed-regional)
After you create the certificate, you can attach the certificate to the HTTPS target proxy.
We recommend using a Google-managed certificate.
## Limitations
The following limitations apply to Cloud Storage buckets when serving
as backends to a regional internal Application Load Balancer:
- Private bucket access isn't supported, so the backend bucket must be publicly
accessible over the internet.
- [Signed URLs](https://docs.cloud.google.com/storage/docs/access-control/signed-urls.md.txt) aren't supported.
- Cloud CDN integration isn't available when creating backend buckets for a
regional internal Application Load Balancer.
- When using a regional internal Application Load Balancer to access backend buckets, only
the HTTP `GET` method is supported. You can download content
from the bucket, but uploading content to the bucket through the
regional internal Application Load Balancer isn't available.
- For a regional internal Application Load Balancer, Cloud Storage
buckets are supported only in the region where the load balancer is
configured. [Dual-region](https://docs.cloud.google.com/storage/docs/locations.md.txt#location-dr) or
[multi-region](https://docs.cloud.google.com/storage/docs/locations.md.txt#location-mr) buckets aren't supported.
## Setup overview
You can configure a regional internal Application Load Balancer in a region as
shown in the following architecture diagram:
[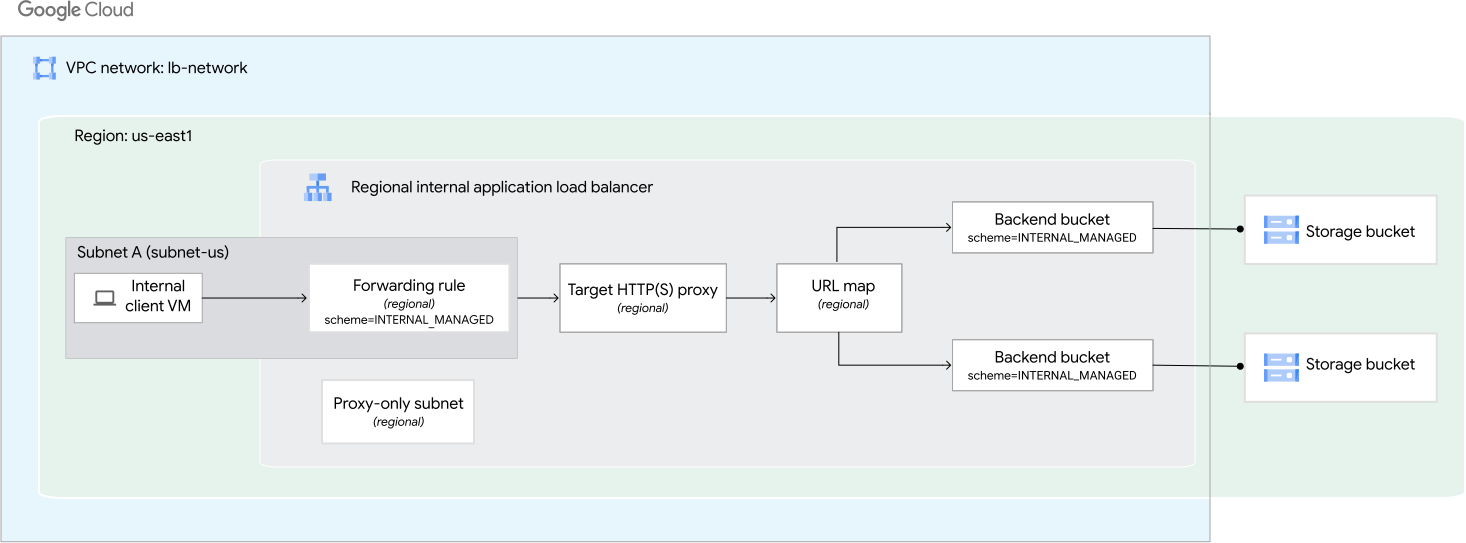](https://docs.cloud.google.com/static/load-balancing/images/regional-internal-lb-bucket.svg) Distributing traffic to Cloud Storage (click to enlarge).
As shown in the architecture diagram, this example creates a
regional internal Application Load Balancer in a
Virtual Private Cloud (VPC) network with two backend buckets, where each backend
bucket references a Cloud Storage bucket. The Cloud Storage
buckets are located in the `us-east1` region and you can balance the load of the
traffic between each bucket.
## Configure the network and subnets
Within the VPC network, configure a subnet in the region,
`us-east1` where the forwarding rule of your load balancers is to be configured.
In addition, configure a proxy-only subnet in the region, `us-east1` in which
you want to configure the load balancer.
This example uses the following VPC network, region, and
subnets:
- **Network** . The network is a [custom mode VPC
network](https://docs.cloud.google.com/vpc/docs/vpc#subnet-ranges) named `lb-network`.
- **Subnet for the load balancer** . A subnet named `subnet-us` in
the `us-east1` region uses `10.1.2.0/24` for its
primary IP range.
- **Subnet for the Envoy proxy** . A subnet named
`proxy-only-subnet-us` in the `us-east1` region that uses
`10.129.0.0/23` for its primary IP range.
### Configure the subnets for the load balancer's forwarding rule
Create a subnet in the same region where the forwarding rule of your load
balancers is to be configured.
### Console
1. In the Google Cloud console, go to the **VPC networks** page.
[Go to VPC networks](https://console.cloud.google.com/networking/networks/list)
2. Click **Create VPC network**.
3. For **Name** , enter `lb-network`.
4. In the **Subnets** section, set the **Subnet creation mode** to
**Custom**.
5. In the **New subnet** section, enter the following information:
1. **Name** : `subnet-us`
2. Select a **Region** : `us-east1`
3. **IP address range** : `10.1.2.0/24`
4. Click **Done**.
6. Click **Create**.
### gcloud
1. Create a custom VPC network, named `lb-network`, with the
[`gcloud compute networks create` command](https://docs.cloud.google.com/sdk/gcloud/reference/compute/networks/create.md.txt).
```
gcloud compute networks create lb-network --subnet-mode=custom
```
2. Create a subnet in the `lb-network` VPC network in the
`us-east1` region with the [`gcloud compute networks subnets
create` command](https://docs.cloud.google.com/sdk/gcloud/reference/compute/networks/subnets/create).
```
gcloud compute networks subnets create subnet-us \
--network=lb-network \
--range=10.1.2.0/24 \
--region=us-east1
```
### Configure the proxy-only subnets
A [proxy-only subnet](https://docs.cloud.google.com/load-balancing/docs/proxy-only-subnets.md.txt) provides a set of
IP addresses that Google Cloud uses to run Envoy proxies on your behalf. The
proxies end connections from the client and create connections to the
backends.
This proxy-only subnet is used by all Envoy-based regional load balancers in the
same region as the VPC network. There can only be one active
proxy-only subnet for a given purpose, per region, per network.
In this example, we create a proxy-only subnet in the `us-east1` region.
> [!IMPORTANT]
> **Important:** Don't try to assign addresses from the proxy-only subnet to your load balancer's forwarding rule or backends. You assign the forwarding rule's IP address and the backend instance IP addresses from [a different subnet range (or ranges)](https://docs.cloud.google.com/load-balancing/docs/l7-internal/setup-regional-internal-buckets.md.txt#create-network-subnets), not this one. Google Cloud reserves this subnet range for Google Cloud-managed proxies.
### Console
1. In the Google Cloud console, go to the **VPC networks** page.
[Go to VPC networks](https://console.cloud.google.com/networking/networks/list)
2. Click the name of the VPC network that you created.
3. On the **Subnet** tab, click **Add subnet**.
4. Enter the following information:
1. For **Name** , enter `proxy-only-subnet-us`.
2. For **Region** , enter `us-east1`.
3. For **Purpose** , select **Regional Managed Proxy**.
4. For **IP address range** , enter `10.129.0.0/23`.
5. Click **Add**.
### gcloud
- Create a proxy-only subnet in the `us-east1` region with the [`gcloud
compute networks subnets
create` command](https://docs.cloud.google.com/sdk/gcloud/reference/compute/networks/subnets/create).
```
gcloud compute networks subnets create proxy-only-subnet-us \
--purpose=REGIONAL_MANAGED_PROXY \
--role=ACTIVE \
--region=us-east1 \
--network=lb-network \
--range=10.129.0.0/23
```
### Configure a firewall rule
This example uses an ingress firewall rule, `fw-allow-ssh` that allows SSH
access on port `22` to the client VM.
### Console
1. In the Google Cloud console, go to the **Firewall policies** page.
[Go to Firewall policies](https://console.cloud.google.com/net-security/firewall-manager/firewall-policies/list)
2. Click **Create firewall rule** to create the rule to allow incoming
SSH connections on the client VM:
3. In the **Create a firewall rule** page, enter the following information:
1. **Name** : `fw-allow-ssh`
2. **Network** : `lb-network`
3. **Direction of traffic** : **Ingress**
4. **Action on match** : **Allow**
5. **Targets** : **Specified target tags**
6. **Target tags** : `allow-ssh`
7. **Source filter** : **IPv4 ranges**
8. **Source IPv4 ranges** : `0.0.0.0/0`
9. **Protocols and ports** :
1. Choose **Specified protocols and ports**.
2. Select the **TCP** checkbox, and then enter `22` for the port number.
4. Click **Create**.
### gcloud
- Create the `fw-allow-ssh` firewall rule to allow SSH connectivity to
VMs with the network tag `allow-ssh`. When you omit `--source-ranges`,
Google Cloud [interprets the rule to mean any
source](https://docs.cloud.google.com/vpc/docs/firewalls#sources_for_the_rule).
```
gcloud compute firewall-rules create fw-allow-ssh \
--network=lb-network \
--action=allow \
--direction=ingress \
--target-tags=allow-ssh \
--rules=tcp:22
```
## Configure your Cloud Storage buckets
The process for configuring your Cloud Storage buckets is as follows:
1. Create the buckets.
2. Copy content to the buckets.
3. Make the buckets publicly readable.
### Create Cloud Storage buckets
In this example, you create two Cloud Storage buckets in the
`us-east1` region.
### Console
1. In the Google Cloud console, go to the Cloud Storage **Buckets** page.
[Go to Buckets](https://console.cloud.google.com/storage/browser)
2. Click **Create**.
3. In the **Get started** section, enter a globally unique name that follows
the [naming guidelines](https://docs.cloud.google.com/storage/docs/buckets.md.txt#naming).
4. Click **Choose where to store your data**.
5. Set **Location type** to **Region**.
6. From the list of regions, select **us-east1**.
7. Click **Create**.
8. Click **Buckets** to return to the **Cloud Storage Buckets** page.
Use the preceding instructions to create a second bucket, in the same
region, **us-east1**.
### gcloud
- Create the buckets in the `us-east1` region with the
[`gcloud storage buckets create` command](https://docs.cloud.google.com/sdk/gcloud/reference/storage/buckets/create.md.txt).
```
gcloud storage buckets create gs://BUCKET1_NAME \
--default-storage-class=standard \
--location=us-east1 \
--uniform-bucket-level-access
```
```
gcloud storage buckets create gs://BUCKET2_NAME \
--default-storage-class=standard \
--location=us-east1 \
--uniform-bucket-level-access
```
Replace `BUCKET1_NAME` and
`BUCKET2_NAME` with your Cloud Storage
bucket names.
### Copy graphic files to your Cloud Storage buckets
To enable you to test the setup, copy a graphic file from a public
Cloud Storage bucket to your own Cloud Storage buckets.
```
gcloud storage cp gs://gcp-external-http-lb-with-bucket/three-cats.jpg gs://BUCKET1_NAME/love-to-purr/
```
```
gcloud storage cp gs://gcp-external-http-lb-with-bucket/two-dogs.jpg gs://BUCKET2_NAME/love-to-fetch/
```
### Make your Cloud Storage buckets publicly readable
To make all objects in a bucket readable to everyone on the public internet,
grant the principal `allUsers` the Storage Object Viewer role
(`roles/storage.objectViewer`).
### Console
To grant all users access to view objects in your buckets, repeat the
following procedure for each bucket:
1. In the Google Cloud console, go to the Cloud Storage **Buckets** page.
[Go to Buckets](https://console.cloud.google.com/storage/browser)
2. In the list of buckets, select the checkbox for each bucket that you want
to make public.
3. Click the **Permissions** button.
The **Permissions** dialog appears.
4. In the **Permissions** dialog, click the
**Add principal** button.
The **Grant access** dialog appears.
5. In the **New principals** field, enter `allUsers`.
6. In the **Select a role** field, enter `Storage Object Viewer` in
the filter box and select the **Storage Object Viewer** from the
filtered results.
7. Click **Save**.
8. Click **Allow public access**.
### gcloud
To grant all users access to view objects in your buckets, run the [`buckets add-iam-policy-binding` command](https://docs.cloud.google.com/sdk/gcloud/reference/storage/buckets/add-iam-policy-binding).
```
gcloud storage buckets add-iam-policy-binding gs://BUCKET1_NAME \
--member=allUsers \
--role=roles/storage.objectViewer
```
```
gcloud storage buckets add-iam-policy-binding gs://BUCKET2_NAME \
--member=allUsers \
--role=roles/storage.objectViewer
```
## Reserve a static internal IP address
Reserve a static internal IPv4 address for the forwarding rule of the load
balancer. For more information, see [Reserve a static internal IP address](https://docs.cloud.google.com/vpc/docs/reserve-static-internal-ip-address.md.txt).
### Console
1. In the Google Cloud console, go to the **Reserve internal static IP address** page.
[Go to Reserve internal static IP address](https://console.cloud.google.com/networking/addresses/add-internal)
2. In the **Name** field, enter a name for the new address.
3. In the **IP version** list, select **IPv4**.
4. In the **Network** list, select **lb-network**.
5. In the **Subnetwork** list, select **subnet-us**.
6. For **Region** , select **us-east1**.
7. In the **Static IP address** list, select **Assign automatically**. After
you create the load balancer, this IP address is attached to the load
balancer's forwarding rule.
8. Click **Reserve** to reserve the IP address.
### gcloud
1. To reserve a static external IP address, use the
[`gcloud compute addresses create` command](https://docs.cloud.google.com/sdk/gcloud/reference/compute/addresses/create.md.txt).
```
gcloud compute addresses create ADDRESS_NAME \
--region=us-east1 \
--subnet=subnet-us
```
Replace `ADDRESS_NAME` with the name for the new
address.
2. To view the information about the address, use the
[`gcloud compute addresses describe` command](https://docs.cloud.google.com/sdk/gcloud/reference/compute/addresses/describe).
```
gcloud compute addresses describe ADDRESS_NAME
```
Copy the returned IP address to use as
`RESERVED_IP_ADDRESS` in the following section.
## Configure the load balancer with backend buckets
This section shows you how to create the following resources for a
regional internal Application Load Balancer:
- Two backend buckets. The backend buckets serve as a wrapper to the [Cloud Storage buckets](https://docs.cloud.google.com/load-balancing/docs/l7-internal/setup-regional-internal-buckets.md.txt#create-buckets) that you created earlier.
- URL map
- Target proxy
- A forwarding rule with regional IP addresses. The forwarding rule is assigned an IP address from the [subnet created for the load
balancer's forwarding rules](https://docs.cloud.google.com/load-balancing/docs/l7-internal/setup-regional-internal-buckets#create-network-subnets). If you try to assign an IP address to the forwarding rule from the [proxy-only subnet](https://docs.cloud.google.com/load-balancing/docs/proxy-only-subnets.md.txt), the forwarding rule creation fails.
In this example, you can use HTTP or HTTPS as the request-and-response protocol
between the client and the load balancer. To create an HTTPS load balancer, you
must add an SSL certificate resource to the load balancer's frontend.
> [!NOTE]
> **Note:** You can only use the gcloud CLI to configure a regional internal Application Load Balancer with backend buckets.
To create the previously mentioned load balancing components using the
gcloud CLI, follow these steps:
1. Create two backend buckets in the `us-east1` region with the
[`gcloud compute backend-buckets create` command](https://docs.cloud.google.com/sdk/gcloud/reference/compute/backend-buckets/create#--load-balancing-scheme).
The backend buckets have a load balancing scheme of `INTERNAL_MANAGED`.
```
gcloud compute backend-buckets create backend-bucket-cats \
--gcs-bucket-name=BUCKET1_NAME \
--load-balancing-scheme=INTERNAL_MANAGED \
--region=us-east1
```
```
gcloud compute backend-buckets create backend-bucket-dogs \
--gcs-bucket-name=BUCKET2_NAME \
--load-balancing-scheme=INTERNAL_MANAGED \
--region=us-east1
```
> [!NOTE]
> **Note:** When creating a backend bucket for a regional internal Application Load Balancer, you can't enable Cloud CDN.
2. Create a URL map to route incoming requests to the backend bucket with the
[`gcloud compute url-maps create` command](https://docs.cloud.google.com/sdk/gcloud/reference/compute/url-maps/create).
```
gcloud compute url-maps create lb-map \
--default-backend-bucket=backend-bucket-cats \
--region=us-east1
```
3. Configure the host and path rules of the URL map with the
[`gcloud compute url-maps add-path-matcher` command](https://docs.cloud.google.com/sdk/gcloud/reference/compute/url-maps/add-path-matcher).
In this example, the default backend bucket is `backend-bucket-cats`, which
handles all the paths that exist within it. However, any request targeting
`http://FORWARDING_RULE_IP_ADDRESS/love-to-fetch/two-dogs.jpg`
uses the `backend-bucket-dogs` backend. For example, if the
`/love-to-fetch/` folder also exists within your default backend
(`backend-bucket-cats`), the load balancer prioritizes the
`backend-bucket-dogs` backend because there is a specific path rule for
`/love-to-fetch/*`.
```
gcloud compute url-maps add-path-matcher lb-map \
--path-matcher-name=path-matcher-pets \
--new-hosts=* \
--backend-bucket-path-rules="/love-to-fetch/*=backend-bucket-dogs" \
--default-backend-bucket=backend-bucket-cats \
--region=us-east1
```
4. Create a target proxy with the [`gcloud compute target-http-proxies create` command](https://docs.cloud.google.com/sdk/gcloud/reference/compute/target-http-proxies/create.md.txt).
*For HTTP traffic*, create a target HTTP proxy to route
requests to the URL map:
```
gcloud compute target-http-proxies create http-proxy \
--url-map=lb-map \
--region=us-east1
```
*For HTTPS traffic* , create a target HTTPS proxy to route requests to
the URL map. The proxy is the part of the load balancer that holds the
SSL certificate for an HTTPS load balancer. After you
[create the certificate](https://docs.cloud.google.com/load-balancing/docs/l7-internal/setup-regional-internal-buckets.md.txt#ssl-cert), you can attach the certificate to the
HTTPS target proxy.
```
gcloud compute target-https-proxies create https-proxy \
--url-map=lb-map \
--certificate-manager-certificates=CERTIFICATE_NAME \
--region=us-east1
```
Replace `CERTIFICATE_NAME` with the name of the
[SSL certificate you created using Certificate Manager](https://docs.cloud.google.com/load-balancing/docs/l7-internal/setup-regional-internal-buckets.md.txt#ssl-cert).
5. Create a forwarding rule with an IP address in the
`us-east1` region with the [`gcloud compute forwarding-rules create` command](https://docs.cloud.google.com/sdk/gcloud/reference/compute/forwarding-rules/create.md.txt).
Reserving an IP address is optional for an HTTP forwarding rule;
however, you need to reserve an IP address for an HTTPS forwarding rule.
In this example, an ephemeral IP address is associated with your load
balancer's HTTP forwarding rule. An ephemeral IP address remains constant
while the forwarding rule exists. If you need to delete the forwarding rule
and recreate it, the forwarding rule might receive a new IP address.
*For HTTP traffic*, create the forwarding rules to route
incoming requests to the HTTP target proxy:
```
gcloud compute forwarding-rules create http-fw-rule-1 \
--load-balancing-scheme=INTERNAL_MANAGED \
--network=lb-network \
--subnet=subnet-us \
--subnet-region=us-east1 \
--ports=80 \
--target-http-proxy=http-proxy \
--target-http-proxy-region=us-east1 \
--region=us-east1
```
*For HTTPS traffic*, create the global forwarding rules to route
incoming requests to the HTTPS target proxy:
```
gcloud compute forwarding-rules create https-fw-rule-1 \
--load-balancing-scheme=INTERNAL_MANAGED \
--network=lb-network \
--subnet=subnet-us \
--subnet-region=us-east1 \
--address=RESERVED_IP_ADDRESS \
--ports=443 \
--target-https-proxy=https-proxy \
--target-http-proxy-region=us-east1 \
--region=us-east1
```
Replace `RESERVED_IP_ADDRESS` with the name of the
address you copied in the
[Reserve a static internal IP address](https://docs.cloud.google.com/load-balancing/docs/l7-internal/setup-regional-internal-buckets.md.txt#reserve-ip-address) section.
## Send an HTTP request to the load balancer
Send a request from an internal client VM to the forwarding rule of the load
balancer.
### Get the IP address of the load balancer's forwarding rule
Get the IP address of the load balancer's forwarding rule (`http-fw-rule-1`)
in the `us-east1` region to make an HTTP request to the virtual IP address (VIP)
in the region using curl.
```
gcloud compute forwarding-rules describe http-fw-rule-1 \
--region=us-east1
```
Copy the returned IP address to use as
`FORWARDING_RULE_IP_ADDRESS` in the next step.
### Create a client VM to test connectivity
Create a client VM and send an HTTP request to the VIPs in the VPC network. The
client VM can be in any zone in the same region as the load balancer, and it can
use any subnet in the same VPC network. In this example, you create the client
VM in the same subnet as the load balancer's forwarding rule.
1. Create a client VM in the `us-east1` region.
```
gcloud compute instances create client-a \
--image-family=debian-12 \
--image-project=debian-cloud \
--network=lb-network \
--subnet=subnet-us \
--zone=us-east1-c \
--tags=allow-ssh
```
2. Establish an SSH connection to the client VM.
```
gcloud compute ssh client-a --zone=us-east1-c
```
3. In this example, the regional internal Application Load Balancer has a frontend
VIP in the `us-east1` region in the VPC network. Make an HTTP request to the
VIP in that region by using curl.
```
curl http://FORWARDING_RULE_IP_ADDRESS/love-to-purr/three-cats.jpg --output three-cats.jpg
```
```
curl http://FORWARDING_RULE_IP_ADDRESS/love-to-fetch/two-dogs.jpg --output two-dogs.jpg
```
Replace `FORWARDING_RULE_IP_ADDRESS` with the
IP address you copied in the
[Get the IP address of the load balancer's forwarding rule](https://docs.cloud.google.com/load-balancing/docs/l7-internal/setup-regional-internal-buckets.md.txt#get-ip-lb-forwarding-rule) section.
## What's next
- [Internal Application Load Balancer overview](https://docs.cloud.google.com/load-balancing/docs/l7-internal.md.txt)
- [Proxy-only subnets for Envoy-based load balancers](https://docs.cloud.google.com/load-balancing/docs/proxy-only-subnets.md.txt)
- [Manage certificates](https://docs.cloud.google.com/certificate-manager/docs/certificates.md.txt)
- [Clean up a load balancing setup](https://docs.cloud.google.com/load-balancing/docs/cleaning-up-lb-setup.md.txt)